This guide aims to give you some efficiency tips to start growing in the Prestige Ladder, we will talk about food efficiency, building placement, solid bonuses among other things to make your settlement truly shine. All praise the Queen!
Chapter 1: Meeting your Citizens
First of all, this guide expects you to already know the basics of the game, so please do the tutorial! From there onward I shall explain to you Viceroys a few tips to make your settlements more efficient and hopefully you too will soon hit Prestige 20.
We have always three races in play, but they are fairly different from each other, let’s break them down and learn where they excel at.
Here, every time something is RED means they are the worse at it. If blue they are the best. Some may be tied.

Understanding the stats:
Base Resolve: This is the starting resolve of your species, how much they have at the start of the game, this is important in two ways, the closer this is to your resolve Threshold the easier it is to start generating Reputation Points and the higher it is, the tankier a species is to all kinds of resolve maluses (From events, to hunger, debuffs, etc.)
Break Interval: How long it takes for a species to enter a break going to eat food in a Hearth and stop working. This is relevant, and it shows that humans and beavers are more productive than harpies and lizards. Every fifth time a Human/Beaver is eating, a Harpy/Lizard already ate 6 times. This makes a huge difference in food consumption overtime.
Resilient: This stats define how long it takes for the resolve of a species to go down towards the new neutral value. Only the lizards have a big value in this and honestly it is not a big deal, you can cheese a lot of storms before prestige 15 using lizards, but from there onward this stats is not even close to being relevant anymore.
Demanding: This defines the base threshold for reputation generation through resolve. Human/Beaver are 30 and Harpy/Lizard are 15. This makes it seem like harpy and lizard are both great at resolve generation, but it is not so and we shall see now on Decadence why.
Decadence:How much more expensive it gets to get the next resolve reputation point from a species for every reputation point earned. This makes a big difference when you want to get reputation points from a species.
Initial Consensus:
Humans: They are very tanky, they will always be your last species to get down to 0 resolve and start leaving. This is huge, helps you a lot in the early game. In their bonuses, the farming one is one of the best, in nine out of ten games you will be farming and you would cherish a human there to give you more crops.
Beavers: Not as tanky as humans but still can last very long, they are somewhat tied with the Lizard in this category. Their decent base resolve will help early, but what is game-changing for them is their capacity to multiply wood. This is a premium speciality and makes them very valuable.
Lizards: They are somewhat as tanky as Beavers despite their terrible base resolve, this is because of their high resilience, which makes their resolve go down very slowly. This makes them very versatile when you are juggling preference around to keep all species positive.
Harpy: Not tanky at all. Their frequent breaks, like the Lizards, reduces their output and their low resilience means that their resolve nose dives when the storm hits. Very annoying to keep around but their low Decadent level and medium Demanding level make it worth it.
Let’s make a tier list and further discuss the species:
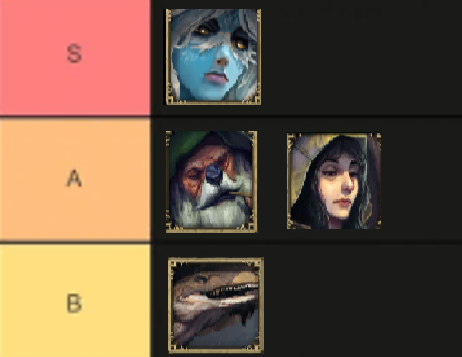
The low decadence alongside low demands makes Harpy the best species in the game. If you have harpies, you have a win condition already, if you focus them you can get 5-10 Reputation Points from harpies alone. The cherry on top, which makes Harpy insane in the early game, is their Fire Keeper bonus, +5 carry capacity is the strongest of all races. Games without harpies are instantly way harder.
Beavers sit comfortable in A tier as the second best species, their wood bonus is always a good addition to any run. I know a lot of new players love Beavers ( with reason ) and veterans think they are a thing of new players and despise them, sorry but I can’t agree, a surplus of wood is simply too versatile. If you are running out of wood, you are in deep trouble, while if you have a surplus you have a lot of opportunities (A lot of recipes uses wood). Wood is a core resource, because of this alone Beavers go high in the list, the second reason they sit this high, is because of their low decadence, they are the second best species after harpy to get reputation points from.
Humans would be S tier alongside harpies if they had a reputation generation in the same line as Harpy/Beavers, because of their inferior reputation generation it is very hard to win with human reputation alone. The main reason they are better than Lizards is that they are way tankier, with 15 base resolve you have leeway to many types of plays early game. Another merit for humans is the lower impatience gain when they are Fire Keepers, which the higher the prestige ladder you go the better this gets.
Lizards are in the lowest tier because they are just terrible, to be honest. A lot of people enjoy lizards to squeeze out one extra reputation point in the early game, well Harpy can do the same thing but scales better. Lizard has a very conditional speciality as well, the fire and meat, some games you will simply not have meat production, while you always have farm for humans, wood for beavers, and rain/Blighrot for Harpies. The cherry on top, Lizard has the worse fire keeper bonus, sometimes it can help you, but if you are needing a lizard to save you the situation is terrible already. Could have some major buffs. Both Lizard and Harpy are weak overall species, with need for frequent meals and low starting resolve, but Harpy compensates this with a insane amount of Reputation Generation, while Lizard compensates this with their resolve going down slowly, and after prestige 15 with the bigger storms, Lizard high Resilience does nothing while Harpy high reputation generation wins you games.
Before going on for the next part of the guide, let’s talk a little about this:

I have painted in blue the good part and in red the one that is OK to have but not that relevant.
Just like in real life, it does not matter what you like, only what you are good at. (Joke, much love to you guys)
The extra chance for production is a relevant part of a species, while the +5 resolve for the worker simply isn’t, in the grand scales of things it barely increases the resolve of a species. The +5 for Resolve has a good use, early in the game when you have 3-5 members of a species, it can make a big difference in this moment, but middle-late game it is near useless.
For humans, Farming is an amazing bonus to have, so is Wood for beavers. Harpy is not that great, but you always will need to deal with Blight, so they can be used there, and sometimes they can go in a few buildings, but they don’t shine in the early game. ( Some people like builds where you start collecting sparkdew early on, in these builds Harpy can get the production bonus there ). And finally Lizards, there is no place super important where you can drop them and they will bring big value. The one building that I think is amazing for Lizards is Ranch, but as I climbed the prestige ladder, I used ranch less and less. It’s so hard to make Lizard bonus work early on. But middle-game when you get the buildings that make complex foods, Lizards have bonuses in almost all of them. Sadly, you are already stable by then. What I think would make Lizard bonus better, is that if the Field Kitchen had a Meat bonus on it, then Lizards would probably make it to A Tier, instead of being left alone on B. But as it is, Lizard is too irrelevant in the early game, and they are the worst species for the late.
Chapter 2: Abusing your Citizens
Now that we know our species, let’s learn how we can abuse them! All hail the Queen!
Let’s first talk about hunger.
Everytime your citizens go on a break they eat.( Every 2 minutes for Beaver/Human vs Every 1:40 minutes for Harpy/Lizard)
When your citizens go on a break and don’t find food you get a -4 hunger penalty (-8 on prestige 17 )
Also it’s important to note because a lot of people don’t know this, but HUNGER DOES NOT KILL. It simply keeps giving you a bigger malus for your resolve every time they miss a meal until they leave, and once they eat again they do not “compensate” for the missing meals, this means that every time you don’t feed them, if they don’t leave from low resolve you managed to save a few pieces of food.
Harpies and Lizard have 5 base resolve, will get +3 from housing for a total of 8, with preferential treatment you can get to +13.
This means that if you have a Lizard/Harpy and a Beaver/Human in the starting caravan, you can skip the first 2 meals, all the way to this point in time:

To do this simply go on the Consumption Control panel and forbid all foods.
If you have Complex foods in your starting caravan it will not work, because your citizens get angry if you deny them a complex food they like.
This means you save 2 whole meals on your first day. And you will often be able to do this again in the second day as well, saving 2 more meals there. this is 40+ saved food in the early game, this will help you a lot. And you can always do this. Create the habit of starving your citizens in the first and second day.
But this has a problem, if you have both Lizard and Harpy in the start, you can’t pull this off, you will be able to skip only one meal before needing to feed. Another reason why Lizards are terrible, rolling Harpies are great and if you roll Lizard alongside them you will need to waste more food than usual.
Here you can see an example:
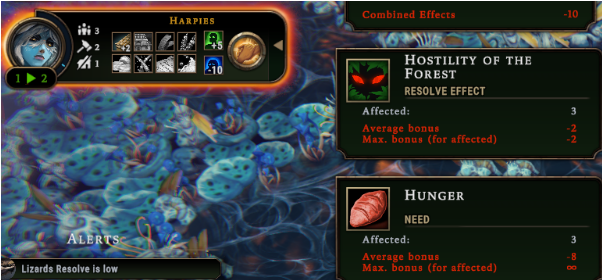
With two stacks of hunger, ( -8) the Harpy is still not unhappy. If you have a human or beaver, they will not be unhappy either. If you have a lizard

This happens instead. The lizards are just terrible man.
Another “Abuse” you can do, is when you are about to start a construction of something important that uses a lot of resources, or a Glade Event that will take many trips for your workers to get all the materials there and you are using let’s say Human as a fire keeper to keep impatience growth slow, you can switch to a Harpy, for the carry capacity, wait for your citizens to get the resources, and you don’t need to wait for them to arrive there, you can switch back to Human instantly and they will not drop the excess resources that they shouldn’t be able to carry. This is very neat and efficient, you keep slowing down the Impatience gain and at same time you can profit from the extra carry capacity! Harpies are amazing man.
Optimal Pathing
Pathing and building placement are two important aspects of this game, because it makes the trips for rest and deliver smaller, resulting in a great increase of production.
But we have some tricks that are not obvious.
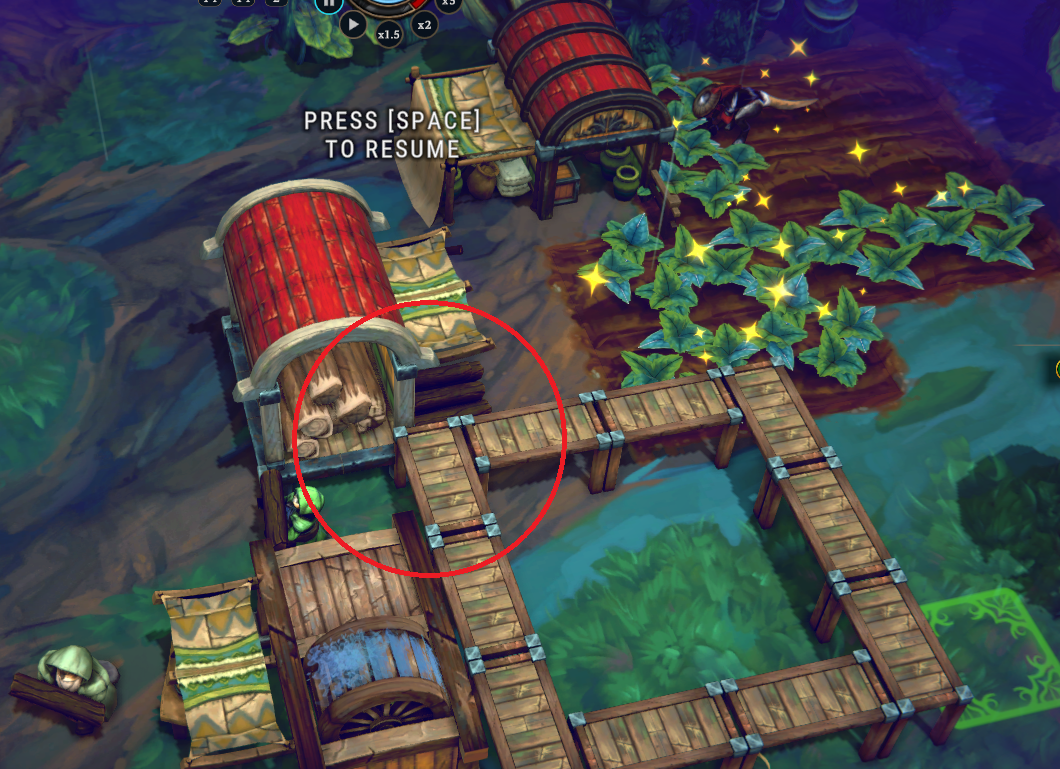
Your citizens can’t walk through this gap, they will have to walk around the building wasting precious time that they could use working.
But here

Is a different history, despite not looking like they should go through this gap, your citizens can walk through this flawlessly. This can and should be abused as much as possible.
Have you ever wondered how Peark Hearth placement looks like? Here it is.

There is a lot of information in this image. First, the two blue circles are areas where your citizens can walk through despite the buildings, second different from the first Hearth and Warehouse, in new ones you should put it like this. Facing each other.
Since they are facing each other, this means that your citizens always travel to the same place, regardless if they are resting or about to store resources. Now instead of having both the Hearth and warehouse as relevant places, you have an amalgamation of both, the 4-6 buildings you can put close to this point will have extreme production efficiency. Also, despite the fact that the Hearth and Warehouse are touching each other, they still both work.
Another strong point, you see that we have insects and eggs nearby? The posts that we put there to collect those will be beautifully efficient as well, because they are so close to both Hearth and Warehouse and once they are completely exhausted we can drop new buildings in those places!
Obs: For some reason this “walking through building” trick does not work with decorations, be careful.
Chapter 3: Embarkation Bonuses
Saying that Embarkation is flawed and some buildings need work is the best way I can start this part of the guide.
You need a building to work on Fertile Land, let’s check our options.
Small Farm (Vegetable 3 per field, Grain 6 per field)
Plantation ( Berries 6 per field, Plant Fiber 6 per field)
Herb Garden (Roots 3 per field, Herb 6 per field)
One of those is different from the others, right?
Plantation is the only one that offers two 6 per field production, well you could think that this happens because the others have stronger products? No that is just wrong.
Let’s talk about the plantation first and then go for the others.
 Plantation: Berries and Fiber
The fiber is not amazing, you can get other resources to do the same from other sources, it is not a good idea to waste fertile land with this. But it is good to have the option if you really need. What makes the plantation great, is the berries. 6 Berries per field is an amazing source of renewable food, this will give you a comfortable position that will allow you to start using resources to further your win conditions, now that food is stable. And the berries are not bad per se. They can make wine which gan give you a lot of resolve, easy and renewable way to make pigment, also biscuits, pie, pickled goods and skewers. It is not like berries are bad, they are part of a lot of vital recipes.
To be honest, you could delete the part that allows Plantation to make Fiber and it would actually make this buildings stronger, because it will not happen that you forgot to disable Fiber when you first built it and it took over half of your fields for the first year. 🙂
 Small Farm: Vegetables and grain.
The vegetables are more important early game, because you will most likely not have a way to translate Grain into something edible. And when compared with Plantation, you can make only 3 vegetables per batch instead of 6. This is not a good look. It’s not like Grain is a premium resource, you use it mainly to make Flour, but both Carrots and Mushrooms can be used as well and you will often find a source of those two. This is just too inferior to Plantation, could use a buff that brings Vegetables to 6 per batch or make grain 9 per batch and then those two could be more comparable.
 Herb Garden: Roots and Herb
Just like Small farm this one falls in the trap that the edible part of the recipe is only 3 per batch, which makes it inferior in the early game when compared to plantation. Also Herbs are the most ignorable product in the game, in over 100+ Hours of playing Against the Storm and in my grind to prestige 20 I never missed herbs, they can be substituted by so many more easily accessible resources. Same thing, This should get buffed, make roots be 6 per batch instead of 3 and then it would be comparable to Plantation.
We have no leeway here, no decision, Plantation is simply way stronger than the other two. The devs will have to either nerf plantation and make farming overall way weaker, or buff both herb garden and small farm to bring them more in line with the other one. For now, Always plantation.
Since Plantation is an auto-pick, this leaves us with either 4 embark points if Plantation is costing 4 in this run or 3 embarkation points if it is costing 5. ( Remember that the prices of the embarkation items can vary from each settlement)
After picking plantation what you do next is personal. My favorite three options are:
Brick or Fabric + Food
Oil ( to deal with possible early glade event) + Food
Amber ( To pay the fine you need to open up a early glade in prestige 19 ) + Food
Also remember that Food is not all born equal.
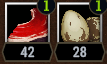
Here you can see that both cost 1 embarkation point, but one gives 14 more than the other. Always get the one giving more, the extra food can save you.

Here we can see in Blue what is good and red what is bad.
First, having two species instead of one is always great. You are able to juggle favoritism to generate resolve and you can also starve them more easily because of this.
Normal food is in blue, because it is always nice to have a surplus of this one, remember, the first objective in the game is to be able to get a surplus of food, you need this to last until then. Complex food, is bad though. Because they come not only in lower numbers, but your population gets angry if you deny them a food they like, making the starvation technique harder.
Tools are always a premium when they offer, with 14 you can open a glade and if you don’t have the resource it requires you can just use tools instead, extremely versatile and gives you an amazing early game. Sometimes it is worth getting a inferior caravan just to start with 14 tools, amazing stuff.
Extra 2 population is often great to me, since on Year 1 you are starving on citizens, with more jobs than people to do them.
Bricks/Fabric or the resources needed to make them are always nice to see here, Planks you can ignore, you can easily make those. If like in this example you start with Bricks, you can get in the embarkation points Fabric and now you have a great amount of starting resources to make your initial buildings, speeding up your development.
Also, if there are Lizards in one caravan you probably don’t want to take it, this guarantees you have the worse species in game. Having a chance to not have Lizards is one very big positive.
Chapter 4: Stabilizing your Settlement
When you start a new game, you must have one goal in special. Find a source of food. You can’t do anything in this game if you don’t guarantee the survival of your citizens first. This is the reason why you always bring a small farm or plantation or anything at all that can work Fertile Ground, because those are infinite.
This is my recommended build order for the first and second year:
First Year Drizzle/Clearance:
Forbid the use of Coal in the Hearth
2 Woodcutter camps, fill both of them and start chopping ( forbid eating food, let them starve for 2 cycles ) ( Harpy as Fire Keeper )
1 Scavenger camp and someone there to start collecting food
Enough houses for everyone
Crude Workstation put only one person here and start working.
First Year Storm:
Remove one woodcutter and put a second person in the Crude Workstation.
30 seconds before the storm ends, start opening a Dangerous Glade.
Build a trading post, you might need it to feed the Glade.
Second Year Drizzle/Clearance:
Stop working the Crude Workstation, remove all resources from inside then delete it and build a new one ( This resets the blight )
Check if you have a way to work the Glade Event, if not buy from trader. If trader does not have it wait for them to go away and call another one.
This build order is not perfect, the hardest part is opening the glade. This is why you have to pay attention to the embarkation. You need to know how many events you have covered up. If you by chance got the 14 starting tools, you are sweet to go.
Observation: Many players like to start a Rain Collector to have enough Sparkdew in case of the event that requires it to solve, this is a solid strategy and you could remove a woodcutters or workstation workers to go on the Rain Collector. Early in the first year, making sure to have enough stockpiled to open the glade more safely.
I personally disagree with this strategy, the Sparkdew events are rare, and often you can ignore the side effect. I rather make a stronger production line to snowball my settlement earlier. A lot of veterans dislike my way of play but I find solid success with it, you should test both to see which one work best for you.
Chapter 5: Winning with Reputation
Winning in this game is a process. It is never quite the same, you have to make some things align.
Let’s talk a bit about Resolve first. Now I will present you even more arguments why Lizard is the inferior species:
Harpy ( Every time you get a reputation point, the next one costs 2 more )
Beaver ( Next one costs 2 more )
Human ( Next one costs 4 more )
–
Lizards ( Next one costs 7 more )
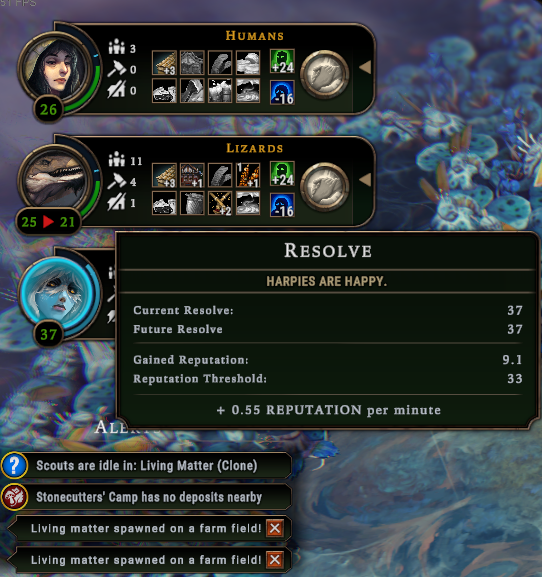
Winning is a very important part of the game, If you manage to grow Harpy resolve to 30, this means that they will generate a whole 7 REPUTATION
If you do the same thing to Lizard, It will be only 2 reputation points, and in 31 you would get the third, but in 31 Harpy is getting their 8th as well. This difference is too insane.
When you are planning on winning with Resolve, or planning on getting a lot of points from it, focus on either Beaver or Harpy first, because they will generate the most. Humans are a good extra if you can afford and Lizards should come as a bonus, not something you invest into.
With 31 resolve Harpies can generate 8 points of Reputation, this should make clear that they are a win condition by themselves. And it is not that hard to get there.
Brawling is +8 resolve
Cleanliness and Education are both +10.
If you can give them all three luxuries, you are looking at an all-mighty +28 for harpies, this is without counting the food and housing and preferential treatment and comfort bonuses, etc.
If there is one thing I want you to extract from this guide is that Harpies are premium.
Beavers are similar in their reputation generation, but it is harder to get them to 30 than it is to get harpies to 15.
I have been saying that Harpies are OP, but not showing proof. So I just went in a random game to get this print from:
I focused on Harpies in this game, this here is not a high roll by the way, it’s just a normal match that I decided to use Harpies to win. I did this on prestige 6, which is way easier than on prestige 12. On 12 when you have less blue prints to choose from you can’t just go to a Harpy build anytime you want. But before getting the blue prints limited it’s very easy to do.
If you are not using Harpies to win games better revise a little. They are a amazing tool to finish a game.
Also, you don’t need the entire production chain, you only need the Service Buildings, the product ( Cosmetics, Wine, etc.) You can always buy from the traders
Now I want to get a bit more advanced with Resolve victory. When you get 1 resolve point extra from a bonus or cornerstone, you probably don’t think much about it’s effect on reputation right? But there is a funny little math we can do to convert extra Resolve into Reputation.
Remember a bit ago when we took a look at this info?
Harpy ( Every time you get a reputation point, the next one costs 2 more )
Beaver ( Next one costs 2 more )
Human ( Next one costs 4 more )
–
Lizards ( Next one costs 7 more )
Every point of reputation, increases the cost, so let’s think it this way.
If we get 1 point of resolve, since we need 2 for every extra reputation point for a Harpy, it means that 1 point of resolve = 0.5 Reputation. Following along thus far?
For Beaver same thing 1 resolve = 0.5 reputation
For human 1 resolve = 0.25 reputation
For Lizard 1 resolve = 0.14 reputation
This means that every time you get a bonus of 1 resolve, if you have as an example, Harpy/Lizard/Human in this run, in fact you are getting ( potentially ) a whole 0.89 reputation points.
If it is a Harpy/Human/Beaver instead you are getting ( potentially) a whole 1.25 reputation points
This is for 1 RESOLVE POINT by the way.
Now we enter in the talk about Orders and these little guys here
![]()
I am sure you have seen them before. The purple one is +3 resolve for everybody and the blue one is +3 resolve to one race.
Let’s believe we have a Harpy/Human/Lizard for the math here. If we get one of the purple one, +3 resolve for everybody this translates in reputation points to:
0.5×3+0.24×3+0.14×3=1.5+0.72+0.42=2.64 Reputation Points
So this purple little thing is worth almost 3 reputation points, absolutely insane, right? And this is the kind of thing that you can get 3+ in a single run sometimes.
The blue one is a bit different, it is very strong for beaver/harpy good for human and almost useless for Lizard.
For harpy/beaver is 1.5 reputation points
For human it is 0.75 reputation points
For Lizard it is 0.42 reputation points
Can you understand now why I always say Lizard is terrible? They profit so little from one of the strongest things in the game. I hope now you understand that extra resolve is not only a fail safe for when bad things happen, it is also a reliable source of Reputation.
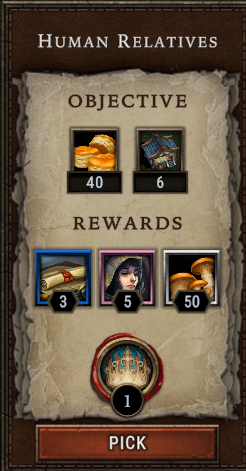
They frequently show up in orders, like this one:
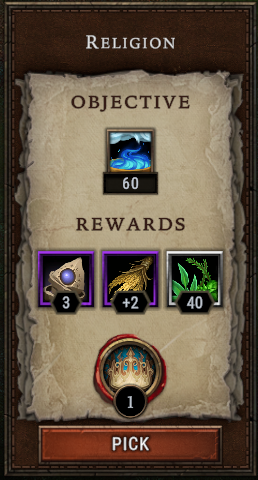
Let’s see the actual reward from this order. +2 grain production and +40 herbs, this part is very simple.
Then there is the 1 reputation you always get, the +3 resolve and the 2.64 reputation points it is worth. Bro, the reward from this Order is looking kinda of insane right?
Now in this one.
We are getting 5 humans, 50 mushrooms, pretty simple.
Then we are getting the 1 reputation from all orders, and +3 resolve for humans, which translates to 0.75 reputation points. So the real reputation reward from this order is 1.75, a lot of extra resolve when compared with a normal order.
And this one here is the HUMAN one, in the Harpy/Beaver the +3 for them is actually 1.5 reputation points, so a single order in those cases are worth a amazing 2.5 reputation points, this is insanity right?
I hope that after this section you all can understand why I rated Harpy as the best race and Beaver as the second.
Also remember, quite frequently you can get the Blue +3 resolve for one species with traders. If it is for either Harpy/Beaver I always dump a lot of resources to get the amber necessary to buy it. It is the same price as the bag that is worth 0.5 reputation points, but in case of Beaver/Harpy you get the +3 resolve to help you tank harsh situations AND you get 1.5 reputation from it. It is so much better, it is incomparable.
Chapter 6: Cornerstone, The Corner from Which Victory Emerges
Not all Cornerstones are born equal, some of them are win condition by themselves. We are going to talk about those here. Why they are strong, how do you use them, among other things. I will only talk about those that I see as strong, and in the next chapter I will talk about those I see as too weak. I will not comment about the average ones.

This is a interesting one, despite the fact that it does not provide you with either a way to grow reputation nor a way to reduce hostility it’s interesting the fact that it is present in this list.
There is one condition when this Cornerstone is amazing, and is terrible in all others. When you open your first dangerous glade at the end of the storm on YEAR 1, if you find fertile land there and this cornerstone shows up is almost an auto-pick for me. It brings too much value if you can get it early before you stock up on too much food. It saves you so much workforce if you get this and when you find a lot of extra fertile land titles you can make a massive stockpile of food, which you can then make a number of products from or sell to exchange for anything you need.
It’s a win condition if offered early, but the later this one shows up the worse it is. Also if it is offered to you YEAR 1 and you have no fertile land on spawn, there is no way you can pick this. It’s a 8 or 80 cornerstone and in the right situation it’s huge value.
 This is a interesting one, if you are offered this is almost always an auto-pick, but you will need to be careful. If you are needing to burn resources in the Hearth every storm you are doing a mistake somewhere, so if you don’t need to burn anything in the Hearth and you are offered this, it’s an instant pick, the reduction of Hostility will give you so much leeway to get the resources you need to achieve a victory.
This cornerstone does not open to you a path to victory, it gives you no Reputation, but it gives you so much of a “comfortable position” with the reduction in hostility that you will be able to achieve a victory easier through any of the paths you choose.


Those two are similar to each other, Calming the Forest being stronger than Forest Mitigation. These are alike the previous one, but they are weaker for one crucial reason. They have to show up early to be very strong. If they show up in the middle of the game or in the later parts, they are almost useless.
The reduction for hostility from events make it so that you can open dangerous glades more easily, and this has two benefits. One you can look for the resources you need without getting strangled by hostility and two you can try to go for a Event Victory without the hostility making your life very hard in your town. A event victory is when you go to almost every single Dangerous/Forbidden glade farming the reputation for fixing the events, prestige 1 onwards you can’t win with this alone but farming those can net you a lot of extra reputation points.
Those two cornerstones are great early game. Mediocre from year 4+. But because of their high potential, they are still in this list.
 By now you should have realized that hostility reduction is a premium stat in this game. And this cornerstone join this list because of it. This one is interesting, in high prestige you don’t want a massive population, the upper limit I have ever went prestige 15+ is 48. Two 20/20 Hearths and one 8 Hearth. This was not a common game, usually I end up with around 28-34.
This Cornerstone is amazing if your population is growing and you have no service buildings. When you are around ~28 you can simply do two 14/14 Hearths to activate this cornerstone twice. In those games this will bring so much extra value that you desperately need, after all you are missing service buildings. Even in normal games, this is at minimum a -40 hostility, and can go to upwards of -120. You want to upgrade your Hearths, so the effects from this come naturally, you don’t need to put any work onto it. I give it a beautiful 5 stars value.

Still in the same train of thought from before, Protected Trade is another amazing way to reduce hostility, this one in special is good at all stages of the game. If you get early, you go for a trade build, if you get this late you can sell your surplus for some extra hostility reduction. 25 Ambers is very easy to achieve, one trade route can pull this one off, even.
A very strong technique is to sell amber for amber. This is super overpowered for any trade cornerstone, it becomes slightly balanced at prestige 9, when trader is weaker, but it is still super strong then.
This, just like the others that reduce hostility buy you “comfort” to go for other win conditions. When hostility is low everything else is easier.

One of the best cornerstones in the game, because it does something that only it does. It opens up a new win condition. Now you can win the game with trade alone. This one is especially strong if you have no Harpy in your roster.
If offered early it might not be the best choice because in high prestige you need cornerstones to help you survive the initial struggle. Despite this it might still be worth picking, another path to victory is incredible, this one might be the best cornerstone in the game pre prestige 9, and it is still solid after that.
You need to know how to trade to use this succesfully. Also, one thing many people believe is that this cornerstone reduces the amount of Reputation you get from Resolve, it does not do that, the cost still increases every single full resolve point per species, the malus is that resolve simply grows in half the speed than before. If I have no harpies, this is an auto-pick for me.

This is a funny one, the only cornerstone that ramps up so much in power the higher you go up in prestige. I still remember the first time I took it in Viceroy, I was so pissed because it didn’t do anything.
At prestige 2 it gets stronger
At prestige 10 it gets even stronger
This cornerstone makes clearing Blightrot free and it even profits you coal every three kills. Amazing stuff, the extra coal can be used in a plethora of ways. If you are climbing the prestige ladder, after prestige 2 this is probably an auto-pick.

You guys might want to call me a Hypocrite for recommending this Cornerstone, and some people of the prestige 20 community may disagree with this, but I think this is one of the strongest cornerstones in the game.
It’s not an auto-pick, it should never be, because it changes fundamentally how you are going to play the game, it will put a lot of extra hostility that you have to deal with. Now, if you got a lot of hostility reduction cornerstones, this becomes way more bearable, but I have taken and had success with this one even without the help of those.
The plan is that you need a coal source ( Kiln or mines ) and you will sacrifice a lot of it during the storms. In exchange if you have a lot of buildings you will profit 100+ Amber per year. ( I hate that this cornerstone does not show you the total of how much it gave, only what it gave in the last minute )
With this ludicrous amount of money you can go for any kind of victory you want.
Disclaimer: Winning with resolve becomes harder with this, because of the higher hostility decreasing your resolve. You will need to burn coal if you want resolve reputation during Drizzle/Clearance.
You will lose runs learning to use this.
Chapter 6: Cornerstone, The Corner from Which Victory Emerges Part Two

This one is amazing and I think it will probably be nerfed. At a measly 6 Impatience it gives you 3 resolve already, which is the same as those guys here:
And those guys are insanely good. Which we talked about already.It’s a straight buff for resolve, which is somewhat versatile. If you see you are about to die and just a few points of resolve could save you, you can call up the trader a few times to stack Impatience and gain those sweet extra resolve points.
14 Prestige onwards, this becomes better and better because it is harder to reduce impatience, so you might as well profit from it. Interestingly enough, when you are almost losing to Impatience this will give you so much extra resolve that you might squeeze that extra reputation points you need to win before your demise. This is another Cornerstone that I rate 5 out of 5 stars. Amazing stuff, should get slightly nerfed.

You can’t always pick this one, sadly. If you are past Year 5 or 6 it might be too late for it already. But when offered early it is game winning. The base production for woodcutters is 1, this doubles it. The beavers have a chance to double it again, when that happens you get 4 wood. If you have this and Beavers it is a combination surprisingly strong and you will have a surplus of wood. And remember, a surplus of wood is always amazing, it enables you to do so much stuff.
The loss of stored fuel is a dealbreaker, because it kills your Oil, Coal… So don’t forget that, I have seen a lot of people lose runs thinking that you lose only the wood, when in fact you lose all of your fuels! If you can take the hit this is super powerful.

I never lost a game when I was offered this cornerstone as my first. Just like the previous cornerstone we spoke about. Cornerstones that buff wood usually have to be taken early, as they are not truly needed in later years. This one is an exception. If you hadn’t had any luck in finding a source of meat for your complex foods, this can make your production line start running smoothly. This Cornerstone always makes my game so much easier when I get it, regardless of when it was offered.
In the early game it gives you a surplus of food, which means you can put effort into chasing your win conditions instead of surviving, in the middle-late game it can give the extra meat you need to achieve your win condition.

 A lot of people think these cornerstones are bad after all losing consumption control and eating more food just seem like such a bad malus, and 10% chance to double production just seems so small. I am sorry to say that this is not in fact a small buff, anything that boosts production is amazing in this game, the reason why is because the base production in this game is very high when compared to others, all buildings produce very well, so putting an extra percentage on top is amazing.
There is also a factor that I like to call “adding percentages”. Which is a process that the more you have of a certain percentage, the more effective it gets.
Per example, Lizards have a 10% chance to double their Skewers, with a fully infested building it jumps to a total of 35%. If you add 10% from this cornerstone on top of that you are now in 45%, you add +8% from Citadel Upgrades then you get the Hearth upgrade for an extra 10%, Now you are doubling the production 63% of the time, you still think this cornerstone is weak? (This is not even Including Service Buildings that increase this further, or stacking this cornerstones with each other or others that buff production)
The more you add up percentages, the stronger an overall percentage get, so the measly 10% from this cornerstone, while seemingly underwhelming, will help scale the chance of doubling to 50%+ This is absolutely bonkers, your settlement will become a production monster when you scale all those factors.

We have talked about the incredible transformation from Resolve to Reputation back a few chapters, and this cornerstone offers you a permanent +5 in exchange for food, you will have to use more citizens in food generation, but it is a strong cornerstones, strong in its simplicity. As always, resolve helps you withstand bad times ( from events, etc.) and converts beautifully into Reputation.

And I saved the best for last. I Believe this is the best cornerstone in the game, every time I see it I smile, because it is a free victory. You will be in a timer, though, because you will be forced to frequently open new glades, but with the extra resolve you should be able to snowball a victory quickly ( you get extra buildings, that generate more resources even faster, and snowball even harder.) This cornerstone is responsible for quick victories. If you misplay and don’t win quickly, hostility will hurt you.
Chapter 7: Cornerstone, That Destroys the Corner and Leaves no Stone
In this section I will talk about the worst cornerstones in the game, the ones I think you get no real benefit from picking.

This one is a special kind of bad. The effect by itself is underwhelming. Blighrot is something that you should not waste a cornerstone to help you hold it back, if this happens you are doing a misplay.
Despite this you would think this cornerstone could help you save some workers? Wrong, at only a -50 for Corruption it does absolutely nothing, because of the long time it takes for a worker to clean blight. This should be -150 at minimum to warrant the wasted cornerstone, this is a never pick, it simply gives you a false sense of security then stabs you in the back.

This one, but it is supposed to also represent all other Cornerstones that requires a citizen to die. The answer why is that you are creating a bad habit. When you finally reach prestige 20 and you see that the debuff is that you lose an extra 0.5 impatience per lost villager, you will understand that all of this kind of cornerstone should be ignored.
These cornerstones are fun to use in low prestiges, but eventually you will never be able to use them again. So if you are in low prestige use it while you can because they will become useless.

Same problem as Firekeeper armor, the effect is too small to be useful, a wasted cornerstone pick. Just pick something else and hope this gets buffed eventually, +50 per impatience point is almost nothing when in high prestige each corruption spot eats 90 resistance. And we go back to the same argument, dealing with Blight is easy, you should never have to use a cornerstone to deal with it.

This is a funny one, you are paying a cornerstone slot to unlock the ability to make Vegetables in the greenhouse, the greenhouse which is already capable of making Mushrooms, which are WAY better. (Mushrooms go in a plethora of recipes that vegetables also go, but you are also capable of grinding them into flour, which can be game winning) This with the fact that you always have plantation to get berries makes this completely irrelevant, this one is a straight joke.

Another cornerstone that feels like a April fool’s joke. You are wasting one cornerstone choice, to get one extra choice in traders? Like what? If it included base cornerstones as well this one would see use, especially in high prestige. Just a wasted slot as it is.

This one is here to represent all others of it’s kind, the incense that gives human resolve, the one that uses Cosmetics to buff harpy resolve, etc. The biggest problems with these, is that 150 of a single service product is usually enough to win. The idea is that you will use all of them at same time.
It is also hard to start the production chain of these resources and expensive. You can only pull it off in the late game, to finish your victory. In turn these cornerstones requires you to stack this effect, something that you don’t have the time to do. If you take this early in the hopes of doing a “wine build” you will soon come to realize that the wine build only starts working 8 years later and in that time one different cornerstone could have helped you a lot more.

This is bad for a smilar reason to the previous ones, and once again I am using the picture of this one but I am also criticizing its siblings. It’s the same explanation as before, services are the things you use to finish off the game, because it is a exhaustive production chain. Takes a lot of workers and buildings. If you can activate this cornerstone, and keep a building with a service active, you will straight up win in a few minutes without this doing barely anything. Same argument as before, another cornerstone that helps you earlier, one cornerstone that helps you NOW, is better than trying to make a play with this kind of cornerstone.
This is a trap.
Chapter 8: Some Buildings are More Equal than Others.
I will talk a little about the best buildings in the game in this section of the guide, why they are so great and you will see that you should look at these very carefully when they show up.
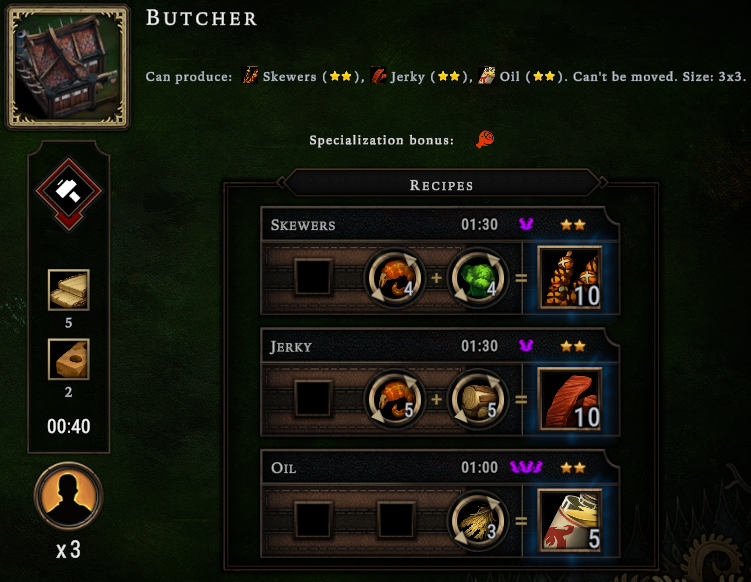
The Butcher is amazing from Prestige 12 onwards, but not so great before this period.
The reason it is so great is because you get both Skewers and Jerky. Jerky being the most efficient way to make Skewers, this is a great addition to your production line, extremely efficient building.
If you are in a game with both Harpy and Lizard, this is amazing, as both eat both products and Lizard in special has the production bonus for the building.
If you are in game with only Harpy, it is still worth it, because the accumulated resolve bonus from both skewers and Jerky will profit you a few extra reputation points fairly quickly, in the early game in special this will help you unlock more buildings.
In a game with only Lizards it is still great, because they have the bonus production alongside the fact that this will generate a lot of extra food. Prestige 12 onward this is extremely efficient.
Before Prestige 12, you can probably get a 3 star jerky and 3 star skewer building instead, but even then if you get this one you can just ignore skewer/jerky buildings and get something else.
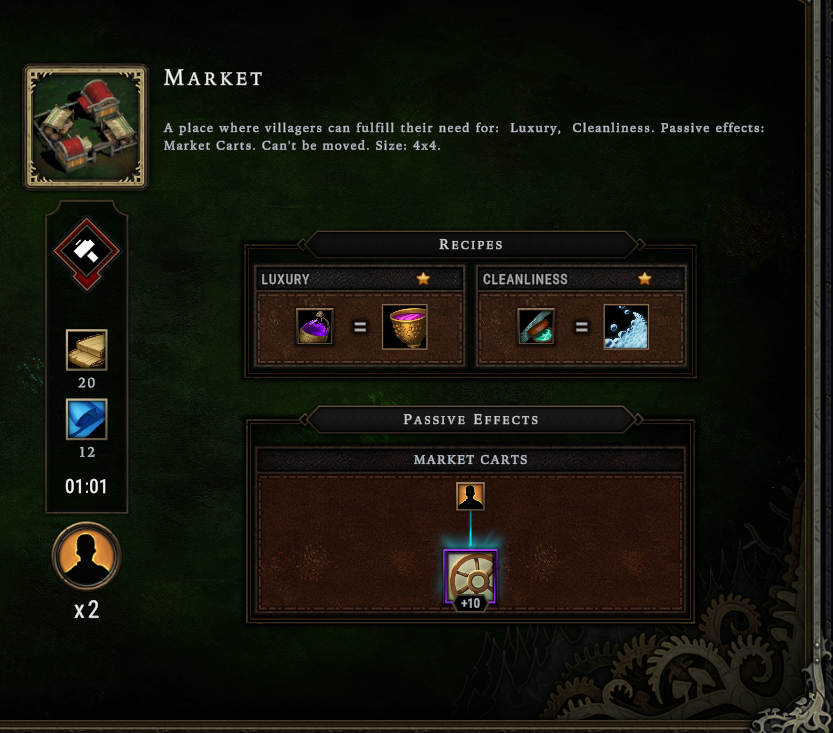
The strongest Service Building in the game.
Market is special when compared to a few other buildings, while Bathhouse, Explorer’s Lodge and Monastery all have great effects, they have one condition to get activated, three citizens.
Market gets activated with only one citizen instead. And the +10 extra carry capacity is an amazing modifier, a +5 is one of the reasons why Harpy is S tier, this is a +10 instead, and it uses just one citizen.
If you are offered this I almost always recommend taking, especially as your first service building, the one you use to upgrade the Hearth to level 3. You usually are low on population and have a lot of jobs to fill, so it is hard to spare 3 citizens for a global buff. Market in turn you can put only one and all your buildings get a big increase in production ( They use around 3 times less time walking around moving resources and they instead work, especially in higher prestige when you have a lower amount of Warehouses this is a big help. It also speeds up the time needed to start Glade Events and normal events. A lot of benefits )
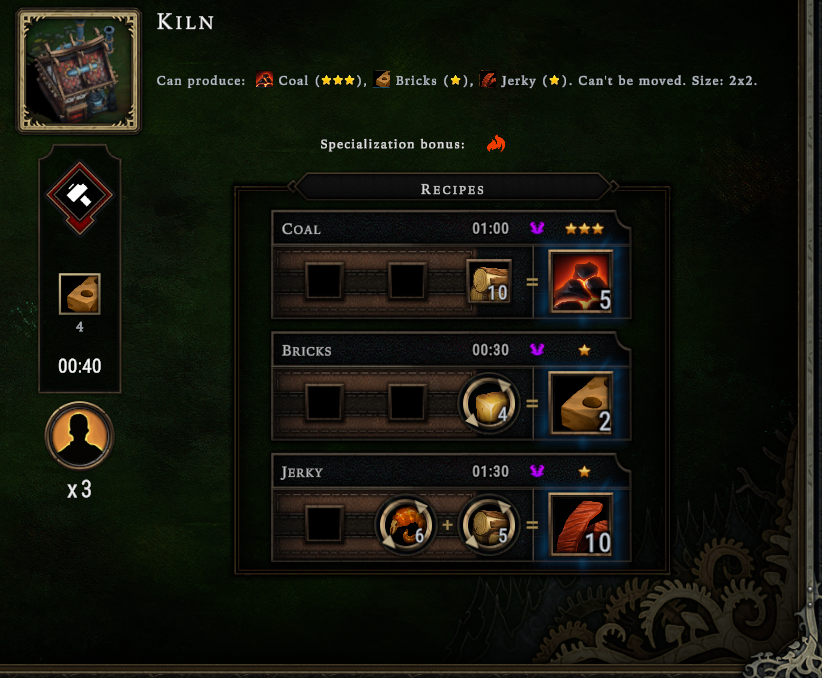
Remember how I said Wood is a very important resource? Well you are burning it away in the Hearth, look at the math:
1 Wood at every 15 seconds is 4 wood per minute.
Kiln makes 5 coal from 10 wood
Each coal lasts 1 minutes
Kiln uses 2:30 minutes of wood to make 5 minutes of coal.
This halves your wood use in Hearths, it’s like having extra woodcutters, but ones who don’t increase hostility!
Kiln also creates a upgrade in the Hearth sacrifices.
from 40 wood per minute to get -50 hostility reduction
to 20 coal per minute (which is 40 wood a minute) to get -80 hostility reduction
The coal alone makes the Kiln great, but as a bonus you also get a more efficient way to make Bricks and you might be unlocking Jerky as well. Since every minute one worker in the Kiln makes enough coal for five, you have enough time to make the other recipes as well and the coal will last.
Another advantage, a lot of glade events have both Coal or Bricks as a requirement to solve them, and Kiln gives both. If you manage to get cornerstones that increase coal production, it gets more and more amazing.
Kiln loses a bit of it’s spark in maps that have Coal on the ground, but in all others is a S tier building.
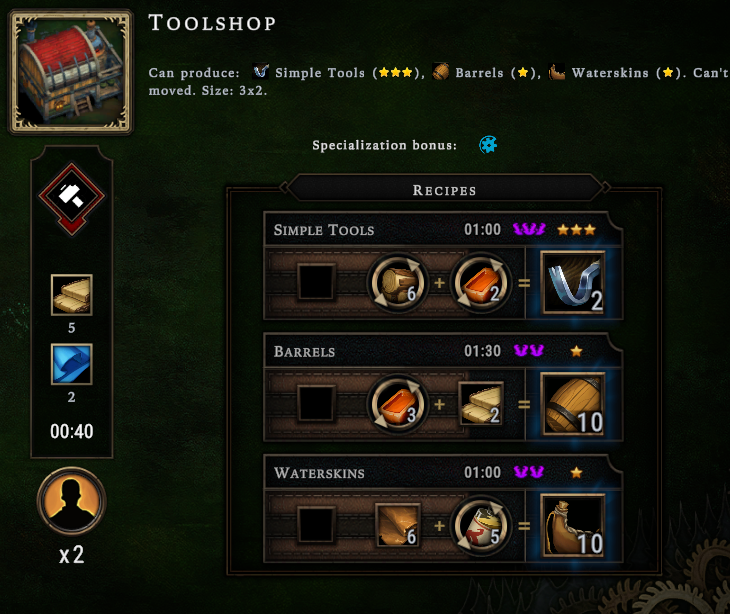
The 3 stars for tool making is amazing. It reduces the requirement from 3 bars to 2, and since bars are the limiting factor here it is a increase of 50% of how many tools you can make. Since tools are an amazing way to get a few extra reputation points to finish up a run, this one deserves it’s place in the top.
As a bonus, it has both waterskin and barrels as extra inefficient options, both of those are recipients, that you most likely will need for a production chain. It’s nice to have a option to choose from barrel/waterskin here, it saves you having to take a different building to have a recipient.

And to finish it off, with those two, they are kind of special. Usually buildings follow one of two rules:
Either three 2 star products
One 3 star product and two 1 star
Both of these break this rule.
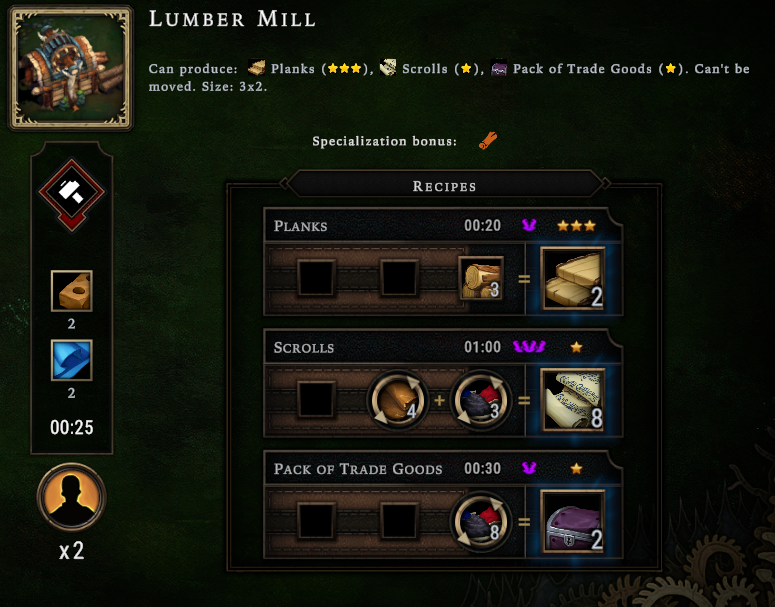
Scribe gives you a perfect source of scrolls and a good source of ale.
Beaver and Harpy like Scrolls
Human and Beaver like Ale.
And the 1 star product is tools, which can be useful if you haven’t managed to find a better building to craft those. Scribe is amazing, they are a solid way to create services to Beaver/Harpy/Humans, if by any chance this is the combination of races you have for this game, Scribe is an auto-pick.
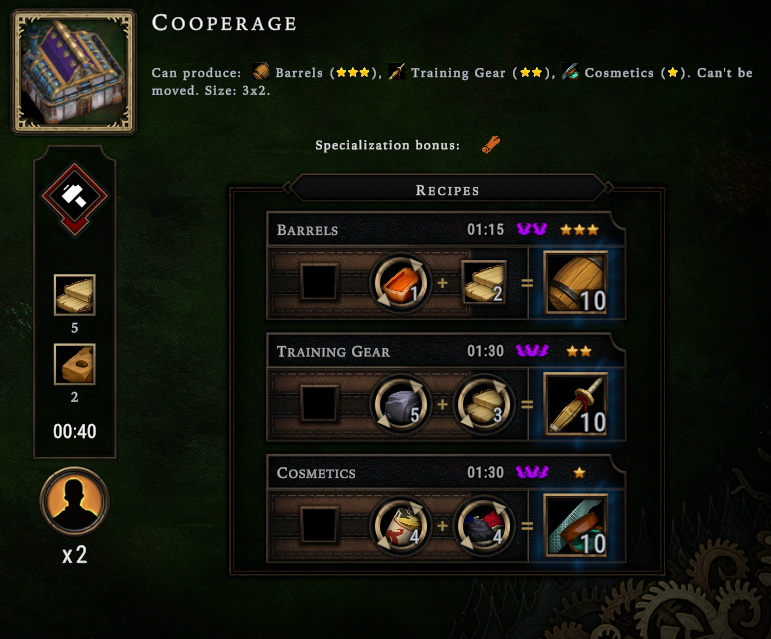
Cooperage in turn is interesting. He gives you a source of 3 stars barrels. Which is great, you will need a way to get recipients and this building is the best of them all. Because other than getting a great recipe for barrels, you also get a 2 star for Training Gear, and a 1 star for cosmetic.
The cosmetic in special does not need to be more than 1 star, it is a very cheap production line. And in the same way training gear is also a cheap production line. This building is also versatile. It gives you recipient to go for Wine/Ale/Pickled goods which feeds onto Beaver/Lizard gives you training gear for Harpy/Lizard and Cosmetic for Harpy. It’s an auto-pick in Lizard/Harpy games, and a excellent building to Harpy games as well.
Now let’s talk a bit about the WORSE buildings in the game.
These are bad, for one reason in common. You are wasting your precious building blueprints to get recipes of something you already have?
The Crude Workstation is good enough for almost any run, you don’t need to waste building blueprints getting those above, they are not furthering any of your win conditions, usually a service building or something that starts to set up a more complex production chain is preferable.
Thanks to aaah myst for his excellent guide, all credits belong to his effort. if this guide helps you, please support and rate it via Steam Community. enjoy the game.
I think you forgot to mention the fungal fortune cornerstone for marsh maps, while it is situational, if you get it as your first cornerstone it is absolutely bonkers on marsh maps. You literally are swimming in unlimited shrooms from year 3 upwards. It is not suited if you want to speedrun the map, but I never lost a marshlands P 19+ with fungal fortunes offered as first cornerstone.