This guide will walk you through on how to level up, acquire all the tomes, and beat the main story… very quickly! It may not be the fastest method out there, but it can be done without cheating and with minimal experience playing the game. I’ll also give a few character creation tips and other things I’ve learned throughout my many adventures. Good luck and enjoy!
Character Creation Tips
My basic stat recommendations are as follows:
- Try to roll around an 80-85 minimum for a decent character that will cover most basics.
- Wisdom is the least important stat (even for clerics/druids, it only adds extra spells which you will have a ton of anyways by mid to end game)
- With the abundance of Intelligence potions, you could arguably not worry about this stat either, even for a mage.
- Dexterity has a giant window (6-14) where you get neither a penalty nor a bonus. Under 6 you get an AC and ranged THACO penalty, while 15 and higher you get bonuses.
- Charisma is useful for rewards, some interactions, and rather large store discounts once you hit 20 charisma with high reputation (can be boosted with the Friends spell)
- Constitution receives no HP benefits above 16 for non-fighter characters.
- Strength is useful for all classes due to carry weight.
With this being said, if you go Fighter/Ranger/Paladin, aim for maxed out Strength (with the 18/xx being at least 18/50 or higher), around 15 Dexterity minimum, and 16-18 Constitution. If you multi-class a Fighter with something else, you can balance the stats a bit more by taking a bit away from Strength or Constitution.
All other classes, max out their required stat (Cleric/Druid 18 Wisdom, Thief 18 Dexterity, Mage 18 Intelligence) and give them 16 Constitution. For the rest, have some fun and distribute as you wish. Maybe you want a physically powerful Mage or a hyper intelligent Cleric.
I won’t get into Dual Classing. It’s fun to do at times but is more for someone who wants to experiment or has beaten the game. There is a lot of downtime where you character will be very weak.
Tome Locations
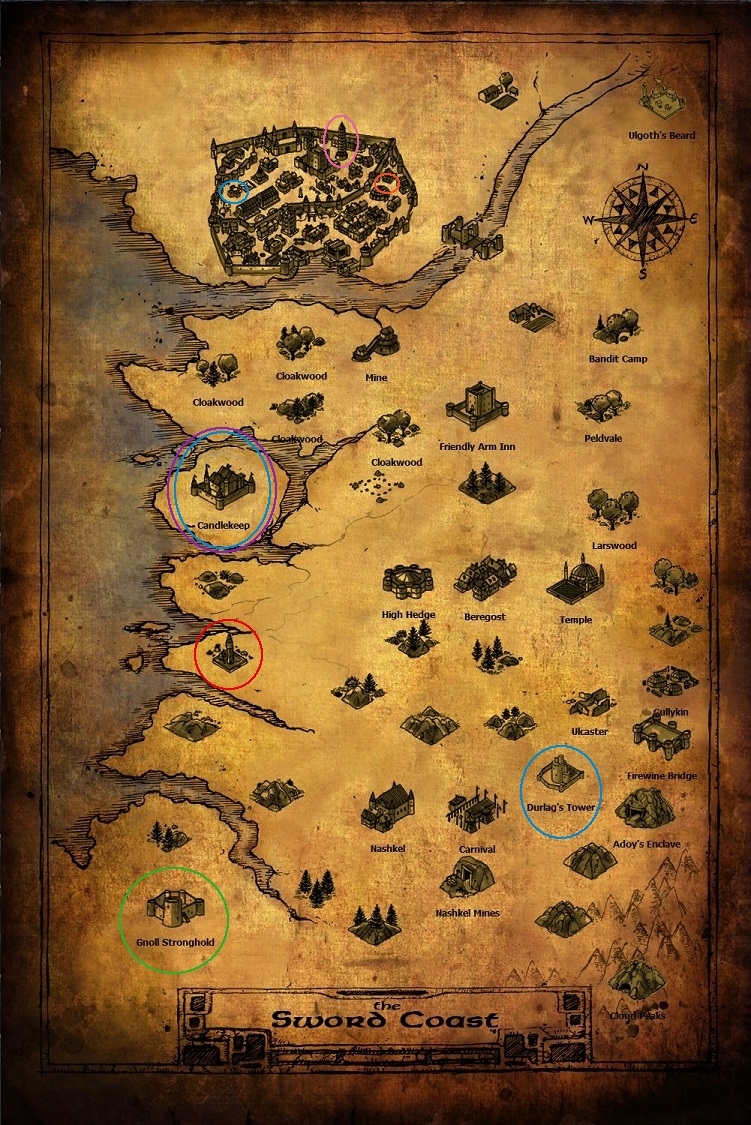
Here is a map of the Swordcoast with each Tome location represented by a colour.
Accessible At Any Time:
Charisma Tome: Green circle, Gnoll Stronghold
– There are three caves in the lower left corner of the map, the top cave on the right has the Charisma Tome guarded by some Xvarts.
Constitution Tome: Red circle, Lighthouse
– In a cave on the far left of the map, guarded by Flesh Golems (which are quite strong), and a few traps. Go for this one once you’ve gained a few levels, even though it is doable at level 1 if you’re quick and lucky.
Wisdom Tome: Blue circle, Durlag’s Tower
– This one is tougher to get, but once again, doable if you run a lot and have some luck with traps. I would recommend waiting until you get a few levels. It is on floor below the top floor, in an altar in the top right of the map. Trapped.
Accessible After Cloakwood:
Dexterity Tome: Orange circle, Thieves Guild, Baldur’s Gate
– Very easy to get, speak to Niklos (in blue and red clothes usually) to the right of Sorcerer’s Sundries. He will lead you to the Thieves Guild where you will state the password “Fafhrd.” Once inside, right behind Black Lily the vendor in a barrel is the Tome (far right of map).
Intelligence Tome: Pink circle, Razamith’s Tower, Baldur’s Gate
– Can be difficult if you fight your way, or easy if you use invisibility or hide in shadows. At the top of Razamith’s tower, it is on a bookshelf.
Wisdom Tome: Blue circle, Temple of Tymora, Baldur’s Gate
– Pickpocket it off of the male priest, Chanthalas.
Accessible After Iron Throne (Return to Candlekeep):
Wisdom Tome: Blue circle, Candlekeep Old Library/Catacombs
– In the sarcophagus that is in the lower right corner of the map. Trapped.
Strength Tome: Purple circle, Candlekeep Old Library/Catacombs
– In the large tomb of the far left of map. It is guarded by three floor traps, four phase spiders, and a trap on the tomb.
Once you’ve gotten all these Tomes, your character will have a nice boost to their abilities. Most notably, a 19 Strength fighter, a 20 Constitution Dwarf that can regenerate, or a highly agile 20 Dexterity Elf. As I said, insanely high wisdom gives additional spells (nice but not necessary), and 19 Intelligence will allow you to learn every spell (which can also be attained by drinking an Intelligence boosting potion).
Walkthrough: Quick Guide
**Note**
Some dialogues, sidequests, and areas will be totally skipped. If you want the full BG experience than just explore the other areas while incorporating my advice/walkthrough when you get there. Remember, have fun!
**Note**
If you get ambushed by enemies while travelling from one area to the next, just reload (or run away). It happens. It is random. You don’t suck, being jumped by 6 bandits at level 1 is just unfair.
**Note**
Make sure you’re frequently Quicksaving with “Q” and just generally saving your game often.
Candlekeep Tutorial
This area is basically a large tutorial. Luckily, after you buy your armor and weapons, you can just walk right over to Gorion on the steps of Candlekeep entrance. Speak to him and say you’re ready to go.
You’ll be forced into a conversation with a traditional looking red robed wizard (who always seems to show up and give you some vague tips whenever you progress in the story). After you speak with him, move on a NE angle until you see a large grey rock. Hit TAB and notice there is something in the middle (a ring of protection)! Grab it and exit to the north of the map. This will lead to the Friendly Arm Inn.
After the cutscene, head over to the right while pressing TAB. At the bottom of a tree near a couple of rocks, there is the Ring of Wizardry (it is a very small area, keep your eyes open). If you’re a mage feel free to equip it, but I would suggest the 9000 something gold you get from selling it is more useful right now (you can always buy it back when you’re loaded with gold later on). Exit the map South again and head to the previous area.
Walk to the south of this map and exit to Beregost.
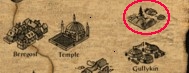
In Beregost, sell that Ring of Wizardry and outfit yourself with a magic weapon and/or armor from the Smithy (depending on your class of course). Rest if you need to. Now it is time to get some easy levels. Exit right from Beregost to the Temple. Proceed to exit right on the Temple map as well (be careful to stay at the top to avoid enemies). When the worldmap comes up, head to the circled area:
Basilisks and Leveling Up Quick
This area is basically a Basilisk free-for-all (they can petrify you with a ranged attack one hit, instant death… save often). Thankfully, there is a friendly ghoul named Korax who is immune to their attacks and can act as a meatshield stunning them for you to easily clean up… even at level 1. Hope you like quick progression, because here we go. I have highlighted how you should progress in order to only encounter basilisks (the one mage will prove difficult but hopefully Korax will stun him).
Basilisk Area Walkthrough
What you want to do here is lead with Korax. Have him stun and attack the basilisks until their status reads “near death” then either range or melee them yourself to death (do not let Korax get the kills). If it doesn’t always work, don’t get frustrated, just reload. Make sure to save every time you kill a basilisk. The Greater Basilisks (dark reddish ones) give a whopping 7000 XP while the Lesser Basilisks (yellow ones) give 1400 XP. Since you’ll most likely be alone or with just Imoen, you’ll very quickly get a few level ups.
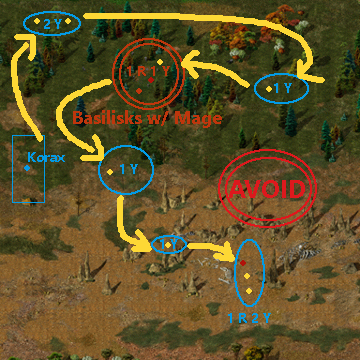
Follow the yellow arrow path I marked and make sure to take your time, be patient, and quicksave after every kill. Apply your level ups immediately to increase your HP and chance to hit. The orange area can be difficult due to the mage, but you should be able to lure the basilisks away before you engage him. If not, send Korax at him and hope for a stun.
The red area marked avoid contains a difficult mob of two casters, an archer, and a fighter. They are quite difficult at this stage so just ignore them for now.
Once you’ve dealt with all the basilisks, head back to Beregost, rest, then head South to Nashkel. Instead of being a wimpy level 1 Gibberling plaything, you’re a seasoned adventurer with a couple of magical items and some gold, ready to explore the Swordcoast and Iron Crisis.
Nashkel Mines
Once you arrive in Nashkel, head over to the far left, about mid way down, beneath a tree there is Ankheg armor and a pearl (find them by pressing TAB). Speak with the mayor in front of the Temple, and exit South the Mines.
The mine entrance is in the top left quadrant of the map. Speak to Emerson to get permission, then the guard so he moves out of the way. Enter the mines. Proceed directly South to the exit along the tracks. In the next area, follow the tracks upward and to the right, then they split off, go South to the next exit. There will be a fair amount of Kobolds here, no match for you though, mighty one. In the next area, proceed South and to the right a bit, cross over the chasm (which has two simple traps) and keep to the left. One of the grottos has a Ghoul and the other has two Spiders. After killing the Spiders go right and kill the Kobolds. Exit to the right which has three traps at the door. In the final area, head to the right and you’ll see a large underground cave. Kill the Kobolds and enter the cave. In the bottom right opening is Mulahey the half-orc Cleric. in the middle opening is Xan the Enchanter. Speak to Mulahey and either lie to him or tell him the truth. The only difference is there are less enemies if you lie to him, but either way they should be easy for you to defeat. Wipe the floor with him and grab the documents and loot from the chest. Recruit Xan if you wish. Leave the cave and proceed North and to the right to find the exit. Once out of the mines head left and exit back to Nashkel. Speak to the mayor for your reward. You’ll be ambushed in front of the Inn by Nimbul who will have a document telling you where you should go next… Feldepost’s Inn in Beregost.
Tranzig and The Bandit Camp
Once you arrive in Beregost, head to the top floor of Feldepost’s Inn. In the room to the left, a mage named Tranzig is the messenger boy for the bandits. Either kill him or let him go and we find out our next stop is either Larswood or Peldvale. Funny thing is though, the “inaccessible” Bandit Camp can be reached if we exit north from Peldvale (which is right beside the Friendly Arm Inn. Head up to the Friendly Arm Inn and exit right to Peldvale, then go exit North to the Bandit Camp.
Bandit Camp
The Bandit Camp shouldn’t be too much trouble for you, just beware the human archers… they can pack quite a punch. The main tent is the elevated one with the dead body above the entrance. Hack through the bandits and enter the main tent. Inside you’ll have to fight a hobgoblin archer, a mage, and a human and gnoll fighter. Kill the mage first and the rest should be easy. Collect your loot and talk to the prisoner Ender Sai for some story progression. The chest is trapped by a lightning bolt. Grab the documents then it is off to Cloakwood Forest. Exit the Bandit Camp area and head to the Friendly Arm Inn again.
Cloakwood Forest
In the first area of Cloakwood Forest, head Northwest to the exit and cross the bridge. If you want the most overpowered thief in the game, take the 20 Dexterity, master of the longbow Coran. Give him that fancy bow “Deadshot” you got off the hobgoblin in the Bandit Camp. Exit North.
In the next area, there are a few web traps (so drink a potion of free action or disarm them), some Ettercaps and Spiders. Clear them out as you seen them and head left, then exit North.
The next area is easy, just head to the right and exit.
This area has a Hamadryad that can Dire Charm you. If you are soloing for some reason a Dire Charm ends the game, so watch out for that. Anyways, kill her then head to the right, cross the bridge and exit right to the final area.
In this area, just head right over the bridge, kill the two guards, then stop the next group of bounty hunters consisting of a fighter with Boots of Speed, and axe thrower, and two mages. Once you kill them, keep going right and enter the facility.
Kill the two guards and take the stairs, then the elevator into the mine.
If you’re playing good, you probably want to save the miners, head to the top right corner and speak to the red tinged slave and find out you need a plug to flood the mines. If you don’t care about the miner slaves (heartless), head to the middle room then take the southern path to the exit.
On this floor, you should circle around the perimeter and find the hidden wall behind the wimpy guard that begs and screams for you to let him go. Head into this back hallway and kill the two Ghasts. At the end of the hallway there is another secret door leading to the prisoners quarters. Speak to Yeslick and recruit him if you need a Fighter/Cleric. Also speak to the slave and decide what to do for the miners.
Unlock the prison door and exit down the stairs directly to the left.
This floor you will be ambushed right away by four guards and 3 hobgoblin archers. Dispatch them and go left and follow the wall to the bottom left corner where the stairs down are.
This will be the final floor, kill the stronger than usual guard and look for the secret door behind him. This hallway is very trapped, and at the end will be the already magically buffed up Davaeron. He will try to lightning bolt, fireball, then charm you (all while using Dimension Door), followed by a summon spell and attacking you with his staff. He is pretty cocky giving up on spellcasting quite quick. Kill him, loot the documents and take the elevator back up on the far left. While on the main floor, before you leave, speak to the red tinged slave again and give him the plug. The mine will be flooded and useless for the Iron Throne.
Baldur’s Gate: The Iron Throne and Return to Candlekeep
Head up to the previously inaccessible Baldur’s Gate town bridge. You’ll be met by Scar of the Flaming Fist who asks you to look into the Seven Suns. We’re going quickly, remember, so we will tell him we’ll think about it. Head into town and go to Iron Throne headquarters (red circle).
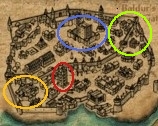
Head to the top and defeat Sarevoks Acolytes. A large combination of mages, clerics, archers and a Doppelganger. Once you kill them, take the document and head to the room at the bottom of the map and acquire the documents off of the table. Go to the room on the right and interrogate Thaldorn. He will tell you the leaders are at Candlekeep. Either kill him or let him go and head off to the Flaming Fist Compound (yellow circle).
Speak to Duke Eltan and inform him of the plot, he will send you to Candlekeep with a Rare Tome so you may gain access. Speak the Gatekeeper who will let you in with the book as a donation. Head directly to the Candlekeep entrance where you first met Gorion. There is a stairwell in the center, so just keep heading up those stairs until you reach the top. You will be arrested for the murders of the Iron Throne leaders, subsequently imprisoned, then teleported to the Secret Library which leads to the Catacombs.
**Note**
This is the only time to get the Tome of Strength and Tome of Wisdom.
Secret Library and Catacombs
The first room contains bookshelves with quite a few spell scrolls on them. Collect those then head to the left hallways for the Tomes and some loot (beware almost every sarcophagus and the tomb is trapped as well as numerous floor traps). Ignore the middle hallway it just leads to about ten Ghasts and some minor loot. Exit right to the next level.
In this area, swarming with Doppelgangers, hug the wall and head to the left, go up the stairs, defeat the Doppelgangers then turn down the left hallway and follow it to the end. Exit at the top.
You are now in the Catacombs. There is another bounty hunter fight with four enemies in the middle area. Dispatch them and collect the documents then proceed south. All of the side hallways have spiders and web floor traps so be careful. In the middle, near the bottom of the map, where all the paths connect to, are two Greater Basilisks so make sure you have petrification protection (summons, potion, spells). Waste those XP treasure troves and exit to the left.
You are now free to return to Baldur’s Gate and teach Sarevok that no one messes with you.
Return to Baldur’s Gate
You’re almost there!
Head back to Baldur’s Gate, fast travelling to the Iron Throne section of the map. Head to the top floor and wipe out the mage and her two Ogre bodyguards. Make sure to take the documentation and Sarevok’s Diary.
Next, head over to the Blushing Mermaid (green circle).
You need to travel to the Duchal Palace area (blue circle first) then exit to the Blushing Mermaid area on the right or else you’ll be in the boxed off bottom section of that area. Enter the Blushing Mermaid and head to the left behind the Innkeeper. Exit in the room behind him to the Undercellars. Head to the center of the Undercellars and kill the two assassins. Take their documentation then head back to the Duchal Palace and show your invitations to the guard. He will let you in and you’ll have to show a second guard. Be ready for a fight here.
In the main hall, all of the noblemen/women will turn into Doppelgangers. Be sure to kill them before they kill Belt and Jannath (as long as one survives you’re ok). If they both die it is instant game over. Either Belt or Jannath will teleport you to the Thieves Guild where you will have to take the stairs and enter the Labyrinth.
Labyrinth Under the Thieves Guild and UnderCity Endgame
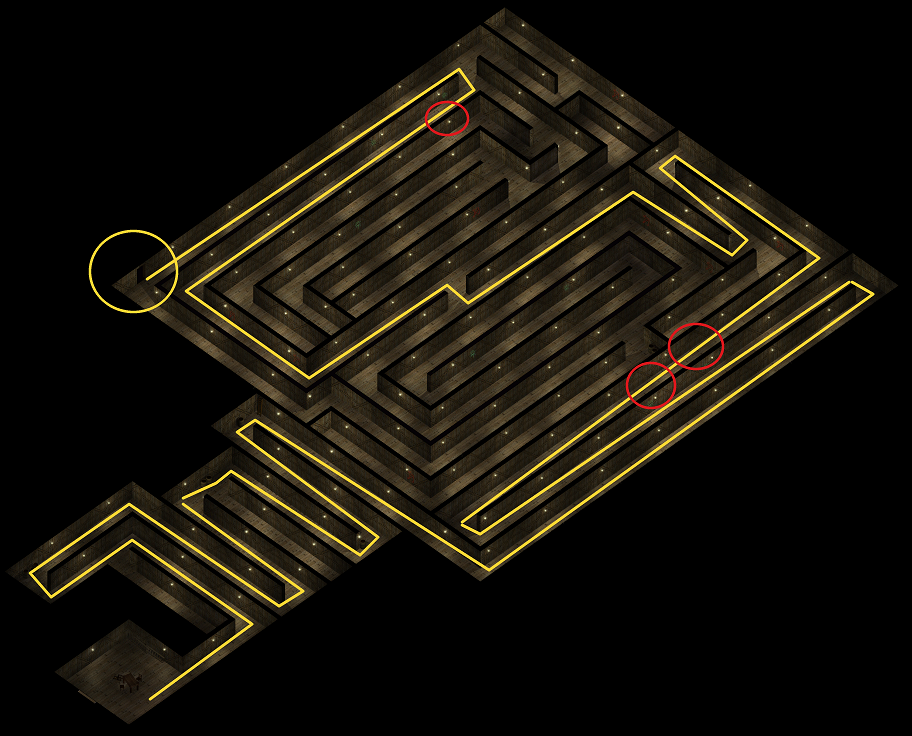
Just follow the yellow line and you’ll make it to the end. There are some Jellies at the beginning which should be no problem. The first red circle is three traps. The second red circle is two powerful skeleton warriors. The third and final red circle is two more traps. The large yellow circle is your exit to the Undercity.
The Undercity and Endgame
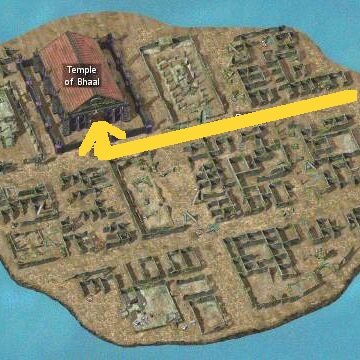
Once again, follow the yellow line. There is another bounty hunter group which you can sneak right by, but by now you should be able to wipe them out easily. Once you pass them, enter the Temple of Bhaal and confront Sarevok and his closest allies.
This is a difficult fight, but you can do it. You’ve gotten this far! Good luck!
**Notes and Tips**
This room is heavily trapped, so be careful. You can not disarm the floor traps on the giant skull, but you can disarm the two on the left.
You can also lure his henchmen away before initiating dialogue with Sarevok.
Sarevok’s enhanced speed can also be dispelled.
Summons will give you some space to hit with ranged or spells.
Hope the Quick Guide helps! Feel free to leave any questions or improvements you’d like in the comments.