This is intended to be a full walk through for Birth ME: Code. It includes the steps necessary to obtain all endings (including locks / directives), as well as additional hints and the answers to room escape sequences and mini-game puzzles.
Note: Not all solutions nor achievement descriptions are currently available. If you have the solution to a puzzle that I haven’t currently included, feel free to post it in the comments and I will add it. Please include an explanation of the solution in your comment.
Deduction Rooms [1 – 3]
Deduction #1 (Initial Room):
Note: To obtain the “On a Tight Schedule” achievement for this room:
- Click on every object in the room twice, including the metal cabinet twice before you have the key to unlock it (as well as a third time after obtaining the key from the desk).
- Click on the door five times before obtaining the key cards, until Superbia gets mad.
- After obtaining the key-cards from the painting, click on the empty safe behind the painting again.
- Click on the lamp to obtain a cylinder.
- Click on the trash can to hear some interesting dialogue from Superbia.
- Click on the large cabinet by the bookshelf to obtain a key.
- Move to the other side of the room. Click on the desk drawer to obtain a triangular prism, a newspaper, and another key.
- Go back to the cabinet in the front of the room. Click on it to obtain the rectangular prism.
- Click on the door in the front of the room twice to obtain a coin.
- Go to the back of the room and click on the painting to obtain a circular object.
- Click on the box (does not contain any items but is important to the story).
Once you are done collecting all of the items, go to the large shelf in the back of the room and ‘mess’ with all of the shapes. You will obtain smaller shapes and several slips of paper. Read through the descriptions of all items in your inventory.
Click on the painting. The group will automatically insert all of the small objects into the painting.
Finally, click on the door to leave the room.
[What connects all 9 participants?]
Let ME out! The Answer Is…
Hint #1: Not full, but…
Hint #2: You’ve read the answer before, in the item description for one of the objects in this room.
Answer: MY EMPTINESS
Deduction #2 (Principal’s Office)
Click on everything in the room twice. In particular, important objects can be found in the following places:
- The desk in the far back of the room — informs you of four potential crimes committed by the principal, labelled as ‘1’ (selling drugs) , ‘2’ (murder), ‘4’ (the crime for which the principal was initially arrested, alluded to at the beginning of the game), and ‘7’ (planting bombs)
- Big drawer of large desk (tells you the principal did not commit crime number ‘2’ – murder)
- Small drawer of big desk (obtain half of a key)
After obtaining the half of a key, attempt to go into the room in the far right corner. Luxuria will inform you that she found the other half of the key.
In this new room, search through the following objects:
- The small drawer by the bed (tells you the principal did not commit crime number ‘1’ – selling drugs)
- Click on the bed twice to obtain a clue for opening the clock
- Now, click on the clock. Ancora will open it using the clue from the bed. She will automatically obtain a golden key.
- Open the wardrobe next to the mirror, which is now unlocked. It tells you that the principal did not commit crime number ‘4’ – the crime for which he was arrested.
- Check your inventory and unlock the journal with the key. It tells you that the principal did not commit crime number ‘7’ – he did not plant any bombs.
Go back to the original room, and review the items in your inventory. You have the following clues:
- “First, eliminate 2”
- “Second, eliminate 4”
- “Third, eliminate 7”
- “Finally, eliminate 1”
Go over to the bookcase in the right corner. Type2471into the padlock.
Click on the door in the main room.
[What is the principal guilty of?]
Let ME out! The Answer Is…
Hint: How many specific crimes were mentioned in this room? For how many was the principal absolved?
Answer: NOTHING
Deduction #3
In the first room:
- Click on the bar to obtain the beverage with the word “LUCK” printed on it.
- Click on the bookshelf on the left to obtain a cube with six keyholes.
- Click on the ceiling blade to obtain the blue key.
- Click on the couch to obtain a slip of paper.
- Click on the small rubbish bin in the right corner to obtain the purple key. This unlocks the door the next room.
- You can also click on the poster in the left corner, but you won’t find anything there.
Click on the door in the right corner. In the new room:
- Click on the fire extinguisher in the right corner to obtain a clue and an orange key. Pay attention to Gula’s comment regarding the French.
- Click on the leftmost shelf to get the gold key.
- Click on the middle shelf to get the green key.
- Click on the rightmost shelf to unlock box using the gold key. You will obtain a yellow key.
- Click on the wheel in the upper part of the room. You can’t get to it without a ladder of some sort.
- Click on the ladder (left back corner of the room)
- You can also click on the shelf on the upper back wall, but this won’t yield any results.
Go back to the main room.
- Click on the bar again. Gula will have found a red key. Note that you have to complete this step after having already visited the other room.
- Click on your inventory, and on “Ancora used the six colored keys on the box”.
Click on the door to leave (left corner).
Steps to deducing the final answer:
Check the two slips of paper in your inventory. They read:
- “Bille quille ville trille”
- “- – – K + common 4” (corresponds to the first name of the terrorist) & “ – – – (ER) + wheel firsts” (corresponds to the last name of the terrorist).
You can deduce the answer to the final question based off of this and the items in your inventory.
“- – – K” means: “LUC”. It refers to the “LUCK” symbol you encountered on the alcoholic beverage. The paper tells you that you only want the first three letters.
“Common 4” means: The letters in common between the four words on the other paper, or “ILLE”
“- – – – (ER)” means: “BOIS”. Remember Gula’s comment that the fire extinguisher improperly read “boiser” instead of “briser” This clue tells you to just take the first 4 letters, or “BOIS”.
“Wheel firsts” means: “JOLI” (the first letters of all the words on the wheel)
[What is the full name of the terrorist?]
Let ME out! The Answer Is:
Answer: LUCILLE BOISJOLI
Deduction Rooms [4]
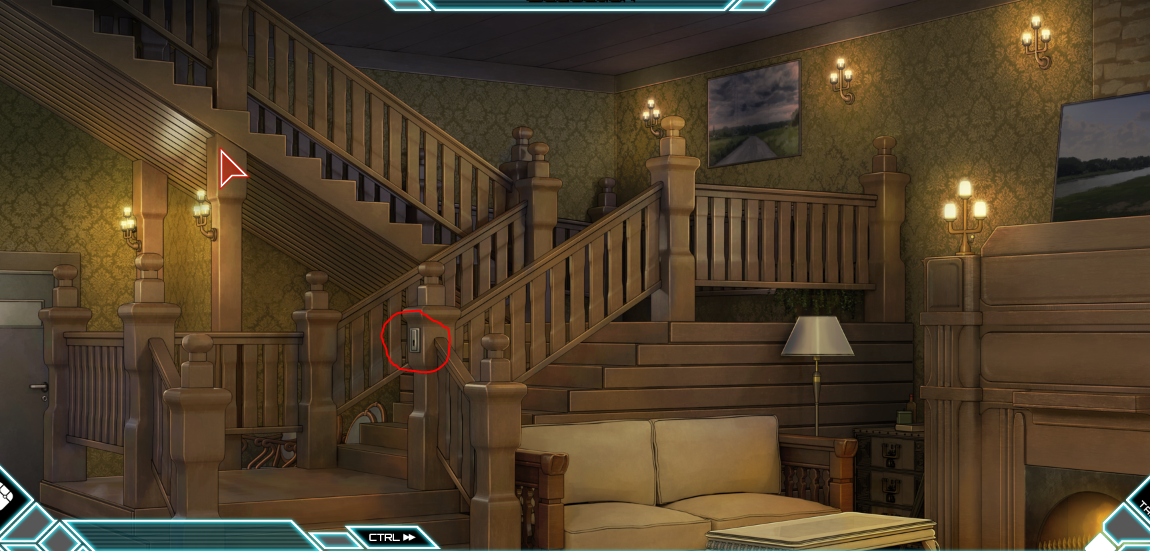
Deduction #4 (Superbia‘s House):
In the first room:
- Click on the fireplace to obtain a silver key.
- Click on the painting above the fireplace to obtain a directive for the final puzzle.
- Clicking on the staircase is not necessary, but it leads to some interesting dialogue from Ira that is relevant to the plot.
- You can click on the painting by the staircase, the table, and the lamp, but that isn’t necessary.
Click on the door in the left corner to go into the other room.
- Click on the cloth-covered stand in the centre of the room to obtain a pole and a second directive for the final puzzle.
- Click on the throne and logs (left corner) to obtain more directives.
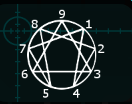
- Click on the boxes in the right corner to obtain the Enneagram symbol and a flashlight.
- You can click on the pillars, but it’s not necessary.
Go back to the main room.
- Click on the tiny keyhole along the staircase railing to obtain yet another directive. You must have already obtained the key from the fireplace.
- Now that you have the flashlight, you can obtain another directive from the couch.
- Talk with Avaritia, and click ‘About the Personality’. She will give you another piece of information key to the puzzle.
- Talking with Ira will lead to some interesting information relevant to the larger mystery surrounding the entire game.
- Click on your inventory, and “the trio worked on the book’s riddle”.
- Click again on the fireplace.
You are now ready to answer the final riddle. Click on the fireplace again.
You have the following collection of clues. (1-6 and 8 are from items in your inventory, while 7 is from talking to Ava).
- Up next to Loyalist is Enthusiast, related to Reformer. (I.e. Enthusiast is directly above Loyalist, and Enthusiast is related to Reformer).
- Peacemaker, Achiever, and Loyalist form a perfect triangle (numbers 9, 6, 3).
- For Helper, it goes where there’s a free space. (i.e. the leftover #).
- Individualist is next to Achiever
- Reformer starts the ball. (I.e. number 1).
- Enthusiast and Challenger are related to Observer.
- Ava says she is type 5 (Observer).
- The final answer is between Challenger and Individualist.
“Related” types means that: There is a line connecting the two types together.
Using logical deduction and the Enneagram symbol, you can deduce the number corresponding to each type.
Loyalist (Clues 1 & 2)
- According to clue 2, this must be type 9, 6, or 3.
- However, clue 1 says Enthusiast is above Loyalist. Since 9 is the highest number, Loyalist can’t be type 9.
- Once you’ve figured out that enthusiast is type 7, you know based on clue 1 that loyalist is TYPE 6.
Enthusiast (Clues 1 & 6)
- According to clue 6, this is related to Observer (type 5). Therefore, it must be type 7 or 8.
- Clue 1 tells us that Enthusiast is above Loyalist. So either: Enthusiast is type 7 and Loyalist is type 6, OR Enthusiast is type 8, and Loyalist is type 7.
- Loyalist cannot be type 7 based on clue 2. Therefore, Enthusiast is TYPE 7.
Reformer (Clues 1 & 5)
- Clue 5 tells us that Reformer “starts the ball”, which could refer to the top of the ball (type 9) or the literal start (type 1).
- However, type 9 is part of the perfect triangle formed by Peacemaker, Achiever, and Loyalist. So Reformer must be TYPE 1.
Observer (Clue 7)
- This is TYPE 5 according to Ava.
Challenger (Clue 6)
- According to clue 6, this is related to Observer (type 5). Therefore it must be type 7 or 8.
- Once you’ve figured out that Enthusiast is type 7, you know that Challenger must be TYPE 8.
Individualist (Clue 4)
- Make sure that you’ve solved all the above types first so that you know Individualist cannot be those types.
- You also know that individualist cannot be types 9 or 3 because those correspond to the ‘perfect triangle’ formed by Peacemaker, Loyalist, and Achiever.
- Therefore, by process of elimination this can only be types 2 or 4.
- Come back to this type after solving for the remaining types.
Achiever (Clues 2 & 4)
- According to clue 2, this must be type 9,6, or 3. Once you’ve figured out that Loyalist is type 6, you know this must be type 9 or 3.
- You should have deduced that Individualist is one of types 2 or 4. From clue 4, you know that Achiever is next to Individualist, corresponding to types 1, 3, or 5.
- Putting these two facts together, you can deduce that Achiever is TYPE 3
Peacemaker (Clue 2)
- According to clue 2, this must be type 9,6, or 3. Once you’ve figured out that Loyalist is type 6 and Achiever is type 3, you know this must be TYPE 9.
Now, let us once again examine the types Individualist and Helper.
- These must correspond to types 2 and 4, but we don’t know which is which.
- Clue 8 tells you that the final answer is “between Challenger and individualist”.
- By “between” the author does NOT mean 3 adjacent numbers (i.e. how ‘7’ is between ‘6’ and ‘8’). This is because Challenger is type 8, and Individualist cannot be type 6 nor type 1.
- Instead, “between” refers to connected lines. I.e. type ‘2’ is between type ‘8’ and type ‘4’.
- This means that TYPE 2 (Helper) is in between TYPE 8 (Challenger) and TYPE 4 (Individualist).
[Which personality type committed murder?]
Let ME Out! The Answer Is…
Answer: HELPER
Deduction Rooms [5-6]
Deduction #5 (Hotel)
In the first room:
- Click on the door in the far left corner.
- ‘Try to sort by size.’
- ‘Subtract PIG from PIGTAILS’
You will now automatically enter the second room.
- Click on the bed to obtain a key.
- Click on the drawers to the left and right of the bed.
- Click on all three sets of paintings to obtain slips of paper.
- You can click on the chandelier, chair, and curtains, but that’s not necessary.
- Click on the painting in the far left corner (by the chair) to discover a safe.
- Click on our inventory and ‘The team talked about the safe’.
You are now ready to determine the code to unlock the safe.
- You do not need the clues found on the drawer and fork for this riddle. That will come later.
- Look at the three slips of paper in your inventory. The one with a triangle on it says “21 12′, and the game told you that stands for “UL”. The one with a square on it says “21 24”, and the game told you that stands for “UX”. The one with a hexagon on it says “made of AIR”.
- Finally, the safe says T21 + S21 + H321.
- Hint 1: What could T, S, and H represent?
- Hint 2: In what direction should you read the papers?
- Hint 3: The answer is the name of one of the characters.
- Explanation of Answer: T, S, and H mean Triangle, Square, and Hexagon. It tells you the order that the papers go in.
- Explanation of Answer: The numbers tell you the order in which you should read the papers. T21 = on the paper with a triangle, read the second letter first and the first letter last. So T21 = LU. S21 = same concept but for the paper with a square. So S21 = XU. Finally, H321 = on the paper with a hexagon, read the third letter, then the second, then the first. So H321 = RIA.
Therefore, the pass-code to the safe is: LUXURIA
Click on the safe two more times. You are now ready to deduce the final answer.
[Who are the two people in the test?]
Let ME Out! The Answer Is…
Hint 1: These are not the names of any of the nine characters.
Hint 2: You want to convert numbers to letters. Normally, you would do A=1, B=2, etc. But FEYYY VAKH doesn’t sound like a real name…
Hint 3: There’s two clues in this room that you haven’t used yet. One of which mentions an alphabet.
Hint 4: The fork tells you to count spaces. If you do that, then the message on the drawer contains 26 characters.
Answer: SALLYANNE
Explanation: The message on the drawer says “no basket no box no marble”. According to that and the clue on the fork, 1 = n, 2 = o, 3 = space, 4 = b, etc. Therefore, 6 5 25 25 Y 22 1 11 8 = SALLY ANNE.
Deduction #6
In the first room:
- Click on the boxes in the far left corner to obtain a key to the second room and a gear.
- You can click on the tubes in the back of the room, but it’s not necessary.
Go into the second room.
- Click on the pipe on the floor to acquire it.
- Click on the set of green tubes to obtain a coin.
- Click on the boxes to obtain a clipboard.
- You can click on the duplicate nuclear reactors, but it’s not necessary.
Go back to the first room.
- Click on the giant nuclear reactor and go through all 5 options. One of these options gives you a clue for the special solution of one of the puzzles. It is important that you click ‘investigate the left panel’ after you’ve already obtained the pipe from the other room.
- Open your inventory. You have a clipboard displaying the number ‘2’ and a message saying ‘multiply all these numbers together’. You also have a slip of paper saying ’15’, and the number ’39’ that you observed on the reactor. If you multiply these, you get 1170.
- Click on the ceiling panel. Type 1170. You will get the “Chaos is a Ladder” achievement.
- Click again on the nuclear reactor and on ‘investigate the right panel’.
You are now ready to deduce the final answer to this room. Click on the right door in the first room.
[Your true enemy is…?]
Let ME Out! The Answer Is…
Hint 1: It’s a one-word answer that the game recently stated.
Answer: TIME
Deduction Rooms [7 – 8]
Deduction #7 (‘The Stars’)
In the first room:
- Click on the bookshelf twice.
- Examine the zodiac signs on the wall.
- Examine the machine on the left side of the room with a large keypad.
Now, click on the door in the left corner of the room to enter the garden.
- Click on the three side planters and the centre planter.
- Click on the sign on the wall with the ‘L’ and ‘R’ symbols.
- Examine the two slips of paper in your inventory. They read “Half 1 = 1L 3R” and “Half 2 = 4R 2L”.
Go back into the first room and click on the chest in the far right. Then, go back into the garden, click on your inventory, and on ‘Ancora used her head to crack the code.
- Hint 1: Remember the signs on the wall. They said “L: Red Blue Green White” and “R: Blue White Green Red”. Combine this with the two slips of paper and one other item in your inventory detailing the number of flowers of each colour in the centre planter.
- Hint 2: What’s the first colour on the left sign…?
- Answer: 1L = first colour on left sign, 3R = third colour on right sign, etc. So “1L 3R 4R 2L” = red green red blue. You have an item in your inventory from when Ancora checked the centre planter, remarking that there are 7 red flowers, 3 white flowers, 4 blue flowers, and 6 green flowers. So red green red blue = 7674.
Go back into the first room.
- Click on the large machine with a keypad on the left.
- Turn off the lights using the light-switch.
- Examine the contraption in the centre of the room.
- Click on the safe.
You are now ready to deduce the answer to this room. Click on the door on the right.
Steps to solving this puzzle:
- Re-examine the items in your inventory.
- The purpose of the black papers is to tell you the order in which you should write the four zodiac signs.
- The purpose of the three planters is to tell you which zodiac signs to remove. It says “KILL LEO PISCES SCORPIO LIBRA CAPRICORN.” Based on the ordering in the first clue, this leaves you with: Aquarius, Cancer, Sagittarius, Virgo, Aries, Taurus, Gemini.
- The purpose of the stars room wall clue (brown) is to tell you which letter to use to represent each sign (capitalised): Aries = R, Taurus = A, etc. Based on the sequence from the previous step, this leaves you with “ANAGRAM”.
[What are the keys?]
Let ME Out! The Answer Is…
Answer: ANAGRAM
Deduction #8 (Back to the Initial Room)
There’s nothing to be done in this room except to finally open that box.
By the time you’ve accessed this room, you should’ve already been told the code for the box.
Answer: 20141119
Flowchart Guide [Important Notes]
Please be warned that this section contains some spoilers for character deaths.
These endings are listed in numerical order. However, certain endings may not be reachable without first obtaining one of the eight locks located in the top left corner of the flowchart. If you find that one of the necessary choices (in bold + italics) is locked off for you at a given time, try first pursuing one of the other endings and then coming back to that one.
Sample choices for accessing any given ending are listed. Although non-necessary choices are in regular font, this guide has attempted to include every possible choice such that your flowchart becomes fully unlocked. Keep in mind that some of these ‘non-important’ choices may become important if it causes you to not meet the criterion in italics listed at the top of each ending.
There are 12 endings in this game, ranging from 277 – 288. Ending 288 is the ‘true’ end.
It is highly recommended that you achieve endings 277/278 first, ending 287 second-last, and ending 288 last. (Though the latter two endings have multiple locks required to see them, it’s possible to access them without having seen all the other endings.)
(Note: the location of the various character directives and codes you obtain throughout the game is still being updated. They’re a bit hard for me to find since I’ve already unlocked everything and they’re not listed in the flowchart. The best order in which to play the endings seems to be chronological order, in terms of efficiency with locks/directives.)
Flowchart Guide [Endings 277-282]
Bad End 277
**The key to obtaining this ending is to not have a significant amount of trust with any of the characters prior to the first vote. Ira and Luxuria must both be at a trust level of 66% or below, and Invidia must be at a trust level of 33% or below.
**This ending is immediately available from the start of the game.
Sample choice sequence:
- Check up on Superbia
- Meet with Tristitia
- Approach Gula
- Talk with Luxuria
- Hack Ira
Bad End 278
**To obtain this ending, you must meet the following requirements:
- Have a trust level of 66% or below with both Ira and Luxuria prior to the first vote
- Have a trust level of exactly 66% (currently the max. possible value) with Invidia prior to the first vote
**This ending is immediately available from the start of the game.
Sample choice sequence (essential choices in bold).
- Talk more with Invidia first. (+33% trust with Invidia)
- Meet with Avaritia
- Wave at Luxuria
- Approach Invidia (+33% trust with Invidia)
- Hack Avarita
- The person you vote for is irrelevant.
- You will obtain the “Lone Wolves Die Alone” achievement.
At this point, Invidia dies in the first vote and you are locked on to this end. The remainder of your choices can impact your trust with other individuals but will have no influence on the ending.
Special Achievement: You, Superbia, and Lux will find a gun. Choose to take it to unlock the “Wait, What?” achievement.
Bad End 279
**To obtain this ending, you must meet the following requirements:
- Ira dies in the first vote. (Requires 99% trust level with Ira prior to that vote).
- When prompted to choose between going with Luxuria/Superbia and Avaritia/Gula, you choose Ava/Gula.
- Your trust level with the other characters is irrelevant.
Sample choice sequence (essential choices in bold + italics).
- Introduce yourself to Superbia.
- Talk with Ira first (+33% trust with Ira)
- Talk to Gula.
- Help Ira (+ 33% trust with Ira
- Hack Ira (+33% trust with Ira)
- Who you vote for is irrelevant.
- You will obtain LOCK #7 and the “Lion Eating the Sun” achievement.
- Agree with the rest.
- Go with Avaritia and Gula.
- You will obtain the Luxuria directive on this route. (Enables you to hack Luxuria prior to the first vote) .
Bad End 280
**To obtain this ending, you must meet the following requirements:
- Luxuria dies in the first vote. (Requires 99% trust level with Luxuria prior to that vote).
- Your trust level with Superbia is 66% or lower.
- You trust level with Tristitia is 66% or lower.
Sample choice sequence (essential choices in bold + italics).
- Talk with Invidia.
- Talk with Avaritia
- Wave to Luxuria (+33% trust with Luxuria)
- Talk with Luxuria. (+33% trust with Luxuria)
- Hack Luxuria. (NOTE: This requires the Luxuria directive, obtained in bad end 279.) (+33% trust with Luxuria)
- Who you vote for is irrelevant.
- You will obtain LOCK #4 and the “Neck the Snake” achievement.
- Walk with Ira
- Turn to the others
- Hack Ira
- Who you vote for is irrelevant.
Bad End 281
**To obtain this ending, you must meet the following requirements:
- Luxuria dies in the first vote. (Requires 99% trust level with Luxuria prior to that vote).
- Superbia dies in second vote. (Requires 99% trust level with Superbia prior to that vote).
- You trust level with Tristitia is 66% or lower. (Note that by meeting step 2 you will necessarily have already met step 3).
Sample choice sequence (essential choices in bold + italics)
- Introduce yourself to Superbia (+33% trust with Superbia)
- Approach Ava
- Wave at Luxuria (+33% trust with Luxuria)
- Talk to Luxuria (+33% trust with Luxuria)
- Hack Luxuria (Requires Luxuria directive from bad end 279). (+33% trust with Luxuria)
- Who you vote for is irrelevant
- Walk with Gula
- Wish Superbia good luck. (+33% trust with Superbia)
- Hack Superbia (+33% trust with Superbia)
- Who you vote for is irrelevant.
- You will obtain LOCK #5, the Gula directives, and the “It’s Rabbit Season” achievement.
Bad End 282
**To obtain this ending, you must meet the following requirements:
- Ira must die in the first vote. (Requires 99% trust level with Ira prior to first vote).
- When prompted to choose between going with Lux/Superbia and Ava/Gula, you must choose Lux/Superbia.
- Avaritia dies in the second vote. (Requires 99% trust level with Ava).
- Your trust level with Invidia is 33% or lower.
Sample choice sequence (essential choices in bold + italics)
- Introduce yourself to Superbia.
- Introduce yourself to Ira (+33% trust with Ira)
- Talk to Gula
- Help Ira (+33% trust with Ira)
- Hack Ira (+33% trust with Ira)
- Who you vote for is irrelevant.
- Agree with the rest (+33% trust with Ava)
- Go with Luxuria and Superbia
- Prepare to set out with Luxuria
- f your current trust with Invidia is 33%, then you must pick the “I” or the “A” key. If it is 0%, then pick any key.
- It’s likely an anagram (+33% trust with Ava)
- Hack Avaritia (+33% trust with Ava)
- Who you vote for is irrelevant
- You will obtain LOCK #2 and the “A Pig Blunder” achievement.
Flowchart Guide [Endings 283 – 287]
Bad End 283
**Note: it is highly recommended (though not required) that you view this route before route 287. However, route 287 contains major spoilers for this route and even gives you the answer to the deduction room.
**To obtain this ending, you must meet the following requirements:
- Ira dies in the first vote. (Requires 99% trust level with Ira prior to first vote.).
- When prompted to choose between going with Lux/Superbia and Ava/Gula, you must choose Lux/Superbia.
- Gula dies in the second vote. (Requires 99% trust level with Gula prior to second vote).
- In the second vote, you must tell everyone to vote for Ava.
- When prompted whether or not to save Superbia’s life, you must do nothing to protect her.
Sample choice sequence:
- Talk more with Invidia
- Introduce yourself to Ira (+33% trust with Ira)
- Approach Gula (+33% trust with Gula)
- Help Ira (+33% trust with Ira)
- Hack Ira (+33% trust with Ira)
- Who you vote for is irrelevant.
- Take Luxuria’s side
- Go with Luxuria and Superbia
- Press Tristitia for details (+33% trust with Gula)
- Pick any key
- It is likely something else
- Hack Gula (+33% trust with Gula) (Note: this requires the Gula directives, obtained in bad end 281).
- Tell the group to vote for Ava.
- You will obtain LOCK #3 the Tristitia directives, and the “Cow’s Tipping Point” achievement.
- The person you actually vote for is irrelevant.
- Do nothing to protect Superbia
Bad End 284
**To obtain this ending, you must meet the following requirements:
- Luxuria dies in the first vote. (Requires 99% trust level with Luxuria prior to the first vote).
- Tristitia dies in the second vote. (Requires 99% trust level with Tristitia prior to the second vote) (Note: Requires Tristitia directives from bad end 283.)
Sample choice sequence:
- Talk more with Invidia
- Meet Tristitia (+33% trust with Tristitia)
- Wave at Luxuria (+33% trust with Luxuria)
- Talk with Luxuria (+33% trust with Luxuria)
- Hack Luxuria (Requires Luxuria directive from bad end 279). (+33% trust with Luxuria)
- The person you actually vote for is irrelevant.
- Walk with Tristitia (+33% trust with Tristitia)
- Turn to the others
- Hack Tristitia (Requires Tristitia directives from bad end 283) (+33% trust with Tristitia)
- The person you actually vote for is irrelevant.
- You will obtain LOCK #1 and the “On a High Horse” achievement.
Bad End 285
**To obtain this ending, you must meet the following requirements:
- Ira dies in the first vote. (Requires 99% trust level with Ira prior to the first vote.)
- When prompted to choose between going with Lux/Superbia and Ava/Gula, you must choose Lux/Superbia.
- Gula dies in the second vote. (Requires 99% trust level with Gula prior to second vote).
- In the second vote, you must tell everyone to vote for Ava.
- When prompted whether or not to save Superbia’s life, you must shove her out of the way.
- When prompted for who’s helmet to hack (in the third set of hacks), you must either hack Ava/Superbia’s helmets or hack Invidia’s helmet but get one of the deductions wrong. (Note that the option to hack Invidia’s helmet is currently locked).
Sample choice sequence:
- Talk more with Invidia
- Introduce yourself to Ira (+33% trust with Ira)
- Approach Gula (+33% trust with Gula)
- Help Ira (+33% trust with Ira)
- Hack Ira (+33% trust with Ira)
- Who you vote for is irrelevant.
- Take Luxuria’s side
- Go with Luxuria and Superbia
- Press Tristitia for details (+33% trust with Gula)
- Pick any key
- It is likely something else
- Hack Gula (+33% trust with Gula) (Note: this requires the Gula directives, obtained in bad end 281).
- Tell the group to vote for Ava.
- The person you actually vote for is irrelevant.
- Shove Superbia out of the way
- Hack Avaritia or Superbia
Bad End 286
**To obtain this ending, you must meet the following requirements:
- Ira dies in the first vote. (Requires 99% trust level with Ira prior to the first vote.)
- When prompted to choose between going with Lux/Superbia and Ava/Gula, you must choose Lux/Superbia.
- Either:
a)By the time of the second vote, you have a trust level of 66% or below with Ava and a trust level of 66% or below with Gula
b) In the second sequence of hacks (right before the second vote), you hack Superbia. (Requires you to have seen bad end 285.)
c) You met all the prior requirements of bad ends 283/285, but when prompted for who to kill in the second vote, you tell the group to vote for anyone but Ava. - Because the Invidia directives are only obtained if you hack Superbia, it is highly recommended that you choose this option.
Sample choice sequence:
- Talk more with Invidia
- Introduce yourself to Ira (+33% trust with Ira)
- Wave at Luxuria
- Help Ira (+33% trust with Ira)
- Hack Ira (+33% trust with Ira)
- Agree with the rest
- Go with Luxuria and Superbia
- Press Tristitia for details
- Pick any key
- It is likely something else
- Hack Superbia
Bad End 287
**It is highly recommended that you view this end second-last as it contains multiple spoilers for the other ends. It is actually an extension of end 282 which unlocks if you have the Invidia directives from hacking Superbia in bad end 286, and have a 66% trust level with Invidia (the current maximum on this route) prior to the end of route 282.
**To obtain this ending, you must meet the following requirements:
- Ira dies in the first vote. (Requires 99% trust level with Ira prior to the first vote.)
- When prompted to choose between going with Lux/Superbia and Ava/Gula, you must choose Lux/Superbia.
- Ava dies in the second vote. (Requires 99% trust level with Ava prior to the second vote.)
- You have a trust level of 66% with Invidia (which is the current maximum for this route).
- You have obtained the Invidia directives from hacking Superbia prior to the second vote in bad end 286.
Sample choice sequence:
- Talk more with Invidia (+33% trust with Invidia)
- Introduce yourself to Ira (+33% trust with Ira)
- Talk to Gula
- Help Ira (+33% trust with Ira)
- Hack Ira (+33% trust with Ira)
- Agree with the rest (+33% trust with Ava)
- Go with Luxuria and Superbia
- Press Tristitia for details
- Pick the “G” key (+33% trust with Invidia)
- It is likely an anagram (+33% trust with Ava)
- Hack Avaritia (+33% trust with Ava)
- If you’ve obtained the Invidia directives from bad end 286, they literally give you the answer to the puzzle.
- At the end of this route, you will obtain LOCK #6.
Flowchart Guide [TRUE END — Ending 288]
**Make sure you’ve played through all other endings before viewing this end. There are multiple locks on it to prevent it from being viewed before you’ve accessed most of the other endings.
**To obtain this ending, you must meet the following requirements:
- Ira must die in the first vote. (Requires 99% trust level with Ira prior to the first vote.)
- When prompted to choose between going with Lux/Superbia and Ava/Gula, you must choose Lux/Superbia.
- Gula dies in the second vote. (Requires 99% trust level with Gula prior to second vote).
- In the second vote, you must tell everyone to vote for Ava.
- When prompted whether or not to save Superbia’s life, you must shove her out of the way.
- When prompted for who’s helmet to hack (in the third set of hacks), you must hack Invidia. (This will be locked if you haven’t played through the other ends).
- You must correctly answer three sets of deductions.
- The remainder of the VN is mostly linear.
Sample choice sequence:
- Talk more with Invidia
- Introduce yourself to Ira (+33% trust with Ira)
- Approach Gula (+33% trust with Gula)
- Help Ira (+33% trust with Ira)
- Hack Ira (+33% trust with Ira)
- Who you vote for is irrelevant.
- Take Luxuria’s side
- Go with Luxuria and Superbia
- Press Tristitia for details (+33% trust with Gula)
- Pick any key
- It is likely something else
- Hack Gula (+33% trust with Gula) (Note: this requires the Gula directives, obtained in bad end 281).
- Tell the group to vote for Ava.
- The person you actually vote for is irrelevant.
- Shove Superbia out of the way
- Hack Invidia
Deduction Sequence:
Note: The answers to most of these will have been revealed to you or implied in the other routes.
- The metal box
- Pandora
- Seven
- Ancora
- Invidia didn’t die
- Twenty-four
- Double the ‘ME’ cards
- Superbia
- The traitor faked their death.
- They need Invidia’s ‘ME’ card.
- G and I
- Keys anagram answer: PIGTAILS
Read through the remainder of the text until you get the ‘NOT THE END’ screen.
You will obtain LOCK #8.
Now, go back to the very first orange block on the flowchart, marked ‘Start’, and click ‘Go’.
Click on ‘Choose US if you value the future’.
Deduction Sequence
[Who do each of the rooms belong to?]
Note: The game will let you re-guess these if you get them wrong.
- Office and bedroom –> Gula (corresponds to crime of terrorism)
- Manor and chapel –> Superbia (corresponds to crime of murder)
- Bar and warehouse –> Ira (corresponds to crime of selling drugs)
- Nuclear reactor rooms –> Tristitia (the crime related to this is explained later in the game)
- Astrology and greenery rooms –> Ancora
- Unspecified room (corresponds to Deduction Room #5) –> Luxuria
Achievement Guide
Some achievements are naturally achieved over the course of the game or before/upon encountering certain endings. See the endings/flowchart section of the guide for more details.
So Long, Bear Well
Steam Description: Get rid of Ancora using the vote. Oops!
How to Obtain: Naturally obtained in bad end 280 or 286.
A Pig Blunder
Steam Description: Get rid of Avaritia using the vote.
How to Obtain: Naturally obtained prior to bad end 282. Ira dies in the first vote and Ava dies in the second.
Cow’s Tipping Point
Steam Description: Get rid of Gula using the vote.
How to Obtain: Naturally obtained prior to both bad end 285 and the true route. Ira dies in the first vote and Gula dies in the second.
Lone Wolves Die Alone/
Steam Description: Get rid of Invidia using the vote.
How to Obtain: Naturally obtained in bad end 278. Invidia dies in the first vote.
Lion Eating the Sun
Steam Description: Get rid of Ira using the vote.
How to Obtain: Naturally obtained in several of the routes, including bad ends 279, 282, 283, 285, 286, 287, and the true route. Ira dies in the first vote.
Neck the Snake
Steam Description: Get rid of Luxuria using the vote.
How to Obtain: Naturally obtained in several of the routes, including bad ends 280, 281, and 284. Luxuria dies in the first vote.
It’s Rabbit Season
Steam Description: Get rid of Superbia using the vote.
How to Obtain: Naturally obtained in bad end 281. Luxuria dies in the first vote, and Superbia dies in the second vote.
On a High Horse
Steam Description: Get rid of Tristitia by using the vote.
How to Obtain: Naturally obtained in bad end 284. Luxuria dies in the first vote, and Tristitia dies in the second vote.
Is it really the end?
Steam Description: Get your first ending.
Hope Stays Inside
Steam Description: Get the true ending. See endings/flowchart section of the guide.
A Cool Secret
Steam Description: Find one secret puzzle solution.
Even Cooler Secrets
Steam Description: Find eight secret puzzle solutions.
The Coolest Secret
Steam Description: Find all twenty secret puzzle solutions.
Not Quite The Answer
Steam Description: Find some flavor text.
How to Obtain: Try entering in a blank answer in one of the deduction rooms. I got this achievement in deduction room #5, but it probably doesn’t matter which room you’re in.
Chaos is a Ladder
Steam Description: Or a stepladder.
How to Obtain: Click on the ceiling panel in the first room of Deduction Room #6. Also make sure you’ve inspected everything else in the room.
You can TRUST Me
Steam Description: Open the TRUST interface.
Wait, What?
Steam Description: Raise your TRUST with the mystery person early.
How to Obtain: After being locked on to bad end 278, you will be presented with a series of three choices. In the second choice, choose to “take the gun”.
You’d Be Dead Now
Steam Description: Reach 6 hours of total playtime.
Order Out of Chaos
Steam Description: Sort the save files by ending.
How to Obtain: Arrange the endings in order from 277 – 288, with 288 being the true end. See the endings/flowchart section of this guide for more details.
On a Tight Schedule
Steam Description: Inspect everything in a specific deduction room.
Room Obtained In: Deduction#1
How to Obtain: See the “Deduction Rooms” section of the guide.
It’s Official Now
Steam Description: Inspect everything in a specific deduction room.
Room Obtained In: Deduction#2
How to Obtain: Currently unknown.
Never Do Drugs
Steam Description: Inspect everything in a specific deduction room.
Room Obtained In: Deduction#3
How to Obtain: Currently unknown.
One Man’s Holy Tomb…
Steam Description: Inspect everything in a specific deduction room.
Room Obtained In: Deduction#4
How to Obtain: Currently unknown.
Hotel Denouement
Steam Description: Inspect everything in a specific deduction room.
Room Obtained In: Deduction#5
How to Obtain: Currently unknown.
Tubular
Steam Description: Inspect everything in a specific deduction room.
Room Obtained In: Deduction#6
How to Obtain: Currently unknown.
Natural Harmonium
Steam Description: Inspect everything in a specific deduction room.
Room Obtained In: Deduction#7
How to Obtain: Currently unknown.
I’ll See You Later
Steam Description: Get all achievements.
Mini-Game Puzzles [General]
The ‘special solutions’ are sometimes extensions of the general solution that incorporate the general solution into it, and sometimes they are completely different. If the special solution is simply an extension of the general solution, it has been marked with three asterisks (***).
The directives for the special solutions are necessary for solving the puzzles. They are obtained by revisiting the puzzle after having already solved it, and then clicking on both hints. By contrast, the hints for the general solutions are usually not necessary, but they are helpful.
For some of the more difficult puzzles, this guide provides additional hints. These are a bit easier than the in-game hints, which should be consulted first.
Mini-Game Puzzles: [1 – 6]
Photos of the solutions for all 20 puzzles are located at the bottom of this guide.
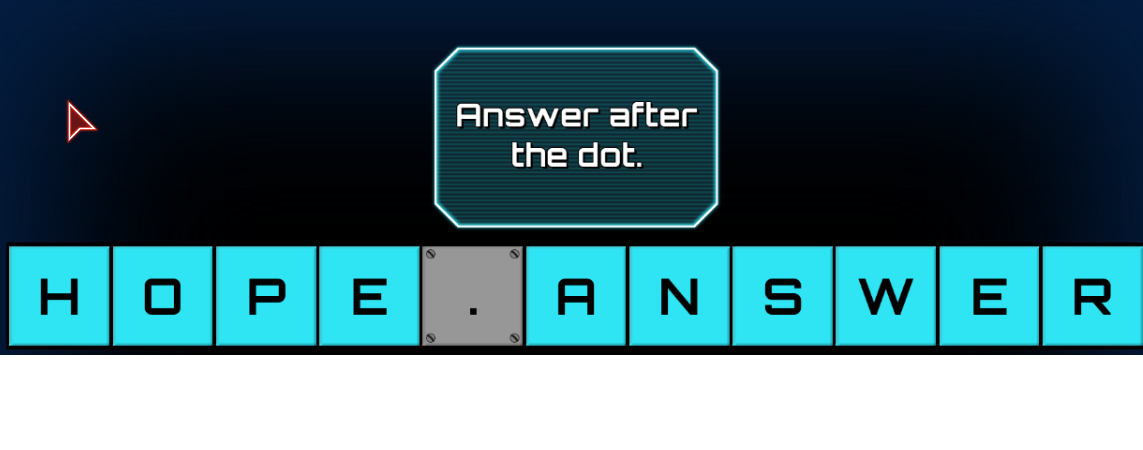
Puzzle 1:
General Solution:
Rearrange the letters so that the word ‘ANSWER’ literally appears after the dot.
***Special Solution:
Answer: Rearrange the letters so that they spell out ‘HOPE.ANSWER’.
Explanation: ‘Hope’ is the meaning behind ‘Ancora’.
Puzzle 2:
General Solution:
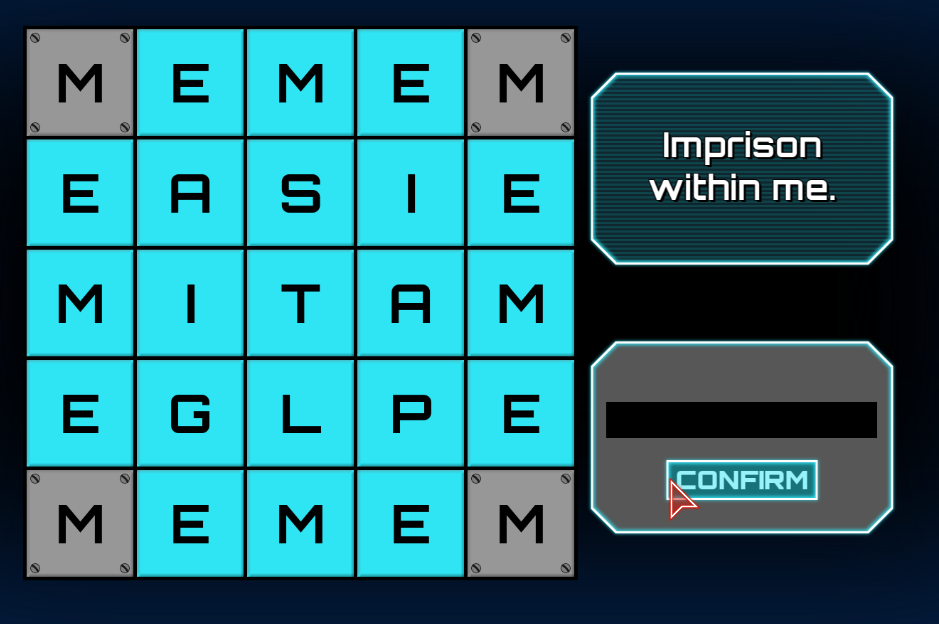
Rearrange the letters so that they read out ‘MEMEME…’ all the way around the exterior of the square.
***Special Solution:
Additional Hint: You’ve already arranged the exterior letters, but what about the interior ones? What could these nine letters represent? Consult the in-game hints for instructions on how to arrange them.
Answer: Keep the exterior of the square the same. Arrange the interior letters so that (starting from the top left) they read: ASIITAGLP.
Explanation: If you click on ‘Hint 2’, it tells you to arrange the interior letters in ‘meeting’ order. Each of the letters stands for the name of one of the characters in the game. If you don’t remember them, you were given a list of them in the room you just escaped from. The order that you met the characters was as follows: Ancora, Superbia, Invidia, Tristitia, Avaritia, Gula, Luxuria, and Pandora.
Puzzle 3:
General Solution:
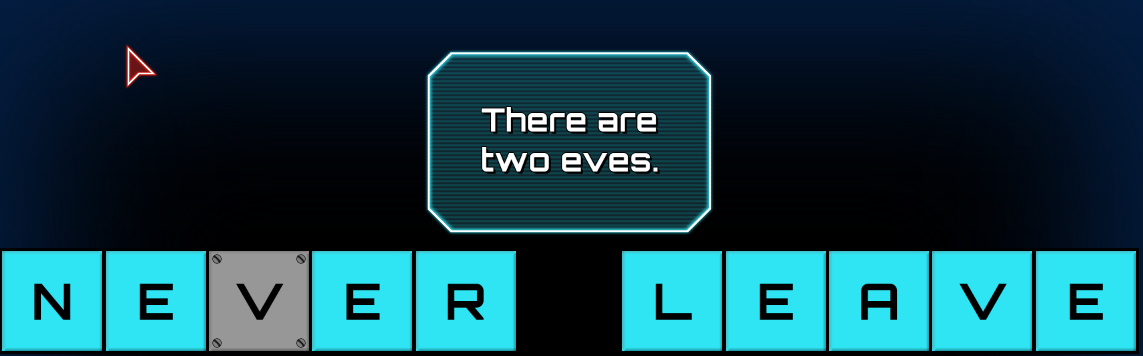
Additional Hint 1: Think of both spelling and phonetics.
Additional Hint 2: The answer is a two-word phrase
Additional Hint 3: The first word has the letters “eve” in it (all in a row), and the second word has the “eev” sound in it.
Answer: ‘NEVER LEAVE’
Special Solution:
Currently unknown
Puzzle 4:
General Solution:
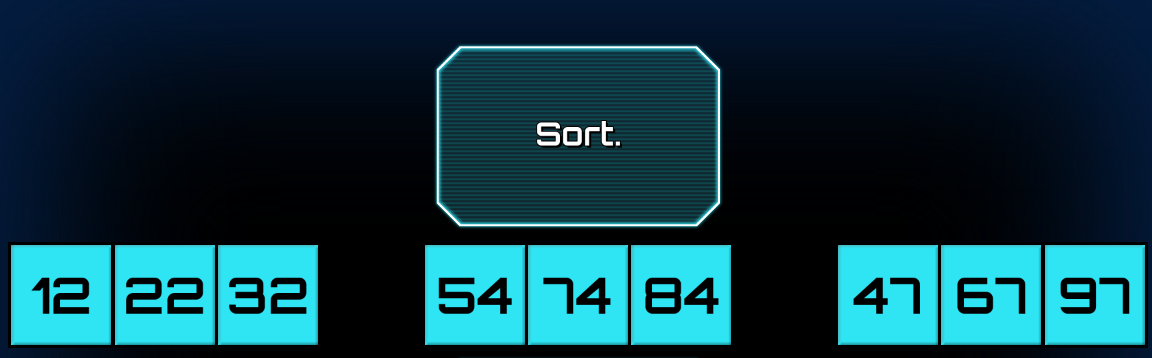
Additional Hint 1: Your first task should be to sort the numbers into three groups. All three numbers in group 1 should have something in common, same for group 2, etc.
Additional Hint 2: After arranging the numbers into groups of three, sort these numbers within their groups.
Answer: 12 22 32 54 74 84 47 67 97
Explanation: The last number in each group is the same. Each of the three groups is arranged in numerical order.
Special Solution:
Currently unknown
Puzzle 5:
General Solution:
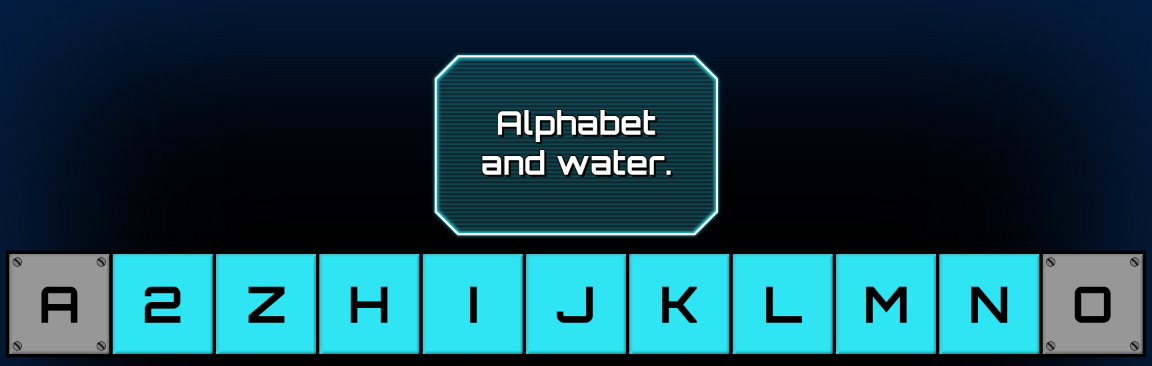
Additional Hint 1:Do you remember your chemistry?
Additional Hint 2: There seems to be a long sequence of letters that are all right next to each other in the alphabet. What could be the significance of that?
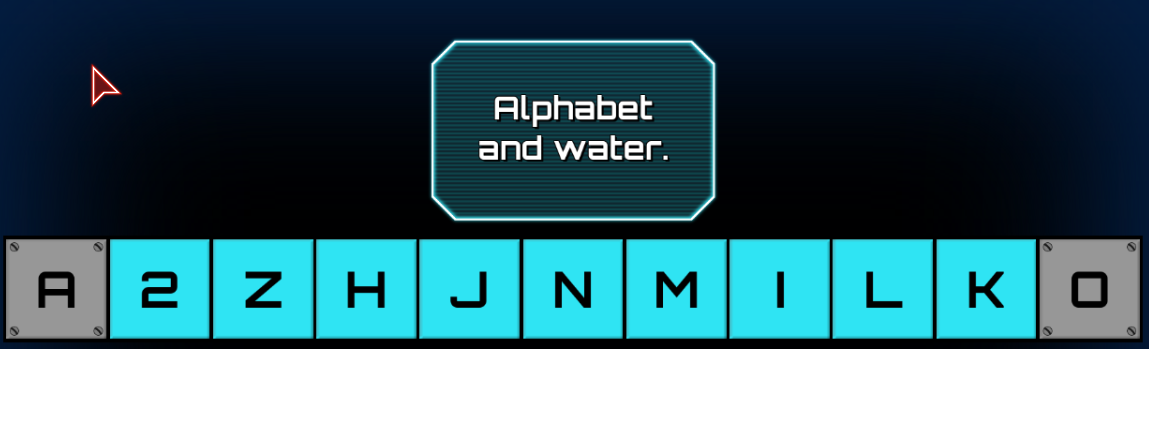
Answer: A2ZHIJKLMNO
Explanation: A2Z = A to Z = the alphabet ; HIJKLMNO = H to O = H20 = water
***Special Solution:
Additional Hint 1: We have the letters H – O, but noone says the letters in-between them can’t change order…
Answer: Keep ‘A’ ‘2’ ‘Z’, & ‘H’ in the same positions. Rearrange the other letters to spell out the word ‘MILK’. The order of the other letters is irrelevant. (Sample answer: A2ZHMILKJNO).
Explanation: Hint 2 tells us that we should add a ‘secon-dary drink’. ‘Dary’ is a homophone for ‘dairy’ (i.e. MILK).
Puzzle 6:
General Solution:
Additional Hint 1: This puzzle throws you for a bit of a red herring, because you might spend time trying to think about what words you can use. You shouldn’t have to think of any new words.
Additional Hint 2: Read the prompt in the dark blue box again. Then think, ‘how would a smart-aleck answer this question?’
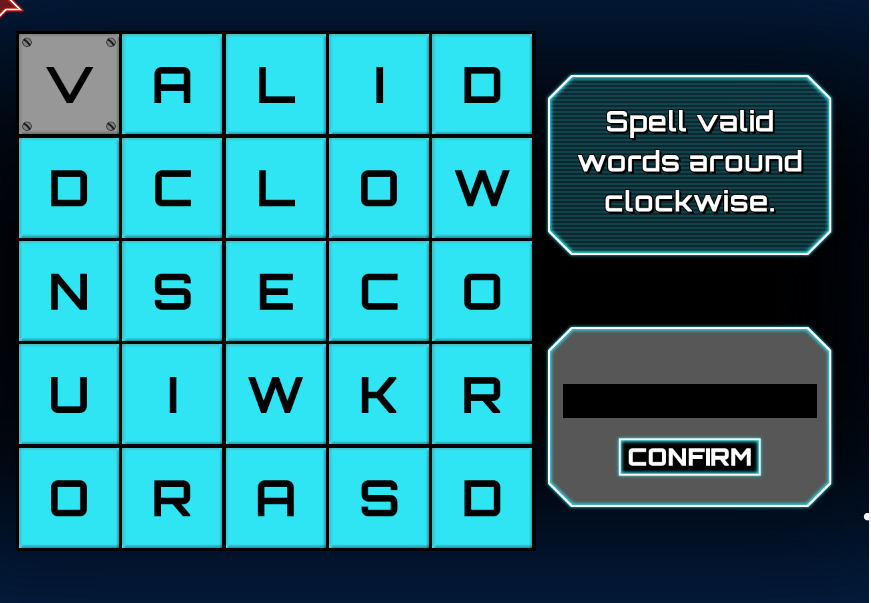
Answer: Literally spell ‘VALID WORDS AROUND’ in a clockwise fashion around the exterior of the square, starting from the upper left.
***Special Solution:
Answer: Keep the same arrangement for the letters in the exterior of the square. In the interior of the square, write ‘CLOCKWISE’ in a clockwise fashion.
Mini-Game Puzzles: [7 – 12]
Puzzle 7:
General Solution:
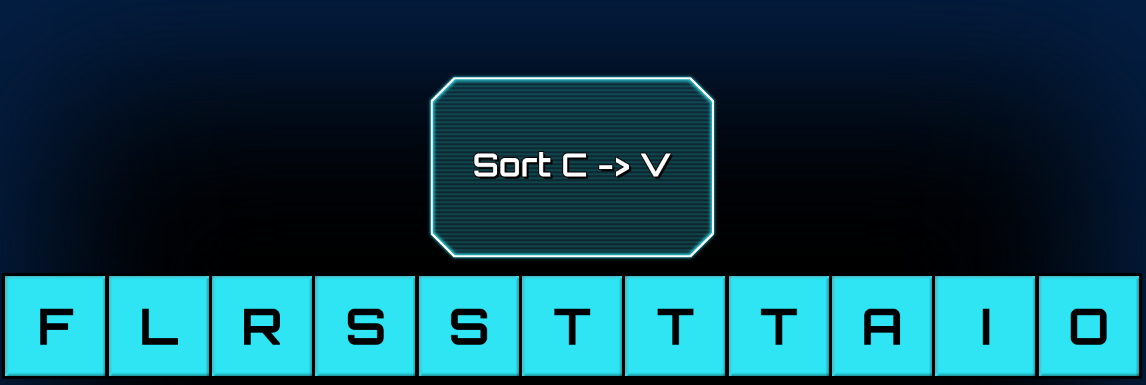
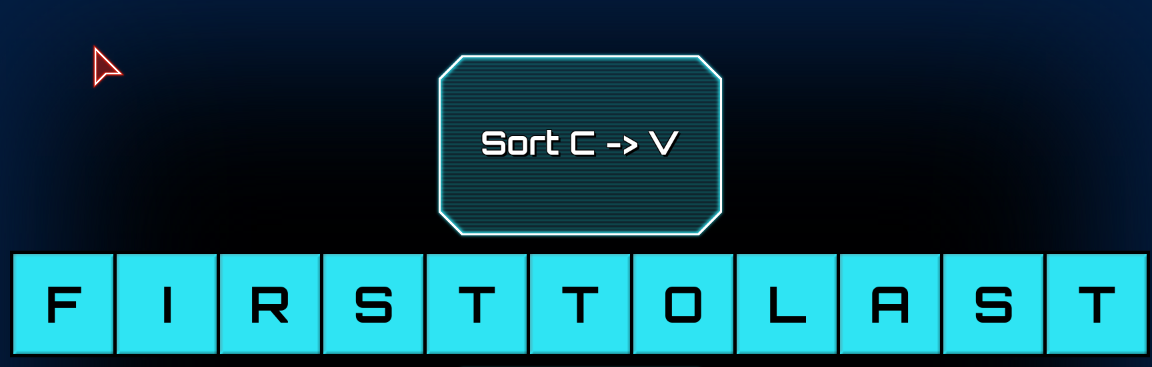
Answer: Arrange all the consonants on the left side and all the vowels on the right. As long as they are grouped in this way, the order of the consonants and vowels themselves is irrelevant (at least for the general solution).
Special Solution:
Additional Hint 1: ‘C’ is near the beginning of the alphabet, and ‘V’ is near the end.
Additional Hint 2: The answer is three words.
Answer: ‘FIRST TO LAST’
Puzzle 8:
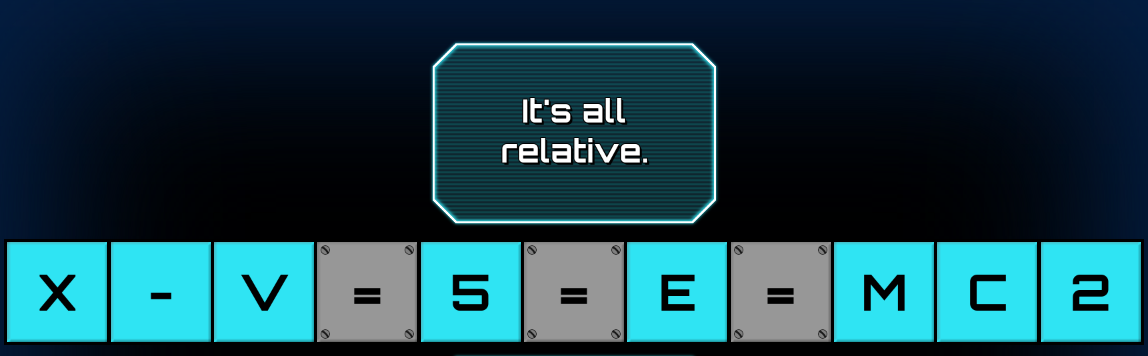
General Solution:
Answer: X-V = 5 = E = MC2
Explanation: The first half of the equation is roman numerals (X = 10, V=5), and the right side of the equation is Einstein’s famous relativistic equation, E (energy) = m (mass) * c^2 (the speed of light squared).
Special Solution:
Currently unknown.
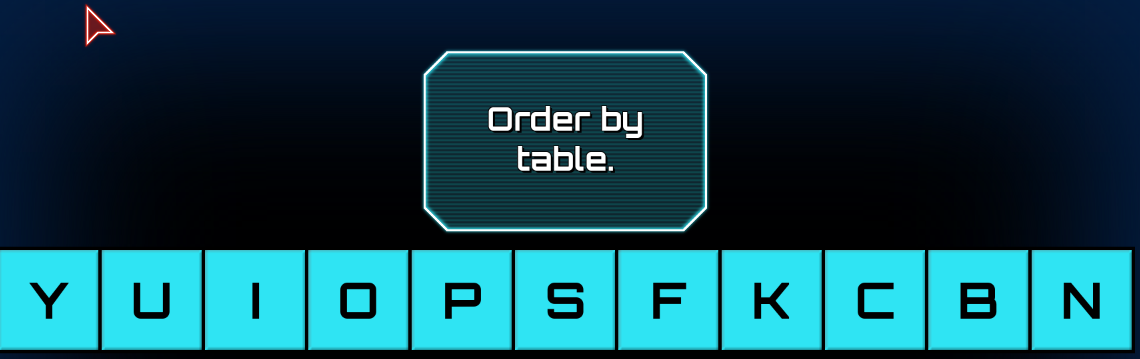
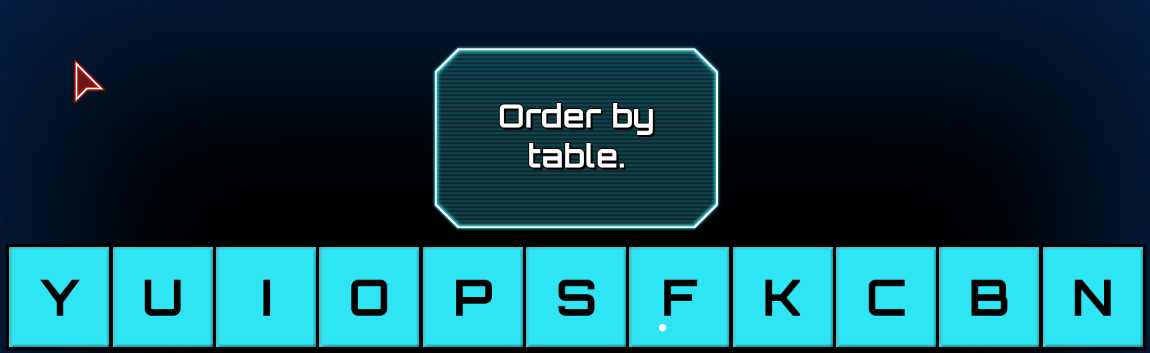
Puzzle 9:
General Solution:
Answer: Each of the letters represents an element. Order them based on the order they appear in the periodic table — BCNOFPSKYIU.
Special Solution:
Additional Hint 1: This time, the answer has nothing to do with the periodic table.
Additional Hint 2:What other way can you arrange letters, besides alphabetical order?
Additional Hint 3: The in-game hint emphasises the word ‘tab’. That’s the key to this puzzle.
Answer: YUIOPSFKCBN
Explanation: In-game hint 2 tells you to order the letters this time in terms of ‘tab-le’. This is a reference to the ‘tab’ key on your keyboard. ‘Le’ tells you to order from left to right, starting at the ‘tab’ key.
Puzzle 10:
The answer to this puzzle is literally given to you in the game in the Invidia directives. If you don’t have that directive, keep playing through other routes until you get it. Consult the ‘endings’ section of this guide for help reaching that directive.
WARNING: Consulting this solution without the directive will lead to you viewing endings in the improper order. It is highly recommended that you simply obtain the directive first.
Special Solution:
Answer: Type ‘LYING TO US’
Puzzle 11:
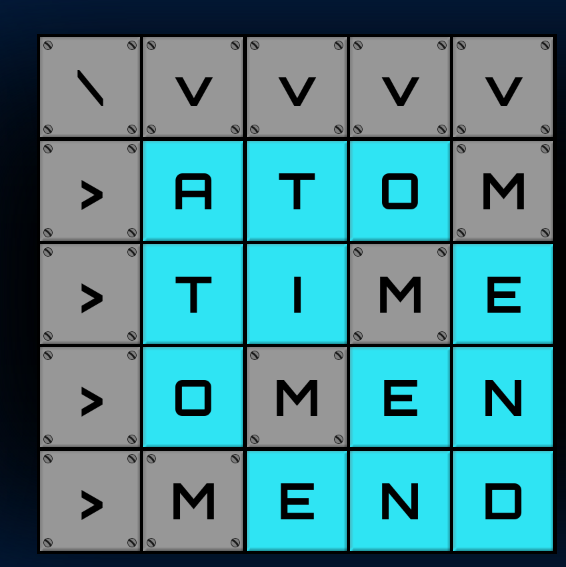
General Solution:
Additional Hint 1: You need to have each column (from top to bottom) read the same as the corresponding row (from left to right). I.e., the leftmost column reads the same as the topmost row, and so on.
Additional Hint 2: You also need each column (and therefore each row) to spell out a 4-letter word related to the game.
Answer:
A T O M
T I M E
O M E N
M E N D
Special Solution:
Currently unknown
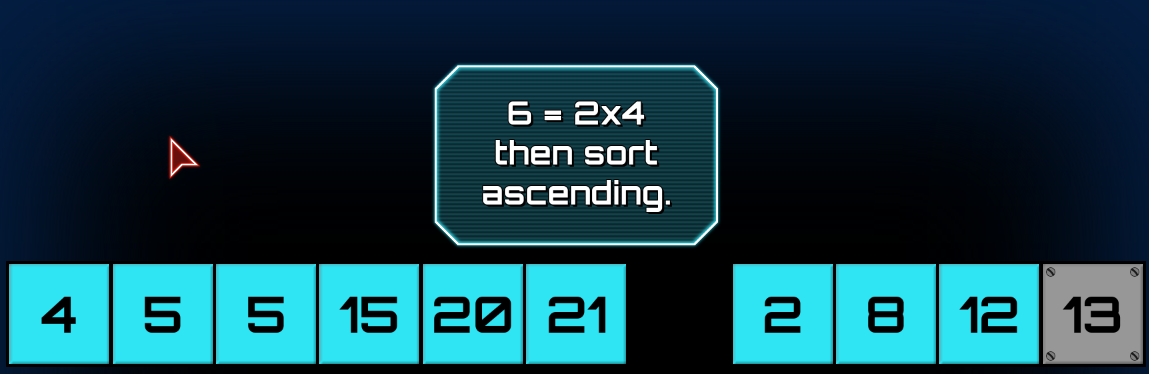
Puzzle 12:
General Solution:
Answer: 4 5 5 15 20 21 2 8 12 13
Explanation: The in-game hints told you that all the numbers add up to 105, and that the first six numbers should be double the last four. If ‘x’ is the sum of the last four numbers, then the sum of the first six numbers is 2x, and the sum of all ten numbers is 3x = 105, giving us x = 35. One possible sequence of numbers that adds up to 35 on the left side is 2+8+12+13. Beyond that, be sure to arrange each side in numerical order.
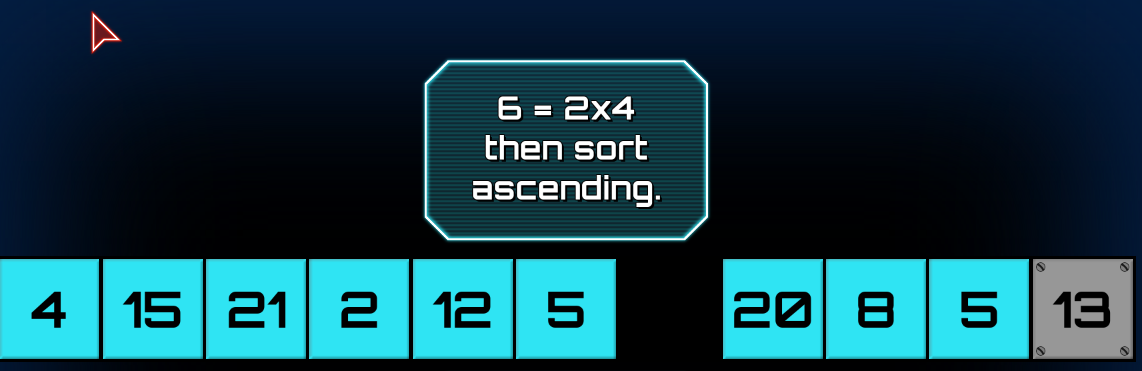
Special Solution:
Additional Hint 1: You no longer need to do any adding, nor arranging of numbers in numerical order.
Additional Hint 2: Play close attention to the new directive. Why is “double them” written in quotes?
Answer: 4 15 21 2 12 5 20 8 5 13
Explanation:You need to convert ‘DOUBLE THEM’ into numbers, i.e. D = 4, O = 15, etc.
Mini-Game Puzzles: [13 – 20]
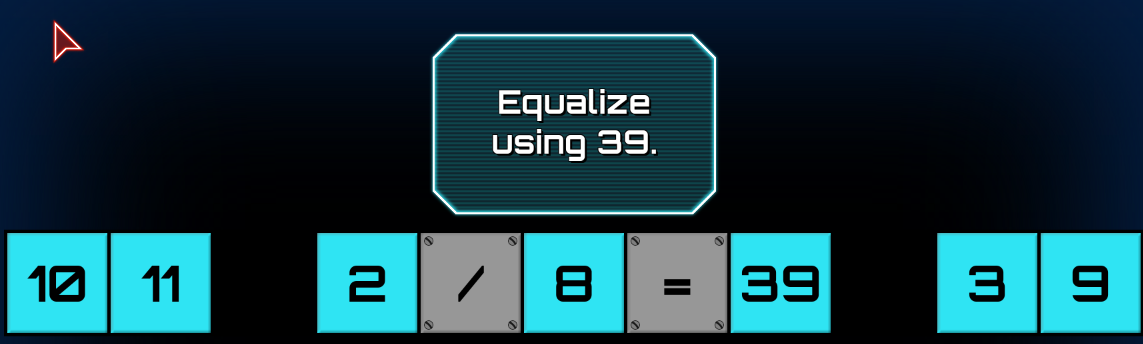
Puzzle 13:
General Solution:
Additional Hint 1: Think of the days of the year.
Answer: The order of the numbers in the middle must be ‘2/8=39‘. The order of all the other numbers is irrelevant, but will become important for the special solution.
Explanation: February 8th is the 39th day of the year.
***Special Solution:
Additional Hint 1: Don’t change the order of the central numbers from the general solution. Read in-game hint 2. ‘Just kidding’ is a clue for how to arrange the first two numbers, and ‘thank you’ is a clue for how to arrange the last two.
Additional Hint 2: Don’t u think this game is gr8?
Additional Hint 3: Do you know any Japanese? If not, Tristitia is willing to teach you some in Deduction 6.
Answer: ’10 11 2/8=39 39′
Explanation The order of the central numbers is kept the same. Click on ‘Hint 2’. The clue it gives you is ‘Just kidding and thank you’. ‘Just kidding’ is commonly abbreviated as ‘JK’ — the numerical values for these letters are 10 & 11. In Japan, ‘thank you’ is sometimes abbreviated as ’39’. This is because 3 is pronounced as ‘san’ and 9 as ‘kyuu’ in japanese, which altogether sounds similar to ‘thank you’.
Puzzle 14:
General Solution:
Currently unknown.
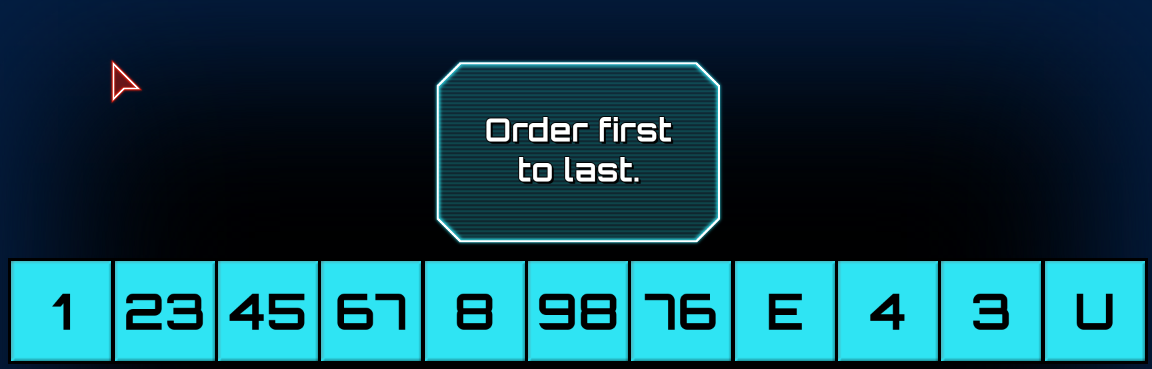
Special Solution:
Ignore the hint about ‘E’ being first for this one.
Additional Hint 1: Assign a numerical value to the two letters.
Additional Hint 2: Go up, then go back down.
Additional Hint 3: The highest number is 9.
Answer: 1 23 45 6 7 8 98 76 E 4 3 U
Explanation: if E = 5 and U = 21 (based on their positions in the alphabet), then this reads: 12345678987654321
Puzzle 15:
General Solution:
Additional Hint 1: Think of this one in a spatial sense.
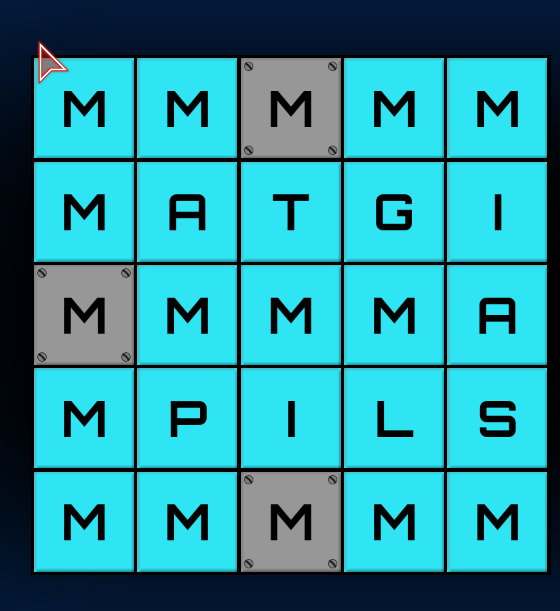
Additional Hint 2: So many M’s….but where’s the ‘E’?
Answer: Literally construct a giant ‘E’ made out of the ‘M’ blocks. (The middle part of the E is shorter than the top part and the bottom part. I.e. –> First column = all M’s, top and bottom row = all M’s, middle row = 4 M’s). The order of the other letters is irrelevant for the general solution.
Special Solution:
Currently unknown.
Puzzle 16:
General Solution:
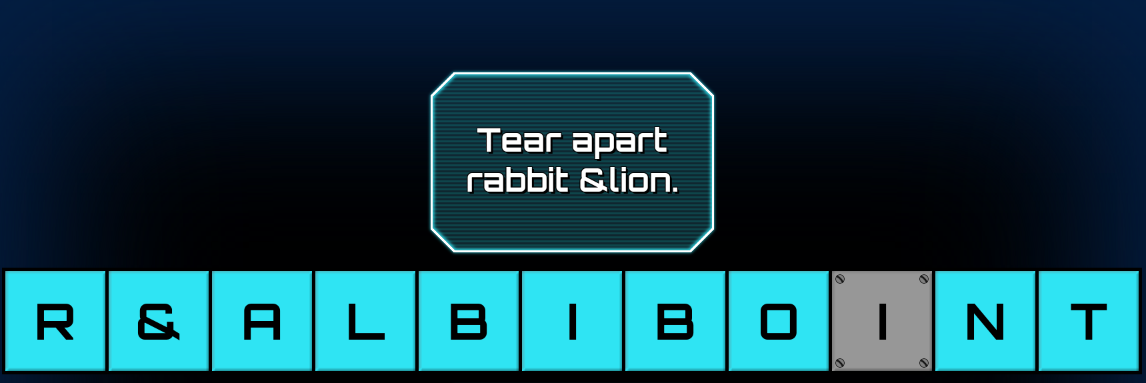
Answer: Intersperse ‘&LION’ between the letters ‘RABBIT’ — R & A L B I B O I N T
Special Solution:
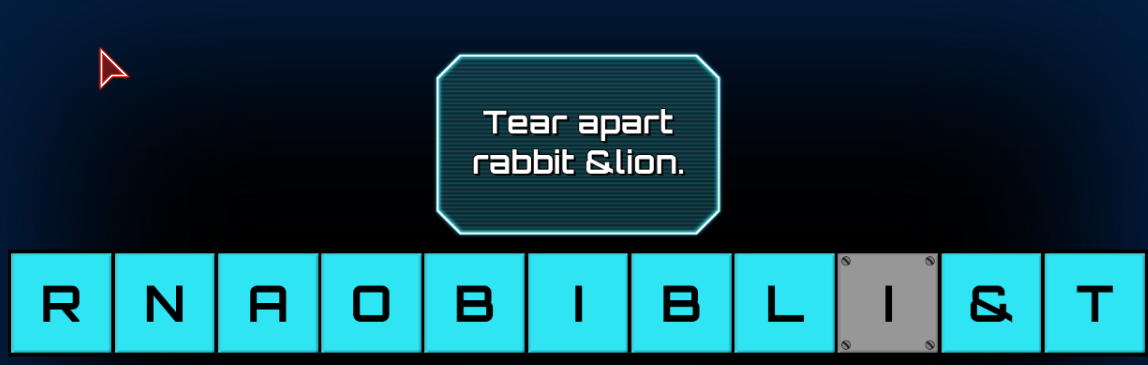
Answer:This is the same as the general solution, except you spell ‘& LION’ backwards (as directed in Hint 2). — R N A O B I B L I & T
Puzzle 17:
General Solution:
Additional Hint 1: The in-game hints imply that the pattern is related to the numbers on your keyboard.
Additional Hint 2: Which number is above the letter P? What about the letter S?
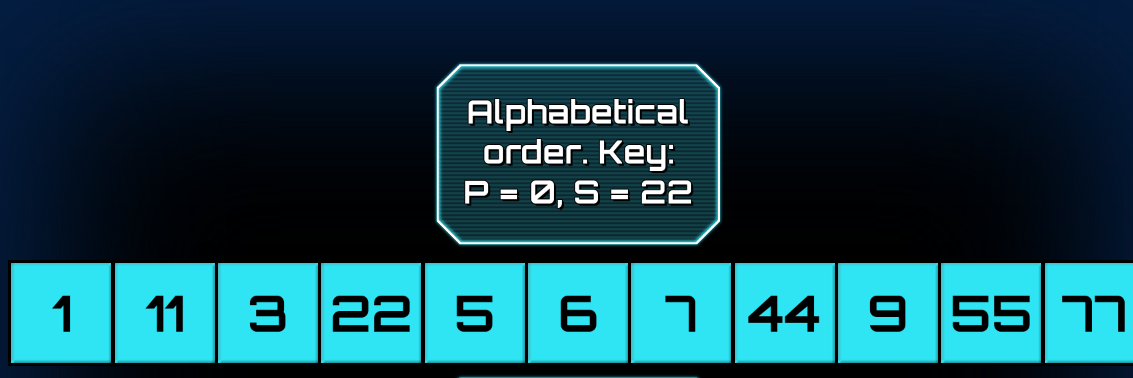
Additional Hint 3: Q=1, A = 11, Z = 111
Additional Hint 4: Now that you’ve figured out what letter each number corresponds to, you can arrange in alphabetical order (not the order the numbers appear on the keyboard).
Answer: 11 3 44 55 77 9 1 22 5 7 6
Explanation:The amount of digits in a number tells you what row of the keyboard the letter is in. The digit itself tells you what column the letter is in. For example, the letters below number ‘2’ on the keyboard are ‘W’ (first row), ‘S’ (second row) and ‘X’ (third row). Therefore, W = 2, S = 22, and X = 222. Therefore, 11 3 44 55 77 9 1 22 5 7 6 = A E F G J O Q S T U Y, which is arranged in alphabetical order.
Special Solution:
Additional Hint 1: The answer no longer has anything to do with your keyboard, nor with letters at all.
Additional Hint 2: What is the most obvious way to order numbers?
Additional Hint 3: 11=2, 66 = 12
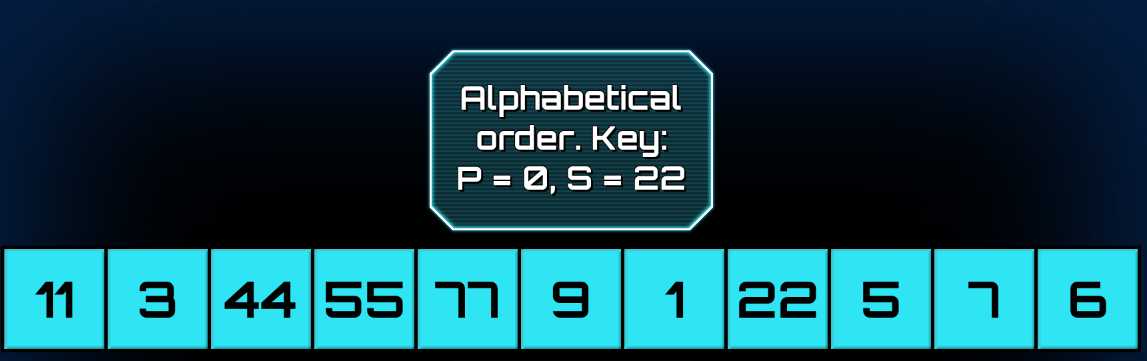
Answer: 1 11 3 22 5 6 7 44 9 55 77
Explanation: Add up the digits in two-digit numbers. I.e. 11 = 2, 22 = 3, 44 = 8, 55 = 10, 77 = 14.
Puzzle 18:
General Solution:
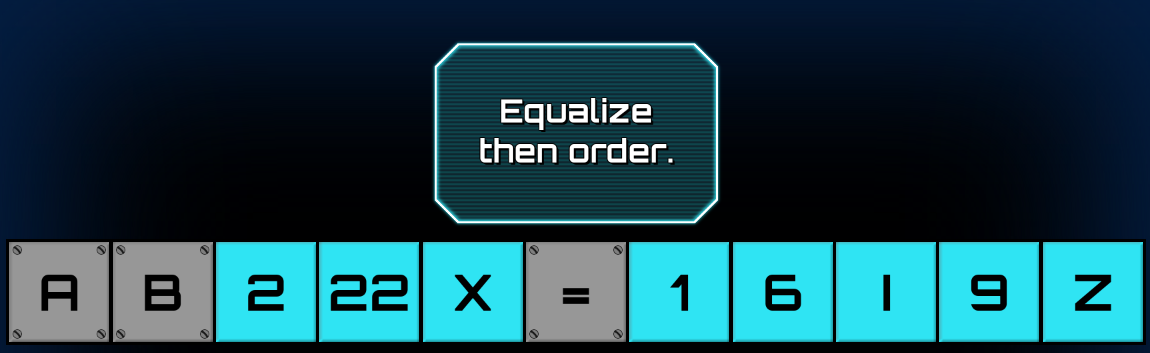
Additional Hint 1: Equate all the letters to numbers, first.
Answer: A B 2 22 X = 1 6 i 9 Z OR A B 2 22 X = 1 6 9 i Z
Explanation: The hint tells you that you add up each side of the equation. If you equate all the letters to numbers (i.e. ‘A’ = 1, ‘B’ = 2, etc.) and then add up the some total of all numbers, you’ll get a sum of 102. Therefore, you need both sides to add up to 51 in order to make both sides equal. Finally, you need to arrange each side in numerical order.
Special Solution:
Currently unknown
Puzzle 19:
Special Solution:
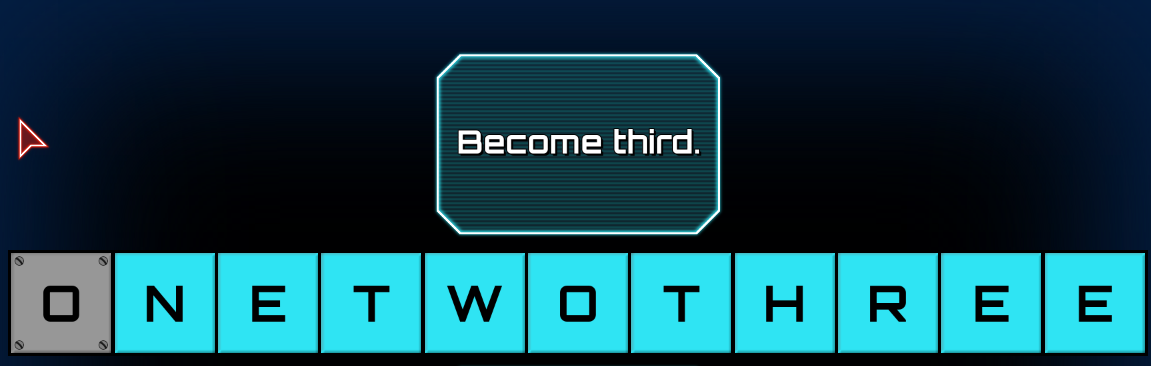
Answer: ‘ONETWOTHREE’
Puzzle 20:
Special Solution:
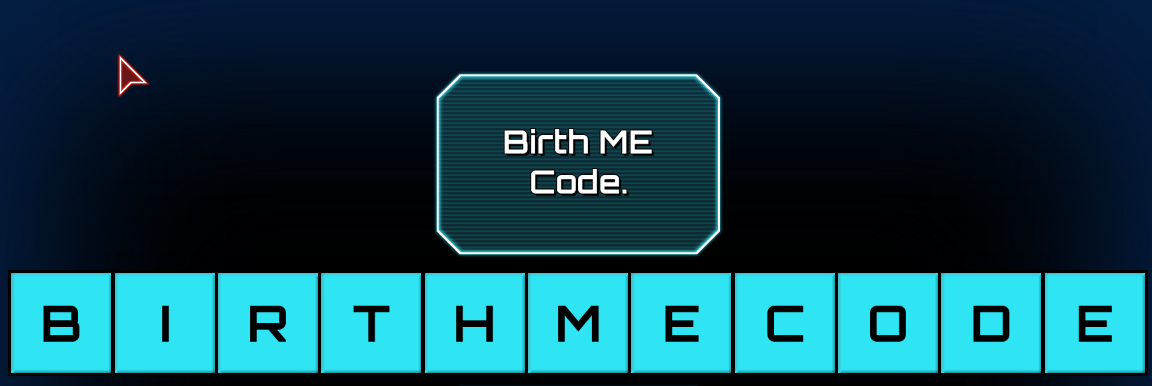
The answer to this one is blatantly given to you in the directives.
Answer: ‘BIRTHMECODE’
If the special solution is simply an extension of the general solution, only the special solution is given. (If the special solution is unknown, then the general solution is given).
Puzzle 1:
Puzzle 2:
Puzzle 3:
General Solution:
Puzzle 4:
General Solution:
Puzzle 5:
General Solution:
Special Solution:
Puzzle 6:
Puzzle 7:
General Solution:
Special Solution:
Puzzle 8:
General Solution:
Puzzle 9:
General Solution:
Special Solution:
Puzzle 10:
Picture not included because the answer is blatantly given in the Invidia directives.
Puzzle 11:
General Solution:
Puzzle 12:
General Solution:
Special Solution:
Puzzle 13:
Puzzle 14:
Puzzle 15:
General Solution:
Puzzle 16:
General Solution:
Special Solution:
Puzzle 17:
General Solution:
Special Solution:
Puzzle 18:
General Solution:
Puzzle 19:
Puzzle 20:
I know the special solution for puzzle 4,
its 47 67 97 – 22 32 74 – 12 54 84
Just in case you havent found it