This guide describes how to create and add new buses to City Bus Manager. Players who do not want to create their own buses can also download shared buses directly from the Steam Workshop.
I. Create the bus model
For the dimensions of the respective bus types, use the parking space references from the modding plugin.
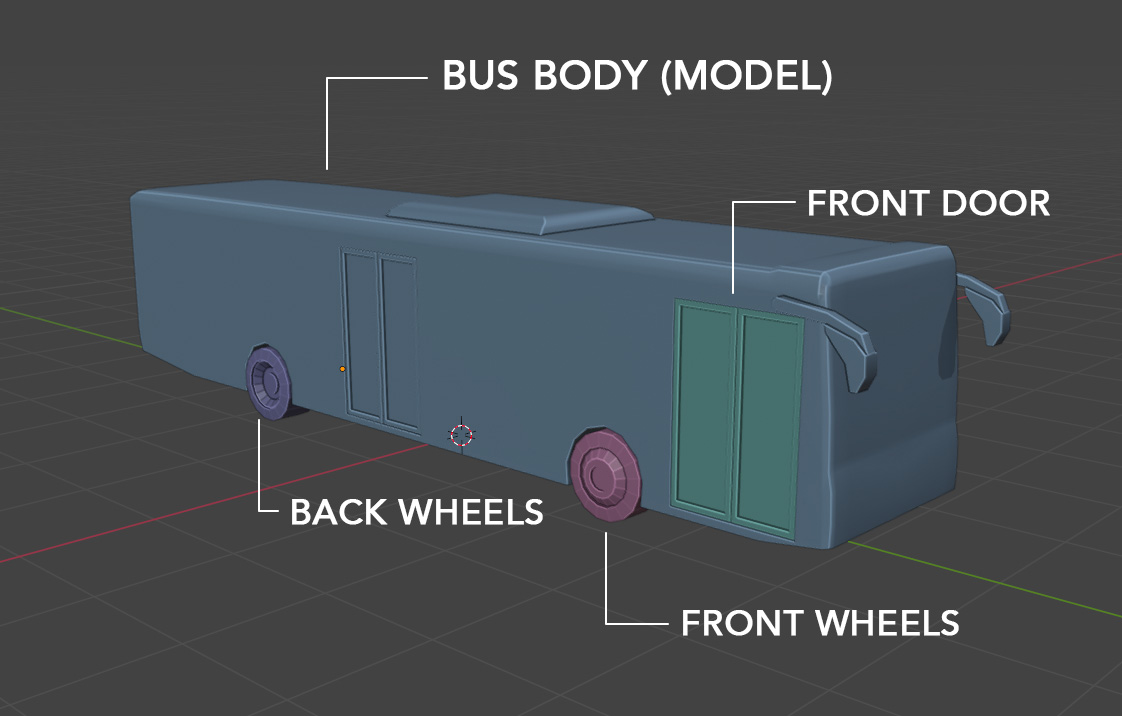
The bus model must consist of the following separate objects:
- Bus Body Object (Name: “Model”)
- Wheels front
- (Wheels middle, for articulated buses)
- Wheels back
- Front door
Recommended polygon count for optimal performance: <10,000
General Information & UV Structure
Only the bus body object will be paintable ingame in the paint shop.
Each side of the bus or each surface that should be paintable must be unwrapped on a common UV map (2048x2048px) and have a common material.
The front door, wheels, mirrors and other extra objects can have different materials and textures.
Repaint Template
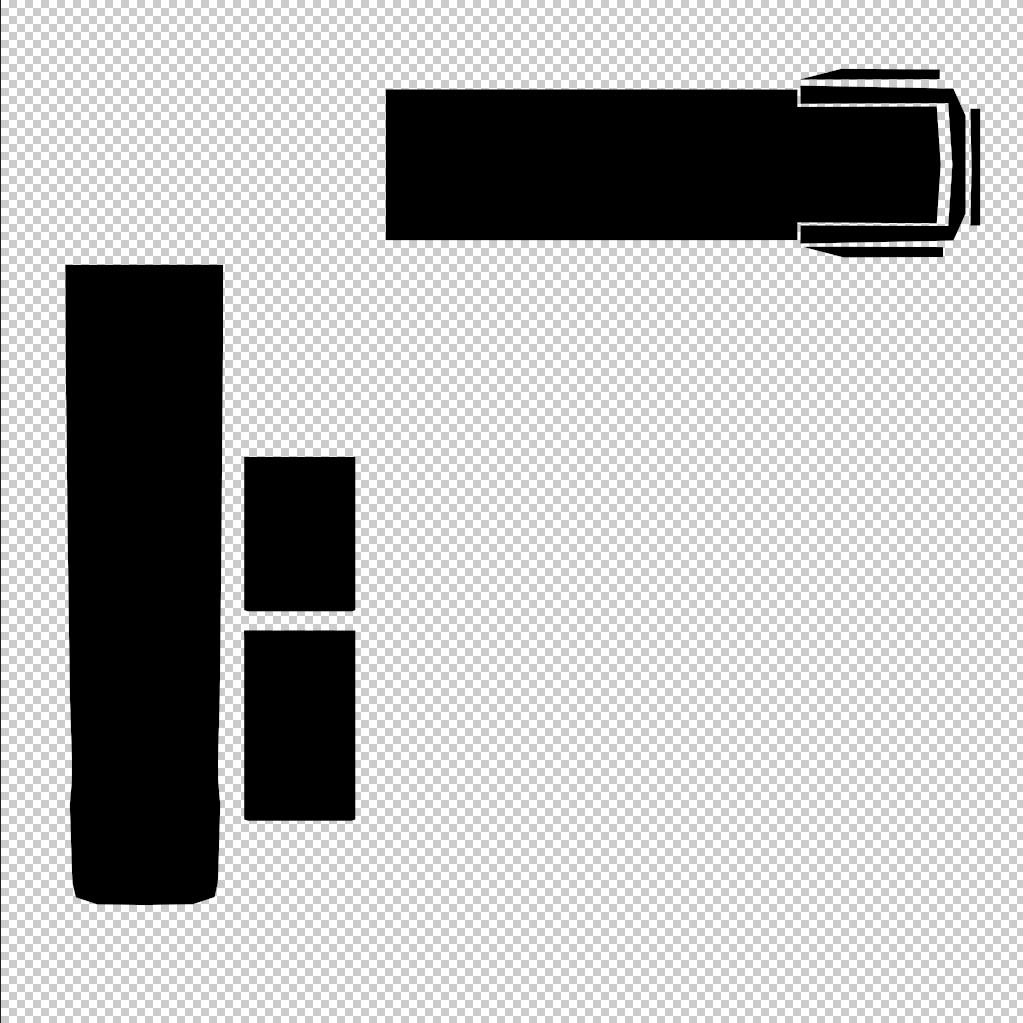
This texture will be downloadable ingame in the paint shop and will serve as a reference for external repaints. All surfaces and details of the bus must be completely mapped on it. The areas with the base color or the areas that should be paintable must be white. The background must be transparent.

Details texture
This texture must contain all surfaces and details that are not to be painted over in the paint shop. For example, windows, lights or vents. The background must be transparent.
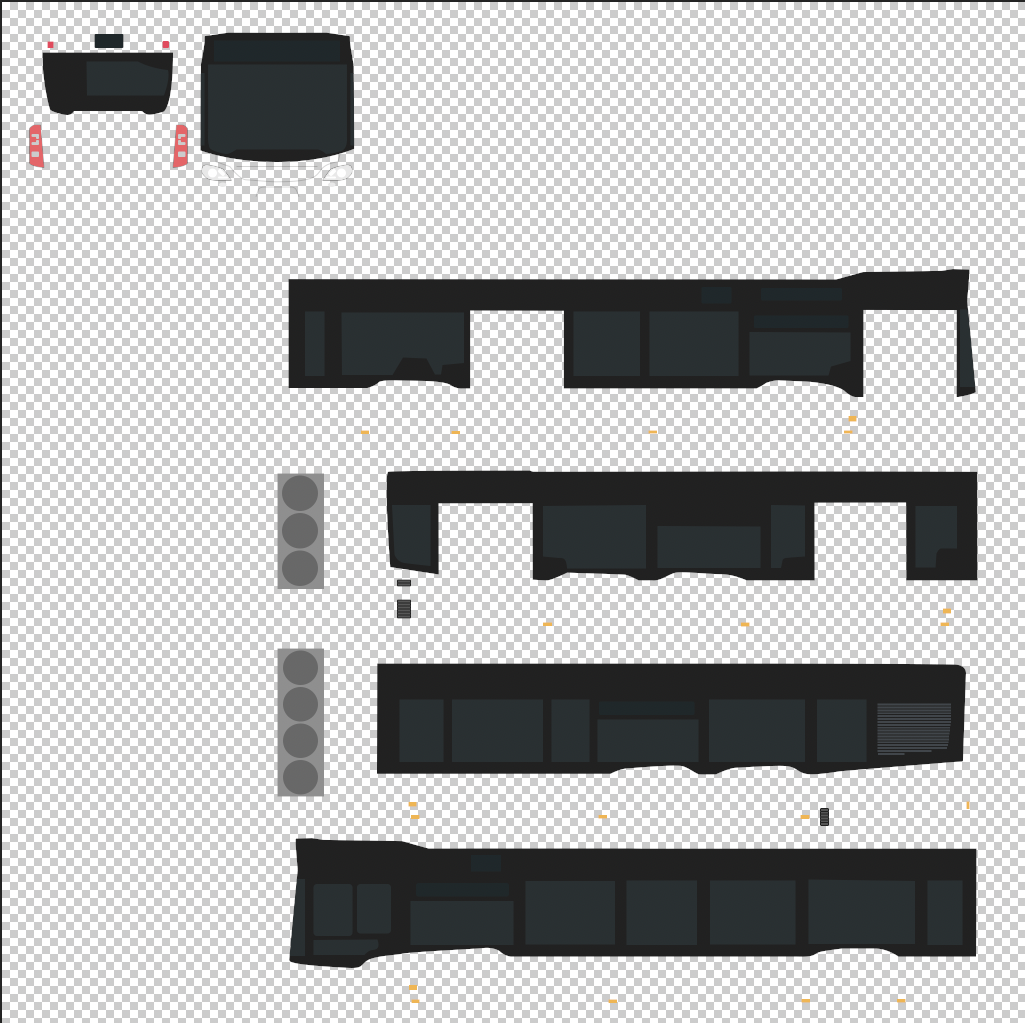
Emission texture
This texture must contain all the surfaces that should be visible and glow at night as lights. The background must be black.
Roof Alpha texture
This texture must contain the silhouette of the roof surfaces with 100% black fill. The background must be transparent.
Front door
- Must be a separate object to the bus body.
- For double door: Each door must be linked to a bone (e.g. Door.L, Door.R)
- Idle state must be closed
- Export one animation to open the door and one to close it with your model
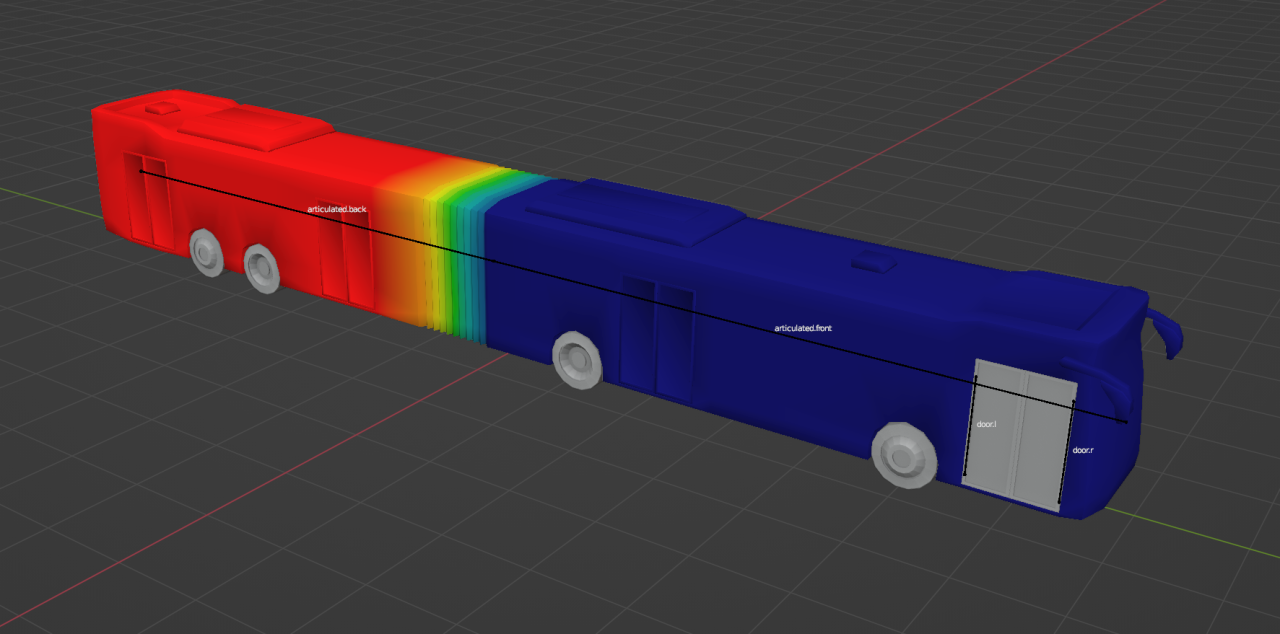
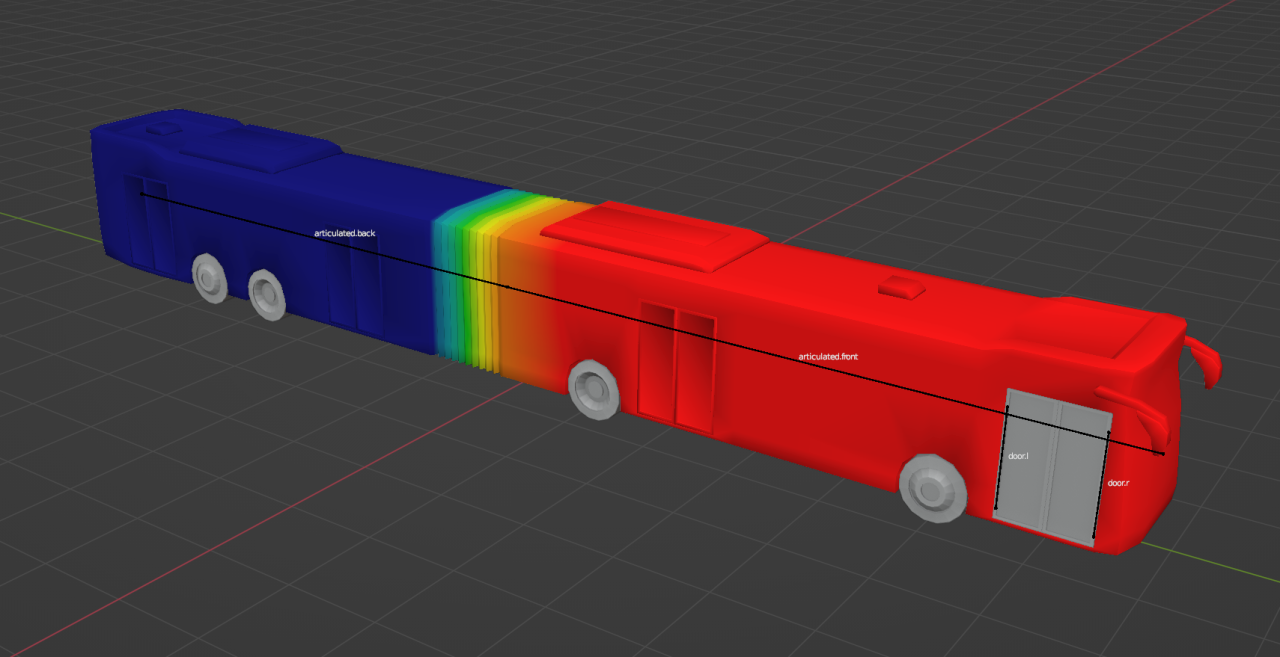
Articulated bus
- Create the bones in the same skeleton/armature as the front door bones.
- Create two linked bones: one for the front, one for the rear bus part. The intersection point is the center of the joint.
- Apply Weight Paint to the Bus Body object and make sure the transition at the joint is smooth (see pictures below).
- Set the Armature as parent for all objects of the bus model that should move with the joint (e.g. wheels).
II. Setup Unity
Unity can be downloaded here[unity.com]. We recommend using Unity 2022.2.11.
- Click on “New project” in the Unity Hub.
- Select the 3D (URP) Core Template as the template. This may have to be downloaded first. Then choose a project name (e.g. name of the bus). The configuration should look like this:
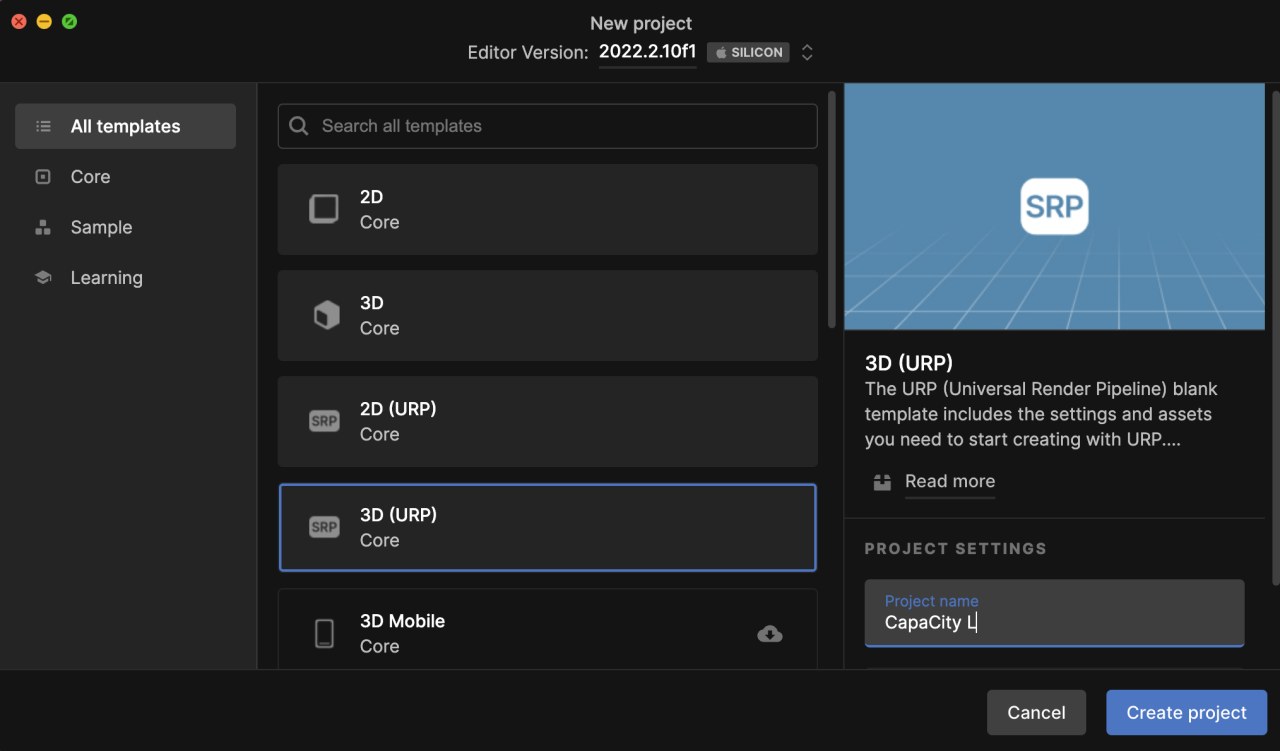
- Click on “Create project” and wait until Unity has opened.
- Download the latest Modding Plugin here
[download.pedepe.de] (Version 1.0).
- Double-click on the downloaded .unitypackage file. The following window then opens in the Unity Editor:
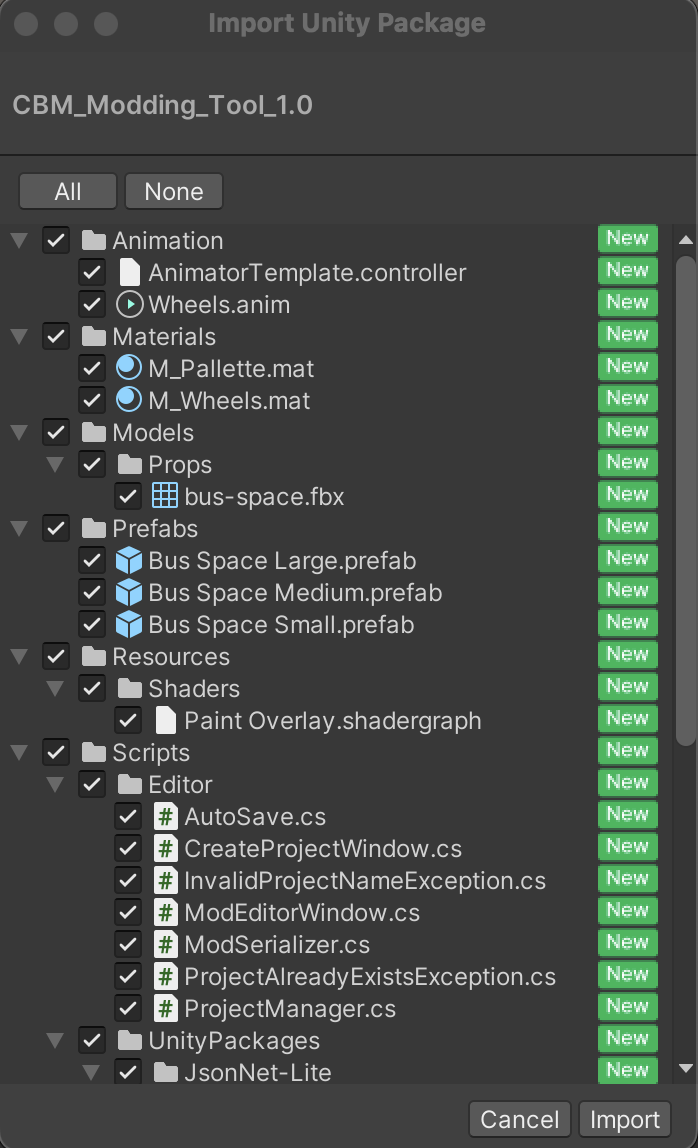
- Click on “Import” at the bottom right. If everything has worked correctly, the “Mod Editor” should now be available in Unity at the top of the bar under “City Bus Manager”.
III. Importing the bus into Unity
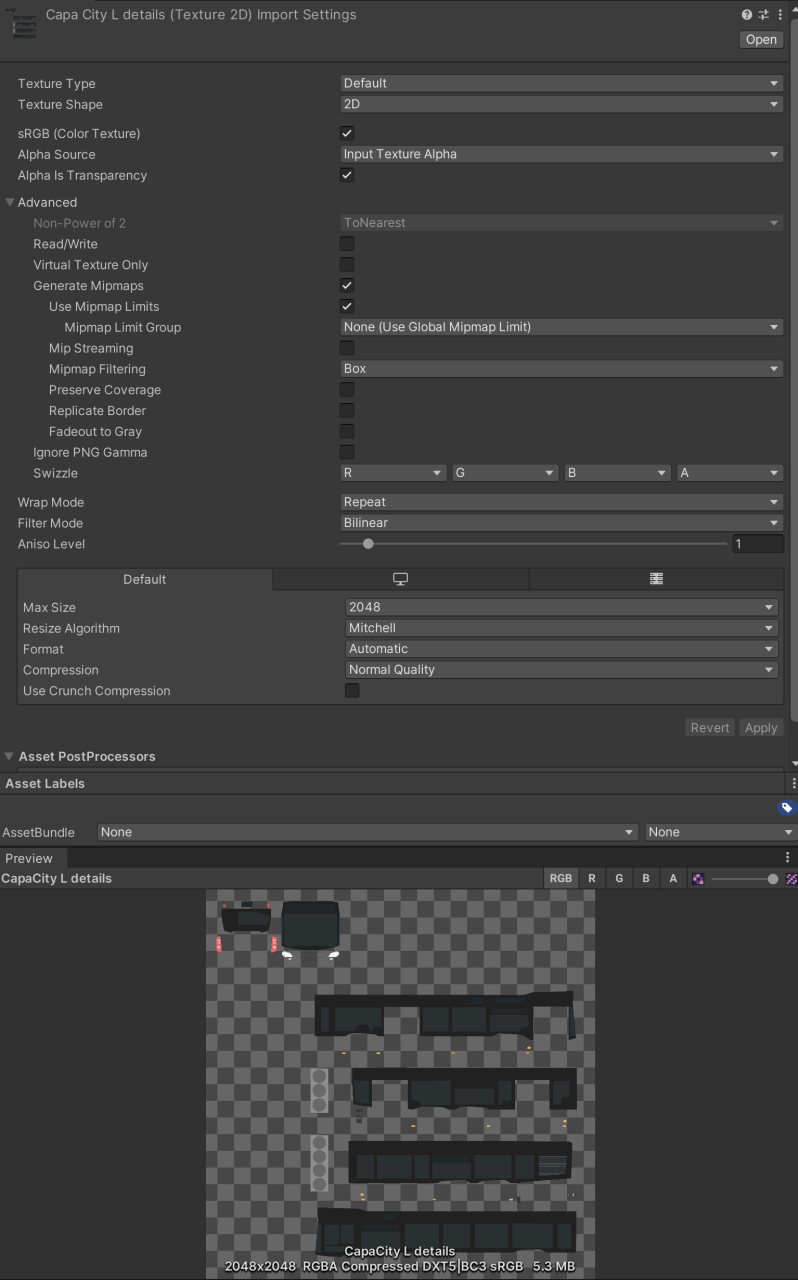
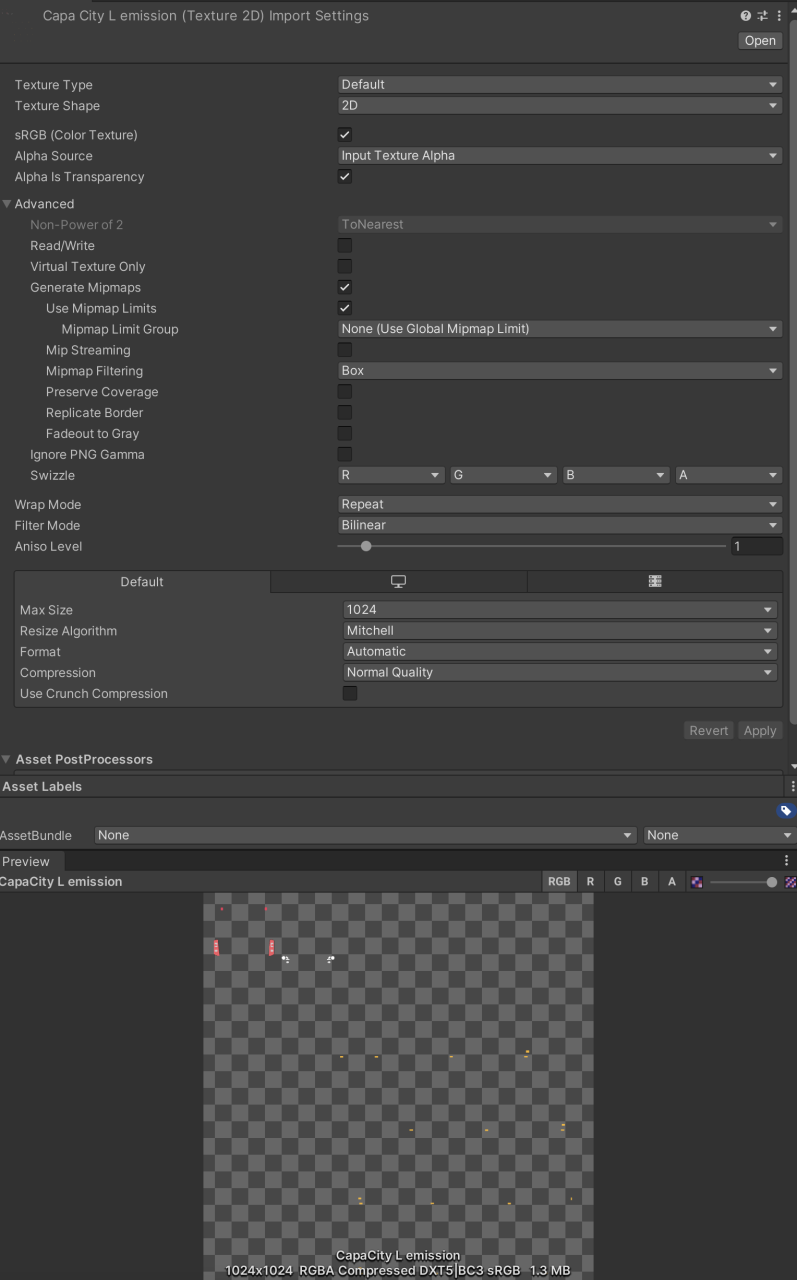
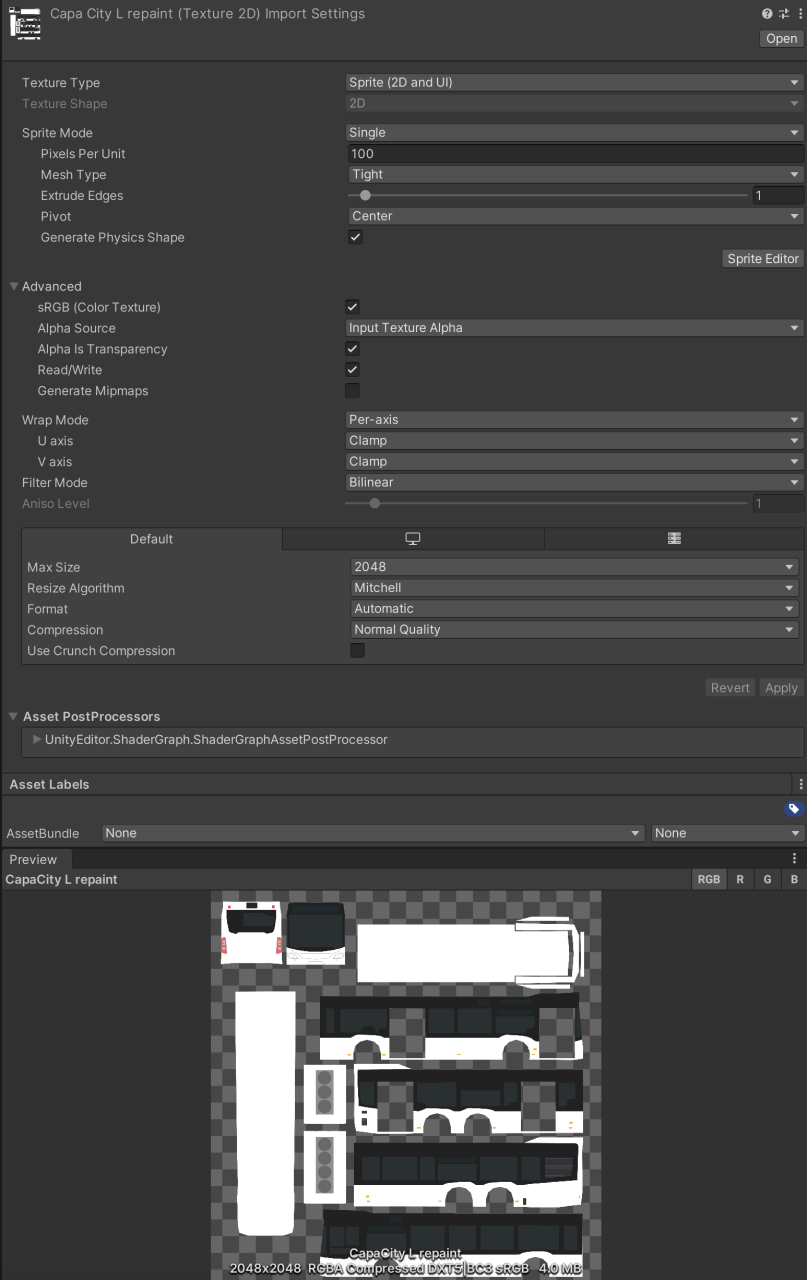
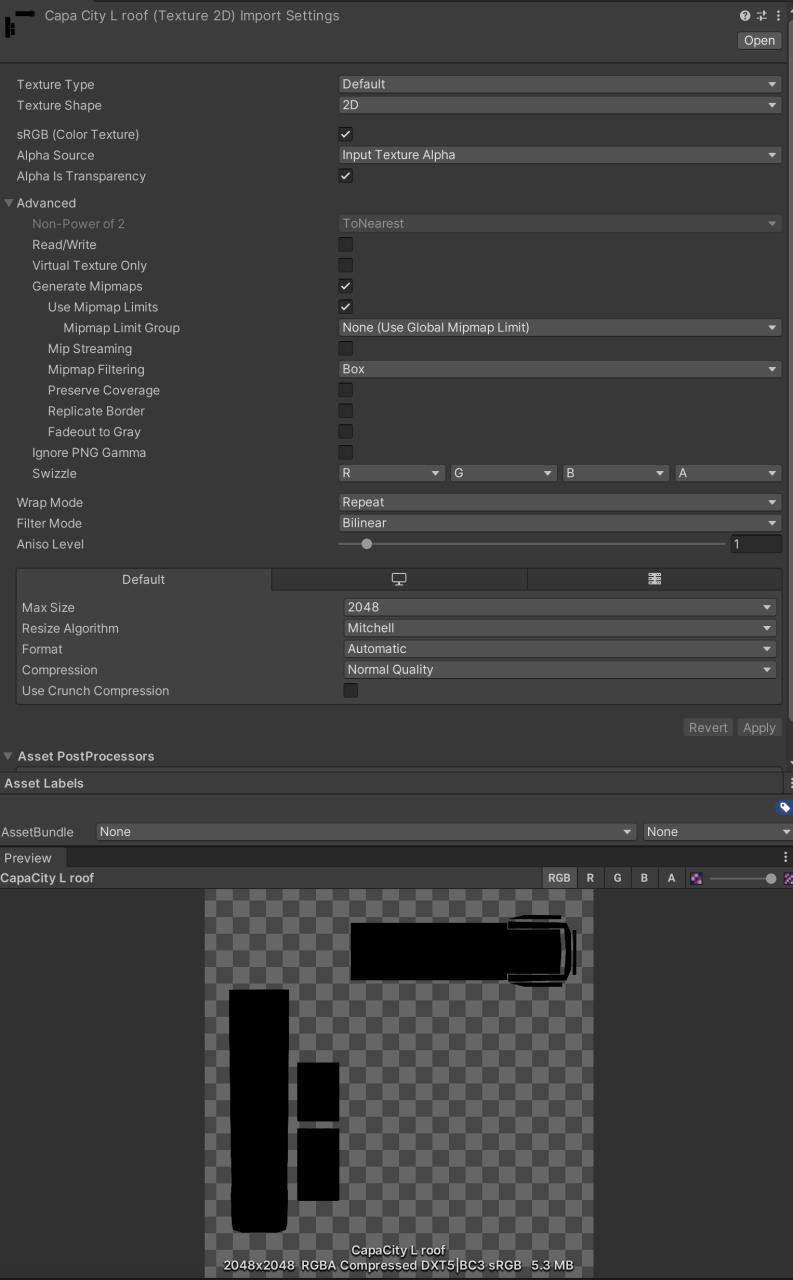
- Textures: Drag the four textures (+ extra textures for separate objects) into the Unity Texture folder and setup the import settings as follows and then click on “Apply” for each texture in the inspector:
Overview:
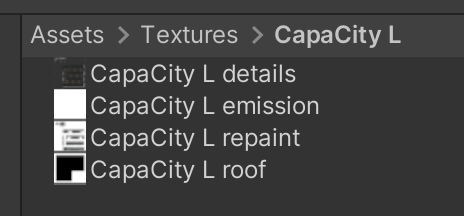
Details:
Emission:
Repaint:
Roof:
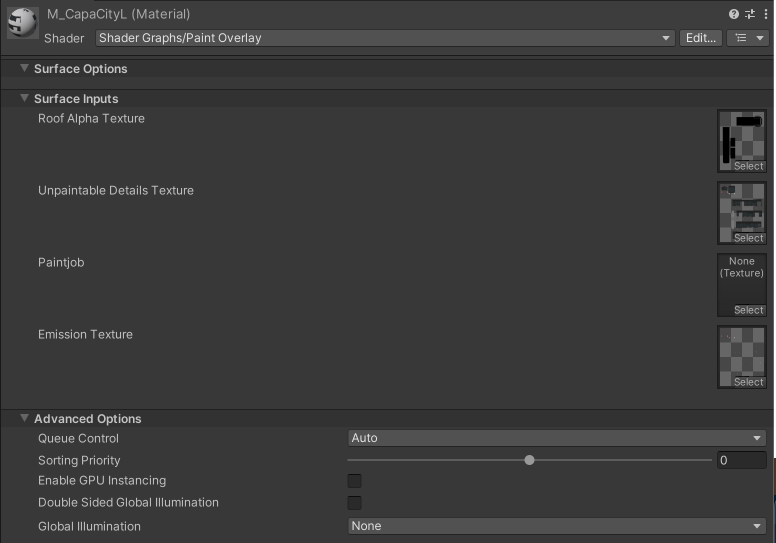
- Material: Go to the Materials folder and create a copy of the material “M_Template”. In the material, select the previously imported textures for
- “Roof Alpha Texture” => “CapaCity L roof”
- “Unpaintable Details Texture” => “CapaCity L details”
- “Emission Texture” => “CapaCity L emission”
Paintjob can be left empty.
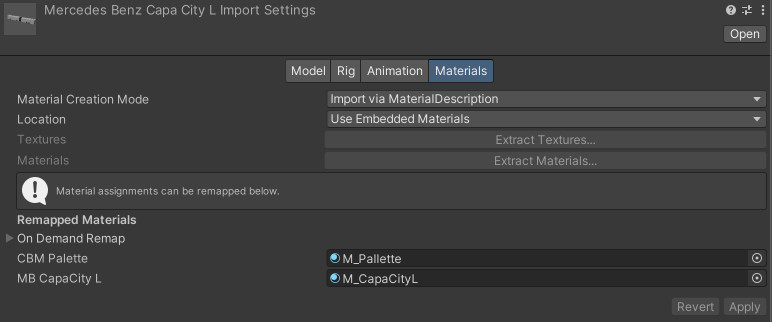
- Model: Drag the created bus (e.g. fbx file) into the Models folder. Set the model and materials tab as follows and confirm the settings again with “Apply”:
Model:
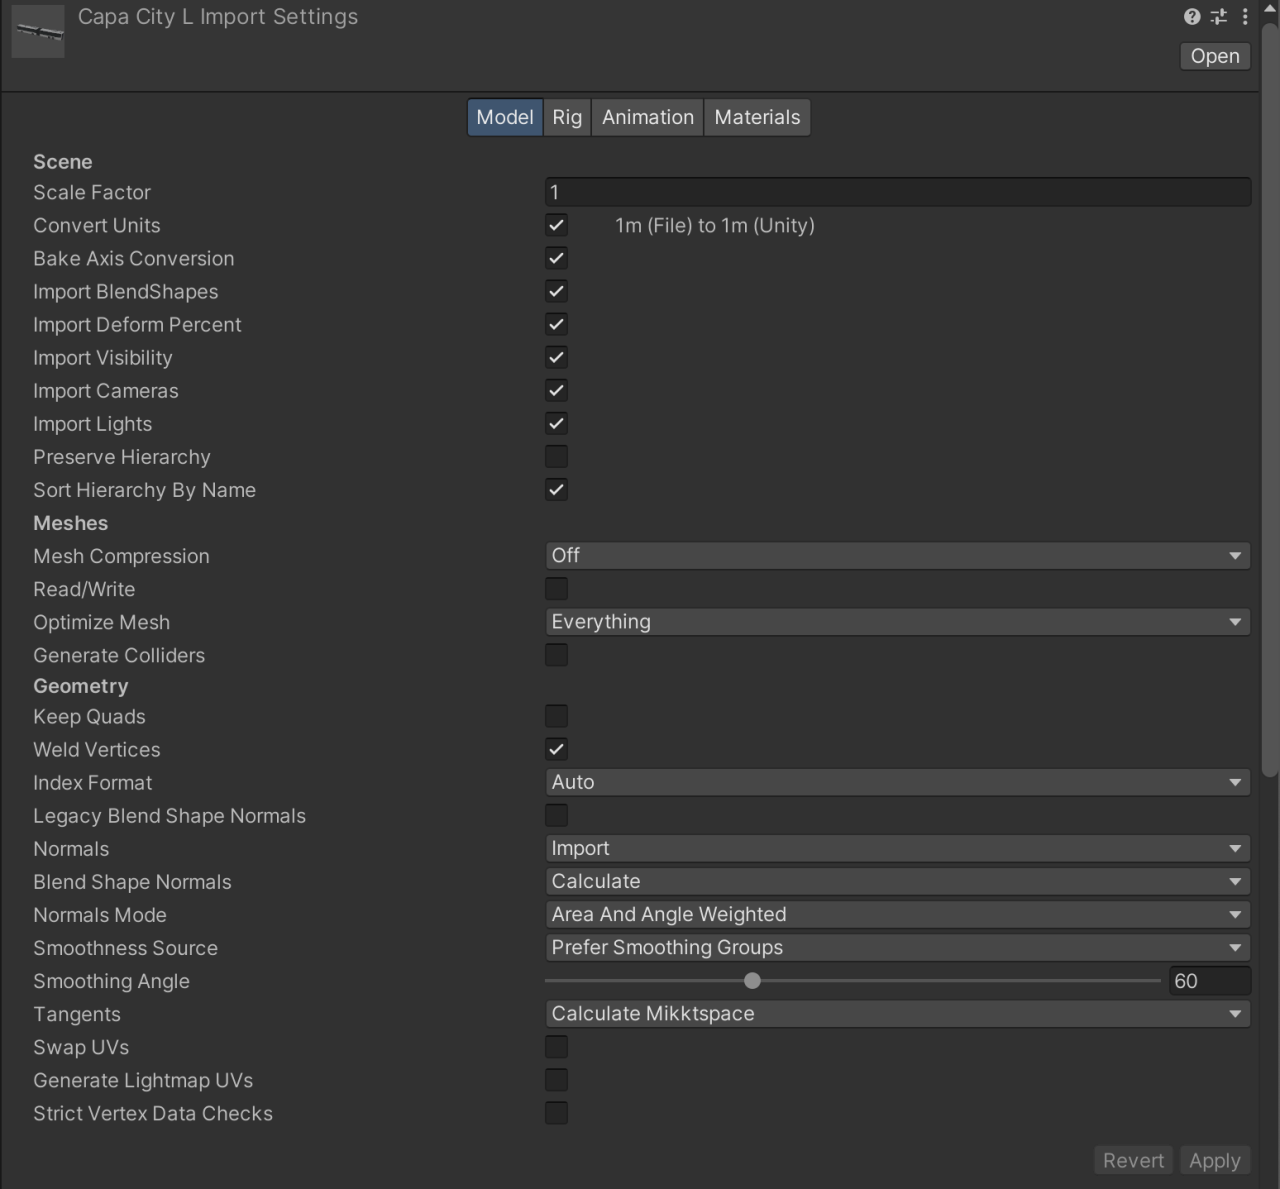
Tip: Depending on the export settings of the 3D program, uncheck “Bake Axis Conversion” if necessary.Materials:
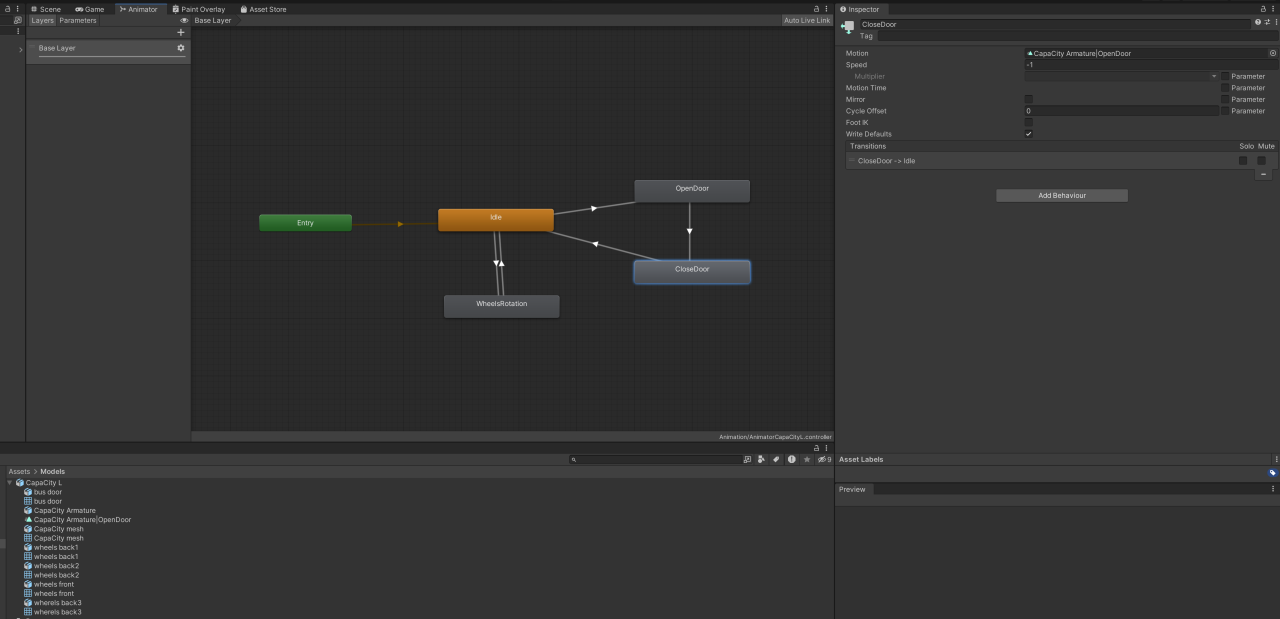
- Animations: Create a copy of the Animator controller “Animation/AnimatorTemplate” and open it. Then set the OpenDoor and CloseDoor animation to the imported animation from the model.
The bus is now completely imported and can subsequently be placed in the scene.
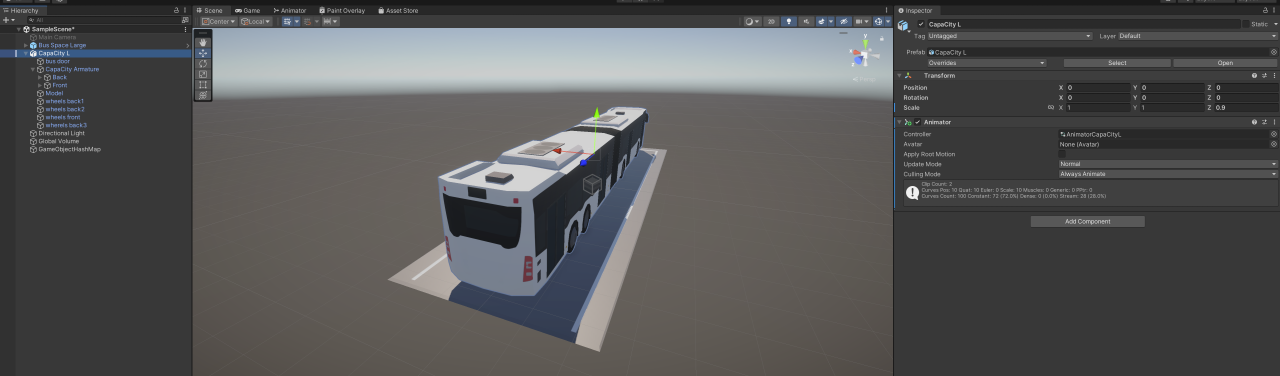
- Drag the bus model into the Unity Scene and set the position coordinates to X=0, Y=0, Z=0.
- In order to scale and position the bus correctly, the parking space objects are provided. The Prefabs folder contains the “Bus Space Large” for articulated buses, the “Bus Space Medium” for solo buses and the “Bus Space Small” for small buses (e.g. Cito, Sprinter). Drag the appropriate bus space from the Prefabs folder into the scene and set the coordinates to X=0, Y=0, Z=0.
The scene should now look like this:
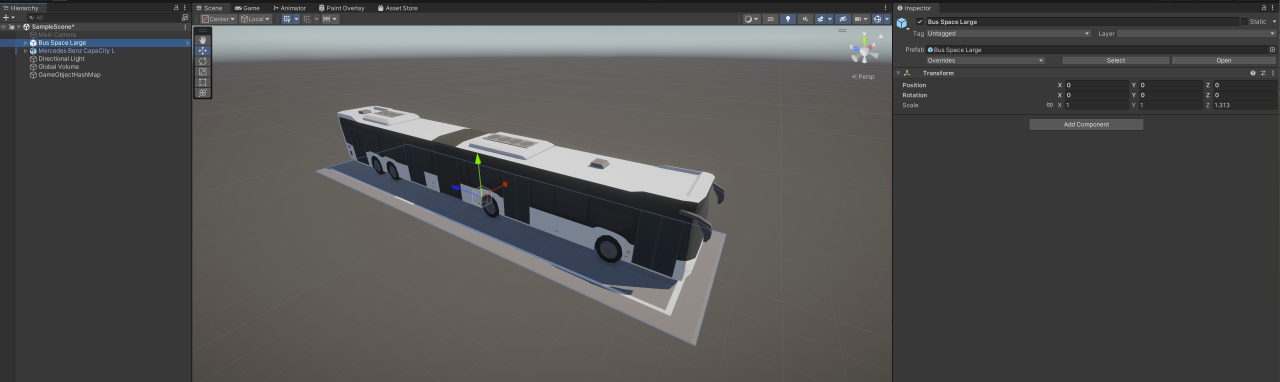
- Now change the position of the bus object in the scene and scale it so that the bus stands correctly on the parking space and does not look beyond it. In addition, the front of the bus on the parking space should also look forward, as shown in the picture above. If the bus is faceing the wrong way, the Y rotation can be set to 180.
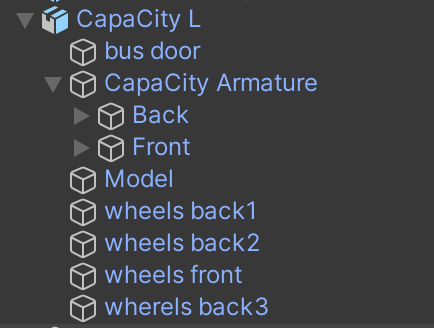
- In the hierarchy, make sure that the objects are named correctly. It is important that the main mesh GameObject is called “Model” and the rear joint “Articulation”. This can still be renamed at this point if the names are wrong.
- Add a MeshCollider to the “Model” GameObject. Select the same mesh as in the existing Skinned Mesh Renderer.

- Add an animator to the parent GameObject of the bus and select the previously created animator controller as the controller.
IV. Configuration of the bus with the Mod Editor
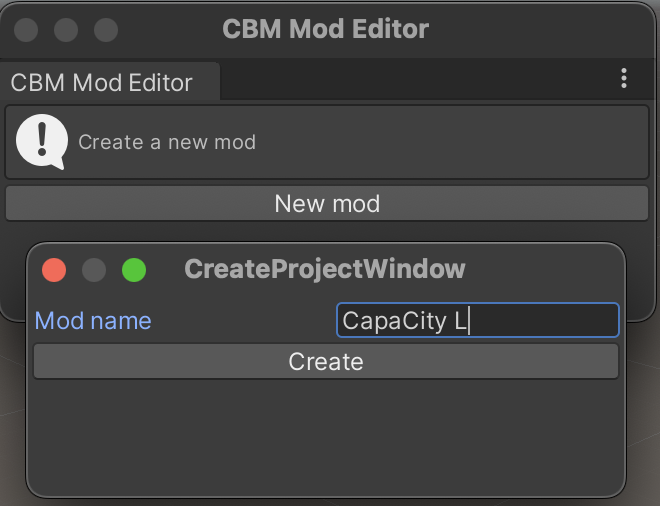
In Unity, click on “City Bus Manager” -> “Mod Editor” at the top. A new window will open. Click on “New mod”, select a mod name and click on “Create”.
The mod editor for configuring the bus will now open. This looks like this:
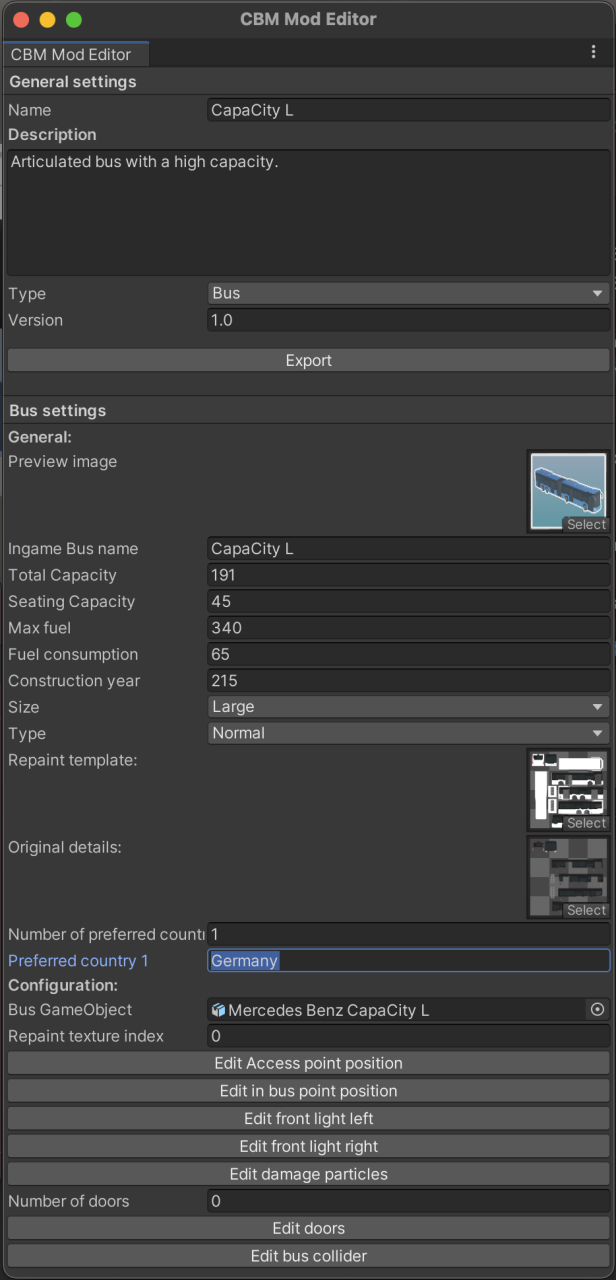
The various settings that can be set are explained below:
Mod settings:
- Name: Name of the mod. This is displayed in the Steam Workshop and in the mod overview.
- Description: Description of the mod. This is displayed in the Steam Workshop and in the Mod overview.
- Type: Mod Type. Currently only bus mods are supported.
- Version: Version number of the mod. This can be increased for updates.
Settings of the bus:
- Ingame bus name: The name displayed in-game for the bus.
- Total capacity: The maximum number of passengers allowed on the bus.
- Seating capacity: The number of seats.
- Max fuel: The size of the fuel tank in litres.
- Fuel consumption: The fuel consumption of the bus in litres per 100km.
- Construction year: Year of release of the bus.
- Size: Size of the bus. Large for articulated buses, Medium for solo buses and Small for small buses (e.g. Cito, Sprinter).
- Type: Type of bus. Double Decker for double deckers and normal for all other buses.
- Number of preferred countries: Number of countries in which the buses are preferentially unlocked. Afterwards, the English names of the countries can be entered in the list of “preferred countries”. This way it can be made possible that e.g. German buses are activated preferentially if you play in a German city and British buses if you play in a city in Great Britain.
Technical configuration of the bus:
- Preview image: The preview image is displayed in the marketplace and is used by default as the image for the Steam Workshop. The image or Photoshop template in “Resources/Preview Image/bus-preview-template” can be used as a template for the preview image. The necessary texture import settings can also be taken from the image.
- Repaint template: Reference to the repaint texture (in this example “Assets/Texture/CapaCityL/CapaCity L repaint”).
- Original details: Reference to the details texture (in this example “Assets/Texture/CapaCityL/CapaCity L details”).
- Bus GameObject: Reference to the GameObject in the scene. Here it is important that the GameObject was correctly positioned, rotated and scaled in the previous step.
- Repaint material index: Each bus has several materials. Here, the index of the material that was previously created and uses the “Paint Overlay” shader (in this example Assets/Materials/M_CapaCityL) must be specified. The index can be seen in the Import Settings of the model in the tab “Materials” (see picture from section 1). The first material listed has index 0 and the second index 1. In this example, index 1 is correct.
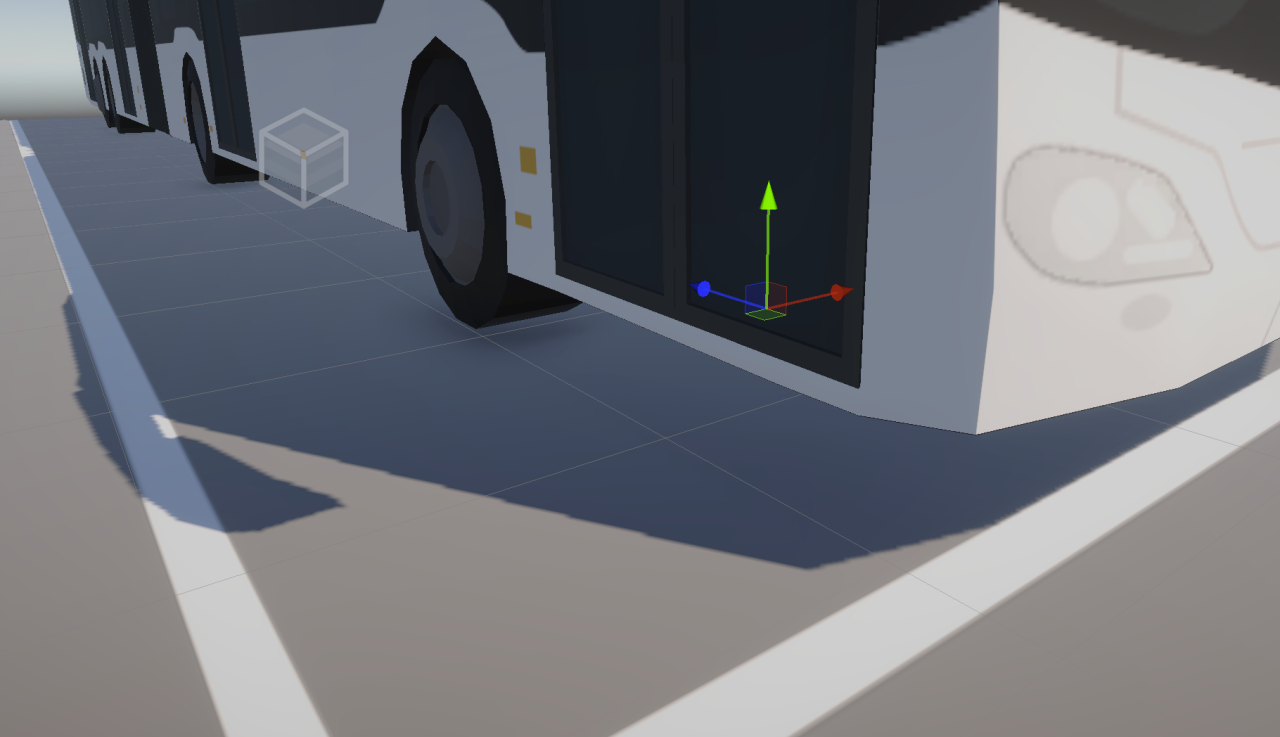
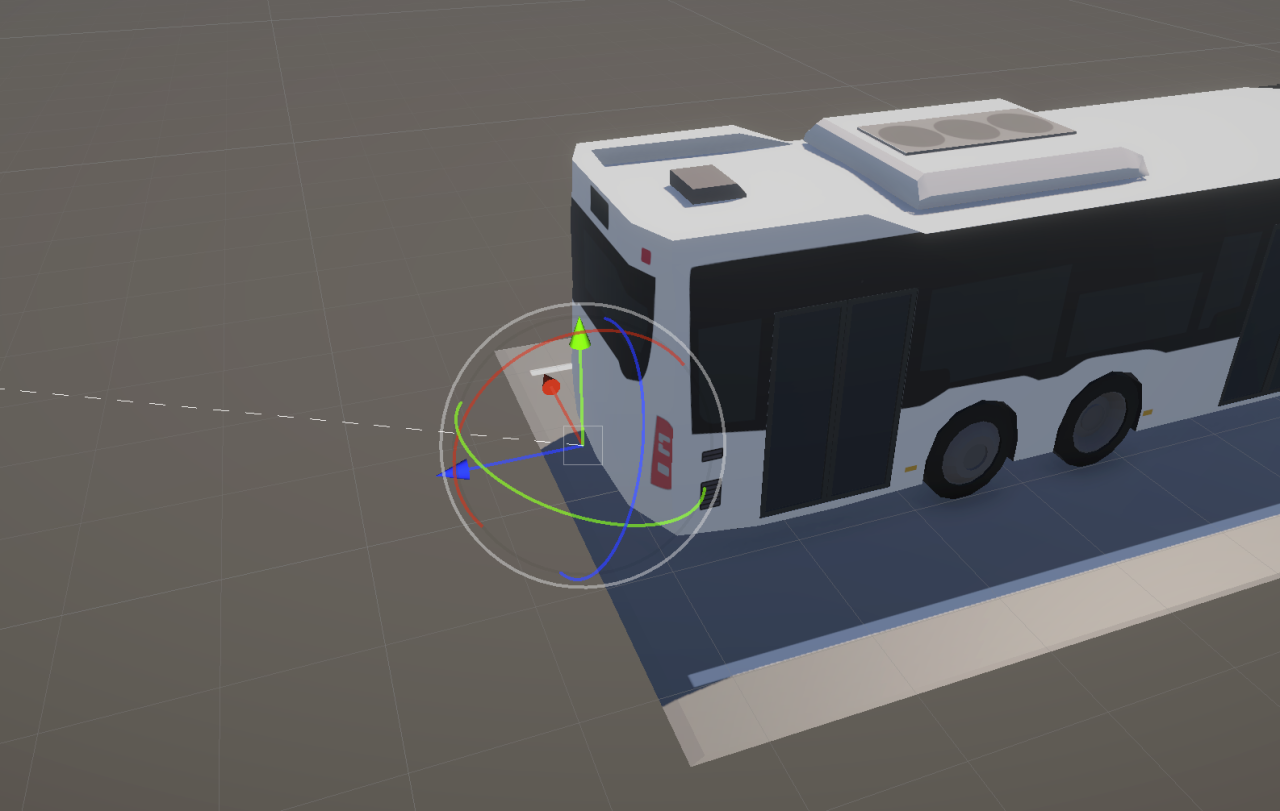
If the index is set incorrectly, painting in the paint shop will not work. In this case, the index must be corrected. - Edit access point position: This sets the point to which employees walk to board the bus. The point should be directly in front of the animated front door and the Y-coordinate must be 0. After clicking on the button, the position can be set directly in the scene or the coordinates can be entered manually.

- Edit in bus point position: This sets the point where the staff spawns before they get off the bus. The point should be directly behind the animated front door in the bus and Y should be set to the height of the floor of the bus. After clicking on the button, the position can be set directly in the scene or the coordinates can be entered manually.
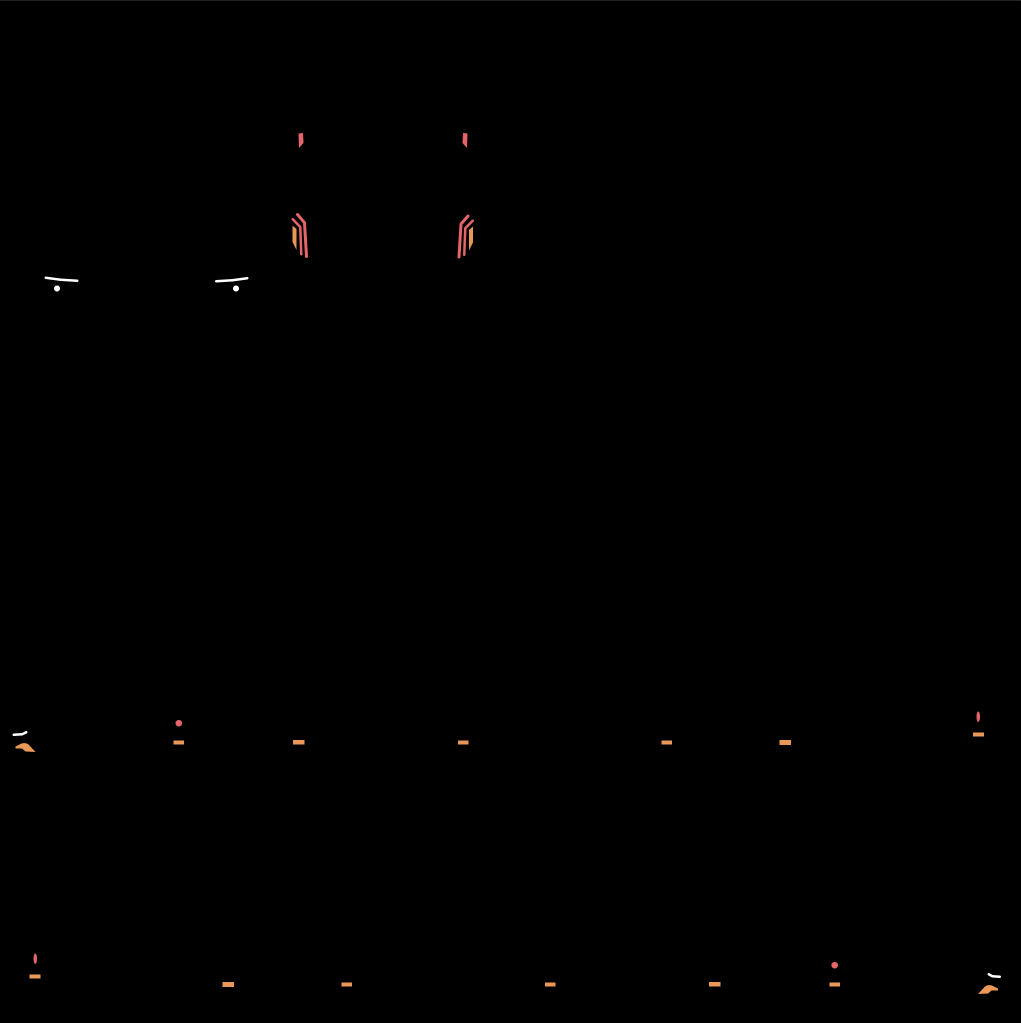
- Edit front light left / right: This sets the positions for the front lights. In addition to the position, a rotation is also required here in which direction the light shines. The dotted line visually indicates the direction in the scene. After clicking on the button, the position and rotation can be set directly in the scene or the coordinates can be entered manually.
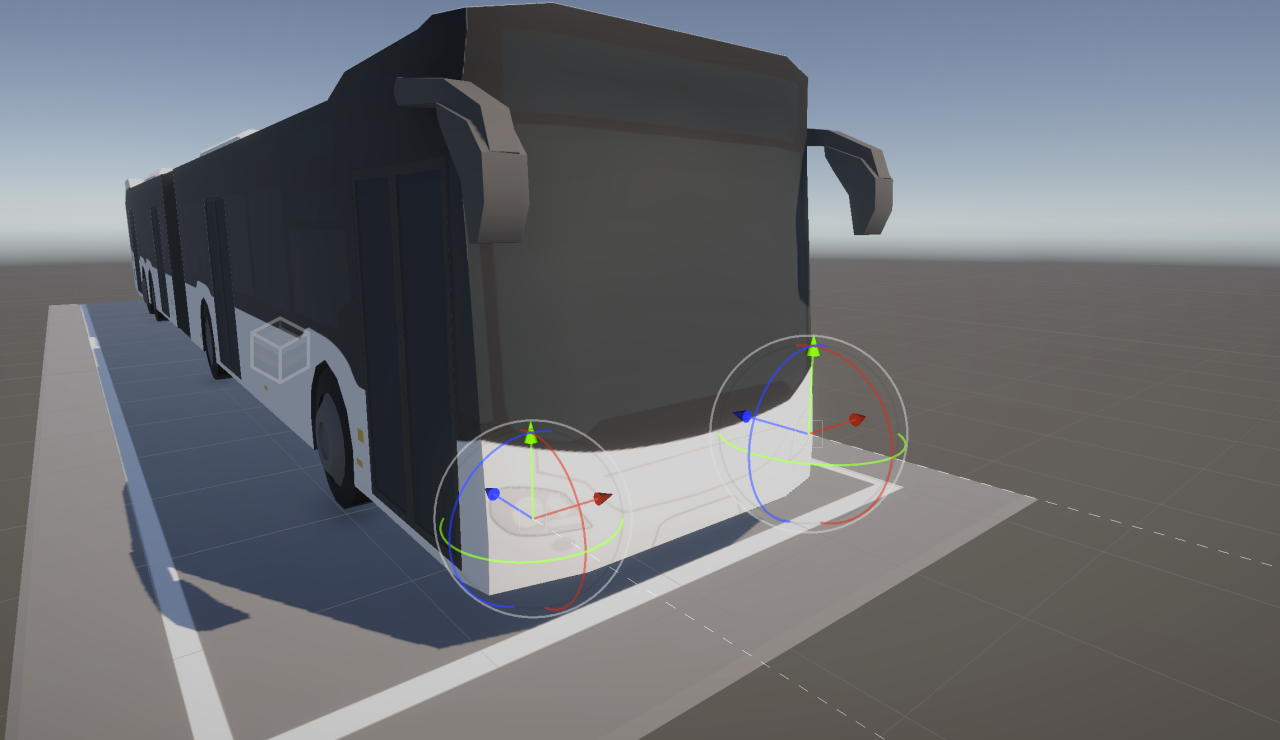
- Edit damage particles: When a bus is damaged in the game, a particle effect is displayed. Here the position of the particle effect and the rotation can be set. After clicking on the button, the position can be set directly in the scene or the coordinates can be entered manually. The rotation can be selected between 0°, 90°, 180° or 270°. The visual dotted line shows the direction of the particles.
- Number of doors / Edit doors : The number of doors is specified here. For each door, the position of the top centre of the door must be specified. This is needed for the particle effects when the bus is dirty inside. After clicking on the button, the position can be set directly in the scene or the coordinates can be entered manually. The rotation can be selected between 0°, 90°, 180° or 270°. The visual dotted line shows the direction of the particles.
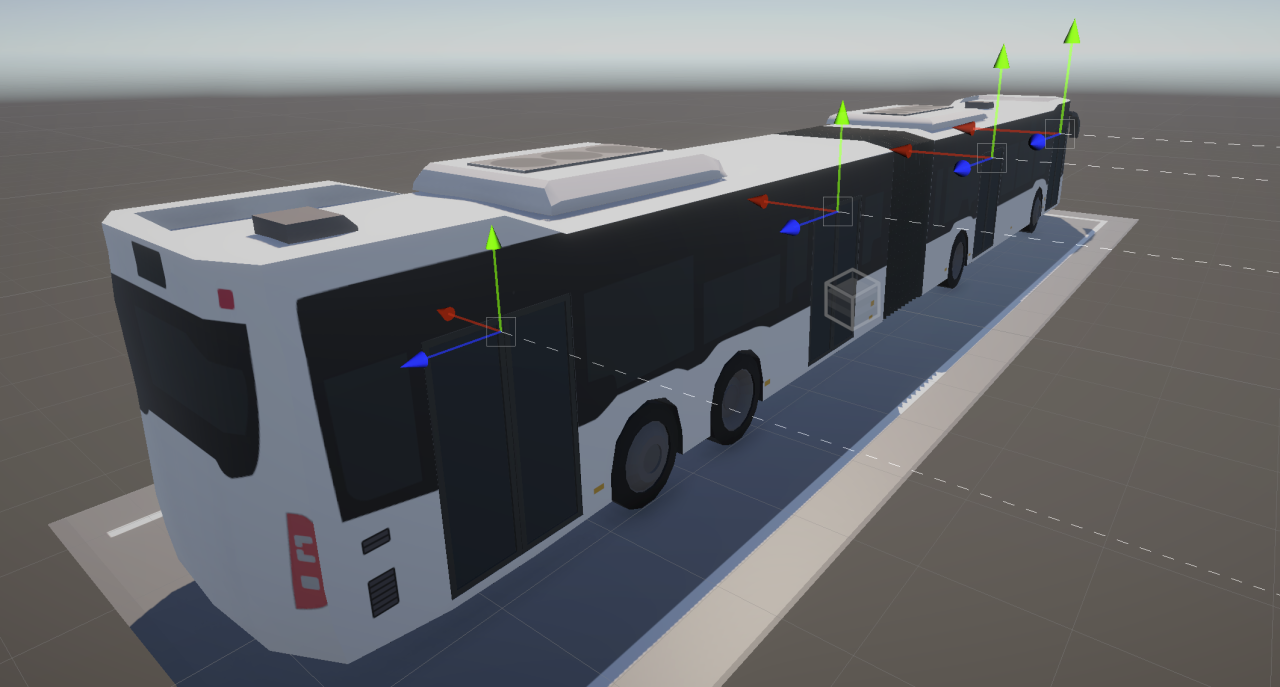
- Edit bus collider : This sets a bounding box that serves as a collider. The box should just contain the entire bus. The In Bus Point that was previously set should be outside the collider. After clicking on the button, the center point and the size of the collider can be set directly in the scene or the coordinates can be entered manually.

3. Export
The bus can now be exported using the “Export” button. This is automatically saved in the City Bus Manager Modding directory.
Windows: …AppData\LocalLow\PeDePe GbR\City Bus Manager\Mods\Buses
MacOS: /Users/*Username*/Library/Application Support/PeDePe GbR/City Bus Manager/Mods/Buses/
Now the creation of the bus is complete and can be tested and shared in the next step.
V: Testing and sharing the bus in the Steam Workshop
In the City Bus Manager main menu, the bus should now be displayed in the modding form:
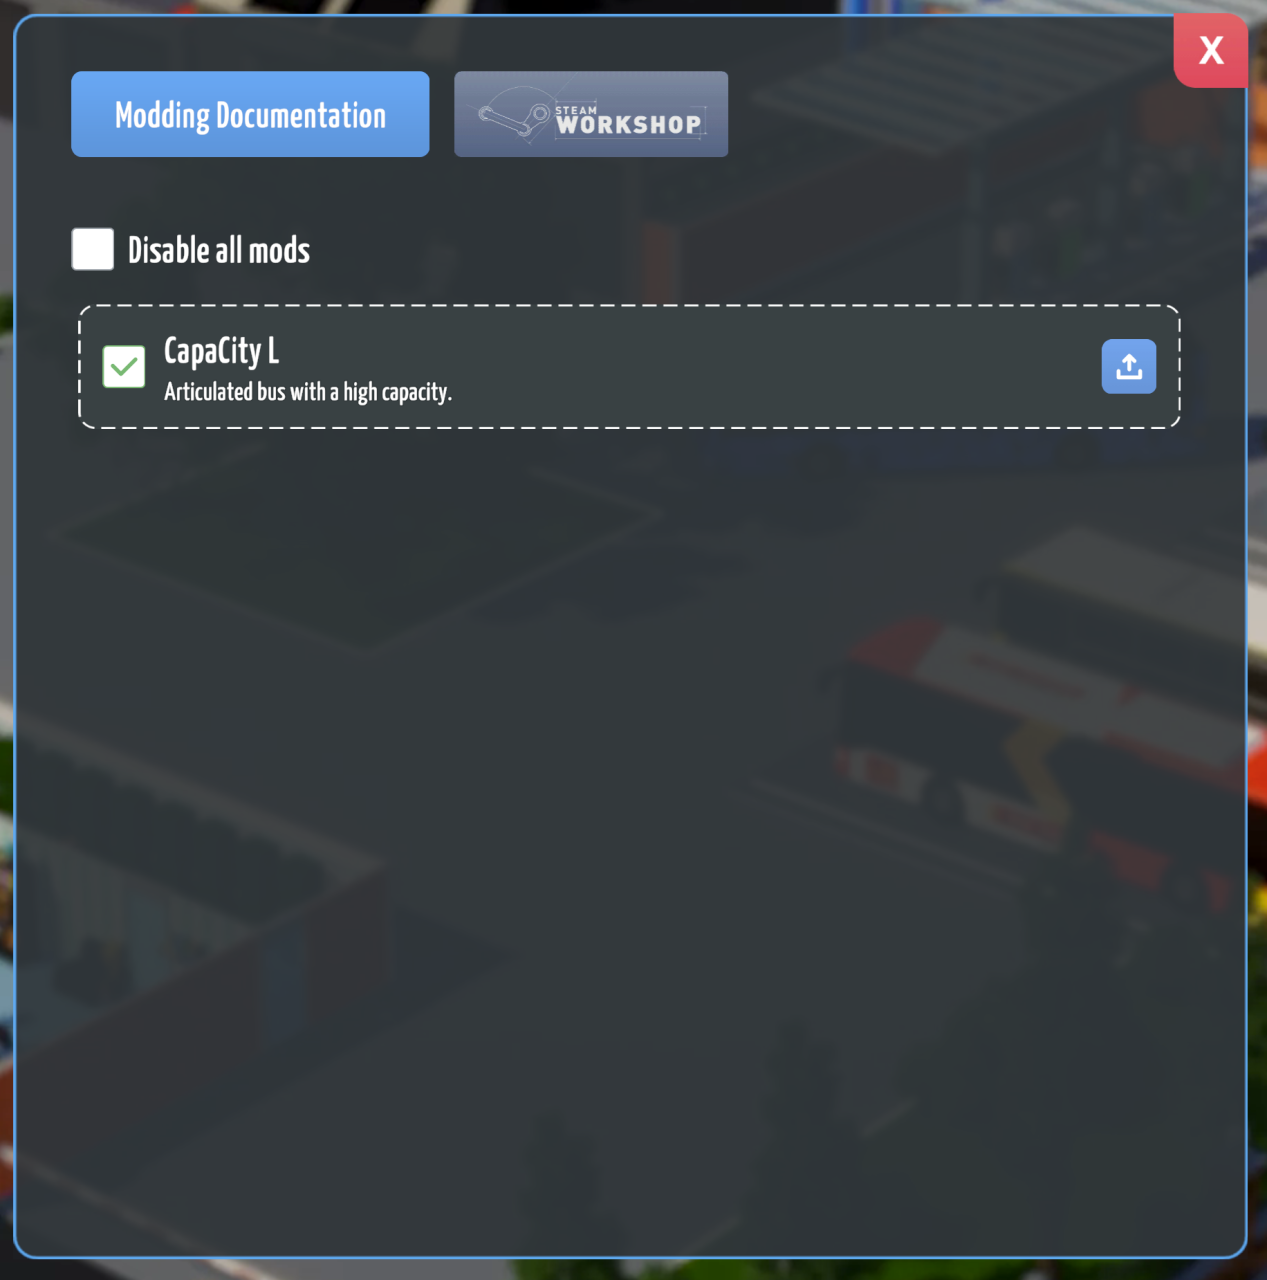
Make sure the mod has been activated with the tick on the left. The bus should now be available in the game. In sandbox mode the bus is available immediately and in normal mode the bus is unlocked via research.
To ensure that the bus is working correctly, the following should be checked:
- Is the position of the bus on the bus space correct?
- Does the animation of the doors work?
- Are the employees getting on and off the bus correctly?
- Are the lights on the bus working at night and are they in the correct position?
- If applicable, does the articulation of the bus work?
- If the bus is damaged, is the smoke particle displayed in the correct position?
- If the bus is dirty inside, are the particles on the doors displayed correctly?
- Does the bus get dirty on the outside?
- Do both in-game paint jobs in the paint shop and external repaints work?
If everything is working correctly, the bus can be shared in the Steam Workshop via the modding form in the main menu. Just click on the blue upload button.
If you have made a change to the bus, the bus can be updated in the same form with the orange update button.
Thanks to [PeDePe] Niklas and [PeDePe] Yannick for their excellent guide, all credits belong to his effort. if this guide helps you, please support and rate it via Steam Community. enjoy the game.