This walkthrough contains gameplay mechanics and will walk you through all of the main game. It doesn’t show all the secrets or achievements or mini games, but does explain how to look for them. Obviously, there are spoilers.
Menu Controls & Checking the Nest
Shield: Check on the Nest
Sprout: See game and mini-game achievements
Lines: Profile – Settings – Exit (game)
Hints/Tips/Things I wish I’d already known
- Dark Screens: The game starts dark. Really dark. There’s no gamma correction because your first job is to add power and light to the scenes. Dark. Train. Get ready for some beautiful neon.
- Enjoy the Ride: Take your time to see and discover things.
- Don’t worry about power supplies: There will always be a lightning storm if you are stopped and have no power.
- The sigils on the train cars will light up if there is something to do. Switch the cars until one lights up. The interior of the cars are affected by the neighboring cars.
- Use the Brakes: The train moves slower with one set of brakes on. Turn on one set of brakes and hover over the button for the second set until you see a window or opening to explore. There is no damage mechanic for brakes and it is a nice animation, so feel free to enjoy. The train will stop as soon as both brakes are down (there is no glide).
- Look for openings: Stop when you see open windows or holes in buildings – once you’ve unlocked the Control Room, you can send Ann inside buildings for collectibles and mini games that change parts of the train/Ann (but are not critical to the story).
- Background buildings repeat, so you have another chance if you miss something the first time.
- There is no time limit, even though it feels like you’re racing ahead. Take time to stock up on fire or water.
- Elevators: There are two types of elevators, Boar and Power. Before choosing a direction, send Ann out to investigate the buildings for secrets. Choose whichever direction arrow you want, I found very little gameplay difference, just flavor.
- Check on the Nest regularly by right-clicking, then left clicking.
Part 1: The Dark Beginning to the Title Screen
- Click several times to make the heart appear and beat, waking Ann. Ann is in the Claw, located in the Nest. You control Ann. Ann follows your mouse as if she was the mouse arrow.
- Push against the bottom right of the Claw to squeeze out.
- Click the window in the back to leave.
Train View: This is the front of the train, covered with sheets of metal. There is a lightning storm. Time to wake the train up and get rolling.
- Run Ann over the chains of the horizontal sheet on the right, until one breaks, revealing a button with the lightning symbol. This is the Power Button.
- Press the Power Button. A lightning catcher comes out of the top of the train. This is how you collect power for the train. Every third lightning strike will hit in the area of the lightning rod.
- Click the Power Button on the second strike, so the lightning catcher will be deployed in time for the third strike.
- A fuchsia grid appears below the Power Button. This is the symbol for the Tower Car. Nose over the small plate under the Tower Symbol. A port will slide open.
- Click on the port to enter it.
Tower (Dark): It’s too dark to see. Let’s get some power going and brighten it up.
- In the lower-right corner, there is a bit of light, and a gear hanging from a crane. Grab the gear and fly it to the center of the tower. Ann’s legs will stick to it.
- Turn the gear. The top of the tower rises, chains break, and blue sparks appear on the coils at the top of the building.
- Each coil has a wire attached. When Ann touches a spark, she will stick to it. Push the sparks down the wires to light up the town. Start with the ones you can see, as the area will progressively get lighter.
- When finished, click the port on the bottom-right of the tower to leave the car and go back to Train View.
Train View: Run over the chains for the piece on the lower-left. The metal comes loose and hangs down, revealing a Car with a leaf shape and a covered port under it. This is the Leaf car. The Leaf is dark, so there’s nothing to do there yet.
Under the Leaf car is a panel. It has little lights when you hover over it.
- Click on the panel to open it. These are the front brakes. There is a button with a white X. This button toggles the breaks for this section of the train.
- Click the X button, and get the train a-moving. The train breaks down almost immediately. The front panel sparks and opens.
- Click the panel to send Ann in for a look.
Front Engines: The rivets have a wedge shape cut in them. They match the shape of Ann’s feet.
- Crisscross one limb at a time to turn the rivets. The panel opens. There are two electric spikes on the bottom of the panel, which is framed by a tube.
- Touch the spikes to gather electricity and transfer the electricity to the hexagon nodes where the electricity is blocked, completing the circuit.
Train View: The train continues on. Title Card. The train busts through a barrier. The Leaf symbol is lit. Enter the Leaf Car.
Part 2
- Use Ann to trace between the stars to make a bird head constellation. A meteor falls, an Egg is thrown from it, and glitter hovers around the egg. Huh.
- Leave.
Train View: Sweep Ann over the chains of the metal sheet to the right of the Tower Car. They fall, revealing the Cross Car. Under the Cross Car is a button with a flame on it.
- Press the Flame Button. A wedge comes down from the bottom of the train and collects fire from the sparks thrown by the brakes.
- Enter the Cross Car.
Cross (leaves): You need to illuminate this car. At the bottom of the screen are tiny candle flames.
- Move Ann over the candles to gather the flame. Caution: if you move Ann too quickly, the flame will go out.
- Light the lantern on a chain to the lower-right of the screen. Note the Sword drawn on the statue.
- About halfway up the left side of the screen are 3 more lamps. Light them. This wakes the bat.
- Enter the Chapel.
Inside the Chapel: There are 4 gravestones with clocks on them. Note the times:
- • Knight: 8:00
- • Shield: 9:00
- • Diver Helmet: 10:00
- • Tower: 11:00
Each of the stones also has part of a wreath (Nest).
- One piece at a time, gather and push the pieces together until they snap into place.
- Touch the completed Nest. Lights will appear on it.
- Click the lit nest to activate it. This is how you activate items in the rest of this walkthrough. The Claw will take the Nest away.
- Look at the two back corners of the Chapel. Take note of the stacks of gears, each with a hanging handle.
- Leave the Chapel.
- Leave the car.
Train View: The Leaf Car is illuminated. Go inside.
Leaf (forest)
- Touch the meteorite. It lights up. Activate it. Ann now has a light beam in the shape of a tree.
- Hover the tree light over the egg to collect the glitter and move the tree away. Without glitter, the Claw can take the Egg away.
- There is a blue box. Click on it to take the Blueprints.
- Leave.
Part 3
- You can now remove the metal sheet over the top left of the train.
- The panel can be opened. Above the panel is a port. Go inside the Left Chimney.
- This is the Control Center. There’s a lot of information here:
- The top train silhouette area shows train status. Of note are the three round switches with symbols that match the buttons on the outside of the train.
- Clicking the switches determines whether that particular system is gathering or deploying the resource. For instance, the fire button outside is set to gather fire from the brakes. If you toggle the switch so the flame is upside-down, the outside button will instead throw fire behind the train.
- Below the train silhouette, the resource gages show how much fire, power, and water the train is carrying.
- Beside the gages is where the Nest is located.
- Under the Nest window is a yellow City Panel that shows how much of the game has progressed. The game does not go to the Mountain panel.
- On the left of the screen is the Targeting System. When the train is stopped, Ann can climb up through the slot in the bottom. The target opens, and you can deploy Ann into the open windows and building holes for little side activities.
4. For now, fill up your fire and switch the button so the flame is pointing down (down = deploying).
5. Leave.
Train View – Boar Encounter: A mechanical boar will attack from behind. Press the Fire button on the bottom of the train to burn the boar.
Scheduled Stop: Fire Fighting: A vehicle in front of the train stops the train in front of a burning building.
- Fill up on water by pressing the Water Drop button above the Cross Car, if you can.
- Go to the Control Center, click the Water Switch (to drop pointed down = deployment) and go outside.
- Use the water button to extinguish the fire.
- Once the fire is out, use the Targeting System to send Ann into the hole in the building. Note: there is one more fire, but you’ll have to stop the train on your own for it.
Train View: Remove the rest of the plate from the top-left chimney. You will see a button with wavy lines. The Wavy button diverts power from one system to the other, so the sigils can light up.
- Press the Wavy button. The Leaf Car sigil lights up. Car Order: Leaf – Tower – Cross – Snow
- Enter the Leaf Car.
Leaf (smelter): There is a gear mold at the front of the beehive-shaped building to the right. You need to make a gear for the Chapel in the Cross Car.
To smelt:
-
- On the left side of the screen, have Ann press down on the fish-shaped piece. This will drop metal into the cart below it.
- Push the cart of metal into the building. Wait for everything to light up and the metal to flood into the gear mold.
- Push the hanging arm over the filled mold. The arm will pick up the gear.
- Push the hanging arm into the center of the building, and get out of the way.
- When finished, the arm will drop the gear.
- Activate the gear. The Claw will descend and grab it.
- Leave by the port in the back building doorway.
[/list]
Train View:
- Enter the Tower Car
Part 4
- Swim behind all the clouds to shut off the rain. Night falls, and you can see neon.
- Touch the word Ann, and activate it. The Claw takes it away, along with other neon signs. How’s the Nest doing?
- Leave.
Train View: Enter the Cross Car
Cross (dark clock): The last time we were here, the Chapel was available, and there were clock faces on gravestones.
-
- Move the hour hand to 9, and let the sun in. There will be three gongs.
- Move it to 10. Three more gongs. Creepy.
- Move it to 11. A shaft of light appears, and the grate in the bottom of the beam opens.
- Go on in.
- The Diver’s Helmet is waiting. Go into its ear. The front frame opens, revealing a Gem.
- Activate the Gem. The Claw takes the Gem.
- Leave through the hole in the bottom of the floor.
- Go to the scaffolding where the Chapel door would have been.
- Leave through the port to the lower right of the clock face.
[/list]
Train View
-
-
- Remove the metal sheet from the top-right smokestack.
- Go into the port.
- This is the Library. Click on the smallest gear on the right of the screen, and Ann will deposit the Blueprints.
- Leave. The exit is just left of the top-center of the screen.
- Click the wavy lines button to swap power. The Cross should be lit.
- Enter the Cross Car.
-
Cross (dark)
-
-
- Avoid the bat and enter the Chapel. The Claw will drop off the gear for the back column.
- This map has a foreground and background. Swim around the gravestones on the far sides to get to the back.
- Place the gear at the top of the left-hand stack. Note the pull-down handles on both stacks at the sides of the room.
- Swim down to push on the handles to pull them both down before they time out. Note: I just got into the Zen of swimming back and forth, pulling handles until it worked out.
- Avoid the bat. It will settle to the back and the light will turn blue.
- Push the bat’s head off. The Gem will fall.
- Swim around the stones to the front and activate the Gem. The Claw will take it.
- Leave the Chapel.
- Take the Blueprints from the box in the front left of the graveyard.
- Leave.
-
Train View:
-
- Go to the Library
-
- Deposit the Blueprints in the largest gear in line with the first one you deposited.
- Leave.
-
Train View:
-
- Remove the rest of the metal sheets. There is a Crane on the top left of the train. This is used to change the order of the cars which also alters the insides of them.
To Change Cars:
-
- Make sure the running lights are on. If they are off, click the Wavy Button between the smoke stacks.
- Click the top of the car (above the sigil) you wish to move. The crane will attach and pull it up.
- Click the car you wish to slide over and drag with your mouse. You can drag the full row over, if you want. The crane will automatically deposit the lifted car to the empty space.
[/list]
Part 5
Leaf (walled park)
- Someone is playing soccer in the field to the back. Go over the wall and steal their ball. The ball will land on a slope in the park.
- Push the ball up the slope and into the top stone mouth. It will come out the mouth in the foreground. Activate it, and the Claw will take it.
- Leave via the port in the back wall.
Train View: Go to Cross.
Cross (forest)
- Pull up the gates under the two windows at the bottom. The pool will fill with water, bringing a platform holding a giant Crab up to the top.
- Yikes! GTFO.
Train Car Order: Tower – Cross – Leaf – Snowflake: Go to Tower
Tower (fallen leaves)
- At the top of the tower, there is a bracket covering the electrical coils. Fly up and push the bracket over, so it is open upward (like a basket).
- There is a tiny candle burning at the bottom of the tower. Push leaves off the bridge to set them on fire.
- Use Ann to scoop under the tower and along the walkway, flipping burning leaves up into the bracket. The available leaves do not run out.
- Close the bracket before the leaves stop burning. The leaves burn all the way down and light the paper lantern in the tower.
- Activate the lantern, and the Claw will pick it up.
- Leave.
Part 6
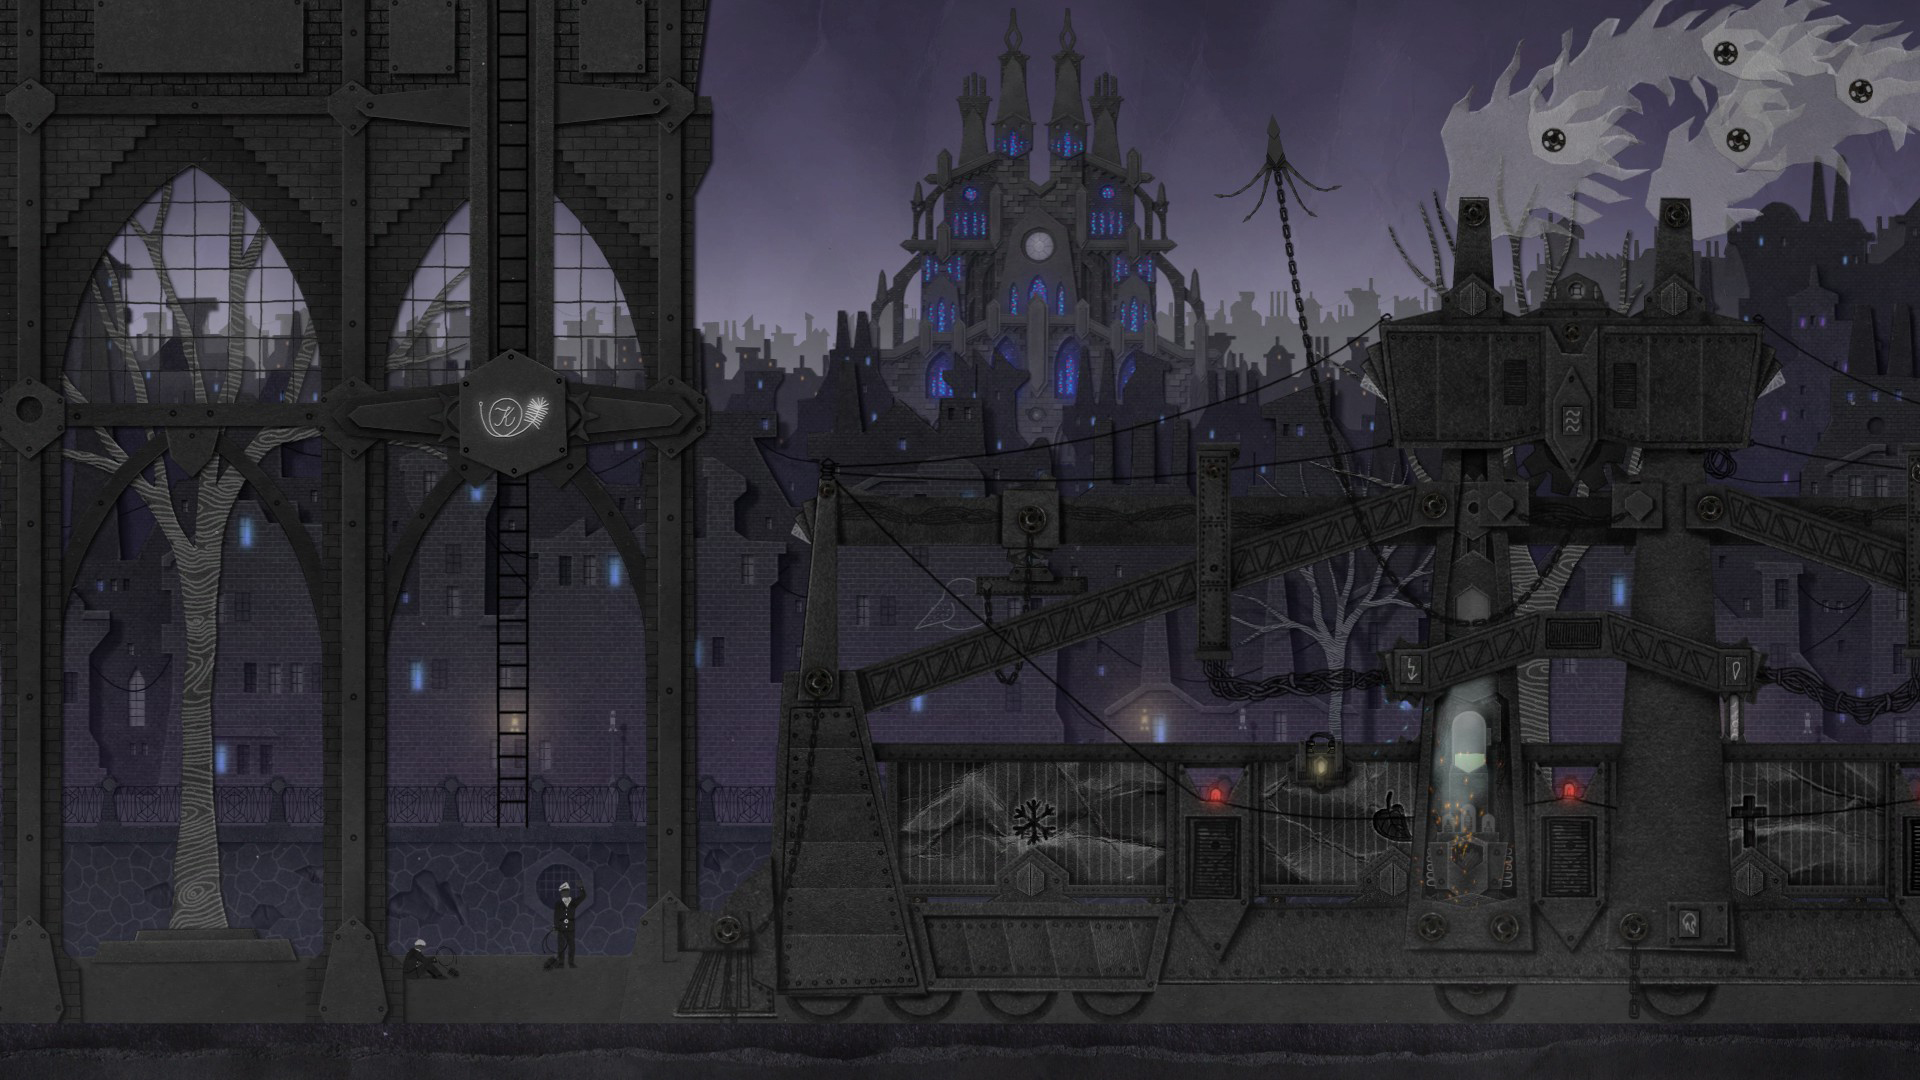
Tower (frozen)
This map has a foreground and a background. See those wrecked train cars in the background, to the right of the tower? The goal is to go to the background, push a train car up and over a ledge to the foreground, then go to the front and activate the train car.
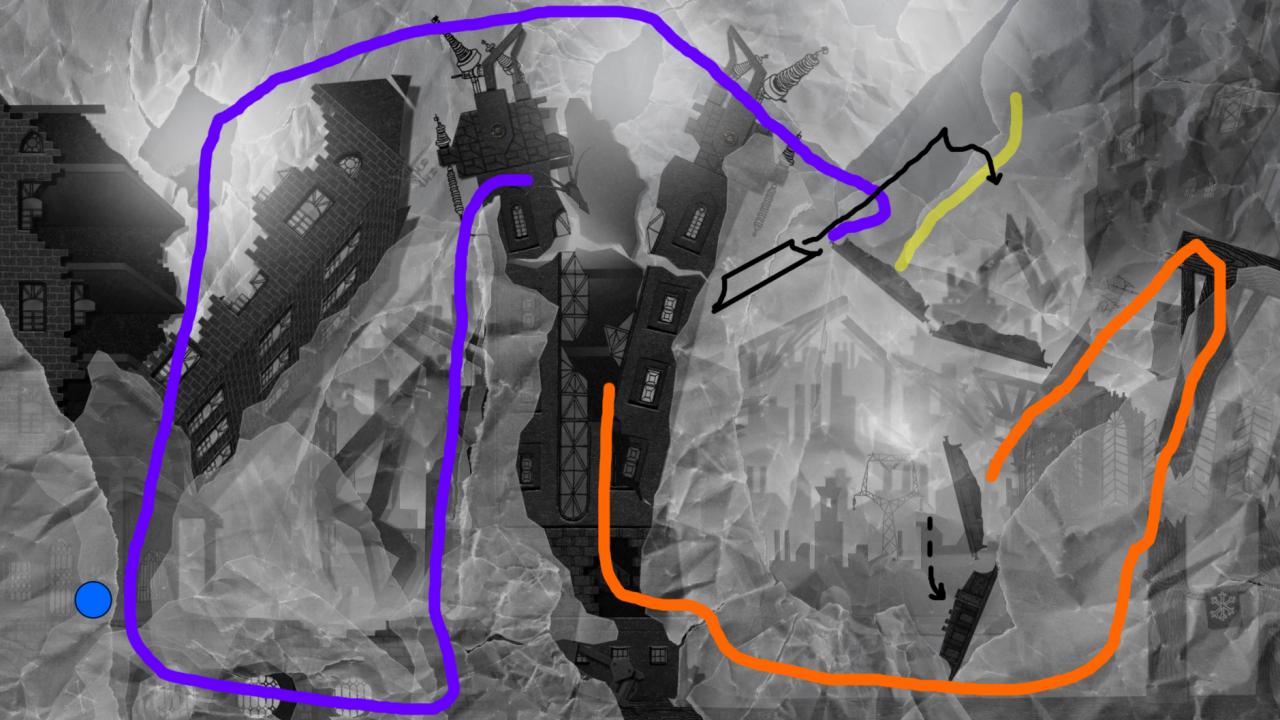
To push the car to the foreground (purple line):
- Go over the lip of ice just above the top window on the left side.
- Go down.
- Go left, across the round porthole windows at the bottom.
- Go to the far left and up; behind the first, left-most ice chunk is a box of Blueprints (in front of the shop, blue circle). Snag them.
- Go back to the portholes, then go left and up the path over the second (slightly darker) ice chunk.
- Fly in a huge arch over the tower, to get to the right side of the tower. You are in the background.
- There is a line of three crashed train cars. Push the piece on the upper left up and to the right (over the other car, black outline), into the large, darker area above the crash.
- Push the piece down, over the slanted bottom of that area (yellow line). The train car falls over the ice ledge, into the foreground.
To get to the car in the foreground:
- Retrace your path around the top and left and around to get back to the front of the tower.
- At the tower, go to the bottom sidewalk, slide right off the edge (orange line)
- Go to the bottom of the screen and squeeze along to the left. The path will rise up.
- Follow up the broken, wooden platform leg. At the top, turn and go left and down until you reach the fallen car.
- Activate the car. The claw will come take the Train Model away.
- Use the exit port to return to Train View.
Scheduled Stop: Boar attack: Another metal boar attacks the train from behind. This time, it will hold on and the train will stop on an Elevator with a Boar sign. There is an arrow pointing Left and another arrow pointing Up. *Using the target display here will get you a Neon Boar Head collectible. Go in whichever direction you’d like.
Enjoy the cut scene. The train will pass the Abnormitron. Eventually you will reach the other side of the elevator. Select the Left Arrow to continue.
Train View: Enter the Library
- Deposit the Blueprint on the right shoulder of the octopus.
- Leave.
Part 7
Tower (snowy)
- Winter wonderland! There’s a train running in the background. Knock the cars until a Sword Mold for the smelter falls out.
- Activate the Mold. The claw will grab it.
- Enter the shop on the bottom left. The claw will exchange a neon Ann for a neon Squid shape, then the train model will be exchanged for a Blue Potion. One picture turns into a Globe Chandelier, don’t worry about it (for now).
- Knock down the birdcage on the right, and activate it. Claw will take it away. Ignore the shadow outside the windows.
- You are done here (for now). Leave the shop.
- There is a box of gears/blueprints on the bottom right of the screen. Snag them.
- Leave.
Scheduled Stop: You are forced to stop in front of a tree building. Go to the Control Room and enter the Targeting System. Send Ann into the hole in the glass above the neon tree sign.
Electricity Puzzle: The goal is to light up all the buttons on the sides of the chair, which will send electricity through the big power cable to the power sign on the right side of the screen.
- Touch Ann to the electrified bars to grab electricity, then select the wall hangings in the right order.
- The order is: Tower Faces – Blue DWT – Teal Stone Holes – Square Frame under Orange Tree – Corner Firelights – Gray Bat with Red Face – Gray Frame above Gray Bat – Orange Tree – Yellow Landscape
- The bars will open. Go in.
Tree Room: This room has two sections: Root Level and Tree Level. You must move Ann around the edge of the floor to get between the sections.
- Take the spark from the first stone and shock the tree roots with the spark before it fades. The spark will move to the second stone.
- Continue taking sparks and zapping the roots until two seeds fall.
- Push the seed pedestals to the center glyph. Ann will automatically grab the glyph.
- Right-click the mouse, then left-click to check on the Nest. Ann will toss the two seeds inside.
Part 8
Change Car Order: Snow – Tower – Leaf – Cross. Go to Tower.
Tower (tornado): The goal is to shoot the spirits away with lightning beams.
- At the top of what remains of the tower, push the arch of wires to the far left until it clicks and stays.
- Jiggle the clouds to make lightning strike, charging the arch.
- Push the arch back to the tower. It will snap back and a bolt will fly from the top of the tower.
- Zap all the ghosties. As you eliminate the top ghosts, the lower ones move up, so there is no aiming, just timing. Shoot just after a spirit begins to move from facing the tower to around the side. After spirits, there is only a gem.
- Activate the Gem. A claw will grab it.
- Leave.
Scheduled Stop: The train will be stopped on a Power Elevator.
- Send Ann out to see the Original Power Station. Otherwise, it doesn’t matter which route you choose.
- Afterwards, fill up your water and start the brakes. You have the opportunity to put out a fire if you stop fast enough.
Change Car Order: Leaf – Snow – Tower – Cross
Cross (red)
- Slide the gravestones over the matching sigils. An Anchor Mold for the smelter will fall.
- Activate the Mold, and the Claw will take it.
- Leave.
Train View: At this point, your train will stop behind some waving Chimney Sweeps, and the engine will break.
- Go inside the broken panel.
- Use Ann’s spade feet to turn the rivets. The panel will open.
- Click a rib with a light on. Open that ribcage. This is a pattern puzzle – each rib moved will move another rib. I brute forced it, so I don’t have a step-by-step solution. Once the ribs are opened, you see the heart of the train.
- Ann’s feet are magnetic, s l o w l y move the pipe parts on the bottom of the heart frame to the right heart outlet. Each pipe will click into place when you are close enough. When everything is in place, click the heart and enjoy the cutscene.
- To continue, go to the Control Room Targeting Station, target the ladder that the chimney sweeps are waving at, and smack Ann into the right side of the ladder until it comes down.
- Leave. One of the Chimney Sweeps decids to come along for the ride.
Train View: Library
- Drop the Blueprints off on the octopus’ left shoulder.
- Leave.
Part 9
Leaf (factory)
- The Claw drops off the Sword and the Anchor Molds. Swap the Molds by activating the new Mold (the smelter must be cold first).
- Make a sword and an anchor.
- Activate them. The Claw will pick them up.
- Leave.
Change Car Order: Leaf – Cross – Tower – Snow: Go to Cross
Cross (light): The Claw lowers to give the sword to the statue on the right side. This causes two hook chains to drop by the Chapel.
- Push each hook chain towards the roof of the chapel. The hooks grab on, and lift the chapel away, leaving a hole.
- Fly around to collect Light Flowers and drop them into the hole. You know you’ve dropped enough when a Skele-squid holding a Glowy Thing flies out of the hole to face you. Disturbing.
- Confront the Skele-squid, circle around until Ann automatically latches her feet to the Glowy Thing. Wrench it away from Skele-squid, and wait for the Claw to take it from you. The Skele-squid flees.
- Follow it.
Train View: Go to Leaf
Leaf (dolmens): Note the drawn Globe Chandelier. We need that for the shop in the Tower car.
- Re-hang the fallen chandelier. It is easiest to pick up if Ann enters the ring and wears it like a hat, moving straight up. Be slow and methodical, it does not click into place. Once back on its hook, Skele-squid breaks the chain on the Globe Chandelier and leaves.
- Touch and activate the globe, and the Claw will take it.
- Leave.
Scheduled Stop: The Train breaks down, giving you an excellent view of the Purple Cathedral in the distance. Your Chimney Sweep passenger cleans one of the stacks to fix it. Go to Tower.
Tower (snowy)
- Go into the Shop, lower left.
- The Claw will trade the Globe Chandelier for a …shawl? scarf? The picture changes to a Birdcage… and a squid. Oh no.
- Leave.
Change Car Order: Tower – Cross – Leaf – Snow: Go to Leaf
Leaf (warm): The Claw drops off the Blue Potion.
- Push the potion into the creature’s mouth. The creature breathes out blue.
- Leave. Immediately wonder if you should go back.
- Return to Leaf. The creature is gone.
- Enter the creature’s den. You killed it. But it was just a puppet after all, right? Right?
- You need to make the creature’s head fall off. Ignore the strings and wedge Ann’s body between the bottom of the screen and the creature’s beak. Make the head swing hard enough for the head to break off. A gem will roll out.
- Activate the gem and the Claw will take it.
- Leave the den. The exit is 1/3 up from the bottom on the right side.
- In the forest, grab the Blueprints from the box.
- Leave.
Train View: Library
- Place the Blueprints in the small gear nest to the first gear you placed, to the right of the screen.
- Leave.
Part 10
Cross (yellow fog): Skele-squid is here, in the background. The Claw drops the Birdcage. You know what to do.
- Grab the cage by the top and fly up to the top of the screen.
- Wait. Don’t move. Ann will become invisible in the fog. Skele-squid checks out the cage and is trapped.
- Drop the Birdcage. The Claw takes it.
- Leave.
Change Car Order: Tower – Leaf – Snow – Cross
Leaf (snowy): It’s another constellation puzzle, so get wiggling.
- Run into the branches of the trees to break the trees and clear the sky.
- Connect stars for 3 different constellations. A space ship will descend, with a center window.
- Hit Ann’s legs against the inner joints of the window frame to break it open. The inside looks like a little moon, doesn’t it?
- Hit the Little Moon to make it fall, then activate it. The Claw takes it.
- Leave.
Scheduled Stop: Purple Cathedral
- Go to the Control Room and enter the Targeting System.
- Find the blue window in the row of stained glass windows and Send Ann out to investigate.
- The Chimney Sweep walks into the Cathedral. Push the platforms from side to side to help the Chimney Sweep cross the pit in the middle and unlock things. When they are done, a ladder descends at the back, and the Chimney Sweep starts climbing.
- Leave and enjoy the cutscene.
Change Car Order: Leaf – Cross – Tower – Snow: Go to Tower
Tower (fallen leaves)
- Go into the shop.
- The Claw will exchange the Skele-squid for a crate.
- Leave.
Part 11
Tower (flood): The claw places the Little Moon into the sky.
- Touch the Little Moon and click it to pick up its reflection. Go where everything but your light is black and click (directly under the moon, in the water). A ship barrels through, in its constant circle. Your goal is to stop that ship.
- Break the front anchor to slow the ship. The Claw will drop the Anchor you made at the smelter onto the ship.
- Push the Anchor along the deck, over the turning fire wheel, and out the back of the ship, where it will attach to a chain and stop the ship. Brace yourself. It’s easier to get over the fire wheel if you can tuck Ann into the curve of the anchor to flip and fly it over. *This can be frustrating, so take a circle or two of the ship to set things up, if needed.
- When the ship stops, activate the little cross-wheel door on the back of the ship and enter.
- Inside, go through the hole in the wave by you and fly up to the ceiling to avoid the shark.
- Continue using the holes in the waves and flying up until you can be directly above the crate in the back. The Shark will attack, tear off the crate. The Claw takes the crate from the Shark.
- Use the holes in the waves to move forward. Let the shark eat you.
- Outside the ship, collect the blueprints.
- Leave.
Train View: Go to the Library
- Place the Blueprints in the center gear at the bottom of the screen.
- Leave.
Train View: Go to Cross.
Cross (forest): The Claw will drop the crates on the Crab, who will smash them.
- Activate the items. The Claw will collect a Triple Stone and a Gem.
- Leave.
Change Car Order: Leaf – Tower – Snow – Cross: Go to Cross.
Cross (webbed): There are no spiders in this game.
- Push the ice chips at the bottom of the screen over the hole covered by the web. When the ice is heavy enough, the web breaks.
- Go into the hole. Go up, under the largest web. Continue up and to the left.
- Knock out the second web from the top. The web falls to the bottom of the screen.
- Swing around to the right of the screen. Grab the Blueprints from behind and just under the right-most web.
- Go around and back under the largest web to get back to the hole and exit.
- Activate the fallen web. The Claw will take it.
- Leave.
Scheduled Stop: Lances
- Go to the Targeting Station.
- Look for the central, yellow window, and send Ann into it. You are in a big hall.
- Activate the door/plate at the back. Ann will go inside and get a Lance Tattoo. If you helped the Chimney Sweep and saw what was in the building behind the Boar Elevator, the tattoo will also include a boar head and a chimney brush. Neat.
- Leave.
Part 12
Snow (melted)
- Pick up the Gem in the corner and match it to the shape on the central window.
- Leave.
Train View: Go to Leaf.
Leaf (frozen): The Claw will drop off the Triple Stone, which expands to show six Holders with web strands. It is set up in front of six trees.
- Use Ann to pull a strand from a Holder, and rub into the corresponding tree, until the web clicks into place.
- Do this for all strands. The strands will look thicker, the closer you are to the target, and break if they get too thin. Six strands will connect directly across to the six trees without crossing.
- When all the strands are connected, fly through to play a tune. The area shakes and comes apart.
- Go through the hole in the broken treetop to the left of the screen. This puts you behind the trees.
- Slide under the Gem on the left to jostle it out. It falls to the ground.
- Grab the Blueprints in the center branches.
- Go back to the foreground and activate the Gem. The claw takes it.
- Leave.
Train View: Go to Snow
Snow (melted): The Claw drops off all Gems.
- Use Ann’s legs to grab each Gem and place it the corresponding shape in the window. It is easier to slide along the floor from one side of the screen to the other to grab the next Gem.
- When finished, leave.
Scheduled Stop: Hooks
The train stops, and a crate is added to the Snow Car.
- Go into the Snow car to see what was added.
- Sweep along the window to close it.
- Leave.
Enjoy the cut scene. You are in the mountains. Time to release your bird friend.
- Use Ann’s body to turn the rivets. Your bird buddy leaves.
- Go into the bird nest. What a lot of work Ann has done. Have a lie down. The view will zoom in on Ann’s Tattoo.
- Click to open the cover.
- Click the face symbol below the beating heart. Goodnight, Ann.