This guide covers the military policies and fleet combat mechanics of Distant Stars 2, including ship behaviour and stances along with explanations for ship roles and suggestions for stance layouts among your fleets to allow your ship designs to engage with the enemy in an effective manner. It will also cover the somewhat hidden depth of the different racial ship designs and ethos of the different races in the game and how this can effect technology choices, ship designs and fleet layout and engagement behaviour.
I will attempt to keep this guide up-to-date as possible but otherwise will include information as to what version this guide is relevant up to at the top.
Brief Introduction
This guide will go into detail on ships, layouts, automation, fleets, combat, behaviours and stances but won’t go into the smallest of details in it’s suggestions down to the level of recommending specific weapons over others for specific ship hulls and such. This is a wider view guide to understand the reasons your ships are flying around as they are during space battles and more importantly why they sometimes aren’t.
Policy Settings Part 1


To start with take a look at your settings when you launch into a game, you’ll want to click the top left most button to access your empire status, then the right most button of that menu to access the Policy Settings which is where your automation and notification settings are found.
Go down to Military, the one with the lightning bolt icon, and open it up.

You’ll find Military Attacks as your first setting, this you’ll want to set to “Suggest & Execute” for ease of use. If your settings are sorted out right this will make the computer only send out fleets to handle known threats that it’s pretty sure overpower the threat in question but will check in with you first with a notification, if you ignore the notification because you’ve wandered off to make a cup of tea then it’ll order this safe attack on it’s own. This does have a niche scenario of sending investigation fleets to check threats only to find the threat to have become far more dangerous and be destroyed but this is rare and can be handled by taking manual control at that point before it becomes a loop.

The Attack Overmatch Factor is your first in-combat setting and basically tells the ships in combat how they should handle the enemy in regards to how many ships should go after the targets they have available to them.
If your fleet is made up of five 100 strength ships and the enemy has two 200 strength ships then this setting will decide how your fleet focuses their fire, setting it lower will cause a 3/2 split of your fleet so the damage is spread among both enemies. This is great to getting the enemy ships to flee combat and win the fight by forcing a retreat, it keeps the fight short and thus the number of lost ships on both sides low while allowing more of a safe window to capture enemy ships once their shields are down as they aren’t quickly blown apart by focused weapons fire but has the downside of not really really costing the enemy much because most of the ships will simply go repair, thus prolonging the overall conflict.
The effect of setting it high is the opposite, your ships will focus their fire 4/1 or 5/0 to completely concentrate their damage. This has the positives of taking enemies out of the fight quickly and reducing the likelihood of successful retreat. Taking them out quickly shouldn’t be underestimated as a fleeing ship can still fire its guns all the way up until it warps out, a slowly expanding cloud of scrap cannot. The downsides are that capturing ships under heavy fire is unlikely as once their shields drop and the assault pods are launched their armour and hull will likely be torn apart before the assault pods can make contact, the other downside is clustering as ships going after the same target may find themselves surrounded by their fellows as ranges of same guns overlap, this is a dream scenario for empires using area weapons especially as the focus fire strategy gives them time to get off a few of these slow firing weapons.
High and low both have their uses but this setting is the overall so you should set it to your preferred settings based on your current race and tech strategy. I usually leave it in the middle at 1.5 though for most races so your fleets try to slightly overwhelm each target in the enemy fleet and if a large or important battle comes up I just handle the micromanagement of each ship in the fleet myself.

Next up is Capture Condition For Ships, overall I’d suggest “When Hightech Or Larger Than You Can Build” which basically translates to “Capture if it’s better than what you can build” as this is useful for research. You can disassemble, or retire as they both mean the same thing, ships and during the process have a chance of getting a tech breakthrough of any unresearched tech of the components on the ship being disassembled. Alternatively you can then use these better ships to augment your combat forces but I’d advise against this, the research breakthroughs are much more beneficial for your empire.
You can also set it to “Always” if you want to be a magpie and blow time and resources on capturing all the ships you can and have a good laugh flying bloated, largely ineffective, fleets of the enemy’s own ships on suicide strikes into their core worlds. Not very effective but nice roleplay and can be funny.

The next setting should just be set to “When Base In Own Territory” as capturing bases away from defensive fleets just strains your freighter networks going back and forth these distant stations and the stations themselves are vulnerable to attack.


I’ll put these two together as they are effectively an “if” statement as far as the way I use them.
Anyway, the first: “Enlist Military Ship” basically means you take control of the ship and it takes on whatever automation you have set up and likely ends up rolled into your fleets. The way I have my settings sorted I don’t really get any ships that use this setting but if I do I usually retrofit them into ships of my race and design so they can act consistently with their fleets.
The second: Disassemble Military Ship” retires ships based on what you select and picks them recycles them for resources and research breakthroughs on any parts or hulls they contain that you have not researched. I keep this set to “When Hightech Or Larger Than You Can Build” for the breakthroughs. Gotta love shaving off months or years of research for the cost of a bit of fleet strength at worst, sure it’s nice to bring a relic wreck ship you found and repaired early game onto the battlefield outgunning the enemy to a hilarious degree but it’s a risky gambit and that single ship will rarely be enough to break an enemy empire alone, better to harvest that sweet, sweet research.


Civilian ships are much the same, if captured you recycle the more advanced ones and retrofit the less advanced ones.
I’ve heard capturing independent traders early game and keeping them around as freighters can give your logistics a boost but that’s very micromanagement intensive and you’ll quickly clear out your territory of traders leaving your bonus income from trade worse off until you find a few independent colonies to open trade with, not worth the effort in my opinion so I haven’t tried it but you can try it if you’d like.
Policy Settings Part 2

With the previous settings of always capturing bases if they are in your territory this setting makes it so you enlist those captured bases instead of scrapping them.
There’s also an option for scrapping them if they aren’t research stations, not 100% sure what this setting is for but I’d guess it’s to minimise the impact on your logistics network as you’ll keep the valuable research stations that don’t get visited often by your freighters and scrap the mining and resort stations that while valuable see a lot more traffic that you’d prefer not to allocate right now.

Don’t automatically upgrade your enlisted military ships, you’ll generally want to take a look at them for info on what your enemy is designing their ships like to counter them and you’ll also want to avoid the game auto-retrofitting a better module into the bin instead of retiring the ship so you can try for the research breakthrough, not a common occurrence on the settings I use but you never know.

Civilian ships are less of a concern as they possess far less variance in their modules and thus less chance to have something you don’t have yet. It’s mostly not worth the effort of running through them manually. It’s up to the individual though obviously.

Personally I have two of the same “Capture If Enemy, Return Home If Other” options with this option selection and “Change Empire” isn’t explained and I haven’t had it do anything when I’ve set it to this and waited for it to do something. Personally I’d recommend just leaving it on “Capture If Enemy, Return Home If Other” as it makes the most sense. It just throws the enemy leaders in prison and sends the friendly and neutral leaders back to their empires to avoid diplomatic issues when you capture planets and bases and this is the optimal situation of the options in my opinion.


So here are your automation options for manually controlled ships and fleets, generally I leave these set to No, if I’m going to handle my ships personally I’ll just handle all the details myself as well but there’s a lot to be said for the automatic refuelling and repair settings during longer manual control sessions during wars, particularly during attacks on enemy home worlds that can go on a while even with a secured supply line but my personal preference is to leave these manual.

I’d wonder why this is an option but whatever, do you not want your already automatic ships to not slowly become obsolete? Well in that case I’d advise leaving this option on yes.


So these are the ratios for your non-fleet assigned ships, some will travel along busy freighter lanes with civilian ships in case enemies attack or travel near there (your military ships will likely have better sensors than civilian ships), some will sit next to planets in case of attack and the rest will travel between controlled systems in general as the computer assigns and unassigns patrol areas based on factors like traffic and hostiles in neighbouring systems.
I’ve left these default as I don’t really use the Fleet Formation automation that then uses the Military Ships Not Assigned To A Fleet system that would then use these ratios to assign roles. But I’ve been told to set them to 100% Guard as Escort and Patrol don’t see much action. It’s up to you.

Next up go to the Fleets section on the Policy menu, this is marked with the fleet icon. This is where we start to really get into the subject matter.

So this is just building new fleets, the computer isn’t too bad of figuring this out as you gain more colonies you need more defences so you need more fleets, as you find more enemies you need more offences so you need more fleets, not too hard for the computer to figure out. But personally it’s such an occasional and important decision I like to handle it personally most of the time.

Argh if only there was more nuance here, of all the complexity of the game and it’s management systems a lot of the fleet management dies at this doorstep.
Anyway you turn this option off if you know what’s good for you generally, for at least the early and mid-game. If you leave this option on the computer will use the fleet template system to handle the types and numbers of ships in your fleets and the fleet template system is not complex enough to allow for detailed fleet designs so you’ll end up needing to design multipurpose ships for all classes and won’t be able to have specialist ships unless you consign an entire hull size to that one specialisation.
You can still do that but the difference in results between a specialised fleet composition and a generalised fleet composition are quite stark. So I’d suggest you embrace the micromanagement and use the fleet menu to build the fleets yourself and maintain them like they are your own children until the late game when there’s so many fleets and ships that you can just start using general designs and rely on your monstrous economy to take the hit the inefficiency will bring.

Fleet postures are fairly easy going, you can leave the computer to handle them generally and take over if you need to do something specific or if it does something dumb. If changing settings back or whatever else annoys you too much you can turn it to manual. I change this settings a few times per game sometimes.

Here we have the percentage of ships that the Fleet Formation automation will leave outside of the fleets it makes to be assigned empire defensive roles. If you for some reason are using the automatic Fleet Formation then I’d advise leaving this at 10%, it’s low enough that it won’t take too much of your income in maintenance on supporting defensive forces that will still need to call in a fleet to aid in defence anyway while also allowing for the odd military ship to possibly be there to soak some firepower when a pirate comes around to poke a busy mining station until your fleets show up.
Ship Hulls Part 1
There are different sized ships in the game and they dictate what slots the ships have as well as the construction cost and maintenance. I won’t be going over industrial or civilian vessels and stations and I won’t be suggesting any specific designs.
The military ship hulls are as follows.
Your starting combat ships. Small, cheap and lacking in flexibility they can only really fit the role of flying up to the enemy and engaging in short to medium range hit-and-run attacks with some races favouring heading straight in close and some firing while fleeing. Looking at you Teekans, stand and fight damn it.
Escort
The smallest, simplest ship. Some races only have a single gun on this hull leaving no room for point defence. While lacking in options and defences they can still bring some firepower and most importantly they are cheap.
Patrol Escort
Simply a faster escort, can be the preferred design for the more speed oriented races.
Heavy Escort
More countermeasures but a bit slower than the standard design, most races allow it to bring an extra weapon slot too. Often the preferred design depending on the race involved.
Some among you will be confused as to why I put fuel tankers among the military ships, you can somewhat see the transport ships getting in but what’s this about fuel tankers? Surely they are civilian ships. Well if you’d seen the heroics these things pull on the battlefield trying not to get blown up supporting their host fleet you’d award them the military honours much as I would. Besides they usually sit with the battleships and provide much needed point defence for them with my designs at least so they get a rank same as others in the fleet.
Small Fuel Tanker
Literally a bucket of caslon with some engines on it. I don’t even give them shields or point defence while they are this size. Still an important element of your fleets once they start operating outside of your home system though unless you like watching the odd frigate slow boat it home for five years from time to time.
Medium Fuel Tanker
Big enough to have earned some defensive modules by now as they are worth the investment. Keep your fleets well stocked with these.
Large Fuel Tanker
It’s all grown up, you’ll still be using these in end game unless you’re quirky and have retrofitted a cruiser into a fuel boat design or something. I like to give these pure point defence and park them near my capital ships in a huddle to protect each other. I have had them all destroyed once by powerful area weapons but it was funny so it’s okay.

Frigate
Finally something with more than two guns. Potentially. I think some races still have two. But it’s bigger and has more slots so it’s all a step forward here.
Heavy Frigate
Bigger, more guns, more counter measures. The heavy design for frigates is a good choice for most of the races as it’s in a good size bracket to find the most benefit.
Fast Frigate
Bigger, Less guns, more speed. Not such a hot choice compared to the fast upgrade for the escort hull but likely can still find a place in some people’s fleet designs for some races.
Fleet Frigate
A flat upgrade compared to the base model across the board although for a hull with the fleet name it doesn’t have any more sensor slots, at least on the races I checked. Just use it like a better normal frigate.
You have to get your soldiers off world somehow and these are your best options. While they start small, to the point you could likely just refit a frigate design and get the same job done near enough, they scale up to impressive troop capacity.
Small Troop Transport
Basically a van with a few guys in the back, you can squeeze one to three troop modules into these depending on race and tech but overall they are not very good. I personally don’t bother giving them defensive systems or point defence and just park them at my core worlds and only bring them in as needed, not even embedding them into a fleet.
Medium Troop Transport
A bit better and more worth their name of transport, they still sit at the planets though. Still not combat ready as far as tech goes at this stage of the game.
Large Troop Transport
By now you’ll start taking these guys around with your fleets and they’ll have PD and defences. They are legitimate military vessels and can carry enough troops to overwhelm prepared AI empires if you plan well and invade correctly.
Massive Troop Transport
By the time you start using these guys most of the AI will have started the planetary fortification stage of the game and you’ll start needing the obscene numbers of troops these size of transport carry.
Expedition Troop Transport
Planets by this point in the game will need to by rained on by troop transports to break the entrenched defensive forces with all their bonuses the AI builds up. You can always bombard a planet to bits first but you’ll take a huge reputation hit and ruin the world you’re trying to take. This is where these giant transports come in, dropping entire cities worth of people at once onto the battlefield. A lot of slots but that maximum size is a limiter…
Army Troop Transport
Ever wondered what it would be like if you orbital insertion dropped the entire population of Malaysia armed to the teeth into New York? Well you get to have a visual representation here with the chunky army troop transport. You can fit so many troop transport modules onto this thing, it’s great. The max size being so high means you can actually fit some good weapons onto this thing.
Despite the name these ships enter a blind spot for me, they are too big to be effective skirmishers but not big enough to be bruisers on the battlefield and in the end game they have no real defence against battleships despite the fact they are reasonably costly. I’m not too enthusiastic about destroyers personally but if you fit them into your builds then great.
Destroyer
The basic model and your first taste of a potential sniper class with the larger number of large weapon mounts most of the races give these hulls. As soon as battlecruisers take to the field though these snipers are simply out ranged.
Heavy Destroyer
Better targeting and more weapon slots makes these the choice for early sniper ships for most races that employ such tactics.
Fast Destroyer
I want the biggest ship I have to go very slightly faster and all it’ll cost me is it’s offensive capabilities. Just go back to frigates for this role. Bad hull even with the speedy races.
Fleet Destroyer
Another fleet upgrade where it’s just a better base model with no additional sensor slots. At least on the races I checked anyway. Not a bad hull.
Ship Hulls Part 2
The bread and butter, you’ll find that by the time you get to cruisers in the research that you’ll feel like you’ve got your bases covered in regards to fleet roles and you’re looking forward to getting deeper in to the specialisations like the carriers and battleships. But don’t be fooled, cruisers are your front line ships with enough damage and defence to have a place in large scale end game fights although it’s sidegrades are a little weird, not enough gain for their cost compared to the base model given that they sit on the line where the hexodorium construction resource starts to be used a lot in their construction.
Light Cruiser
Your first cruiser hull and the cheapest, has enough slots for it to start showing some nuance. This will be your fleet backbone ship, it’s the largest and most complex ship you can make before you start spending hexodorium in your builds.
Fast Cruiser
Speed bonus cruiser with a bigger maximum size. Not the hull for speed bonuses really, stay with the light model.
Long Range Cruiser
Small shield recharge rate bonus and a bigger size. Kind of a baby exploration cruiser but not worth it really. Could be useful if it didn’t sacrifice slots for these attributes, personally stick with the light cruiser here.
Command Cruiser
Has some better countermeasure stats but only 5%. Not even worth the design menu here.
Cruiser
Bigger, more slots, more expensive. This is more like it. I’d suggest staying with the light cruiser design until you’ve secured enough hexodorium sources but once you have, this will be your new backbone ship.
Exploration Cruiser
This hull could be used to replace your exploration ships, although I personally stick with the Large exploration ships. I’ve seen good use of these though in larger galaxy sizes where you get further from support and repair.
Patrol Cruiser
A speed bonus cruiser that didn’t ditch it’s engine slots. Not a bad choice for some races that focus on mobility like the Teekan or the Boskara.
Fleet Command Cruiser
More sensor slots for fleet electronic warfare but otherwise normal. Good to have one or two in each fleet set on super defensive.
Heavy Cruiser
A cruiser hull with better targeting. Nothing special here but some races benefit more than others with the layout.
The biggest construction ship class you can build. Nah just kidding these are the big gun boats, the planet bombers, the station breakers. These will be your damage dealers once you can field them as every one of them is covered in heavy weapon slots and they boost weapons range to allow them to sit outside the scrum of lesser ships on the perimeter of the battlefield.
Battlecruiser
Don’t be fooled by the name, this is no cruiser. The weapon range boost along with the number of guns isn’t comparable to even the heavy cruiser regardless of racial design. Sluggish and with a malus to countermeasures you’ll want to design this ship to sit still at the back and hit the whole battlefield.
Battleship
Same style as it’s baby sister but even more extreme, more size, more malus to countermeasures, more guns, more defences. A flat upgrade.
Heavy Battleship
The big get bigger but fortunately the countermeasure malus doesn’t. More size with this hull and that’s always a good thing.
Dreadnought
Remember when you unlocked the medium spaceport? Felt pretty big didn’t it. This is that big. It’s a big old girl. Oh lawd she comin’. Anyway you’ll top out here for offensive ships in the tech tree. Well that’s what they want you to think anyway. *x files theme music*

The support capital ships that fill the screen with hordes of fighters of various flavors and the only ships I actually bother to manually control the fighter build configuration for. These ships will sit preferably outside the focus of the battlefield and just send in their fighters.
Light Carrier
Your first mothership, a lot of fighter hangars and a good number of guns besides they make good snipers although their speed and countermeasure malus make them back line only. Very back line preferably.
Carrier
Straight upgrade besides the increasing countermeasure malus. More fighters and more defence.
Heavy Carrier
Another straight upgrade although you should take note the size now likely allows you to fit more support modules.
Fleet Carrier
The biggest alongside the dreadnought and with enough sensor slots to fit all the fleet electronic warfare you want. Top of the class.
Ship Layouts
Weapon position and it’s firing arc make up a large part of fleet combat and thus a huge component of this game.
The smaller the firing arc the more you benefit from putting a seeking weapon such as a missile or area weapon in that slot as they ignore weapon arc once they get away from the ship. While the larger firing arcs and especially the 360° firing arc weapons usually make great point defence spots due to the fact that fighters, missiles and other seeking weapons can come from odd angles during combat.
This makes your middle range arcs like 180° or near enough good offensive direct fire weapon spots. You should consider that your ships will attempt to generally apply as much damage as possible while following their stances so some may favour facing the enemy and find it hard to flee while applying damage like most boskara ships, while others will broadside their enemy and find fleeing between volleys relatively easy like the human ships, others like the teekan can effortlessly flee while firing because they didn’t read the instructions and built their ships backwards.
These differences compound together with other factors like racial technologies and minor ship differences in slot numbers and overall statistics to make the races favour different styles of combat.
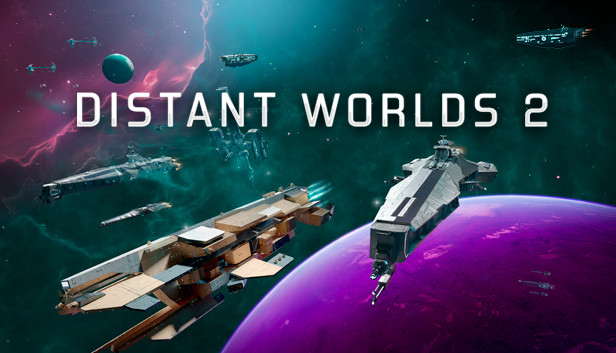
Lets look at a teekan ship.
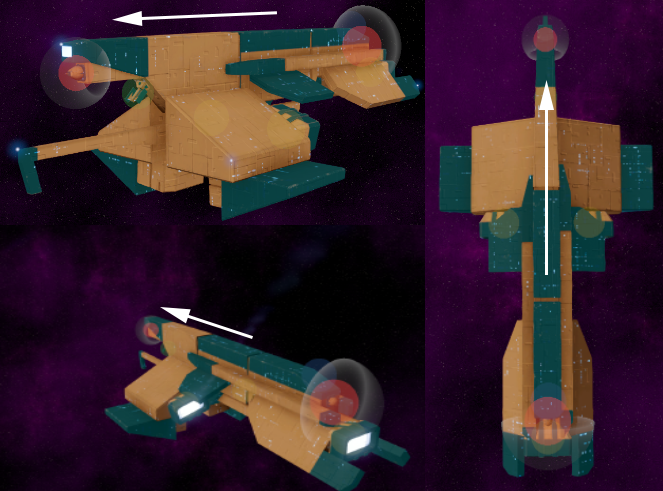
So you can see that the front facing gun is a small mount and has a very wide arc of fire while the back facing gun has a 180° arc of fire and is a large mount. On an escort. Completely antithetical to all the logic I laid out previously. Are the teekan actually just skaven?
So with this ship layout you’d put a defensive weapon on your front facing small gun, something like a point defence weapon or small fast accurate weapon like a laser. Then you’d put a powerful large direct fire weapon on the large rear mount and simply flee from your enemy, keeping them in the long range of your large rear weapon while hopefully staying out of range of their weapons allowing you to attack the enemy without putting yourself in danger.
Another avenue for this ship layout is to put a small direct fire weapon on the front and a large seeking weapon on the back like a large missile system or an area weapon, a technology that the teekan actually start with in fact, and stay out of range of the enemy as much as possible while bombarding them with seeking projectiles and applying direct fire from your front weapon when approached.
As you can see there are options to ship design based on the role you’d like this ship to play and the larger role it will play in the fleet. If you entire fleet is set up the first way they you essentially have a skirmish army of horse archer style ships relying on being able to out run their enemies while sniping them with large rear facing weapons. While the second design favours a fleet that spreads out, forcing the enemy to wade through seeking area bombardment to get to each enemy.
And this is literally the smallest, simplest ship that one race has to offer. and a single one playing a single role at that. If you mix the two basic designs together you have a area of effect dealing front line with a back line of mobile single target snipers.
Teekan also start with the tractor beam technology unlocked so you could separate some of those front line designs from small direct fire weapons into tractor beams to force the enemy to stand still for the back line snipers.
This is with no research done to unlock additional weapons.
The fleet design discussed is build on a single hull, the game contains upwards of thirty nine separate hulls, not including fighters, for each race.
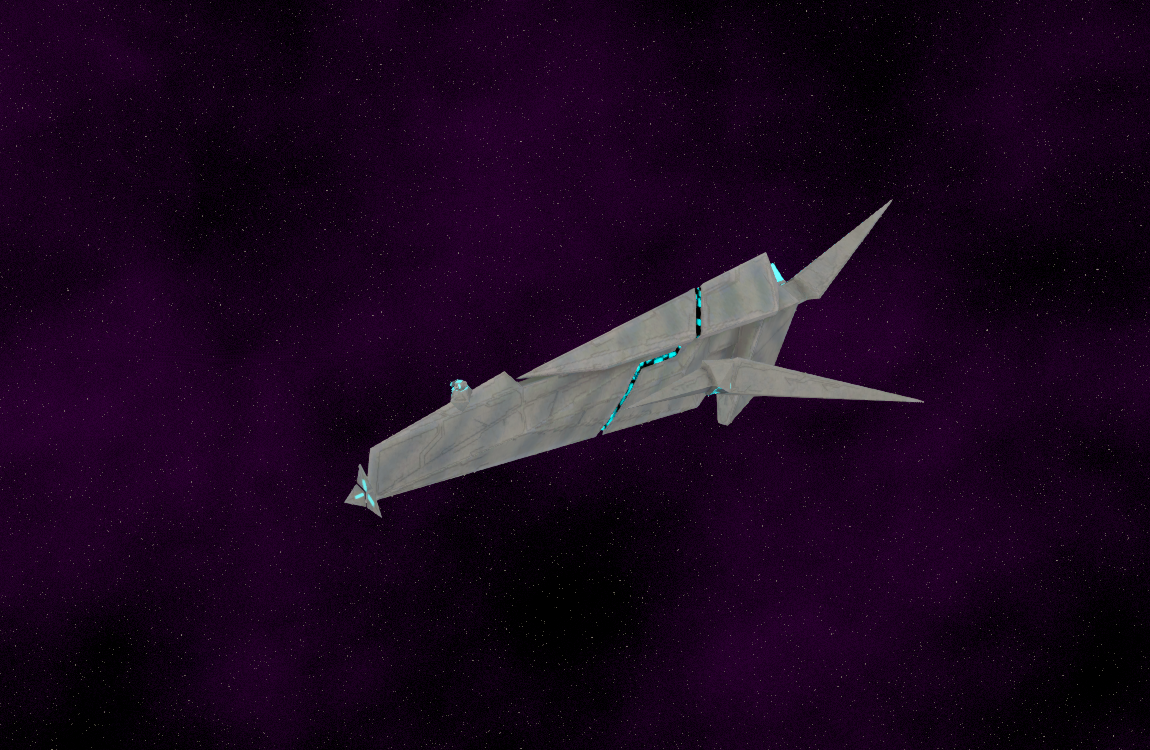
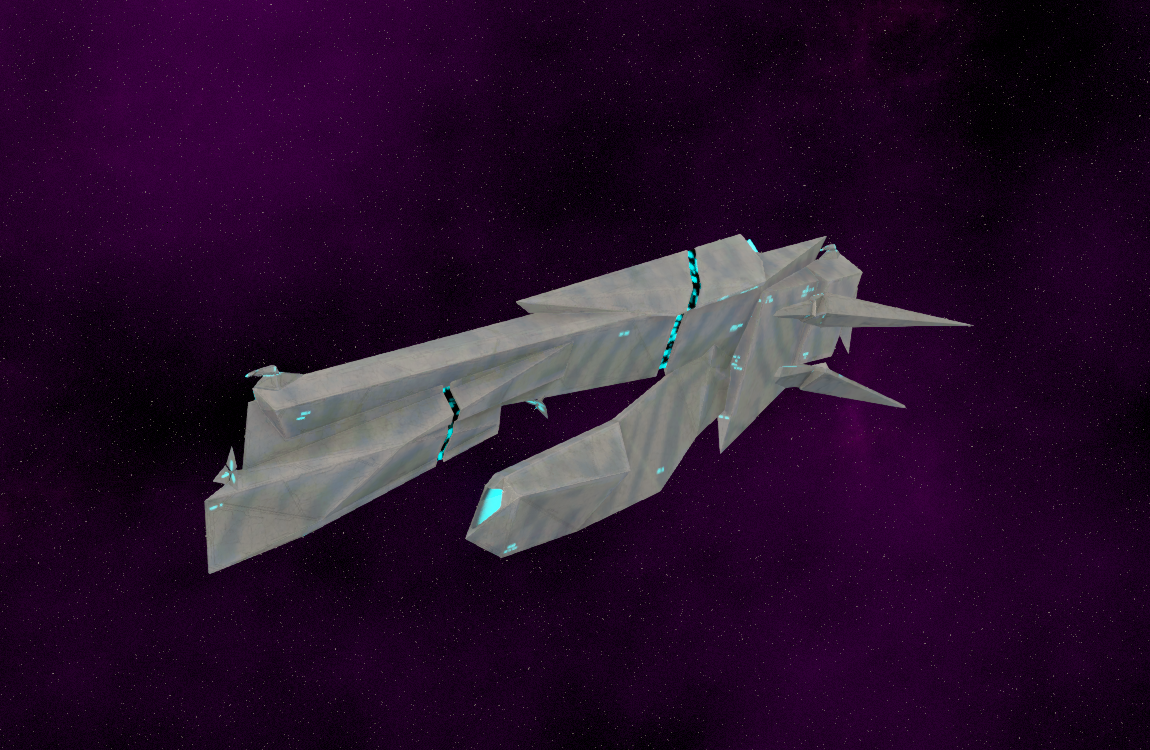
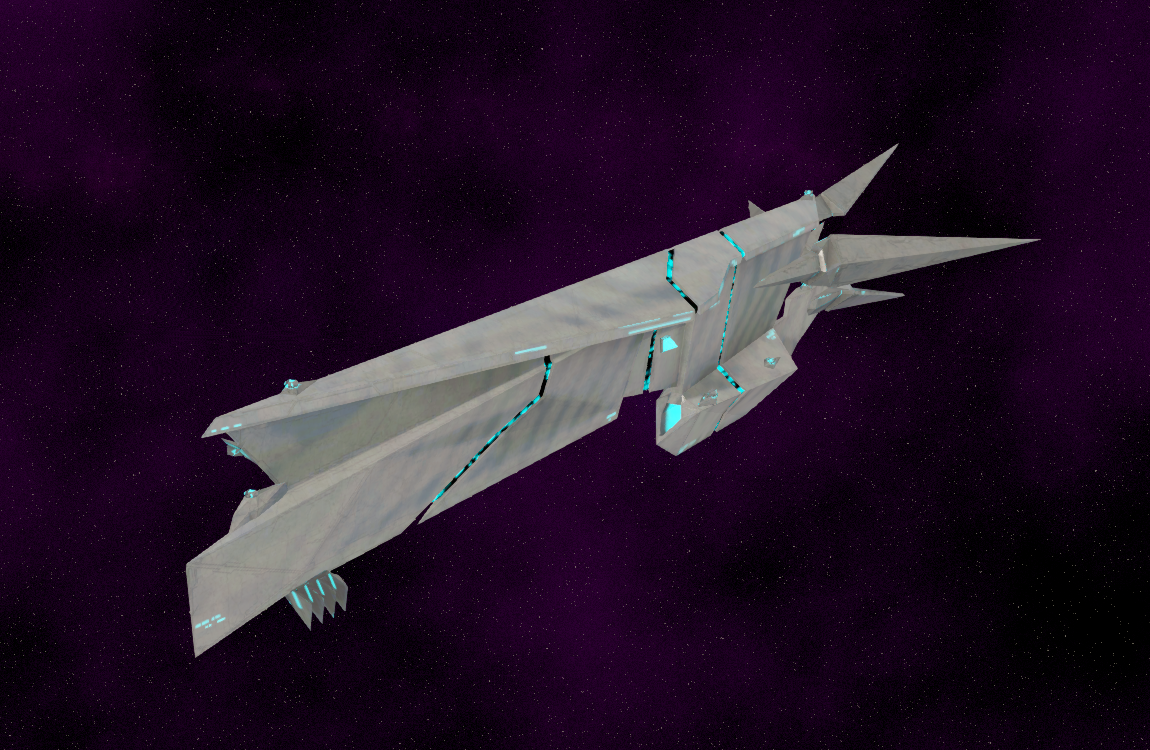
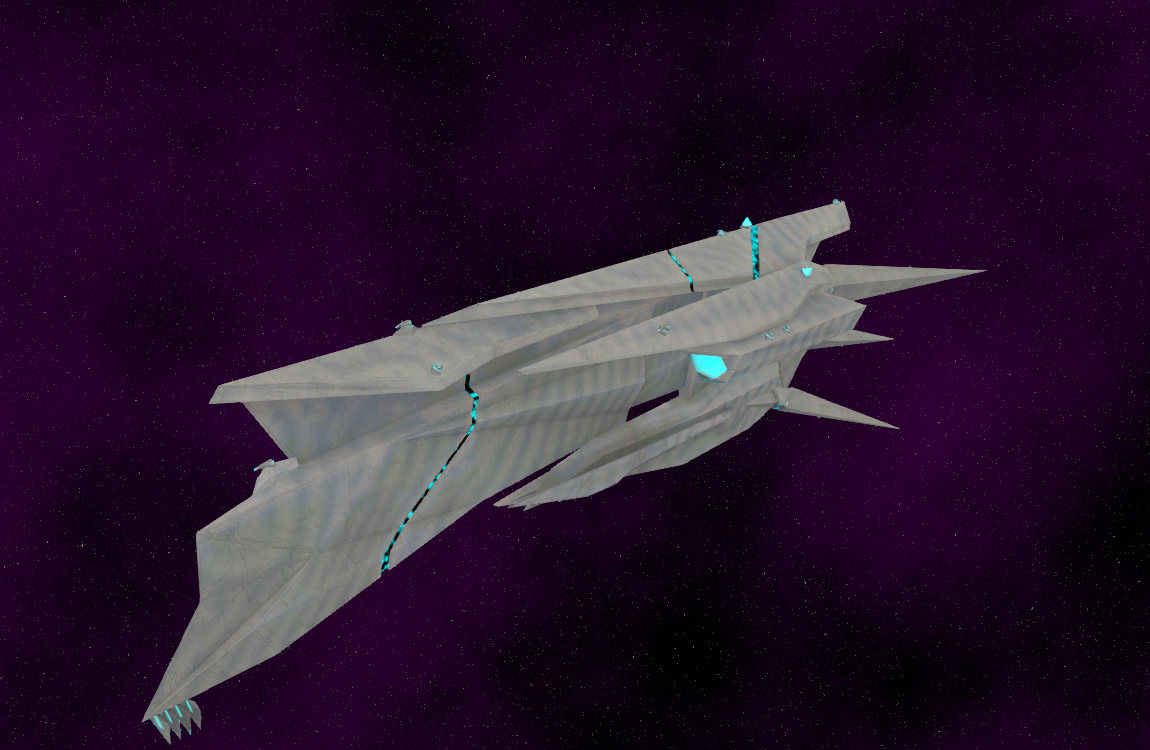
For comparison lets compare them with the boskara.
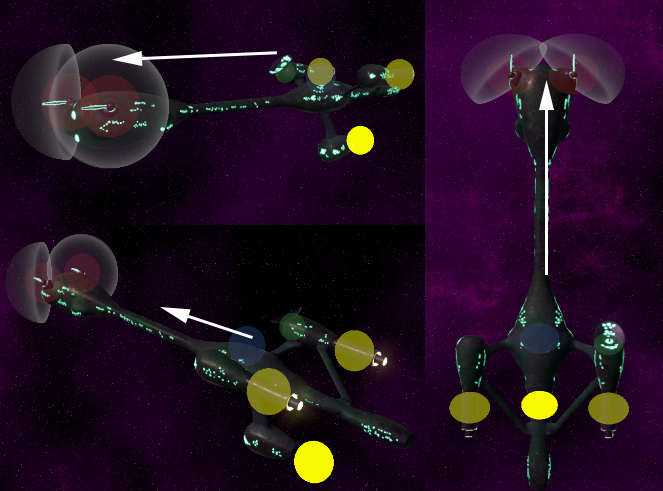
So you can see the clear difference in design and ethos, the boskara are aggressive and domineering. They move in and kill you, that’s it. Two large weapon slots on a damn escort and both of them overlap in a near 75° or less firing arc with no small mounts for point defence.
If they do have to retreat they basically have to give up on dealing damage, so when you’re designing your boskara escort ship are you going to set it on any kind of defensive stance where it’ll turn away to maintain range on it’s target? Stopping firing and dealing damage to make a range adjustment. No, you’ll likely set it to aggressive to maintain it’s line of fire.
At the same time fleeing from combat and entering warp takes time and during that time a boskaran ship will flee from the enemy, charge its drive and then warp but given the nature of the ship this will mean stopping dealing damage at all during this process. So you’ll likely make them stick it out until the last possible moment. Flee when shields are down to 50% in a hit and run tactic typical of escorts? No, way too costly in terms of damage per second for the boskara ship layout, instead you’ll set it to 20% or even 50% of non-defence components damaged to make them stick it out and keep their damage up to support their fellow fleet members, putting their ship highly at risk.
This way the racial mindset is carried through to their ship design and combat styles, this is not including stuff like the firestorm torpedo, the racial tech of the boskara which operates as a high ship damage weapon but also one of the more effective planet bombardment weapons. Kind of invites you to bombard planets doesn’t it? Especially when you have easy access to such powerful tools and already have them on your ships as they are great ship weapons as well.
Ship Behaviours And Stances
You can design your ships to approach two different situations: Attacking a weaker target and attacking a stronger target.
Now typically you won’t attack a stronger target alone as a ship, it’ll be a bunch of weaker ships attacking a stronger ship so you should consider that when you’re thinking of what you want your ship to do against weaker targets considering in battle the average weaker target won’t be alone.
There are four stances to choose from for each of these scenarios as listed below.
This stance will make the ship attempt to avoid being within effective range of any enemy firing arcs as their first priority while attempting to place their target into the effective range of their furthest firing arc.
This is a great stance for sniper ships, carriers and skirmish ships. Snipers apply their artillery weapons from safe distances, carriers can just send their fighters and apply their artillery weapons and skirmishers can preserve their health while harassing the enemy.
This stance will allow the ship to enter the furthest range firing arcs of the enemy ships but they will still avoid middle and close range firing arcs. They will also attempt to close range on their target so they overlap their own effective firing arcs instead of Evade where they will be happy enough with just their longest range firing arcs.
Good for your fleet command ships and ships with heavier weapons.
With this stance your ship will attempt to overlap their target with as many firing arcs as they can while staying out of as many effective firing arcs as they can. They will take higher damage using this stance but will also maintain good movement and damage output.
Great for front line ship designs.
No consideration for enemy firing arcs with this stance, just get in there towards your target and overlap as many effective firing arcs on them as you can. This stance is near suicidal but it does apply damage the fastest of the bunch.
Very good for certain types of designs, ships filled with small or close range weapons that trade range for damage that can charge in and apply maximum effect and shred enemy fleets and potentially still warp out before they are destroyed, at least with larger hulls. Mass small weapon fitted battleships come to mind.
Fleet Behaviours And Micromanagement
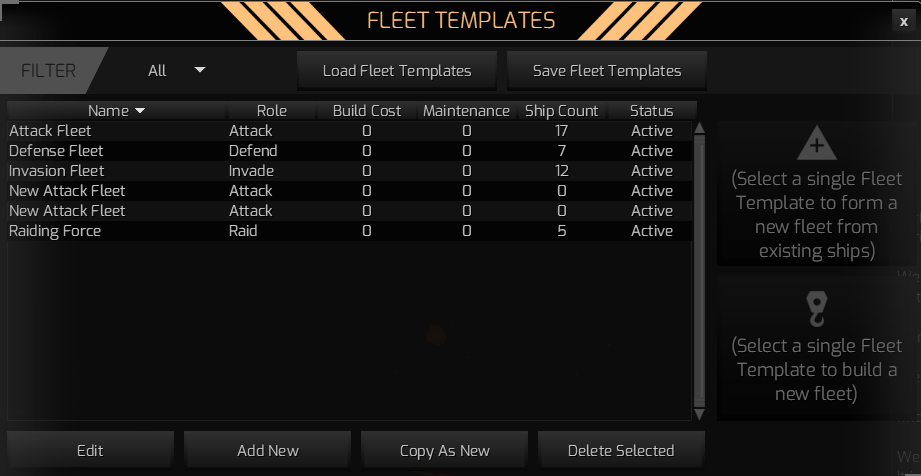
So we had to get to it eventually, the Fleet Template system. You’ll be tempted by the sweet, sweet automation to rely on the fleet template system to handle your fleet designs using the built in UI, you’ll click “Add New” to create your own custom defence fleet for for your empire and then you’ll notice once it opens.
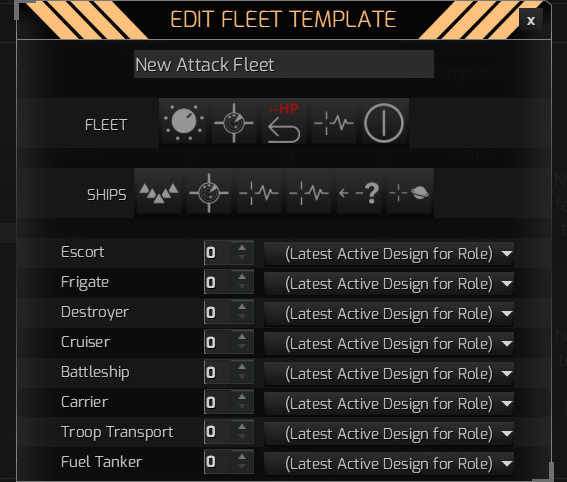
Do you see the missing elements here? Well if not I’ll explain. You’ll take note that there are multiple types of escort class ship, there’s the standard escort, the patrol escort and the heavy escort. So you make a normal escort design as your front line ships and a heavy escort design for some back line missile ships.
Well take a look at the interface there, it allows a single design for each class of ship. So you have to pick one of your escort design to go in there. But your front line escorts aren’t very well suited for combat without support so you tweak the design for more general combat.
You’ve just made a multi-role escort design. Now make the same multi-role design for each of the hull sizes because you can only have a single design slotted into the fleet template here for each. So ship specialisation is not possible. You can still hack it together by specialising your ships along their hull size, so frontline escorts, anti-fighter frigates, bomber destroyers and so on but this is only really possible once you’re far enough up the tech tree to specialise in this way not to mention the fact that it’s inefficient even then to different degrees depending on your race as many of them will have their ships laid out in ways that don’t fit what you need them to do, but this is what you need this hull to do because the other hull sizes are doing the other stuff and you can’t use the same hull size for two roles.
Anyway rant over, don’t use the Fleet Template system, just use the Military menu, go to the ship tab, filter by ships not in a fleet, select some fleetless ships you have made using your designs. So you grab five of your frontline escorts and three missile heavy escorts and click “Form Fleet With These Ships” and bam you’ve just made a small early defence fleet made up of your own designs using two types of escorts without using the Fleet Template system.
So do you need to manually control your fleets to do well in this game? Wow, no, thank goodness. You can leave your fleets to different roles generally and the automation will handle most of the functions based on your military policies.
The different fleet roles are as follows.
Manual
With this the fleet won’t do anything you don’t tell it to do and it won’t be elected by the notifications from the automation policies either. So if you want a fleet to literally sit still and not move then set it to manual. But the primary use for manual role is of course to control the fleet yourself, you tell it what to attack and let your ships stances and such handle actual combat once they get into battle.
Attack
This sets the fleet into a mode where the automation will search for hostile targets within engagement range based on the fleet tactics and will then ask you if they should move out to attack.
Once the targets are dead or if they are too powerful once the attack fleet arrives the fleet will return to the home base.
Raid
A fleet set to this will need some assault pods but if they have some then they’ll send a notification if an enemy station is located within the engagement range of the fleet. If confirmed they will atempt to raid the station, this means breaking it’s shields and sending the assault pods in.
After the raid they will return to their home base.
Defend
Fleets in this role will only activate and send a notification for confirmation and head out if something friendly comes under attack within the fleet engagement range. Once the threat is dealt with or lost the fleet will return to home base.
Invade
A fleet assigned to invasion will need some form of troop transport as the troop power score of the fleet is used as part of the automation calculation on whether to launch an invasion on the target colony. If the troop power score of the fleet is high enough compared to the troop power score of the colony defence forces then a notification will pop up.
Once the colony is invaded a ground battle will happen, once it’s done either the colony will be yours or it will not be, either way the invasion fleet will head back to their home base.
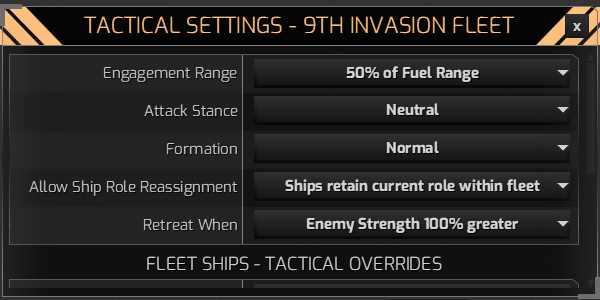
If you select a fleet you’ll get it’s selection interface in the bottom left, if you look in the bottom right of this interface you’ll see the fleet tactics button. Opening the fleet tactical settings you’ll see a number of dropdown menus related to the automation and formation of the fleet.
Details on these drops down follows.
Engagement Range
This sets how far the fleet will search for targets when set to automation, attack fleets will search for hostiles, defence fleets will search fr friendlies under attack and so on. Situations outside this defined range won’t request this fleet and if there is no fleet in range simply won’t trigger a notification for fleet action confirmation.
Attack Stance
Not a hundred percent sure on the full function of this setting yet but I think it’s warp engagement distance. Evade is warp into a distant location and approach target to engage, Cautious is warp in nearby and approach target to engage, Neutral is warp in close to the target and engage, Aggressive is warp in on top of the target and engage.
Formation
How close together do you want your ships warp arrival locations to be. Very tight is nearly on top of each other, Tight is close to each other, Loose gives a bit of room on arrival and Very Loose is spread out. Once they are at a destination they just fly about as normal.
Allow Ship Role Reassignment
In theory this allows the fleet to re-balance fleet roles when they lose ships so it maintains enough picket ships or whatever but overall I personally don’t like it messing with my ship settings so I leave this set to “Ships retain current role within fleet”.
Retreat When
This one is simple enough, it sets when the fleet retreats from an enemy force based on fleet strength. This is quite variable for me as I set different fleets to different values and they change over the game but I’d suggest running from fleets that are 100% greater in strength generally as it’s a good cut off for when you’ll really not make much of an impact in the enemy fleet for the cost of inevitable losses even with the ships warping out when damaged based on individual ship settings.
Under these settings you’ll find the ship override settings, so that your ships use a generalised fleet setting for their own. Keep this disabled and rely on ship settings, it’s just better in every scenario.
These can actually be set in the ship design menu so you don’t really need to adjust them after that but if you want to adjust a ships tactics after it’s built for some reason you can do so from the bottom right of it’s selection interface, similar to the fleet tactics menu.
Thanks to Ulluses for his great guide, all credit to his effort. you can also read the original guide from Steam Community. enjoy the game.
Related Posts:
- Distant Worlds 2: How to Add Your Own OST
- Distant Worlds 2: How to Manually Upload Steam Screenshots