This is a complete guide to everything in the game. What your stats and perks do, what the enemies do, when they appear, and strategies for how to get every achievement (aka beating the game and getting the five transformations).
Intro
I’ll be honest, I’ve never written up a guide like this so I’m not really sure the best way to do it… so for now I’m just going to lay out all the info I can, and explain things to the best of my ability. Also, I’ll mention now that most of the achievements in this game are VERY simple to get. Literally you get an achievement for the first time you get each of the perks, for the first time you defeat any of the enemies and bosses, and for the first time you get each of the five transformations. There are only three more achievements past that, and they’re all for game progress.
Anyway, there’s a lot to learn for this game if you want to make it to the end, so let’s get started.
The Stats
Life (3)- how many times you need to get hit to lose the game. Higher is definitely better, Minimum of 1, max of 20.
Speed (2)- how fast your character can move. Fairly important, especially later on. Minimum of 0.5.
Range (300)- how far your bullets travel. Not sure if this is supposed to be a distance in pixels or not.
Damage (1)- how much your damage is multiplied by.
Shot Delay (40)- how many frames pass between shots. The lower the number, the more you shoot. Minimum of 3.
Shot Speed (8)- how fast your shots travel. Also increases effective range.
Dash Delay (150)- how long your dash cooldown is in frames. Roughly 60 per second.
Wisdom (10)- not 100% sure, but I think this gives you an experience bonus so that you level faster. Minimum of 0.
As for which stats are most important that would be shot delay, damage, speed, and life. Shot delay exponentially increases the amount of damage you do the less of it you have, to the point where you’ll eventually be shooting over 13 times as many bullets per second as you started with. The number of upgrades needed to reach max would come out to roughly 4x damage if you’d spent every upgrade on straight damage boosts instead. That said, the two multiply off each other, so both are important, and unlike shot delay pure damage has no cap, so you can keep raising it until you stop playing. Speed is necessary eventually for kiting the basic enemies (as you will eventually be unable to kill them faster than they can reach you), and life actually gets increasingly better the more of it you have. This is due to life-increasing perks actually fully healing you when taken, so the higher your current max the more it can heal.
The Perks (pt. 1)

Definitely the best life perk, but doesn’t show up as often as Gluttony.

You won’t find a higher speed increase, but has no other benefits.

Again, there are no higher range boosts, but it lacks other benefits. No downsides either, however.

There are actually other perks that grant this same bonus plus others as well, such as crossroads, adultery, or sacrifice. Still, as shot delay is one of the most useful stats it’s rarely a bad pick.

Not really worth taking unless the other perks either have undesirable drawbacks, or do nothing. No enemies really move fast enough that your normal shots won’t hit them.

Basically useless. You don’t need to dash very often, and -2 is very little to a base delay of 150. Still, may as well take it if you’re trying to avoid certain drawbacks or the other perks do nothing.

Not a terrible perk, but there are MUCH better choices. Still, if you have plenty of wisdom and need more range, it’s still somewhat useful.

One of the more decent perks, gives a few different benefits for some rather small losses to range and wisdom. Easily balanced by the higher range and wisdom perks.

Another decent perk. A good amount of range and shot delay for another minimum loss to wisdom. Again, easily balanced.

This is one of the best stat perks. Four stat bonuses for another small penalty to wisdom.

This is probably the best stat perk, as it grants 5 different small bonuses at NO PENALTY. Unless there’s something else you need more at the time, you probably want to take this.

Unfortunately worse than the Life Up perk as it grants no more health while adding a penalty. Still, often worth taking since it’s one of the only two ways to heal and raise your max health. Just try to keep your speed up in case you need this.

So, this perk is something of a double-edged sword. Sure it’s one of the two best sources of wisdom, but it also gives a rather large speed penalty (the range and shot speed roughly cancel each other out). If you’re high on speed and low on wisdom, it’s probably worth it if there aren’t any other good perks.

This is again one of the best stat perks around. It increases lots of useful stats, for a smaller speed penalty than most other perks. If you still need shot delay and aren’t low on speed, take it!

Not terrible. A decent damage boost for the usual small wisdom penalty.

This one is another mostly good perk. I personally love it as I’m always trying to boost damage early on, but It does have two different penalties. Still, -5 to range is nothing, and between Demon Horns and Laziness it’s pretty easy to get wisdom back up.

This one… it’s both very good and very bad. It’s the single strongest perk for increasing your damage stats and even adds a bit of wisdom back, but losing a heart is a big loss. Still, if you’ve got a decent amount of health and are good at dodging I’d say it’s probably worth it. Note, if you’ve already taken damage this won’t do further damage to you, it’ll remove one of your empty hearts.

Pretty good, a solid boost to speed and damage with a small loss to wisdom (as so many of these do). Amusingly, gives a much larger boost than the actual Dash Delay Up perk.

A fairly decent perk to gain back some of the many wisdom and range penalties. These perks tend to be why getting speed perks like Speed Up, Lust, and Greed is worthwhile.

This is one of the worst of the beneficial stat perks, honestly. Try to take something else if you can.

DO NOT TAKE THIS. EVER. AVOID AT ALL COSTS (except once for the achievement)
The Perks (pt. 2)

This is one of the very best perks in this game. All benefits, and no downsides, while boosting the best stat and granting the highest wisdom bonus of any perk. I’d try to take this often.

Also a good perk, just be careful you don’t accidentally transform if you’re going for one of the other types.

The least effective of the Demon perks, the tail somehow adds speed to your character. If you’re trying to avoid transforming, this is the one to avoid.


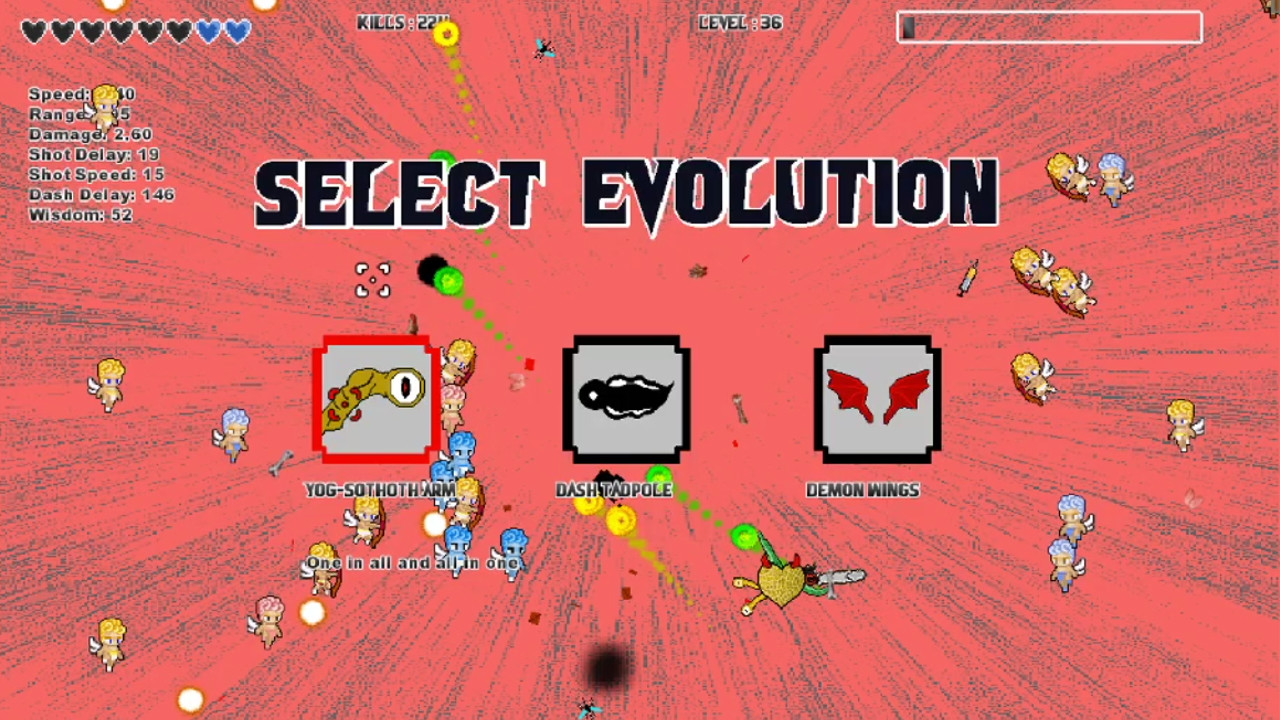
The Five Transformations

Causes the heart to fire a special homing projectile that follows your cursor until it either deals a certain amount of damage or exists for a short period of time. These are piercing and deal a large amount of damage to anything they pass through, but are relatively short range. Like all the specials, how often this triggers is based on Shot Delay. I think they benefit from Shot Speed as well, but even then they’re still pretty slow and short range.
Causes the heart to spawn weird little green familiars, which proceed to shoot towards your cursor whenever you are. These shots are quite short range, less than the player’s starting range, but fire at a pretty good rate independent of your own. These familiars are actually pretty cool, as you can have up to 10 of them at a time, they follow you closely, and they block arrows shot at you… but they also die instantly to any attack, which means many of the boss angels can annihilate them in seconds. Their spawn rate is based on your Shot Delay.

Causes gigantic anvils to spawn from the top of the screen above the cursor, dropping straight down hitting everything in their way until they fall out the bottom. These projectiles are actually pretty powerful, if sometimes hard to aim. As with all transformation abilities, Shot Delay decides how often this randomly happens.

Causes the heart to randomly fire about a dozen massive beams in all directions while you’re firing, piercing everything in their path. These beams don’t spawn in the exact same directions each time so you can’t predict where they’ll hit, but they hit quite a bit of the screen every time it goes off. During the middle stages of the game, this can actually annihilate every normal enemy without you doing anything if your Shot Delay is maxed and you’re in the middle of the screen.

Causes the heart to fire out a few homing projectiles at random times while you’re firing. These projectiles are fairly strong, and their frequency is based on the normal Shot Delay. Not much else to say here, through the projectiles seem to spawn from the sides of the heart rather than the firing direction.
The Cherubs


They’re somewhat faster than the original cherubs, and can take a bit more damage as well.

These are between the basic cherubs and baby blue cherubs in speed, but can take noticeably more damage than the baby blue cherubs can.

These are relatively slow and fragile, but they make up for it by being one of only two cherubs capable of actually attacking you. They don’t fire arrows often, and they can be destroyed with your attacks, but in groups they can be quite dangerous.

These are a bit dangerous, as they’re much quicker and more durable than any other cherub to this point.

Unlike the light red cherubs, these are both more durable and faster than the blue cherubs.

A faster, stronger Archer Cherub, moving about the same speed as the blue cherubs. Shoots two arrows at once, but doesn’t do any more damage than the normal Archer.

I have no idea what’s with the name, but they’re just a stronger and faster basic cherub.

A slightly stronger and faster cherub than the weirdly named Smurt

Warning, these are where things start to get rough. They’re only slightly faster than the rage cherubs, but they are at least TWICE as durable. Be careful, and ready to kite them.

If you thought the Gamma Ray Cherub was bad, these guys are again TWICE as strong or even more than the last, though no faster as far as I can see. If you’ve reached these guys, congrats!

The final cherub, only seen by the dedicated willing to play this far in. Just like silver, these are around twice as strong as the previous level. Still, you should have no trouble with these as you’ll have had plenty of time to boost all your stats before they show up.
The Boss Angels (And the last three achievements)


Anyway, I’m sure you’re wondering about the last three Achievements. They are;


Now, these are actually received through normal gameplay progress. Spoilers now for when you receive them and the end of the game, you get them roughly at levels 41, 126, and 301 respectively. Unfortunately, there is NO actual ending to the game. No cutscene, no little text blurb, nothing. In fact, if you didn’t notice that you received the Hell’s Gate Open, you wouldn’t be able to tell at all. It’s super disappointing. And with that, you’ve beaten the game and probably gotten all the achievements. At least aside from the transformations, and maybe Addicted if you listened to me and never took it.
Strategies and opinions
- Pick your transformation before you start, and work towards it as soon as is safe. Personally, I’m fond of the demon transformation, but the best two are probably Steel and Cyber. Steel is the most powerful, able to deal targeted destruction to an entire column wherever your cursor is. Since the angels enter the arena in a column from both sides of the screen, you can often destroy 90% of the incoming angels on one side before they can even start to bunch up. On the other hand, it can be distracting to have to have to keep it targeted. Alternately, Cyber will destroy things all across the screen without you having to worry about it, but it’s not as good once they’re all grouped up and following you. That said, I beat it the first time with the Ancient transformation, so they’re all viable. Find the one that suits you best, and stick to it. At least for now.
- Don’t neglect any of the stats, aside from Dash Delay and maybe Wisdom. You’ll need them all high by the end to help deal with the powerful swarms, and to survive more difficult bosses and moments. Try to start with shot delay, damage, and speed, as they’re the ones that’ll keep you alive the most. If you have the extra speed or luck out by finding a life up, try to get your life up to 4 or 5. Save sacrifice for later when you’re better settled, and never let it take you below three unless you’re having trouble with the swarms and already down a point of life anyway. As for wisdom, all it does is accelerate you through the game. Since tougher enemies spawn based on your level rather than how long you’ve been playing, leveling faster only brings the challenges sooner and while you’re less prepared.
- Get the Saw Blade, chainsaw, or extra firepower as soon as possible. Aside from saving your sanity with how slow things start, all of these are extremely helpful for dealing with the first couple boss angels. Saw blade lets you wipe out entire swarms of enemies until around levels 30-50 where it starts to become less useful, and also makes you immune to contact damage while dashing. The chainsaw does a lot of damage, and can trivialize the angel and maybe throne. Extra projectiles will multiply your damage the fastest, as well as likely increase your range.
- Don’t let the boss angels multiply! One boss is easy enough to deal with usually, two at once is MUCH harder.
- When enemies get fast, Kiting is your friend. Basically, once the enemies are fast enough that they’re actually chasing you and tough enough that they don’t die after a shot or two, it’s best to start circling them. Let them clump up, lead them to the middle, and then you can circle them firing into the group until they die.
- If you’re going for completion, be ready for the long haul. After the Silver Cherubs show up, this game quickly becomes a matter of perseverance. Congratulations, you are literally 1/3rd of the way through the game now! And it won’t change further until you make it to 2/3rds and unlock the gold cherubs, the last effort the game will make. Not to mention they don’t really change anything, as if you can survive a few minutes of the silver cherubs without much issue, you’ve essentially won. Anyway, now it’s just a matter of enduring around twice more the time you’ve spent up until here. Don’t give up, this game is very winnable!