This guide will allow you to configure your (fighting) controls the way you want while still being able to navigate menus by pressing A and B (or whatever buttons are usually used for menuing on your controller).
The problem
Using the steam controller configuration you can mostly solve these issues.
Keep in mind that unbinding attack / special means that you will no longer be able to select or cancel in menus using your controller. Unbinding attack will prevent you from changing any keybindings using your controller (since you can no longer select the binding that you want to change). Only ever unbind attack if you have a different input device (e.g. mouse) ready.
Important: A button can only be assigned to one option at any time. If attack is assigned to A, assigning A to any other option (e.g. jump) will immediately unbind attack.
Concept
Configure your controls in Fraymakers like you want them to be.
Use the steam controller configuration to set up a second action layer that maps your A button (or whatever button you want to use to select of confirm in menus) to the button you configured for “attack” and your B button (or whatever button you want to use to go back or cancel in menus) to the button you configured for “special”.
Choose a button to activate the menuing layer and one to deactivate it (you can choose the same button for both).
If you want to unbind attack you can assign it to a button that you do not use. This could be a bumper, trigger, the option button or a stick press/click.
Assign attack to that button in Fraymakers.
Then assign your A button (or whatever button you want to use to select of confirm in menus) to input that button in your menu action layer.
Enabling controller configuration support
To enter big picture mode, click the rectangle with the two arrows on the top right of your steam browser window (where the buttons to min/maximize and close the window are).
Once in big picture mode, select the gear at the top right. Click controller settings and enable support for the type of controller you use.
Starting the controller configuration
In this guide I’ll use the steam controller configuration available from “normal” (not big picture) mode.
To open the controller configuration from “normal” mode:
- go to your library
- right click fraymakers
- click “manage”
- click “controller layout”
The big picture version is missing the latest ui overhaul. You can use it if you want to, but options might be named differently or be placed in other menus.
To open the controller configuration from big picture mode:
- go to your library
- select fraymakers
- hit “manage game”
- hit “controller configuration”
Setting up the action layers
In the controller configuration, select “edit layout”.
Now add a new action layer (not an action set).
To do so, go to “Action Sets” and hit the gear of the “default” action set.
Select “add layer” and name it “menu”.
The “menu” layer copies the default configuration and adds some changes to it. Making changes to the default layer will affect the “menu” layer.
Note: When assigning buttons in the controller configuration, always make sure that you are configuring the right action layer! You can choose which layer to edit at the top left or by pressing lb / rb.
This is how it looks when you’re editing default controls:

This is how it looks when you’re editing the action layer:

Select the default configuration (without “menu” layer).
Choose a button that you don’t use while playing fraymakers. This button will be used to swap from fighting configuration to menu configuration . For this guide, I’ll choose right stick click. Go to joysticks > “right joystick behavior” > “R click”. Choose “action sets” at the top > “add action set layer” and select the “menu” layer you created.
Note: The “Display name when changed” option will only work if you have big picture mode open when starting Fraymakers. You do not really need it though.
Select the “menu” layer.
Again, choose a button to swap between configurations. I, again, choose “right stick click”. You can choose any button that you don’t need when menuing.
I go to joysticks > “right joystick behavior”. Now it says “Joystick (inherited)”. This means that our menu layer copies the configuration for the joystick from our default/fighting layer. I change it to “Joystick” and assign “R click” with “action sets” > “remove action layer” and select the “menu” layer.
If you choose a different button for mode changing in the menu layer than in the default configuration, you should set the button you use in the default layer to input its normal action in the fighting layer. (Remember that the fighting layer copies the default configuration. The change from fighting to menu mode is copied to the fighting configuration, although it is not useful here.)
Now you have two configurations between which you can switch by pressing the buttons you configured.
Changing the attack button
For example, if you want to jump with A instead of attacking with A, you will first have to assign a new key to attack (see default Xbox controls below). As soon as you assign a different key to attack you can no longer select things by pressing A. You will now have to press the button that is configured as attack button instead. (We will use the steam controller configuration to fix this later.)
If you assign A to jump first,, attack will be unbound from A (so there’s only ever one binding per button). In that case you will no longer be able to confirm/select menus using your controller. In particular, you will no longer be able to change key bindings using your controller, meaning you are stuck. (This does not matter if you have a mouse to select the keybindings you want to change.)
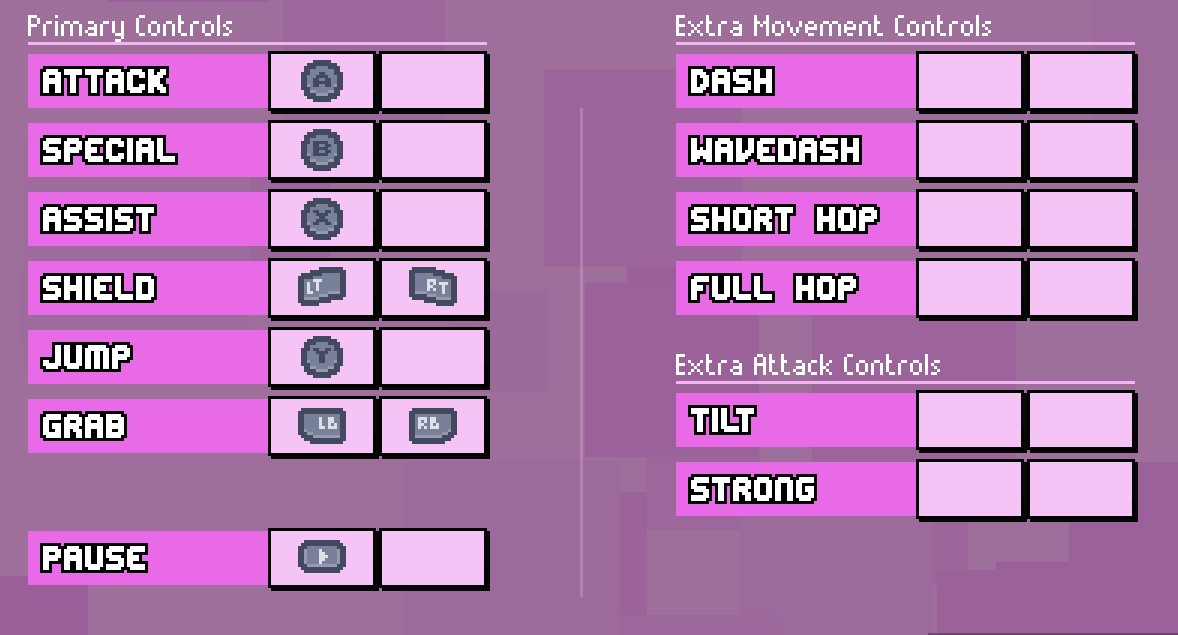
These are the default controls for an xbox controller:
Configuring your controls
In Fraymakers: navigate to “options” > “controls”.
Select “+ New Profile” at the top. Name your profile and select your controller type as “device type”.
(You can switch between which profile you are editing at the top right “select profile”)
Configure your controls as you want, but remember not to unbind attack (unless you don’t mind using a mouse to select the bindings you want to change).
Configure your controls as you want.
Remember that just like confirm/select is done by hitting the attack key, cancelling is done by hitting the special key. It is not possible to cancel the button assigning dialog with a controller. You can only cancel the button assignment by pressing escape on a keyboard.
If you changed your attack or special button, you will no longer be able to use the typical buttons to confirm/cancel in menus.
To fix this, open the steam controller configuration.
Select the menu layer.
Assign the button you want to use to select or confirm in menus (A for me) to input your configured attack button.
Assign the button you want to use to go back or cancel in menus (B for me) to input your configured special button.
(Because I still want to be able to input all buttons while in “menu” mode, I assign my attack button to input A, and my special button to input B in return.)
Swap to Fraymakers.
Go to “Training”.
Select you controller profile beneath your character portrait.
Now your configured profile should be active everywhere in Fraymakers, not just in Fraymakers’ controller configuration.
Activate the menu layer by pressing the key you configured earlier (I press right stick).
Now everytime you press A (or whatever button you chose) it will input your “attack” button and will select/confirm in menus. Likewise, pressing B (or whatever button you chose) will input your “special” button and will go back/cancel in menus.
You can deactivate the menu layer by pressing the key you configured (right stick click for me again).
Use menu mode to navigate menus, then swap to “fighting” mode when you are in a fight.
After the fight, swap back to menu mode and back to “fighting” once your in a fight again.
Restart Fraymakers because it seems to lag horribly after opening the ingame control configuration.
Saving your configuration
In the layout overview, hit the gear symbol (while your configuration is selected above), then hit export and name it. You will now be able to find your layout in the “your layouts” tab. Repeat this if you made changes to your configuration and select “Update Layout” (select “Save New Layout” if you want to keep the old version too).
“Unbinding” attack
However, you can assign attack to a key that you do not actually use (I “use” one of the bumpers for this, you might want to chose one of the stick presses).
Then, in the menu layer, just assign the button you want to use to select/confirm in mues (A for me) to input this button (bumper for me).
Issues & Fixes
Remember to choose your control profile beneath your character portrait.
Entering Fraymakers’ control configuration seems to make it lag a lot. To prevent this, restart Fraymakers after every time you went to its control configuration (the ingame configuraiton, not steams controller configuration).
Thanks to The Legend of Peter for his great guide, all credit to his effort. you can also read the original guide from Steam Community. enjoy the game.