
A guide to doing map R6 C3 in 10 Steps by Nokturnal.
How to do Rundown 6, C3 Overload & Optional Objective.
First off this mission is on a timer, you’ll want to run and loot quickly the entire time as you try to complete the objectives as fast as possible. Waves of enemies will constantly be spawning to attack you. Waves can include around 4 Giants and 2 Hybrids. You’ll also have to deal with 3-4 Tanks. There’s only 1 Checkpoint and it’s all the way in the southern area of Zone 173. It requires 2 Scans.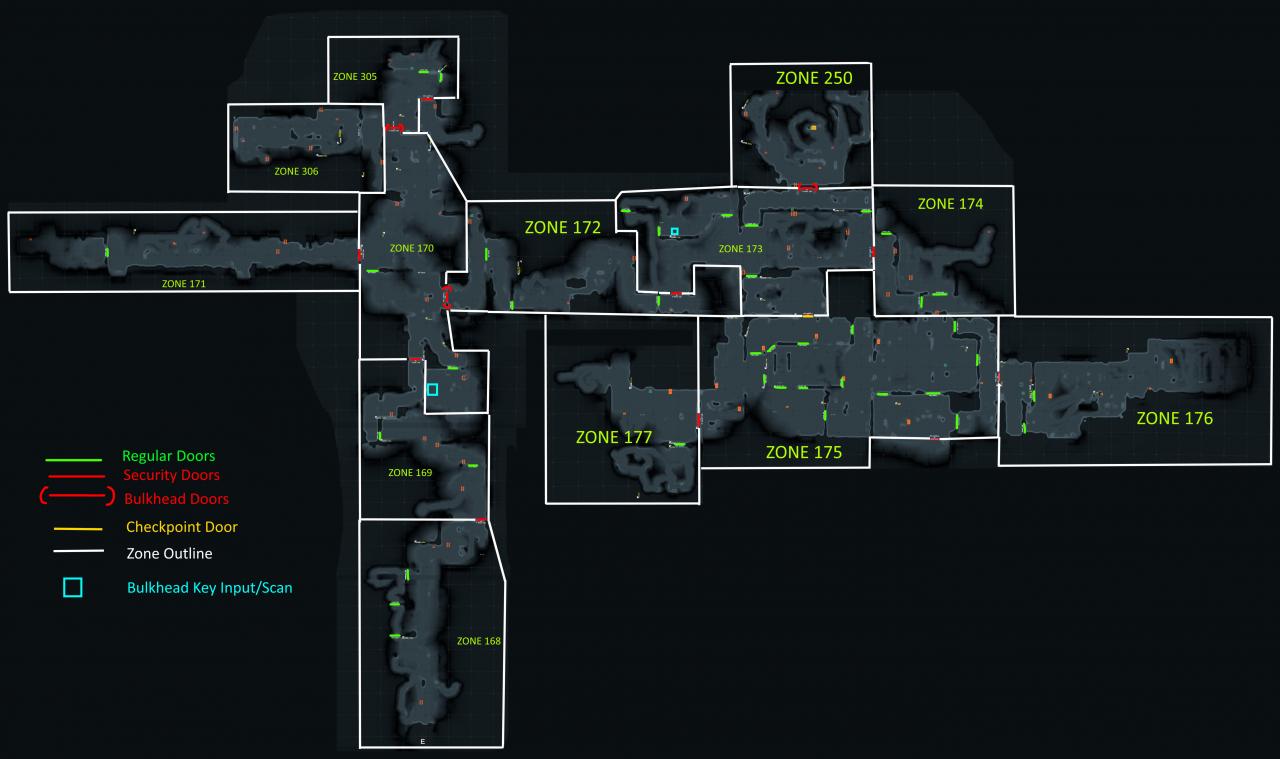
Step 1: Head straight to Zone 171 to get the first Bulkhead Key.
You’ll have to pass through a Security door, a Blood Door, then one more Security Door to get there. Once inside the key can be in any locker/crate inside Zone 171. Usually spawns in the far west side of the room. Some good loot should be in this Zone as well.
Step 2: Go back to the Bulkhead Scan in Zone 170
Input the key, prep the Main Bulkhead Scan to 80-90% then completely finish the Overload Scan.
Step 3: Head north through Zone 170 to get to the Overload Bulkhead and pop it open. Then input SCP_ZONE_PURGE into the terminal
You’ll probably want to aim turrets at the door, C-Foam it and mine it as most likely you’ll encounter at least 2 Waves of Enemies while doing so.
Step 4: Just south of you should be the security door to Zone 306, head inside to get the 2nd Bulkhead key.
Just like the first key, it can spawn in any locker/crate in the area, it usually spawns in the western area of 306. WATCH OUT! There’s a sleeping Tank in this Zone. Introduce his butt to your Scatterguns.
Step 5: Head back out to Zone 170 and plug the key in for the Main Objective Scan.
Stick together, deal with waves as they come.
Step 6: Head through the Main Bulkhead Door, through Zone 172 and 173 to get to Zone 174 to find the 3rd Bulkhead Key.
After the Main Bulkhead Door, you’ll have to pass through 2 security doors. The key can spawn in any crate/locker in Zone 174.
Step 7: Plug the key into the Optional Objective Scan in the NW corner of Zone 173 and do the scan, it’s in the lower area cover
There’s no fog repellers in this entire map so you’ll have to enjoy breathing Toxic fog while you finish the scan. There is a Turbine you can carry but it’s behind the Optional Bulkhead Door.
Step 8: Head out and around to the northeast to open the Optional Objective Bulkhead. Once inside there should be a powercell in
The first powercell and the place you plug it into are both in this room, Zone 250. There’s also some good loot here and at this point you’ll probably be needing it.
Step 9: Head south through the Checkpoint Door in Zone 173 to get to Zone 175. Time to find the other 2 Powercells.
They can be in both Zone 177 and 176.The zones to the east and west through Security Doors. Feel free to consult your terminals.
Step 10: Once you’ve gotten the 2 Powercells bring them back to Zone 250 to plug them in.
Congrats, that’s it, now it’s time to run your butt off to the extraction zone south of Zone 175. You’ll have to pass through 2 Security Doors.
*Note: I’m missing the last 2 Zones on my image of the entire Map, I’ll add those later, not much to do in them except run straight south to the extraction zone.
Thanks to Nokturnal for his great guide, all credit to his effort. you can also read the original guide from Steam Community. enjoy the game.