How to find all the souvenirs and hidden trophies, plus hints and speedrun strats. In-text form. Spoiler Warning!!!
Guide to the guide
The general structure of each part of the guide will be: An overview of the basic components of each puzzle, followed by the souvenir guide, followed by a list of tricks for the speedrun, followed by a full speedrun walkthrough. The speedrun tricks are there to help you find the tricks necessary without just telling you what to do. Do not scroll past the souvenir guide if you are afraid of being spoiled.
Op. 1: Stage Fright
In front of you:
- Headphones that you can wear to hear instructions for setting the stage up
- A panel to control the lights and stage effects
- A lever to raise the clock
To your left:
- Drawers containing useful items like the key under the clipboard
- A panel requiring a combination to be unlocked
- A crossbow and shield
- ~Mysterious Messages~ on the underside of the shelf thing
To your right:
- Ropes with lever locking mechanism that control the banners, lights, and curtain respectively
Souvenirs
Speedrun Tricks
- You can just raise the curtain ASAP and the mastermind will skip to the gas attack.
- The rope for the banners will slowly lower them by itself when unlocked.
- The detached lever from the curtain rope can be used as a lethal projectile.
- The lights will instantly incapacitate the targets as soon as they become vulnerable.
Speedrun Walkthrough
- Face left as you load in
- Pull up the shelf with the donuts, open the first drawer, get the key from under the clipboard
- Put key in keyhole on the right, immediately draw up the curtain and lock it in place
- Face left, 2112 on panel to get the fuel can
- While waiting for dialogue to complete: Unlock the banner rope, load the detached lever from the curtain rope into the crossbow, then lower the banners
- As the mask comes down: Open the hatch, replace its gas with the fuel can
- Set the lights to the right slot to blind the thug as he walks in
- Once he’s blinded, set the lights to the down slot to blind the other thug
- Wait for the thug on the bottom to come in, press the top right sound switch to slam the door in her face
- Shoot the crossbow thug on the left with the crossbow
Op. 2: Jet Set
To your left:
- A window overlooking the wing
In front of you:
- An in-flight service button
- A menu
- A chair that can be reclined
- A portrait
- An ice pick
- A compartment
To your right:
- Books on a shelf
- A capacitor
Below the secret security console revealed by the book:
- A compartment containing an oxygen mask and a needle thing
Souvenirs
Speedrun Tricks
- No matter what combination you enter into the cart, it’ll trigger the laser sequence and need to be put in again.
- You can enter the code into the cart (and press the button) during the laser sequence and it’ll instantly unlock once you’re done dealing with the lasers
- Any laser can take out any laser emitter.
- You can reveal the capacitor panel thing immediately so that you don’t have to stockpile all the capacitors before then.
- Although you can rush through the steps of resetting the defense system, the green needle puzzle will not register as complete until a certain voice line plays. When the handler says “Oh no”, you can change them to black.
Speedrun Walkthrough
- Press the service button
- Press the button on the cart as it rolls in
- Enter 1313 on the cart and push the button
- Face right, pull the middle book on the top shelf down, get the capacitor
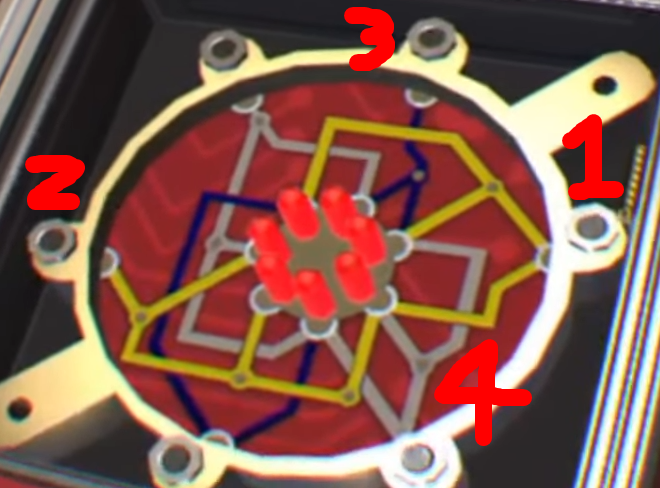
- Plug the capacitors in as you get them (the one with 4 goes in top left, 2 in the middle goes bottom left, and the 2 identical ones with a gap in the middle go on the right side)
- Pull the lever to lean the seat in front of you back
- Use the plate to deflect the laser at the laser emitter on your right, then back at its source
- Grab the capacitor behind the seat, get the capacitor from the compartment under the portrait, get the capacitor from the cart
- Rip the comm jammer out ASAP
- Put on the air mask and get the needle thing
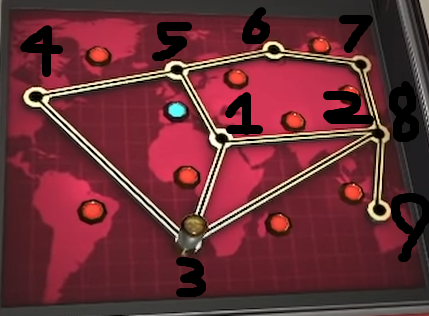
- Set the destination to Lisbon (bottom left node)
- Get the ice pick and smash the window
- Mash the change route button as the dialogue starts to end
- Mash the defense mechanism button as Juniper’s dialogue starts to end
- Face forward, twist the dials as they come out
- Press the left and right buttons on the left panel
- Remove both cards, put the top one in the top left, put the bottom one in the bottom left
- Set the slider to 6
- Put the needle thing in, set the needles to green (middle dial, then right dial, then left)
- Set the slider to 2
- Open the panel on the left, press the middle and right buttons
- Wait for your handler to start saying “Oh no”, then set the needles to black
- Look at the wing and wait until you can unjam the flare launcher
- Uh… Unjam the flare launcher.
Op 3. Eaves Drop
(Prior to lowering down)
Below you:
- A big lantern thing that looks like the other ones on the pedestals
In front of you:
- A bunch of pedestals with one that’s missing something
(After lowering down)
In front of you:
- A back panel holding a soldering gun and assorted wheels
- A locked desk
- A poison bottle
To your left:
- A tape player
- The farthest left compartment of the desk
To your right:
- The farthest right drawers of the desk, with odd red squares on them
(After opening the desk)
- Two small shelves on the left, one with a trap that can be disarmed
- A middle panel with a scrambled symbol
- Two locked compartments on either side of the middle panel
- A panel underneath the blueprint that hides some gears
- A small red-colored blade
(In the locked compartment on the far left)
- Aside from the other stuff there, there are two smaller compartments that can be slid out from the top
Souvenirs
Speedrun Tricks
- As soon as you place the lantern thing on its pedestal, you can immediately lower yourself through the laser field without dying.
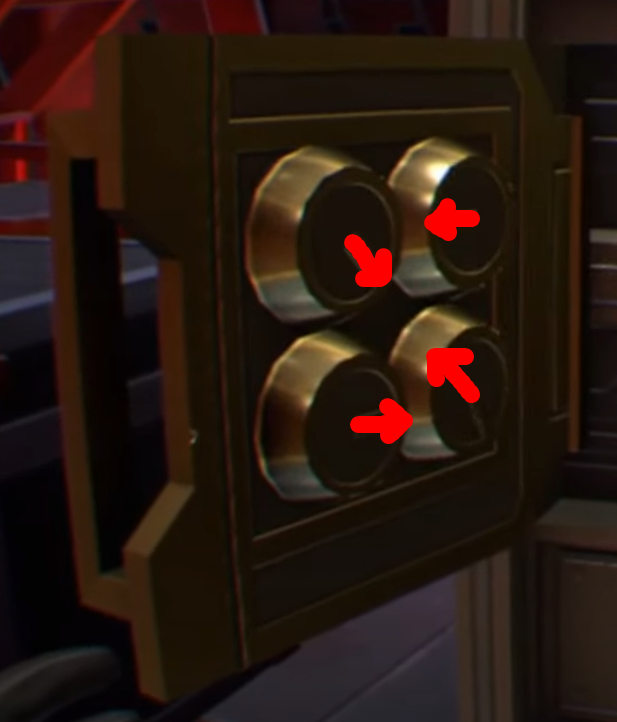
- The drawer puzzle with the red buttons will be complete as soon as all the red parts are in position, so you can just yank the last drawer out and it’ll still work.
- The guard can be removed much more quickly with the poison bottle or poison darts.
- The poison bottle will take the guard out when he walks into it, even if it’s set to hover.
- The guard will walk in on you more quickly if you put on the Mimic Mask.
Speedrun Walkthrough
- Face left while loading in, grab the red ball lantern thing, pull it up and put it on the pedestal
- Lower yourself down, grab the small wheel on your way
- Pull the drawers on the right to the correct positions
- Open the desk, yank the blueprint off
- Open the panel to reveal the gears, place the wheel
- As you turn the wheel, grab the red blade to the right
- Once done, pull the lower shelf on the left and cut the wire
- Put the red blade in its slot on the far bottom left drawer, grab the white chisel screwdriver thing
- Put it in its slot on the front right, open the compartment, grab the chisel again, unscrew the back panel, turn the dial clockwise to rotate the symbol once
- Raise the poison bottle out of the way, open the cabinet behind it, yank the document out of the way, grab the screwdriver
- Unlock the front left compartment, open it
- Turn the dial on the far left clockwise to rotate the symbol once, turn the front-left dial counter-clockwise to finish the puzzle
- As the mask comes out, get the wire cutters from the shelf at the top of the far bottom left drawer
- Remove the chip on the left, cut the wires on the right, remove the right chip
- Put the poison bottle where the guard will walk in (it takes him out automatically)
- Grab the soldering gun
- Get the tracking chip, put it on the right spot
- Replace the right chip, solder it up, replace the left chip
- Put on the Mimic Mask to speed the guard up
- Replace the Mimic Mask once done
- Pull the lever upward to rise out of there
Op. 4: Party Crasher
In front of you:
- Casks of wine in the back with symbols on them
- Instructions for using wine glasses properly
- A top hat with something inside
To your left:
- Wine bottles
- A big cask with swords in it and more swords above it
To your right:
- A dumbwaiter
- Wine glasses
Miscellaneous tip: You’re supposed to send the bottle up unopened with its glasses
Souvenirs
Speedrun Tricks
- There’s no need to send Juniper the Mimic Mask.
- The guards will walk into rooms even when you’re pumping gas into them.
- The smoke grenade will prevent Juniper’s thug from even trying to shoot you.
Speedrun Walkthrough
- Face left, grab the bottle with the red top in the front, place it on the dumbwaiter
- Get the two glasses second from the top, put them on the dumbwaiter
- Send it to the ballroom, press the call button
- Pull the swords out from the big cask, put in the 2nd and last swords to unlock it, then open it
- Move the ladder out of the way, get the key, place the key in the cask
- Turn off the 1st, 3rd, and key-cask spigots
- Reveal the hidden button, press it, detonate the mines
- Activate the map, gas the guards (Billiards, then Gymnasium, then Upstairs Bar) (use the dumbwaiter and call button to lure the balcony guard in)
- Use up all the gas while you wait
- Get the nuke briefcase
- Get a smoke grenade, pull the pin as Juniper starts telling his henchman to shoot you
- Grab the grenade, put it in the big cask, close the door
Op. 5: Safe & Sound
In front of you:
- Plates and a knife
- An agency symbol
To your right:
- Locked drawers containing a lighter, drill, and drill bit
(After revealing the full set)
In front of you:
- A whole lot of explosives
- A clapperboard, that film thing with the part at the top that you smack down
- A mirror on the left in a trailer
- Arrow keys that rotate the backdrop
- A motion-tracking rocket launcher
- A camera with a death ray taped to its side
- A filming set with a rotating backdrop
- A mirror on the right
Souvenirs
Speedrun Tricks
- You can skip Juniper’s monologue with the clapper.
- You still have some brief windows where you have to wait, so you can use that time to set up the light puzzle in advance.
Speedrun Walkthrough
- Grab the knife, open the bottom drawer on your right and cram it in
- Unlock and open the drawer, grab the lighter, send it forward while lowering the agency symbol, tilt it slightly so that it sets the wall on fire when it collides
- Take out the drill and attach its bit
- Get the clapperboard and use it to skip Juniper’s speech
- Angle the mirror on the right (it should be facing mostly left)
- Press the left arrow button twice to change the backdrop to the Zoraxis one
- Immediately take out the missile launcher by getting it to shoot itself
- Grab the battery, put it in the drill, use it on the death ray
- Grab the death ray, replace your drill bit with it, fire it at the left mirror
- If your angle was off earlier, fix it
- Once the laser field is destroyed, use the death ray on the water tower
Op. 6: Phoenix Rising
Lobby floor:
- A fruit tray
- Scattered access cards
- A clipboard listing what the access cards do
Next floor:
- A fire extinguisher
- A tool cart with a small key, big key, screwdriver, and wire cutters
Next floor
- Levers to control the doors
- A cattle prod
- A locked cabinet
- A battery that falls from the left-most room
Above
- A hatch
- A sawblade mechanism that comes down to cut the elevator cables
Top Floor
A screwdriver on the left
An unlocked cabinet on the right with a lever
The nuke briefcase
Souvenirs
Speedrun Tricks
- You don’t need to individually free every VIP. You can just pull the lever on the left and they’ll all escape instantly.
- The battery can be charged with the cattle prod, which takes much less time than waiting for the saws.
- The saws can be taken out using the elevator’s original broken battery, letting you continue your ascent unimpeded.
Speedrun Walkthrough
- Get the card furthest on the right in the back, slot it in, press button 32
- Get the screwdriver, start unscrewing the panel
- While doing this, get the big key and unlock the hatch at the top
- Get the wire cutters and the small key
- Cut the wires, put out the flames
- Use small key on lock, open the panel, pull the lever
- Grab the battery and the cattle prod
- Put the battery on the shelf by the elevator panel, activate the prod and hover it
- Connect the cables to the prod to charge the battery, connect the battery to the elevator
- Look up, open the sawblade hatch, then place the broken battery from the elevator panel next to it in order to blow it up
- As you reach the top floor, open the electrical panel on the right and pull the lever, Kronk
- Bring the screwdriver on your left over, grab the briefcase, open the briefcase
- See images:
- Push abort botton, connect power cables to botton, push big botton and win game forever
Thanks to Effluvial Kraken for his great walkthrough, all credit to his effort. you can also read the original guide from Steam Community. enjoy the game.