Quick Guide to Combat in Ironseed.
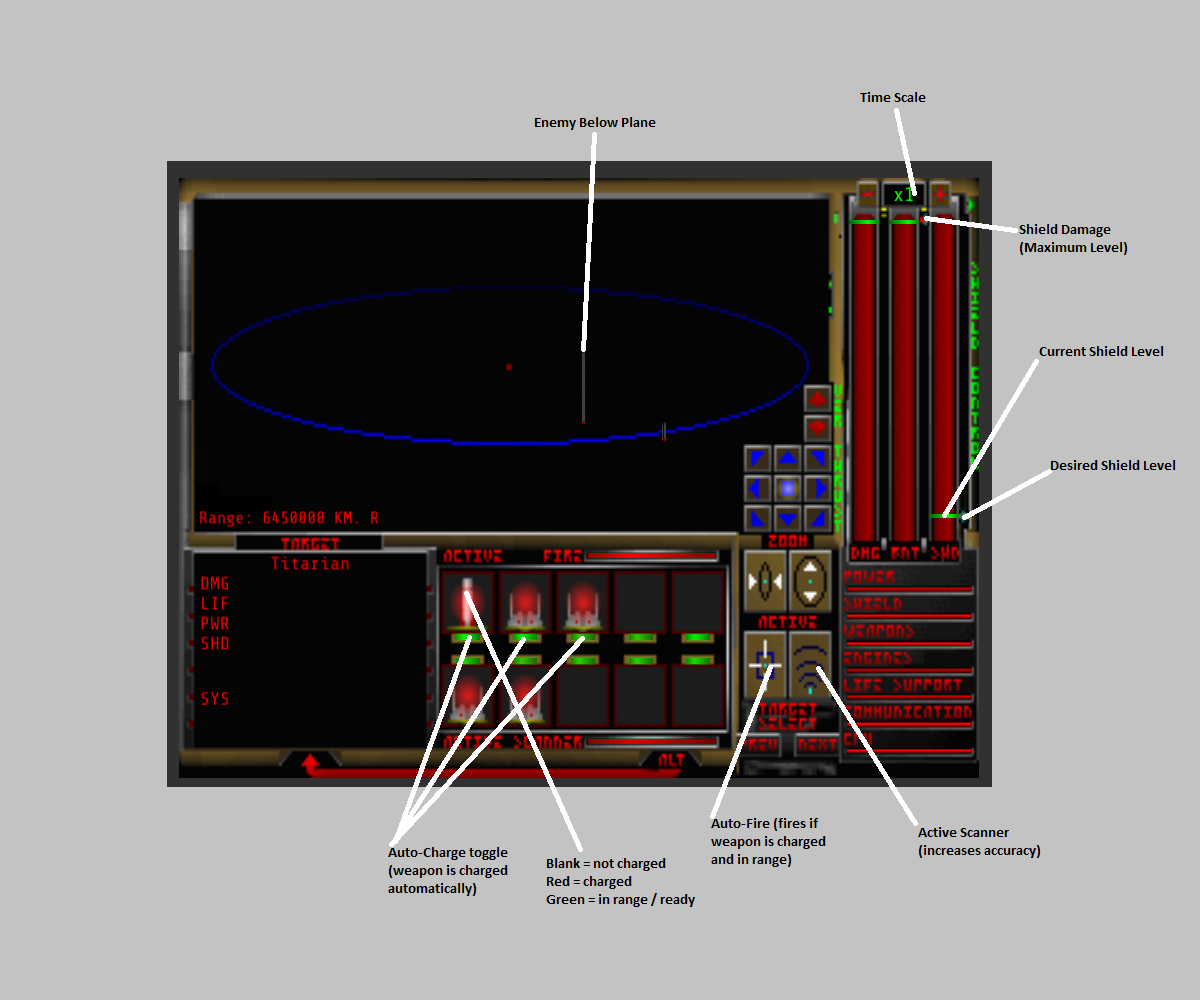
Blips are shown on the map relative to your ship’s location. Think of submarine warfare. Since we’re in a 3 dimensional space (just like the ocean and submarines), there are 3 directions of movement. Enemies that are below your ship are seen a line with a red dot at the bottom of the line and gray dot at the top. Enemies above you will have red dot at the top of the line and a gray dot at the bottom.
The up/down (Z vector) does affect range when firing weapons.
Use the arrow buttons to control which vector to travel in.
Shield control is made up of 3 values.. the maximum shield level (based on damage to the shield system), the current shield level (what level the shield is currently at and may be moving up or down), and the targeted level (where you want it to be). Reinforced Shields do not have a shield level but more like a certain amount of “hit points”. They do not raise and lower like other shields.
Weapons can be in different stages:
Light Red (can’t really see it) – weapon is uncharged
Red – weapon is charged
Green – weapon is charged and ready to fire
Weapons charge automatically when the Auto-Charge toggle is green. Otherwise the player must click on the weapon to being charging it. Charging a weapon uses Battery power. If there is insufficient power, the weapon will not charge.
Active Scanners increase accuracy.
Auto-Fire will automatically fire all weapons charged and in range.
Next and Prev cycle through targets. Alt shows a different target view.
Some weapons are better than others. For example, psionic weapons cut right through most shields. Range is sometimes more important than damage.
Multiple shots may be required to cut through an enemy shield. Turn off auto-fire and allow all weapons to charge. Turn back on to fire all simultaneously.
Disable auto-charging weapons that are unneeded or wasting power.
Shields can get into what is known as a “Ground State Pulse”. The shield will start charging up and using battery power. The battery drains and the shield starts dropping. The battery recharges a bit and the shield starts going up. This is not a good situation to be in. When shields fail because of power failure, the shield takes damage, reducing your maximum shield level. Eventually the shield will take so much damage that an equilibrium point will be reached.
Running out of power can be a bad thing. Weapons won’t charge, shields won’t raise. The big issue is to cut down the shield maximum level by dragging the shield slider on the right of the shield. Uninstall weapons that are unneeded or too weak to be useful such as Dirks.