How to create your own CUSTOM MISSIONS, as well as upload and share them with your fellow Mayors!
What makes a fun map?
The dark project deck should usually be mostly Black Ops. Pick 3 to 4 cards (besides Doomsday Clock) that will create interesting challenges and then the rest Black Ops. Put in enough total Black Ops to overcome the player’s starting security.
How much money income the player needs depends a lot on kaiju abilities. If kaiju have no ‘unit-killers’, then the player really only needs $1 or $2 per turn once they’ve deployed a few initial units. If there are more kaiju, or they have more deadly abilities, more income is needed.
Once you’re pretty happy with your map, tweaking the difficulty is easy. Adjust the number of Breakthroughs needed, the kaiju’s starting health, or else place a few extra warehouses near the kaiju’s spawn position.
But above all, experiment and have fun! Good luck with the city planning, Mayors!
Starting Out
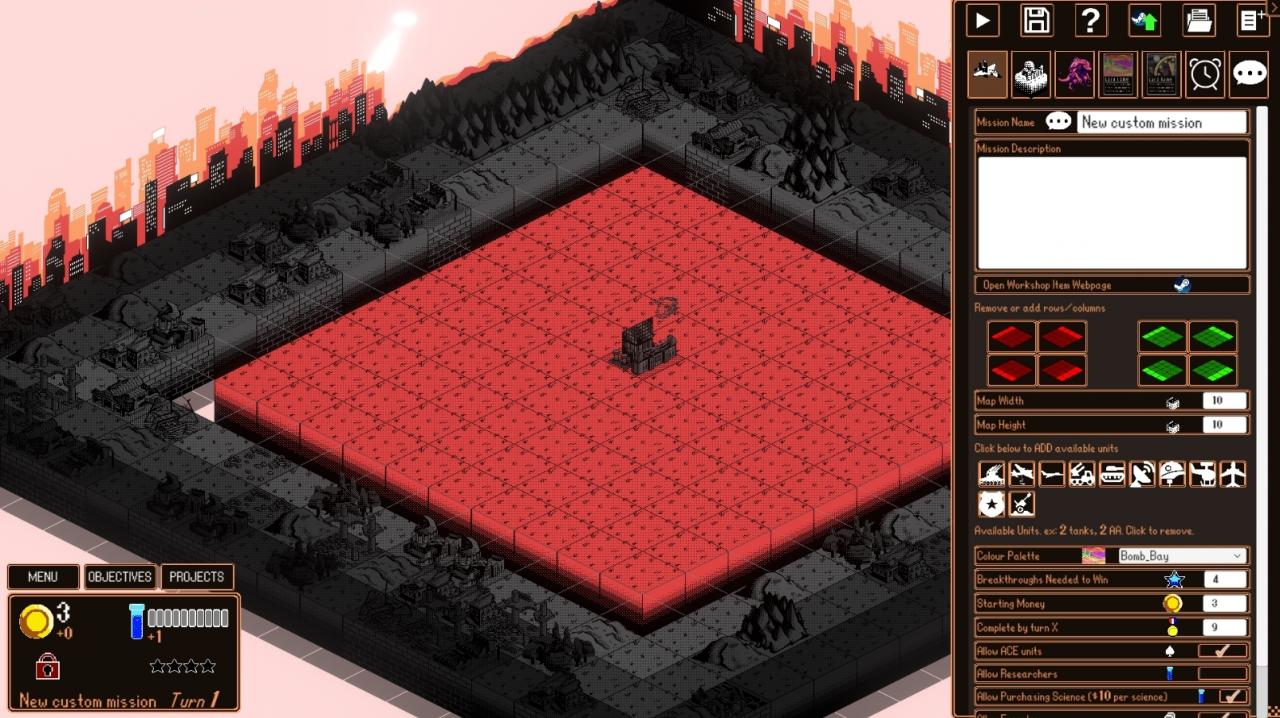 Upon first entering the Map Editor from the Main Menu, you’ll be greeted with an empty map save for Dr. Wagner’s laboratory in the center.
After saving your mission once, your mission file will be located at:
<path to Kaiju Wars folder>/Scenarios/Usermade
You can find the path to the Kaiju Wars folder using the Steam client.
The Map Editor panel is on the right-hand side of the screen.
Many elements have a tooltip that explains functionality if you hover your mouse/cursor over them.
We will now go from top to bottom explaining the Map Editor panel.

At the top of the Map Editor panel is the Options Bar. Using it, you can PLAY/TEST your map, SAVE, view HELP, SAVE/LOAD and create a NEW MAP.
Remember, you can hover over items to view a tooltip explaining them.
Mission Settings Tab
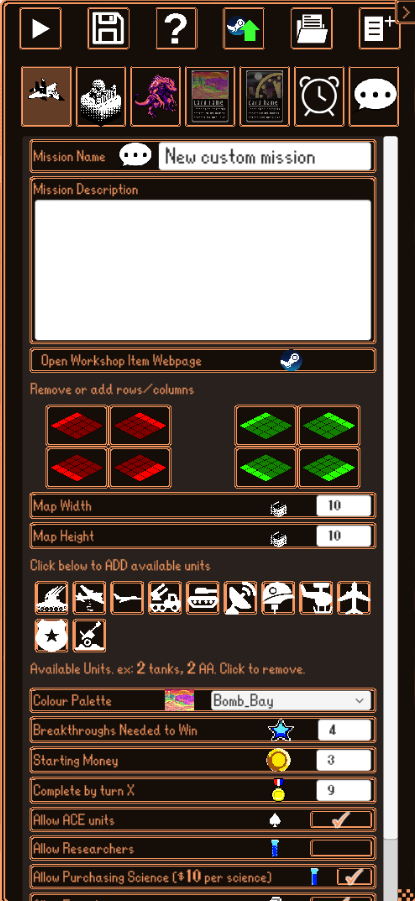 Slightly below the top options bar, we have a number of tabs. The leftmost tab (the Fighter icon) is the mission settings tab.
Most items are self-explanatory, but for each mission you’ll want to:
– Fill in ‘Mission Name’
– Fill in ‘Mission Description’
– Set your dimensions by editing ‘Map Width’ or ‘Map Height’, or clicking on the red/green add/delete row/columns buttons
– Add units the player can deploy by clicking on unit icons
– Choose your ‘Colour Palette’
Some fields can use a more in-depth explanation.
Stating Money: How much money the player starts with.
Tip: How much money income the player needs depends a lot on kaiju abilities. If kaiju have no ‘unit-killers’, then the player really only needs $1 or $2 per turn from buildings once they’ve deployed a few initial units. If there are more kaiju, or they have more deadly abilities, more income is needed.
Breakthroughs Needed To Win: A BREAKTHROUGH is earned by the player accumulating 10 SCIENCE (from SCIENCE producing buildings like Labs or Offices), OR by reducing a kaiju to 0 health. The number of breakthroughs determines how long the mission will last. Giving the player more starting SCIENCE buildings will make BREAKTHROUGHS come more quickly.
Tip: Once you’re pretty happy with your map, tweaking the difficulty is easy. Adjust the number of Breakthroughs needed, the kaiju’s starting health, or else place a few extra warehouses near the kaiju’s spawn position.
Complete by turn X: An optional objective encouraging the player to try to beat the mission before a specific turn. Does not give a Medal (unlike Campaign missions).
Allow ACE Units: If checked, the first TYPE of each player unit will be replaced by the player’s ACE version of that unit. ACE units can have their stats upgraded by spending medals during the campaign.
Allow Researchers: Researchers are unlocked in Act 2 of the campaign, and can give powerful bonuses to generating SCIENCE (as well as other goodies).
Allow Purchasing Science: If checked, the player can click on Dr. Wagner’s current lab, and pay $10 to purchase 1 science. If you give the player lots of MONEY producing buildings, allowing this option guarantees their money will always be useful, even after they’ve constructed every building and deployed every unit.
Allow Freeplay: Freeplay allows the player to CHOOSE their own project card deck before playing the mission with project cards they’ve played during the campaign. The number of project cards the player can choose is determined by how many project cards YOU put into the Project Card tab. Allow Freeplay is a fun option, and allows a near infinite amount of project card combinations – expect players to perform way better than expected with their own decks!
Forced Freeplay: FORCES the player to CHOOSE their own project card. The number of project cards the player can choose is determined by how many project cards YOU put into the Project Card tab, so fill out that tab!
Core Defence: Core Defence emulates the final mission of each Act in the campaign. This is NOT recommended for players new to the map editor. Please refer to the Core Defence section of this guide for more details.
Tiles Tab

To place TILES on the map, click on the TILES TAB (the Lab icon) in the Map Editor Panel, click on the TILE you want to place, then LEFT-CLICK on the map itself.
You can also RIGHT-CLICK to place an EMPTY tile on the map.
Each map REQUIRES Dr. Wagner’s starting lab to be placed – an error will be shown when saving if it has not been placed. This starting lab is where Dr. Wagner starts the mapl; choose its location wisely.
You can hover over each tile to see their effects.
Tip: Maps are most fun when there’s a threat to Dr. Wagner. Place the doctor’s lab close to a kaiju’s starting location, or in a spot where monsters can get there quickly if there’s a breach.
Kaiju Tab
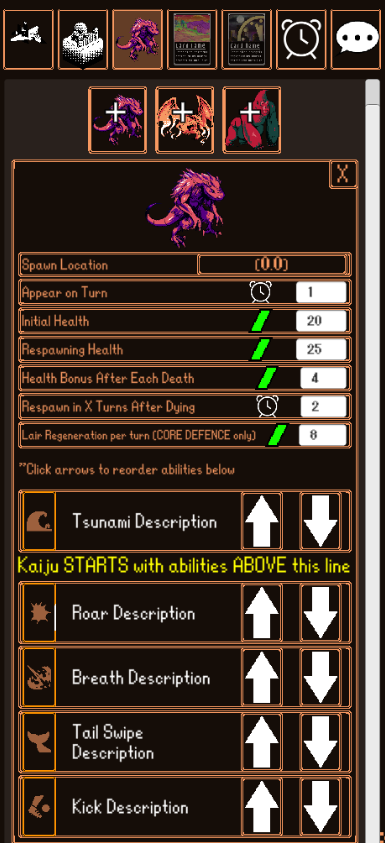
The Kaiju Tab lets you edit the mighty KAIJU! Click one of the ‘+’ buttons to add a kaiju to the map.
NOTE: for the DEMO, the kaiju selection is limited.
You are allowed as many duplicate kaiju as you like.
The default values provide a good start for most missions.
Spawn Location: Click this button, then click on the map itself to set the kaiju’s spawn location. If defeated, the kaiju will reappear here later (unless it’s a CORE DEFENCE mission).
Appear On Turn: Which turn number the kaiju appears on.
Initial Health: Health the kaiju INITIALLY appear with.
Respawning Health: After being defeated once (health reduced to 0), the kaiju will RESPAWN with this health.
Health Bonus After Each Death: If the kaiju is defeated MORE THAN ONCE, this health bonus is added to the Respawning Health. For example, if the respawning health is 20, and Health Bonus After Each Death is 5, it will have the following health on respawn:
20 health after first defeat
25 health after second defeat
30 health after third defeat
etc.
Respawn in X turns after dying: How many turns it takes for this kaiju to reappear.
Lair Regeneration Per Turn: Only used in CORE DEFENCE. If this is the ACTIVE kaiju, and it is not on the map, it regenerates this much health per turn.
Kaiju Abilities: Click the UP and DOWN arrows to reorder the kaiju’s abilities. Abilities below the yellow text ‘Kaiju STARTS with abilities ABOVE this line’ are not learned/active. By default, the kaiju has no abilities. Choose which abilities to give them with care. For most missions we recommend giving each kaiju only one or two abilities, so the player doesn’t get overwhelmed trying to remember too many abilities. For CORE DEFENCE, the order of these abiltiies (from top to bottom) is the order abilities are learned during RESURGENCE or MUTATION dark projects.
Projects Tab
 Each turn, three project cards are drawn, and the player MAY choose to play one. Click on projects on the left to add them to mission. Click on added projects to remove them.
For FREEPLAY missions, only the NUMBER of projects you add to the mission matter. Ex: add 20 projects to the mission, and the player can choose up to 20 projects of their own take in.
Unlike during the campaign, there are no limits on how many projects you can include, though we recommend giving the player a variety of projects to use.
Dark Projects Tab
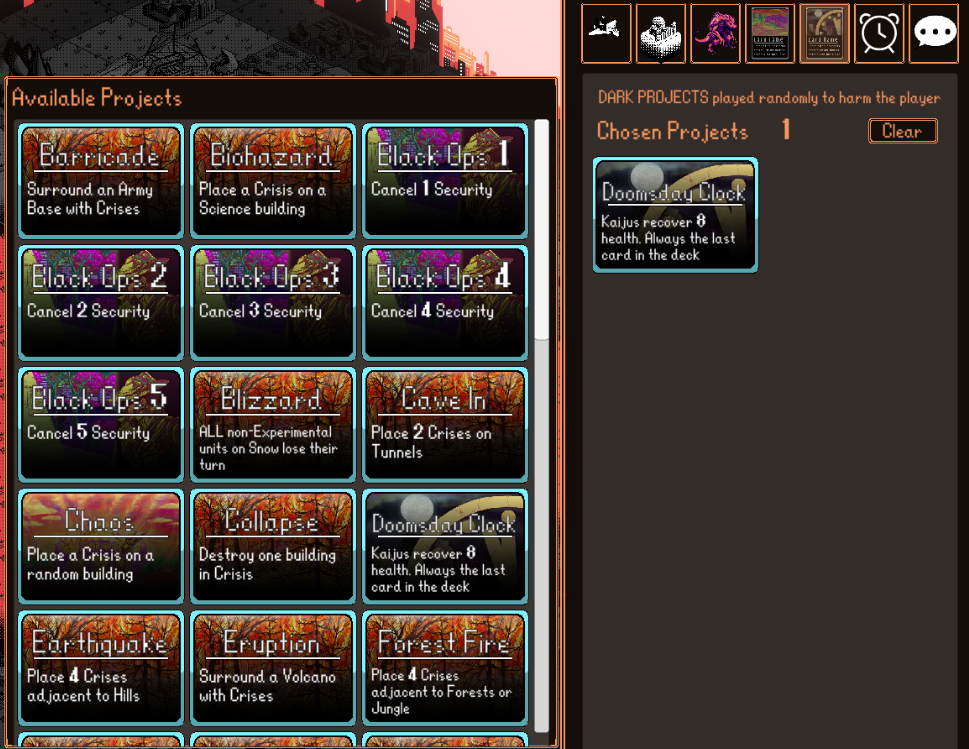 Dark Projects are played AGAINST the player each turn.
By default, ‘Doomsday Clock’ is added. Doomsday Clock is always the LAST drawn Dark Project, and it RESHUFFLES the Dark Project deck. Without Doomsday Clock, the Dark Project deck WILL NOT be reshuffled, and will eventually run out of cards. This is not recommended – time is meant to be against the player.
We recommend having adding many BLACK OPS 1 or BLACK OPS 2 dark projects to allow for BREACHES, forcing the player to evacuate Dr. Wagner and preventing them from getting too comfortable.
For CORE DEFENCE, ‘Retreat’ is automatically added. Retreat will have the ACTIVE kaiju retreat to its lair, where it will REGENERATE health each turn, and play LAIR projects instead of DARK PROJECTS each turn.
Tip: The dark project deck should usually be mostly Black Ops. Pick 3 to 4 cards (besides Doomsday Clock) that will create interesting challenges and then the rest Black Ops. Put in enough total Black Ops to overcome the player’s starting security.
Lair Projects Tab
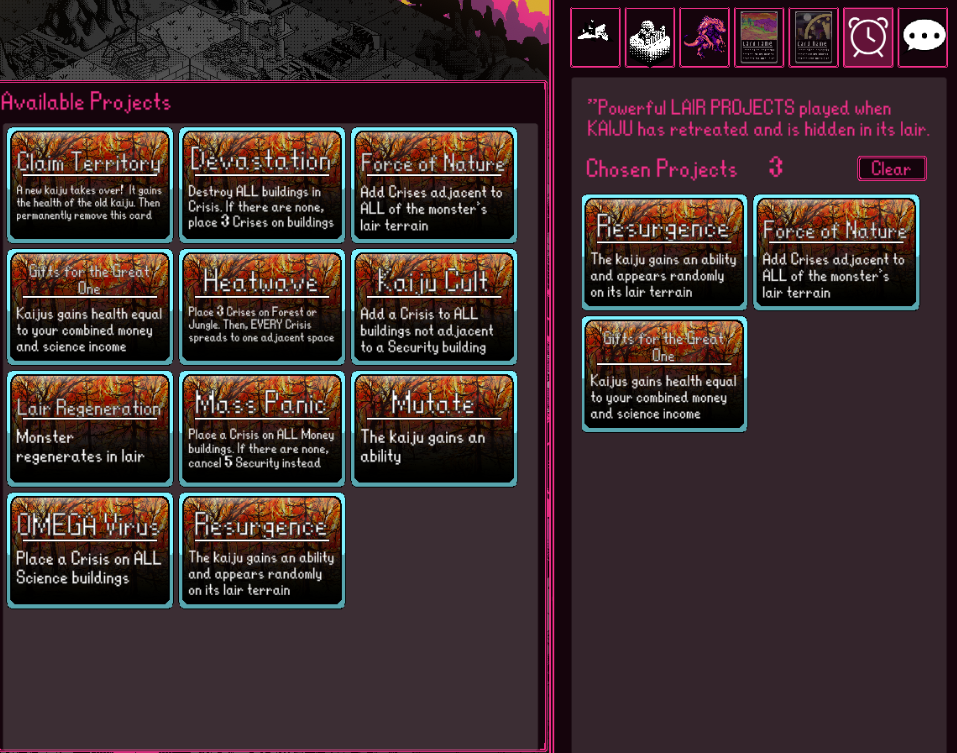
Lair Projects are played AGAINST the player each turn the kaiju is NOT currently on the map (is resting in lair).
‘Resurgence’ MUST be added as a lair card, else the kaiju will never emerge from its lair.
If you want MULTIPLE different kaiju to attack during a CORE DEFENCE, add a ‘Claim Territory’ card to have the kaiju switch the ACTIVE kaiju.
Ex: Alphazaurus is the first kaiju. After a few turns it retreats to its lair. Claim Territory is drawn, and the next kaiju takes over, which happens to be Pterus Ignis. There are no more ‘Claim Territory’ projects since it is removed permanently after play, meaning Pterus Ignis will be NEVER be swapped out.
A recommended Lair Project deck is Resurgence along with 2-3 other Lair Projects of your choice.
Dialogue Tab
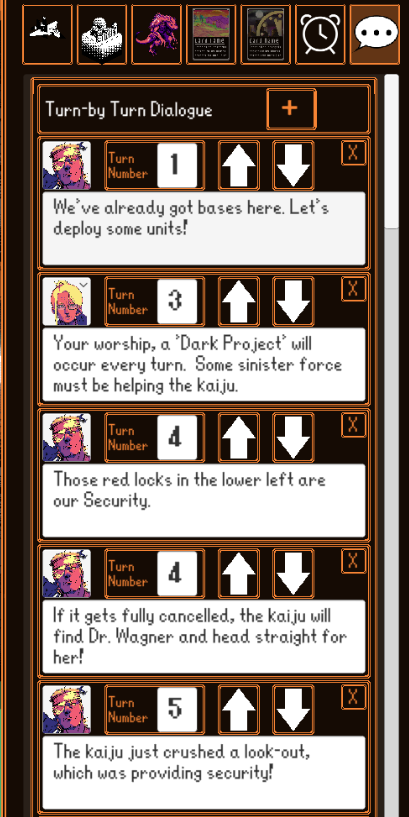
Turn-by-Turn Dialogue: Dialogue played on a specific turn. Play on turn 1 to give some context, and on a specific later turn if something shocking like a surprise kaiju appearing!
Advice: The player can optionally click on one of their Advisor’s portraits to get sage advice. You can have other characters speak during other character’s advice. Give them some tips, or a funny quip! You can h
Victory Dialogue: Played if the player wins the mission.
Defeat Dialogue: Played if the player loses the mission.
On the top bar is the ‘Upload to Steam Workshop’ button (steam logo with green arrow). Click it to have your mission uploaded to Kaiju War’s workshop page. These missions are then PUBLICLY VIEWABLE, and playable by everyone! The workshop URL it’s uploaded to depends on if you’re playing the DEMO, or the FULL RELEASE.
DEMO workshop: https://steamcommunity.com/workshop/browse/?appid=1751450
FULL RELEASE workshop: https://steamcommunity.com/workshop/browse/?appid=1508400
NOTE: Any changes you make AFTER uploading your mission WILL NOT be automatically uploaded. Any time you make changes, you must SAVE, then UPLOAD again.
Sorry, but Steam doesn’t allow this (not our fault!). You’ll have to RE-UPLOAD the mission again the full-release.
There are several ways to view your online steam workshop mission entry:
- In the Map Editor, click the ‘Open Workshop Item Webpage’ button on the Settings Tab.
- Click one of the workshop links below in a web browser to search for it manually.
- Using a web browser or steam client, click on your profile, click on Workshop Items
It can take several minutes for your mission to appear after an upload, so be patient.
Viewing the item via web browser or steam client allows to modify its settings, like changing its visibility to PRIVATE instead of PUBLIC, or even deleting the item itself.
To play other people’s uploaded missions (or your own), go to the MAIN MENU and click ‘Custom Missions’. You can filter for missions YOU uploaded, and a variety of other options.
After finishing a downloaded workshop mission, you’ll be asked to rate it with a THUMBS UP or THUMBS DOWN. Help out the community, and rate those maps to let others know you had a good/bad time!
Core Defence
CORE DEFENCE missions differ from regular missions in several ways:
Only ONE kaiju will ever be on the map at a time
Kaiju spawn randomly on tiles matching their LAIR TERRAIN. Ex: Big Donk appears on a random FOREST tile, Alphazaurus appears on a random OCEAN.
The ‘Doomsday Clock’ DARK PROJECT is not allowed
Each time a kaiju appears, 5 cards from the DARK PROJECT deck are drawn, with ‘Retreat’ guaranteed to be the last or second last card. You are allowed to have as many Dark Project cards in the mission, but a random subset be randomly selected each time the kaiju appears.
When the RETREAT dark project is drawn, the active kaiju retreats to its lair and leaves the map.
Upon entering the LAIR (and leaving the map), 4 LAIR PROJECT cards are randomly drawn, with RESURGENCE guaranteed to either be the last or second last card.
While in the LAIR, LAIR PROJECTS are played against the player each turn instead of DARK PROJECTS
While in the LAIR, the kaiju heals its ‘Lair Regeneration’ amount of health each turn
While in the LAIR, the RESURGENCE LAIR PROJECT will eventually be drawn. The kaiju will reappear on the map, thus reshufflig the DARK PROJECT deck, making DARK PROJECTS be played each turn instead of LAIR PROJECTS
If you want the active kaiju to CHANGE while in its lair, add one ‘Claim Territory’ LAIR PROJECT per change you want to happen. You will need to add multiple kaiju to the mission to make use of switching kaiju mid-mission. Kaiju will be used in the order they’re added. If there are more ‘Claim Territory’ LAIR PORJECTS than kaiju, kaiju will be picked RANDOMLY after each kaiju has appeared at least once.
Again, we DO NOT recommend new map makers try to make CORE DEFENCE missions.
Thanks to Foolish Mortals for his great guide, all credit to his effort. you can also read the original guide from Steam Community. enjoy the game.