This is a comprehensive guide detailing a step by step walkthrough of all 47 Achievements in the game. If you have never played this game, this guide will show you a road map & order in which these unlocked for me. If you are simply hunting for Achievements this will hopefully help illuminate the ones you are missing.
Achievement Breakdown: (47)
Story Related: (21)
Side Quests: (3)
Collectibles: (10)
Slay: (7)
Miscellaneous: (6)
Sequence 1: Route A
2. Sub Quests: 3/80%
3. Archives: 0/45
4. Chips: 24/44
5. Pod Programs: 7/17
6. Weapons: 7/40
7. Unit Data: 4/80%
8. Endings: 1/26
9. Achievements: 6/47
—————————————————————————————————–
Pod Program #1 – R010 Laser: Given during the Prologue while you are battling the massive Goliath-Class Boss.

Achievement #1 – Resuscitated Body: Stare into space from the Bunker.
Story Related. Unlocked after completing the Prologue & defeating the Goliath-Class Boss for the final time.
Weapon #1 – Bare Fists: Starting Weapon. This is the only Weapon we are unable to Upgrade at all & does not count towards the Inorganic Blade Achievement.
Weapon #2 – Virtuous Contract: Starting Weapon.
We begin the game officially on the Bunker, the events & Items we received in the Prologue do not carry over with us. We only have these two weapons to start; we have to find that Large Sword – Virtuous Treaty later on.
Ending #1 – T – fa[T]al error: Remove your OS Chip.
This will be the first Ending we will unlock. Save your game before attempting! Go into your menu & enter the Skills – Plug-In Chips – Set Type A – Customize – Equipped Chips. Find your OS Chip & remove it… & die. If done correctly, you will see a fast-forwarded Credits & an Ending Screen with “fa[T]al error” on it.
You will be returned to the Main Menu afterwards. When you go to load the game up again, you will notice underneath your current location that you will now have a “T” beside the Endings section. 25 more to go…

Achievement #2 – What Are You Doing?: 2B’s secret discovered 10 times…
This is a very strange Achievement. If you do not already know what her secret is… it is the fact that we can peek under 2B’s skirt. For the Achievement, we have to angle the camera to look under 2B’s skirt from the front 10 times. You will know you have done it right because 2B will swipe at the screen & actually reset your camera angle.
You cannot have 2B or the camera moving, you must leave it with your view of 2B’s white under garments for her to move the camera & it to register as being seen. By the second time doing it… it really starts feeling like harassment & you question the nature of this game. The Achievement will unlock after our 10th abuse of power.

Achievement #3 – Vestiges of Prosperity: Arrive at the City Ruins.
Story Related. Climb onto the next building after leaving your Flight Unit & a cinematic will play showcasing the City Ruins. The Achievement will unlock after the cinematic returns you back to 2B.

Achievement #4 – The Circle of Death: Have your body collected.
If you have ever played Dark Souls or a Souls-Like game, this should not be a foreign concept to you. When you die, your body will remain in the place you were killed. Return to your death spot & retrieve your corpse for the Achievement.
When you die in Nier – Automata, you will lose all your equipped Plug-In Chips on your corpse. It is a very good idea to retrieve your bodies at all times if you can manage it.
There are a lot of very useful things for sale at the Resistance Camp & we will need a good sum of G to purchase it all. Some good initial sources of money for us are Sub Quests & Fishing. Fished objects/fish themselves sell for quite a bit of G. As well, if you see rare White Moose or Boars, kill them for the chance of acquiring some valuable loot.
Pod Program #2 – R020 Mirage: Purchased from the Resistance Camp for 10,000G.
Pod Program #3 – R030 Hammer: Purchased from the Resistance Camp for 10,000G.
Pod Program #4 – R040 Blade: Purchased from the Resistance Camp for 10,000G.
Pod Program #5 – R050 Spear: Purchased from the Resistance Camp for 10,000G.
Pod Program #6 – A060 P-Shield: Purchased from the Resistance Camp for 10,000G.
Pod Program #7 – R070 M-Shield: Purchased from the Resistance Camp for 10,000G.

Achievement #5 – First Errand: Complete your first quest.
We will receive two Sub Quests from the Resistance Camp: The Supply Trader’s Request & The Weapon Dealer’s Request. The Achievement will unlock after turning in either of these quests. We will need to complete 48/60 Sub Quests to unlock The Mercenary Achievement.
After completing the Sub Quest – The Weapon Dealer’s Request we will now be able to purchase our next 3 Weapons.
Weapon #3 – Ancient Overlord: Purchased from the Resistance Camp for 15,000G.
Weapon #4 – Beastbane: Purchased from the Resistance Camp for 10,000G.
Weapon #5 – Beastlord: Purchased from the Resistance Camp for 10,000G.
Weapon #6 – Phoenix Dagger: Leave the Resistance Camp & follow the stream below its entrance all the way down to the large waterfalls into a large valley below. Be forewarned, the enemies down here are Level 25+ & it is advised that you flee from them. Save at the nearby Access Point, then leap into the valley. Be sure to hold the “jump button” to hang onto your Pod as you descend.
At the bottom of the valley, head towards the flooded section & take a right up the sandy bank where all the Machine corpses are. Along the rock wall will be two Chests. One can only be opened by 9S in Route B, but the other Chest beside it is unlocked. Open the Chest & collect the Phoenix Dagger.
To escape this area, head along the passage opposite of the flooded area & there will eventually be an elevator we can take up out of here along the right wall.

Achievement #6 – Animal Rider: Any animal ridden for 5 kilometers.
This is a straightforward Achievement. This does not have to be completed in one ride & the distance is cumulative. The only mounts in the game are Boars & Moose; with rare albino types sometimes spawning.
If you want to unlock the Achievement right away, purchase some Animal Bait for 100G & the Satchel for 1000G at the Resistance Camp. Then approach any Moose or Boar & place the Bait down so you can mount it. The distance between the Resistance Camp & the waterfall into the valley & back is around 1.6 kilometers. Do this circuit of riding to the waterfall & back 3 times & that will net you the Achievement after you have gone 5 kilometers.
Weapon #7 – Virtuous Treaty: By this point, you should have received an email from The Commander that “Lost Equipment” has been located at the Abandoned Factory. Return to the Factory by climbing up the truck & following the large broken bridge over to the Factory Entrance Access Point.
There will be three Red “???” Dots marking Sub Quest locations in this area. One is the Factory Entrance Access Point; another is way below the others & can be found a lot later in the Flooded City. The third Sub Quest will be the location of Virtuous Treaty. It can be found stuck into the concrete at the beginning of the long causeway where we fought the Goliath-Class Machine during the Prologue.
Sequence 2: I Must Be Beautiful!
2. Sub Quests: 12/80%
3. Archives: 1/45
4. Chips: 39/44
5. Pod Programs: 7/17
6. Weapons: 14/40
7. Unit Data: 21/80%
8. Endings: 2/26
9. Achievements: 9/47
—————————————————————————————————–
Pod C: After a Resistance Member blasts open the entrance to the Desert Zone, enter the large dune sea & begin making your way along the rock walls left around the map. Head past the entrance to the Oil Field Access Point & up the tallest dune hill shortly afterwards. Pod C can be found a little ways from the summit of the large dune facing back towards the way back to the City Ruins.
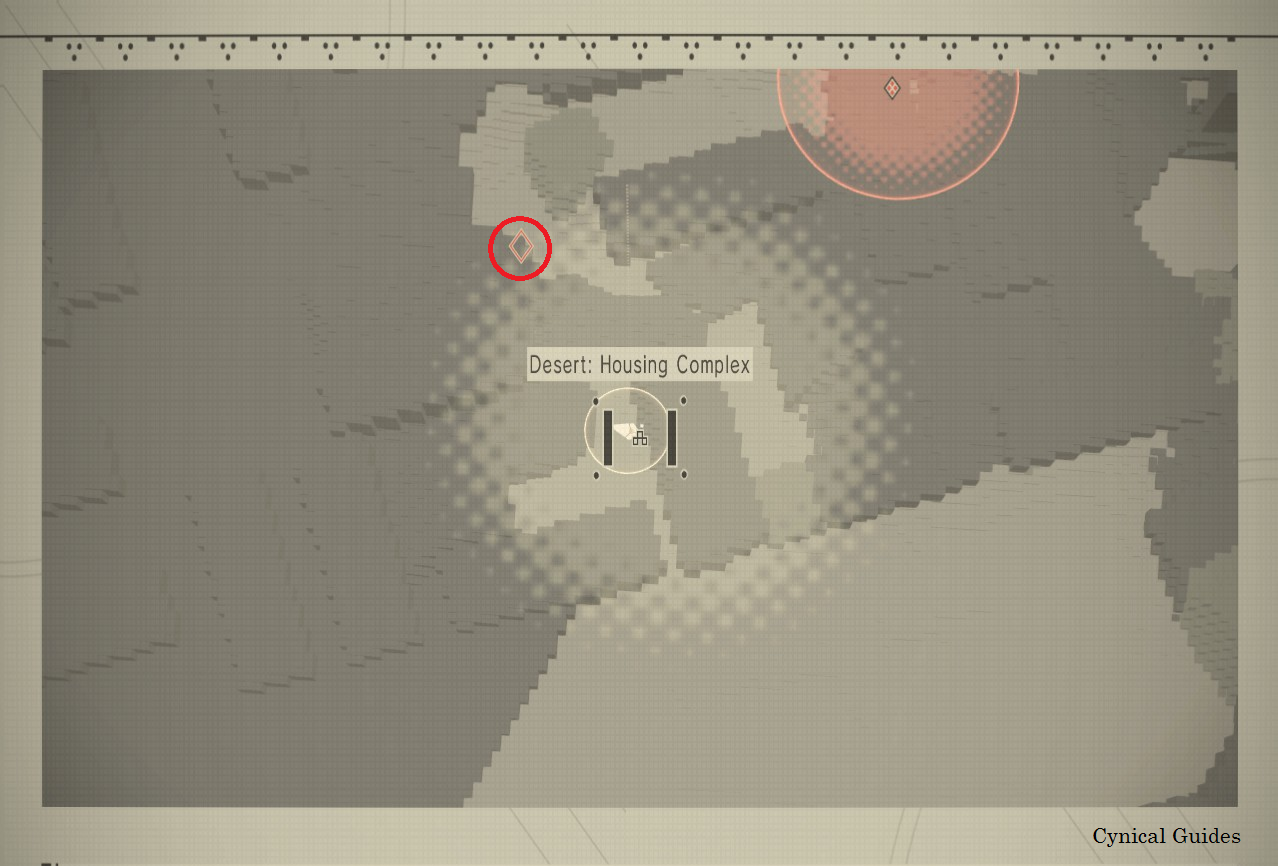
Weapon #8 – Fang of the Twins: As you progress through the Main Quest – The Machine Surge, you will eventually be brought to the Desert Housing Complex. From the Housing Complex Access Point, head further into the area right, then left around a large broken building. You will see a quick cinematic of the Machine we are chasing flee further into the area & we will be attacked by two other Machines. In this area straight ahead should be a visible fire escape attached to the building directly in front of us. The Fang of the Twins will be in a Chest at the top of the fire escape.

Achievement #7 – It’s A Healthy Baby Boy!: Complete the Desert Area.
Story Related. Unlocked after defeating the boss inside the Desert Housing Complex at the end of the Main Quest – The Machine Surge.
Two new Sub Quests have become available for us back at the Bunker. Use the Access Point in the Resistance Camp to Transport yourself there…
Archive #1 – 11B’s Escape Plan: One of these will be the Sub Quest – 11B’s Memento. 11B’s body can be found in the Abandoned Factory, all the way back where we first begin the game, in the very beginning room. When you collect her Black Box for the quest, we will also collect our first Archive.
Weapons #9 – YoRHa Issue Blade: Return 11B’s Black Box to our quest giver 16D back at the Bunker & we will receive this Weapon for completing the Sub Quest.
Weapon #10 – Iron Pipe: Speak with Anemone after completing the Main Quest – The Machine Surge. We will receive the Main Quest – MIA from the Commander when we go to leave the Resistance Camp into the City Ruins. Following the Quest Marker will take us into a sewer system.
If you have the HUD: Fishing Spots Chip equipped, you will be able to Fish in the Sewers. I do not think there is a specific spot where you can collect the Iron Pipe, it just has a random chance to appear while Fishing. I fished 8 times in the spot where you first come across the sewer water, got nothing. Then I went right, down the tunnel to the broken piece of pipe & the metal grate on the first corner of the sewer tunnel. Fished there only once & I got the Iron Pipe. Be patient, worst case is your going to discover some new “Fish” for our Encyclopedia & get some loot to sell for some G.
Weapons #11 – Virtuous Dignity: Carry on through the Sewers until you get to the end & see a ladder that will take you to the surface. Do not climb up it yet. Instead, walk past it & you will see a hole in what looked like a dead end. On the other side will be a different ladder. Climb up it, & you will entire an isolated grove. The Spear can be found in the heart of a large tree with chains hanging off it in front of you.

Achievement #8 – Wait! Don’t Kill Me!: 10 Friendly Machine lifeforms destroyed.
When you enter the Amusement Park, you will notice that there are some Friendly NPC Machines in same of the areas. These Machines will respawn if you leave the area & return so do not worry about destroying them & feeling bad. They are not unique NPC’s or quest givers.
Kill 10 of these Friendly Machines to unlock the Achievement. There are more than 10 Friendly Machines in the Amusement Park.

Achievement #9 – We Await Your Next Visit: Complete the Amusement Park.
Story Related. Defeat the Opera Singer Boss of the Amusement Park & exit the coliseum. You will then come in contact with a Friendly Machine who will guide you to their village. Follow them, & the Achievement will unlock when you are just outside the village & the area cinematic begins.
Leave the area & when the music changes return back to Pascal’s Village. There will be new Sub Quests & two Shops will have opened up.
Weapon #12 – Machine Sword: This Weapon can be purchased from the Weapon Trader in Pascal’s Village for 15,000G.
Weapon #13 – Machine Axe: This Weapon can be purchased from the Weapon Trader in Pascal’s Village for 15,000G.
Weapon #14 – Machine Spear: This Weapon can be purchased from the Weapon Trader in Pascal’s Village for 15,000G.
Half-Wit Inventor: Before leaving Pascal’s Village, there is a very important Sub Quest we must pick up. Take the path we took leaving the Amusement Park to get here & we can find a Scientist Machine above the bridges near a small hut.
As crazy as it sounds, we will need to invest a total of 180,000G to complete the quest. When we do, we will have access to his Shop that will sell us random Items. What we need specifically from the Shop are 6 Meteorite Shards for a few of our Weapon Upgrades. They can only be purchased from his Shop. This can be completed at anytime during this Route or even during Route B. But we cannot leave it for Route C as he will no longer appear which will void the Inorganic Blade Achievement for us… Technically though, there are no missable Achievements, if you mess up, you can always purchase the Achievement from the Special Shop in Route C.
We will have access to a lot of Sub Quests at this point, consider doing a few for some extra G & XP.
Ending #2 – H – a mountain too [H]igh: Ignore orders to intercept the Goliath-Class in the City Ruins during the Main Quest – Assault.
After you deliver the Viscous Oil to Pascal from Anemone & complete the Main Quest – Machine Trade, you will receive a report that a Goliath-Class Machine is attacking the City Ruins.
Save before attempting Ending! Instead of going to the City Ruins, take the path back towards the Amusement Park instead, past where the Half-Wit Inventor can be found. Along the way, your Pod will warn you that you are going the wrong way & that casualties will occur if you carry on. Ignore the Pod, & keep heading towards the Amusement Park. The Resistance Camp will be destroyed & the Credits will roll.
Sequence 3: For the Glory of Mankind
2. Sub Quests: 25/80%
3. Archives: 4/45
4. Chips: 42/44
5. Pod Programs: 9/17
6. Weapons: 16/40
7. Unit Data: 32/80%
8. Endings: 2/26
9. Achievements: 12/47
—————————————————————————————————–

Achievement #10 – Desire Without Emotion: At least 100,000G in possession.
This will come naturally as you playthrough Route A. Complete Sub Quests, hunt Albino Animals, & Fish; selling off any valuables along the way. We will receive 4 Machine Cores from the last Main Quest which will net us 40,000G right there. Hold off from investing money to the Half-Witt Inventor for now until we unlock this Achievement.
Pod Program #8 – A140 Gravity: Close to the Near Factory Access Point we will be able to collect the Sub Quest – Retrieve the Confidential Intel. Simply go & collect all 3 lost Chips & return them to the Resistance member & we will receive this Pod Program as a reward.
Weapon #15 – Type-40 Lance: Check your Inbox at an Access Point & you will receive the Sub Quest – YoRHa Betrayer’s from The Commander. Track down the rogue YoRHa units & defeat their captain. You will receive this Weapon from the captain when you take her down.
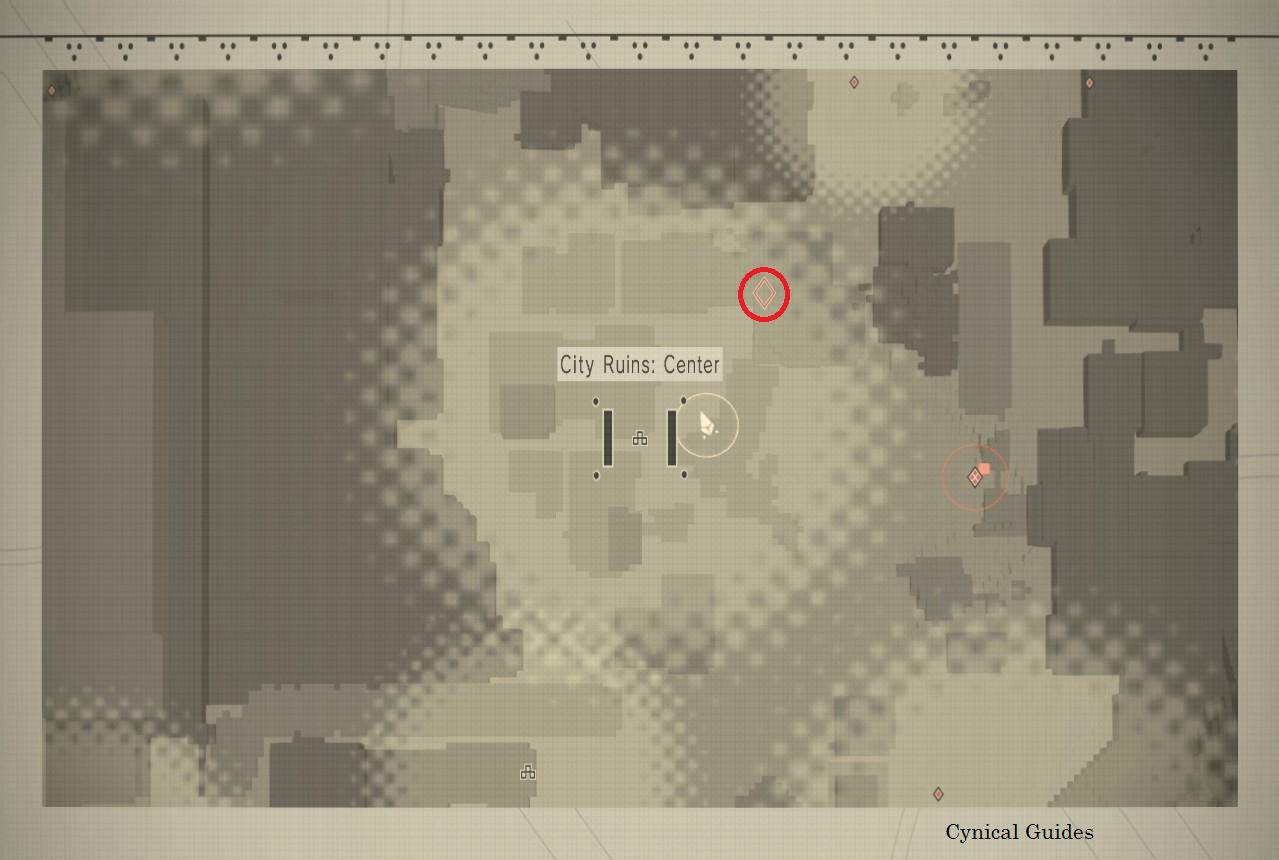
Archive #2 – Engels 110-B Record 0005: We can find the Sub Quest – Machine Examination 1 by interacting with the head of one of the destroyed Goliath-Class Machines in the City Ruins. It can be found directly across from the Near Factory Access Point. Stand underneath the Goliath’s head & you should be able to interact with it.
Defeat the Goliath-Biped in the Desert Zone: Border Area afterwards & bring the Pristine Screw back to it. Completing the Sub Quest will reward you with our next Archive.
Archive #3 – Engels 110-B Record 0010: After the last Sub Quest we will unlock the next Sub Quest – Machine Examination 2. Collect all the parts from the given locations in the City Ruins & return back to the disabled Goliath.
Powerup Part S #1: These are very special Upgrade Materials for upgrading our Pods. There are only 3 to be found in the game & only as specific rewards. After the Main Quest – Assault we can find some unique Machines in this location in the City Ruins.
We can collect the first Powerup Part S by killing these three golden Machines. They have incredibly high health so be careful; bring lots of Recoveries, Melee Attack Up (L), & Ranged Attack Up (L). The last two Item Buffs can be purchased in unlimited supply from the Desert Supply Trader across from the Desert: Camp Access Point. Focus on killing the two Gold Goliath-Bipeds first then whittle away at the Courageous Brother Stubby. The Stubby has the most health out of the three. This is not a hard fight, but very tedious & will take quite a while to kill them.
You will receive the part after they are all slain. Out of the 3 Powerup Part Ss, this is the only that is missable. The others can be found across Routes, be these guys will not appear through Chapter Select. It will void the Supreme Support Weapons Achievement (if you aren’t using the Special Store).
Sub Quest – The Wandering Couple: Before we carry on with the Main Quest – Flooded City Recon, we need to go to the Flooded City itself. Above the chasm that just opened up in the City Ruins, there will be a river of water flowing down close to a large open pipe. Head through the pipe & it will take you to the Flooded City. If you progressed the Sub Quest – The Wandering Couple (found initially in Pascal’s Village), you will find them standing close to the entrance here. We need to loan them 50,000G. It is steep, but we need the quest reward.
Leave to the City Ruins & run around until the quest progresses. Return to the Flooded City
This needs to be progressed before we receive the Main Quest – Missile Supply Mission or it will fail the Sub Quest!
Pod B: When you enter the Flooded City, carry on past the Coast Access Point until you reach the ocean straight ahead. Before following the broken bridge right, carry on straight until you are standing above the ocean itself. We can Fish for our final Pod if we have the HUD: Fishing Spots Chip installed.
It took me around 6 tries before I caught the Pod. Be sure you are Fishing in the ocean & not in any of the enclosed pool areas near the buildings. You will catch it eventually…

Achievement #11 – Pod Hunter: All 3 Pods found.
The Achievement will unlock after we successfully catch Pod B. Pod A we begin the game with & Pod C can be found back in the Desert Zone.

Achievement #12 – A Round By the Pond: 20 different kinds of Fish caught.
There are 41 different kinds of Fish in the game. We can Fish more or less in every location discovered so far. The prime Fishing Spots are in: the City Ruins stream outside Resistance Camp or the Cave Access Point, the Desert Oil Field, Sewers, & of course the Flooded City. You need to have the HUD Fishing Spots Chip installed to be able to Fish. It is sold at almost every Item Shop that sells Chips.
The majority of the Fish in the game are found in the Flooded City.
Weapon #16 – Type-3 Lance: This Weapon can be difficult to get to. As you walk across the broken bridge progressing through the Flooded City, you will eventually have to start jumping on sunken buildings. The third building you jump on will be slanted & laying on its side. Walk up to the top of the building & you will have two waterfalls on your left & right. In between the waterfalls in front of you, will be an isolated building in the middle of the enclosed pool (not the one you only see its side peaking out of the water). It will have a Chest on its roof.
The best way to get over to it, requires having a Small Sword equipped. Take a running jump from the high side of the slanted building, double jump, & press Evade at the end when you are the highest in the air. Then, as fast as you can, perform four Quick Attacks with the Sword for a boost, then glide right afterwards towards the low side of the far building. When you get close, perform one more Quick Attack while gliding & it will launch you into the air a bit & should send you on top of the building. This is a very difficult jump with a lot of steps that need to be done in order to complete it. Be patient, you’ll get it with timing.
Pod Program #9 – A080 Wave: After progressing the Sub Quest – The Wandering Couple, make your way to the Quest Marker in the Amusement Park. The woman can be found leaning against a tree facing towards the Amusement Park entrance. Patch her up & the quest will play out. This Pod Program will be our reward.
Sequence 4: A2, Brute?
2. Sub Quests: 47/80%
3. Archives: 4/45
4. Chips: 44/44
5. Pod Programs: 10/17
6. Weapons: 20/40
7. Unit Data: 46/80%
8. Endings: 4/26
9. Achievements: 15/47
—————————————————————————————————–

Achievement #13 – Creation & Insurrection: Complete the Alien Ship
Story Related. Complete the Main Quest – Flooded City Recon & fight off the two hybrid Machine bosses to unlock the Achievement.
Ending #3 – U – debnked: Self-Destruct while in the Bunker.
Save before attempting Ending! This can be unlocked at any point you are on the Bunker. Simply engage Self-Destruct protocol while you are in the Bunker. Consult your Combat Controls in your Tutorial tab while in Intel to see how to Self-Destruct.
Self-Destructing in space has some… pretty adverse reactions.
Ending #4 – K – aji wo [K]utta: Die by eating a Mackerel.
When you are finished speaking to The Commander, we will have two new Emails in our Inbox. One will be from the Resistance Member whose name I am unable to say on Steam… Go & see her at the Desert: Camp Access Point & she will give you a Mackerel Fish. Not that it is necessary, but Mackerels can also be caught at certain Fishing Spots.
Save before attempting Ending! Eat the Mackerel… & receive a severe case of food poisoning.
Now that we can Transport between all available Access Points, now is a really good time to clear out as many of your Sub-Quests as you can.
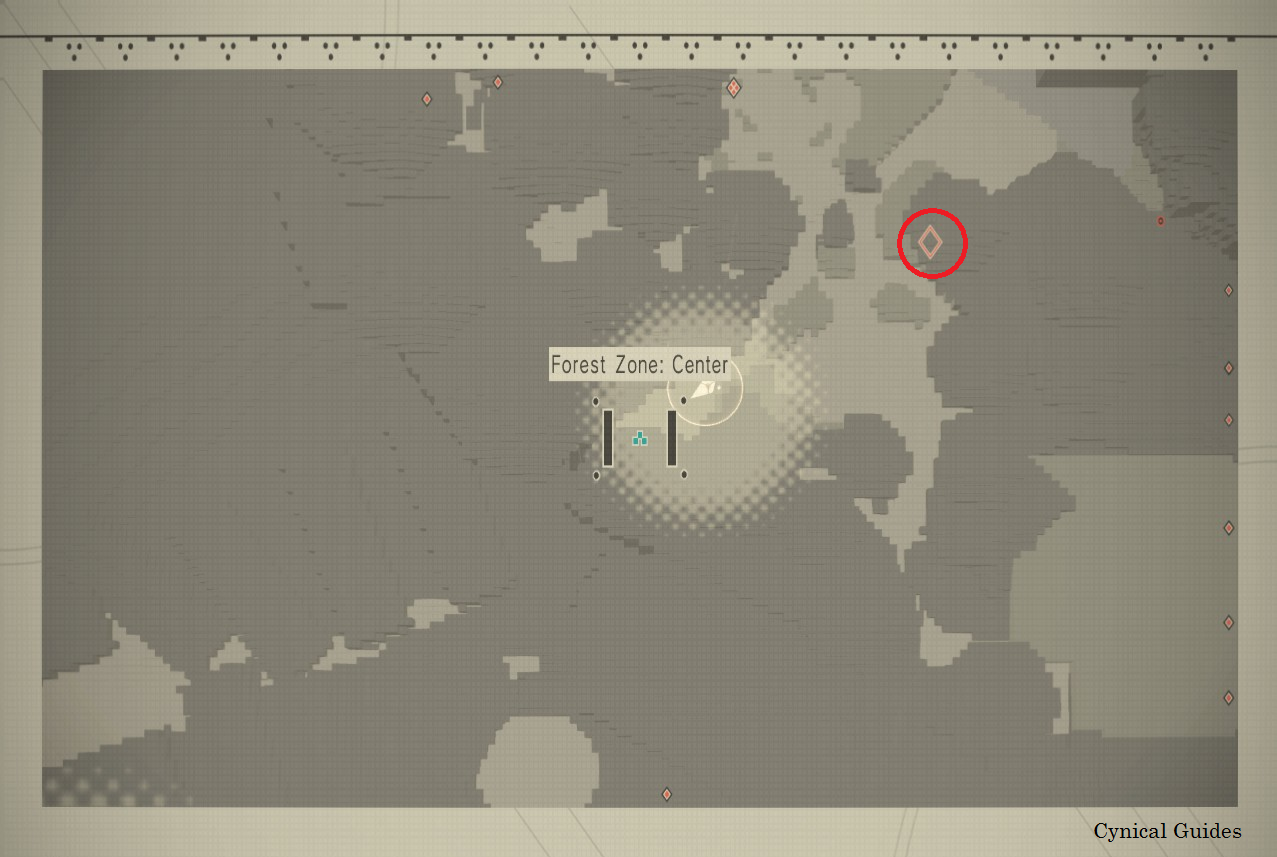
When you enter the Forest Zone, follow the path & you will come across the Center Access Point. From here, head down the path & turn right to find a river flowing down the hill. Follow the river down until it falls off of the cliff & there are a series of large flat rocks on your right. At the far end of these flat rocks, underneath one lone tree down here, will be a cave in the rock wall. Enter the cave & you can find the Dragoon Lance in a Chest tucked in at the back.
Weapon #18 – Virtuous Grief: Our next Weapon is actually above the cave we found the Dragoon Lance in. Carry on through this area & you will come to another river that will flow off the cliffside. At the cliffside beside the waterfall, head right over the rocks & begin climbing your way back over to where that cave was. Jump across the gap over the first river & you will be above the cave. You will want a running double jump & glide at the end to get over the gap. Ahead of you, will be a large tree that will have chains hanging off it. We can find this Weapon in the heart of the tree like we found the Spear Virtuous Dignity.
Weapon #19 – Cypress Stick: When you head across the stone bridge over the valley, take the path up the hill & you will enter a large area with a lot of stone pillars in it. To the left is the way you are supposed to go & a small sub-boss, to the right will take you to a closed gate (later a shortcut to Pascal’s Village). At the closed gate, turn around & look back at the pillars; one will be tipped over. Climb up the tipped over pillar onto the next one & you will see a large stone arch way ahead of you. Now take a running double jump & get across to that stone arch. This is a very difficult jump.
Another two stone arches down, at the end, you can see a Chest on the farthest arch. This is where the next Weapon is. We have to jump across the pillars all the way over there. This is a very annoying platforming event, for if you fall, you have to go all the way back to the beginning. It is easiest maintaining the same sprint the whole way through & timing your jumps then it is trying to sprint off the pillars without the momentum. As well, you can glide at the end of every double jump & if you hit the Evade button at the very end you can give yourself a bit of boost.
Archive #4 – Records of A Bestial Machine: This is received at the end of the second Sub-Quest given by the Animal-Loving Machine. The Sub Quest Marker can be found a short ways down from the Center Access Point. Fight him off & spare the Boar to make him a quest giver.
When you get to the Forest Castle: Front Access Point, check your map & you will see he has a Sub-Quest for us. Complete it, then Transport back to the Forest Castle: Front Access Point again to reset the area. He will then have the second Sub-Quest – Turf War. Be warned, this is a high level Sub-Quest & has Level 40 enemies in it. You will at least want to be around Level 30 with two Level 3 Weapons equipped.
Defeating the sub-boss will reward you with the Archive Entry.
The Blacksmith Masamune: Eventually as you progress through the Forest Castle, you will come across the Royal Chamber Access Point. From here, turn around & head back outside where the large broken bridge jump is. On this side of the bridge, drop down below onto a ledge & you can find a stone block we can pull out of the way below the Royal Chamber entrance. Simply run as far as you can into the dead end below the bridge then press your “interact” button & start pulling backwards. Past the block will be a secret room with the Forest Blacksmith. He is the only person in the game that can upgrade our Weapons to Level 4.
Irritatingly, we will have to pull that stone block out of the way every time we want to see him…

Achievement #14 – The Mechanical Kingdom: Complete the Forest Castle.
Story Related. Complete the Main Quest – The Forest Kingdom & meet the Machine King to unlock the Achievement.

Achievement #15 – Chip Collector: 80% of all Plug-In Chips collected.
To unlock 80% you will have needed to collect 44/55 of the different Plug-In Chips in the game. Retrieving the bodies of fallen Online Players is a good way of getting different Chips as well as really rare versions of them as well like +4 & +5. There is a good Item Shop in the Forest Zone we can unlock that should have any Chips you are missing for sale. It is unlocked after the Sub Quest – Lord of the Valley. This Achievement is guaranteed to unlock at some point during the 3 Routes.
Weapon #20 – Type-40 Sword: If you have previously completed the Sub Quest – Terminal Repairs, Operator 6O will leave you an Email in your Inbox thanking you. This will initiate the Sub Quest – Find A Present. Find the Desert Flower & send the picture to 6O. When you check back at an Access Point, she will have sent an Email that will contain this Weapon in it.
Pod Program #10 – Bomb: Along with the Type-40 Sword, we will also receive this Pod Program as thanks for completing the Sub Quest – Find A Present in our Inbox.
Sub Quest – Find A Present must be completed before venturing down into the Flooded City or it will no longer be available. As well, it is only available in Route A.
Sequence 5: Adam & Eve
2. Sub Quests: 53/80%
3. Archives: 6/45
4. Pod Programs: 11/17
5. Weapons: 21/40
6. Unit Data: 53/80%
7. Endings: 6/26
8. Achievements: 20/47
—————————————————————————————————–
Half-Witt Inventor: After you have invested all the necessary money, access the Item Shop & purchase 5 Meteorite Shards so that you have 6 of them total for our Weapon Upgrades.
Ending #5 – N – [N]o Man’s Village: Destroy every Machine in Pascal’s Village.
When at Pascal’s Village asking about the rogue Android, this is as good an opportunity to try this as any. There are 32 Machines in the Village at this point.
Save before attempting! From the Access Point, drop down into the lower area… & start killing. There are 11 Friendly Machines down here. The Goliath takes a bit of time to whittle down, you will want two high level Weapons to deal enough damage in a reasonable amount of time. On the middle floor, there are 6 Machines. Be sure to kill the two guards that are at the Village entrance.
Head up to the third floor now & kill the 13 Machines up here. Be sure to kill the two Machines inside the huts as well as Pascal. 1 more guard can be found at the back entrance to the Village leading where the shortcut to the Forest Zone is. We can also find 1 lone Machine down a small ladder near a Hackable Chest off the third floor as well. Check where all the ladders up here lead & you will find them.
After killing the last Machine, you will receive the Ending. The Half-Witt Inventor is not part of the Village & does not need to be killed.
Archive #5 – Letter to the Forest King: After speaking with Pascal about the rogue Android, there will be a Sub-Quest Marker visible at the bottom of the shortcut to Pascal’s Village. Speak with the Weird-Talking Machine & we will receive the Sub Quest – Treasure Hunt At the Castle. There are 3 hidden Chests around the Castle containing Machine Parts. Collect all 3 & they can be made into a Key.
The secret door can be found in the multi-tiered library room on the third floor. When you enter the library for the second time as you progress through the Castle, you will be on the fifth floor. Climb down two ladders & you will see an open doorway on the third floor that leads to a large locked gate. The Archive will be the quest reward found at the Machine King’s Grave.

Achievement #16 – Come Take A Look!: Emil’s Shop used for the first time.
By this point we should have Emil’s Shop unlocked. Return to the City Ruins & look for the Emil Marker on your map somewhere in the City Ruins. If you do not see it anywhere, Transport yourself to a different Access Point in the City Ruins until he spawns.
At the Marker when you find him, we can find Emil roving around in a strange cart. Clip him with some Pod fire & he will come to a halt. Speak with him & access his Inventory. You do not need to purchase anything, simply browse his wares & close the menu to unlock the Achievement.
Emil has a large supply of Plug-In Chips for sale. If you have not already unlocked the Chip Collector Achievement, now is a good opportunity to do so.
Emil’s Shop is a bit convoluted. There are two routes he takes the “Desert Zone Route” & the “Resistance Camp Route”. Each has two different inventories, one being common the other being rare.
Archive #6 – Engels 110-B Record 0020: After progressing the Sub Quest – Machine Examination 2, make a habit of stopping by & speaking with Engels if you are passing through the City Ruins. Speak with him three separate times when his Sub Quest Marker returns & he will eventually give us his final Archive Entry.
Powerup Part S #2: We can receive our second Powerup Part S for our Pod Upgrades from the Sub Quest – Anemone’s Past. This Sub Quest can be collected after she gives us the Main Quest – Missile Supply Mission. Complete the quest to get the Upgrade Material as a reward.

Achievement #17 – Cherish Our Resources: Have 100 bodies collected.
This will come naturally as you playthrough the game. If you are connected to the Network, then you will encounter a host of Online Player’s bodies & you will unlock this fairly early on if you are diligent about collecting them. There are pre-set bodies that can be found Offline in the areas of the game but there’s usually only 2 or 3 of them per area. They do respawn, but it will take a lot longer farming this Achievement off the Network.
Before carrying on with the Main Quest – Missile Supply Mission in the Flooded City, make sure you completed the Sub Quest – A Find A Present.

Achievement #18 – Ruler of the Skies: 255 enemies destroyed using a Flight Unit.
This will come naturally as you playthrough Route A most likely. There are way more than 255 enemies during these Flight Unit sections. 9S may end up killing some along the way, but it should unlock at some point during the Main Quest – Missile Supply Mission.

Achievement #19 – Ruler of the Deep: Complete the Flooded City.
Story Related. Complete the Main Quest – Missile Supply Mission & defeat the Colossal sea dwelling Machine to unlock the Achievement.
Pod Program #11 – A170 Scanner: We will receive this Pod Program through the Main Quest – MIA from the redhead twins & Devola.
Weapon #21 – Iron Will: Return to the Flooded City now that you have the Scanner Pod Program. Head to the end of the bridge just before you start jumping across sunken buildings. The Scanner will direct you down to the right of the bridge where you can find a disgruntled YoRHa soldier. Keep Scanning & we can find the Weapon hidden to her left.
The Main Quest – MIA will lead you to the City Ruins: Cave Access Point. Save before carrying on! This is our only Save before we have to make an Ending decision & we will have to reload back to this point again! As well, heading into the Copied City will void a lot of our Sub Quests if they are not completed like the Robo Dojo & Emil’s Memories quests.

Achievement #20 – Those Who Love Humans: Complete the Copied City.
Story Related. This Achievement will unlock after you kill the boss in the Copied City. Do not approach 9S after the cinematic!
Ending #6 – I – no {I} in team: Leave 9S to die in the Copied City.
When the boss is defeated & the Achievement unlocks, turn away from 9S. Do not approach him & leave the Copied City without him. Prepare for a brutal Ending… thank goodness it lets us reload afterwards…
Unfortunately, this will put us back to our last Save & we will have to re-fight the boss again.
Sequence 6: Always Ends…
2. Sub Quests: 55/80%
3. Archives: 7/45
4. Pod Programs: 11/17
5. Weapons: 26/40
6. Unit Data: 62/80%
7. Endings: 9/26
8. Achievements: 23/47
—————————————————————————————————–
Weapon #22 – Type-3 Sword: Devola & Popola now have an Item Shop open at the Resistance Camp. There we can buy this Weapon for 14,000G.
Weapon #23 – Type-3 Blade: Devola & Popola now have an Item Shop open at the Resistance Camp. There we can buy this Weapon for 14,000G.
They also sell some really good Plug-In Chips. Of these, Auto-Collect Items is essential if you plan to farm for materials for Weapon upgrades. This will make your life so much easier, especially when paired with a high level Drop Rate Up Chip.
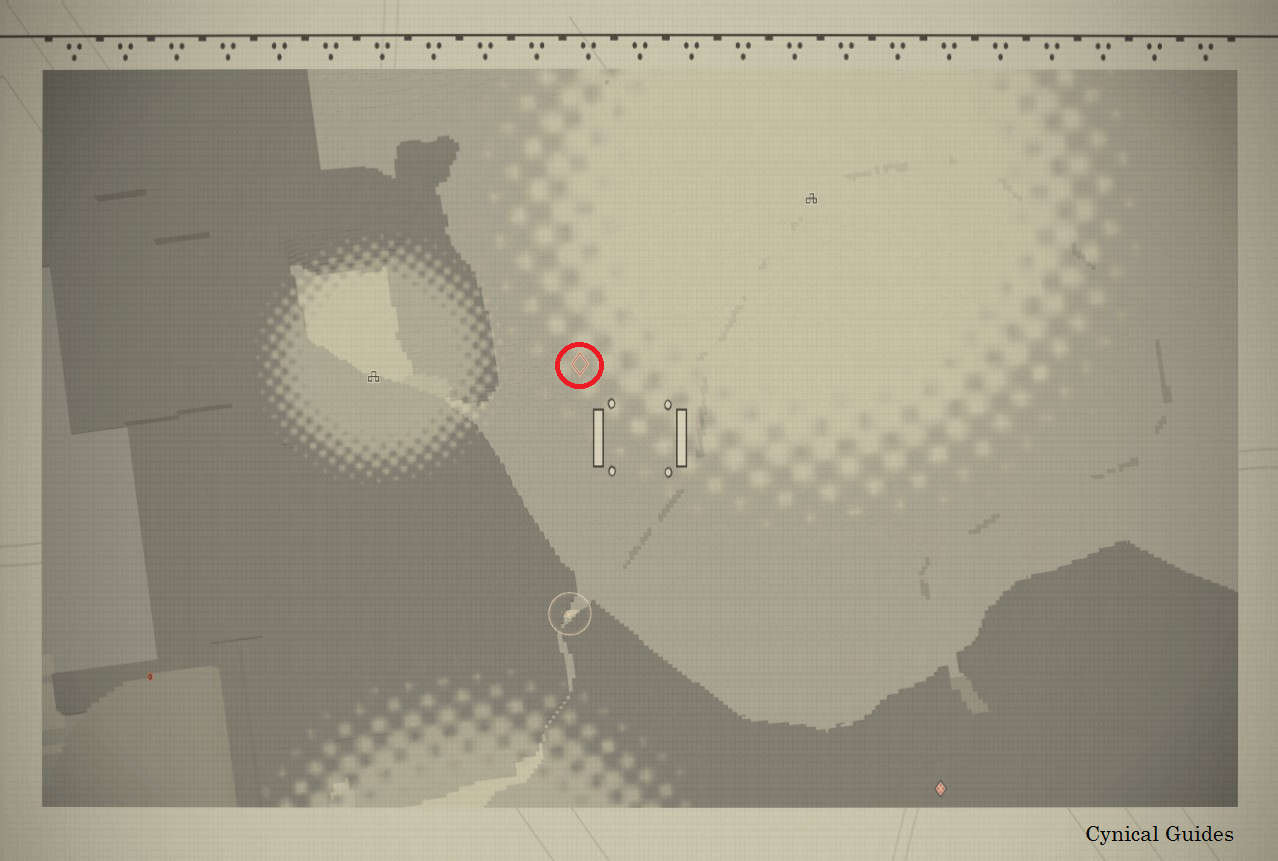
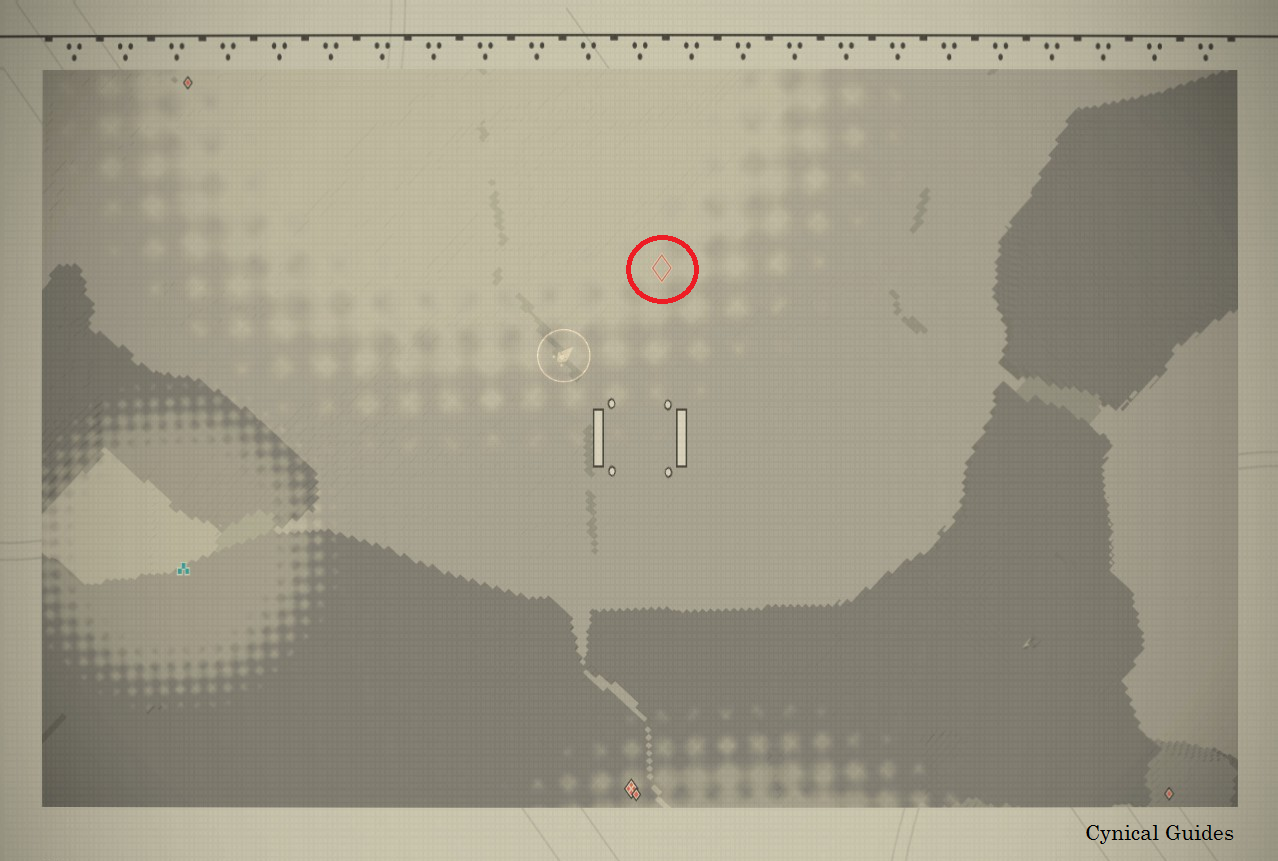
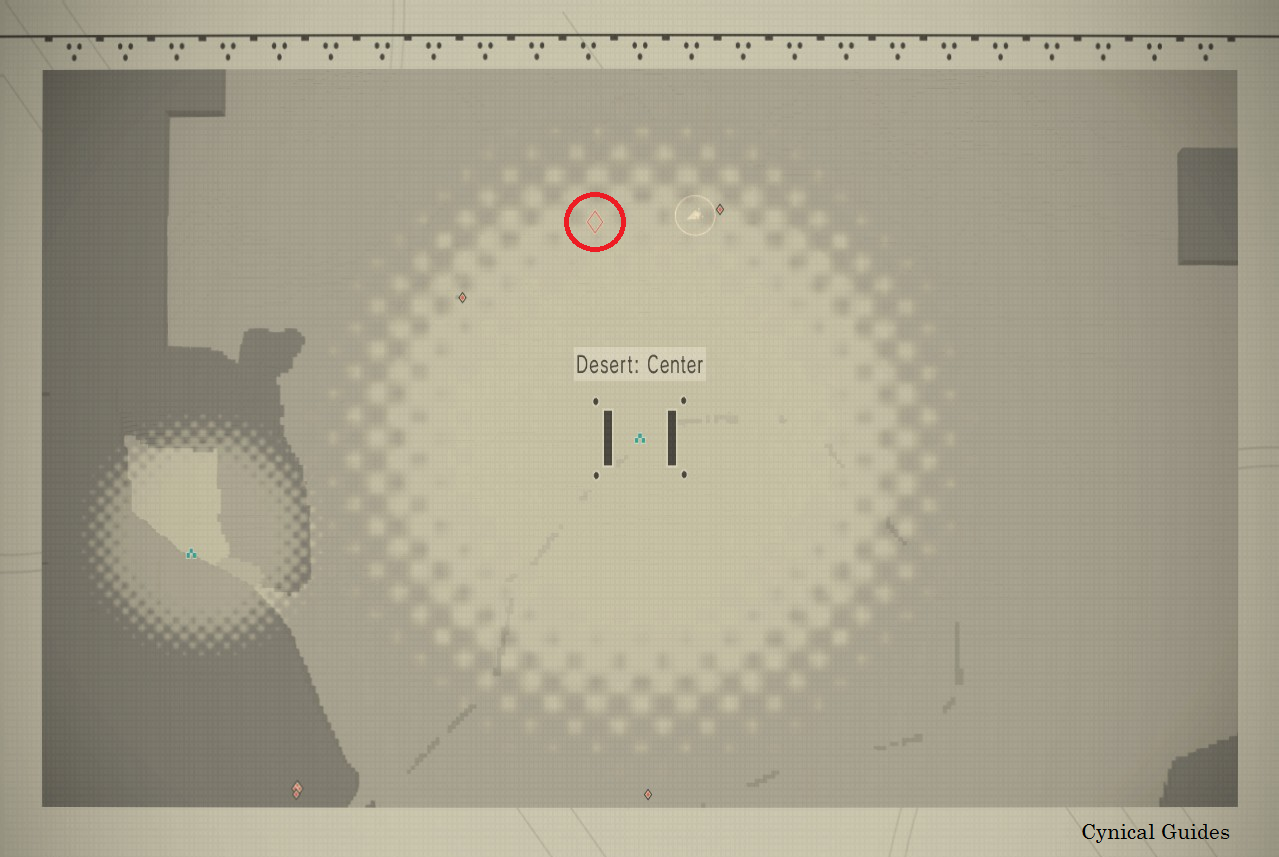
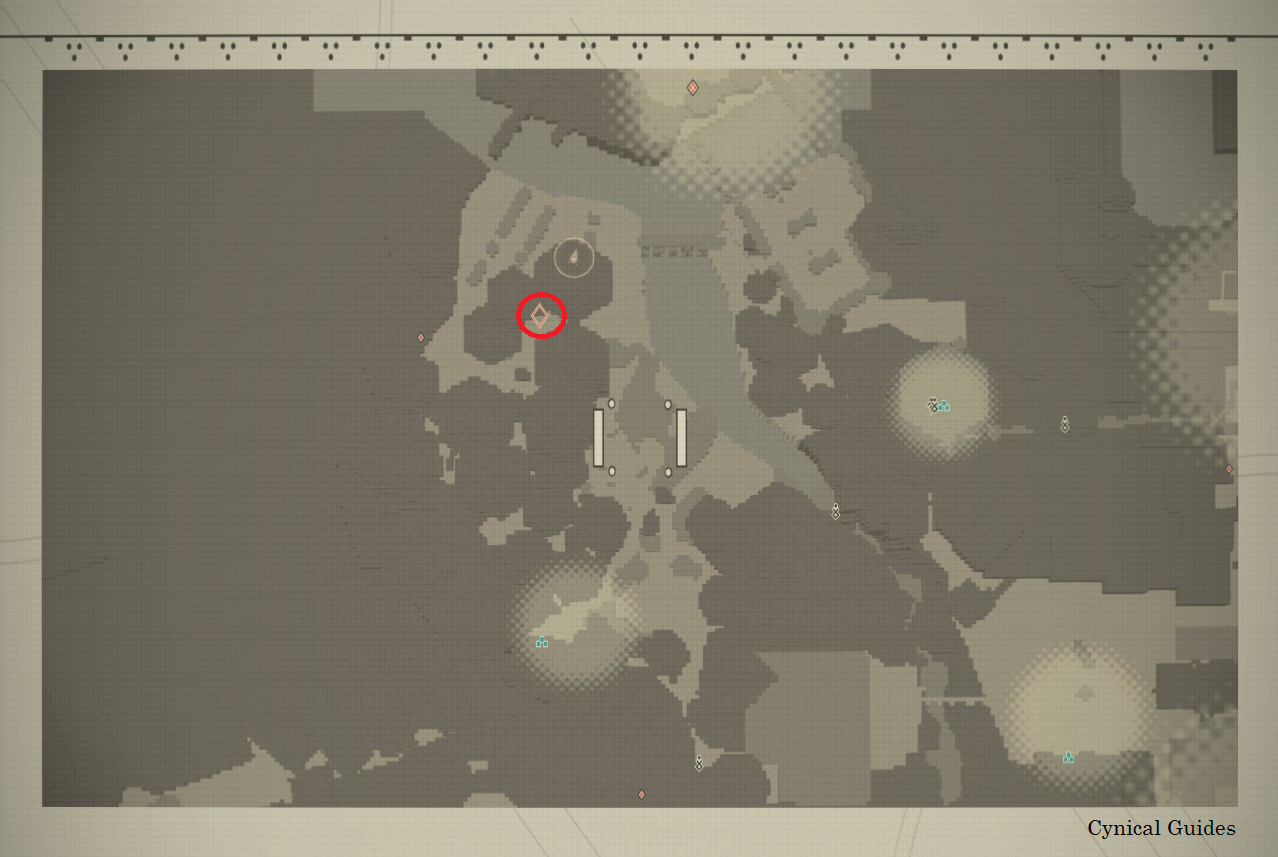
Weapon #24 – Phoenix Lance: Now that we have the Pod Scanner, head to this location in the Desert Zone. Use the Scanner & it will be uncovered. It is a little difficult to triangulate, even with a Screenshot, though it is not too far to the right of the broken oil pipe snaking through the desert.
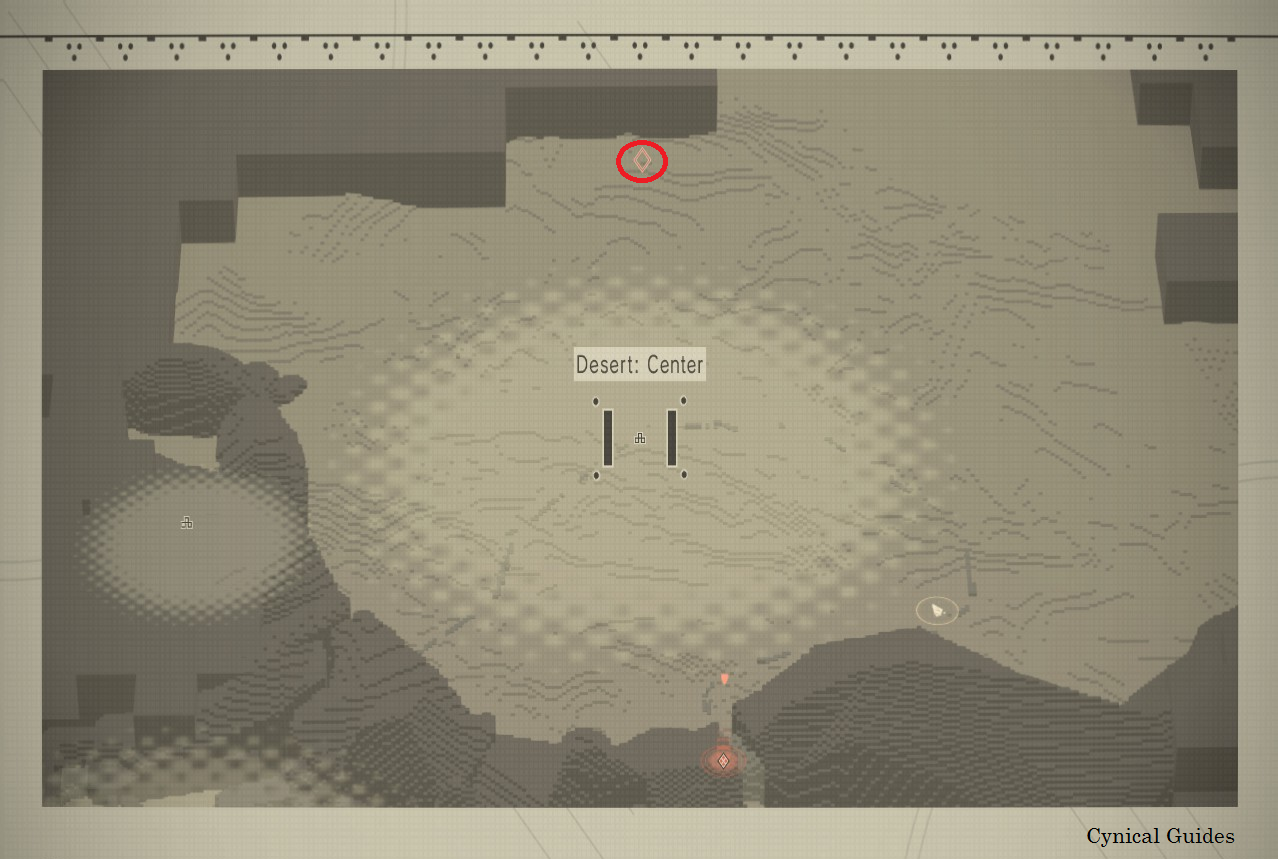
Archive #7 – Mysterious Lithograph 2: While in the Desert Zone, look for the Sub Quest Marker in the far left corner of the area. There are four Relics we need to find for the Sub Quest – Heritage of the Past. We need our Scanner to locate them.
First, head to the Center Access Point. Follow the oil pipe along the sand & you will eventually see some ruined buildings on your left. The Aged Stick can be found here.
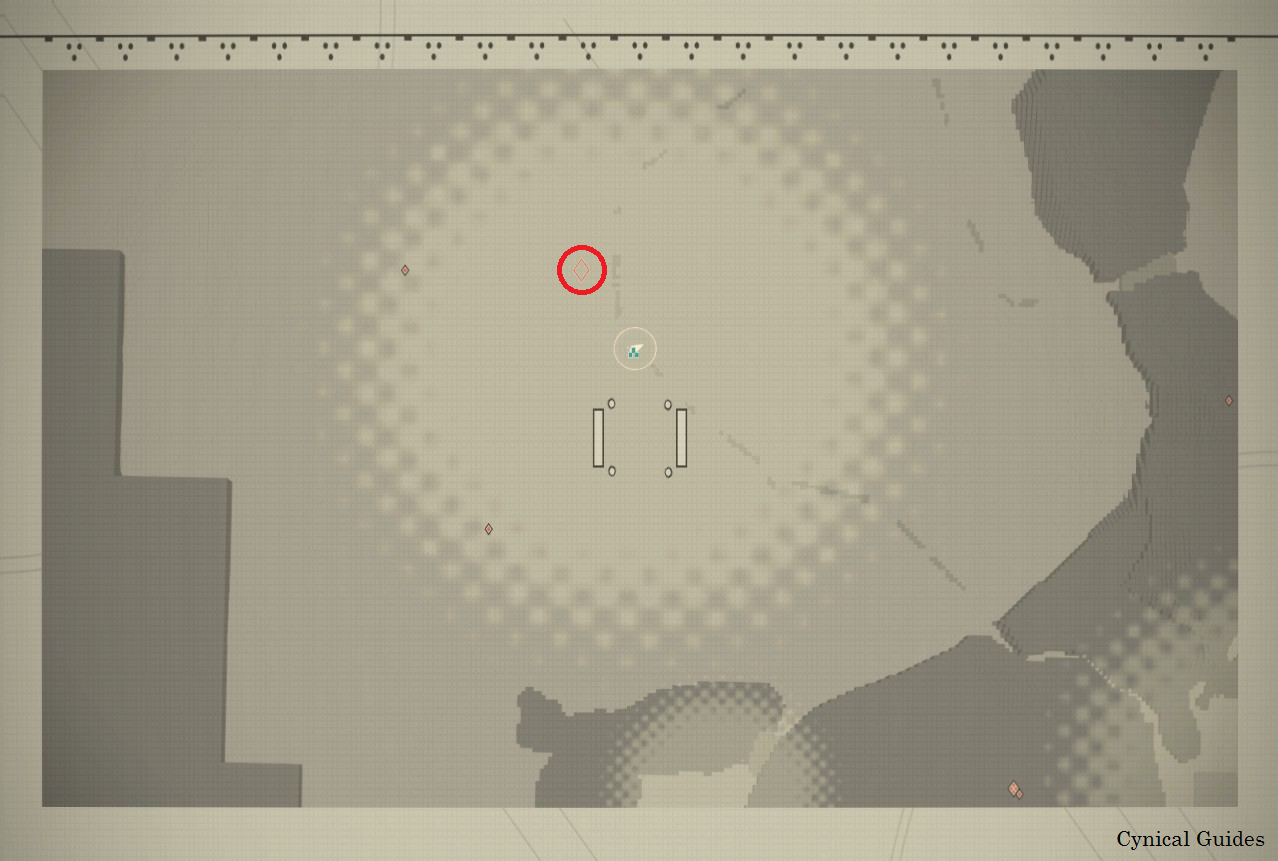
The Archive is next, & it is in the middle of no where. It will be right along the edges of “light” on your map from the Center Access Point.
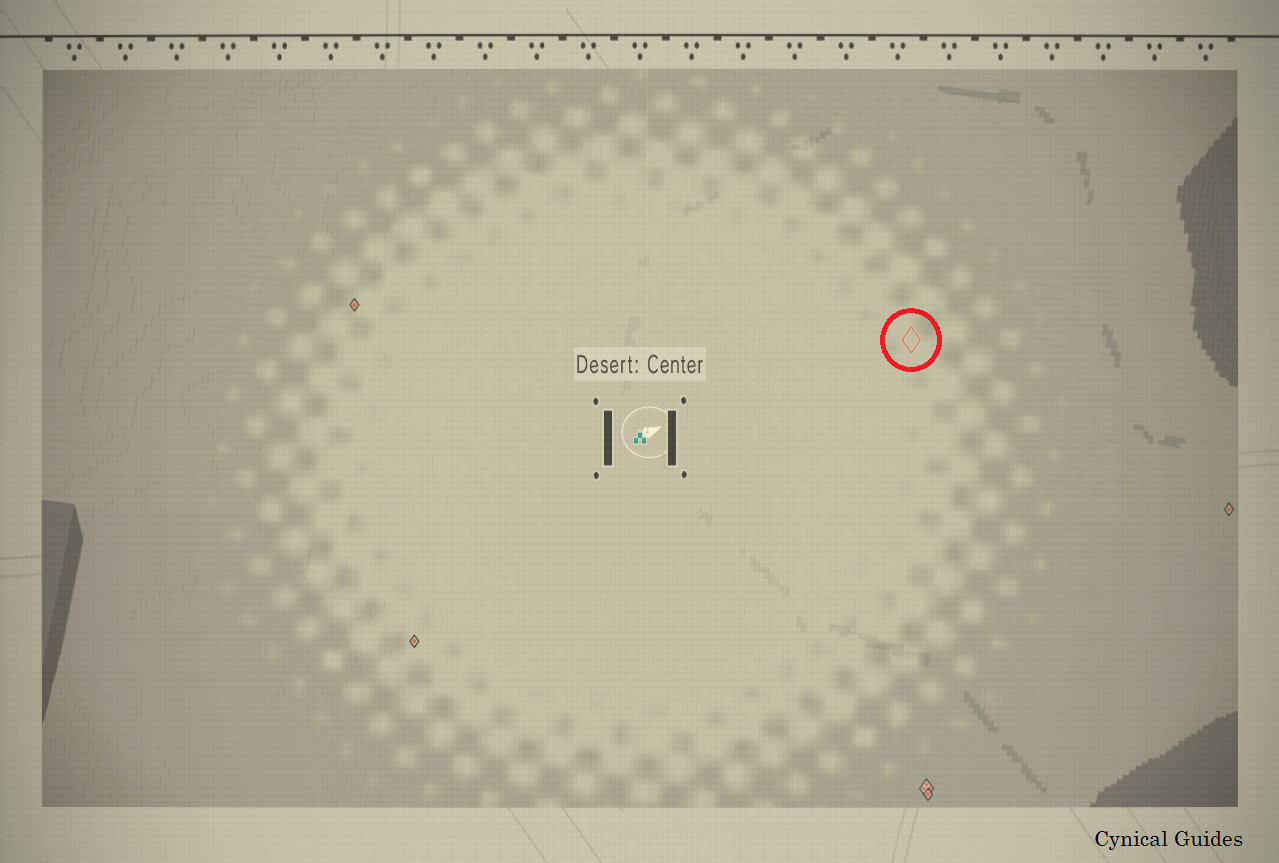
Carry on from the last Relic past the past (not through) the entrance to the Desert Housing Complex. This Relic will be in between a huge rock & another smaller one.
Turn in the first three Relics, then head a little ways away from the Resistance Researcher to find the final Relic here. Be careful, we will be attacked by some Level 40 Desperadoes…

Achievement #21 – Harvest King: Materials gathered at a hidden Harvest Point 10 times.
With the Scanner unlocked, try making a habit of using it while you head to & from locations. The faster the Scanner blinks, the closer you are to a hidden object. After your 10th time grabbing an Item, the Achievement will unlock.
Weapon #25 – Spear of the Usurper: We will receive this Weapon as a reward for completing the Sub Quest – Heritage of the Past.
This is the point of no return for this Route, clean up any Sub Quests or errands & accept the Commander’s Email from your Inbox. You will be directed to link up with Pascal at the Abandoned Factory for the new Main Quest – Olive Branch.
Ending #7 – J – bad [J]udgement: Kill the Machine Priest without harming the other Machines.
Save at the Factory: Entrance Access Point before attempting! Enter the Factory with Pascal, & you will be greeted by a Priest Machine & his covenant. When you regain control of 2B, head up to the Priest Machine & kill them. Do not harm any other Machine in the room.
Killing the Priest Machine will trigger the Ending, & 2B will annihilate all Machines in the Factory…
Weapons #26 – Engine Blade: After things go south at the Abandoned Factory, you will have to escape. Eventually as you progress through it, you will stand on a moving conveyor belt then a second conveyor belt that was hydraulic presses you have to dodge through like we are on Geonosis or something…
Enter a tower, then out the other side & up some stairs. At the top of these stairs will be a small landing before the stairs carry on up. In the middle of this landing, the railing opens up & we will be able to jump out towards the camera view on top of the hydraulic presses. Jump across them all & you will enter the previous tower on an upper floor. The Weapon will be in the large Chest that we can open in the center of the room.

Achievement #22 – Iron Soul: Complete the Abandoned Factory.
Story Related. Complete the Main Quest – Twisted Machines & escape from the Abandoned Factory to unlock the Achievement.
After escaping the Factory, we will be directed to go to the Resistance Camp. Quickly stop by the City Ruins: Center Access Point & Save. We will be triggering another alternate Ending shortly…
Ending #8 – L – [L]one wolf: Flee the Resistance Camp while it is being attacked.
Save before attempting Ending! When you enter the Resistance Camp, you will see a brief cinematic of Machines attacking the people. When the cinematic ends, turn around & leave the Camp. 2B will question your decision, but keep heading for the exit until the Ending triggers… & go Fishing instead.
You can technically unlock this same Ending by fleeing Pascal’s Village later on when it is being attacked. But it is easier just getting this Ending over with right now instead.
Ending #9 – A – flowers for m[A]chines: Complete Route A.
This is the cannon Ending for Route A; defeating the final boss will complete it.

Achievement #23 – One Battle Ends: Achieve Ending A.
Story Related. Complete the final Main Quest – Threat Disposal & defeat the final boss to unlock the Achievement & cannon Ending of Route A.
Save over your Save File, & hit Continue from the Main Menu to be sent into Route B. This Route is very similar to Route A… & yet totally different at the same time. The plot thickens… As a side note, whatever Weapons you have equipped when you beat Route A, 2B will use them during Route B. So keep that in mind before defeating the final boss.
Sequence 7: Route B
2. Sub Quests: 57/80%
3. Archives: 16/45
4. Pod Programs: 11/17
5. Weapons: 30/40
6. Unit Data: 65/80%
7. Endings: 12/26
8. Achievements: 24/47
—————————————————————————————————–
To begin Route B after completing Route A, simply select Continue from the Main Menu. Do not hit New Game! Be sure to complete any left over Sub Quests you missed from Route A, the majority of these will become unavailable during Route C & you could lose out on valuable quest rewards!
Weapon #27 – Cruel Oath: We will begin Route B with this Weapon.
Ending #10 – G – hun[G]ry for knowledge: Take the secret route out of the Abandoned Factory…
As soon as we gain control of 9S, we will be tasked with going down to our Flight Unit. Do not go to it. Instead, walk along this upper platform & we can find a control console off our left. Activate the crane that will lower down & simply walk to the end of the crane to receive the Ending.
There are three alternate Endings we need to get in the Prologue… there are no Saves. Be prepared getting used to grabbing oil for your Brother… This part of the game is a real chore.

Achievement #24 – Fighting Is Not My Thing: Play your first Hacking Game.
Story Related. As we fly around in our Flight Unit as 9S, we will be prompted to Hack an enemy. The Achievement will unlock after successfully completing the mini-game for the first time.
Ending #11 – F – mission [F]ailed: Fail to repair yourself during the Goliath boss battle.
During the battle with the Goliath, a cinematic will play where we send the Goliath’s rockets back at it. We will then be struck out of the air & have to reboot ourselves in a little mini-game. For this Ending, do not repair yourself & just let the 3 minute timer run out.
It’s oil grabbing time!
Ending #12 – W – broken [W]ings: Fail to protect 9S as Pod 153.
Fight through the Prologue, again, & defeat Engels with his missiles. This time complete the repair mini-game. We will then get to play as 9S’s Pod 153 & have to defend him while 2B makes repairs… do not defend 9S. He will get swarmed by Machines & perish triggering this final Ending. All it takes is one hit. Ironically, you may get this Ending even if you don’t want to if you fail by accident…
Now, finally, beat the Prologue as per usual & let’s get this show on the road! Route B, woo!
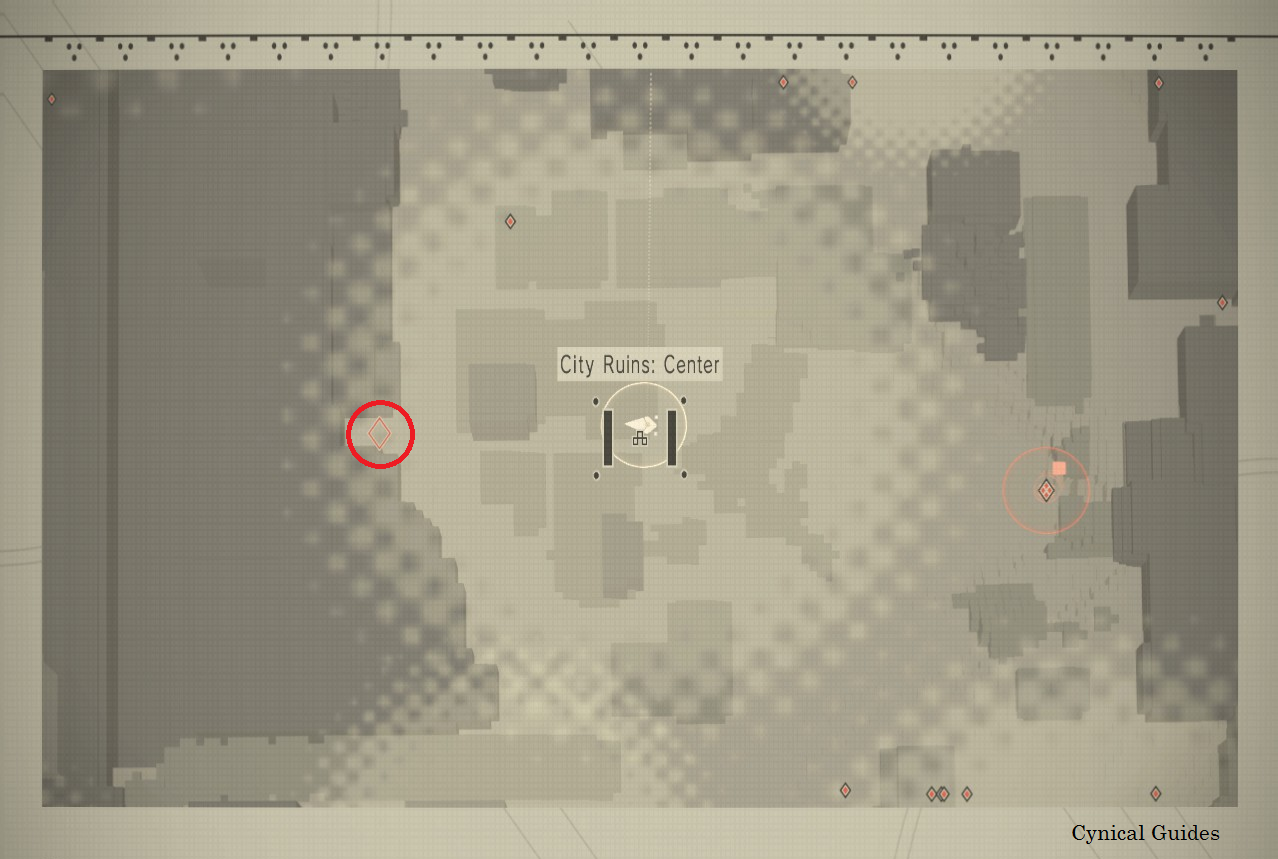
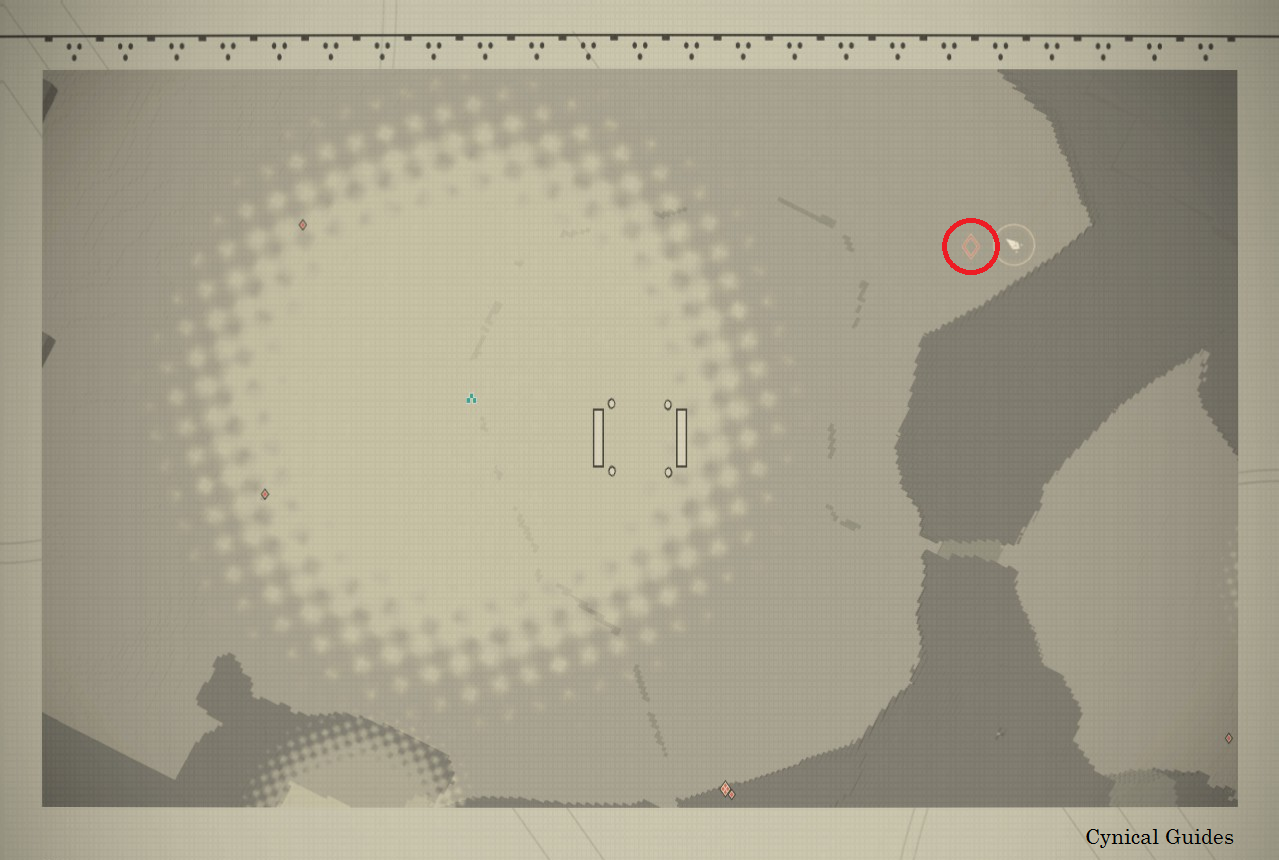
Weapon #28 – Phoenix Sword: When we land in our Flight Units in the City Ruins, make your way over to the far-right corner of this first building. In behind the small rectangular structure we can enter/jump on to progress, there will be a Hackable Chest. Hack it & collect the Weapon.
Weapon #29 – Type-40 Fists: When we arrive in the Resistance Camp, jump over some metal crates to the left of the Access Point. We can find a Hackable Chest here that contains this Weapon.
Archive #8 – Paper Attached to Vehicle: Make your way back towards the Abandoned Factory. To get there, we need to jump on a rusted semi-truck to get on top of the broken bridge. To the right of this truck will be a Hackable Chest on the ground that has the Archive inside it.
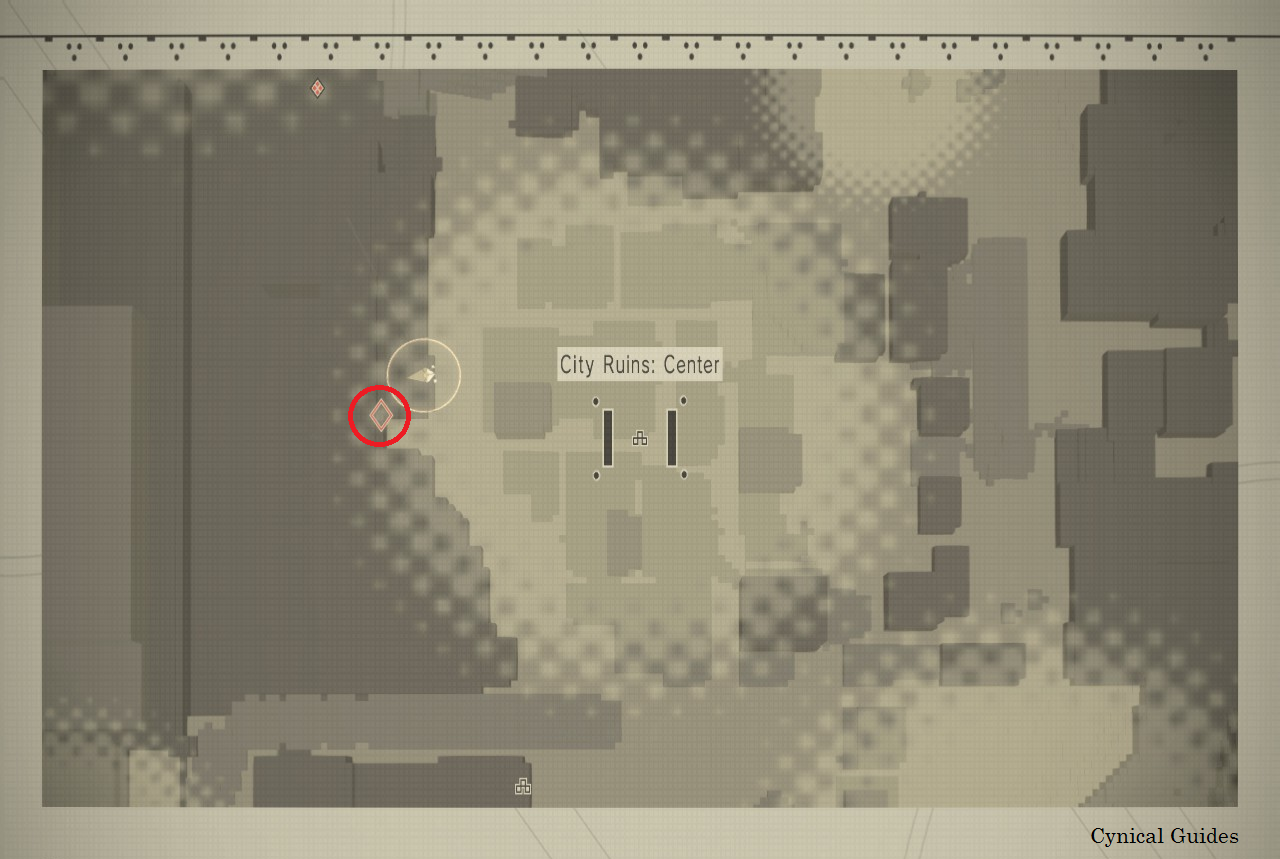
Archive #9 – Ragged DVD: Much like the Type-3 Lance in the Flooded City, this will require some epic jumping. First, head to the building across from the Waypoint indicated in the Screenshot with all the stacked C-Cans on it. Take a running jump towards the building with the Waypoint, dash forward with Evade, perform a four hit combo with a Small Sword (do not do five as 9S will perform a Plunging Attack). Then glide, pressing Quick Attack at the end while gliding for some vertical lift to grab hold of the building. Hack the Chest & collect the Archive.
Archive #10 – Department Store Flyer: Make your way over to the Commercial Facility now across the long wooden bridge. Before the entrance to the Facility, go along the right wall outside & we can find a Hackable Chest behind some bushes. Hack it to collect the Archive.
Archive #11 – Weapon Shop Flyer: From here, drop down into the valley below & head to the flooded section where we found the Phoenix Dagger in Route A. Directly across from the same Chest we found the Weapon, in will be a Hackable Chest. Hack it to collect the Archive.
Weapon #30 – Cruel Blood Oath: Head past the Desert Camp & enter the Desert Zone: Border Area. Enter the caverns below the sand & we can find a Hackable Door in the center/North end of the area. The Weapon will be stuck in the sand past the door guarded by a new Unit Type.
Archive #12 – Project Gestalt Report 6: From the Door we found the Weapon through, head left down in the caverns. Follow the path down & it will take us outside. We can find this Archive in a Hackable Chest right beside a regular Chest.
Archive #13 – Mysterious Lithograph 3: Blast open the way to the Desert Zone with “Donkey’s” help & head to the Desert Oasis at the very back end of the desert. We can find this Archive in a Hackable Chest to the right of the YoRHa Soldier.
Archive #14 – Project Gestalt Report 8: Begin completing the Main Quest – The Machine Surge until it leads us to the entrance to the Desert: Housing Complex. Do not chase the Machine down into the new area yet, instead from the tunnel entrance, head right along the rock wall up the hill. At the top of the hill, not far from where we were, we will see a large rock with two Medium Flyers around it. A Hackable Chest containing the Archive will be tucked beside the large rock here.
Archive #15 – Bulletin Record: Now we can make our way down into the Desert: Housing Complex & head to the Access Point there. Go left up the hill across from the it & around the corner to a dead end. We can find a Hackable Chest in the corner containing this Archive.
Archive #16 – Mysterious Lithograph 1: Back track out where we came to the Access Point & follow the buildings outside to the left. Go past the second entrance to the Housing Complex near the fire escape & keep going until you reach the third entrance instead. Enter the ruined building leading in. But before leaving it towards the tree in the center, look to your right inside the building. We can find a Hackable Chest here that will have the Archive.
After completing the Main Quest – The Machine Surge, return to the Bunker & head to the Command Room. Here, 9S’s Operator 21O will have a Sub Quest for us, Data Analysis Freak. Complete the Sub Quest; we need the Sub Quest – Data Analysis Freak 2 later on for some quest rewards.
Sequence 8: Of Minstrels & Blacksmiths
2. Sub Quests: 62/80%
3. Archives: 21/45
4. Pod Programs: 13/17
5. Weapons: 34/40
6. Level 4 Weapons: 10/39
7. Unit Data: 69/80%
8. Endings: 12/26
9. Achievements: 25/47
—————————————————————————————————–
Archive #17 – Tattered Pamphlet: Enter the Amusement Park & head to the Attraction Square: Access Point. Head along the ground to the far end of the fenced in “spinning ride thingy”. We can find a Hackable Chest at the back with this Archive in it.
Archive #18 – Filthy Lottery Ticket: Drop into the next area & defeat the Amusement Park Goliath Tank. Hop over the small fence where the stairs leading up to the Roller Coaster are & go to the right corner past them. We can find another Hackable Chest with an Archive inside it behind a tree tucked beside the building.
Weapon #31 – Demon’s Cry: After defeating Simone in the Castle, head down the stairs. Before leaving the Castle, head down to the left corner of the room & take the elevator down to the lower level. Follow the side scrolling hall along & head behind the stack of TVs to find a Hackable Chest with this Weapon inside it.
Pod Program #12 – A110 Slow: As we progress through the Main Quest – Machine Trade & if you completed the Sub Quest – Data Analysis Freak, we will receive Data Analysis Freak 2. Head to the Desert: Housing Complex area & collect the 3 Items scattered around. 9S will automatically turn in the Items & we will finish the Sub Quest.
Go to the Access Point & collect our reward in our Inbox.
Weapon #32 – Type-40 Blade: We will receive this Weapon along with the A110 Slow Pod Program for completing Sub Quest – Data Analysis Freak 2.
After the Main Quest – Assault & the City Ruins is wrecked, a whole slew of new Sub Quests will become available to us.
Pod Program #13 – A090 Wire: We can collect the Sub Quest – Amnesia from a Resistance Member inside the multi-stored building we use to get up to our Flight Units.
Complete the Sub Quest & we will receive the Pod Program as a reward.
Archive #19 – Nuclear Arms Manual: Speak with Pascal & he will give us the Sub Quest – Data On the Old World. By this point, we probably already have enough to turn in the quest, but do not do so yet. Head to this location in the City Ruins while this Sub Quest is still active. We can find a special Hackable Chest on the bottom floor of the three-story building with all the tree roots coming out of it.
This Chest will only spawn if this Sub Quest is still active!
Power Up Part S #3: You may have already collected this Powerup Part in Route A if you completed all the Robo Dojo Sub Quests for Father Servo. If not, this is the last time we are able to do so, these Sub Quests will not be available in Route C. Complete the Sub Quests – Robo Dojo: White Belt, Brown Belt, Black Belt, Red & White Belt, & Red Belt. The later Sub Quests are easiest on Route B while playing as 9S; Servo can be instantly taken out if you Hack him twice.
Defeat Father Servo for the final time & we will receive the Powerup Part S as a reward. This is the last Upgrade Material for our Pods that is missable.
Carry on & complete the Main Quest – Flooded City Recon & confront Adam & Eve in the Alien Spaceship.
Archive #20 – Strange Doll: When you enter the Forest Zone, go to the Center Access Point. From there, follow the path along until you cross the small stone bridge that spans over the second river. On the other side of the bridge, go right, & follow the first set of stone stairs down the hill. In between the stairs you came down & the next set of stairs going down will be an opening between two large trees off your right. Head over to the opening & look in the roots of the large tree on your right. Close to the ledge looking down at the first river below, we can find a Hackable Chest with this Archive in it.
Archive #21 – Rotten Info Sheet: Head over to the Forest Castle Front Access Point. From here, go to the wall directly left from the Caste entrance. We can find a Hackable Chest tucked right against wall here with this Archive inside.
Weapon #33 – Beastcurse: In the Forest Castle, when we re-enter the large multi-story library for the second time, climb the ladder up to the next floor. As you walk up the stone ramp to continue further into the Castle, leap backwards towards the library & reach a ledge that will take you to the top floor of the library. Follow it around & you can find a Hackable Chest next to a regular one that contains this Weapon.

Achievement #25 – Tools of the Trade: Any Weapon upgraded to the highest Level.
By this point, you should have enough Materials to upgrade a Weapon to Level 4 with the Blacksmith Masamune. If you were smart, you may have already gotten this Achievement during Route A. I spent the majority of my Materials just getting everything to Level 3 that Route.
Either way, after you upgrade the Weapon, we will unlock the Achievement… only 38 more to go for the Inorganic Blade Achievement.
Weapon #34 – Cruel Lament: After we have upgraded any Weapon to Level 4, exit out of dialogue with Masamune, then speak with him again. Then, exit out of the dialogue once more & he will say something different to us about how strong our Weapon is. He will then hand us this Weapon in appreciation… even though he was the one who upgraded it for us.
Sequence 9: Emil’s Accursed Shop
2. Sub Quests: 78/80%
3. Archives: 23/45
4. Pod Programs: 13/17
5. Weapons: 36/40
6. Level 4 Weapons: 10/39
7. Unit Data: 71/80%
8. Endings: 12/26
9. Achievements: 28/47
—————————————————————————————————–
Weapon #35 – Angel’s Folly: Can be purchased at Emil’s Resistance Camp Shop when he has his Rare Inventory for 25,000G.
Return to the City Ruins & go to the Desert Camp Access Point. Here, we should be able to find Emil. Speak with him & purchase something so that his shop is now triggered. Now, Transport to the Resistance Camp. Emil has two routes: City Ruins/Desert Area & the Resistance Camp. He has a different Inventory for each route, & a different Rare Inventory for each route as well. We need his Rare Inventory on the Resistance Camp route for two Weapons. His standard Inventory there has Level 6 Chips, the Rare Inventory has two Weapons & the Dress Module.
There are so many obscure methods for getting him to spawn, firstly at the Resistance Camp then secondly to spawn him there while also having his Rare Inventory. None of it worked for me. None of it. The only way I did this was Transporting back & forth from the Resistance Camp & The Bunker. I’d Transport to the Resistance Camp, check my map: if he was on the Desert route, I’d Transport back to the Bunker, if it was the Resistance Camp route, I would at least go check the Inventory before Transporting. I did this, over & over & over again. For at least two hours honestly until he actually had his Rare Inventory at the Resistance Camp. This is very, very tedious.
Only try to get him to spawn here once; it really isn’t worth trying to do this multiple times. Be sure to at least have 45,000G before grinding this.
If anyone has a guaranteed method to spawn him, let me know in the comments. My method sucks, but it does work… eventually.
Consider purchasing the Dress Module for 10,000G too if you can afford to make unlocking an Achievement easily.
Weapon #36 – Type-3 Fists: Can also be purchased at Emil’s Resistance Camp Shop when he has his Rare Inventory for 20,000G.

Achievement #26 – A Scanner’s Power: 100 Machine Lifeforms destroyed by Hacking.
This may come naturally as you play through Route B, depending on how frequent you Hack. Until the Achievement is unlocked, I would recommend Hacking as much as you can. While it is very handy to take down large foes, it does take a very long time to add up to 100. Whenever you encounter enemies, just try Hacking one or two of them in the group. Eventually, once you hit 100, the Achievement will unlock.

Achievement #27 – Not That I Mind…: 1 hour played with 9S in a certain state.
For this Achievement, we need to play 1 hour as 9S… without his pants on. There are two ways we can achieve this. The first & easiest, is if you purchase the Dress Module Emil’s Resistance Camp Shop’s Rare Inventory for 10,000G; use it to remove 9S’s pants. Do not equip it; click “use” to remove his pants. Then, just carry on your merry way. After an hour has elapsed, the Achievement will unlock & you can his pants back on.
If you do not have the Dress Module, you can still unlock this Achievement, but it is different & more annoying. Turn on Self Destruct, then do just that. Self Destructing will blow off 9S’s pants, the caveat is we have no health & we will die in one it. To unlock the Achievement this way, you pretty much need to Self Destruct then leave 9S idle somewhere safe, like the Resistance Camp, for an hour. Come back after an hour & you will have the Achievement; you may need to reload your game after doing this though.

Achievement #28 – Machines vs Machines: 50 Machine Lifeforms destroyed by Remote Control.
This is an Achievement you are unlikely to get through natural play. To get a list of options while Hacking, you need to Hack a Machine who is not in combat. Sneaking up on enemy Machines is not easy & annoying. The best place for this is at the Amusement Park & Hacking Machines while they are parading around. When you do, you will get options listing: Detonate, Subjugate, & Remote Control. For this Achievement, we need to Remote Control them. The Medium Bipeds (tall Machines that shoot projectiles into the air) are the easiest to control & do the most damage.
Before attempting this, speak with 2B & switch her Combat Style to “Passive”. From the Access Point without killing any Machines yet, sprint to the Golden Rabbit Statue area at the entrance to the Amusement Park. Take control of a Medium Biped then go on a rampage killing all Machines that are in the Park. I am not sure if the Friendly Machines will count towards our kills, but it couldn’t hurt taking them out anyways. After all the Machines are dead, Self Destruct your Machine & Transport out & back to the Amusement Park. Rinse & repeat. The Achievement will unlock after we have killed 50 Machines this way, it may take 1-3 runs depending on how many 2B kills before you can if you do not set her to “Passive”.
Sub Quest – Emil’s Memories: In the Commercial Facility you should see a Sub Quest Marker. Approach it, & you will find a Lunar Tear. Emil will arrive & ask you if you can find more of them. There are 4 others we will have to find in The Desert Zone, Amusement Park, Flooded City, & Forest Zone.
Archive #22 – Mysterious Lithograph 4: This Archive can be found in a Hackable Chest directly across from the Lunar Tear in the Desert Zone. To reach it, go through the caverns below & head for the pathway left, then down from where you enter. Hop across the sandstone & you will find the Tear.
Archive #23 – Newspaper Scrap: While in the Flooded City finding the Lunar Tear here, head to the same isolated building in the inner pool where we found the Type-3 Lance last Route. From the tipped over building, take a running jump, double jump, Evade, then perform a four hit combo with a Small Sword, ending with a Glide & a Quick Attack while Gliding to boost you ever the edge. We can find the Archive in a Hackable Chest inside the small room on top of the building.
Sequence 10: Always Ends… In Tears
2. Sub Quests: 78/80%
3. Archives: 33/45
4. Pod Programs: 13/17
5. Weapons: 36/40
6. Level 4 Weapons: 15/39
7. Unit Data: 71/80%
8. Endings: 13/26
9. Achievements: 31/47
—————————————————————————————————–

Achievement #29 – Lunar Tear: The Place of Memories has been visited.
After finding all 4 Lunar Tears in the Sub Quest – Emil’s Memories, return to the Commercial Facility in the City Ruins. Here, there will be an elevator in the center area of the room underneath the roots of a large tree. Using the Elevator Key we received from Emil, take the elevator down. Speak with Emil here & learn his backstory. The Achievement will unlock after the Sub Quest is completed.

Achievement #30 – The Mercenary: 80% of all Sub Quests completed.
I unlocked this Achievement around this time. If you completed the majority of the Sub Quests in Route A & the majority of the Sub Quests leading up to this point you should be very close to 80%. The Achievement should unlock for us sometime during Route B.
If not, there are still more Sub Quests to be found during Route C. This will come naturally as you complete them.
Archive #24 – Project Gestalt Report 10: Before leaving the Lunar Tear, check behind Emil’s home down here. Here we can find a Hackable Chest that contains this Archive.
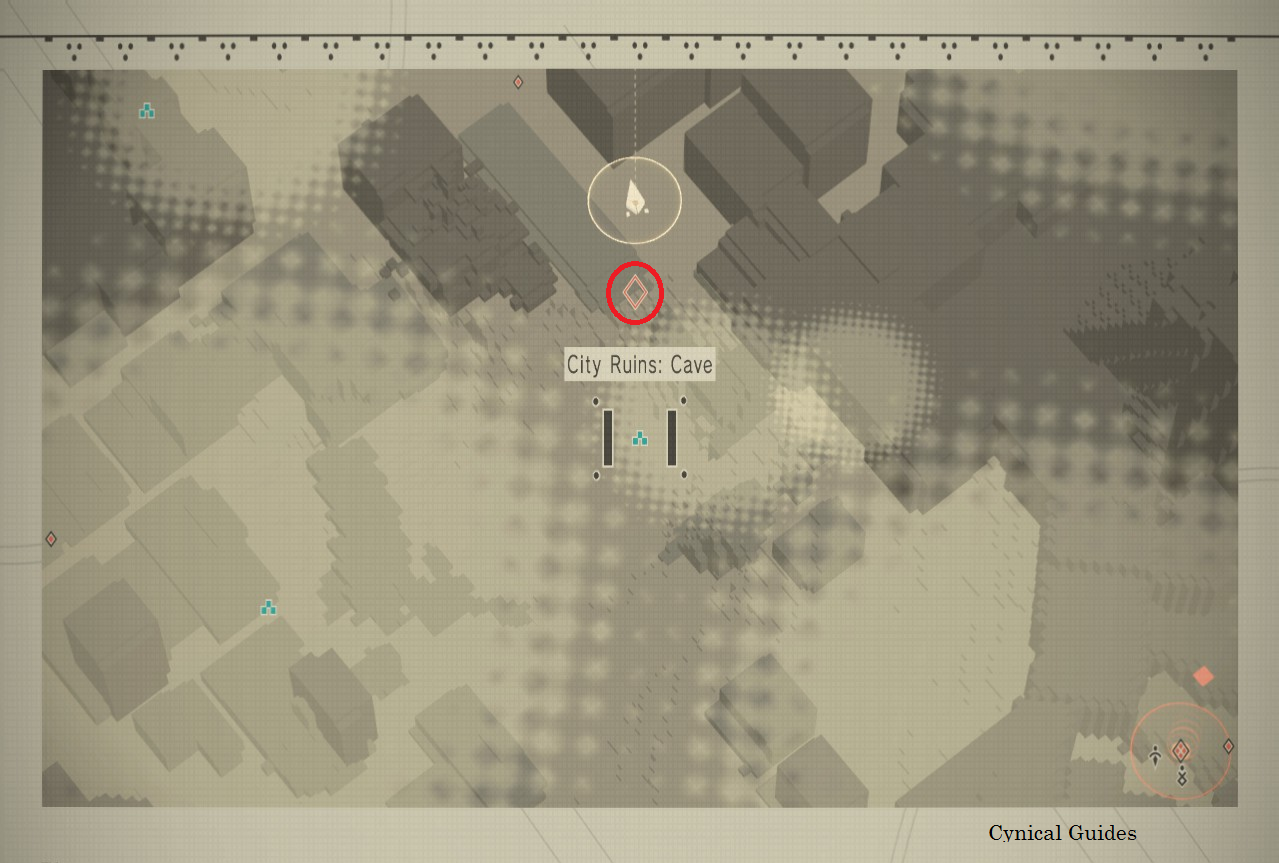
Archive #25 – Project Gestalt Report 7: These next Archives are a little tricky to find. Head to this location in the City Ruins; the roof of a small square building overlooking the Cave Access Point. From this square roof, look to your left, & there will be a large stone pipe mouth coming out of the rock wall with water coming out of it into the chasm below. Leap off the square roof & Glide into the pipe, this is the only way to reach it.
Inside the pipe, we will see an elevator; take it down. Follow the secret cave system you enter down until you find a gorge area. There are two ledges we can drop down to, a ledge at the bottom & one halfway between it & where we are. Glide down to the middle (not bottom) ledge & follow this new area along. There will be a Hackable Chest in the left corner at the dead end containing this Archive.
Archive #26 – Project Gestalt Report 4: Return back to the gorge & this time drop all the way down to the lake below (you can loot the other ledge areas first though if you want). Follow the path around the lake & there will be a Hackable Chest containing this Archive on the far side close to the waters edge.
Emil’s Mask: Carry on past the lake, ignoring all the elevators for the moment, & head to the very end of this lower cavern. Through a set of doors, we will enter a glade that contains Emil’s House. Beside a rack of Masks, we can “steal” an Emil Mask laying on the ground in front of it. This is important to set up the Super Boss of Automata. Though… we may have to redo this part since I will not walk you through that boss fight until we are in Route C & can actually fight it.
Steal the Emil Mask & speak with Emil & he will tell us he has boosted his security. We will be coming to his house later to steal another Item from him, but do not do this yet! Doing this without having all 39 Weapons at Level 4 will void the Ending Y for us. Just remember how to get to his house for later…
Catch up on Sub Quests or upgrading a few more Weapons. When you are finished, begin continuing through the Main Quests as normal. Completing the Main Quest – Missile Supply Mission will put us into unknown territory in Route B; be sure you are caught up on everything you need to do.
Archive #27 – YoRHa Body Storage Records: After completing the Main Quest – Missile Supply Mission, the Main Story will be progressed to the end of the Copied City since 9S is unconscious the entire time.
We will wake up on the Bunker & have to do a Self-Hack to run our diagnostics. During this mini-game, we will enter into the YoRHa main servers. Head around the circular servers counter clockwise (right) & Hack the first Server node you come across. It will contain this Archive.
Alternatively, you can go the other way around the server & find Archive #28 first then Archive #27; it does not matter.
Archive #28 – Shipping Records: Carry on counter clockwise around the main servers. When you reach the spot opposite to the last Archive, we can find another server to Hack. Hack it, & we will receive this Archive.
Archive #29 – Council/YoRHa Records: After collecting both Archives in the YoRHa main servers, a new port will open up & we can find one last server to Hack. Hack the node & unlock the final Archive in here.
All three of these Archives are tied to the Main Story & cannot be missed.
Archive #30 – Project Gestalt Report 1: When we arrive in the Abandoned Factory as a Hacked Machine, make your way through the level until you Hack the elevator for 2B. After this, 9S will Hack into the Facility main frame where we will enter a large Hacking mini-game
Open Gate 12, then take the right path, not straight. At the end of the path will be a node we can Hack to access this Archive.
Archive #31 – Project Gestalt Report 2: Carry on over to Gate 17 & unlock it. There will then by a diverging path going straight & left. Take the left path then left again following this side route to another Hackable node that contains this Archive.
Archive #32 – Project Gestalt Report 3: Return to the last side area & take the right path this time. It will end in a dead end with a node we can Hack to receive this Archive.
Continue through this level now & Hack Gate 44 & leave the server.
Archive #33 – [Top Secret] Project YoRHa: This Archive is received through the Main Story from the Commander after we complete the Abandoned Factory.
Ending #13 – B – or not to {B}e: Complete Route B.
Follow through with the rest of the playthrough & defeat the final Boss Eve. We will unlock this Ending when we complete Route B; this is our second “Cannon Ending”.

Achievement #31 – A New Battle Begins: Achieve Ending B.
Story Related. After completing Route B, there will be a short sequence of us stopping in to see 9S & grabbing some gear as 2B during the Credits on the Bunker. After seeing 9S, return to your room to unlock the Achievement.
Sequence 11: Route C
2. Archives: 42/45
3. Pod Programs: 14/17
4. Weapons: 36/40
5. Level 4 Weapons: 15/39
6. Unit Data: 77/80%
7. Endings: 18/26
8. Achievements: 34/47
—————————————————————————————————–
Prepare for oil carrying déjà vu… we have a few Endings to unlock at the beginning of Route C & will have to replay a lot of it to receive them all…
Ending #14 – O – just y[O]u and me: Abandon YoRHa during the Machine attack.
When you begin Route C, we will be bouncing back & forth between playing as 2B & 9S. After disabling the Air Defense System as 9S & complete the Flight Unit section as 2B, the two will regroup on the bridge leading to the Abandoned Factory. As soon as you gain control of 2B, Save your game, then turn around & follow the bridge to the Abandoned Factory instead of progressing the Mission further into the City Ruins. The Ending will que after getting to the far end of the bridge.
You can also unlock this Ending by not Hacking into 2B when everyone is hit by the EMP & getting attacked by the virus.
Ending #15 – P – corru[P]tion: Let 2B be consumed by the Machine Virus.
After we leave the Bunker & regain control of 2B in the Flooded City, 2B will be infected with the virus. For this Ending, let the System Corruption reach 100%. I would recommend Saving in the Flooded City, so we do not have to replay the entire Bunker section again.
To make the timer increase faster & save us waiting for a while, make your way out of the Flooded City & head to the bridge leading over to the Commercial Facility. Do not cross the bridge. Walk a couple paces onto the bridge & System Corruption will jump to 90%. Stay put here & let the virus consume you to unlock the Ending.
Ending #16 – X – time to rela[X]: Abandon 2B in her time of need, as A2.
Reload your Save & this time cross the bridge into the Commercial Facility as virus infected 2B. When we get there, A2 will arrive to help us & we will gain control of her. As soon as we gain control of A2, turn around & run back across the bridge to the City Runs instead of helping 2B fight to unlock the Ending.
Ending #17 – Q – [Q]uestionable actions: Abandon 2B in her time of need, as 9S.
Unfortunately, we once again have to hobble 2B back up to the Commercial Facility while being infected.
After assisting 2B as A2, we will take control of 9S next. Pop forward & Save at the Near the Tower Access Point, but do not go to 2B at the Commercial Facility. Instead, make your way over to the Desert Area or the Resistance Camp to unlock the Ending.

Achievement #32 – Final Wish:
Story Related. This mega spoiler related Achievement will unlock after crossing over the bridge to 2B’s location at the Commercial Facility as 9S in Chapter 11.

Achievement #33 – Treacherous Blade: Control A2 for the first time.
Story Related. We will get to decide who we want to play as next: A2 or 9S. Choose A2, & the Achievement will unlock.
A2 & 9S both have arcs at the beginning of Route C. When given the choice throughout the beginning to switch characters, keep selecting A2 until her arc is complete. When it is finished, we will then have to play through 9S’s anyways to progress.

Achievement #34 – The Power of Hate: 50 Machine Lifeforms destroyed with Berserk Mode.
As A2 we can activate Berserk Mode the same way we activate Self Destruct Mode for 9S & 2B by pushing in both sticks of our controller (or however you do it with a Keyboard). When Berserk Mode is active you will lose health but have your damage greatly increased. When you reach 1HP Berserk Mode will deactivate. I would try farming this Achievement right away, so we do not have to worry about it. As you progress through A2’s storyline, make a point of hunting down Machines in Berserk Mode. It will not take long to unlock.
There is not much point in healing while Berserk Mode is active, heal after its has worn off unless you are going to be killed in combat. Having the Deadly Heal Plug-In Chip can greatly increase your survivability.
Archive #34 – Infant Machine’s Memories: We will unlock this Archive as part of the story when we destroy the Goliath Hegel in the Main Quest – Destroy Machines.
Ending #18 – Z – over[Z]ealous: Kill Pascal as A2 after he is being attack by Machines outside of the Resistance Camp.
Destroy the Goliath Hegel in the Main Quest – Destroy Machines & return to the Resistance Camp. When we arrive, we will see Pascal being attacked by some Machines.
Destroy the Machines around Pascal & speak to him afterwards. We will be given a choice: Let Pascal live or Destroy Pascal. Choose to Destroy Pascal & do so to unlock the Ending.
Archive #35– Resistance: Rose: As A2, after speaking with Anemone, our Main Quest will prompt us to go to Pascal’s Village. Before we go, speak to Anemone again & she will tell us we can use a nearby terminal. Access the YoRHa Pearl Harbor Descent Personal Record – Part 1 at the terminal to receive these two Archives. Access the next 2 Parts of the Record to unlock the other 5 Archives.
Archive #36 – Resistance: Anemone: Collected by accessing YoRHa Pearl Harbor Descent Personal Record – Part 1 at the terminal Anemone lets us use as A2.
Archive #37 – YoRHa: Attacker 4: Collected by accessing YoRHa Pearl Harbor Descent Personal Record – Part 2 at the terminal Anemone lets us use as A2.
Archive #38 – YoRHa: Scanner 21: Collected by accessing YoRHa Pearl Harbor Descent Personal Record – Part 2 at the terminal Anemone lets us use as A2.
Archive #39 – YoRHa: Gunner 16: Collected by accessing YoRHa Pearl Harbor Descent Personal Record – Part 2 at the terminal Anemone lets us use as A2¬¬.
Archive #40 – Pearl Harbor Descent Summary: Collected by accessing YoRHa Pearl Harbor Descent Personal Record – Part 3 at the terminal Anemone lets us use as A2.
Archive #41 – YoRHa: Attacker 2: Collected by accessing YoRHa Pearl Harbor Descent Personal Record – Part 3 at the terminal Anemone lets us use as A2.
Archive #42 – (Censored by Steam)’s Bomb Recipe: If you have completed the Sub Quest – Sorting Trouble 2 during Route C, we will be able to collect Sorting Trouble 3 shortly afterwards. Complete the Sub Quest & we will receive this Archive as a reward.
Pod Program #14 – Repair: We can receive this Pod Program for completing the Sub Quest – Sorting Trouble 3 as a reward as well.
Sequence 12: A Tale of Two Androids
2. Archives: 44/45
3. Pod Programs: 17/17
4. Weapons: 38/40
5. Level 4 Weapons: 25/39
6. Unit Data: 80/80%
7. Endings: 20/26
8. Achievements: 37/47
—————————————————————————————————–
Pod Program #15 – A100 Decoy: Make your way up to that multi-storied building south of the Near Factory Access Point we would always climb up to get to our Flight Units. At top of the building across the rubble bridge, we can find the corpse of a YoRHa soldier in combat armor. Loot her nearby Pod to collect this Pod Program.
Pod Program #16 – A150 Volt: Go to the Amusement Park now & jump across the tall ride close to the Attraction Square Access Point. There will be another Amusement Park Goliath Tank in the same area we fought the first one back in Route A. Destroy the Tank, then search in the center of the area we fought it to find another dead YoRHa soldier. Loot here Pod for the Pod Program.
Pod Program #17 – A169 Missile: Navigate through the Abandoned Factory close to where the game first begins & we fought that Goliath Buzz Saw Arm. From that circular boss room area, head across the metal bridge we shot down to the far end. Instead of carrying on along the chain link fence to the right, keep going straight & jump on top of the rusted metal C-Cans at the dead end. We can find a dead YoRHa soldier here. Loot her Pod for the final Pod Program.

Achievement #35 – Weapons Maniac: All 17 Pod Programs obtained.
If you have been following along with the guide, after collecting the final Pod Program we will unlock the Achievement.
Ending #19 – M – break ti[M]e: Abandon Pascal when his village is under siege as A2.
During the Main Quest – A Villager’s Request we will pick up a philosophy book, Pensées, from Anemone & we must deliver it to Pascal. Before we leave the Camp, we will play a brief scene as Pascal before switching back to A2 & must go to his rescue. Do not go to Pascal’s Village. Instead, run to the very far back of the Resistance Camp & it will trigger this Ending. You can also sprint to the Abandoned Factory or the Amusement Park as well for the same Ending.
Ending #20 – R – mave[R]ick: Destroy Pascal & his villagers at the Abandoned Factory after his village is lost as A2.
In the Main Quest – Village Turmoil, save Pascal’s Village from the Machines & regroup with him at the Abandoned Factory. Enter inside the first room of the Factory to find him & the survivors from the Village. Pascal will talk to you when you enter, then we have to talk to him again to progress the Main Quest. Do not talk to him again. Instead, begin destroying the Friendly Machines in the room to trigger the Ending.

Achievement #36 – Farwell Pascal: Grant Pascal’s final request.
Story Related. At the end of the next Main Quest as A2 we will have to make a decision about Pascal. Wipe his memory & the Achievement will unlock. This will end A2’s first arc in Route C. We will now get to play as 9S & complete his first arc.
You can technically destroy him, but if you do not, we will be able to return to Pascal’s Village & purchase Upgrade Materials from him as well as a Weapon there as 9S.

Achievement #37 – Destruction Is My Job: 80% of all Unit Data unlocked.
This is definitely one of the more time consuming Achievements in the game. If you have completed almost every Sub Quest as well as explored every area of the game during Route A, B, & most of C, you will most likely unlock this Achievement at some point during Route C. We need to unlock 138/172 Unit Data entries in the game, so there is quite a bit we are allowed to miss. Route C opens up the rest of the Unit Types to us.
Weapon #37 – Machine Heads: As 9S, go to Pascal’s Village & speak to Pascal. We can now purchase the Machine Heads from him for 10,500G.
We can also purchase some important Upgrade Materials from him as well.
Archive #43 – A Pious Robot’s Will: As 9S, return to the Abandoned Factory. Shortly after the initial room we found Pascal in, there will be a Hackable Chest over in the next room. Hack it to receive the Archive.
From the Chest, go left & take the elevator down into the old Machine Commune area of the Factory.
Archive #44 – Abandoned Factory Memo: If there was any Archive to skip in favour of later ones, it would be this Archive. I will do my best to explain how to get there.
Progress through the Abandoned Factory, past the Hangar Access Point. When you pass where the deactivated hydraulic presses are & enter the following tower, we will be attacked by two Multi-Leg Medium Models (spider walker guys). Exit the tower & the camera will shift to side scrolling & we will be walking up some railed steps. On our right, the railing will be busted & we can leap off on top of the hydraulic presses below. You may remember doing this to collect the Engine Blade, we are heading back to that exact room. Jump across the presses & into the tower. To the left of the Chest we found the Engine Blade in will be a Hackable Chest containing this Archive.
Weapon #38 – Cruel Arrogance: Return back to the previous tower & you’re your way up the broken stairs. Eventually we will enter a small conveyor tunnel where we will be attacked by some Small Stubbys with Shields. Exit the conveyor tunnel up to the next tower entrance. Instead of entering the tower, turn around & run along the top of the conveyor tunnel back the way we came. At the end of the conveyor roof will be a Hackable Door on an upper level of the previous tower. We can find a covenant of Machines inside praying to the Spear inside.
Grab the Spear but be prepared to fight!
Sequence 13: Rampancy
2. Archives: 45/45
3. Weapons: 39/40
4. Level 4 Weapons: 32/39
5. Endings: 22/26
6. Achievements: 41/47
—————————————————————————————————–
Weapon #39 – Faith: Carry on in the Main Quest – Obtain Keys as 9S & go to the Flooded City. Enter the Soul Box & take the elevator up to the second area. In the large circular room, there will be Chests lining the sides. We can find this Weapon in the Chest two Chests down off your right.
We now have all Weapons we can collect so far. To receive Weapon #40, we will need to progress Emil’s Sub Quest…
Archive #45 – Tower System Outline: Head up the elevator to the next floor & Hack the two Chests to carry on. Hacking the second Chest will also reward you with this Archive as well.

Achievement #38 – Information Master: 80% of all Archives found.
If you have been following along with the guide, you should unlock this Achievement after collecting that last Archive. We only need to collect 45/54 Archives.
There are still more to collect, but we do not need anymore for Achievements. I will not include the remainders locations, though we will be getting a large stack of them (at least another 5) through the story later on in case you have missed a few.

Achievement #39 – Justice: Stop all Resource Recovery Units.
Story Related. Complete the Main Quest – Obtain Keys to unlock the Achievement. We will awaken in the Amusement Park Ruins afterwards as 9S.
Ending #21 – S – city ecape: Abandon Devola & Popola when they assist you in Hacking the Tower, as 9S.
Before entering the Tower & continuing with the Main Quest – Tower Infiltration, Save your game at the nearby Access Point! It is also worth saving after Hacking the 3 Sub Systems as well to save yourself some effort; we have two alternate Endings to unlock so we will be redoing this a few times…
Start Hacking the Tower & Devola & Popola will arrive & start battling the Machines. When they arrive, stop Hacking/fighting & begin sprinting away from the Tower. Go to leave the City Ruins wherever you like to unlock the Ending.
Ending #22 – V – reckless bra[V]ery: Watch Devola & Popola die by not Hacking the Tower & wait for them to be overwhelmed by Machines when they assist you, as 9S.
Reload your game & re-summon Devola & Popola when Hacking the Tower. This time stay in the pit near the Tower but do not continue to Hack it. Instead, just fight alongside the girls or stand still & watch them. This may take a few minutes to trigger (not sure if it happens faster if you aren’t killing Machines or BECAUSE of the amount of Machines dying). Regardless of what you do, wait it out & eventually one of the girls will cry out, & the Ending will unlock.
Aside from Ending Y from Emil’s Sub Quest, this is the last alternate Ending we have to worry about.

Achievement #40 – Crime & Punishment: Watch the final moments of Devola & Popola.
Story Related. After Devola & Popola assist 9S in entering the Tower, the Achievement will unlock after we regain control of 9S inside. The Achievement will unlock regardless on if you read the Novel involving them or not.
Point of No Return!: This is the point of no return if you want to deal with Emil on this playthrough. So long as you do not go through the double doors at the end of the first area inside the Tower as 9S, we are able to leave the Tower at our leisure down the elevator we came up.
The Tower is important because the Harvest Points here have a chance of being Meteorites, which we need 19 of to max out some Weapons for the Inorganic Blade Achievement. As 9S, take the elevator we came up, up & down the Tower to reset the Harvest Points. After you collect the ones you need. Leave the Tower & begin your long grind for Materials. Saving & reloading your game will also reset the Harvest Points & is a faster method in my opinion. There are 4-5 Harvest Points in this first area of the Tower.
If you plan on buying the final Achievements from the Special Shop we unlock after beating Route C, skip this section & go down to the next Sequence instead.
Now we enter the main grind of the game, while this can be done at any point after beating Route C, it is easiest to complete this before beating it so that we are guaranteed not to miss anything. I found going back through & doing this during Post-Game a bit confusing honestly, so I decided to do this now while I knew where I was & had done up until. In Post Game, certain Materials can be purchased infinitely from the Machine Shopkeeper in the Amusement Park which does make it a little less time consuming. Your call, so long as you do not progress Emil’s Sub Quest, you won’t miss any Endings.

Achievement #41 – Supreme Support Weapons: All 3 Pods upgraded to the highest level.
This will be the first of our tedious Achievements to unlock. We need to upgrade all 3 Pods to Level 4. These take a variety of random Materials.
Pod A: Starting Pod.
Lv. 2 – 2500G, Mushroom x10, Natural Rubber x10, Powerup Part S x1, Pure Water x10, Tree Seed x10
Lv. 3 – 5000G, Eagle Eggs x5, Filler Metal x5, Plant Seed x5, Powerup Part M x1, Tanning Agent x5
Lv. 4 – 10000G, Dye x3, Giant Egg x3, Machine Oil x3, Powerup Part L x1, Tree Sap x3
Pod B: Route A – Flooded City (Sequence 3 of Achievement Guide).
Lv. 2 – 2500G, Natural Rubber x10, Powerup Part S x1, Simple Gadget x10, Torn Book x10, Tree Seed x10
Lv. 3 – 5000G, Elaborate Gadget x5, Filler Metal x5, Plant Seed x5, Powerup Part M x1, Tech Manual x5
Lv. 4 – 10000G, Complex Gadget x3, Machine Oil x3, Powerup Part L x1, Thick Dictionary x3, Tree Sap x3
Pod C: Route A – Desert Zone (Sequence 2 of Achievement Guide).
Lv. 2 – 2500G, Mushroom x10, Powerup Part S x1, Pure Water x10, Simple Gadget x10, Torn Book x10
Lv. 3 – 5000G, Eagle Eggs x5, Elaborate Gadget x5, Powerup Part M x1, Tanning Agent x5, Tech Manual x5
Lv. 4 – 10000G, Complex Gadget x3, Dye x3, Giant Egg x3, Powerup Part L x1, Thick Dictionary x3
For a full list of where to locate or farm certain Upgrade Materials, check out my Achievement Checklist back in the Introduction & scroll down to the Notes Sequence.
If you cannot find Emil’s Shop anywhere to buy Materials from, return to his house & try stealing his Mask as 9S again. The beginning of the Sub Quest may have to be redone. You won’t be able to collect more than 1 Emil Mask, but attempt to grab it then leave the cave & Emil should be back driving around the City Ruins again.
Sequence 14: Emil’s Determination
2. Weapons: 40/40
3. Level 4 Weapons: 39/39
4. Endings: 23/26
5. Achievements: 43/47
—————————————————————————————————–
Weapon #40 – Emil Heads: When you are ready & have upgraded all 38 Weapons (Bare Fists do not count), return to Emil’s house as 9S & there should be a Hackable Chest in front of his house. If it is not there, the Sub Quest may have reset & you must collect the Emil Mask & return to him so he tightens his security again which will spawn the Chest.
Warning, we will be attacked by Emil & he will be Level 99! People have reported beating him at Levels as low as 65 however (I was only Level 78). If you are worried, farm the Golden Rabbit Statue in the Amusement Park for insane XP until you are your desired Level. I have its information under the Powerup Part L farming location in my Achievement Checklist. You will also want a specific Plug-In Chip loadout for fighting him; high damage & high defense, removing any unnecessary non-combat Chips you do not need.
Hack the Chest & collect the Item, Emil’s Head. After leaving Emil’s home, he will intercept us & we must fight him off. Hacking him is not recommended as it takes a very long time. Stay close to him & try baiting him into using his easily Evaded/less damaging melee attack. Emil’s ranged attack do an insane amount of damage, so be sure to have lots of Recoveries. The most irritating part is having to run all the way back through the cave if you die.
When you defeat him, be sure to collect the Emil Heads Weapon.

Achievement #42 – Naughty Children: Emil destroyed.
We will unlock this Achievement for defeating Emil’s first phase in the cave system after raiding his house.
This will allow us to progress his Sub Questline. The Achievement is misleading, Emil isn’t technically destroyed yet. In fact, as soon as you exit the cave you can find him driving around on a route as per usual as though nothing even happened!

Achievement #43 – Inorganic Blade: All Weapons upgraded to the highest level.
After you have collected all of the necessary Materials, & defeated Emil to collect our final Weapon, return to Masamune & upgrade all 39 of our Weapons to Level 4 (Bare Fists do not count). This will allow us to receive Ending Y when we defeat Emil in the Sub Quest – Emil’s Determination.
In my opinion, the Black Pearls were the most annoying thing to farm for…
Ending #23 – Y – head[Y] battle: After upgrading all 39 Weapons to Level 4, go to the Commercial Facility in the City Ruins to find Emil. Speak with him & he will run off to the Desert Zone & start the Sub Quest – Emil’s Determination.
Before heading to the Sub Quest Marker, Save your game! There is a possibility of messing up during this Sub Quest which will permanently ruin Ending Y for you.
When ready, head to the Sub Quest Marker & get ready to fight Emil’s second phase. When you defeat him, a Self Destruct countdown will ensue. Do not attack Emil, let the countdown expire! Attacking him will finish the Sub Quest, but you will not get the Ending & will not be able to replay the Sub Quest unless you reload your game if you did not Save. Let Emil Self Destruct to unlock Ending Y, the final alternate Ending in the game!
Unfortunately, this means you have to redo that whole fight if you want to actually complete that Sub Quest after getting the Ending. Seeing as though this is pretty much the end of the game, I never bothered doing that…
Sequence 15: An End to YoRHa
2. Endings: 26/26
3. Achievements: 47/47
—————————————————————————————————–
Ending #24 – C – meaningless [C]ode: Complete Route C, as A2.
Now, we can finally beat Route C worry free. When we reach the final boss battle, we will have a choice between 9S or A2. For Ending C, choose A2. If you want to do 9S’s Ending first, choose him for Ending D. We will be doing both, so the order does not matter.
Defeat the boss as A2 to beat Route C & unlock Ending C.

Achievement #44 – Beautiful World: Achieve A2’s Ending.
Story Related. Beat the final boss as A2 & we will unlock this Achievement after the Credits end.
We now have access to Chapter Select & will enter “Post Game”. If you are going down the Special Shop route to unlock your Achievements, load up any Chapter & go to the Resistance Camp. Speak with the Strange Resistance Woman wearing the Machine head & “Request unlocking you-know-what” to access the Achievement Shop. We can purchase Achievements 20-47 from her; basically, all Achievements that are not Story Related. Prices vary between 50,000-200,000 which is surprisingly cheap.
If you are purchasing any Achievements, they are most likely going to be Transcendent Being, Inorganic Blade, & maybe Supreme Support Weapons. This will run you 350,000G. 450,000G if you throw in Naughty Children. If you purchase Inorganic Blade, you must also purchase Transcendent Being as you must have all 39 Weapons at Level 4 in your Inventory for Ending Y.
Ending #25 – D – chil[D]hood’s end: Complete Route C, as 9S.
Now for the final hurrah. Use Chapter Select & load up Chapter 17-09 & play the final boss battle as 9S now.
At the end you will have two choices: Go or Stay. Choose either for Ending D, though the content will be altered slightly.
Ending #26 – E – the [E]nd of yorha: Achieve the True Ending after completing both Ending C & D.
After you have received both Ending C & D, we will be unable to skip the Credits. Pod 153 will begin speaking during them & ask us if we accept the Pod’s request.
Select “Yes”. Saying “No” will send you back to the Main Menu & you won’t receive the Ending.
Pod 042 & Pod 153 will begin speaking & we will be asked if “we still wish for them to survive”.
Select “Yes”. Saying “No” will send you back to the Main Menu & you won’t receive the Ending.
We will now enter into a cute mini-game where we get to destroy the credits. If you die, do not give up! Keep saying “No” & keep playing through the mini-game. As you progress, we will be asked a series of questions. Always say “No”! Dying seems to trigger the questions, again, always say “No”. This mini-game can get tedious, but stick with it, we must go through the entire Credits to unlock the Ending. The last stretch will be where we fight the “Square Enix, Co. LTD” & “Business Division VI” bosses. If you die during this battle, we can receive help, this time select “Yes” & we will receive some aid by “other players” to defeat the boss. If you die, one of them will be destroyed instead… I will explain what exactly is happening in a sec… it is disturbing.
The True Ending will play after we finish the Credits battle, but there is still one more, crucial, step before the game registers us receiving Ending E.
Pod 153 will ask us if we want to say something to other Players, either answer does not matter. Write your message or skip it. This next step is insanely important, pay attention!
Pod 042 will then ask if we have any interest in helping the weak. Say “Yes”.
He will then warn us that we will forfeit our Save Data to do this & ask us again. For the love of God, say “NO” not “yes”. If you hit “Yes” your game WILL be deleted. Want to know what was helping us during the Credits? Poor fools who got their Save Data deleted! Hit “NO” & we will be returned to the Main Menu. Save your game when it asks to Save the Ending E.
While there is no “Ending Screen” for it, we should have it unlocked.

Achievement #45 – Leaving For the New World: Achieve 9S’s Ending.
Story Related. Beat the final boss as 9S & we will unlock this Achievement after the Credits end.

Achievement #46 – The Minds That Emerged: View the Final Credits.
Story Related. This Achievement will unlock on your way to Ending E after completing the mini-game where we must literally destroy the game Credits.

Achievement #47 – Transcendent Being: All 26 Endings achieved.
Story Related. If Ending E was your last Ending, the Achievement will unlock when you return to the Main Menu. Technically, if you prepped for it, you could have followed through & deleted your Save Data when it asks… but then all our hard work getting 100% on this profile would be completely wasted. Really, really, not worth it in my opinion.
If it was not your final Ending, or you have things to do still in Post Game, use Chapter Select & mop up whatever remains for you.