Full walkthrough plus blueprint/cooking/crafting recipes, and a list of commonly encountered bugs and glitches. For “final release” version 1.0.K_182
So… what is this game anyway?
The story opens with Ellen (that’s YOU) living on a space station, waiting for her turn to relocate to Mars permanently. But she decides to come visit her grandfather’s farm on Earth one last time… only to find Grandpa gone and the farm is a TOTAL MESS. So you have to clean up the mess, help the neighbors to uncover clues, and go find your Grandpa. And it all starts with a… talking… chicken.
It’s an adventure/exploration game mostly. You run around the world, cleaning up all the trash that civilization left behind when everyone packed up and moved to Mars. As you go, you will help out the neighbors with some odd jobs. And you might find some “treasures” buried in the trash, or left in the luggage that people forgot to grab on their way out the door to the spaceport. But not treasure in the “so shiny, bling bling” sense…
The game is also a farming/ranching simulator. The economy of the game runs on “preserved foods” which you make by growing crops and raising livestock on your farm and then cooking them in your kitchen. Bring enough jars to your neighbors and they’ll trade for blueprints of items that let you improve your farm, or unlock upgrades that let you access new areas of the world. Then you have to go to your workbench and actually build those items if you want to use them, and that requires some recycled materials that you earn by throwing all the trash you found into a recycling machine. There are also blueprints for decorative items that you’ll find during your travels – these will let you decorate your farm, and inside your home, however you like.
There are also a lot of enemies that will try to stop you from cleaning up the world. These are evil robots with rotten programming. Use your drill tool as well as your water gun and vacuum pack to take them apart – literally – then use their parts to further your quest to rebuild the old farm and find Grandpa.
It’s not as epic as it sounds though. It’s really a casual style gaming experience. There are no time limits on anything in this game. If the robots kill you, you just wake up in your bed the next morning, losing out on whatever time was left for that day. It’s very chill, very low-key. So don’t be in a hurry with this one. Just enjoy the ride.
DANGEROUS GRAPHICS MODE!!
This game has quite a few glitches and bugs, some of which are directly related to your graphics settings. So before you start a game, get into the settings and make sure you have them set properly. Some advice about that:
The difference between “Performance” graphics and “High” graphics is INVISIBLE in terms of how the game looks. However, on HIGH mode it will use up roughly 5 GB of RAM as well as 60% CPU power (running on an Intel i7 4.2 GHz system with NVidia GeForce 1080 graphics). The drain on your PC will drop to about HALF of that much if you use PERFORMANCE settings. None of it makes a visible difference in the game either, it’s all just math done behind the scenes. If you are running on a low-spec computer, there is a good chance this game will overheat your CPU and your GPU, potentially causing PERMANENT PHYSICAL DAMAGE TO YOUR COMPUTER SYSTEM. So always run the game with graphics set to “PERFORMANCE” mode, and un-check all the special effect boxes on the right side of the graphics settings screen.
In addition to avoiding catastrophic CPU failure, you can also adjust volume levels and change some of the controls before you start a game. All of these settings can also be changed after you’re in the game, but it’s more efficient to set them before you start. The other settings can be set however you like, so feel free to experiment. But remember: ALWAYS USE PERFORMANCE GRAPHICS SETTINGS to avoid damaging your computer hardware.
Having “too many” crops growing and/or animal pets in any one area (i.e. your farm) will overload the graphics processing and the framerate will lag down to maybe 6 fps, even on “performance” graphics mode. Workaround: never have pets and veggies in the same area, and never have more than 100 crops growing in the same area at the same time, and never have more than 5 level-3 pet houses in the same area. In short, spread your buildings around some. Don’t just try to put EVERYTHING on your main farm. Unless you’re weird and you just LOVE low-fps lag and overheating your GPU.
Nasty “save/load” glitches
There are two glitches that a lot of people claim they have problems with. I cannot verify these because IT NEVER HAPPENED TO ME in 22 play-throughs all through early access stages of development or 3 play-throughs since full release. But in case you run into them, here is some info about that.
The developers posted this message in the discussion board regarding a nasty bug where items on your farm will just “vanish” for no apparent reason.
If your save game broke down or your game crashes but used to work earlier, or your farm items have vanished then please prepare copy of your:
1. Save Games
2. Player Files
3. System specification
and send them to us to: [email protected]
Where to find them: Open up any folder on your computer. Paste this in a direction field: %USERPROFILE%\AppData\LocalLow\Awaken Realms\NPLH\
Here is a picture instruction:
https://cdn.cloudflare.steamstatic.com/steamcommunity/public/images/clans/39143148/d79c89a47215ab1b4d892cb140884a2b356639ca.png
Now, I think what is happening is because of the NEW SAVE GAME SYSTEM, they added “autosave” function whenever you go through a door to a new area it will save your game. But then you can also save manually from the ESC menu. And then you can also save your game by sleeping in a bed or by getting killed and waking up the next morning. FOUR ways to save your game. And it keeps TWO save files per game: one for the most recent auto-save, and one for the most recent manual save. When you go to load your game, PAY ATTENTION to which option is checked on your save slot. By default it will load the most recent MANUAL SAVE ONLY. If the autosave is more recent, and you use the “Continue” button to load the manual save or if you hit “Play” and just select the default file, then you will lose some progress because the manual save is older than the autosave. You’ll have to click “Play” (NOT CONTINUE) and change the check-box on your file to the MOST RECENT save before you load your game.
Or, to make it simple, just always make a manual save from the ESC menu before you quit the game for the day. Then the manual save will always be the most recent one, and it will be the one that loads by default whether you hit “Play” or “Continue” on the main menu screen.
If you still have problems with vanishing stuff, send your files to the developers.
…
Well, I swear there was another one I wanted to discuss here, but I’m having a brain fart because I totally forgot what it was. I’ll come back and add it if I ever remember what it was.
Other Bugs and Glitches
- For all of the quests that require special items, you will find EXTRA items all over the place. Nearly twice as many as you actually need. Most of them CANNOT be thrown away either, so they just clog up your backpack space. FIX: build a chest specifically to hold all the extra quest items that you’ll find.
- Feathers are scattered all over the world. You can pick them up from the beginning, but the quest to turn them in is about 2/3 of the way through the game. So build a chest to hold all the feathers that you find. Or don’t touch them until you get the quest to pick them up from Jay in the Frozen Peaks zone.
- On the “Achievements” menu, the description for each achievement is written in VERY LIGHT GREEN TEXT on top of a light tan background, it is very hard to read.
- Ranch buildings (chicken coop, pig sty, cow shed, robot lodge) need you to leave about “three feet” of space around all edges when you place it on the ground. This INCLUDES the area inside the little fence, not just the main building. If you put it too close to other objects, fences, or walls then sometimes animals will disappear or get stuck in unreachable places.
- CHEAT for when you run out of Pet Food: If you have a bunch of animals who want pet food, but you don’t have enough ingredients to make it… just REMOVE their house. Put it somewhere else (or have a second empty house waiting already). re-tame the animals so they walk back home.
- Next day, they’ll give you an item as if they were never hungry. Repeat each day if they ask for more Pet Food.[/spoler]
- There will be several places where you get stuck on the terrain, or possibly fall through the floor. On the ESC menu is a “save and go home” option. Be sure to SAVE AGAIN when you get home because this option will save your game BEFORE sending you home.
- In the Village, by the lake, there are three foxes. After you feed them, they have a stupid tendency to walk THROUGH the mountain wall behind their den, or to get stuck UNDER their den. Sometimes they will teleport back home after a day or two though.
- NOT A BUG but a lot of people have trouble with this: Harold’s quest to rebuild his house asks you to bring him the materials to fix it. He WILL NOT take the materials though. Just stand in front of his house and press the “interact” key (E by default) when you see the tag pop up asking for old wood and rubble. You’ll fix the house yourself. Then talk to Harold about it.
- NOT A BUG but everyone seems to think it is: In Lonely Hills, Frank asks for wood and parts for TWO quests. The first quest takes parts that look like CINDER BLOCKS (all found in the first area near Frank and down the hill by the river) as well as OLD WOOD. The second quest takes parts that look like WEATHER VANES (all found in the next area, through that big door by the river bank) as well as OLD WOOD and some food. At no point does he ask for Quality Wood, that stuff is for rebuilding the deer habitat. Unlike Harold’s house, you actually have to give these parts to Frank. Then he gives you a Repair Kit, which you bring to his house in the village and fix it like Harold’s house. For the second quest, once you give him the parts he will just open up some doors in the back of your house so you can go decorate them.
- NOT A BUG but a lot of people have trouble with this: In Lonely Hills, there is a quest from Rudy to fix the broken bridge by finding a bunch of bridge planks. He doesn’t want the parts, just take them to the bridge and fix it yourself.
- In Lonely Hills, there are a few piles of trash that the final little bit of it is sunk too far into the ground, Ellen can’t reach it to vacuum it up. Not a big deal, you’ll only miss out on about a dozen pieces of regular trash. Just ignore them and move on. Might get fixed in a future update.
- In Lonely Hills after you befriend five ducks, the quest tells you to return to Frank; this is wrong – return to Harold instead. Specifically, return to his shop in the back end of Lonely Hills.
- In Lonely Hills, when Rudy sends you to find Harold he asks you to get his “Farmer’s Chain” – nobody knows what that is… throughout the quest it is just referred to as “the part” and then when you finish Harold’s quests with ducks and deer he gives you a bottle of “Neutralizer” instead. Just bring it back to Rudy and it’s fine.
- In Lonely Hills, the deer have a bad habit of magically walking through the mountain walls and falling off the map, never to be seen again. This can happen before or after you befriend them.
- Lonely Hills, the two pigs who want oats will still get highlighted after the quest finishes, as if they have something else to say or give you, but you can’t actually do anything with them after that.
- In Frozen Peaks, the area behind the giant ice brick where you have to find mushrooms to help the sheep, there are several trash bricks that are positioned TOO HIGH, floating in midair, too high for Ellen to reach. Just ignore it, you’re not missing anything special here. May get fixed in a future update.
- In Frozen Peaks when Lilly asks you to get the bulbulator, most of the folks who played this game on “Early Access” remember the algae being by the sea shore. IT IS NOT THERE, they moved it into the village, scattered around the lake, for the full retail release. And it’s not really algae, it looks more like seaweed. Many people claim it doesn’t appear for them… try fixing the mine cart first, then talk to Rudy about the bulbulator, before you go looking for the algae.
- In Frozen Peaks, Lilly’s quest to collect crops WILL NOT accept Tea or Sunflowers, but it does require cranberry, watermelon, and olive which you can’t find until you reach the Desert.
- In the Desert, the Designer NPC introduces herself as “Yvonne Sin Laurent” but all other text in the game refers to her as “Janet.” Same person, just two different names for some weird reason.
- In the Desert, the “dam console” that needs the three parts WILL NOT SPAWN into the game until you get the quest from the designer to go fix it. But you can pick up the parts well before that, just save them until you need them.
- Desert fennecs do not get highlighted when you approach, need to just “guess” when you are in range to touch them.
- Watermelons and Sunflowers cannot go in a bird feeder, Watermelon seeds must be obtained from Fenencs or bought from Lily’s shop. Sunflower seeds are also sold by Lily.
- Lily does not sell any Tea seeds, if you want more tea you need to put some in a bird feeder and never spend your last tea leaf.
- The following items have NO USE in the game: glue, wool, and wool ball. Goat cheese is almost useless too because it is only used in one recipe that you’ll probably never bother to cook.
- When you reach Sunken City, the only exit is to use the map for fast travel.
- There are still a bunch of typo errors in the dialogues.
- Sunflowers make ZERO PET FOOD in the kitchen – you get no reward from cooking them. So don’t cook them.
- Coffee makes 25 jars in the preserver and can get seeds from bird feeder, but gives ZERO pet food in the kitchen.
- Cocoa cannot go in the preserver or bird feeder, and gives ZERO PET FOOD in the kitchen.
- Having “too many” crops growing and/or animal pets in any one area (i.e. your farm) will overload the graphics processing and the framerate will lag down to maybe 6 fps, even on “performance” graphics mode.
- Creative Mode only: enemies in range of the “doctor” robots DIE INSTANTLY instead of being healed.
Broken Achievements
Some of the in-game achievements are BROKEN. Here is a list
- There are only 3 foxes in the game but it asks for five.
- There are only 5 sheep in the game but it asks for ten.
- There are only 5 goats in the game but it asks for ten.
- It asks you to collect items from fennecs but it doesn’t count them when you do.
- It asks you to build 25 stations, but the count stays at “-1”
- The stations achievements DO NOT DEFINE WHAT A “STATION” IS – very confusing
- There are achievements for “glue” but glue is not an item in the game.
- It asks you to collect 20,000 Recycled Material, but there is not enough trash to recycle that much, and not enough found in suitcase loot etc. Clearing the game, recycling ALL the trash I found, I got just under 15,000 recycled materials. Even after recycling all of the glue, e-waste, glass, rubber, rubble, and old wood that I had leftover after building a full farm I still had under 17,000 recycled materials done. The amount of time (getting llama deliveries and then recycling them) required for this is just insane. So I’m not going to finish this one.
- It asks you to find 200 glass, but there is only 186 glass in the game. It only counts glass you receive from breaking glass trash bricks, llama deliveries do not count.
- It asks you to collect 5 items from Llamas, but it doesn’t count any items that you get from them.
- It asks you to make 20,000 jars of preserved food, but that’s ridiculous since it only takes about 8500 jars to beat the whole game. I mean, sure you could spend three times more time on cooking and preserving than you “need to” … but that just seems excessive to me. So I’m not finishing this one.
Game Modes
There are currently TWO game modes, and a third is planned to be released soon. Here are some basic descriptions so you can choose the right one for your play style.
Enemies can’t hurt you. You can destroy them in just ONE HIT even with your vacuum. ALL the recipes are unlocked (except a few decorations that you’ll have to hunt for the blueprints in loot boxes) so you never have to go shopping again. You still should buy some upgrades from Rudy’s shop, but they are all FREE. You have special machines that spawn in animals, if you want a ranch with 300 sheep – now you can! There is a device to move time forward so you don’t have to sleep in bed to skip a day. They added four new crops: cherry and pear trees, coffee plants, and cocoa plants – but no recipes use them. You can build any farm equipment FOR FREE. All decorations can be built FOR FREE. You can buy all the seeds as well as animal hats from your decoration workbench. But you will still need to wait for the plants to grow, and for the buildings to upgrade, like normal. You can also still follow along with the main quest – and anything out in the world that normally would require items (such as needing a few old wood and rubble to repair the fox den) will still require those items. But for the most part, this mode is for when you just want to focus on farming and not worry about anything else. You don’t need to cook anything unless you just want to cook. You don’t need to recycle trash because everything is FREE. Just chill out and build your farm.
A weird bug: in Creative Mode, any enemies that stand near one of the evil “doctor” robots that usually repairs his friends… will be KILLED instead of repaired.
This is the main “arcade” style game mode. Enemies can kill you, and they take more than one hit to defeat them. You will unlock more crops and blueprints as you progress farther into the game. Most of the story quests have to be finished in order to make any progress. You will have to grow crops and cook food in order to earn enough “money” (in the form of jars of preserved food) to buy all the blueprints, as well as collect Old Wood, Rubble, Rubber, and other resources to build all the equipment for your farm. And you will need to recycle all the trash in order to get enough recycled material to build equipment for your farm. The number of animals is limited so you can’t have that farm with 100 foxes and 300 sheep here. This mode is for people who want to explore and follow the story WHILE setting up a farm and ranch.
Higher costs for blueprints and crafting recipes. Stronger enemies. Same basic game, but more of a challenge and it will take you longer to complete the story quests. This mode is not yet available, but it is in development.
Farming 101
You’ll find a bunch of different seeds in this game. There are basically THREE kinds of seeds.
You can use regular soil farm plots, or “flower pots”, or the greenhouse to grow any of these crops. Blueprints for each type of soil are available to purchase from Mark (farm soil plots only), Frank (farm soil plots and flower pots), and Yvonne/Janet (all three). Then you have to build the item at your workbench… but you will find PLENTY of regular farm soil plots in the trash so you probably don’t ever need to build those yourself. These are your basic fruit and vegetables. Each seed takes three days to grow, and will usually produce only ONE crop. (You can boost your chance to find extra crops at harvest time by purchasing “Berry Picker’s Glove” upgrades from Rudy). If you want more seeds, you can buy them from Lily or put some of the produce into a bird feeder. Basic bird feeder gives 3 seeds per item. Advanced gives 4 seeds per item. Ultra gives 6 seeds per item. Remember, you need to water these crops EVERY DAY or they will not grow. You can water them automatically using sprinklers. Regular sprinklers cover a 4 x 4 square area. Turbo sprinklers cover a square 6 x 6 area. NOTE: The sunflower and watermelon cannot go in a bird feeder. The oats can only go in a basic bird feeder, the upgraded versions won’t accept it.
- Potato
- Tomato
- Pumpkin
- Lettuce
- Eggplant
- Oats
- Strawberry
- Pepper
- Corn
- Blueberry
- Carrot
- Wheat
- Beetroot
- Onion
- Garlic
- Cranberry
- Watermelon
- Tea
- Sunflower
These take about a week to grow (except acorn/oaks which take twice as long). You never need to water them. They wills tore up to SIX fruits once they start producing, and each tree grows ONE fruit per day. So if you miss a couple days of harvesting, just keep clicking on the tree to get additional stored fruits until the green highlight goes away. You don’t need any special soil to grow trees. Just plant them ANYWHERE – even underground. NOTE: these cannot go in a bird feeder. Luckily you should find plenty of seeds in the trash as you go. Or buy them from Lily if you need more.
- Apple
- Peach
- Orange
- Olive
- Acorn – Oak
Purely decorative, produce NOTHING, cannot go into the Bird Feeder, Kitchen, or Preserving Machine. Plant it, look at it, admire it. That is all. If you press R to “remove” the plant, you will get the seed back. The only way to get additional flower seeds is to purchase them from Lily in the Frozen Peaks power plant. Anything that is not classified as “fruit or vegetable” is considered a flower, there are too many varieties to bother listing here. They all grow on soil farm plots, flower pots, or greenhouses.
Ranching for Dummies
There are several kinds of animals in this game, and you can befriend or tame ALL of them. Here I’ll give you a quick summary of how to do that. There are three types of animals: wild animals, farm animals, and delivery llamas.
First you need to repair their natural habitat. Then feed them ONE piece of their favorite food, and they will go live there. Once you befriend enough of them, they will give you seeds FOR FREE every morning.
- Foxes (3) – in the Village by the lake, they live at the den near Harold’s house and they eat Strawberries, give you Strawberry seeds. NOTE: after you feed them, foxes have a habit of walking into the den or the rock wall nearby, where you can’t reach them. They usually correct themselves after a day or so.
- Deer (10) – in the Lonely Hills past the Old Trading Post, they live at the woodlet past Harold’s shop there. They will eat acorns and then give you blueberry and pepper seeds every morning. NOTE: Deer have a bad habit of walking THROUGH the mountain walls, then falling through the floor and disappearing forever, even after you befriend them they will walk through the walls near the woodlet.
- Boar (5) – In the Frozen Peaks behind Jay’s shop is their den. Feed them a beetroot, then they are SUPPOSED give you beetroot seeds each morning. But currently they DO NOTHING after you feed them. And they tend to get stuck INSIDE the trees and the den, where you can’t reach them anyway.
- Fennecs (5) – their den is in the Desert just past Yvonne/Janet’s shop. Feed them a watermelon, then they give you watermelon seeds every morning.
First you need to buy blueprints for their house, then build their house at your workbench, then construct it ANYWHERE in the world. Upgrades to their house must be placed on top of the previous version. You can’t skip an upgrade level either, level 2 goes on top of level 1, then level 3 goes on top of level 2. Level 3 CANNOT be placed on top of level 1. Once you have the home constructed, you have to feed the animal one of their favorite foods. After that, they live at the house and will give you ONE item each morning – as long as you took care of them the previous day. By “took care of” I mean each time you take an item from them, they will ask you for something. You will have to either PET THEM (press E key), FEED THEM (Pet Food, press E key), or BATHE THEM (R-click to spray them with water). If you don’t take care of this, they will keep asking for it and never give you another item until you handle it. ALL the farm animals will eat pet food after you befriend them, you only need their favorite food if you find them in the wilderness and want to bring them home for the first time. NOTE: there is only ONE each of the dog, cat, and raccoon in the game. The other animals you can find several of them, and adding an upgrade to their house will allow five more animals to live there.
ALL of these animals will eat PET FOOD after you “befriend” them and bring them home. They only want their “favorite food” the first time you meet them.
- Chickens – live at chicken coop, eat a potato, give eggs
- Pigs – live at pig sty, eat honey, give truffles
- Dog – live at dog kennel, eats dog bone, gives random items and recycled materials
- Cat – live at cat house, eats honey, gives random items and preserved jars
- Ducks – live at chicken coop, eat a carrot, give duck eggs
- Raccoon – lives at raccoon house, eats garlic, gives glass and random items
- Cubots – live at cubot lodge, eats batteries INSTEAD OF PET FOOD, gives recycled materials
- Cows – live at cow barn, eats Wheat, gives Milk
- Sheep – live at cow barn, eats herbal medicine, gives wool
- Goats – live at cow barn, eats cranberry, gives goat milk
Wild animals and your pets/livestock will all have a “heart” that fills up every time you feed them, take their gift, spray them with water, pet them, or activate the party button on their level 3 house. With each heart level, you get a bigger chance to get MORE ITEMS from those animals every day.
Near your first farm you’ll find a llama garage. If you fix it, then you will be able to feed FIVE LLAMAS (all found on your farm) a Battery and then they go live at the garage. You can place an item (old wood, rubble, rubber, glass, e-waste, or glue) into the garage and hit the “Collect” button and the llamas will go find more of that item, leaving them in boxes beside the garage each morning. You must FILL THE ENTIRE GARAGE before they will handle any deliveries though. This first garage you can CHOOSE which item you want them to find, and it requires five llamas.
In Frozen Peaks near the swamp and radio tower, there is another llama garage. There are five llamas in the area, but you can only get three of them to work at the garage. They only bring glass, but will bring it every morning rain or shine.
In the Desert there is another llama garage. Like the one in the swamp, it can only have three llamas even though there are five of them in the desert. This one will only bring you e-waste, you cannot choose another item from the garage here.
Delivery llamas have no “heart” level. They just bring 2 boxes of items each day.
Blueprints and Crafting
The NPC shops will sell you BLUEPRINTS for various items you can use on your farm. These include machines to prepare your food, flower pots and greenhouses to plant crops in, and homes for your animal friends. Once you purchase the blueprints (usually at a cost of preserved jars and some food items) you need to go back to the workbench on your farm to actually build the item itself (usually at a cost of recycled materials and some construction items as well). Except Rudy – Rudy sells you upgrades to your tools directly, they will apply immediately without needing to build them at your workbench later.
Once you buy a blueprint and build the item, put it in your “hotbar” (numbers 1-0) and hit the number for that item’s slot to place it on the ground. MAKE SURE to leave a little space around the edges of everything; if you put it too close to a wall, fence, or other obstacle then animals or items produced could potentially get STUCK in unreachable places or else glitch through the wall and fall off the map entirely. Or you might put things too close together so you won’t be able to walk around/between them. So just leave plenty of space. Also make sure you’re building on FLAT ground, too, or else you’ll get some bad glitches.
If you are building an UPGRADED item, you have to place it directly on top of the previous item. At each upgrade stage, there will be a tent on top of the item indicating that it is being renovated. This process will take a little bit of time (usually about half a day) and you cannot use the item until it finishes. For example, to get a fully upgraded cheese house:
- Place the basic cheese house wherever you want it.
- Place the advanced cheese house on top of the basic one.
- Place the ultra one on top of the advanced one.
Furniture and Decorations
You might notice there are TWO workbenches at your farm. One is for building animal homes, farming equipment, kitchens, and other USEFUL items. The other one is for building DECORATIVE items like furniture and cute little items you can place around your house and farm to make it look pretty. The decoration workshop also has access to ALL seeds, animal hats, sheep medicine, disco ball, and a few other things – but only in CREATIVE MODE.
Whether it’s a couch or a chicken coop, building anything in the game is always the same. Open your backpack and put the item into the hotbar at the bottom of the screen. Then close the backpack. Move near the spot where you want to build it. Hit the button for the hotbar item you want to build. Use the mouse to move it around – RED hologram means you cannot build it there, GREEN means you can. If it’s red, there is either a wall, another building, or an animal in the way. Before you put the item down, you can press “E” to rotate it 90-degrees until it faces the direction you want. Then L-click to put the item in place. IF you put it in the wrong place, walk up to it and press R to pick it back up and put it back into your backpack to try again later.
Blueprints for decorations are not sold in any shops. You’ll find them in suitcases scattered around the world (and a few in the back rooms of grandpa’s house). You won’t be able to build an item until you unlock the blueprint. (In Creative Mode, all blueprints are unlocked from the start of the game.) Decorations only cost 1 or 2 recycled materials to build, so they’re pretty cheap.
Feel free to design your decorations and furniture however you like. There is no bonus for putting them in certain places or anything like that. It’s totally up to you. You cannot interact with or use decoration items either, for example the beds in the decoration workbench CANNOT be slept in – they just look nice.
I haven’t used very many decorations yet, just a few. SOME people say they are having problems putting the decorations in the house, they keep going invisible or falling through the floor… but I have never experienced that. If you experience that issue, please email your save game files to the developers as per the note at the beginning of this guide about save/load glitches.
The point is, decorative items (like garden fountains and couches) have NO PRACTICAL PURPOSE. They’re purely for your own visual enjoyment, to add a personal touch to your farm and home.
Recipes and Cooking
As you progress further into the game, you’ll find new seeds and new animals. This will expand the types of food that you can produce on your farm. Once you have some ingredients (by farming it or by ranching some animals), there are several options you can do with them.
- Use the ingredients as part of the cost to buy blueprints and upgrades from NPC shops
- Put the ingredients into the bird feeder to get more seeds
- Put the ingredients into a machine (jam house, cheese house, mayo maker) to produce a new ingredient (jam, cheese or goat cheese, mayo)
- Put the ingredients into a kitchen and follow a recipe to cook a “dish”
- Put the ingredients into a kitchen but DO NOT follow a recipe, to cook “Pet Food”
- Put the ingredients directly into the Preserving Machine to make preserved jars… but this method is inefficient and won’t give you very many jars.
- Put the COOKED DISHES into the Preserving Machine to make preserved jars, which are used as money to buy blueprints and upgrades at NPC shops. Using cooked dishes for this is more efficient than trying to preserve the raw ingredients.
- Put a cooked dish into your hotbar (1 – 0 keys) and press the button for that slot. This will activate the dish’s special effects, and consume the dish.
Notice that cooked dishes come with special effects if you eat it. Some will restore your health. Some will make you walk faster (temporary boost). Some will make your attacks slightly stronger (temporary boost). And some will let you fire “super chickens” by using R-Click – this will replace your normal water gun. Super Chickens fly straight ahead, but may bounce off of walls, trash, or enemies. They basically attack everything within a pretty big range as they travel.
Recipes can be FOUND in suitcases hidden around the world. Or you can “experiment” in the kitchen and you will unlock the recipe if you use the correct ingredients. If you feel like experimenting to unlock recipes, feel free. ANY time you use “wrong” ingredients, you just make Pet Food so nothing is ever really wasted in the kitchen.
The basic kitchen can take two types of ingredients, so it can make a few different dishes.
The advanced kitchen can take three types of ingredients, expanding the recipes you can cook.
The ultra kitchen can take four types of ingredients so it can cook any recipe in the game.
Press E to use the kitchen. Move ingredients from your backpack to the kitchen one at a time… or you could just click on the recipe from the recipe list at the bottom right to automatically add the correct ingredients. Any recipe that is greyed out means you don’t have enough ingredients in your backpack to make that dish. If the greyed out recipe has a number on top, that means your kitchen isn’t big enough to handle that recipe and you need to upgrade your kitchen first. Once your ingredients are in, just hit the “COOK” button. Cooking only takes a few seconds to finish. Dishes can’t be turned into Pet Food since you can only cook a food once. You don’t put toast back in the toaster at breakfast time, right?
At the Preserving Machine, press E to use it. Then select what foods you want to preserve. Then hit the “PRESERVE” button to start the process. It will take a little while to finish. Different foods/dishes make different numbers of jars. For ingredients, the number of jars is equal to the number of pet food it will make in the kitchen.
You only need a few of each ingredient for shopping purposes. The rest can be turned into pet food, or else turned into cooked dishes and then made into preserved jars. Good luck.
Duck eggs are not (currently) used in any recipes, and they can’t be used to make mayo either.
Eggs are used in a few kitchen recipes, or they can go into a mayo maker to get mayo out.
Milk is used in a few kitchen recipes, or it goes into a cheese house to make cheese.
Goat milk is NOT used in the kitchen recipes currently, but it can go into a cheese house to get goat cheese out.
Goat cheese and cow cheese both are used as ingredients in the kitchen.
Olives are not part of any official kitchen recipe (currently) but can be made into oil in an oil press, and the oil is an official kitchen ingredient.
The jam house lets you choose which fruit to use, but only peaches, strawberries, and blueberries can be turned into jam.
Jam can be used as an ingredient in the kitchen.
Truffles can be used in the kitchen.
Wool cannot be cooked or preserved, but it can go into the loom to make “wool ball”. Neither wool or the ball has any practical purpose in the game though.
Tea is not part of any official recipe, but it can be cooked to make pet food or it can be preserved to make jars.
Sunflowers make ZERO PET FOOD in the kitchen – you get no reward from cooking them. So don’t cook them.
Oats are not part of any official kitchen recipe, but can be cooked into pet food or preserved to make jars.
Walkthrough – with maps
And this begins the reason why most of you are here. The walkthrough. I’m making my own maps (in Microsoft Paint – sorry I’m not an artist) that will indicate the locations of most of the important things. But for most of the quest items they’re scattered around in pretty obvious locations so if you just take your time and explore each area, you should find them on your own without my help. So my maps will just list most of the major points of interest, and i leave the little stuff up to you to locate on your own, but for particularly hard ones I’ll give some hints. First up: the tutorial level!
Tutorial
When you first start a new game, you have the option to run through a little tutorial area. There is a ladder to your left that will skip the whole thing, but actually finishing the tutorial will provide you with around 1400 jars of preserved food as well as a bunch of recycled materials for free. Taking that ladder means you get NOTHING from the tutorial so you have to work a little harder to unlock the first bunch of blueprints once you get into the main game. Think of this as a “thanks for your time” gift for those who put in the work to finish this thing. The path here is very linear, just follow along the route on the map from RIGHT to LEFT.
To get the most “free stuff” from the tutorial…
Break all the trash bricks and vacuum up all the trash. The recycling machine is most efficient if you run a full load of 500 trash through it to get 30 recycled materials, but if you don’t have 500 then you can run it with 250 trash to get 15, or run 100 trash to get 6. Don’t run any odd numbers or you’ll just waste some trash though.
HINT: to move a specific number of items from backpack to machine, hold SHIFT and then CLICK, then use the plus and minus buttons on screen to adjust the amount. To move a single item from a stack, hold CTRL and right-click to move it automatically or CTRL and left-click to move a single item manually.
You can practice planting, watering, and harvesting some potatoes if you want to, but the only step that matters here is harvesting the final ones. Collect all the potatoes. Put them in the Kitchen 2 at a time to make Mashed Potatoes, except the last THREE potatoes – save those to feed the chickens.
Put the mashed potatoes into the preserving machine to get jars of preserved food. This is the basic shopping money for this game.
Pay the blueprint shop to buy the plans for the Chicken Coop.
Build a Chicken Coop item in the workshop, it will cost you a few recycled materials..
Place the Chicken Coop somewhere near the chickens up ahead.
Grab the three potatoes and feed them to the chickens. They’ll give you a few eggs in return.
Go back to the kitchen and put the eggs in TWO AT A TIME to make Fried Eggs.
Put whatever Fried Eggs and Mashed Potatoes you have, into the Preserving Machine now.
Pick up all the jars of preserved food from the preserving machine.
Continue on… there is a red button you can hit to open a gate, and there is a wooden box you can pickup. Bring it to the left, click on the red panel on the floor to place the box there. This will form a ramp you can cross to reach the loot box on the other side.
Grab the 10 plates of ratatouille from the area with all that trash. If you’re curious what a “super chicken” is, you can “eat” the ratatouille to find out. (After eating one, it gives you a few super chicken shots as indicated in the top left next to your health bar. Right-click to fire one off, this replaces your basic water gun until you run out of super chicken ammo.) But you should really take it all back to the preserving machine instead, since preserving all 10 of them gets you 1400 jars or preserved food.
Smash all the trash and kill all the spider robots in the next area. Then go all the way back to the recycling machine and put all of the trash in there, then collect any recycled materials it makes for you.
Now you can leave the area. The only things you keep once you leave will be the jars and the recycled materials. All of your seeds, soil plots, potatoes, chest,, etc. will be removed from your inventory when you go up the ladder.
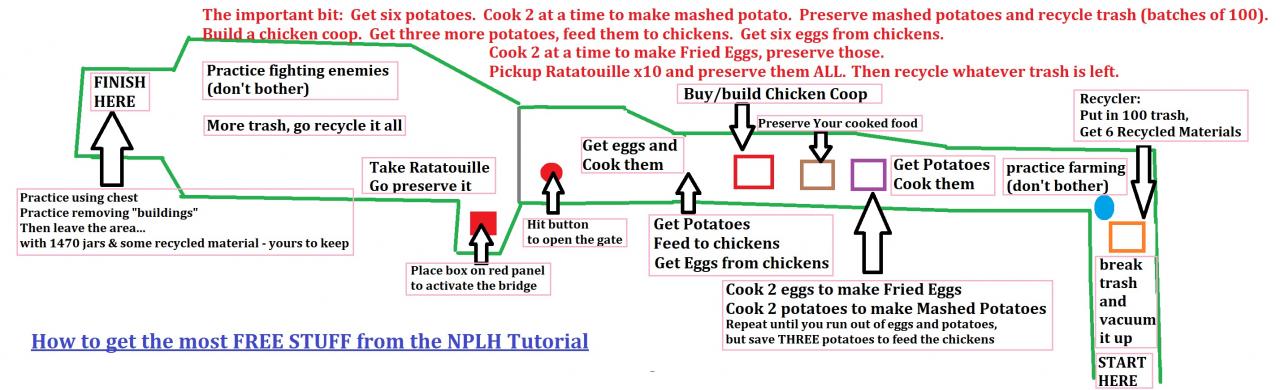
Those free 1400 jars will make the early part of the main game a lot easier to progress through, since you won’t have to do any real cooking for your first two weeks this way. If you skipped the tutorial, then you’ll just have to spend more time on your farm and in your kitchen during the first two weeks of the game so the early part of the game might feel a bit slower for you.
First 4 Days on Your Farm
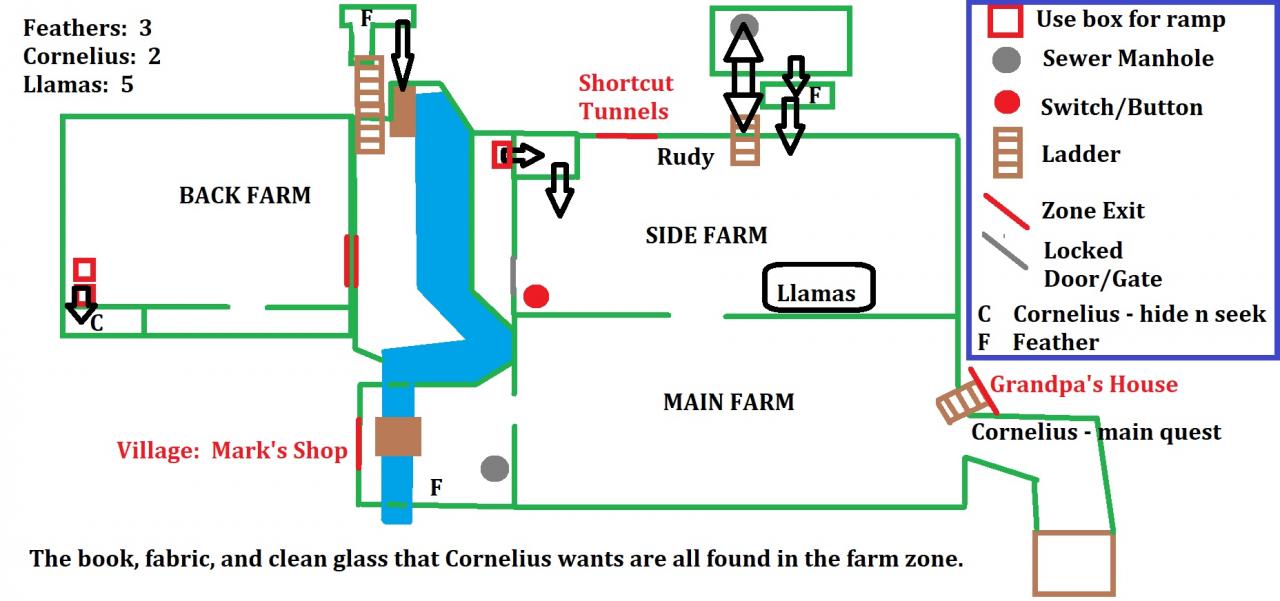
- Clear the trash around the farm until you find the book that Cornelius wants. Bring it to him.
- Keep clearing trash around the farm. Pick up any fabric or clean glass items, save them for a quest later.
- Remember to put full stacks of 500 trash into your recycler to keep it from taking up space in your backpack.
- Place any soil farm plots onto your farm (I prefer doing farm sizes of 6 x 6 plots because later a single turbo sprinkler can water that whole area).
- Plant vegetable seeds onto the soil farm plots.
- Those veggies will grow after three days as long as you water them each day.
- Build a Chicken Coop at your workbench.
- Place the Chicken Coop somewhere on your farm – leave plenty of space between it and any walls or rocks, and make sure it’s kind of out of the way so the chickens won’t block your path or prevent you from expanding your veggie fields later.
- You might also want to build and place several Chests around the farm, perhaps even one or two inside the house, to keep your stuff organized.
- Find a couple of chickens, now that you have a Chicken Coop you can feed them a potato to befriend them. They’ll go live at the chicken coop from now on, and if you take care of them they’ll give you eggs every morning.
- On the right side of the farm, on the other side of the wooden fence, find Rudy. He sells upgrades for your weapons and such. The FIRST THING YOU MUST MUST MUST BUY is the Rubble drill upgrade. After that, you should also get the Big Backpack 1 upgrade.
- Continue clearing the farm, then go through the metal fence and across the river. Clear the trash from the area back there. One of the trees has a ladder on it that leads up to some free stuff. When you drop down, also check behind the little waterfall.
- Go through the door in the grey wall and clear the trash out of there, too. From now on, I’ll be calling that place “the back side of the farm.”
- Get three of the wooden boxes. Put two of them in front of the ramp at the back corner of this area, Cornelius is over there with another quest for you. He wants you to find him in every location he visits. This is his “farm” location.
- Back across the river, turn left and there’s another ramp where you use a box to cross, bit of free stuff there.
- Go up the ladder onto the top of the cliff, there is some free stuff up there as well as on two platforms when you drop down the cliff.
- Make a chest and place it near Rudy, put any feathers you find into it since you won’t need them for quite a while.
- Now go out the other side of the farm, clear a little patch of trash there. Go underground by using the manhole there. Your rubble drill can destroy the red bricks here, but the purple ones will need a rubber drill that you’ll get a little later.
- Back up the manhole, go through the door nearby. Clear trash out of the area until you reach Mark. He won’t actually give you any quests or tell you about your grandfather until you bring him proof of the chicken’s love. But you can use his shop here. As soon as you can afford it, buy the Preserving Machine and the Simple Kitchen. After you grow some pumpkins, also buy the first upgrade for the kitchen. You’ll find PLENTY of soil farm plots just by breaking trash piles, but you can buy the blueprint of you really want to – it’s cheap.
- Back on your farm, you should have tamed five chickens by now. Talk to Cornelius near your house. He wants fabrics to make an outfit for the chickens. You should already have enough fabric, so talk to him again and give it to him.
- Go up to one of your pet chickens and press R. You can rename it, but the quest only asks you to give it a hat. So do that now.
- Go back to Cornelius and he’ll give you a disco ball in trade for some clean glass. Go place it in front of your pet chickens and watch them dance. Go talk to Cornelius again. He gives you proof of chicken friendship and then he leaves.
- Go back to Mark in front of his store, give him the chicken statue thing. He’ll tell you about your grandfather if you help him with a few things first.
Days 4 – 8 Around the Lake
- Go downhill from Mark’s store. There is a ton of trash down here, as well as a lot of dangerous enemy robots, so be careful.
- To the left is a feather. Pick it up and go put it in a chest for later.
- You can’t get the pigs yet, you need to do a few quests first.
- The dog on the hill can become your pet, bu you need to do some quests first.
- Straight back to the river, in the right side you can spray water across the river into a bucket to activate a switch. Turn around and go through a small gate that opened right behind you for some free stuff.
- You need to go through the wooden fence nearby and clear more trash until you find a wooden box.
- Put the box on the red panel behind the ruined house by the river to open the gate at the back of the house. You’ll find some free stuff in there, as well as a switch that removes the floor from the house next door.
- The house that used to have a floor now gives you access to its basement. Go through the door there. Spray water up at the enemies on the platforms to kill them both, then take everything you can from the room.
- Back upstairs, go clear out the area between the wood fence and the big wall on the other side of the little field.
- While you’re here, you should go left and up the ramp, spray water into another bucket to activate another switch. When you jump down you should notice a chain-link fence has been opened straight ahead. Go through there, around to the back near the wall, and up a ramp for another feather and some free stuff. When you jump down, go through the door. More trash, a few enemies, and some free stuff awaits in there.
- Once this area is cleared out, back track a little bit. There are two big trees that look toxic and sick. Use your drill to knock them down, then press “E” to plant an acorn there. This will slowly grow into a mighty oak tree… later you’ll be able to shake the tree to get more acorns from it. There are two of those trees in this area, and 13 more waiting to be dealt with later.
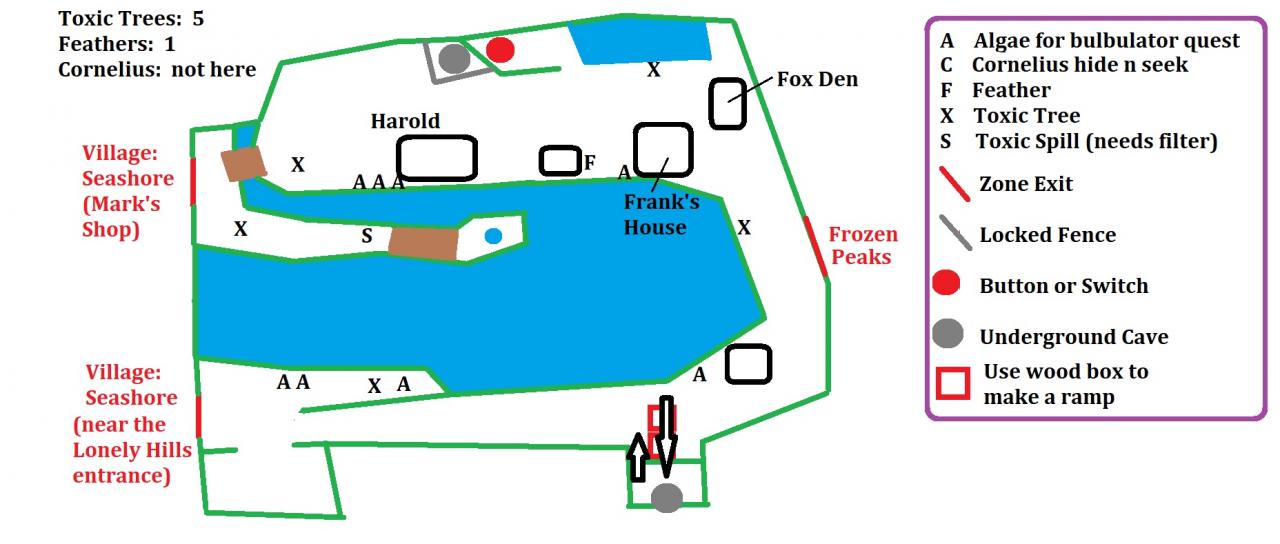
- Go through the door in the wall to reach the Lake. To the right you’ll find a giant green spider robot that has more HP and hits harder than the little red ones. Past that, there is a toxic waste spill that’s making the lake water poisonous. You need to find five hydraulic parts to fix it. You should also see a fox over there. There are three foxes around the lake, you need to feed each one a strawberry to befriend it (after rebuilding the fox den).
- To the left is a little bridge. Harold lives over there, he runs a shop that sells some interesting equipment you can use on your farm. He also will give you a few quests so you can progress the story more.
- Find five dog food cans, give them to Harold to get a doggie treat. Then build a dog kennel. Then give the treat to the dog and it will go live with you.
- Rebuild the fox den. Also rebuild Harold’s house (costs a bunch of old wood and rubble) by pressing E on the building when you have the required items in your backpack.
- Find five bear traps and destroy them with your drill.
- Meanwhile, start growing a bunch of strawberries.
- Feed strawberries to the foxes and then they give you strawberry seeds every day.
- Tell Harold that’s all done. Then he mentions he lost Napoleon (his favorite pig).
- Buy blueprints for the mayo house, upgraded recycler, bird feeder, and upgrades to your kitchen. Go ahead and build some of those as needed to make mayo and expedite recycling your trash. Now you can also make better foods in your kitchen, which makes it easier to get more jars of preserved foods (or more pet food).
- Build some beehives and collect some honey. Build a pig sty and feed honey to five pigs. Go tell Harold you helped the pigs.
- Around this time, you should start finding Peach seeds. Go plant some apple and peach trees, they take a whole week to start growing fruit. You should only ever need about half a dozen of each kind of tree.
- Napoleon is in the underground basement closest to the entrance to Lonely Hills and the seashore, on the other side of the lake. When you find him, say “Liberte” and he’ll go back to Harold’s house. Then you can build a pig sty and feed him a honey and he will go live with you.
- Back on your farm, you can use old wood and rubble to rebuild the llama garage now. Then find all five llamas (on your farm) and feed them batteries to befriend them. Click on the garage and select which item you want the llamas to bring you each morning, then hit “Collect” and wait a day. They’ll drop it off as little boxes outside the garage.
- Now go tell Mark that you helped Harold.
- If you go through the door to the seashore, you can finish the quest to cut down the toxic trees.
- There is also a “Message in a Bottle” quest item on the edge of the beach. Give that to Mark.
- Tell Mark that you healed all the trees. Give him the five hydraulic parts, too.
- Take his water filter to the toxic spill behind Harold’s house and use it to fix the spill. Tada – very pretty scenery now.
- See if you can afford any more upgrades from Rudy – especially the Rubber Drill should be your next purchase.
From here you have options. Depending if you can afford the Glass Drill upgrade yet or not, you are “suppsoed to” go to Lonely Hills first. But if you have the glass drill then you can also choose to go to Frozen Peaks now. Technically speaking, you could potentially skip most of the quests in Lonely Hills and Frozen Peaks both, since the objective of the game is simply to reach the Sunken City after completing quests in the Desert. But I will assume you want to follow the full story, so we’re going to Lonely Hills next.
Week Two – Entering Lonely Hills
As I said, you could potentially go straight over to Frozen Peaks if you bought the glass drill upgrade… but you’d have to come back here for some orange seeds and a couple of other things anyway. So we’ll start here. But I will end up sending you to Frozen Peaks a bit early to get wheat seeds (and a few other things) after all… but not just yet.
The entrance to Lonely Hills is down hill and across the river from Mark’s store… the fastest way to get there from your farm is to go through the seaside area behind Mark’s shop (after you open that locked door of course). Once you open the door to Lonely Hills, you unlock fast travel on the global map – just click on any door with a yellow outline to go there immediately. Doors with red outlines are still locked, so can’t be fast-traveled yet.
- Up the hill, make a U-turn and go further up back towards the door. There is a feather and some free stuff on a tiny little alcove there.
- Continue up the main path and you should find Frank the architect standing on top of the hill. He sells two things – farm soil plots, and flower pots. His resource shop sells recycled materials and rubber. And he has some quests for you.
- He wants five house parts and five old wood to start with. All five parts are found here, and in the area down the hill BEFORE you go through the next door. They look like concrete cinder blocks and you can’t vacuum them up you have to press “E” to pick them up.
- Remember to explore behind Frank – there’s a button that opens a gate down by the river. And a manhole that leads up a narrow mountain peak (where you will find another pig).
- Down the hill, explore this side of the river thoroughly. You should have all 5 parts before you even cross the river, but if you missed one there are more on the other side of the river, too.
- Then there is a spot on the left side where you can place five wooden boxes to build a bridge across the river. Explore that side of the river thoroughly, too, including to the right and up the hill.
- Bring the house parts and old wood to Frank, and he’ll give you a repair kit.
- Take that to his house by the lake in the village and fix the house yourself. Also take a minute while you’re in the village to start growing new veggies from the seeds you found.
- Tell Frank his house is fixed. Now he wants five more house parts (these are different, they look like weather vanes) and five more old wood in order to help Ellen start fixing up Grandpa’s house.
- All the house parts are in the area through that next door as you go upriver. So head there now. Explore that region thoroughly, there’s another manhole that leads up to another narrow mountain peak. Fun stuff there.
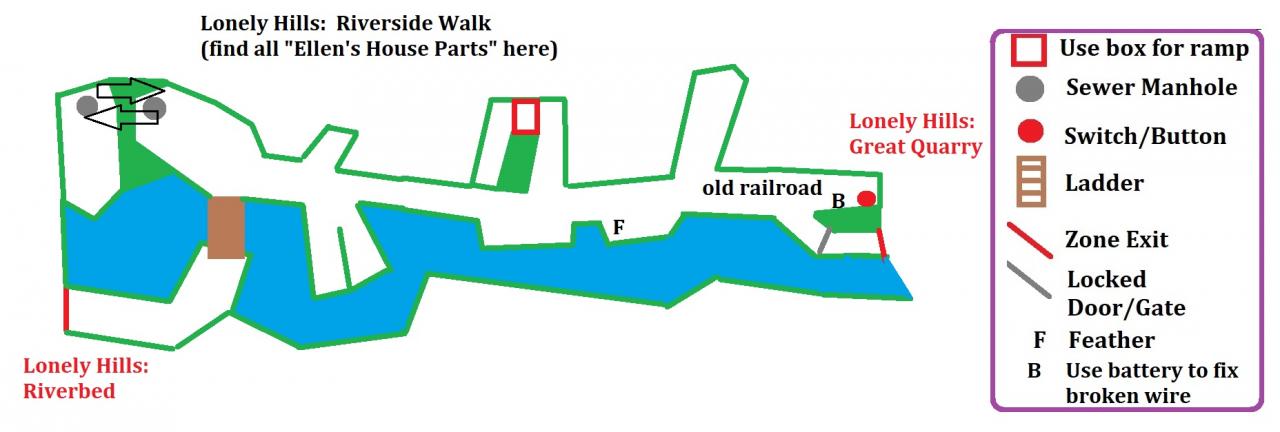
- At the back of the area is a place where a train got stuck in a tunnel. There is a broken wire there, which will require a battery to fix it. Then you can hit the red button nearby to open the gate that leads to the next area.
- Then go see Frank, give him Ellen’s house parts. For the next room in the house, he’ll need more old wood and some food. You’ll need to grow some peppers and tomatoes to make a peperonata for him. And he’ll tell you to go see Rudy to continue the main story quest. He means find Rudy DEEPER INTO THE LONELY HILLS, not back at your farm.
- Talk to Frank once again about your house. This time he asks for five old wood and an apple pie (cook two apples + one honey + two wheat to make it)
- In the next area, IGNORE the big piles of stinky garbage that look different from the normal trash piles, those are for a quest in a little while.
- Keep an eye out for Bulbulator Parts (little rings with a single propeller blade in the middle). You’ll need five of them before you talk to Rudy in the next area.
- Once you have cleared this area, go through the next door. The rest of the bulbulator parts are scattered around the other side of that door. Get five parts and go see Rudy.
- Rudy will ask you to use your WATER HOSE on a bunch of those toxic waste dumps. Most of them are farther ahead, but there are a few near Rudy and the area you just came from, back across the river. So back track and hit those now.
- Go past Rudy. There is a button near a cave, it opens the gate in front of the cave. Now you can use the underground tunnel to go between here and your farm. Or just use the fast-travel from the map.
- Go through the next door. The rest of the toxic waste dumps you need to spray with water are all in this area. Find them, spray them. While you’re at it, collect five planks of wood and then fix the bridge nearby.
- Go back to Rudy. With the toxic piles dealt with and the bridge repaired, he’ll ask you to find some special fungus. it looks like a pink mushroom, and it all grows in the “old quarry” pit.
- Go across the bridge that you recently repaired and through the door on the other side. You could clear this area now… but I like to just open up the fast travel here and then skip over to Frozen Peaks for a little while first.
Week Three – beginning Frozen Peaks
Ok, time out. Now that you can fast-travel to the old quarry, we’re going to head to Frozen Peaks for a little while instead. Go back to the lake by Harold’s house in the Village. Around the back of the lake is a door blocked by some glass trash bricks. Break the bricks and go through the door.
Your goal here is to find some wheat seeds (very easy, should take 2 minutes), some blueberry seeds (will take more like 15 minutes), and some beetroot seeds (maybe 45 minutes). While doing all of this, we’ll be working on the first few quests in the area. Why the diversion over this way? Because Frank is going to ask you for some food that requires wheat before he’ll open the next room in Grandpa’s house. And you normally don’t find blueberries until the very end of Lonely Hills but it’s good to have them earlier than that. So, here we go…
- Move forward, clearing all the trash you see.
- On the left is a little ramp leading up to a nest with a feather in it. Grab that.
- To the right is a little path leading to a small field with a fence on the left side and another fence on the right side. The left fence has to be opened from the other side so ignore that for now.
- The right fence has a combination lock – you have to hit the buttons in the proper order. The order is shown on a sign that is up the hill in the back of the field. Go check that sign, then come enter the code (X, Triangle, Circle, Square) to open the gate, and go up there to get a recipe for your kitchen.
- Make a mental note that there is a boar here, we’ll be back to help him out later.
- Back to the zone entrance, keep going forwards past a long and narrow lake to your left. There’s a bucket switch in the middle of the lake, spray that with water to activate the button.
- You’ll see an NPC waiting to talk to you at her shop ahead. That’s Jay. Go check her store and talk to her. If you have any feathers, bring them here.
- In the area around Jay’s shop, there are a bunch of golden acorns – grab those – and a bunch of holes – plant the golden acorns in those. Then go ahead and tell Jay you planted all the trees.
- Next she mentions a malfunctioning robot, and some boars.
- To the right just behind Jay’s shop is another little field with a boar in the back corner. There are also THREE feathers in this area, grab them all. On the right side, in the back corner, is a spot where you can walk through a bush and stand on a wooden platform overlooking the area you’ve already been to. Drop down there and push the button to open the fence, and grab the loot while you’re there.
- To the left behind Jay’s shop is a small path leading to a feather and a duck.
- Go back to Jay, give her the feathers you just found.
- Behind Jay’s shop, at the other end of the field, the path leads to the right – you’ll see your first cow there. There’s a pit there that has a boar den frozen in ice. Use the “dry firewood” you found to melt the ice.
- With the ice gone, you need to rebuild the den.
- With the den rebuilt, you need to plant acorns around it.
- Now whenever you see a boar you can befriend it by feeding it beetroots. Which is why we want to find beetroot seeds before we leave the area.
- Past the boar den is a robot standing on a hill. The robot wants three spare parts.
- The spare parts are scattered around the ground not too far from the robot.
- His program is still being interfered with, by a satellite radio signal!! The radio tower is pretty far away, so we’ll go there later.
- Go past the robot and finish cleaning out this area. Down the hill to the right, you can build a bridge from five wooden boxes. There’s a pig over there. There’s also a cow down there, by the shack.
- YOU CAN ENTER THE SHACKS HERE. There’s trash and usually some free stuff inside.
- Remember to climb the tree behind the shack at the top of the hill.
- Open the next door.
- Clear out just enough trash here to reach the cave with the fence in front of it. Hit the button to open the fence, this opens the shortcut underground tunnel.
- Also feel free to go up to the shack nearby and go inside.
- You can keep clearing trash off the path if you want to, but we’re done here for now I think. We’ll come back later to finish up.
- Back to the Farm. Start growing some wheat, blueberries, and beetroot. Also some onions if you found any seeds for that.
- See what new buildings and upgrades you can afford while you’re here.
- Now head back over to Lonely Hills – Old Quarry.
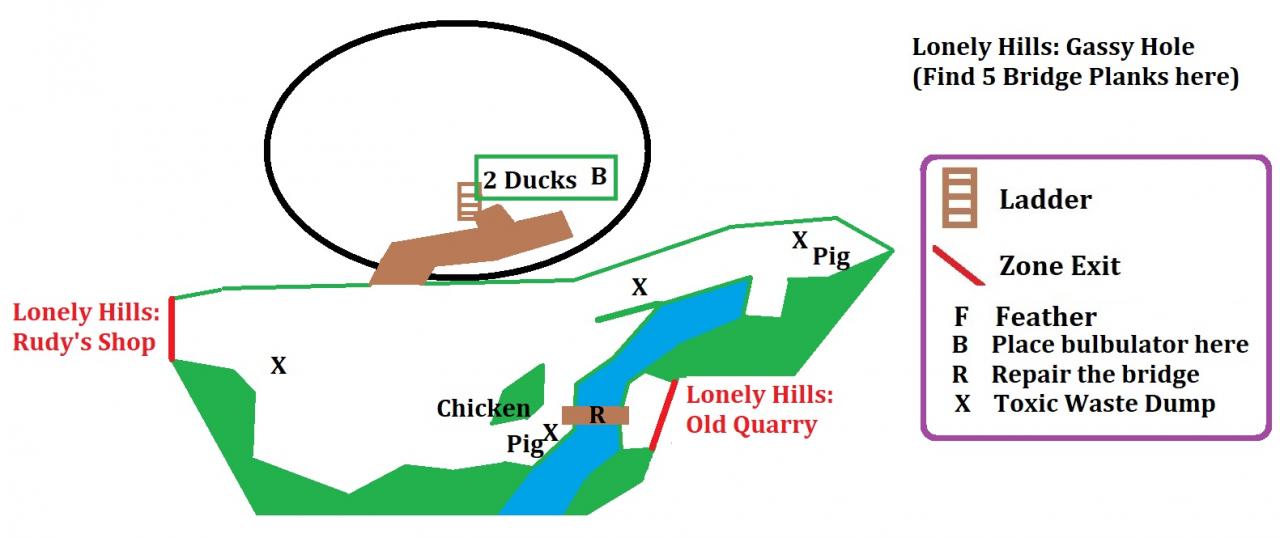
Week Four – The Quarry, Ducks, and Deer
Upon entering the area, keep moving forward and clearing the trash until you reach a broken down old cement truck near a ramp. Welcome to the quarry. Rudy’s fungus will be scattered around the pit and the hill behind it, but all seven pieces are BEFORE the door to the next area. On the right side you’ll find Cornelius playing hide and seek again. And directly ahead, halfway up the hill by a ramp, you’ll find a cat. Build a house for it and feed it some honey and it will live at your farm, giving you a few preserved jars (and maybe other random items) every morning. You’ll also find a couple of pigs and chickens up at the top of the hill, and I think maybe a duck, too… I don’t remember if there is a duck here or not. There’s TONS of trash here so it might take a couple of trips back to the farm to recycle it when your backpack gets full… or you might want to just build a recycler machine here before you start. Also, the ground here is pretty flat, so it’s a decent place to build a “second farm” if your main farm gets too crowded.
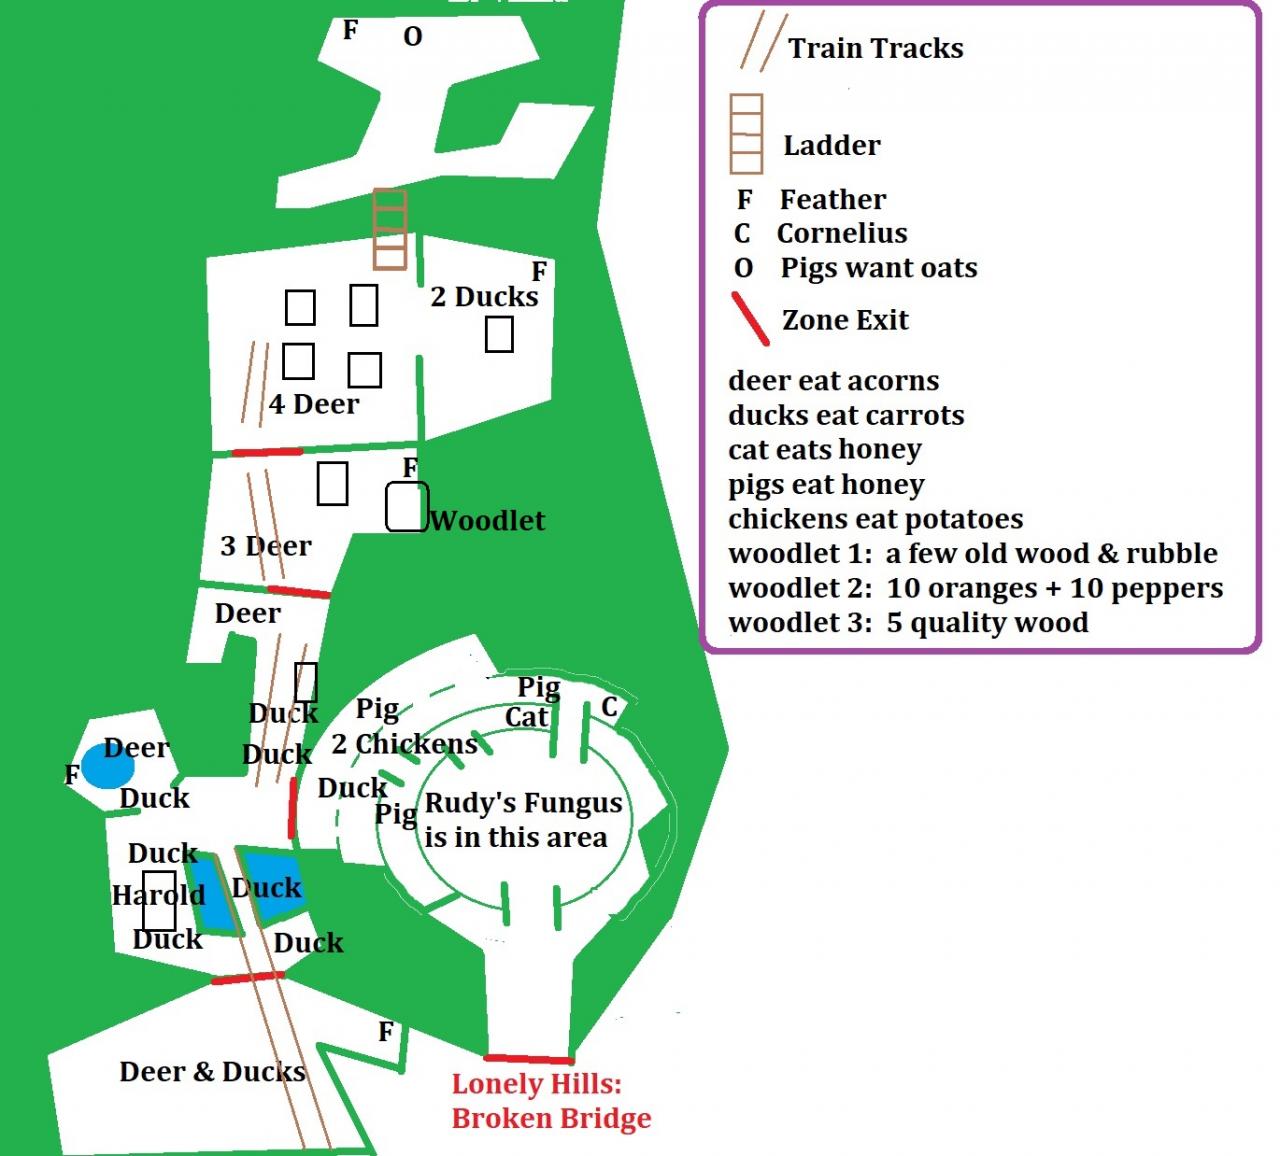
Once this area is cleared out and you find all the fungus, go back to Rudy and give him the fungus. He’ll ask you for Harold’s “Farmer’s Chain” – what the frig even is that?? Nobody knows. There’s no such thing as a “farmer’s chain.” I think it was a bad translation maybe. But anyway, you need to find Harold now. NOT at the Village, but here in Lonely Hills. So go through the pit and up the left side and you’ll find a door there. Harold has a vacation home over there, by a little train station and a lake. He wants you to help some ducks.
Originally, ducks were not allowed to live at a basic chicken coop, you would need to upgrade it first. They changed that because for a while during early access the upgraded chicken coop was BROKEN so any animals you tried to tame there would VANISH, teleporting off the map instead of to the chicken coop… so they made ducks live at basic chicken coops to work around that bug. The bug has been fixed now, so in the future they might exclude ducks from basic coops again… but for now ducks can live at any chicken coop. Feed them carrots to befriend them, you need five.
Return to Harold, now he wants you to help some deer. Go LEFT first, through the door and down a long staircase. There are a couple of ducks and deer here… but what you really want is the Quality Wood that you find here. You’ll need it. Also keep an eye out for orange seeds.
Then clear out the area where Harold is, and follow the tracks past his house and up a narrow path to the next area. There is a woodlet (deer house) there but it’s broken. You can fix it in THREE phases. First it needs a few construction materials similar to how you fixed the fox den. Then it needs 10 Oranges and 10 Peppers… so go plant some orange trees and pepper plants. Remember, trees take up to a week to grow so you might want to jump back into Frozen Peaks while you wait for those oranges. (See next chapter for that.) Phase three needs 5 quality wood, which are all found in the four areas here, from the place under the railroad tracks below Harold’s shop through the area past the deer woodlet.
In the next area, you’ll find more deer and a ladder that goes up to a “secret area.” There are a couple of pigs up there who are arguing about oats. Bring them some oats to make them happy. Hooray! Also keep an eye out for more quality wood for the deer woodlet.
Once you fix the woodlet, find a bunch of deer and give them acorns. They’ll live at the woodlet, and each morning they will have some seeds for you. It will be a mix of blueberry and pepper seeds. With that done, go talk to Harold. You will not get a “Farmer’s Chain” because there is no such thing. You will get a bottle of acid neutralizer though, which is what Rudy REALLY wanted. So return to Rudy now and he’ll assemble the bulbulator’s final form.
Now take the bulbulator to the big gassy hole behind Rudy’s shop, down the ladder into the basement. Kill the giant spiders (and maybe feed the ducks that they drop). Then walk up to the indicated square on the floor and press “E” to install the bulbulator. Return to Rudy one last time, tell him it’s done, and he says the road to Frozen Peaks is now open… this is another leftover piece of dialogue from a previous EARLY ACCESS version of the game when the door to Frozen Peaks was actually locked until you finished the bulbulator quest. But it’s not locked anymore… so you probably already went there. But whatever, you’re done in Lonely Hills now… mostly.
But don’t forget about Frank!! Your wheat should be grown by now. So make an apple pie and bring him that plus five old wood and he’ll unlock the next room in your house. This would be a good time to go clean up those back rooms, and you’ll unlock some decoration blueprints when you do. Feel free to experiment with furniture and decorations, make your place look nice. Then we’re moving on to Frozen Peaks, to pick up where we left off.
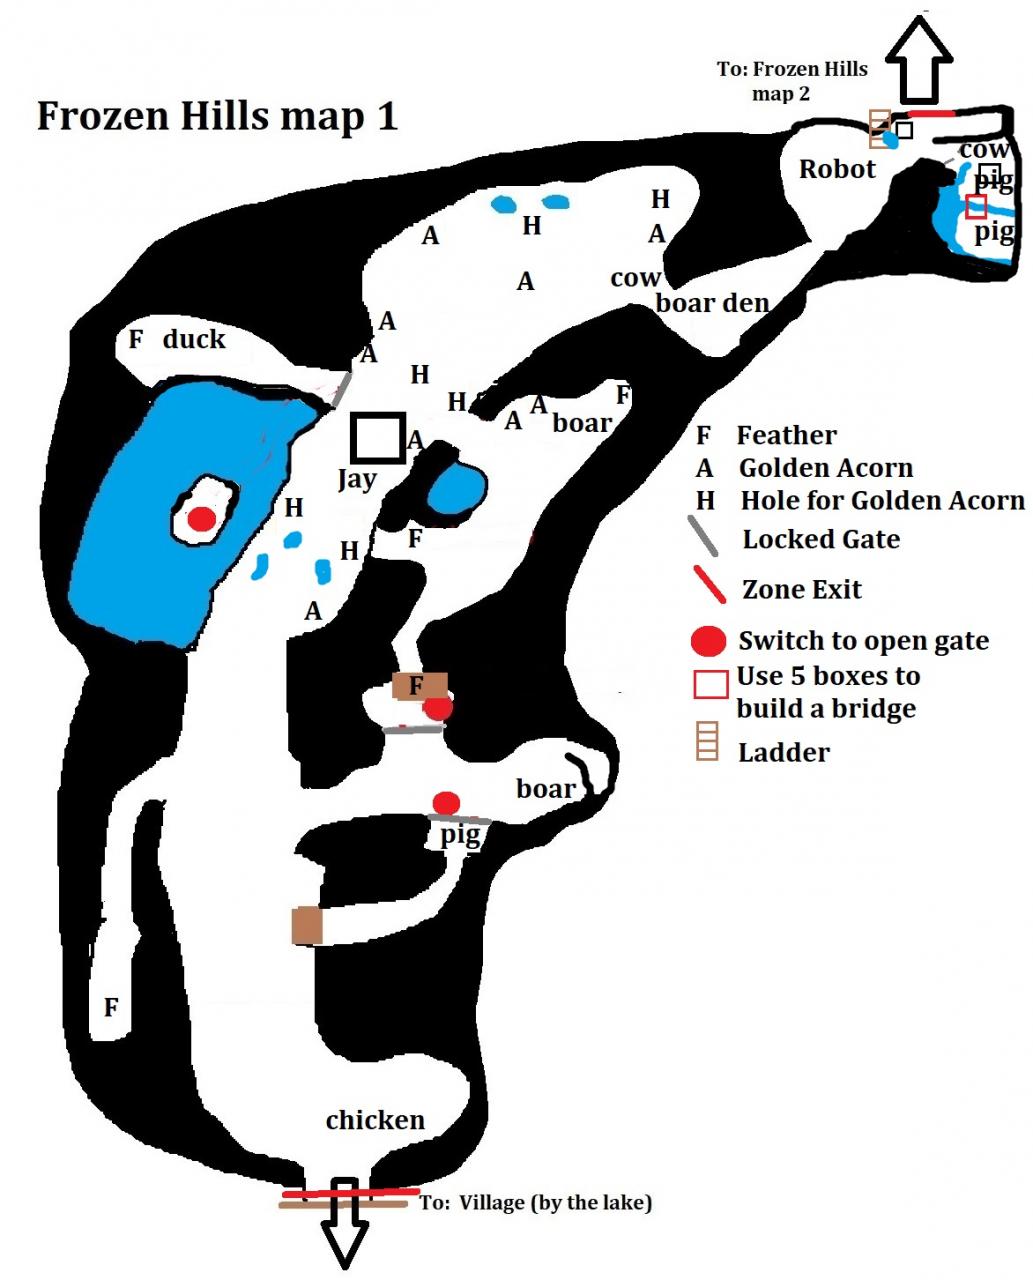
Week Five – Getting Cold in Frozen Peaks
Bring a handful of WHEAT with you to save some time (or you’ll get enough FREE wheat pretty soon but it will take a half hour or so to find it), this will be for feeding the cows. There are only 8 cows in the game. Also bring a handful of beetroot so we can feed the boars, there are 5 of them. I know this map looks different from the previous ones; it’s from my old Early Access guide but they really didn’t change this area at all (except the “frozen hay” is now “frozen wheat” and cows eat wheat instead of hay) so I figure it’s not worth the effort to make a new map if it’s going to be EXACTLY THE SAME just different colors. LOL. Lazy moment, maybe, but the map is still good.

NOTE: You will find Snowballs scattered around here. In an EARLY ACCESS version of the game you could use these to build a snowman decoration (starting with the “snowman head” blueprint that was sold by Jay) but it seems they’ve removed that blueprint from the game. So snowballs are now USELESS and you CANNOT THROW THEM AWAY because they are marked as quest items. Apparently there was going to be some sort of “frosty the snowman” quest at some point but they never finished implementing it. So you can either IGNORE the snowballs on the ground, or pick them up and stuff them in a chest somewhere, otherwise they’ll just take up space in your backpack.
- Bring any of your feathers to Jay first, to add them to your collection in the menu.
- Buy the blueprint for the Cow Shed, and then go build TWO of them.
- If you haven’t fed the two boars in the area yet, go do that now – boars like to eat beetroot.
- Just past Jay, before you reach the Robot, feed that cow some wheat so she goes home.
- Past the robot, down a little hill by a shack, is another cow that wants some wheat – go feed it now.
- Go past the robot and through the door, this will put you back where we left off last time: right in front of the “shortcut tunnel” entrance.
- If you haven’t done it yet, go left up the wooden ramp into the shack and clear the trash in there.
- Go right up the hill. Halfway up the slope you’ll find a yellow button. Don’t hit that button yet.
- On top of the hill you’ll find a locked “garage door” with another yellow button in front of it (buried under trash piles). Don’t hit that button yet either.
- A third yellow button is behind a locked fence. There’s a bucket button up on a rock nearby, aim up and spray some water into the bucket to open the fence.
- Hit ALL THREE yellow buttons before the timer runs out, to open the big garage door.
- Inside the door you’ll find a cow. Feed it some wheat.
- Farther up the path you’ll reach a mine cart and a raccoon. You can’t do anything with them YET, but remember they’re here because we’ll be back for them later. Head back down the hill now.
- Farther up the main path, you’ll reach an intersection where you can go left, right, or straight ahead. Straight ahead is the power plant – nothing to do there yet. Left goes to the cow pasture, radio tower, swamp, and desert – we’ll go there soon. Go right first.
- You’ll see a locked fence, there are FOUR blue switches needed to open it.
- First switch is a bucket switch in the middle of the lake. It’s kind of hard to aim at, you can reach it from only two places – down the hill right next to the water (but it’s VERY tricky to aim that far away) or else up on top of the hill overlooking the lake. Either way, just fill the bucket to press the button.
- The three other buttons are just regular blue buttons scattered around the top of the hill. Hit them all.
- Feed the boar a beet so he’ll go back to the boar den.
- There is another bucket button sitting on the support column nearby, hit it with your hose. Go inside the locked fence here to find another feather.
- Back down the hill, the locked fence is gone, so go in there for some free stuff.
- Back at the intersection, go straight ahead from here (LEFT from where you entered the area) and put some dry firewood on that giant ice block. Also feed the cow some wheat so she’ll go home with you.
- In the cow pasture ahead, use dry firewood to melt all the ice. This exposes a bunch of wheat which you can use for cooking or feed it to the cows.
- Go up the hill, there’s a chicken there and a shack with some trash inside. Also use a battery to fix a broken wire there, this activates a floating platform on the lake at the bottom of hte hill.
- Ride the platform across the lake, there is one suitcase to open under the waterfall. Be careful – you can fall off the dock or off the platform and end up at the bottom of the lake.
- Walk in the direction leading away from the lake, feed a couple of cows and a duck (after killing a giant purple crab robot), and clean up more trash until you reach a little wall. On the other side you’ll find a few more ice blocks to melt, a staircase leading down to a box with two turbo sprinklers inside, and another feather.
- The next door leads to the radio station, the swamp, and the desert. Go there now.
Week Five-and-a-half: Radio Tower Shenanigans
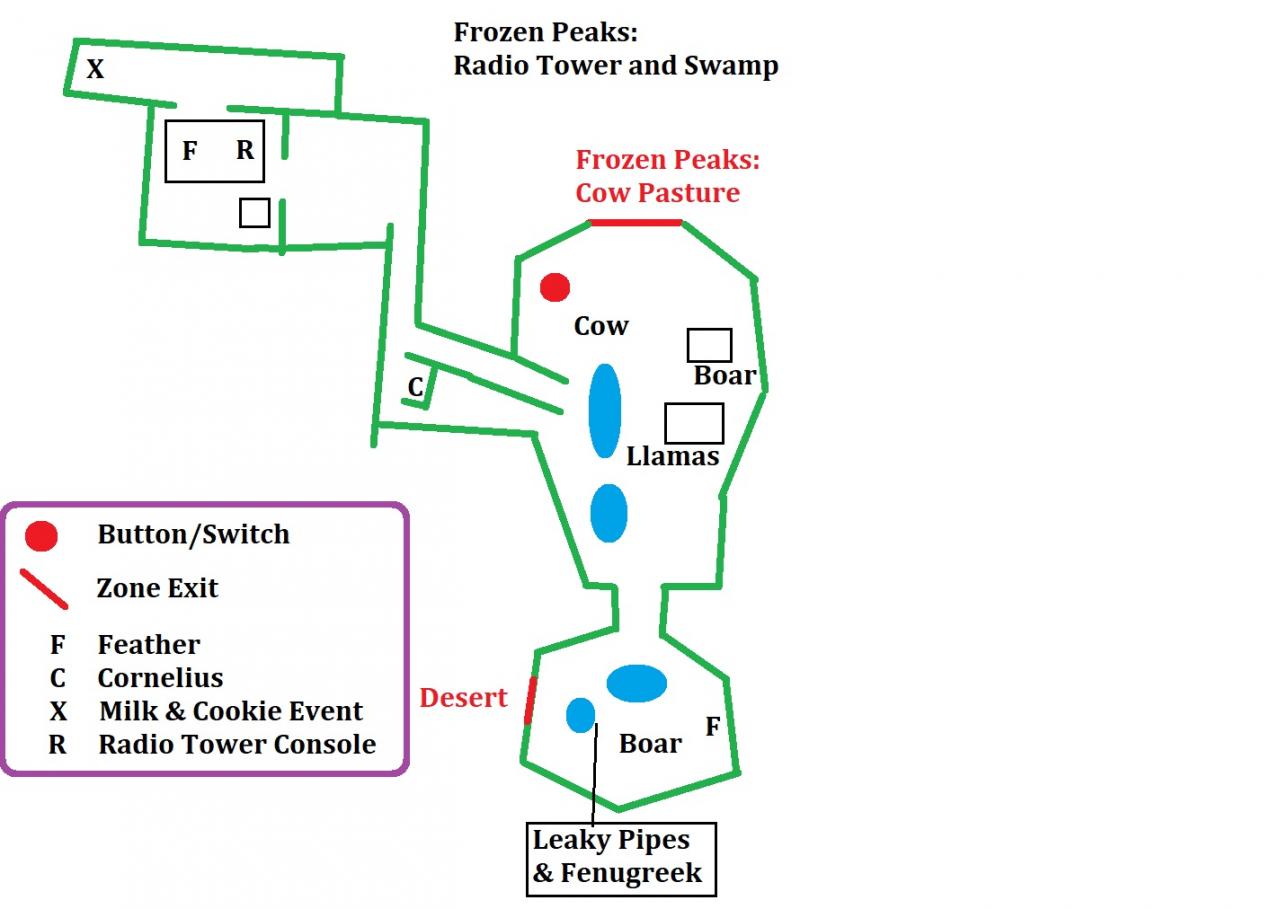
- In this area, to the right you’ll find a little shed with a button inside. The button lowers a bridge on the left side of the area. In a previous EARLY ACCESS version of the game, there was some special item on that bridge but it got removed for the full release version so that button is kind of useless now. Just sayin’.
- Near the bridge you just lowered, there is a boar. Go feed him so he’ll go home. That makes four boar so far.
- Around the corner from the boar and the bridge, you’ll find a Llama garage that needs to be fixed with a few construction parts. Do that now. Be advised: there are FIVE llamas in the area but this llama hut can only take THREE of them, the other two will just always live wild and free.
- Just past the shack with the useless button is a narrow and steep path leading up the mountain. That’s our target to finish the robot’s quest. Go all the way up that path until you reach the radio tower on top of the mountain.
- WARNING: getting up to the tower platform can be difficult because there are SO MANY robots that spit acid at you, including a giant purple one. Just be careful and kill them all.
- In the area around the tower (and one right on top) you’ll find some console parts. You need these to fix the satellite console, then push the red button that magically appears to deactivate the signal.
- While you’re up here, there is a feather on top of the tower. Grab that.
- Back down the tower, go behind it and onto the path at the other side. There’s a sign there about leaving cookies and milk for a traveler… but we don’t have cookies and milk yet because we only JUST GOT OUR FIRST COWS.
- Back down the trail… at one point there is a break in the wall where you can jump down a waterfall onto some wooden platforms. Do that, there is a suitcase with loot that you will want to grab, plus you’ll find Cornelius there playing hide and seek again.
- Keep going down the valley until you reach the swamp. The final boar is wandering around here, make sure to feed it.
- There are also a bunch of water filters in the area. You only need three. Use them to fix the leaky pipes here. Just getting a head start on a quest for later.
- Also go through the door, this will take you to the Desert. You’ll find the designer nearby, there is some debate about whether her name is Janet or Yvonne, depending if you’re reading her dialogue or the blueprint menu LOL. Hopefully they make up their mind what to call her soon.
- Buy the Desert Pot blueprint from her now, you’ll need it pretty soon anyway.
- Now use “fast travel” from the map, or just walk, back to the robot in Frozen Peaks. Talk to him to complete his quests. It says he’s supposed to find Harold now, and if you talk to Harold in Lonely Hills he will mention the robot, but don’t worry it’s not another quest or anything like that. You’re done with the robot forever.
- Go back to Jay. Give her any feathers you found. Tell her the robot is happy. Tell her the boars are happy (I honestly don’t remember if there is an option for this, but if it’s there then mention it to her). Then she’ll say that you should go see the botanist next.
Week Six – Power Plant and Sheep
- See the map in “Week Five”. The power plant is at the top end of that map (the EAST / RIGHT side of the world map in the game).
- Head back to the Frozen Peaks intersection, and this time go straight ahead. It will start snowing once you get halfway up that path, that’s how you know you’re going the right way. The door at the end leads to the power plant, that’s where the botanist is.
- As you clear out the trash here, there are a few points of interest. One is Lily the botanist. She sells seeds (in exchange for preserved jars) for flowers, fruits, and vegetables. If you ever run out of seeds for something, come see her. She also gives you a few quests to continue the story.
- There are three “railroad scrap” parts hidden around the power plant. Make sure you find them all.
- The final cow is hiding in the back corner of the power plant. Feed her some wheat so she goes home.
- Garlic seeds can be found here, you’ll need some of those.
- There is a feather in a corner of the area, outside the power plant fence. Grab it.
- There is a gigantic ice brick with toxic sludge on it… we’ll break that later to reach the area behind it.
- Lily asks for your help dealing with some sick sheep. She also asks you to bring her some of your crops for scientific study.
- Once you’ve cleared the whole area and found all three railroad parts…
- Go home. Check your cows to get some milk. Make Cookies in your kitchen. Plant some garlic.
- Take the cookies and a bottle of milk back up to the top of the radio station hill. Go behind it and put the cookies and milk onto the stump and see what happens. LOL. Yeah. Unfortunately you cannot “befriend” this guy.
- Take the railroad scrap parts back up the hill to the mine cart. Use them to fix the mine cart.
- While you’re there, the raccoon wants garlic – which you probably haven’t harvested yet but once you have garlic remember to come get the raccoon. It gives you some glass (and occasionally other random items) every morning.
- Go to the Village, down by the lake, and talk to Rudy about the bulbulator. He’ll “let you borrow it” but the game actually gives you an entirely new one, it is a DIFFERENT ITEM than the one used in Lonely Hills so if you didn’t do that quest yet and you still have that old bulbulator it WILL NOT WORK for this quest and you’ll keep it after this quest.
- Go to the lake behind Harold’s house and you should see a few plants around the lake that weren’t there before. They’ll be glowing for easy visibility. They look like seaweed, but they are the “Algae” that you need for the new bulbulator. Grab them all.
- Head back up to the mine cart. Put the bulbulator and algae into the cart. Press the red button that appears on the back side of the cart. Why they put it on the BACK side? I don’t know but they did.
- I really wish they made a cut-scene for this… but nope it just says “good job you broke the ice brick.” So go back to the power plant and talk to Lily again.
- She wants special mushrooms, like Rudy wanted for his first bulbulator. They grow in the area behind the toxic ice block that you just broke, so go find them all.
- Bring those mushrooms back to Lily. Unfortunately you’re not done yet…
- Go back to the swamp (where you used the water filters to fix the broken pipes). You’ll find a few plants there that weren’t there before. They are glowing for easy visibility. These are the Fenugreek Herbs that Lily wants to make the medicine for the sick sheep.
- Go back to Lily and give her the herbs, also tell her you fixed the pipes. She’ll give you some herbal medicine. Find all five sheep and feed them the medicine – they will go live at a COW SHED so make sure you have enough space for all five of them first.
- One sheep is right behind Lily. The other four are all behind the toxic ice block, where you found the medicinal mushrooms.
- After finding all five sheep, report back to Lily. She’ll tell you that you can “use the bulbulator to break through the other toxic ice on the path to the desert” but we’ve already BEEN to the desert and there’s no toxic ice there so I don’t know what she’s talking about.
- Sheep will give you wool every morning. You can put the wool into a Loom (blueprints bought from Jay) to make a wool ball. There is NO USE AT ALL for wool or wool balls though, so sheep are kind of pointless – don’t waste your pet food on them.
- Lily’s final quest requires you to bring her one of EVERY crop you can grow on your farm, including trees and soil farm plots. She will NOT take tea or sunflowers (but they might fix that in a future update) but she does need one of everything else. Here’s the list of what she wants:
- potato, tomato, pumpkin, lettuce, oats, eggplant, strawberry, carrot, pepper, corn, blueberry, wheat, beetroot, onion, garlic, cranberry, watermelon, apple, peach, orange, olive.
- Cranberry, watermelon, and olive are only found in the desert. Olives are found WAAAAY in the back of the desert, too, and they grow on TREES which take a week to grow. So it might be a good idea to buy a couple of these seeds from Lily now so you can start growing them while you are running around the desert instead of waiting until there’s nothing left to do except the final boss fight.
- Bring Lily what you can for now, to add crops to your collection in the menu.
- Go back to Jay and see what blueprints you can buy. Definitely build some cheese machines. Maybe also upgrade your cow sheds. The loom… since wool has NO PURPOSE WHATSOEVER, well you can buy it and use it as a “decoration” for your farm if you really like it.
- Work on other upgrades for your farm, and also upgrades for Ellen (from Rudy’s shop) now that you can afford most of them.
- Also be sure to build the Desert Pots from your workbench now, you’ll need them as soon as you go back to the desert. Build it once but get 16 of them. Notice that they only stack up to 10 though, so you get a stack of 10 and a second stack of 6 but they’re all there.
Final Week – The Desert
This basically is the last area of the game where you can explore freely. Once you finish here, all that’s left is the final boss fight. Just so you know.
The desert is composed of FOUR areas. It’s pretty linear so I’m not making a map for this. But I’ll give you a quick run-down of what’s in each area and the quest you have to finish in order to proceed. This is the one and only time when the next zone (Sunken City) really is locked until you finish all of the designer’s quests.
- There are no more feathers beyond this point, you should have found them all by now. Turning them all in to Jay in Frozen Peaks will reward you with five ULTRA BIRD FEEDERS. These are not upgrades for smaller ones, these are fully built and ready to go. … Kind of sad that at this point in the game you really don’t need any more seeds.
- Talk to the designer to start the quest line. Be sure to grab your first desert seed right behind her.
- EACH area has FOUR spots where you need to build a desert pot and then plant a desert shrub. The shrubs look like tumbleweeds and they are found all over the desert. There are only about 18-20 seeds, and the seeds look exactly like the full-grown plant rather than like a bag of seeds.
- EACH area has ONE broken pipe that needs to be fixed, then a shallow lake will fill up near where you planted the desert shrubs.
- Once those are all done, go talk to the designer again to start the next quest: fill up the three deep lakes.
- The first three areas each have ONE deep dry pit. Spray your water hose into it until it fills up and plants start growing around it. Sometimes it can be a bit finicky about where you aim – must aim near the bottom of the hole but not directly at the bottom of the hole.
- After that, she wants you to fix the dam console and help the animals.
- The FOURTH AREA has all the dam console parts. You can find them BEFORE starting the quest, but the console itself will not appear until AFTER you start the quest.
- The FOURTH AREA has three yellow buttons at the midpoint of the area, these activate a bridge to the left. Across that bridge is a Fennec.
- All of the dam console parts are located up the canyon past those three yellow buttons.
- The FIRST AREA has three fennecs and a goat.
- The SECOND AREA has a fennec, and also another Llama garage that you need to fix before you can feed the llamas batteries. This one will only bring you E-Waste, you cannot set it to bring anything else. It also only has room for three llamas but there are five of them in the desert.
- The THIRD AREA has three goats, but no fennecs.
- The FOURTH AREA has a goat hiding on the right side of the shallow lake.
- FENNECS want a “fennec treat” which means a regular old watermelon. Nothing fancy about it, you don’t need to make a special treat like you did for your dog.
- GOATS want to be sprayed with water first, to free them from being stuck in the sand. After that they want to eat a cranberry.
- BE CAREFUL – don’t spray the goats until you have a cranberry for them AND you have room for them at your Cow Shed. If you spray them too early, they walk around. When they walk around, they have a nasty habit of walking through walls and falling off the map, never to be seen again.
- The dam control console will appear in the back right corner of the FOURTH AREA, where the big dam wall meets the little canal wall. But only AFTER you start the quest to fix it. Once you have the dam control console fixed, hit the RED BUTTON that magically appears on it.
- By now, your olives should be grown. Take one to Lily (as well as a watermelon and a cranberry) to finish your crop collection. As a reward for giving her one of every crop (except tea, sunflower, decorative flowers, coffee, cocoa, pear, and cherry) she gives you a Jackelope decoration.
- Use 1 Watermelon, 2 Cranberries, and 2 Blueberries to make a Watermelon Salad. Bring it and 5 pieces of old wood to Frank in the Lonely Hills to unlock the final room in grandpa’s house. Now you can decorate the entire house to your liking.
- FYI: You can put olives into an oil press to make olive oil. Jay will trade one of her blueprints for some oil.
- FYI part 2: You can put regular cow milk into a cheese machine to make “cheese.” Or put goat milk in to make “goat cheese.” They are TWO DIFFERENT kinds of milk, so you get TWO DIFFERENT kinds of cheese. You can mix both kinds in one cheese machine though, it will then give you the right amounts of both cheeses when it’s done working..
- Fennecs will give you seeds every morning. Last I checked it was a mix of watermelon and cranberry seeds, but they might have changed it in a recent update to only give you watermelon seeds.
- NOTE: Watermelons cannot go into a bird feeder, so the only ways to get more seeds are buy from Lily or talk to your fennecs.
- Go back to the designer, who lets you use her boat. Her boat is located in the SECOND AREA, just before the door to the third area. It’s in the hole in the gray canal wall.
Sunken City – the Final Boss Fight
- The boat sends you to the Sunken City. The only way back is to use fast travel from the map.
- You have “infinite” chicken cannons here. Just R-Click to fire an exploding chicken at whatever is in front of you. The path is completely linear, so just keep moving.
- You will find GLUE here, which has no practical use. However, one of the achievements asks you to make 20,000 recycled material and the best way to get them all is to recycle glue when you run out of trash. Glue gives more recycles than any other “construction item” will. So put a piece of glue into your llama garage FIRST, so they bring more glue every day… otherwise you run out of glue because there’s only about 100 pieces in the game.
- Eventually you have to fight the final boss… but with the chicken cannon it’s ridiculously easy.
- Save Grandpa.
- Now you have a choice. “Go to Mars” just ends the game, you see the credits screen and it’s all over. “Stay here” lets you keep playing. You’ll be able to keep growing crops, raising animals, and decorating your house. But there are no more quests to do, no new areas to explore, so at that point it’s just you and your farm. Kind of zen I guess… but really the game is over.
If you decide to stay here, you can work on some of the achievements (shown in the “TAB” menu) but some of them are BROKEN (see the chapter about broken achievements and bugs at the beginning of this guide for more info). Finishing every achievement in a category will reward you with a poster that you can hang on the wall in your house.
Encyclopedia of Blueprints and Recipes
Eventually will be a list of all the blueprint prices, Rudy’s upgrade prices, crafting requirements, and kitchen recipes (with locations where to find them). But I have to play through the game again to finish compiling the list, because I forgot the lists I have now are INCOMPLETE since they made a few changes (like adding goat cheese back into the game).
Your patience is appreciated.
Future Updates
The developers are planning even more changes yet to come.
Hard Mode will be… well, harder.
And all the entrances to the underground basements in the Village used to be connected to a bigger labyrinth during early access, but they removed it for final release. However, due to popular demand, they are planning to rebuild the old underground labyrinth so you’ll have more areas to explore. Note this might change the locations of some of the cooking recipes, decoration blueprints, and maybe one location of Cornelius playing hide and seek… we’ll have to wait and see.
And perhaps someday maybe possibly perhaps… they might throw in a use for the sheep’s wool, the decorative flowers, and a few other things that are currently mostly useless.
Thanks to dj_moyer for his great guide, all credit to his effort. you can also read the original guide from Steam Community. enjoy the game.
This is the best game guide I have ever seen. The Gold Standard.
Thank you so much for such an amazing job.
You addressed all the mechanics of running the game as well as playing through it. Wow.