A guide on how to complete the game and also reviewing it. Includes spoilers.
Technicalities
Whilst featuring some rather simple controls that can be found in other games of this caliber, Panzer Knights goes out of its way to include some interesting ideas. Most comparable to War Thunder, Panzer Knights gives the player limited ammo, repairs, and other items that go as follows. Smoke grenades, which are used to hide behind to get in an emergency repair if needed. Bomb drops which can outright insta-kill enemy units; great to use on a pack of enemies who haven’t spotted you yet. And supply drops, which refill all ammo types and repair usages. On the topic of ammo, there are different types. AP rounds, which have a balance of armor-piercing casing and explosive filling. APCR which have increased penetration potential but less explosive filling, great for heavily-armored targets. And HE rounds, which have less armor-piercing capability but more explosive filling, to be used on lightly armored targets.
The tank’s armor is also a large center of focus (obviously). Every tank follows the same rule system, so I will refer to the player’s tank to express both allies and enemies too. Your tank has 4 parts: the tracks (individually represented), the chassis, and the turret. Each part can be both damaged and destroyed. When tracks are damaged, you go slower, and movement is outright removed when one of your tracks is destroyed. When your turret is damaged, it turns slower, and when destroyed prohibits movements of it and even firing off rounds. When the chassis (referred to as the hull) is destroyed, your tank is destroyed. All elements can be fully revitalized with a repair module, which takes a fixed amount of time to use. When a player’s tank is destroyed, the mission is ended regardless of progress made. A unique and commonly unrecognized mechanic in tank games is also featured in this: angling. If you or your enemy positions themselves correctly, a shot, no matter how powerful the tank, can bounce off the enemy and render it a missed shot. Angling can be the difference between life and death at times, and is a very useful feature. You’re also able to change the layout of friendly teammates’ formations by pressing T, but this doesn’t really matter regardless.
![]()
The ability and ammo bar
That really concludes the features I needed to talk about, so let’s move onto the next part.
Crew
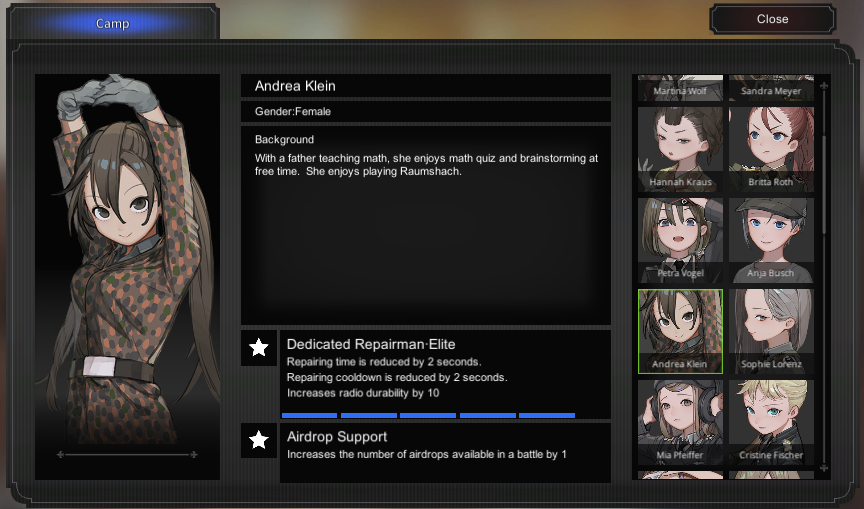
A fraction of the crew member list
Each individual crew member gives a special and specific boost to a tank’s performance, each with its own male and female variant. As you upgrade each individual crew member, they gain upgraded stats and unlock new traits to further expand your arsenal. Some of these can be unremarkable or can be absolutely amazing. The best being (in my opinion) those who increase the carry amount for AP rounds, who also let you carry about 10 more APCR, which is a crazy good upgrade, and saves off on the amount of supply drops needed, whose uses can also be increased by crew members. On that topic, there are certain bonuses you can get based of character relations. Each member is linked to another, usually having their stories intertwined. If you play with both specified characters on a designated map, you unlock their “friendship bonuses”, which are stronger attributes that can seriously help you in battle and are worth the trouble. My recommendation is to unlock each character and play with them on their designated map so you don’t have to go back and redo mission just to unlock the bonuses for the achievement. That is, of course, if you don’t want to go back and destroy enemies in your Königstiger later. Up to 5 members can be but into tanks depending on the type, and give huge bonuses when all put together. Crew is definitely worth upgrading.
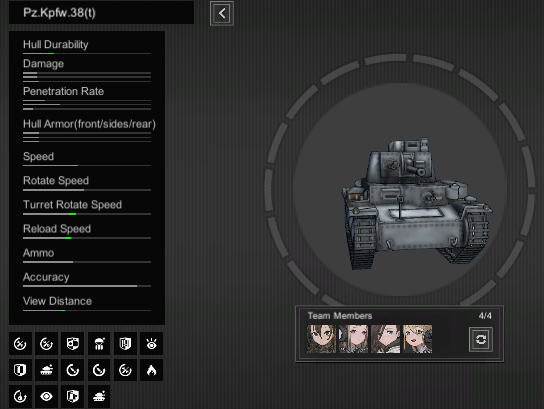
A full crew equipped on the Panzer 38(t) and their effects (seen on the left)
Tanks
The game offers a selection of largely german tanks, with a couple of Soviet, French, and British tanks that will be talked about later on. The selection isn’t large enough to offer massive replayability, but it’s good for a couple more playthroughs. There are really 2 types of tanks available. Your standard traversables and the assault guns, which consist only of the StuG III and Jagdpanther. The roster mostly consists of the most famous tanks from the listed factions, and even has the KV-2, which can be unlocked for free after completing a mission later on in the story (which unfortunately isn’t long). It even has the exact same model of tank the Anglerfish team uses in Girls und Panzer, so I guess you can roleplay that in tandem with the GuP crew member pack mod on the workshop. The progression of tanks is fairly simple, and I would recommend that you skip some tanks to save up for more powerful ones instead. Tanks can range from underwhelming to absolutely indomitable at times depending on if you were smart and saved up for the best tank, which can no-joke carry you through half the game. Spend wisely, and once you beat the game, THEN you can farm medals for the rest of the tanks. There are also camos available for most tanks at the cost of 2000 medals each, most of which look pretty nice. Just play the game how you want to, and smoothly progress through the game!
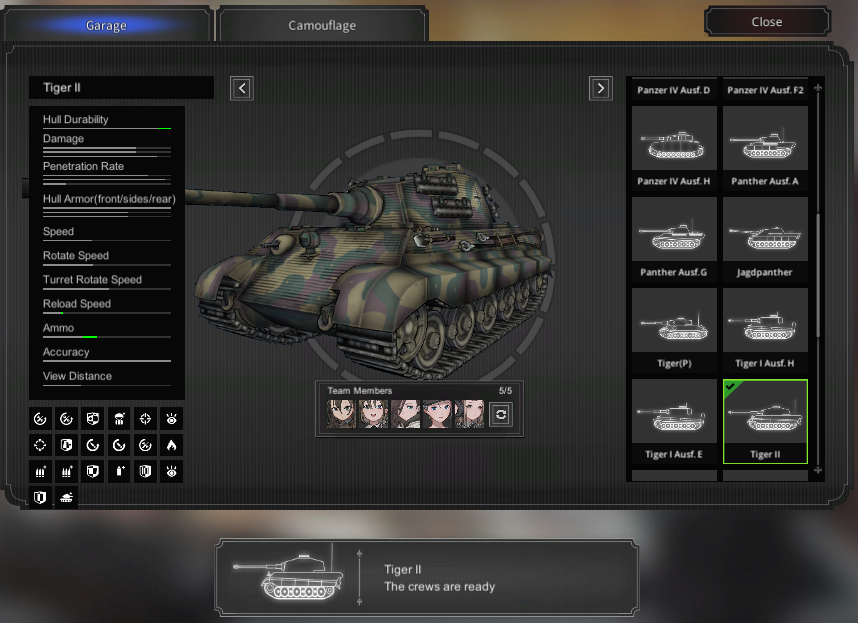
Fragment of the list of available tanks. Note that I have all tanks already unlocked. You have to pay for most shown in the image.
Speaking of which, it’s time to talk about the missions
Missions
I will leave the rest of the missions to you, not only to not spoil them, but also out of sheer unwillingness. The rest of the missions are fairly simple and easy, and don’t really warrant any sort of independent review, as they can be done singlehandedly by the player.
Mission – Battle of Montcornet
Mission – Occupy Boulogne-sur-Mer
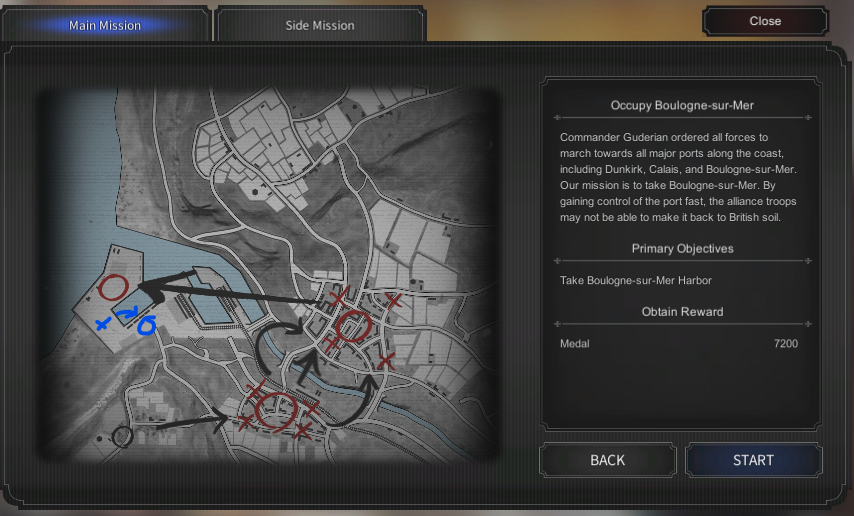 Please refer to this image for the rest of this section
During this mission, you will encounter many. many large and extensive battles, especially if you’re doing the Side Mission too (which I recommend you do for every mission). Towards the end of the mission, you can be easily killed due to a possible oversight by the wonderful developers. I marked on the map a couple of symbols with a blue marker at the dockyard. I will explain their meaning now, so read carefully, this is important. At the point I marked with the blue “X”, an event triggers. This event causes multiple enemy forces to spawn in the area marked by the blue circle. If unprepared, this will absolutely destroy your tank and you will be forced to restart the mission again. I went through trial and error 4 or 5 times trying to figure this out and wasted multiple hours on this single mission. The easiest tactic, at least in my own knowledge, is to snipe the enemies before you turn and drive into the area marked by the “X”. Enemies can’t trigger the event, so you’re safe as long as you don’t make contact with the area. It also might help to lure the enemies over to your to help kill them easier. Once they’re all dead, you can then trigger the even, turn around, and finish off the rest of the horde with relative ease. This single part can and WILL kill you if not approached with caution, so please take my advice into consideration at the very least. I just want to help you here
Mission – Operation Winter Storm
List of Enemy Tanks
Poland
7TP (7 Tonne Polish) – A light cruiser (“fast”) tank made quickly to defend against impending German forces. Can be dealt with by simple AP rounds.
TKS (TK-3) – A cute little Polish tankette that saw limited usage and were ineffective against invading forces. Dispatchable by HE rounds.
France
Renault FT-17 – A standard tank of the French ground forces, used since WWI. Lightly armored, and can be destroyed with AP rounds.
H35 (/39) – A decently armored light infantry tank with a moderate armament. Can be killed with APCR.
R35 (/40) – Almost identical to the H35/39, but featured a variation as a support tank with slightly more armor and slightly less firepower. Destroyed with APCR.
S35 (SOUMA) – A light cruiser tank that could glide around easily whilst still employing the use of advanced and heavy French armor. Best combated by HE and AP rounds.
B1 Bis (Char) – A legendary tank known for being a metallic wall of traversable steel. Doesn’t use its 75mm ABS SA 35 howitzer. Can only really be attack by shooting APCR directly into the front or back of its chassis.
United Kingdom
Matilda II (Infantry Tank Mk.II, A12) – A medium infantry tank with a decent armament that made up a portion of Britain’s forces during WWII. This well-remarked tank can be bested by AP and APCR.
Ordnance QF 20-pounder – A British anti-tank gun. Unremarkable and easily destroyed by any ammo type.
Soviet Union
BT-7 – A light cruiser tank infamous for making up a large portion of the Soviet forces of WWII. This vehicle that zooms around can be easily destroyed by even HE rounds. It’s chassis served as a base for my favorite tank, the Finnish BT-42.
T-34/76 – A predecessor to the 85, this medium tank could pin targets with ease. Destroyed with AP rounds.
T-34/85 – A renowned tank that employed the use of thick armor, great speed, and an even better cannon to decimate opposing forces. Can be killed with AP rounds.
KV-1 – A legendary heavy tank that was said to soak up shells like a sponge. Can be destroyed with APCR rounds.
KV-2 – A self-propelled gun classified as a “bunker-buster’ commonly mocked for looking like a refrigerator. Can be destroyed with APCR rounds, and is easiest to exploit due to its tragically long reload time.
ZiS-3 (76 mm divisional gun M1942) – Soviet anti-tank gun. Just like the British anti-tank gun, this one poses no real threat and can be easily dispatched with an HE round.
IS-2 (or JS-2 if you’re a ♥♥♥♥♥) – A tank that bore the name of the leader of the Soviet Union itself. The Iosif Stalin II was a Soviet heavy tank which employed a devastating cannon whilst being impenetrable due to its armor. Pretty much requires APCR to beat and can absolutely cripple even the King Tiger tank. Only found in the most recent Side Mission as of the time of writing.
Thanks to Carnificus for his great guide, all credit to his effort. you can also read the original guide from Steam Community. enjoy the game.