This guide is an attempt at describing how to optimize your system, in general and for planetside 2 specifically.
- CPU – Processor
- GPU – Graphics card
- VRAM – Dedicated memory on your GPU
- FOV – Field of View
- Vsync – Vertical Syncronization
- ROF – Rate of fire (weapons fire rate in games)
- X Bound – Limited by X parts performance
- AO – Ambient Occlusion
If I’ve missed one, let me know and I’ll add it to the list.
It looks like this:
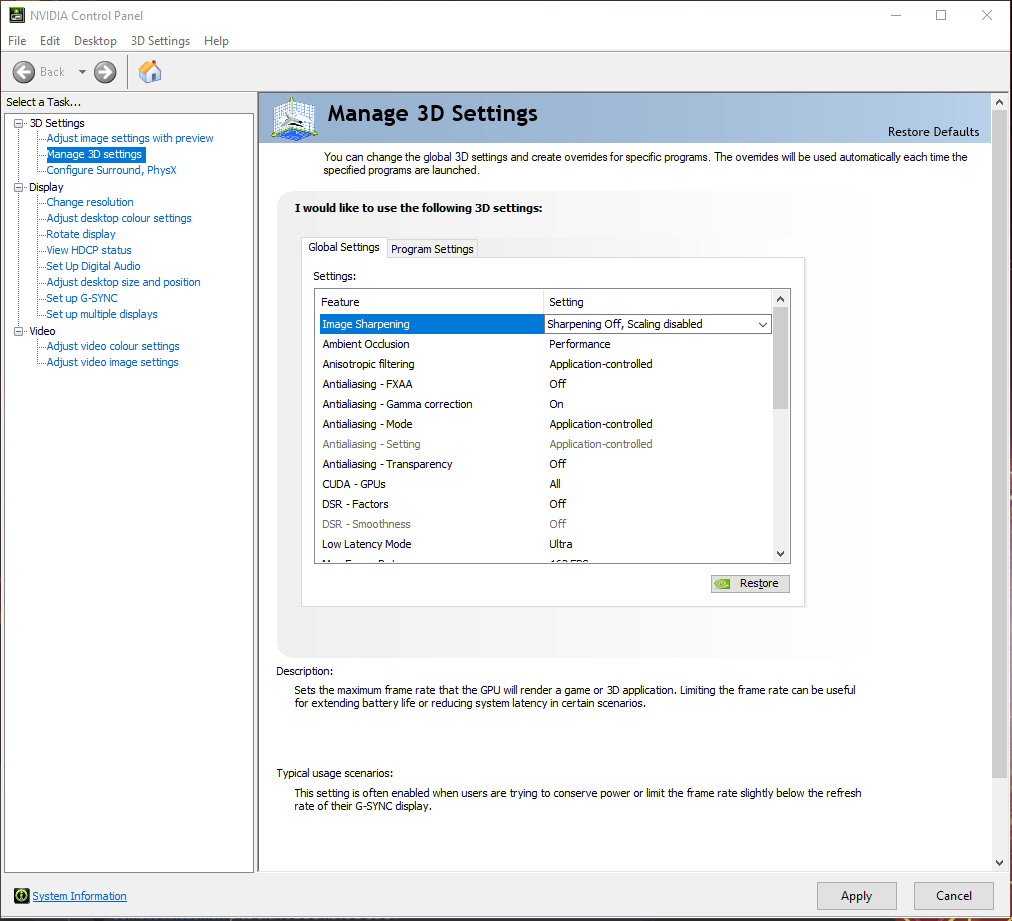
In this menu you can control how the driver behaves. Most importantly we can give ourselves a small increase in performance that is measurable in applications like 3DMark Firestrike.
Ambient occlusion is a shading and rendering technique used to calculate how exposed each point in a scene is to ambient lighting. TL:DR it improves the look of shadows.
This can be set to Performance, which means it will apply AO quickly when it is needed instead of maximizing fidelity.
Low Latency Mode (Anti-Lag on AMD) controls how many frames are pre-rendered in the buffer and is meant to reduce input lag.
This can be set to Ultra if your GPU is always being fully utilized (99-100% usage while playing a game). This is usually the case unless there is a frame rate limit in place stopping it or you are severely CPU limited. Since Planetside 2 is CPU bound in many scenarios it should most likely be set to ON for mid to high-end systems.
Setting it to Ultra while underutilizing the GPU or while being CPU bound can have the opposite effect and increase input lag.
Max Frame Rate is a relatively new feature to the Nvidia control panel and can limit your maximum FPS. Previously this had to be done with RTSS (A third party program) if there was no limit built into the game. This is useful if you want to create a smooth gaming experience (more about this later) and if you have a display with adaptive sync(more about this later). If you have a high refresh rate display without adaptive sync, you may want to set this to your screens refreshrate + 2 to stop a lot unnecessary frames from being rendered. If you have a refresh rate below 75hz I recommend leaving this OFF.
The amount of frames that are rendered per second will impact how responsive your game feels. 60 FPS is rendering a new image every 16.6 ms while 120 FPS is rendering a new image every 8.3 ms and 240 FPS is rendering a new image every 4.2ms. This will hugely impact the responsiveness of your game but reaches diminishing returns (producing 240 FPS is A LOT harder than 120 FPS) and is why my recommendation is as previously stated.
Monitor Technology has three modes I am aware of: G-sync, ULMB and Fixed refresh rate.
G-sync is Nvidias proprietary method of adaptive synchronization. This will have its own section because there are lots of intricate details that need to be covered but the TL:DR is that the display is changing its refresh rate dynamically to match the frame rate of your game to mitigate screen tearing.
ULMB stands for Ultra Low Motion Blur and is Nvidias proprietary blur reduction technology. It is a successor to an older technology called Lightboost. It is designed to reduce eye tracking motion blur, however it should be noted that this can not be used in tandem with G-sync so you will have screen tearing and can only be used on certain fixed refresh rates. Asus is the only known alternative to this tech; they have what is called ELMB which combines adaptive sync tech with ULMB for the best of both worlds.
ULMB is useful for games like Counter Strike where you can have a stable fixed frame rate combined with ULMB for the best possible target-tracking combined with vsync to eliminate screen tearing.
Fixed refresh rate is how a display without any adaptive sync technology functions. There is no benefit to this mode when you have adaptive sync available. Images are displayed as fast as the screen can display them, if you don’t have enough new images to match, the previous one will be displayed again.
Power management mode defines your preferred performance level when running a 3D application (game, CAD, etc). It affects your GPU which in turn impacts your framerate. You can gain a small performance increase by setting this to Prefer maximum performance at the cost of using more power when mostly idle. My recommendation is to set this to Adaptive Power instead of the default Optimal Power, as it is a bit more aggressive on what performance levels should be running at any time but isn’t as extreme as Prefer maximum performance.
Texture filtering is the method that determines the texture color for a texture mapped pixel, using the color of nearby pixels (from the texture). The way textures are rendered is affected by this and there is a specific setting that can always be changed. Texture filtering – Quality should always be set to High Performance to gain some additional performance by telling the driver to do it quickly instead of nicely.
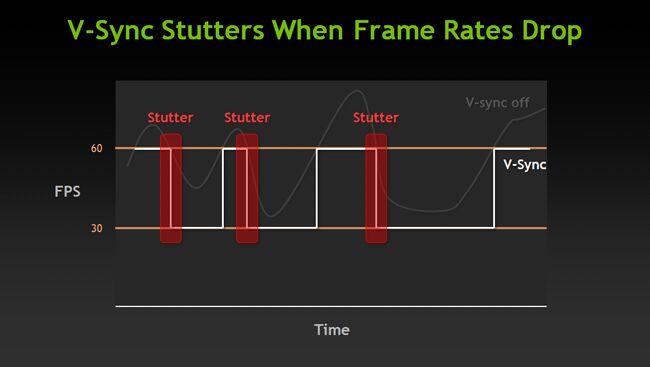
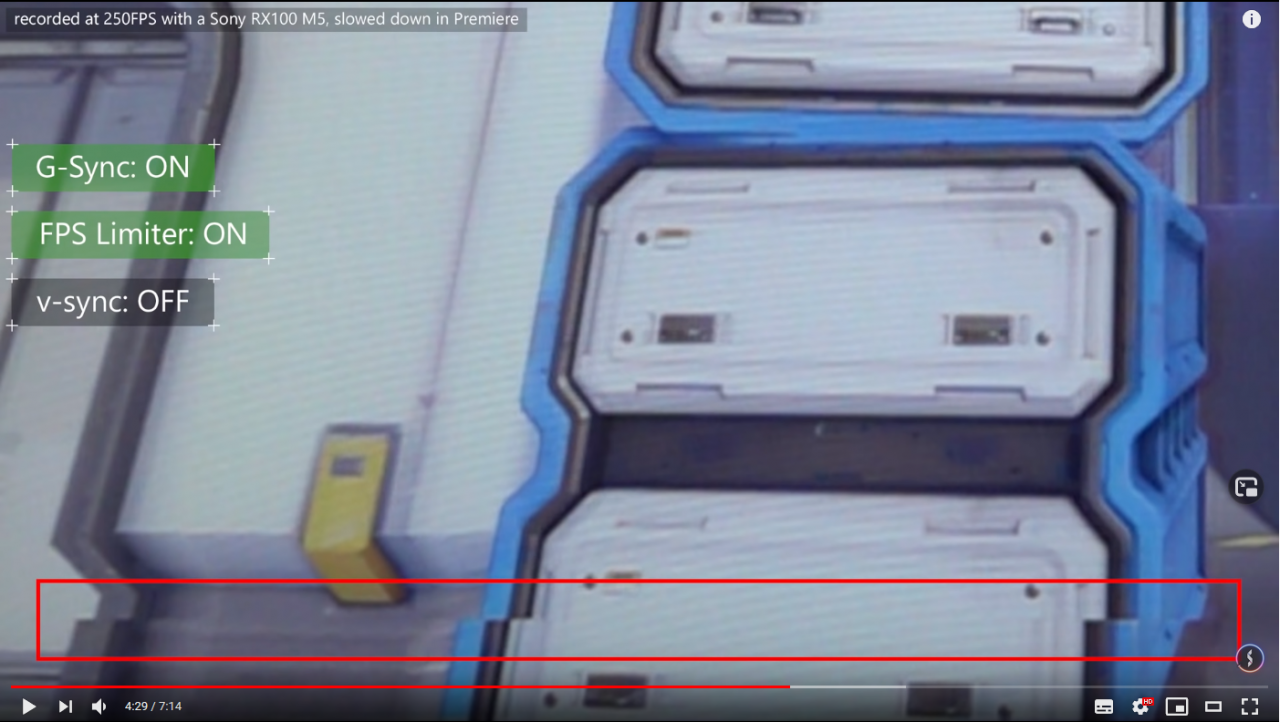
Vertical sync or vsync is a term that gets thrown around a lot, usually in a negative way. It is called vertical sync because it is synchronizing the image displayed on your screen in the vertical axis. A screen renders from top left to bottom right and when you have more frames than the screen is capable of displaying multiple images may overlap, causing screen tearing. That looks like this:
We have the previous image still being displayed on the bottom while the new image is displayed on the top half. This always happens when you have a higher frame rate than your screens refresh rate without mitigation technologies, such as vsync and adaptive sync.
When the frame rate drops below a displays refresh rate while vsync is enabled a stutter happens. This is when the vertical sync can not be maintained and it halves the framerate so that each image can be displayed twice instead, which will maintain the vertical sync but causes intense input lag.
If you do not have adaptive synchronization in your display but it is a high refresh rate display (100hz and up) I recommend using the setting called Fast in your nvidia control panel for vsync, which is a form of Adaptive Vertical Sync. It is similar to Adaptive Sync but not the same.
If you have an older card, Fast may not be available to you, then you should use Adaptable.
What happens in that case is that it is allowed to drop from the “framerate equals refreshrate” mode without the stuttering.
As long as the vsync at native refresh rate can be maintained, there is no screen tearing. If the framerate is dropped it disables vsync. Best of both worlds without hardware solutions.
If you have a 75hz or below refresh rate display, I recommend not enabling vsync as you will have a better experience from having lower input delay from a higher frame rate, even if your display can not keep up.
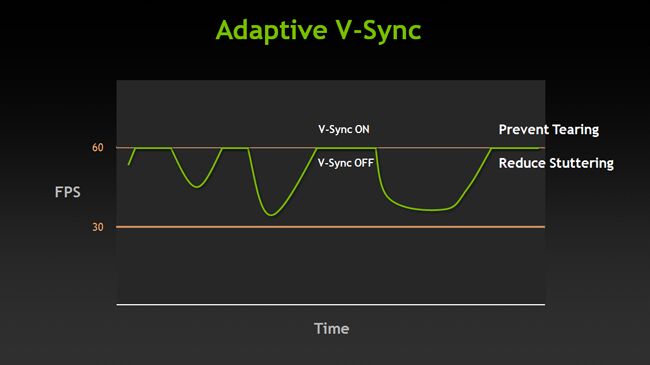
Having the game jump between very large differences in FPS can feel jarring. Having a maximum FPS of 144 and then suddenly dropping down to 80 FPS will not feel good even if its for a short time because your frame time between those images are so different (6.9 ms to 12.5 ms between each image).
Minimizing this difference will make the game feel smoother than stuttering between a very high maximum FPS and a minimum FPS. By figuring out what your average FPS is and then limiting the game to that you achieve a much smoother experience.
Make sure you have your in-game video/graphics settings dialed in where you want them at this point. You may want to skip ahead to the Planetside 2 Settings Section and then come back here.
We want to make this line as straight as possible (preferable at a very low frame time):

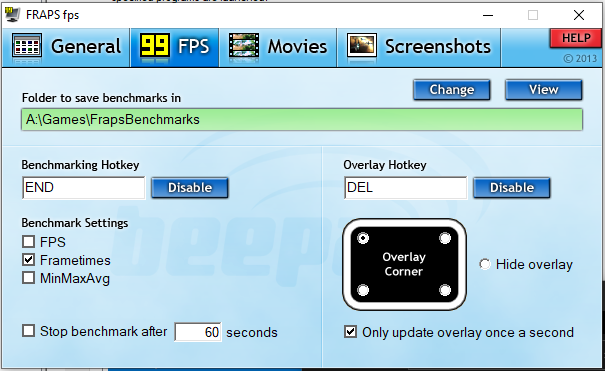
To know what this line looks like we have to use FRAPS and FRAFS.
Fraps can be downloaded here.[fraps.com]
Fraps needs to be setup so that it saves your frametimes and you need a benchmarking hotkey. The overlay will help you know what the program is doing when recording. This is writing down your frame times into a CSV file (a text file format).
Now you have to gather data on your own system. Start up Fraps and then start up your game. Get into a multiplayer match or mode of your choice and toggle the benchmarking hotkey when the match begins and again when it ends.
For this guide that game is Planetside 2. It is important to gather good data, which means we have to get most of every scenario covered. In Planetside 2 this can take some time, you should have played in both small fights and big 96+ fights to get good data. It is also beneficial if you get some vehicular combat as both air and tanks. The longer you play the better the data becomes.
To examine the data you just gathered you can use FRAFS, which can be downloaded here.[frafs-bench-viewer.software.informer.com]
when you open FRAFS it will automatically open the default folder that FRAPS saved the file. Drag and drop this file into the FRAFS window.
Your result can look something like this:
It shows your Avg. time and its translated frame rate. This is the information you want.
Open up the Nvidia control panel and go to your program page for Planetside 2.
In Max Frame Rate you should input your average frame rate. In my case that would be 110.
Enjoy your very stable frame rate and frame time.
Sometimes games will have an in-game option called Smoothing, or FPS Smoothing. This is supposed to achieve similar results as the manual method but has varying results in every game I have come across the feature in. It is also not always available, which forces you to use the manual method.
With Frame Rate Smoothing, the application is determining what range is acceptable for Frame Rate wandering, so it can cap your Frame Rate between Min and Max allowable values and achieve stable frame times for you. Since it is written by the game developers the algorithms of how it behaves will vary. I will get to this feature in Planetside 2 later, as there are controversies surrounding this feature.
Adaptive sync currently has two available versions:
G-sync, which is Nvidias proprietary method and Freesync, which is AMD’s open standard.
G-sync is a licensed module that has a stricter specification and often a bigger frame rate range in which it can be active. It is required to function from 30 hz and up to the screens maximum refresh rate. Freesync often starts at 48hz and goes up to the screens maximum refresh rate but is not a licensed product. Some Freesync displays are checked for compatibility with Nvidia graphics cards and can then be used as G-sync compatible but can still be worse than the real G-sync module.
They exist to mitigate screen tearing without causing any performance limitations but are not perfect solutions. Most notably you MUST make sure your game is running within the variable refresh rate range that your monitor supports, that means you need to use the Nvidia control panel to limit your frame rate to a value that is 2 frames lower than your screen refresh rate to make sure it does not go outside that range. (If there is an ingame FPS limiter, that works aswell)
This does not completely remove screen tearing. There can still be tearing on the lower part of your screen:
To solve this we have to enable vsync. This will NOT increase the input delay. It does NOT increase the input delay because Adaptive Sync is keeping your screens refresh rate in sync with your frame rate.
Do not use the Fast method of vsync in the Nvidia control panel for this, instead just use ON or the ingame vsync toggles.
Planetside 2’s graphics menu looks like this:
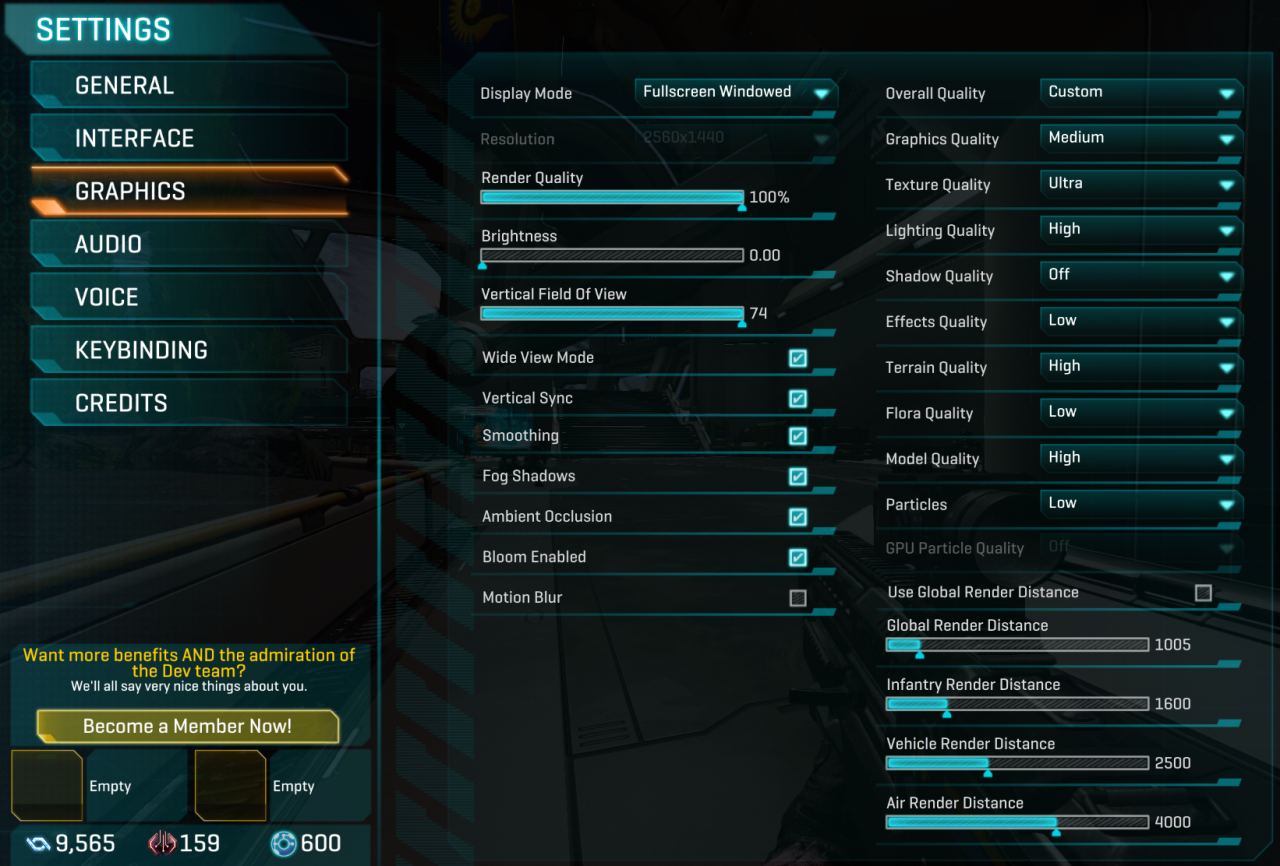
I will go through the relevant graphics settings. These settings can be changed in the file they are stored in.
Usually it is located in C:\Program Files (x86)\Steam\steamapps\common\PlanetSide 2 and is called UserOptions.ini
Display Mode is where you pick how the window of the game should behave. If you only have one display you should use Fullscreen to get the best performance and optimal alt-tabbing. If you have more than one monitor you should use Fullscreen Windowed, so that you can alt-tab out of the game and use your other display without the game being minimized. There can be a very small loss in performance in any Windowed mode but is worth it for the quality of life it gives.
Resolution is the resolution at which everything in the game runs at and should be set to the native resolution of your display. This is grayed out on Fullscreen windowed as that is forced to your native resolution. Changing this affect GPU workload.
Render Resolution is the resolution at which the game world (the 3D part of the game) is rendered at in a % of your Resolution setting. Using this to gain performance in extreme cases can be useful without making text and HUD illegible as those are not affected by Render Resolution. Changing this affect GPU workload.
Example: Resolution of 1920×1080 with a render resolution of 50% means the game world is rendered at 1280×720, which is a lot easier for the GPU to handle.
Vertical Field of View defines how wide your vision is in the game. This has a maximum of 74 in the game but can be edited in the config file to a much higher value. This game is a little odd in that it uses Vertical FOV, where most games use Horizontal FOV. A vertical fov of 74 is translated into 106 degrees of horizontal fov on a 16:9 aspect ratio screen.
Wide View Mode is designed for playing with a triple monitor setup but may be useful for ultrawide monitors (Aspect ratio of 21:9).
Vertical Sync we have already gone over quite a bit. This is the in-game toggle for it.
Smoothing will be covered last in this section as it will require a lot of text.
Fog Shadows allows shadows to be drawn through fog, this only works if Shadow Quality is not OFF and has a decent impact on performance as Shadows are rendered with the CPU. Leave this disabled for better performance.
Ambient Occlusion is a shading and rendering technique used to calculate how exposed each point in a scene is to ambient lighting. TL:DR it improves the look of shadows. This is not very resource intense for PS2 and can be enabled if you don’t need to maximize your framerate.
Bloom is a shader effect that changes how lights look. The effect produces fringes (or feathers) of light extending from the borders of bright areas in an image, contributing to the illusion of an extremely bright light overwhelming the camera or eye capturing the scene. It has very little performance impact. Use it if you like the effects.
Motion blur creates blur when you move. This is generally unwanted as it makes tracking harder and your peripheral vision gets blurred more than needed. This has a noticeable performance impact.
Overall Quality is just a preset quality picker. It replaces every setting in the column with the one you pick in it. the presets are never optimal for any system and I do not recommend that you use it.
Graphics Quality affects many effects and details, such as the quality of cloaking and smoke particles. Medium is a good middle ground for performance and quality. Going lower makes it harder to spot cloaked objects. Impacts GPU and according to some increases input lag as you set it higher.
Texture Quality decides how big textures should be and makes the game prettier. Ultra requires about 2GB of VRAM, which on modern dedicated GPUs is below the minimum they have. Exceeding the amount of VRAM you have will cause Stuttering, as the memory can not contain all of it. There is no noticeable performance impact for using Ultra when you have more than 2GB of VRAM.
Lightning Quality affects things like muzzle flashes. The performance impacts is not big and may help with spotting people when they are firing. Use it on High unless you really need performance.
Shadow Quality affects if shadows should be drawn and at what quality. There is a big quality difference between low – medium and high. Trees will have shadows on High. Shadows have a big performance impact on the game and essentially needs to be set to OFF if you want to be competitive. Shadows are considered to be rendered by the CPU and are not coded especially well. (Shadows look really good on High, if you don’t care about being competitive)
Effects Quality affects smoke from grenades, the quality of explosion effects and will have a big impact on performance in the big fights. This can be set to Low without much loss in fidelity, as explosions are very brief.
Terrain Quality affects which level of detail the maps terrain should use at its various ranges. the terrain becomes less detailed far away to save performance. Setting this higher increases this range. On mid to high end systems this does not impact performance much and using Low will have noticeable pop-in.
Flora Quality changes how far away objects like grass and small bushes should be rendered and can also be completely disabled. Removing grass and bushes has a small competitive advantage occasionally, but makes the game look very plain. It affects performance slightly and can be used on Low for good fidelity and performance.
Model Quality defines the level of detail model objects like certain buildings and possibly also character models have at range. This affects performance slightly but can usually be used on High. Lower it if you need higher frame rates.
Particles control how many particles (bullet tracers, etc) there can be at any given moment. This has a large performance impact in large fights and can be used on Low to save on performance. Beware that this will make some particles in large fights invisible.
There is a setting for particles that is unreachable from the ingame menu called “ParticleDistanceScale” which should be set between 0 and 1. This controls the range at which particles are rendered.
The setting is written as ParticleDistanceScale=0.650000 in the [Rendering] section of the config file. I personally use a value of 0.35 for improved performance in large fights, whereas 0.65 is the default value.
Render distance can be set per Infantry, vehicle and Air and I recommend that you do this.
For infantry a render range of 1000* m is enough for anything, but can be set lower for performance gains on struggling machines.
For Vehicle a render range of 1000 to 2500 m is good, adjust as you need for performance.
For Air a render range of 1600* to 4000 m is good and can also be adjusted as you need for performance. It is good to have a large range in the Air because the it is easier to orient yourself when there isn’t fog everywhere.
*According to some the render range between infantry and vehicles/air is 1000m while Air and other vehicles is 1600m. I have not tested this so I can not confirm.
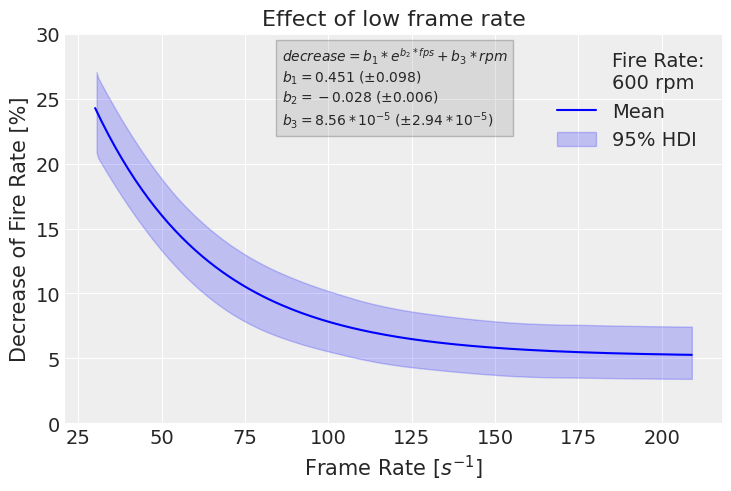
Below 60 fps there is a large hit to rate of fire in the games current state.
Smoothing in Planetside 2 is intended to work as I’ve described the function in the previous section “Optimizing YOUR framerate for smooth gameplay on YOUR system” but it has some interesting implications in PS2 and configuring it correctly is key to gaining anything from it.
It is controlled by these three commands:
Smoothing
SmoothingMaxFramerate (Max frame rate allowed)
SmoothingMinFramerate (Minimum frame rate it is enabled for)
In Planetside 2 it’s essentially doing three things:
- slowing down all frames to (almost) match the slowest recent frames, except never slowing anything below SmoothingMinFramerate
- capping framerate at SmoothingMaxFramerate
- delaying the submission of some work to the GPU so that inconsistency in GPU performance doesn’t cause inconsistent frame delivery
What is controversial about this is that last point, which has showed indication that it can mitigate the problem that Rate of fire is affected by frame rate.
So when it is used that way the previous graph will instead look like this:
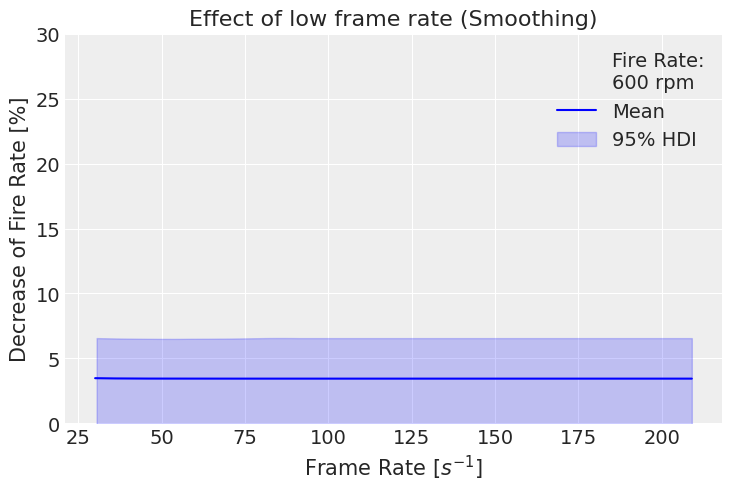
We are no longer affected by frame rate to get our proper ROF.
Two recent people who have been testing this issue is JetpackT304[forums.daybreakgames.com] and xRetry[github.com].
This leaves the feature rather open-ended. I do not fully know how we should use this games Smoothing right now.
My current method is a combination of my previous section and this games commands.
Bring your FRAFS measurement back up:
And we set the commands according to Average FPS and 1% lows.
For my result this means I should set the commands as this:
Smoothing=1
SmoothingMaxFramerate=110
SmoothingMinFramerate=67
Which means I will have smoothing in my normal and achievable FPS range and gain consistent frame times from the max limit.
There have been claims that using smoothing increases input delay but this is not something I have not found this to be true so far. The developer of the smoothing function has said this in 2014 (may be outdated info):
“The implementation of smoothing should have a positive impact on input lag. If you are GPU bound, having smoothing on will be helpful as it will wait at the end of a frame, rather than starting the next frame then pausing when it absolutely has to (which will be after reading input). In short, without smoothing, however much time we waste waiting on the GPU is lag added to your input.
If you’re CPU bound, all it will do is stabilize frame times, which is unrelated to input lag/responsiveness.” – DrHook[forums.daybreakgames.com]
Which means it should improve input delay, making it lower or the same as having smoothing disabled.
If you are afraid it will hurt your performance you can leave it off, but keep in mind that you are losing ROF when you are in big fights.