
A few advanced techniques to help you Rise To Not-Ruins.
Motivate Land Resource Spreading
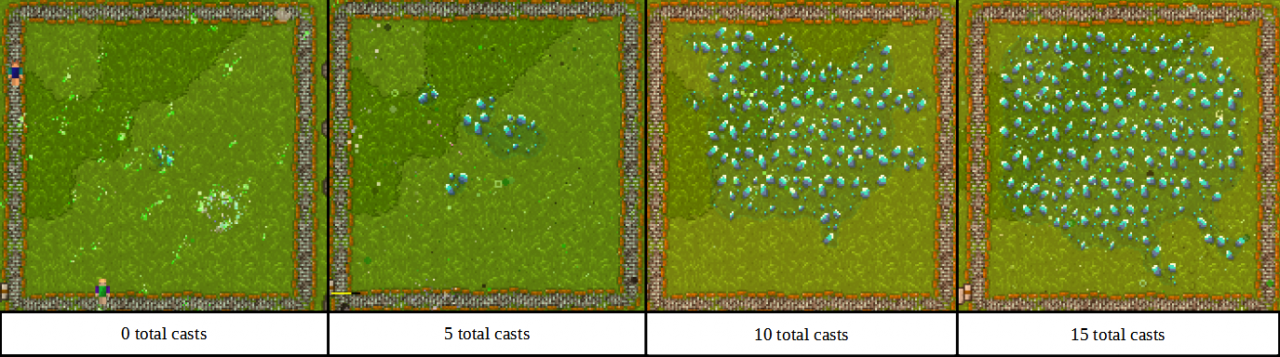
Did you ever wish a certain resource deposit was bigger or positioned in a different location? This technique allows you to solve this problem. For this technique you will use the Spell “Motivate Land”:
![]() Motivate Land – Motivate some natural resources to grow. Works best in the Spring and Autumn or when it’s raining, very ineffective in the Winter.
Motivate Land – Motivate some natural resources to grow. Works best in the Spring and Autumn or when it’s raining, very ineffective in the Winter.
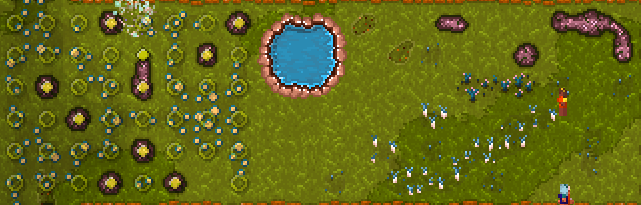
The way it works is that when you cast Motivate Land on a certain resource (except Rock and Water), said resource will grow (if harvested) and has a chance to spread. That feature allows you to expand and/or move your resource deposit to a more desirable spot.
As is explained in the spell description, it works better in Spring, Autumn and when it’s raining.
Example:
Zebra Resource Harvesting
This technique consists in harvesting a certain resource deposit in a Zebra pattern. What this does is that the unharvested resource will help the harvested resource to regrow faster. Keep in mind you must have a big enough resource deposit so the unharvested resource doesn’t harm your economy.
Example:
God Wall Gate
Have you ever had problems using gates for your villagers to go outside your village but monsters kept attacking your gate instead of walking the path of death in your maze? Or perhaps even worse, your villagers keep wandering in dangerous areas. This technique rectifies that. For this technique you are will use the spells “God Wall” and “Dispel Structure” instead of building gates:
![]() God Wall – Summons a magic wall that will help block all types of monsters, including specters, from crossing. Requires a portion of your maximum influence to maintain. Can be dispelled with the Dispell Structure spell.
God Wall – Summons a magic wall that will help block all types of monsters, including specters, from crossing. Requires a portion of your maximum influence to maintain. Can be dispelled with the Dispell Structure spell.
![]() Dispel Structure – Dispel a previously summoned structure to regain some of your maximum influence.
Dispel Structure – Dispel a previously summoned structure to regain some of your maximum influence.
The way to utilize this technique is summoning God Walls instead of building a gate wherever you want to keep as passage for your villagers. Each God Wall tile requires 50 influence to maintin and dispelling them grants you that amount back instantly. You will then control the “gate” by:
Opening the “gate” – dispel your God Walls to regain range outside of your village.
Closing the “gate” – summon your God Walls to cut your exterior range, keeping villagers from wandering into underisable places.
Example:
The Red Arrows represent the monster path and the Blue Arrow represents the Gate mechanism, that will cut or gain range, depending on the existence or not of my God Walls. This allows me to regain range to my outer walls, in case I want to build something there.
Golem Boxing
This technique is about creating a box where you’ll put all your RANGED Golems. This allows you to easily define where you want them to, put them out of danger or even level them up if you put them at the start of your maze and outside of Fire Elemental’s attack range. For this technique you will use the spell “God Wall”.
![]() God Wall – Summons a magic wall that will help block all types of monsters, including specters, from crossing. Requires a portion of your maximum influence to maintain. Can be dispelled with the Dispell Structure spell.
God Wall – Summons a magic wall that will help block all types of monsters, including specters, from crossing. Requires a portion of your maximum influence to maintain. Can be dispelled with the Dispell Structure spell.
The box must have AT LEAST 2 free tiles (so you can’t create a 3×3 box, the minimum is 4×3)
I once had a level ~25 (if I recall correctly) Golem that was almost 50 days old. Beware that upgrading your Combobulator will reset your Golem’s level. So if you plan to level a bunch of Golems to crazy levels, place your Combobulators in a permanent spot and upgrade it before doing so.
Example:
Meteor Farming
When playing this game long enough, you will certainly find yourself with a lack of iron. You could keep mining and hope for iron ores, but this could take some time and generate trash if your rock storage is full.
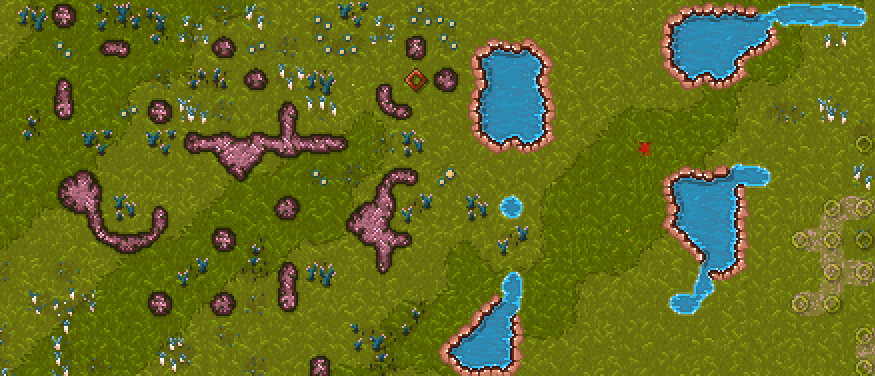
This technique allows you to solve this iron shortage with minimal disadvantages. For this technique you will use the spells “Meteor” and “Recall”:
![]() Meteor – Drop a flaming space rock on something! Careful though, sometimes it’ll drop a Fire Elemental instead.
Meteor – Drop a flaming space rock on something! Careful though, sometimes it’ll drop a Fire Elemental instead.
![]() Recall – Teleport a large group of villagers and resources safely back to the village.
Recall – Teleport a large group of villagers and resources safely back to the village.
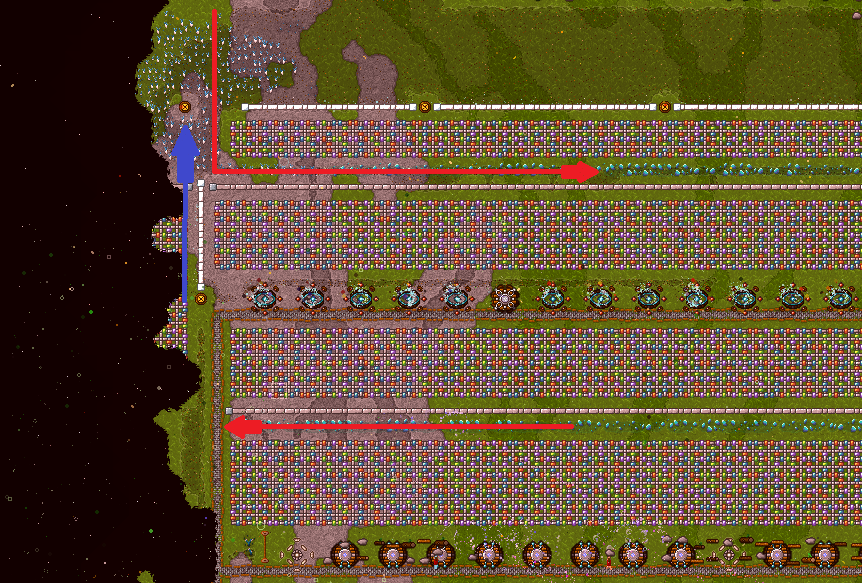
To apply this technique, find a spot OUTSIDE of your village, as close as possible to the corruption and start spamming the “Meteor” spell while casting “Recall” when it’s avaiable. This will start to generate rocks and iron ores, and they will be teleported to your village. This may spawn Fire Elementals, so your defenses should be strong enough to handle a few more of these. You can easily generate 100+ iron ores within minutes.
Example:
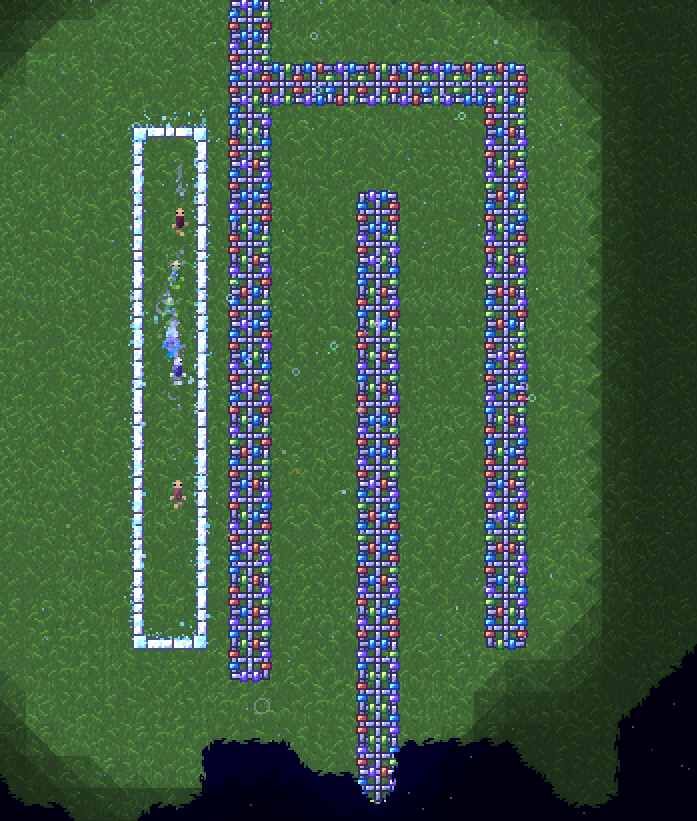
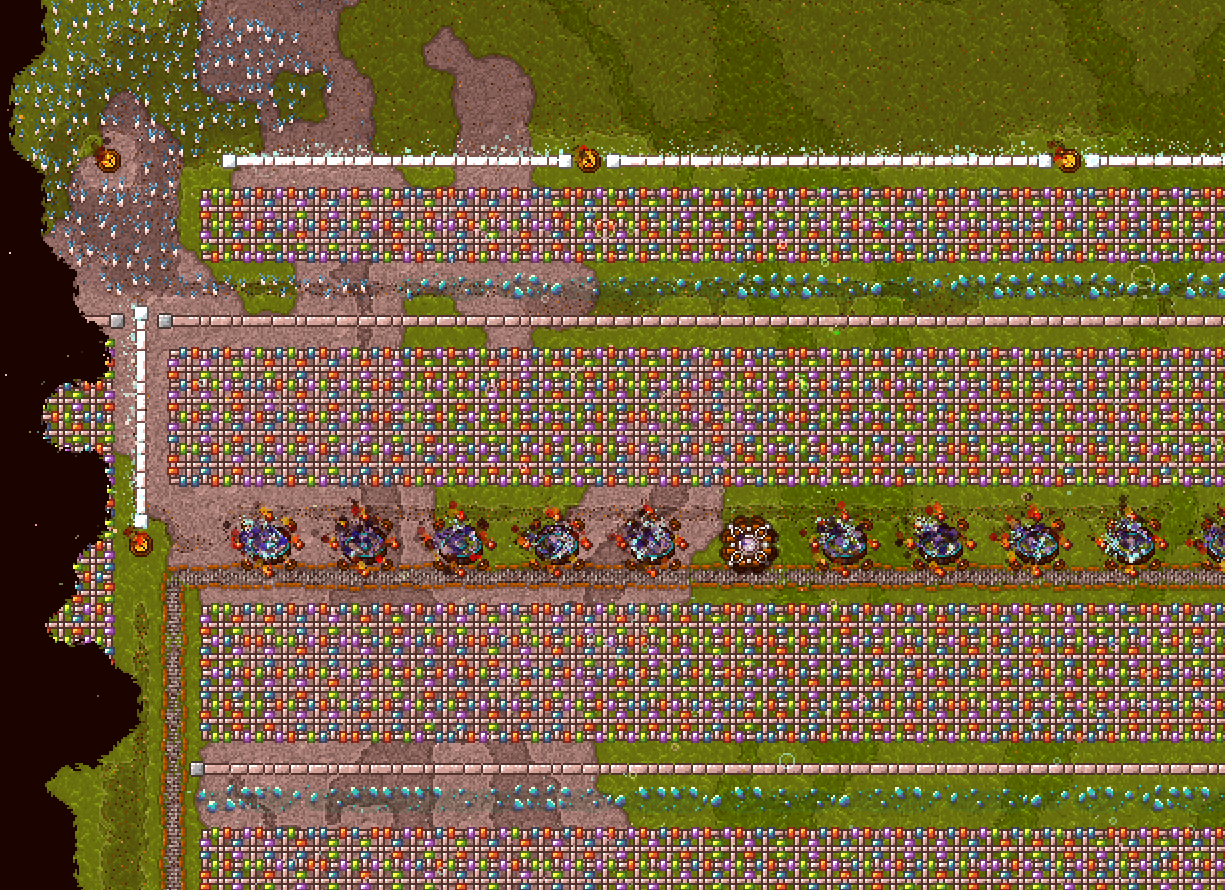
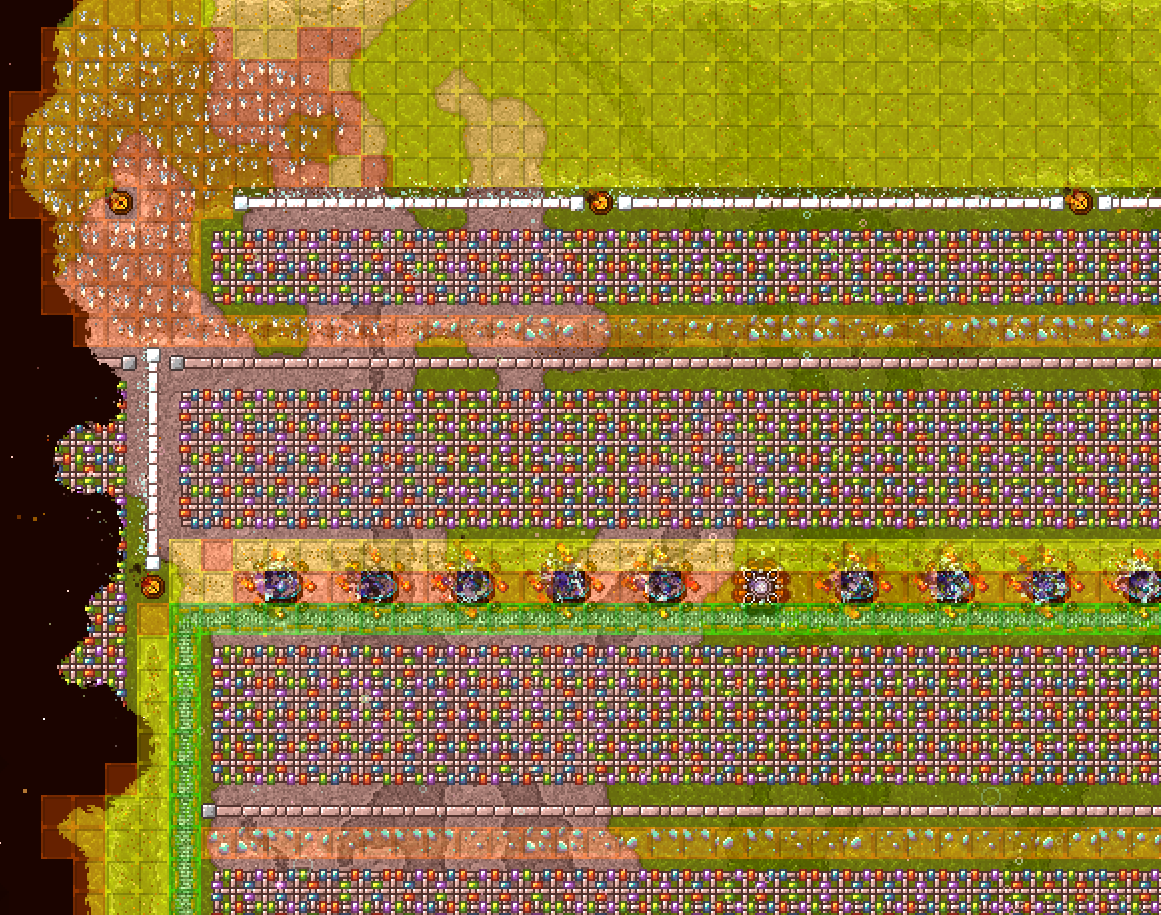
Crystal Pathing
To use this technique, you are going to need to use the first technique (Motivate Land Resource Spreading). The goal here is to fill your maze’s path with crystal. But why? As you’ll be able to see below in the Example and its Movement Cost Data View, crystals have a slightly higher movement cost, thus they are slower to cross.
For this technique you will use the Spell “Motivate Land”:
![]() Motivate Land – Motivate some natural resources to grow. Works best in the Spring and Autumn or when it’s raining, very ineffective in the Winter.
Motivate Land – Motivate some natural resources to grow. Works best in the Spring and Autumn or when it’s raining, very ineffective in the Winter.
WARNING: Spectres do not walk on crystal, the same way Fire Elementals do not walk on water. So plan carefully. In my example, there’s a inner layer of stone wall for Spectres to walk through, while all other monsters walk on the crystal path.
Monster pathfinding is based on movement cost. When a monster decides on a route to take, the pathfinding portion of the AI looks at the movement cost of everything between the monster and where it wants to go. Base terrain has the default cost, paths and roads lower movement cost, resources like crystal raise it, as does water (fire elementals refuse to go into it as it harms them) and tar. Forest and mountains have quite high costs, and walls can as well. Gates don’t have as high a cost as walls, so will get targeted over walls more often.
A newer addition to this is that each mob that’s planned a path through a tile, whether they’re actually in it or not, slightly raises the movement cost of that tile, causing them to spread out. You may find yourself needing to go with 2 or even 3 thick walls in some places, depending on all the variables.
Another newer addition is specters and ghosts ignoring non-crylithium walls, blocked by crystals, same as fire elementals and water. If they’re fully blocked from the village they will make their own path, though.
Example:
Movement Cost Data View:
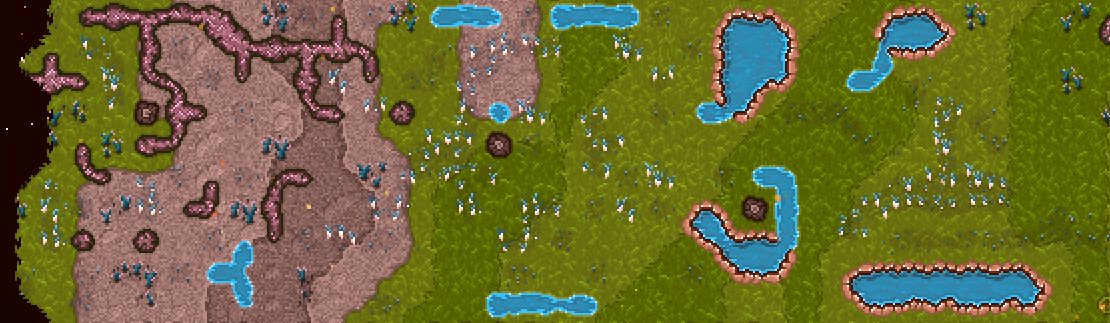
Animal Spawn Spots
Animals are crucial to your village’s survival, since they are the only source of meat and you need plenty of meat to cook rations. Although I don’t know the exact mechanics behind animal spawning, it is known that for animals to spawn they need a specific environment.
Animal capturing requires there be locations on the map with unharvested wild food (holy potatoes count), water, and another unharvested resource all in the same general vicinity.
Without such spots, wild animals don’t spawn, existing ones have nowhere to hangout, rangers won’t capture them.
Your own actions, and the corruption, can wipe out such spots the map starts with. You can make your own if needed.
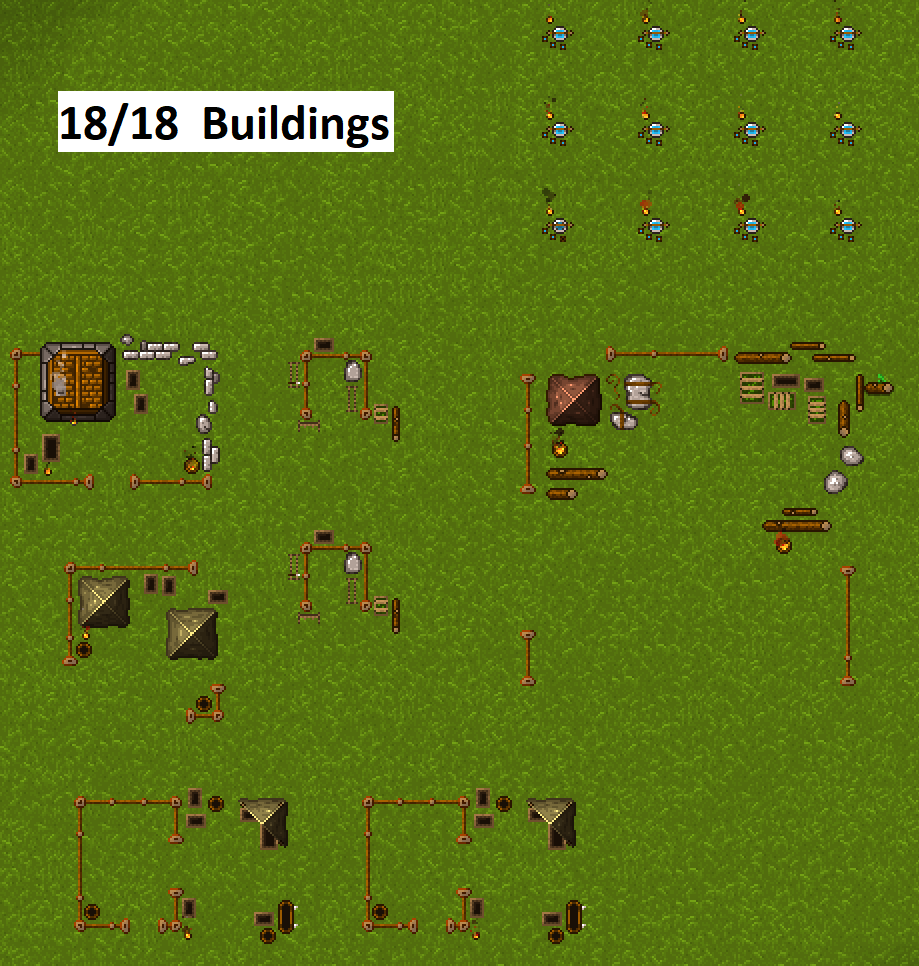
So what this means is that you need to have the correct environment in your world. Since the corruption will eventually destroy anything outside your village, you’ll need to create “wildlife areas” inside your village. I have many scattered around.
For this technique you will use the spells “Holy Potatoes”, “Holy Wood” and “Meteor”:
![]() Holy Potatoes – Sprouts magic potatoes from the ground, really hand if you’ve just completely run out of food or want to create a new patch elsewhere in the village!
Holy Potatoes – Sprouts magic potatoes from the ground, really hand if you’ve just completely run out of food or want to create a new patch elsewhere in the village!
![]() Holy Wood – Sprouts large erections of wood from the ground, really handy if you’ve just completely run out of wood or want to create a new patch elsewhere in the village!
Holy Wood – Sprouts large erections of wood from the ground, really handy if you’ve just completely run out of wood or want to create a new patch elsewhere in the village!
![]() Meteor – Drop a flaming space rock on something! Careful though, sometimes it’ll drop a Fire Elemental instead.
Meteor – Drop a flaming space rock on something! Careful though, sometimes it’ll drop a Fire Elemental instead.
First you want to cast a few “Meteor” spells until you get a rock. The reason for this is because it may destroy the surrounding environment. Then you cast “Holy Potatoes” and “Holy Wood” carefully so they don’t replace the rock. Lastly, you send your villagers to dig some holes when all the resources are in position.
Examples of “wildlife areas” in my MegaCity:


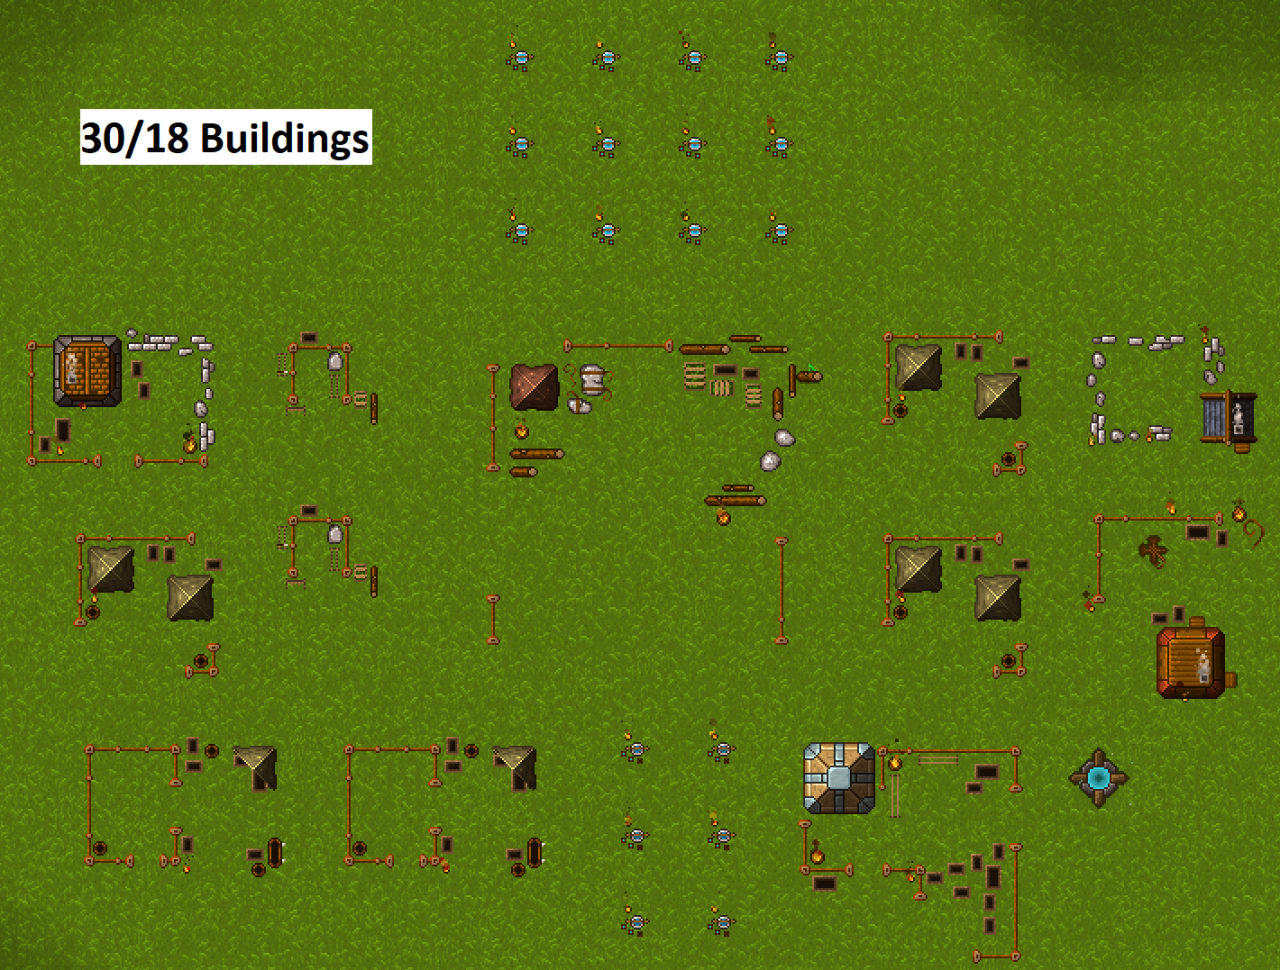
Beyond the Building Cap Cutting Range
This is probably the most significant technique in this guide, as it allows you to greatly surpass the amount of buildings one can have. For example, in my MegaCity I had over 500 buildings, even though my building cap was around 332. For this technique you’ll use the spell “God Wall”:
![]() God Wall – Summons a magic wall that will help block all types of monsters, including specters, from crossing. Requires a portion of your maximum influence to maintain. Can be dispelled with the Dispell Structure spell.
God Wall – Summons a magic wall that will help block all types of monsters, including specters, from crossing. Requires a portion of your maximum influence to maintain. Can be dispelled with the Dispell Structure spell.
The basic principle is that if you lose range to a certain building, that building will no longer be counted as one. Here is how it works:
Step 1 – Place your buildings in a way that you can “isolate” them later with God Walls (at least 1 space in each side)
Step 2 – Isolate a block of buildings with God Walls

Step 3 – Build new buildings
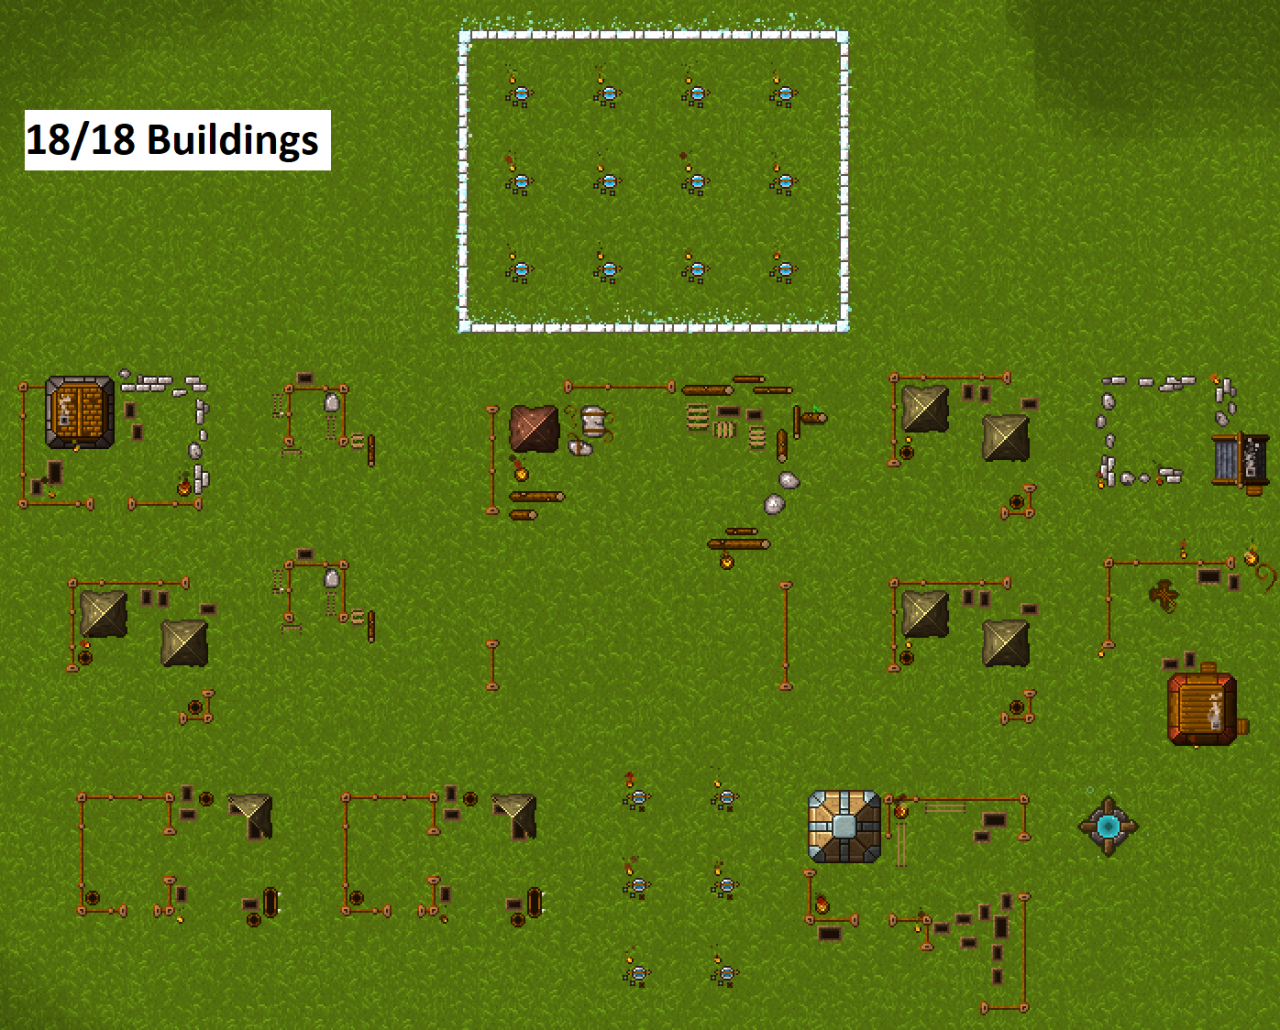
Step 4 – Remove the God walls to regain control over the buildings (WARNING: You must fill the job slots again as your villagers will have “quit” their jobs due to lack of range)
The Ultimate Defense Setup
There are many ways to defend yourself indefinitely, this was what worked best for me. It manages to defend my village without using a single spell, at day 150 and about 75% of the region conquered.
Requirement: at least +2 range for Static Tower perk.

Why so many walls? If fewer layers of wall were used, the monster’s AI pathfinding might find it is faster to destroy to walls to reach the village.
The first layer of walls (1 God Wall + 3 Crylithium Walls) is just to direct the monsters to the entrance of the maze. It doesn’t need to be God Walls for the first layer, it could very well be another Crylithium Wall layer.
The second layer of walls (1 Stone Wall + 5 Crylithium Walls) protects the Static Towers from getting attacked by Fire Elementals. The Stone Walls serve as a path to the Spectres. The remaining Crylithium Walls are the exact amount to keep the towers protected.
Range 1 is considered the Fire Elemental itself.
Range 2 is the Stone Wall.
Range 3-7 are the Crylithium Walls.
Range 8 is the border of the Static Tower. HOWEVER, the Fire Elementals target the center of the tower (range 9), and thus cannot attack it for their range is 8.
The third layer of walls (5 Crylithium Walls + Stone Wall) is exactly the same as the previous one but mirrored.
The fourth layer of walls (6 Crylithium Walls) protects the Ice Bolt Towers from being attacked by the Fire Elementals. There is no need for a Stone Wall layer here because there is already a Stone Wall layer avaiable for Spectres to walk through thanks to the third layer of walls.
Static Towers act as an AoE-Cleaner, they kill and thus filter the monsters for the Ice Bolt Towers to finish whatever survives. The choice of the element Ice is due to the fact that no monster is strong against Ice plus the fact that Fire Elementals are weak to it, and they are the toughest monsters out there.
Additional useful information
Here I’ll gather some additional useful information I found searching in the Discord.
Nomad data provided by user Veldrin on Steam Discussions.
For those who struggle to read the code, you can increase the chance of a nomad spawn event with:
Up to 200 positive desirability points (negative desirability points are ignored)
Up to 100 unoccupied housing slots
Up to 70 more jobs than villagers
Up to 50 towers and combobulators (includes recombobulator and crystal motivator)
Up to 200 more food than villagers (each type of food is considered equal here)
Up 10,000 full water buckets (or 40,000 units of water)
Unlimited amount of villagers
Every 3 ticks during dawn, morning and midday on days you don’t get nomadsHowever there are some things that decrease the chance of a nomad spawn event:
Up to 70 less jobs than villagers
Up to 200 less food than villagers
Unlimited amount of villagers more than total housing slotsFocus on ensuring there is enough housing slots, jobs and food for every villager first (the housing penalty is massive so prioritize that).
Day duration by user Tiberiumkyle on Discord:
The game runs at 60 TPS, and a full day is a total of 132,000 ticks. So 132,000 / 60 / 60 = 36.66 minutes.
Resource storage priority by user Tiberiumkyle on Discord:
resources are taken from lowest priority storage to highest priority, so ancillaries first, then general storage, then production buildings, generally.
opposite from the order they get stored in
Water production data provided by user Veldrin on Discord. Keep in mind that the Water Purifier won’t work most of Winter days, the Well will. The Water Purifier has a better production/building value and the Well has a better production/area value.
| Water Source | Production per sec | Production per day | Supplies |
|---|---|---|---|
| Makeshift Well | 2 water / 5 sec | 880 water / day | 10 idle villagers |
| Well | 3 water / 5 sec | 1320 water / day | 15 idle villagers |
| Established Well | 6 water / 5 sec | 2.640 water / day | 30 idle villagers |
| Makeshift Water Purifier | 3 water / 2 sec | 3.300 water / day | 37 idle villagers |
| Water Purifier | 4 water / 2 sec | 4.400 water / day | 50 idle villagers |
| Established Water Purifier | 6 water / 2 sec | 6.600 water / day | 75 idle villagers |
Food data provided by users Veldrin and Tiberiumkyle on Discord. Villagers take ~66 bites of food per day. Working villagers and pregnant females double that value. A working pregnant female would triple that value.
| Food | Food Value |
|---|---|
| Ration | 100 |
| Cooked Meat | 80 |
| Boiled Egg | 60 |
| Raw Meat | 50 |
| Egg | 40 |
| Raw Vegetable | 25 |
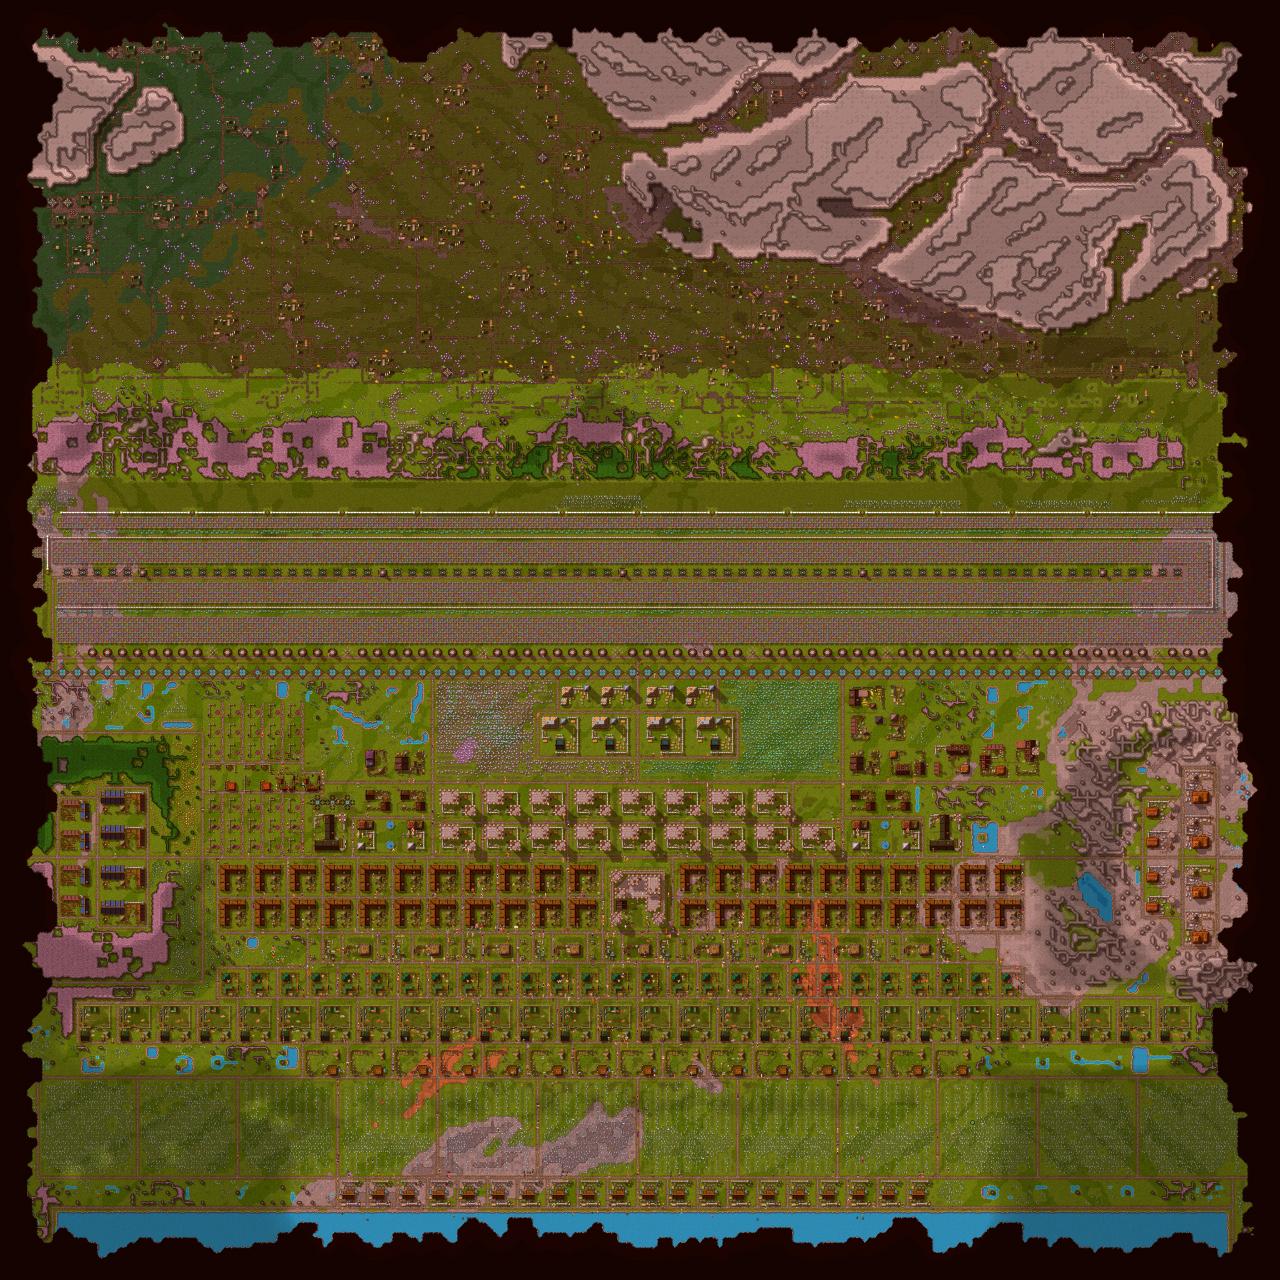
MegaCity
I’ll just have this section so you can see my MegaCity at day 150 on Survival and how I applied these techniques.
Day: 150
Population: 1417
Housing Capacity: 1554
Building Count: 503
Monsters Spawned per night: 5.200 ~ 5.500
Monsters Killed per night: 3.500 ~ 4.000
Total Energy: 118.653
Total Influence: 49.760
Total Corruption: 16.228 tiles, between 24%~25% of the world
Owned Territory: between 74%~75% of the world
Total Towers: 144
Total Walls: 963
Essence Generated per night: 500.000 ~ 600.000
Essence Decayed per night: 200.000 ~ 300.000
Thanks to goldeNspiriT for his great guide, all credit to his effort. you can also read the original guide from Steam Community. enjoy the game.