Everything you need to know in order to start Parallax Mapping in RPGMaker MV. Up to do date and told simply and concisely.
Intro
Now with all that blabber out of the way, let’s finally begin.
Requirements
1. Images/Tiles to Map With
Should go without saying but I like to be thorough. Feel free to follow along the Guide with the RTP tilesets if you want. I’m using the tiles from the Mythos Reawakening Pack in the example images.
2. Galv’s Layer Graphics Plugin – https://galvs-scripts.com/2015/10/30/mv-layer-graphics/
The free code you’ll need for the map to function properly (Yes, it’s free for Commercial Use). There are other Parallax Mapping scripts, but Galv’s is by far the easiest to use. Download the .js file and insert it into your game’s “Plugins” folder. Open your game in the Engine and be sure to turn the plugin on. It’s order in relation to your other plugins shouldn’t matter. As per the requirements of the plugin, you will also need to create a “layers” folder in your game’s “img” folder. That’s where most of your maps and map effects (like fog) will go.
3. A Photo Editing Software
Photoshop is the best, so if you have the money, get it. I heard good things about GIMP as well, but I’ve never used it myself. Personally, I use Pixlr mainly because it’s free; https://pixlr.com
I will not be covering the basics of Photo Editing, so if you do not how to use your software of choice, you’ll have to learn that first before moving on with Parallax Mapping. It’s not hard, you’ll figure it out quick I’m sure.
Once you have all of those, you’re ready to actually begin mapping! Who would’ve guessed?
Beginning your Map
Once done laying down the ground and wall tiles or not, save the map as an image.
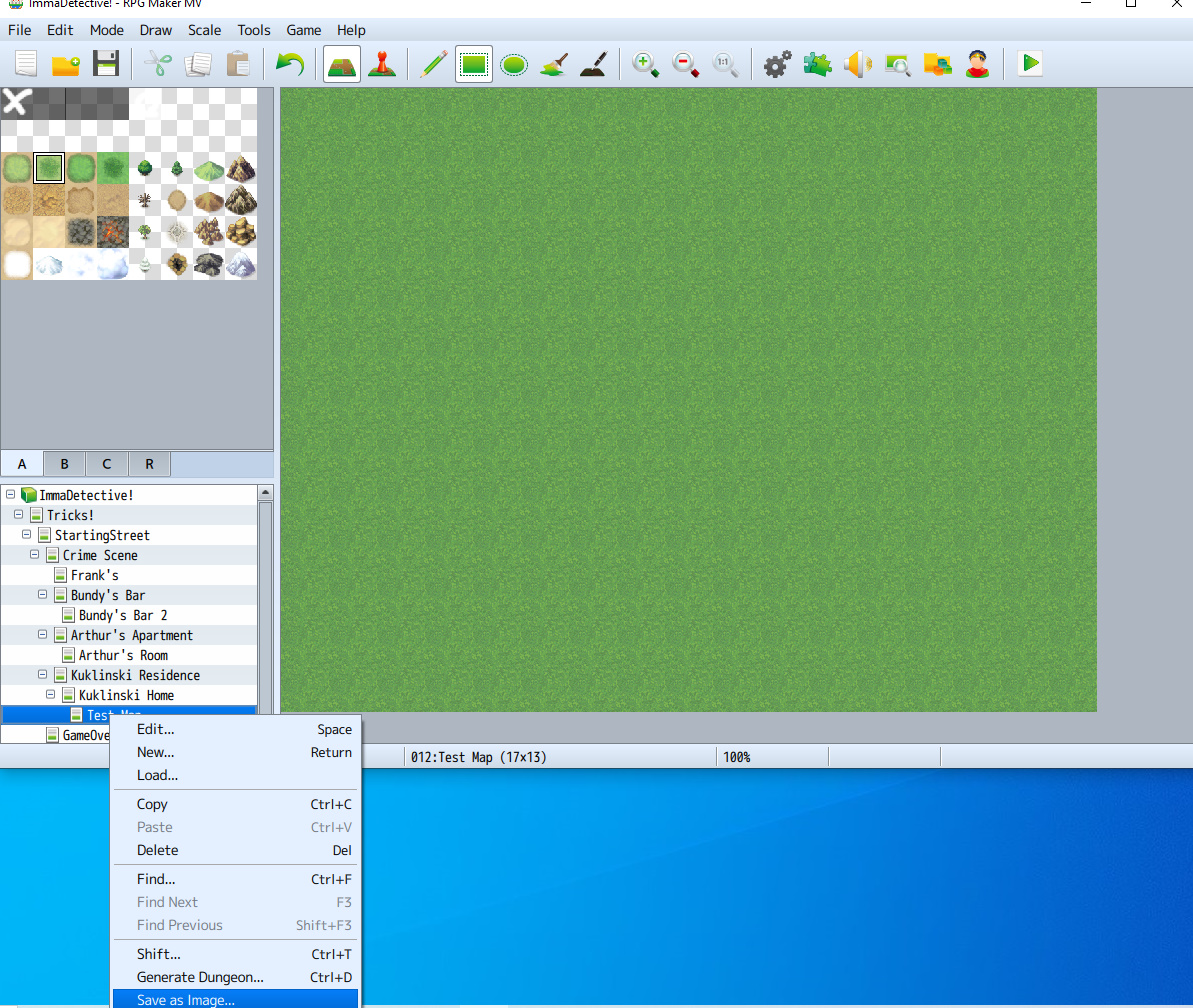
Now, you could also start by opening a new blank image in your Photo Editing software if not bothering with traditional MV ground/wall tiles, and create the actual map file later. This is fine too, all you’re doing is changing the order of things. Do whichever is more comfortable.
Last thing I want to mention is that, whether you creating an image from scratch or saving an image from the Engine, the resolution of your game does not matter. You will not have to set your resolution to certain numbers based upon your map sizes or vice-versa. I only mention this because I have heard otherwise before. Don’t worry about it.
Drawing and Saving your Map
Finally, If your photo editing software has a grid, turn it on and set it to 48×48 (MV’s tile size). While not required, this will aid you in telling where to place your tiles/images greatly.
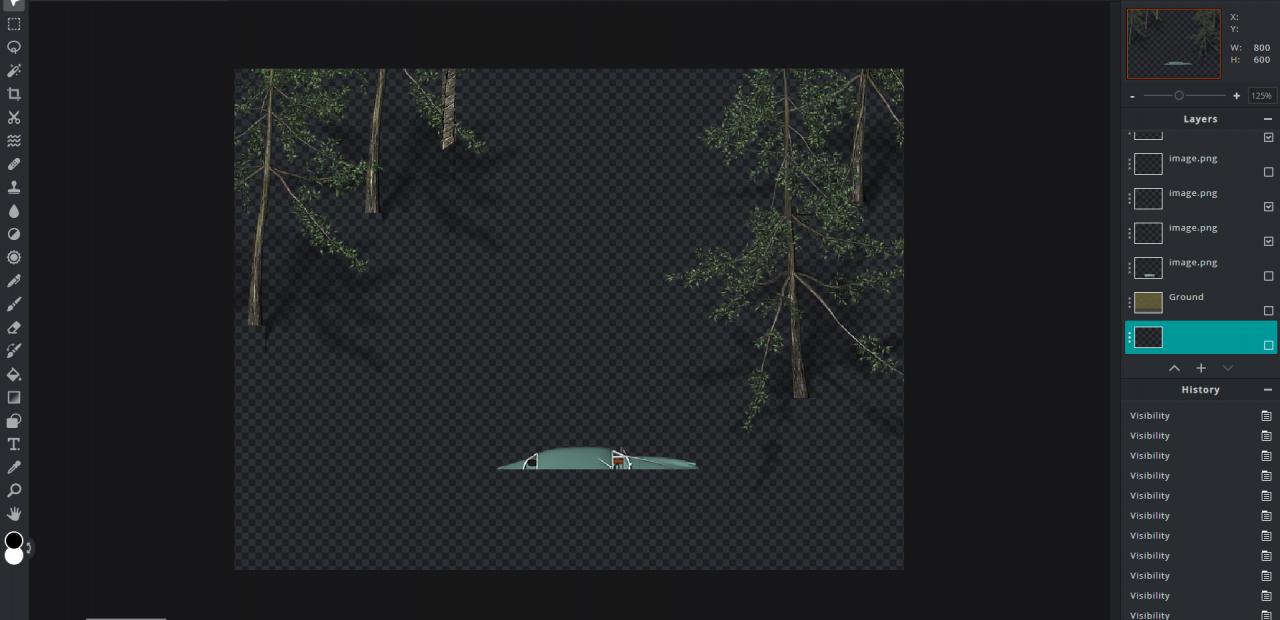
Then, the fun part, actually mapping! Copy your graphics over onto your map and make it pretty. I highly recommend labeling your layers as you go (Starting with Ground, then Tree 1, Tree 2, etc.) just to make things organized. Oh yeah, and save the editable image file with all of your layers often.
Once you’re satisfied, save the entire image as a .png to your game’s “parallax” folder in “img”. Place an “!” before the .png’s title so it doesn’t repeat.
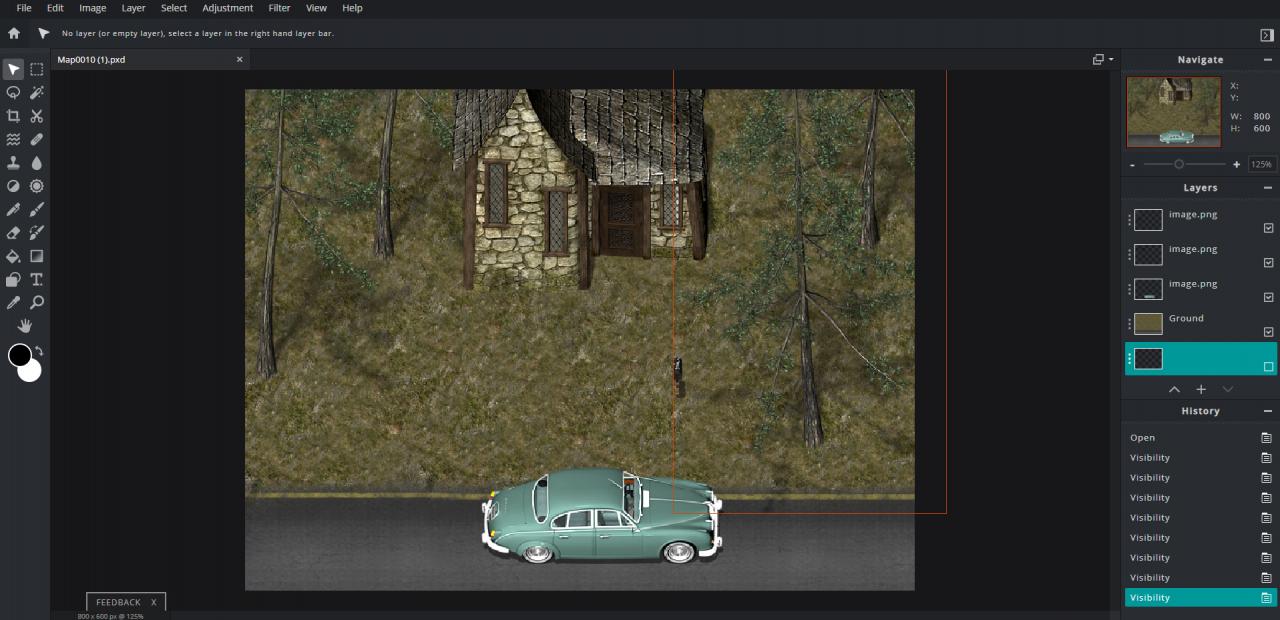
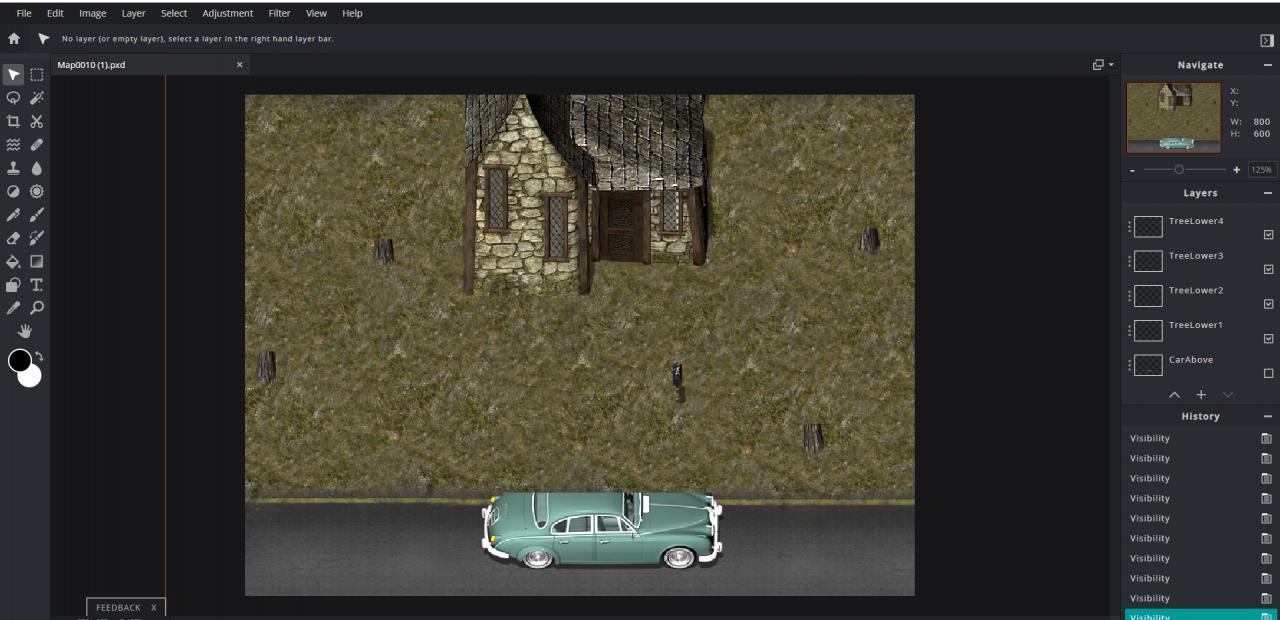
Now comes what is probably the trickiest part; Setting the Upper and Lower parts of your map (This is where labeling all of your layers will make things much easier).
For the Lower part, turn off all the layers which would appear above your characters in-game (Branches of a tree, an overhead bridge, outcropping of a roof, etc.). Since most of these will come as one complete image and not separately, you may need to cut the image in-half yourself. Using the Marquee or Lasso tool, draw a box around the parts of the image that would appear above characters, “Cut” them (Ctrl+X), and then “Paste” them (Ctrl+V) as their own separate layer. Then, line up the separate layer back to where it should be with the original layer (if needed) before turning it off.
After turning off all the above layers, save the map as a .png to your “layers” folder (the one we created earlier).
Then, do the same thing for the Upper part of the map, only this time you’re turning off the layers for things below and at level with your characters in-game (Ground, walls, and most objects period).
Save the .png same as before, only titled differently from the “Lower” image. (I recommend titling the images the name of the map then “Lower” or “Upper” respectively for maximum simplicity).
Save the editable image file one last time. By the end, you should have saved 4 separate files; The .png in your Parallax Folder, the “Upper” and “Lower” .png’s in your Layers folder, and the editable image file for your photo editing software of choice.
There is one last thing to do in your Photo Editing Software. Open up any A1 tileset from the MV RTP. Create a new Layer over it. On that new layer, draw an “X” on one of the graphics and an “O” on another. Then, draw transparent boxes around both using separate colors for each (I use black and white because it’s simple).
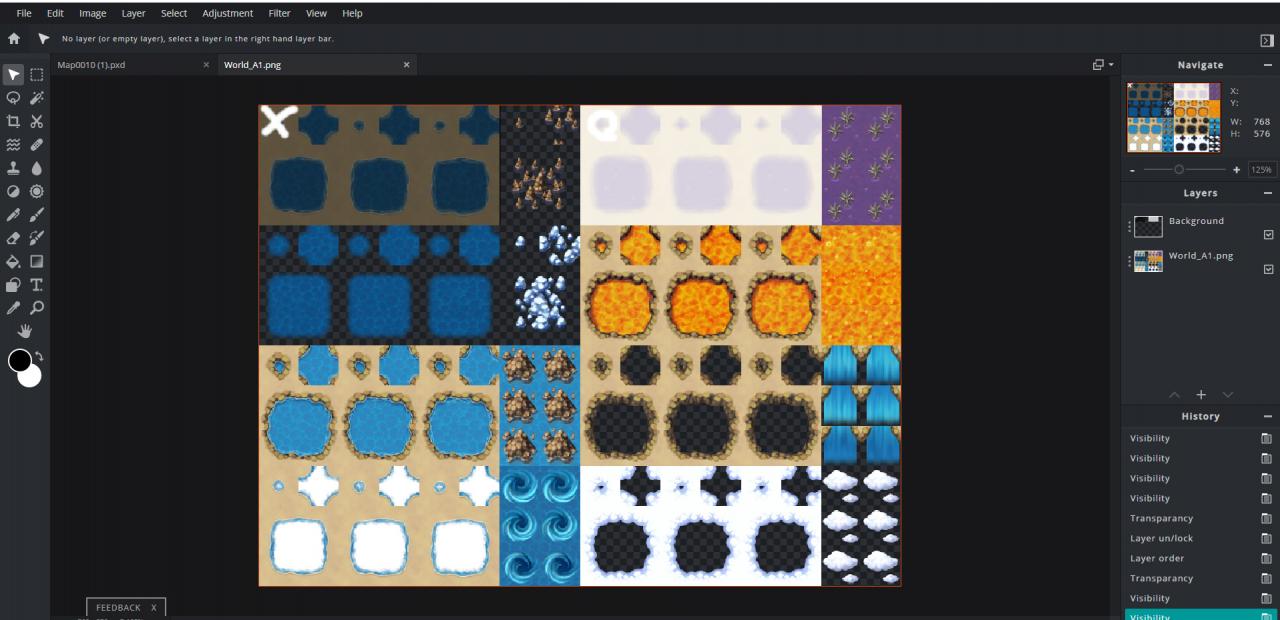
Turn off the original layer so the only layer visible is the new one you created, and then save it as a new .png to your game’s “tilsets” folder in “img”. In the Engine under “Tilesets”, add your new image to a tileset, and then set the solidity of the “X” tile and the tile directly below it to impassable, and then set the solidity of the “O” tile and the tile directly below it to passable (No stars). This is the tileset you will be using to set the solidity of each tile on your Parallax Map.

Then, under “Parallax Background”, select the .png of your Parallax Map saved under “parallaxes” (The one with the “!” in-front of it’s name). This image will not serve as the actual map in-game. It is merely a representation of what the map will look like in-game, allowing you to set up your events and tile solidity as you normally would.
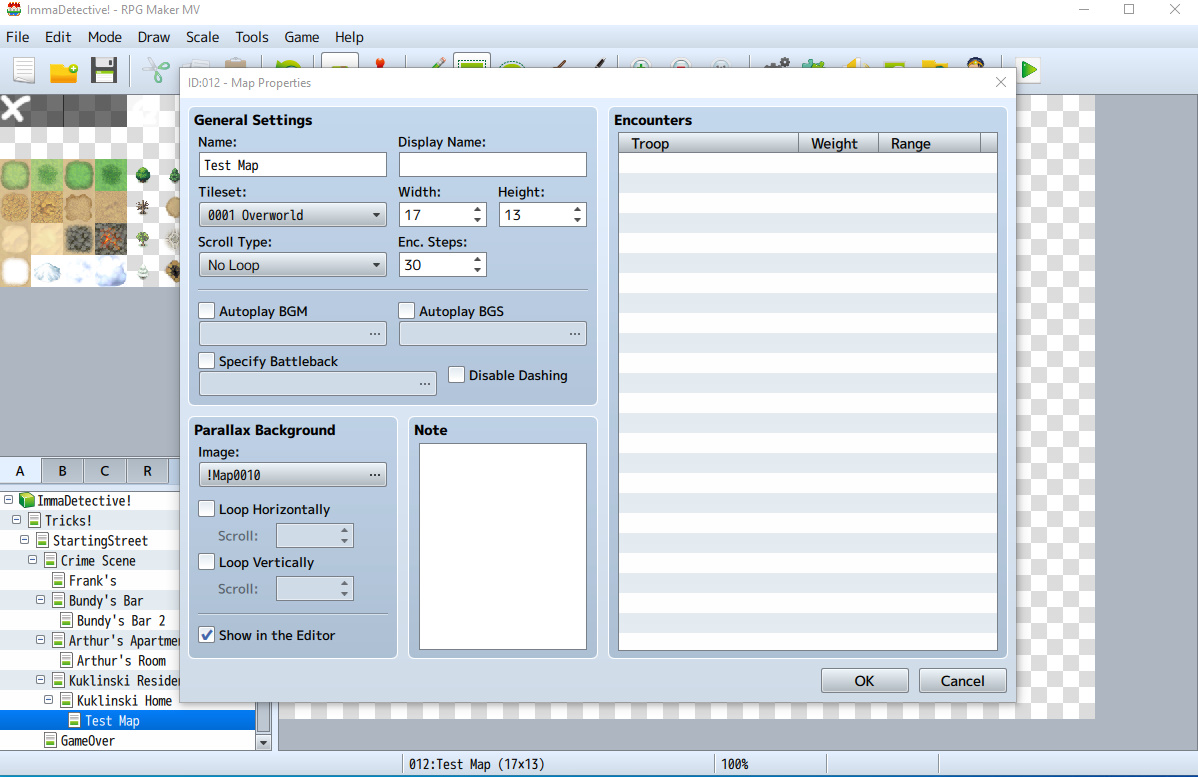
After doing this and pressing “Okay”, you may find that the parallax either repeats or isn’t shown completely. That’s because the map size is either too big or too small for the parallax. Just play around with increasing and decreasing the map size until the parallax no longer repeats and/or is completely shown in editor. You may be unable to get the size perfect, and that’s okay. There’s one more step we’ll do a little later which will take care of that.

Once you’ve gotten the map size as best you could, it’s time to set solidity. Go over all the tiles that would be impassable with the “X” tile, and then all the tiles that would be passable with the “O” tile.
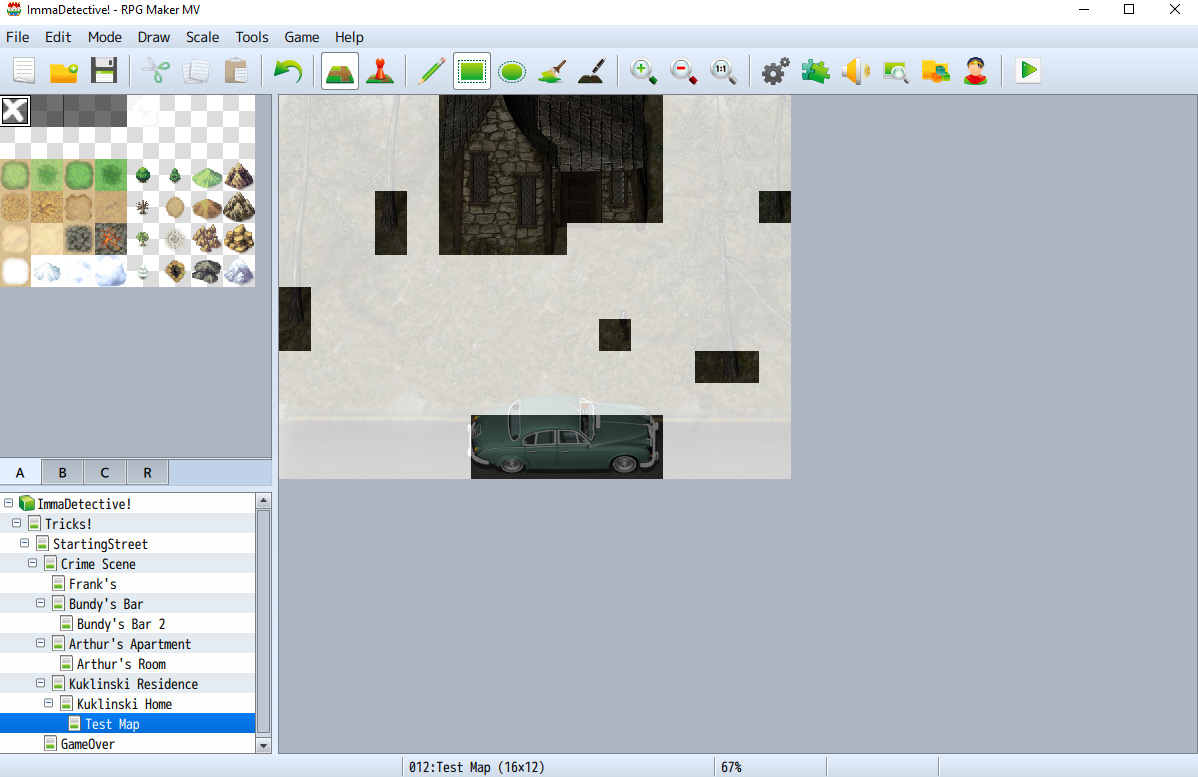
After that, go back over the “X” tiles with the clear tile under it in the tileset, then the same thing for the “O” tile (Paintbrush makes this go by a lot faster). Congrats, your Parallax Map’s solidity is ready to go!
Plugin Commands and Parallel Event
Now, on a separate map that loads before your Parallax Map, create a new event (Preferably an Auto-Run just to make sure it happens). Then, insert two Plugin Commands (One Command for the Upper image and another for the Lower image you created earlier) in the Event:
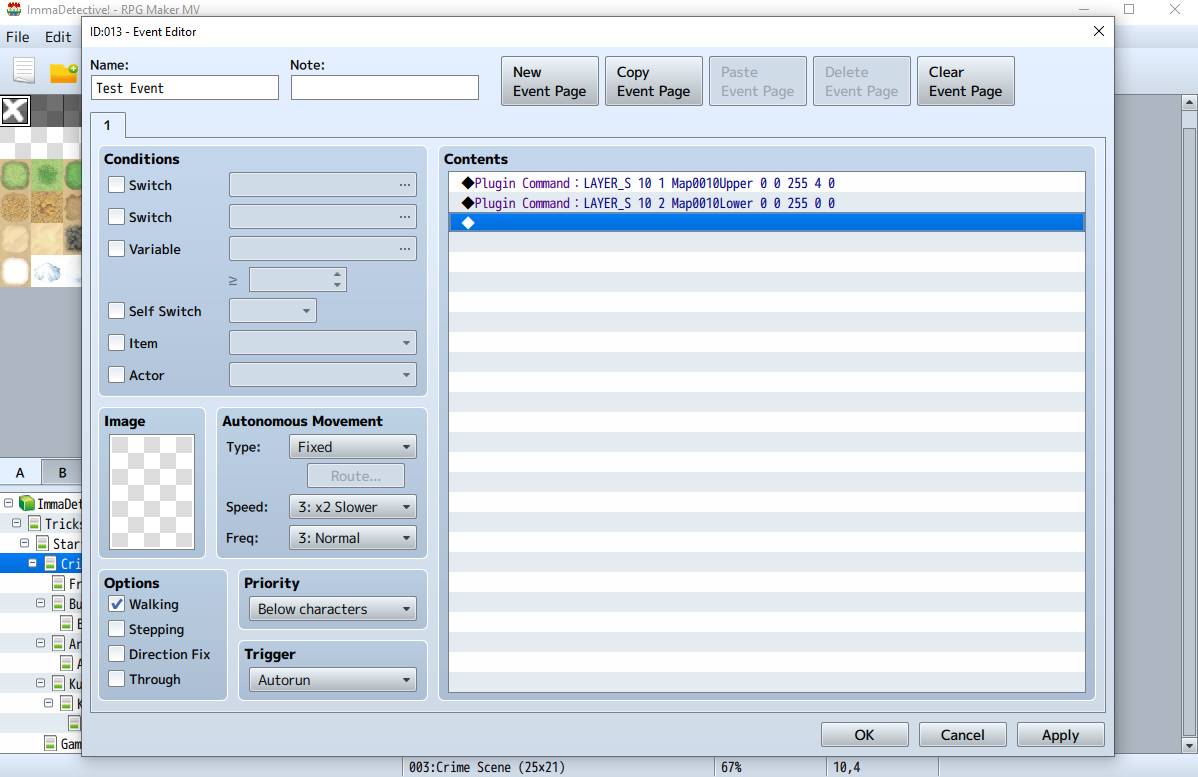
These Plugin Commands are included from Galv’s plugin. I’m not gonna go over every possible way to use them, but I do want to cover what each part used in the example means;
“LAYER_S”: This states that the image will remain static and not repeat.
The 1st Number (In the examples, “10”): This is the ID of the Map you want the images to appear on.
The 2nd Numbers (In the examples, “1” and “2” repsectfully): These are the ID’s of the images. It doesn’t really matter what the numbers are, just make sure they’re different from each other so the images don’t replace one another.
Name of the Image (In the examples, “Map0010Upper” and “Map0010Lower” respectfully) : After the first two numbers goes the name of the image you saved in your “layers” folder.
The next 3 numbers don’t really matter for the basics, just make sure the 3rd number is set to 255 like in the examples, since that number represents the image’s Opacity.
The 2nd to Last Number (In the examples, “4” and “0” respectfully): This is the most important number. This sets the priority of the image, meaning where it appears in relation to the rest of the characters and images. For the Upper image, you’ll want to set it to “4” (Placing the image above everything except Weather). For the Lower image, you’ll want to set it to “0” (Placing it below everything).
The last thing you need to do is create a Parallel Event on the Parallax Map. The Event only needs one command, “Change Parallax: None”
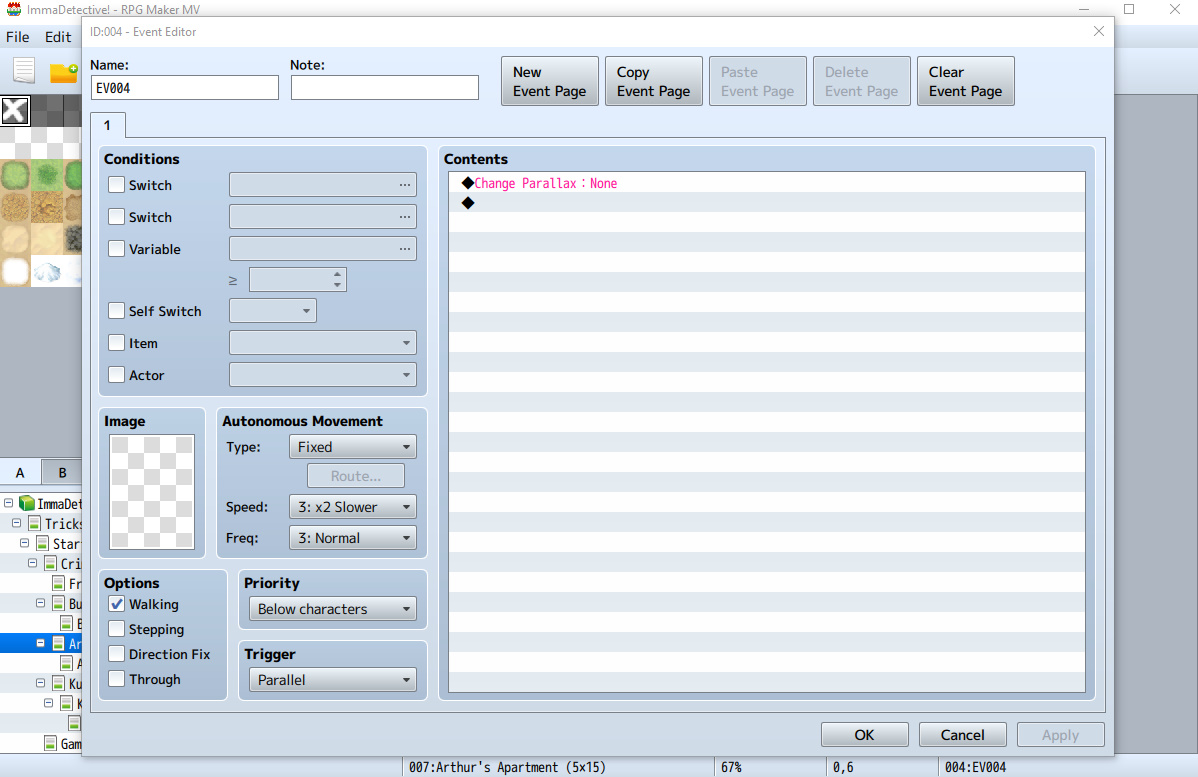
This will remove the Parallax Image you have set in your Map Properties from appearing and repeating in-game.
Congratulations! You have successfully created a functional Parallax Map! Go into the Tester and admire your handiwork! (Make sure the map with the Plugin Commands is separate from the parallax map and runs before transferring the Player to said Parallax Map)
Bonus: Fog Effect
To have a Fog effect, make sure you have a Fog Image in your “layers” folder (Galv’s Layered Graphics comes with a pretty good free one).
Then, same as before, go to a map that loads prior to the Parallax Map and insert the following plugin command;
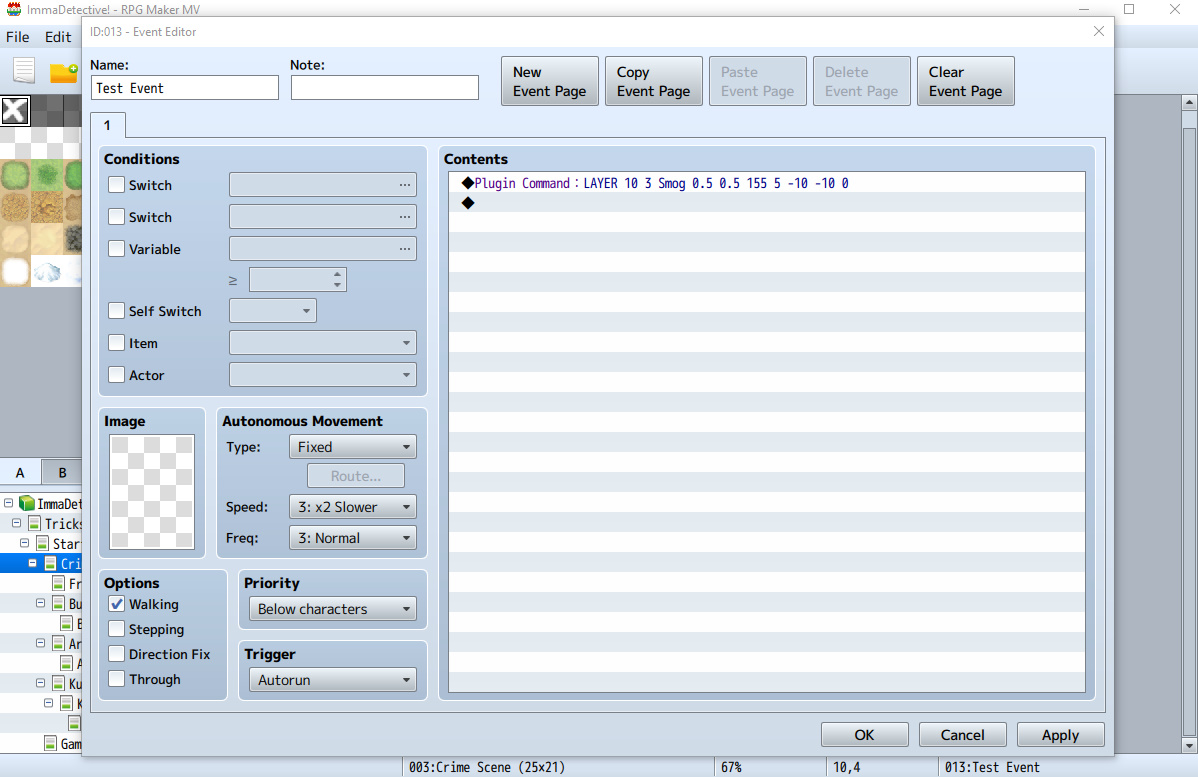
It’s a lot like the Command used for your Upper and Lower images, but with a few key differences;
“LAYER”: Unlike “LAYER_S”, this command will allow the image to move and repeat.
The 1st Number, 2nd Number, and Image Name are the same as before.
The next two numbers after the Image Name (“0.5” in the examples) sets the speed of horizontal and vertical movement (“XSpeed” and “YSpeed”).
Next number is the same as before, Opacity. For a fog/smog effect, I’d recommend lowering it quite a bit from the default 255.
Next number is the same as before, Priority. For Weather Effects like Fog/Smog, this should be set the highest priority, “5”, placing it above everything else.
The next two numbers are XShift and YShift respectfully, determining how the image shifts in relation to player movement.
And the last number is Blend type. You can play around with this if you want, but I find “0” (Normal) is fine 9 times out of 10.
This plugin command along with your Upper and Lower Commands should merge for a finished result like this;
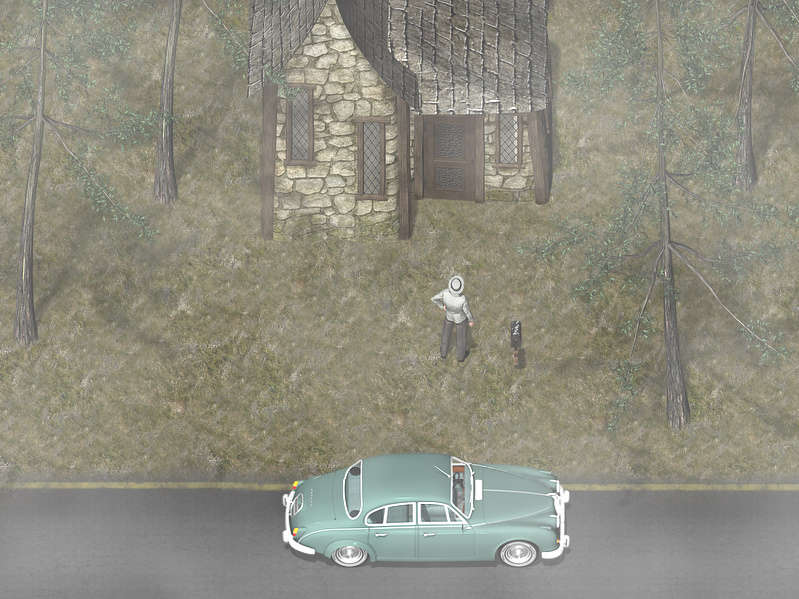
Congrats! Now your map has a bit more character than the average one!
Hi! Thank you for the detailed guide on parallax mapping. I’ve been struggling with it for weeks and this guide is what works for me. I only have one problem: my character won’t show up after they transfer to the map with parallax but they can move around (the map itself works). I’ve checked the transparency, and it was off. Do you have any idea what could cause this?
It’s funny you had problems with the transfer part of this guide because around the time you posted this, I posted this about Galv’s screen buttons plugin:
“If you’re having trouble with your buttons’ functionality (especially after transferring the player), experiment with adding a wait timer at the start of the event that calls the button. I had a couple buttons that refused to animate or execute scripts despite being the same priority as player and using a fresh save, and making the event wait 60 frames before adding the buttons made them work perfectly.
Been using this plugin extensively and it’s really changed what I can do with my game! An absolute necessity for creating unique scenarios in your game that surpass what RPG Maker can do out of the box”
I have no clue if messing around with a wait timer will help you or not but I hope it does! Best of luck 🙂
Wrote this about Galv’s screen buttons plugin around the same time you wrote this:
“If you’re having trouble with your buttons’ functionality (especially after transferring the player), experiment with adding a wait timer at the start of the event that calls the button. I had a couple buttons that refused to animate or execute scripts despite being the same priority as player and using a fresh save, and making the event wait 60 frames before adding the buttons made them work perfectly.”
Not sure if it’ll help in your case but I hope it does! Best of luck 🙂