Knowing how stats work in Sands of Aura will come in handy, especially when up against the bosses.
Intro
is a punishing game, and even more so if you’re not taking full advantage of the stats that properly complement your play-style. If that’s the case, you’re going to be in for a bad time. That’s where this guide comes in.
Love to build combo attacks and unleash devastating specials with heavy, slow, weapon types that focus on dealing large chunks of direct health damage? Whelp, you’re going to need to know how to focus your gear to successfully achieve that play-style.
Prefer to be as fast and lithe as possible, dealing quick attacks with your twin-axes, all the while dodging, ducking, and weaving through enemy attacks unscathed whilst your foes are forced to constantly chase you as you whittle away at their health? Absolutely doable and we can show you how!
Today, we’re going to look at each of the stats that you can upgrade in Sands of Aura so that you can easily identify which ones to prioritize when gearing up within the game.
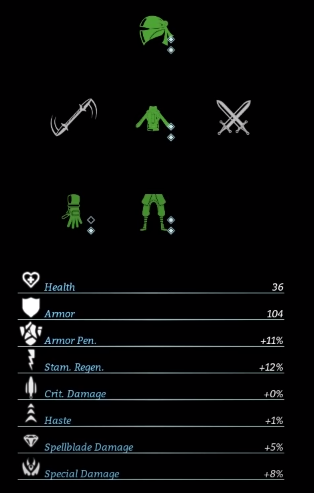
Health
If this bar reaches empty, you’ll be defeated and have to respawn where you last rung a bell. Augmenting your character with health-boosting equipment will not extend the bar, but it will reduce how quickly that it is depleted from enemy attacks.
And don’t forget your personal bells as well. Whilst you can recover, reset, and rest at the large bells scattered throughout dungeons, you also carry personal bells that have a watered-down effect. They will fill your HP bar to full, but will not reset the world or create a respawn point. Use these as you would health potions in similar games.
Want to build a durable character? This is one of the stats you should focus on. Use your personal bells well, and survive!
Armor
A) want to build a tanky character and utilize your blocking ability with a rune to mitigate as much damage as possible, or…
B) suck at dodging, like me.
I say this because, as you can expect, armor has a direct influence on your health and overall survivability by mitigating the damage you take and how much of your health that you lose. The higher your armor stat, the more damage is taken off enemy attacks. Focusing on Health and Armor can create a really stalwart character that even bosses have to take extra effort in defeating and really opens up options as far as your play-style.
If you find yourself dying too much in Sands of Aura, but you’re able to defeat mobs quite easily and quickly, consider sacrificing some of that damage to invest into your armor and health stats. This will make positioning and timing mistakes when engaging in foes much less punishing and will make your supply of personal bells much easier to manage.
Armor Penetration
If you’re finding that your attacks are lackluster, despite having crafted the perfect weapon and augmented it with the runes that you feel will pack the most punch, armor penetration is likely why. Each enemy has a different health and armor stat, and as such you will notice that your armor penetration will influence each fight and boss differently; it is never a bad idea to invest in this stat if you’re trying to do the most damage possible.
Upgrading Armor Penetration is the easiest and most effective way to influence the damage for your “auto-attacks”, which is the damage that you deal with your weapons’ normal attacks, not including magical or otherwise. So, if you’re wanting to deal damage with your chosen weapon naturally and weave in devastating auto-attacks, then invest in armor penetration!
Stamina Regeneration
Running and dodging use stamina as a resource, and timing your dodges correctly can result in your character taking absolutely no damage whatsoever from enemy attacks. That is just as influential to your survivability as it sounds. As such, you don’t really want to be caught out when attempting to doge. Recovery from dodging and sprinting is directly tied to your stamina regeneration and investing it in will absolutely save your life. Timing blocks correctly, or timing a dodge will, without a doubt, be the difference in surviving a boss attack or not.
Don’t think that this only influences your survivability alone, as you can use dodges to your advantage for more than just staying alive. Augmenting your weapons with the Spellblade runes will also augment your dodge with an added effect, and some can be pretty potent damage-dealers. Therefore, being able to dodge more often means that you’re increasing your damage per second as well.
Critical Hit Damage
This stat is a modifier that is applied when you inflict critical damage on a foe and will determine just how much bonus damage your attacks deal. Are you feeling lucky, punk? Well, if so, this is a stat that you can absolutely build around and strategise with when crafting weapons at the forge. Influencing the critical hit chance, and then heavily pumping into this stat, is an effective way of directly improving how much damage your character does overall.
If you would like more consistent damage, and would rather rely on slower, high damage-dealing attacks, rather than quick attacks that result in a higher chance of pulling of crits, then this is a stat that you can ignore. However, Sands of Aura rewards experimentation, so it’s worth trying out different builds and the critical hit one can be potent!
Haste
Sure, if your character is a monolith of health and armor, and you’ve perfectly blocked all enemy attacks throughout your play-through, haste might not be that important to your build. But, if you’re playing a squishy, high-damage character that relies on heavy stamina regen to always be evading enemy attacks, then having your actions and movement improved through a high haste stat is going to make reacting to enemy attacks infinitely easier.
Spellblade Damage
This is a modifier statistic similar to how your critical damage stat works in that the damage inflicted will not be a static number based on your Spellblade damage statistic, but adds on to the damage based on the percentage that you have achieved through your equipment.
If you’re curious about the various Spellblade effects and how you can employ the various runes in combination with it to build your character, be sure to check out our original guide on Spellblade gems!
Special Damage
Each weapon has a different special attack. For example, the first you’re likely to see is the straight-line skill shot from the Sword that deals damage along that shot’s line. Or perhaps the dual axes, which can be thrown forward in another skill-shot that deals damage in a twirl. Regardless of your chosen weapon, the Special Damage statistic is the modifier that will improve these attacks. Want to weave in devastating specials with your favorite weapon? Invest here!
Thanks to BigCMGN for his great guide, all credit to his effort. you can also read the original guide from Steam Community. enjoy the game.