Everything you need to know about the materials in the game and the items you can exchange them for.
Why search for materials?
By the way; new weapons, presents, and plug-ins will always be available during a new standby phase, so check the shop every time you finish a phase.
Now, why earn these things as fast as possible?
– Weapons are pretty self-explanatory. More damage, easier time fighting. Don’t forget that a new weapon will only raise your attack stat (melee attacks), and not your power stat (psychokinesis attacks). Yuito relies more on his weapon than psychokinesis, and vice versa for Kasane. Prioritize weapons if you’re playing as Yuito. Of course, don’t forget to upgrade your party member’s weapons as well.
Protip: If you haven’t gotten a weapon for you or a party member in a while, it might be best to just buy the latest weapon available that you can buy with Kins, then exchange from there to save on resources, as the next upgraded weapon will always require the weapon before that anyway.
– Presents are for raising your bond level with your party members. Even if you don’t care about the story or characters themselves, raising their bond level gives huge advantages in battle that give you so many more aces up your sleeve compared to having none of it. At the very least, try to get combo visions for each character (bond level 3) as they drastically increase your damage output and ability to quickly deplete the crush gauge for easier brain crushes. Certain party members also have critically helpful passives as their bond level raises when you use their SAS, such as Tsugumi’s clairvoyance giving you the ability to instantly destroy enemy armor shells when you do a perfect dodge attack.
Basically, bond level abilities can completely trivialize some enemies or make tough battles far easier.
Also, presents can sometimes be found when you’re out and about in the world, usually in more hidden areas. Always search for those green marks whenever you can.
– Plug-ins are probably the least prioritized of the three, but they can still be immensely helpful as you shape your playstyle later on in the game. For Yuito/Kasane, I encourage you to give them the more specialized plug-ins that start showing up around Phase 5 or 6. I’ll give my personal plug-in recommendations in a later section.
Material types/Rarities & how to get them
To make your life easier, always remember to look at the enemy library to know where specific enemy types are and what they drop. Go to “Library” in the pause menu, then “Enemies”. it will automatically update as you progress. Also, keep in mind that Yuito and Kasane sometimes have different enemies in different areas from each other’s stories.
Rarity color in order of least to most rare: Gray, Blue, Purple, Yellow/Golden
Enemy drop names in order of least to most rare: Suppression (Blue), Suppression+ (Purple), Analysis (Yellow)
Environment Data/Battle Record/Other Ecology rating in order of least to most rare: C (Gray), B (Blue), A (Purple), S (Yellow)
So to sum it up, here’s every material type, and then they will be elaborated upon:
– Battle Record C to S
– Other Ecology C to S
– Environment Data C to S
– Pool-type Suppression and Suppression+
– Rummy-type Suppression and Suppression+
– Pendu-type Suppression and Suppression+
– Paws-type Suppression and Suppression+
– Yawn-type Suppression and Suppression+
– Pound-type Suppression and Suppression+
– Rut-type Suppression and Suppression+
– Santa-type Suppression and Suppression+
– Sabbat-type Suppression and Suppression+
– Chinery-type Suppression and Suppression+
– Analysis (Almost every single unique enemy has their own analysis drops. For example, Vase Paws Analysis)
Material types:
– Suppression/Analysis: Dropped from specific enemy types you defeat. The Suppression and Suppression+ drops can (usually) be obtained from any enemy within that specific family. For example, if the material you need is a “Paws Suppression” or “Paws Suppression+”, then that material can drop from any “Paws” type enemy in the game, such as the Vase Paws, Saws Paws, and Base Paws. However, an Analysis is more tricky to get. Not only is it Yellow rarity, but it must come from that specific enemy it has in the name. So if you need a “Vase Paws Analysis”, it will ONLY drop from the Vase Paws enemy, and not any other Paws type. Keep that in mind.
It is worth noting that not every enemy type in a family drops both a Suppression and Suppression+; some only drop a Suppression, and some only drop a Suppression+, but most of them drop both. As well as that, not every single unique enemy has their own Analysis. Double check the enemy library to make sure you’re not chasing the wrong enemy.
– Environment Data: Every area in the game (except hub areas like Suoh or Seiran and specific story locations) has environment data scattered at specific spots on the map. Once you pick it up at a specific spot, it will always be marked on the minimap next time you visit the area. As you may have guessed, the name of the environment data you need determines where it’s found. If it’s a Kikuchiba environment for example, then you can find it anywhere in Kikuchiba, it doesn’t matter what sub-areas you go to.
For the record, this is the icon for an environment data point. It will be faded out if it has already been collected or it’s not there.
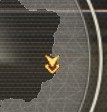
Something to keep in mind: The data points are always at pre-determined locations on the map, but the ones that will actually be there will be randomized each time you visit the area. Along with that, the letter grade for the data point will also be random. It can be a case of bad RNG, but more often than not it shouldn’t be too bad if you just do a few runs of the area from time to time.
– Battle Record/Other Ecology: These can drop from almost any Other enemy you’re able to kill. These will be the easiest ones to obtain, but it’s always good to stock up on these as certain items can use up quite a lot of record/ecologies. Keep in mind the letter grade of the ones you obtain.
Just like with the Suppression mats, not every enemy drops every Battle Record and Other Ecology; some of them don’t even drop a Record or Ecology. I’ll specify where specific Record/Ecologies can be found in the next section.
Specific enemies for Battle Records and Other Ecologies
– Doppel Pool
– Grin and Spawn Yawn
– Session Pound
– All Santa types
– Booger Sabbat
– All Chinery types
– All non-Other enemies
– All bosses
Enemies that drop every type of Record and Ecology:
– Scummy, Fuel, and Bile Pool
– Buddy and Rainy Rummy
– Scummy and Plateau Pendu
– Vase Paws
– Rat Rut
(Given the enemy types that drop every Record/Ecology, your best area to grind lots of these might be the Abandoned Subway or Mizuhagawa areas since plenty of Rummy and Pool-type enemies are there along with Rat Ruts in both Yuito’s and Kasane’s story (moreso Kasane’s).
Battle Record C:
– Scummy, Fuel, and Bile Pool
– Buddy, Kitchen, and Rainy Rummy
– Scummy and Plataeu Pendu
– Vase Paws
– Cushion Pound
– Rat Rut
– Cut Rut
Battle Record B:
– Scummy, Fuel, and Bile Pool
– All Rummy types
– Scummy and Plataeu Pendu
– Vase Paws
– Cushion Pound
– Rat and Cut Rut
Battle Record A:
– Scummy, Fuel, and Bile Pool
– All Rummy types
– All Pendu types
– Vase and Base Paws
– Missin and Cushion Pound
– Rat and Cut Rut
– Auger Sabbat
Battle Record S:
– Scummy, Fuel, and Bile Pool
– Buddy, Kitchen, and Rainy Rummy
– Scummy and Plataeu Pendu
– Vase and Saws Paws
– Brawn Yawn
– Cushion Pound
– Rat Rut
Other Ecology C:
– Scummy, Fuel, and Bile Pool
– All Rummy types
– Scummy and Plateau Pendu
– Vase Paws
– Rat and Cut Rut
Other Ecology B:
– Scummy, Fuel, and Bile Pool
– All Rummy types
– Scummy and Plateau Pendu
– Vase Paws
– Cushion Pound
– Rat and Cut Rut
Other Ecology A:
– Scummy, Fuel, and Bile Pool
– All Rummy types
– All Pendu types
– Vase and Base Paws
– Missin and Cushion Pound
– Rat and Cut Rut
– Wither and Auger Sabbat
Other Ecology S:
– Scummy, Fuel, and Bile Pool
– Scummy, Buddy, and Rainy Rummy
– Scummy and Plateau Pendu
– Vase and Saws Paws
– Brawn Yawn
– Cushion Pound
– Rat and Cut Rut
– Wither and Auger Sabbat
Brain Map skills/Plug-Ins that can help
Brain Map:
– Item Attraction: Automatically draws in enemy drops near you. It has a very generous collection field so you’ll never accidentally leave behind a drop from a hectic battle. This doesn’t work for Environment Data Points or Green Item data points.
– Brain Crush Money Bonus: Get more Kins for killing an enemy with Brain Crush. If you’re able to buy something you need with Kins, then maybe you don’t even need to waste your precious materials in the first place. The more money the better.
– Additional Plug-In Slot 1 & 2: Gain an additional plug-in slot for Yuito/Kasane (up to 3). Trust me, you’ll want these beyond just grinding for mats. Try to get them as soon as you’re comfortable getting them.
Plug-Ins:
– Special Mission Pay Bonus: +5% Kins gained from killing enemies. Combine this with Brain Crush Money Bonus and you can rack up Kins just a bit easier if you’re in dire need of them.
Now, in addition to these things, I would strongly encourage you to focus on increasing your crush effect. Enemies are guaranteed to drop an item if you kill them using Brain Crush. Not only that, it is the fastest way to kill enemies if you’re able to perform your actions just right. So, this isn’t only for grinding, but just a great general gameplay tip. You could kill enemies in half the time it would normally take with Brain Crush. This is every Brain Map skill and Plug-in that increases your crush effect in some way, shape or form:
Brain Map:
– Psychokinesis Crush Effect Up: Crush Effect +5% with Psychokinetic attacks
– Psychokinesis Crush Effect Up 2 (Kasane only): Additional +5% Crush Effect
– Weapon Crush Effect Up: +5% Crush Effect with your weapon
– Weapon Crush Effect Up 2 (Yuito only): Additional +5% Crush Effect
– Power Up 1: +5% to Power stat
– Power Up 2 (Kasane Only): Additional +5% Power
– Attack Up 1: +5% to Attack stat
– Attack Up 2 (Yuito Only): Additional +5% Attack
– Concurrent SAS Activation 1 & 2: Use up to 4 SAS effects at once. If you play your cards just right you can wipe out the crush gauge with ease combining SAS. Recommended crush combos will be shown later.
– Brain Crush SAS Restore: Restores some of the gauge of the current SAS effect(s) being used. Multiple Brain Crushes in quick succession can lead you to prolong most SAS effects for a very long time, leading to easier brain crushes. This also works with “Concurrent SAS Activation”, it will restore the gauge of every currently active SAS effect if you do a Brain Crush.
– Brain Drive Status Up: +10% to Attack, Power, and Defense while Brain Drive is active.
– Brain Drive Restore Brain Drive 1 & 2: While Brain Drive is active, restore some of the BD gauge whenever you perform a Brain Crush. Staying in BD for as long as possible helps dramatically with easier Brain Crushes since you’re much more powerful using BD. Of course, this isn’t terribly useful for major bosses since they’re 1-on-1s and you can only perform 2-3 brain crushes at most, but anywhere else, especially against multiple waves of mobs it’s very helpful.
– BD Consecutive Assault Vision: Use multiple Assault Visions in quick succession if one is activated during Brain Drive. This does absolutely massive damage, and most assault visions will annihilate the enemy’s crush gauge by a significant amount. This is more for late game, though; around Phase 9 when you have more party members and most are at bond level 4 to perform Assault Visions.
– Max Psy. Gauge Boost 1 & 2: Increase the Psy Gauge. This is more for Kasane since her psychokinesis is much more powerful than Yuito’s, but any Psychokinetic attack on an enemy’s weak point (especially if paired with Shiden’s Electrokinesis or Hanabi’s Pyrokinesis) can drain the crush gauge by a huge amount.
– Slam Attack: Perform a powerful downward strike from mid-air. More useful with Yuito given his focus is on his weapon, but this works well with Kasane too. It might not sound like much, but it’s quite powerful and can drain the crush gauge by a significant amount. Doubly so with, again, Electrokinesis or Pyrokinesis.
Plug-Ins:
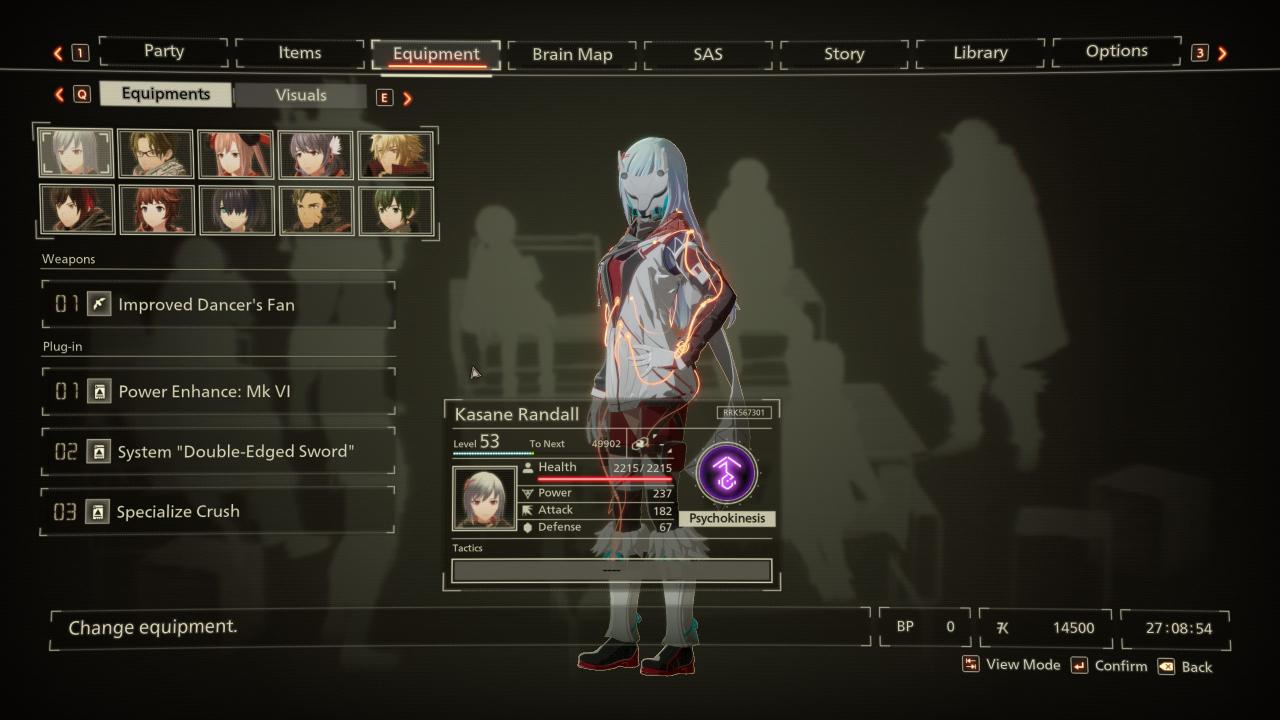
I encourage you to use Enhance/Specialize Crush, which Increase Crush Effect by 5% and 10% respectively, at the cost of -5% or -10% Attack. The downside is pretty miniscule considering how much you can deplete the crush gauge before that damage reduction even matters. Heck, you even can use the “System Double Edge Sword” plug-in that increases your damage done by 20% but damage taken is also increased by 20%. If you’re confident in your abilities, I recommend using that with Specialize Crush because this will negate the damage penalty. You can use both Enhance and Specialize crush if you wish, but I feel it’s more efficient to use the “Power Enhance” plug-ins for Kasane and the “Weapon Attack Specialization” for Yuito.
For reference, here’s the plug-ins I use for Kasane. For Yuito, replace Power Enhance with Weapon Attack Specialization.
Thanks to Scout for his great guide, all credit to his effort. you can also read the original guide from Steam Community. enjoy the game.