Seiken Manifestia is a real-time strategy ‘tower defense’-like game Originally released as a gacha browser game on DMM in Feb 2016. here is a full English Guide for Beginners.
Home Page
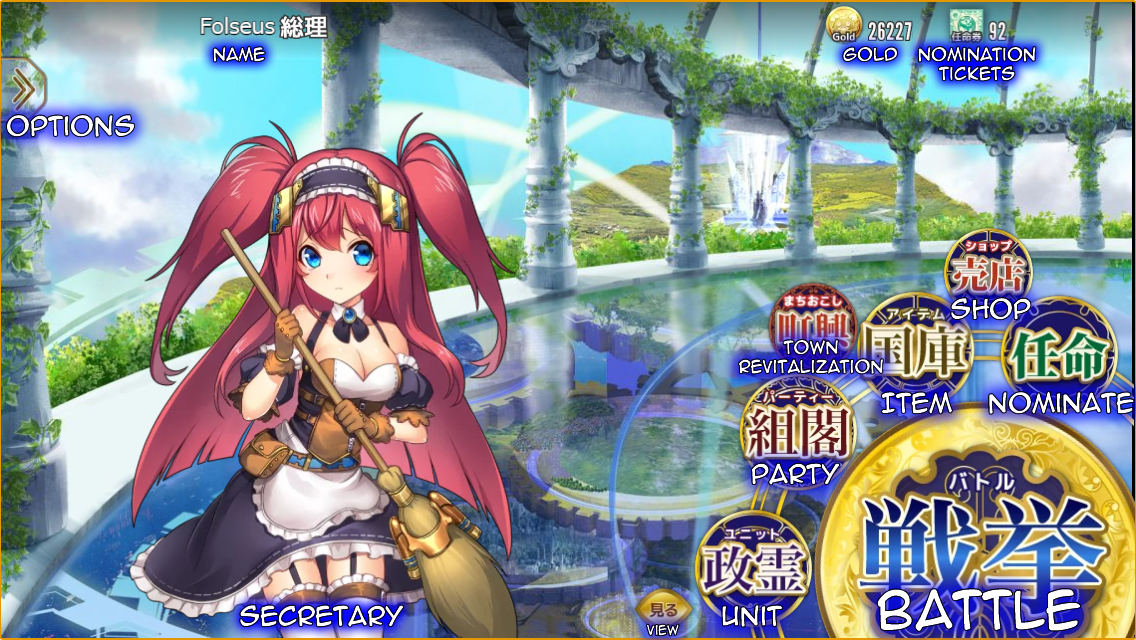
- Battle: allows you to enter combat.
- Unit: shows you individual stats of each Spirit you have, their rarities, allows you to improve Affection, Skills, Awakenings, and set your secretary.
- Party: allows you to set up your parties, selecting up to 6 Spirits, and setting their current rarity.
- Town Revitalization: an expedition-like feature. Grants EXP, Gold, and a chance for bonus items.
- Item: manage all the items you currently own.
- Shop: purchase items with Gold earned from Battle.
- Nominate: use your Nomination Tickets to obtain new Spirits.
- Options: includes settings for in-combat features, the Tutorial, an Encyclopedia for enemies, and the Mission list to receive rewards for completing objectives such as the story progression.
Page 1:
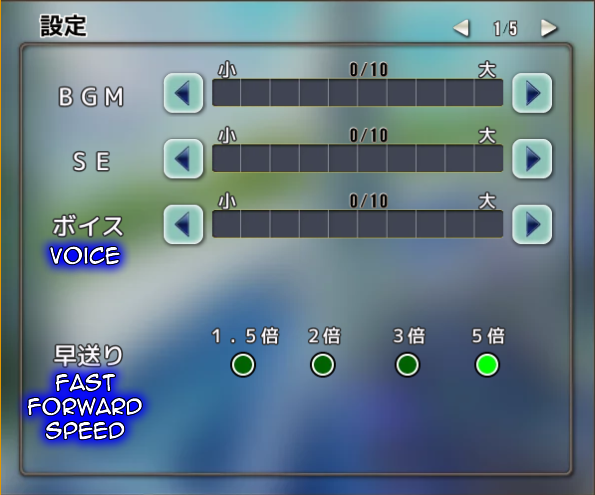 Volume settings for Background Music, Sound Effects, and Voice.
Fast Forward Speed setting for the fast forward button and [Space Bar].
Page 2:
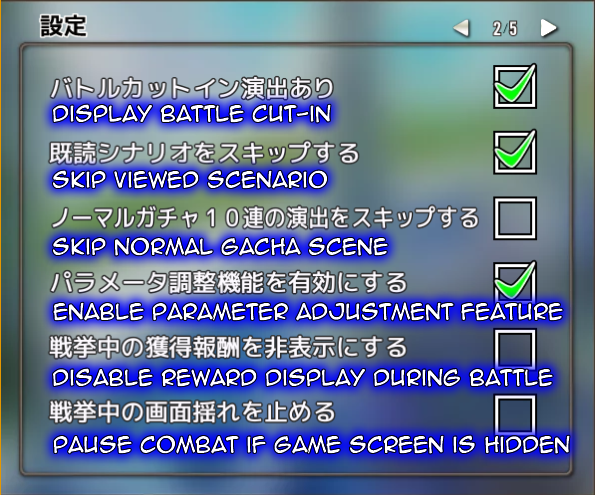 Show cut-in when you activate a Skill.
Skip Scenarios.
Skip Gacha Scenes. (Deprecated)
Parameter Adjustment. Allows you set your team’s level, affection, etc. to a lower amount. This is used for people testing lower level teams when they have higher level ones, doing challenges, and making tutorials etc.
Disable Reward Display. Rewards are displayed at the bottom of the screen during combat and can be disabled.
Pause combat if the game screen is hidden.
Page 3:
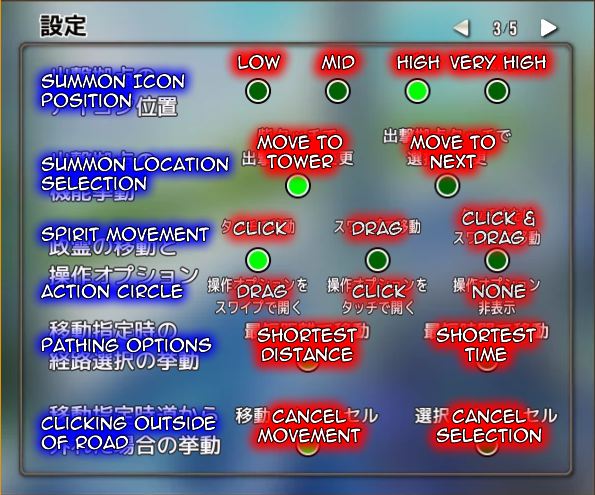 Your current sortie point is indicated by a blue balloon. Its location above your Castle/Tower can be adjusted from Low to Very High.
You can choose to either click on a tower/castle to move the blue balloon to that position, or click on the blue balloon to move it to the next tower.
Movement and Action Circle define how you interact with your Spirit in combat. By default, you Click on the Spirit to move them, and you can Drag on the Spirit to bring up the Action Circle. The terminology is “Touch” and “Swipe” in Japanese instead of “Click” and “Drag”.
Action Circle is a circle that appears around your Spirit where you can quickly choose their Skill, or Boost instead of selecting from the right side of the screen.
Pathing options can be set to shortest distance or shortest time, which can vary depending on highways or slow paths; however, the Shortest Time does not always work correctly and it is recommended to use shortest distance.
When you have a Spirit selected and you click somewhere outside of the path, it can either cancel the Spirits’s movement or deselect them. This is useful because the locations you can select on the map are similar to “tiles”, but if you cancel movement, you can stop in between the selectable “tiles”.
Page 4:
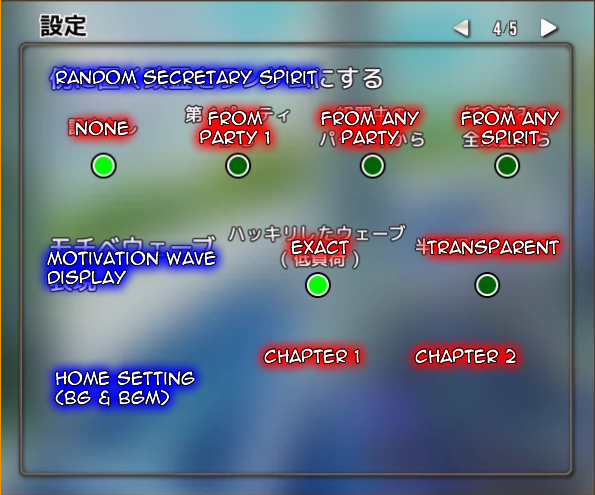 You can have a Random Secretary setting. The None option gives you your manually selected Secretary, while the others will be Random from those groups.
The Motivation Wave can be shown as Exact which covers its full area in a translucent green circle when it appears, or Transparent, which only shows the ring when it appears.
The Background image can be set to Chapter 1 or 2 after you unlock Chapter 2.
Page 5:
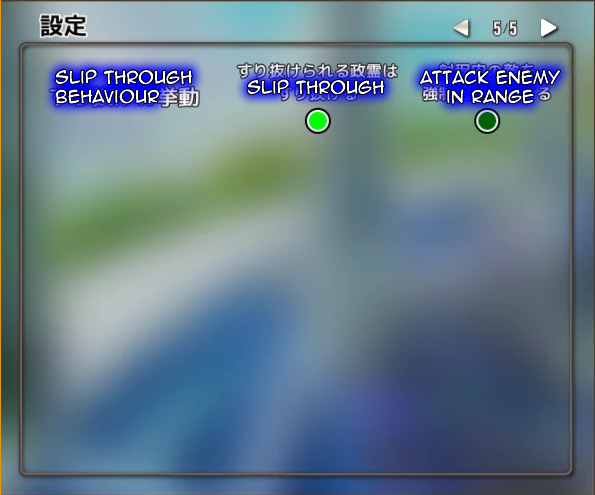 Spirits that “can move through enemies” (i.e. certain Melee units) can be set to always move through them or force them to attack enemies in range.
Unit Page Part 1 (Units and Awakenings)
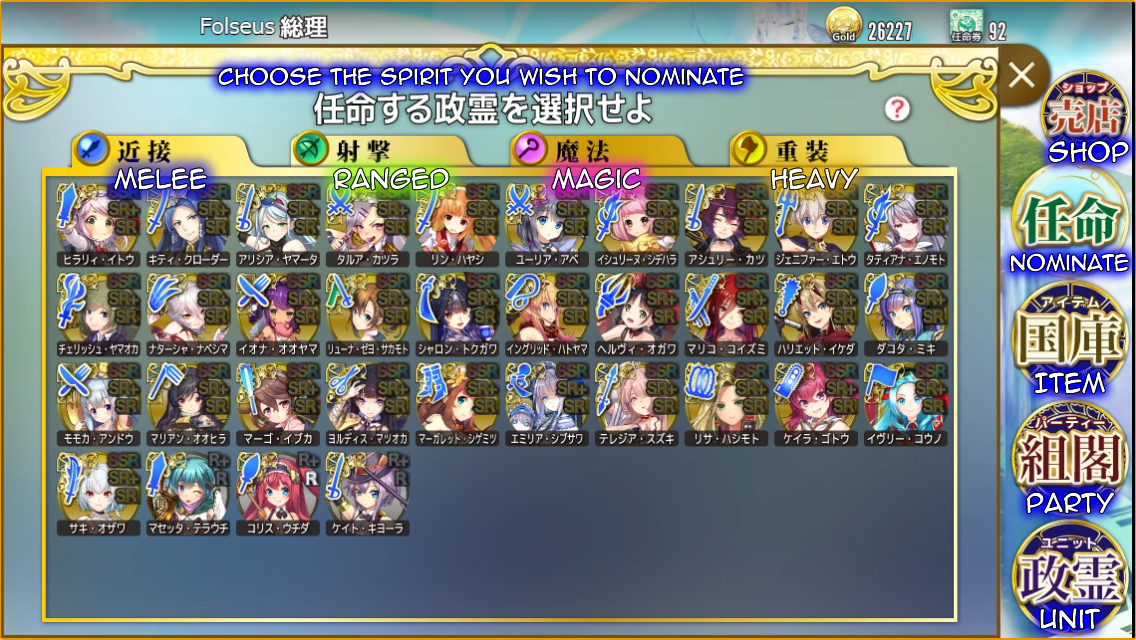
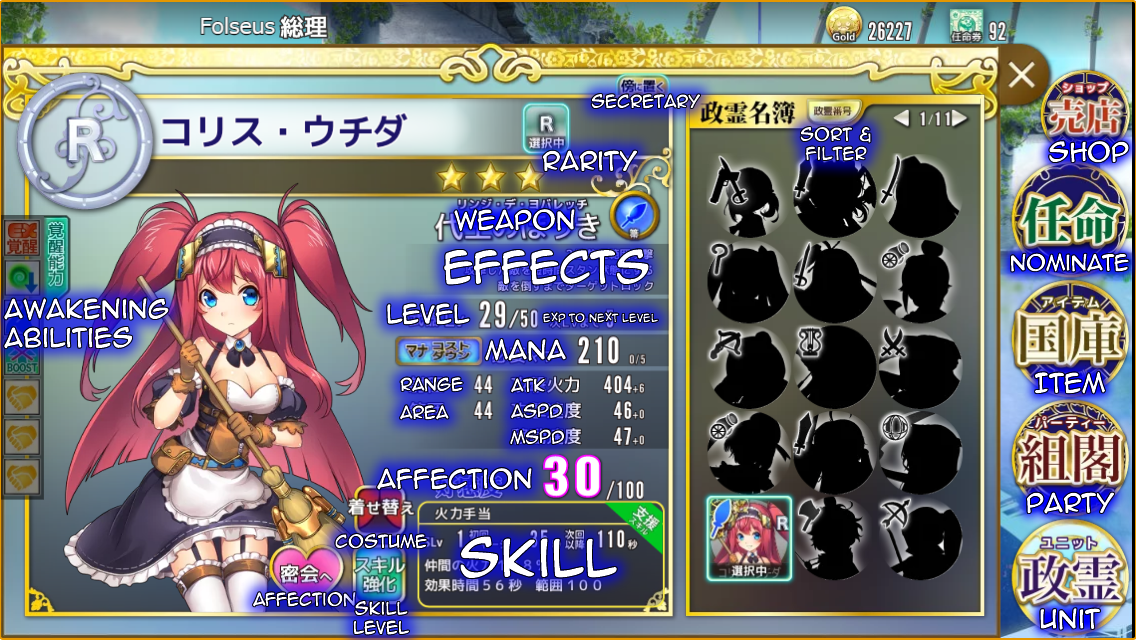 The characters in this game are known as Spirits. The right panel allows you to select a Spirit and indicates whether you have them, and their available rarities.
You can Sort and Filter Spirits with the button above their icons.
The Sort feature is by
[Spirit Number] [Rarity] [Level] [Affection]
[EXP Bonus] [Cost] [Skill Lv] [ATK]
[ASPD] [MSPD] [Range] [Area]
The Filter feature can filter by weapon type and rarity.
The unit page displays all the information about a Spirit. You choose which rarity to view at the top, and can select them to be your secretary with the button next to the rarities.
The rarities and their level caps are N (30), N+ (40), R (50), R+ (60), EX (75), EXA (100), SR (70), SR+ (80), SSR (99), SSRA (120).
These rarity names are Normal, Rare, Extra, Extra Awakening, Super Rare, Super Super Rare, and Super Super Rare Awakening.
Their weapon name and type is displayed along with their special effects.
There are four types of weapons, Melee, Ranged, Magic, and Heavy. A thorough list will be provided further below with all Spirits.
Their current level out of their max level and the EXP required to level is shown next.
The amount of Mana required to deploy this unit and the number of [Mana Cost Downs] they have acquired out of their max is shown.
Mana Cost Down can be purchased with Gold for R+ or lower rarity non-event characters.
Mana Cost Down for Event Characters can be obtained by progressing their event.
Mana Cost Down for SR or higher rarities require a [Cost Cat] item, which can be purchased with Gold. (It’s the same thing but with more steps)
Higher rarity versions of a character have higher Mana Costs, higher base stats, higher maximum levels, and higher EXP requirements to level. EX have inordinately higher EXP requirements due to being event rewards, and are roughly between SR and SR+ in power. EXA are about equal to an equivalent SSR in power.
The Spirit’s Attack Power (ATK), Attack Speed (ASPD), and Movement Speed (SPD) are shown, including a +X for the bonus they gain from Affection. ATK is the amount of damage they will do before enemy’s defense is taken into consideration. ASPD is the amount of attacks they will do in 100 seconds. MSPD determines how quickly they will move across the map.
In this case, my Colice has 404 ATK + 6 ATK from Affection = 410 ATK per hit. She has 46 ASPD + 0 = 46 Attacks per 100 seconds.
The current Affection level out of their current maximum is shown below, followed by their skill’s effect.
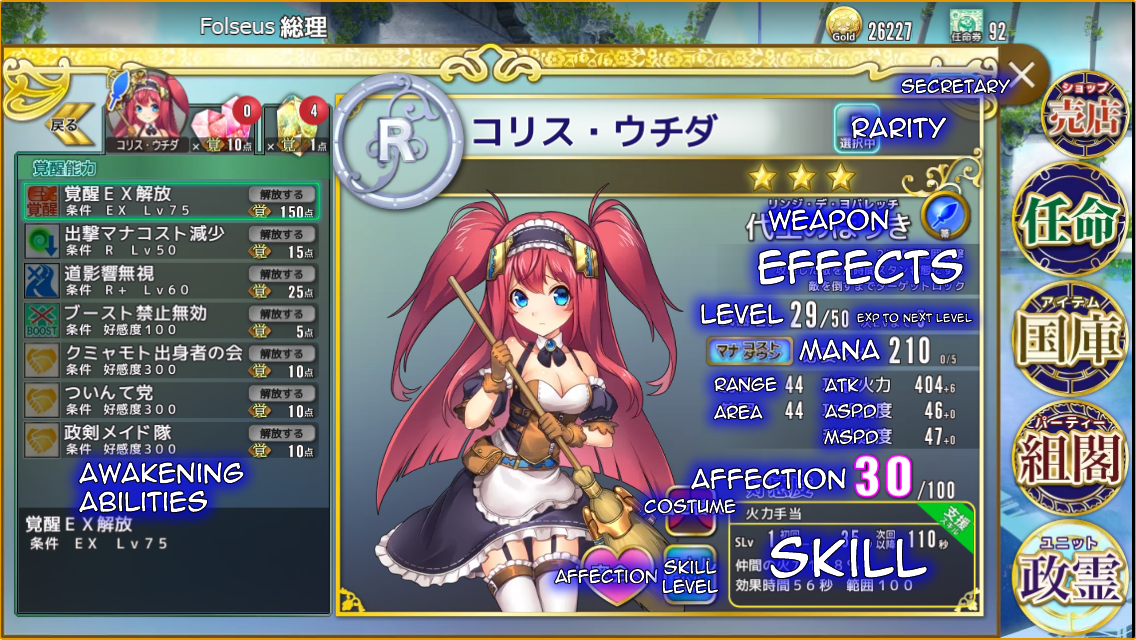
Awakening Abilities differ per Spirit. They are typically unlocked by reaching the max level of a rarity. There are several types of Awakening Abilities. The following are my own terminologies as none appear to exist in Japanese.
- Awakening Unlock: (Red) Unlocks the Awakening Rarity for this Spirit. Furthermore, Mana Cost Down for Awakening Rarities can be purchased with more ACs.
- Awakening Unique Trait: (Purple) Unlocks a unique ability for an SSRA Spirit, only available after level 100.
- Awakening Stat Boosts: (Blue) Various general buffs, such as decreased Mana cost, or ignore path speed shown in the screenshot. Can be found on various Spirits. Available after reaching the level cap on certain rarities.
- Awakening Gear Negate: (Green) Ignores certain debuffs, namely those found in Chapter 2.
- Awakening Bonds: (Yellow) Increases stats when multiple Spirits with the same Bond are in the same party. Available after reaching 300 Affection. Based around Spirits who have a connection with one another. The stronger the bond (i.e. fewer Spirits who share it), the stronger the stat boost.
The number of Awakening Crystals required to unlock an ability are shown on the right side. The button will turn blue instead of gray if you reach the unlock conditions.
Depending on the number of Mana Cost Downs that an SSR has, they will have decreased AC costs for their SSRA Cost Downs. They will also receive AC refunds if they gain their Mana Cost Downs at a later point.
EXA Spirits have the lower AC cost to begin with and receive no AC reduction based on Mana Cost Downs.
The Costume button can be used to change the Spirit’s appearance between rarities in combat, or a costume if one is available.
The Skill Level button can be used to increase the skill level with the Skill Badge items.
The Affection button with a heart is used to increase the affection by Gifting items.
Unit Page Part 2 (Skills and Affection)
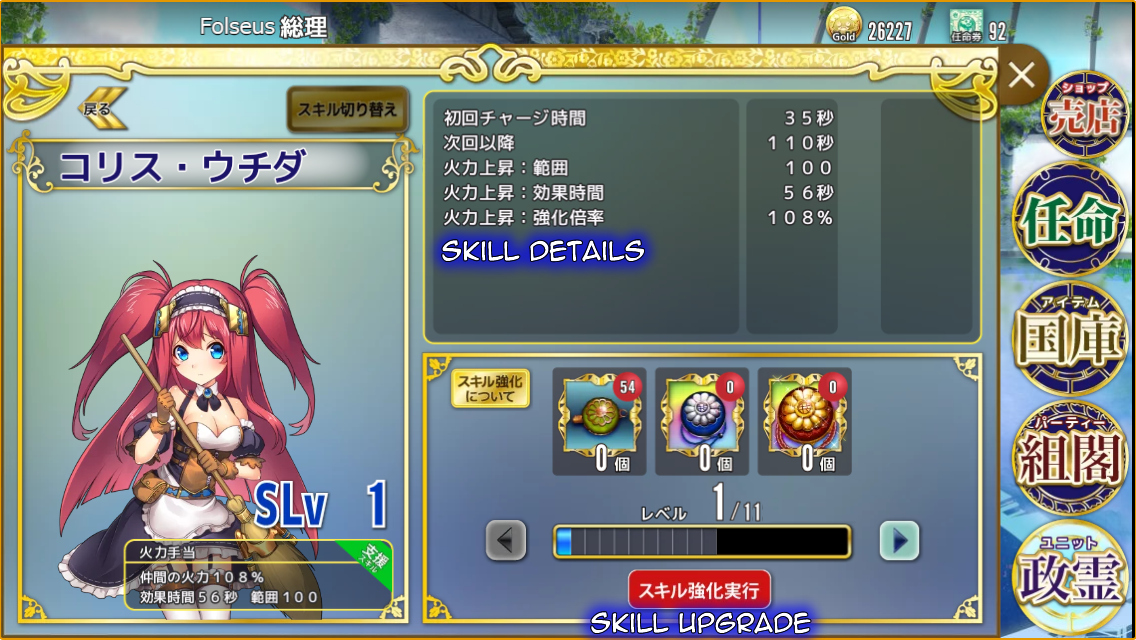 Skills have a First Recharge timer which indicates how long before the skill can be used for the first time after the Spirit is sortied. They have a second Recharge timer, or cooldown, which indicates how long before the skill can be reused after its cooldown begins. There are various different skills, some having quick immediate uses for early snipes, while others have long durations for high uptime.
There are six types of skills:
- Party Buff (Green) – Increases a stat for all allies in range of the effect.
- Self Buff (Yellow) – Increases stats of the user.
- Attack (Red) – Deals high damage to enemies in range with some sort of effect (i.e. multiple hits, range, splash, etc).
- Debuff (Purple) – Deals damage to enemies in range while applying a debuff.
- Change (Blue) – Changes how the Spirit functions.
- Special (White) – A skill that does not qualify for any of the above.
Skill Badges can be earned from battles and events. They are used to increase skill levels. These come in three varieties: Bronze, Silver, and Gold.
Pressing the arrows will preview the skill levels, and the changes are reflected in the skill details above. Going past your current maximum, or past what you can afford will give a warning, but you can preview all levels.
Increasing Skill Levels gives different bonuses for each Spirit, ranging from reducing First Recharge timer, to cooldown, or the strength and range of the skill itself.
The max Skill Level is 20. Additional Rarity versions are required to unlock higher levels. All Spirits start at level 10. SR and higher require all Rarities at max Mana Cost Down to unlock level 20. R and EX Spirits only require EX at max Mana Cost Down.
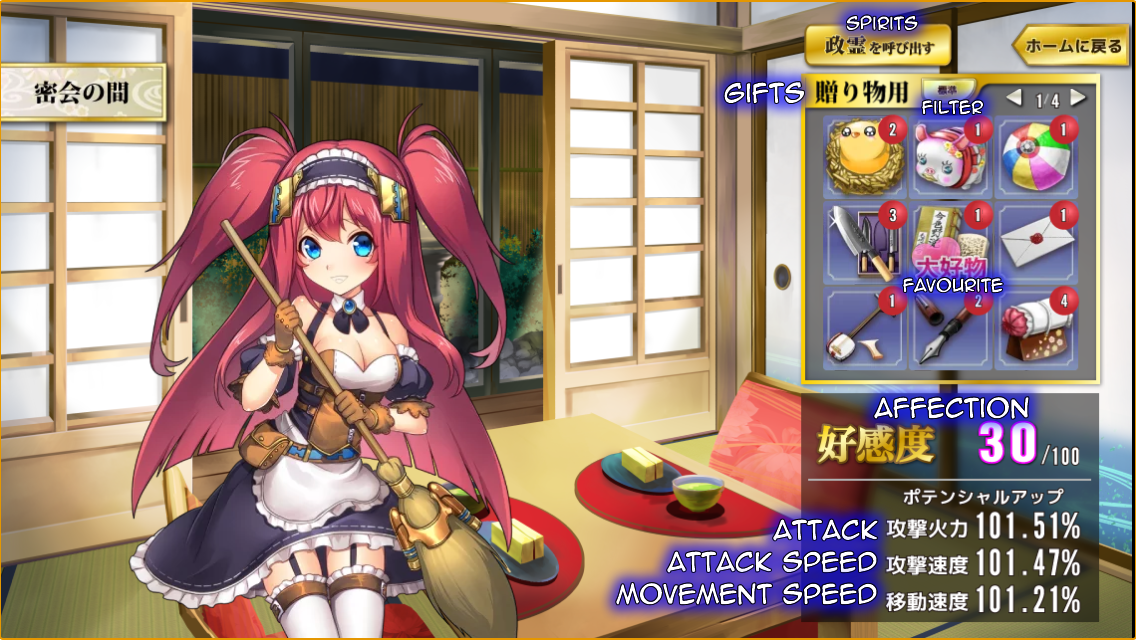 A Spirit’s Affection can be raised with Gifts. Gifts are obtained from battles.
The Affection cap can be increased with Gold. Increasing Affection will give bonus stats. The stats gained are based on whether a Spirit is Attack-type, Speed-type, Movement-type, or Balanced-type. All Spirits under a certain type gain the same % boost.
At 100%:
- Attack: ATK +13%, ASPD +7%, MSPD +3%
- Speed: ATK +7%, ASPD +13%, MSPD +3%
- Movement: ATK +8%, ASPD +8%, MSPD +10%
- Balanced: ATK +10%, ASPD +10.01%, MSPD +6%
Spirits will indicate certain Gifts as 好物 [Likes] or 大好物 [Favourites].
- N rarity Spirits get 10 from base, 30 from Likes, and 100 from Favourites.
- R rarity Spirits get 3 from base, 10 from Likes, and 30 from Favourites.
- SR rarity Spirits get 1 from base, 3 from Likes, and 10 from Favourites.
There are three general gift items for all Spirits:
- The brush, which is the most common gift item
- Pair of Bottles, which most Spirits like, and some even favourite
- Special Bottle, which all Spirits will favourite
The following may be deprecated, but was unlocked with story progression in the original game:
There are two unique units, Shinobu and Naikaku, your advisors who can have their Affection increased.
Increasing Shinobu’s Affection increases your structure’s HP, and the rate at which your Motivation Wave occurs, increasing your mana generation in combat.
Increasing Naikaku’s Affection increases the base Mana you start a battle with.
Party and Town Revitalization
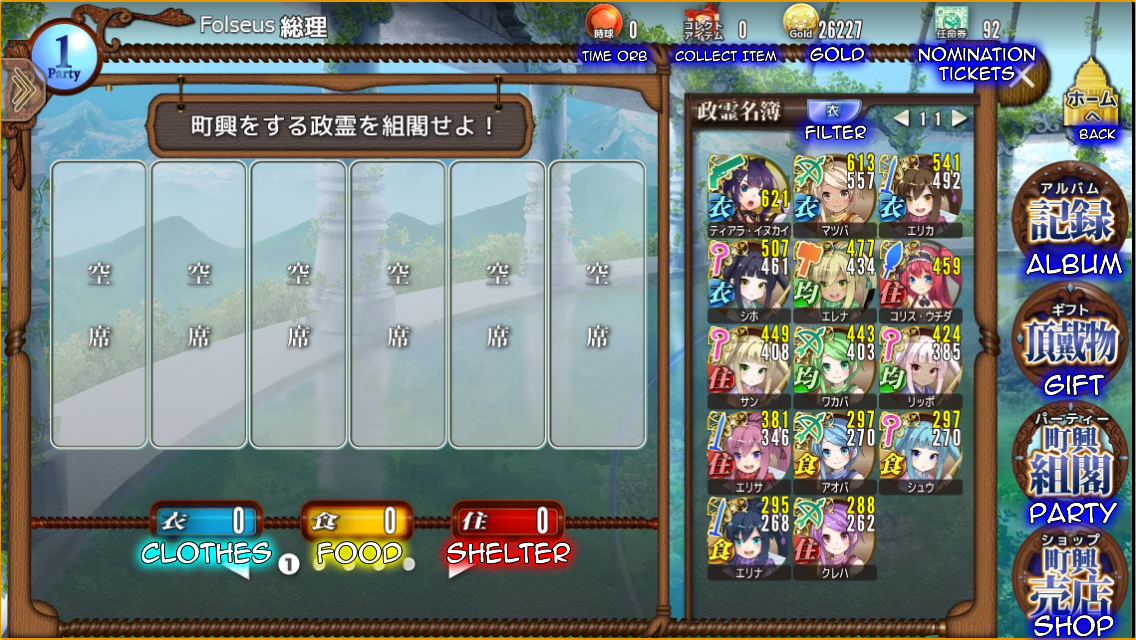
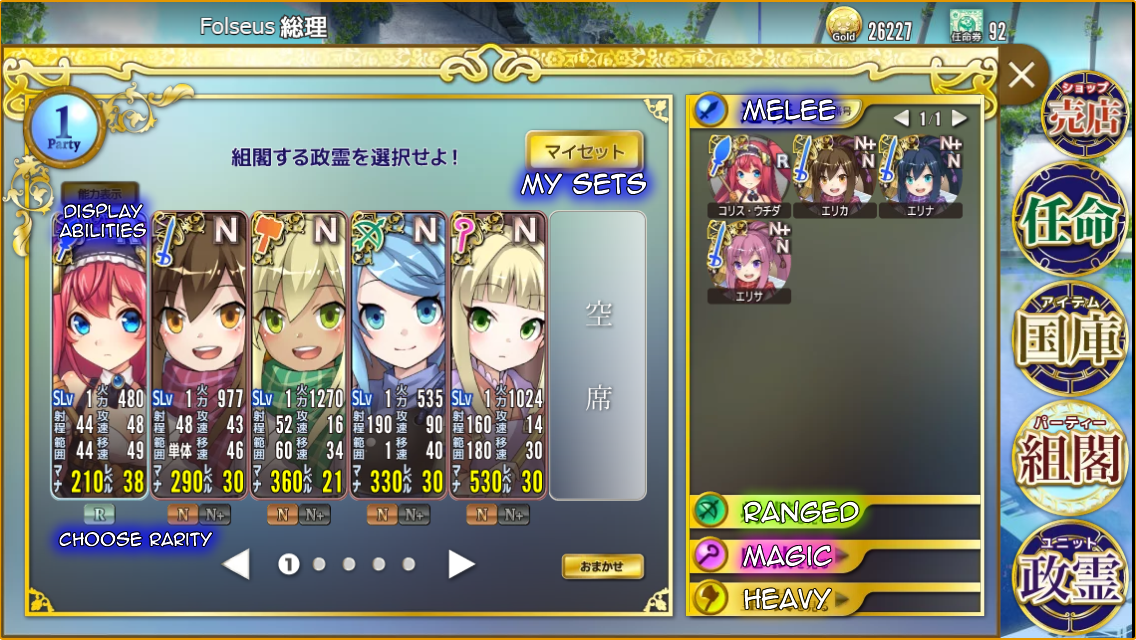 Click on Spirits from the right side to add them your party list on the left.
Drag and drop a Spirit from the right onto another Spirit on the left to replace them in your party.
Dragging a Spirit in your party up or down can remove them from the party.
Dragging a Spirit left or right can move their position which affects the order they appear on the sidebar in combat.
The Display Abilities button will display icons above a Spirit’s stats for any active Awakening Abilities they have.
You can choose the rarity of a Spirit at the bottom of their card which determines which version will enter combat.
You can have up to 5 different parties active (the 5 pages at the bottom). You can save up to 10 different parties with the My Sets button.
The red arrow saves a party. The blue arrow loads a saved party.
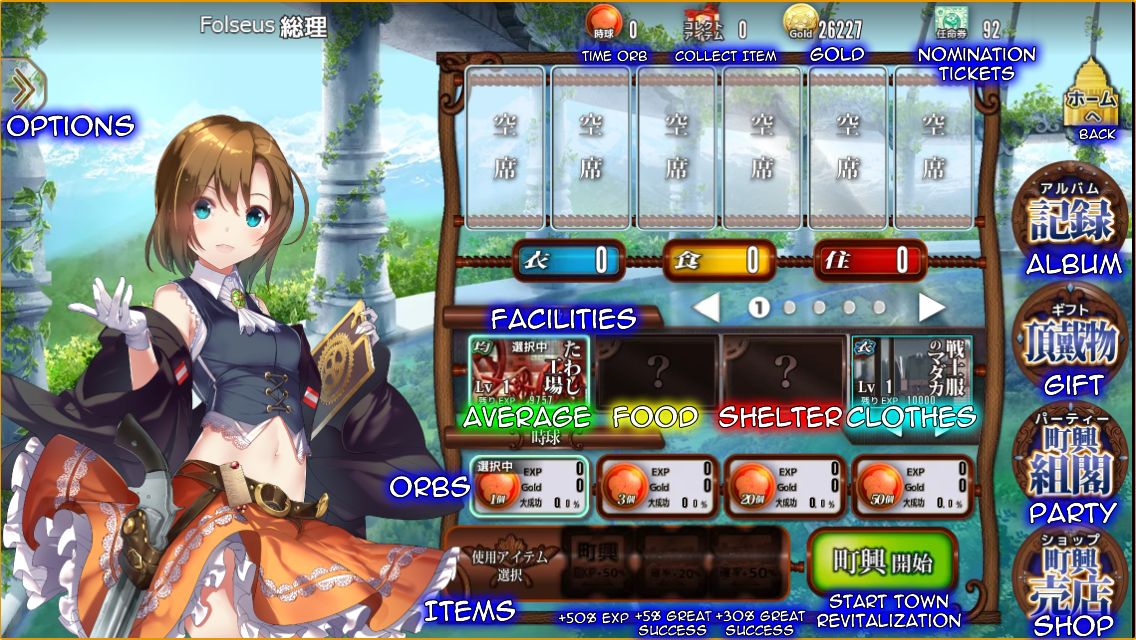 The Expeditions of Seimani. Set up a party to help rebuild the towns that have been damaged by Yato.
Town Revitalization requires Time Orbs to participate. There are also items that can be consumed to increase rewards.
You can earn EXP, Gold, Affection Items, Nomination Tickets, and other items from this system.
There are three stats shown below your currently selected party. These stats are named after the necessities for living.
They are 衣 (Clothing, BLUE), 食 (Food, YELLOW), 住 (Shelter, RED). There is also 平均 (Average, GREEN) which is just the average of all three.
 Spirits have points in each of these stats. Their icon colour in this mode indicates which stat has the highest value. Selecting a higher Rarity provides more base stats than a lower Rarity. Mana Cost Downs also increase these points. More Mana Cost Downs can overcome the higher base stats of a higher rarity. Adding a Spirit to your party will automatically choose the rarity with the highest stats.
Town Revitalization involves upgrading the town’s Facilities. Your stat values determine how much EXP your party gets and also goes towards leveling these Facilities. Higher stats also increases the chance of Great Success. Higher level Facilities give more EXP, Gold, and chance for Great Success. Great Success gives you the chance of earning Affection Items, Consumables, or Collect Items.
By performing Town Revitalizations, a Spirit can earn Collect Items at 10, 50, and 100 total runs. Spirits require an equal amount of Affection to collect these after returning. You will be rewarded with Nomination Tickets for reaching certain total numbers of Collect Items, i.e. 5x, 10x, etc. Only non-N rarity Spirits can give Collect Items. Great Success also has a chance of giving a unique Collect Item for a Spirit who has 100% Affection and 100+ runs.
Leveling a facility awards you with Nomination Tickets. There are also certain radish Collect Items for leveling to 2, 5, 8, and 10 as thanks from the townspeople.
Specific combinations of Spirits can lead to side stories between them, and certain Spirits have unique side stories for themselves.
Items, the Shop, and Spirit Nomination
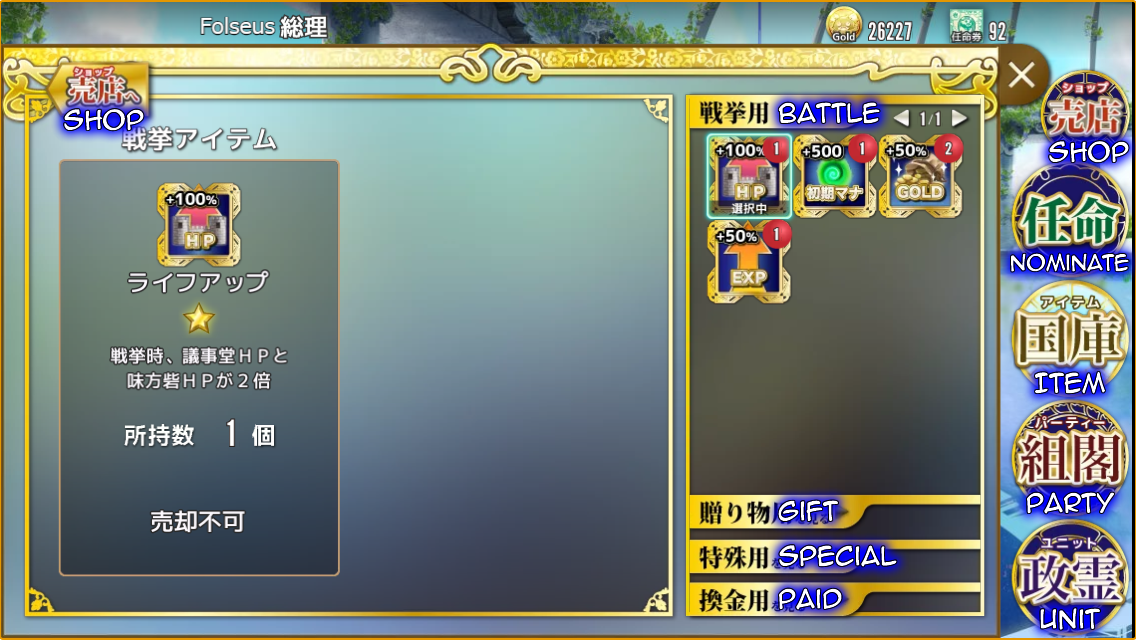 There are four types of items shown. Items that can be sold will have a green button on the left under their description.
There are specific items meant for selling, and it is not recommended to sell any other items.
- Battle items are consumables you can use before combat to increase your building HP, starting Mana, Gold earned, or EXP earned.
- Gift items are given to Spirits to increase their affection.
- Special items include Skill Badges, Awakening Crystals, Time Orbs, and items that can be sold for Gold.
- Paid items are the items that were previously paid only. They can be obtained by purchasing them from the shop, or earning them from events. These namely include special costumes for some Spirits.
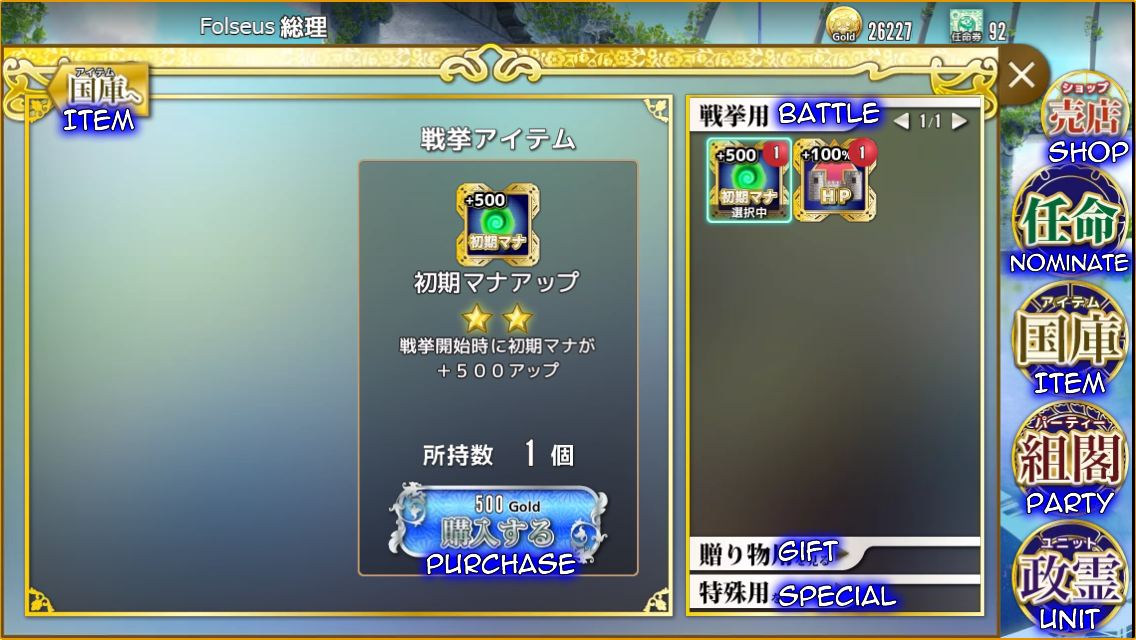 The Shop has three types of items that can be purchased. All Paid items from above are under the Special category.
All items can be purchased with Gold which is earned from combat.
 Seimani was previously a gacha game, where Spirits were randomized. All non-event Spirits can now be obtained by trading Nomination Tickets.
Their cost is determined by their rarity.
- R = 2 Ticket
- R+ = 5 Tickets
- SR = 10 Tickets
- SR+ = 15 Tickets
- SSR = 25 Tickets
You must purchase the previous rarity before you can purchase the following rarity.
Event Spirits can be earned by completing their events instead.
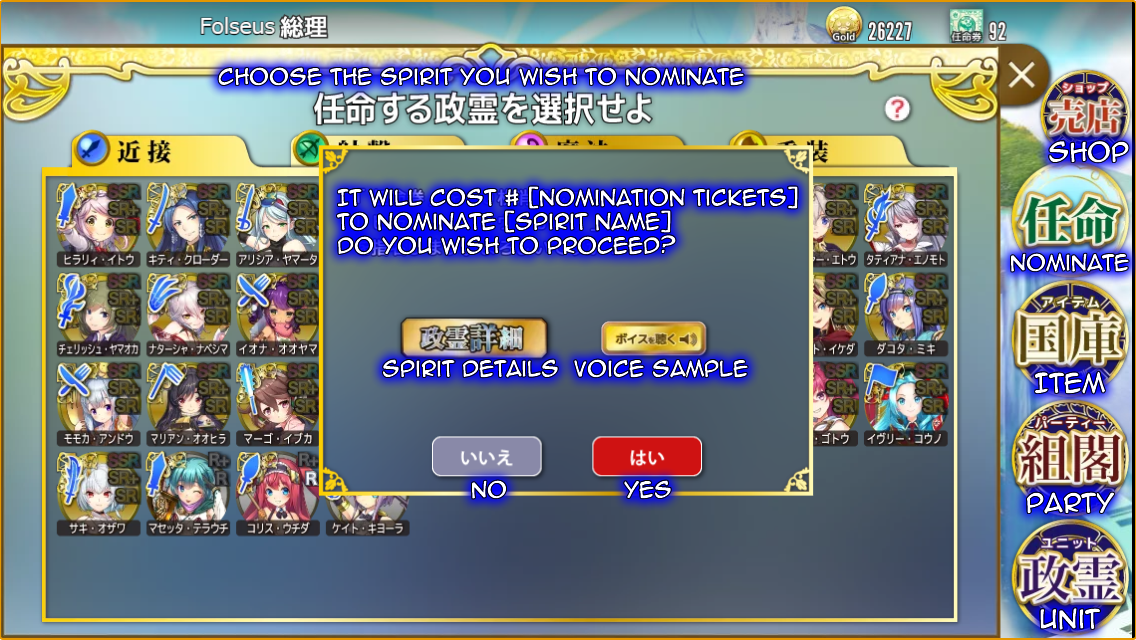 Choosing a Spirit will show a confirmation window with details and a voice sample.
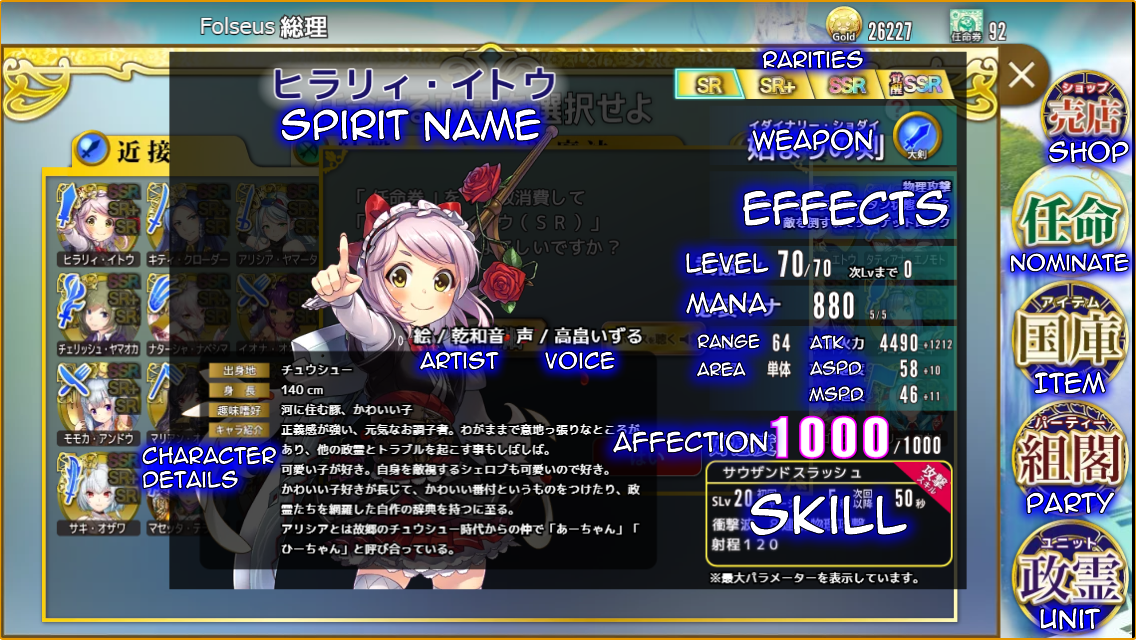 The details will show their full art, artist and voice actress, character details, all their different rarities, their weapon’s effects, and their stats and skill at maximum level and affection.
Battle Part 1 (Pre-Battle)
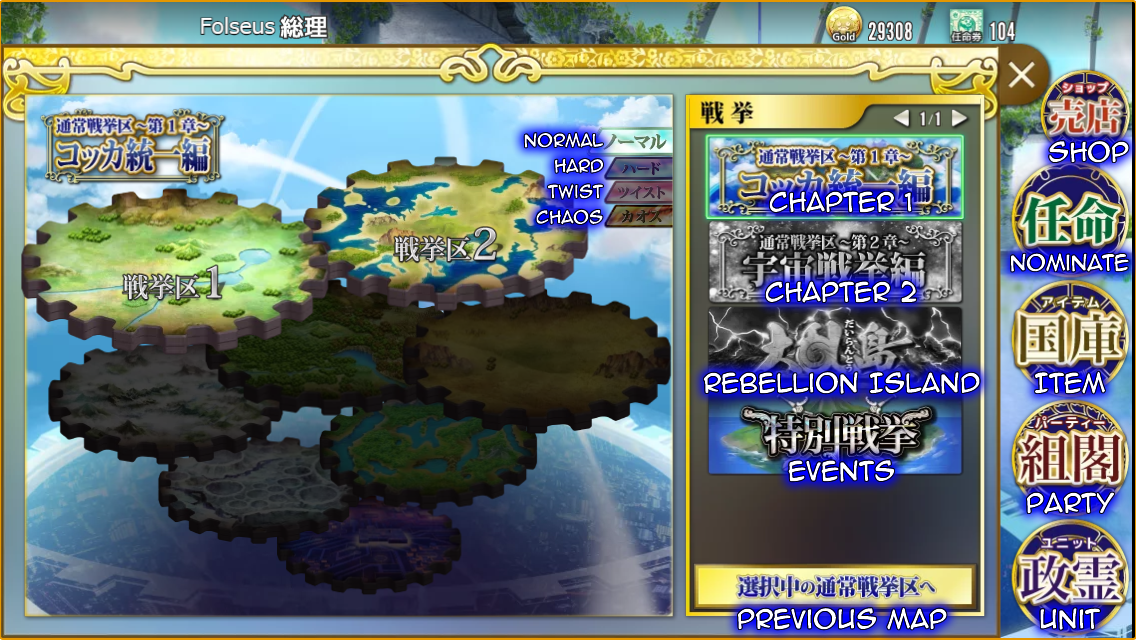 You can choose the area, also known as an Election Ward, you want to clear from the Battle page.
There are 8 story areas for Chapter 1. Chapter 2 can be unlocked after completing Chapter 1.
There are also 4 difficulties.
- Normal is the basic difficulty.
- Hard is unlocked after clearing the final map on Normal.
- Twist is unlocked after clearing Hard. It is a harder difficulty that rearranges the map. It is only available on a few areas.
- Chaos is unlocked after clearing Twist. It is an even harder difficulty with chaotic elements. It is available on even fewer areas.
Rebellion Island is a higher difficulty challenge mode, but is currently unavailable.
Events are special maps where you can earn certain rewards, mostly EX rarity Spirits.
The Previous Map button will bring you to your previously played map.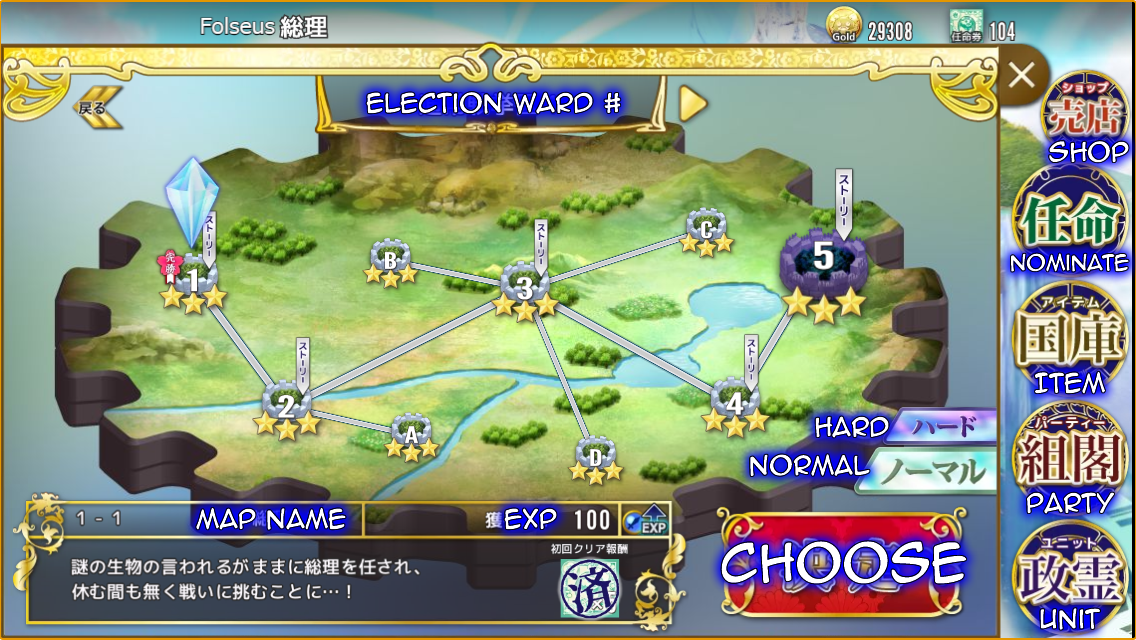 After choosing an area, you can select a map. A map’s number is shown on the left, such as 1-1 for the first map.
The EXP earned can be seen next to the Choose button, including which weapon types gain 1.3x bonus EXP from the map, in this case 100 EXP and Melee.
The first clear reward is shown, indicating how many Nomination Tickets you will earn for the first time.
The final map, X-5 requires you to unlock stars across maps in the area on top of clearing a direct path.
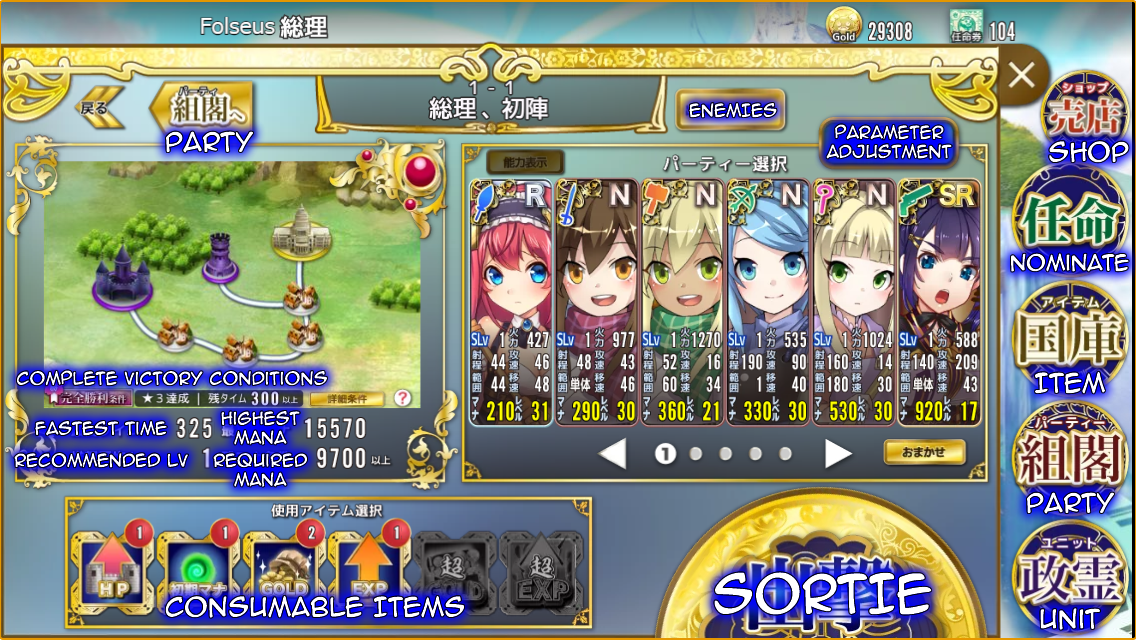 You can select which registered party you want to send to this map. The enemies that spawn can be confirmed at the top.
Parameter Adjustment can be used to lower your stats or level for testing compositions or strategies.
The map preview is shown on the left, with the Complete Victory conditions, your records, the recommended level, and the required mana for a good clear.
Clearing a map is rated on 3 stars. The first star is given for victory. The second star is given if no Towns or Towers are destroyed and gives 1.2x Gold. The third star is given if you meet the required mana, which is calculated based on time and how much mana you have earned. This third star gives 1.2x EXP.
A Complete Victory is awarded if you fulfil the more strict conditions shown; it requires three stars, all Villages and Towers liberated, and a minimum completion time.
Achieving a Complete Victory once on a map will guarantee three stars on all future completions, regardless of your performance.
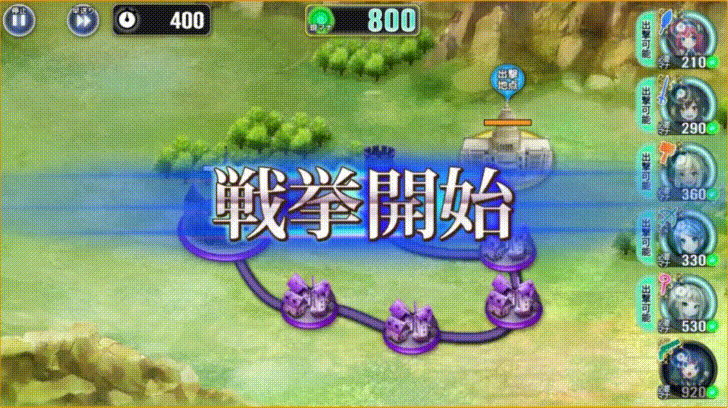
Battle Part 2 (Combat)
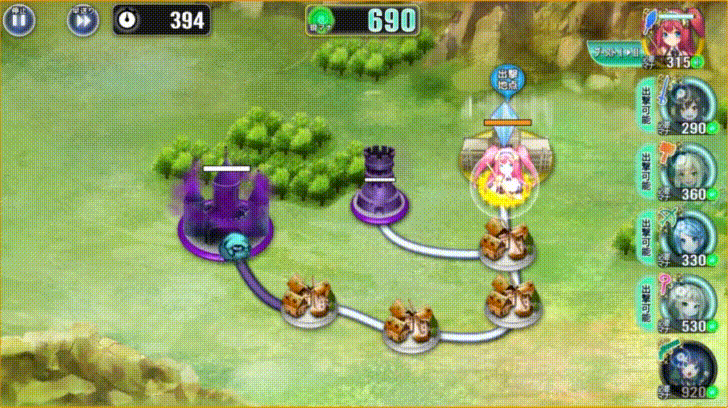
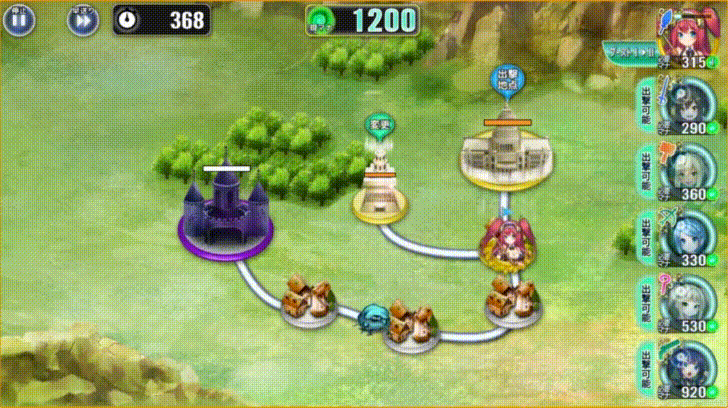
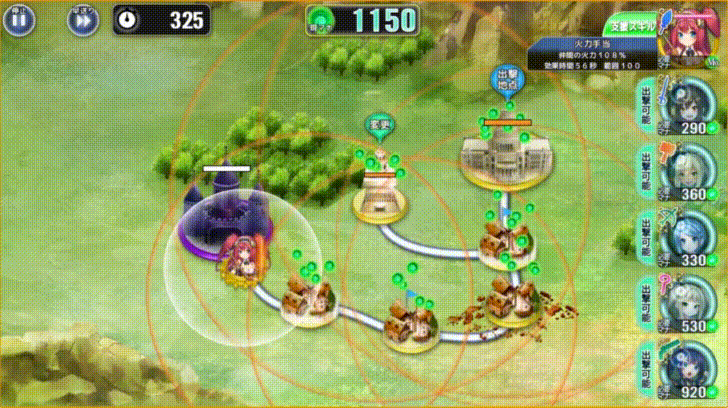
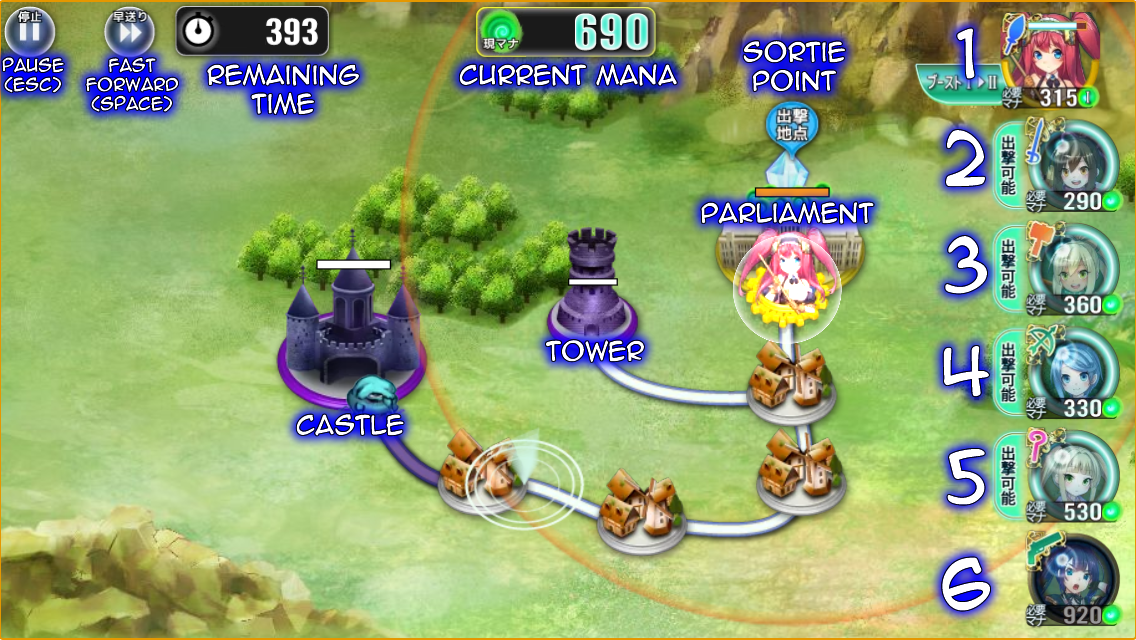 You begin at your Parliament and can sortie units there. Your sortie point is indicated by the blue bubble. You can move it to any liberated Tower.
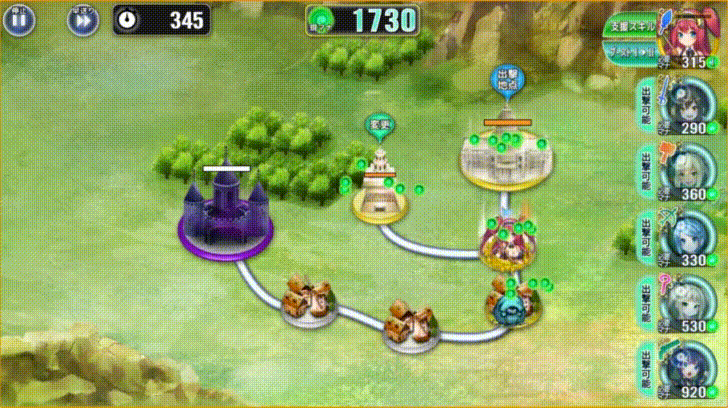
The amount of Mana you have is displayed at the top (690 in this picture). The starting Mana depends on the map.
Any Spirits who can be deployed will light up on the right, and deploying them will consume their Mana Cost shown below their portrait. Spirits can be summoned and selected by clicking on them, or by using the keyboard with 1, 2, 3, 4, 5, 6.
 Your territories unleash a Motivation Wave, an orange circle with a green light that comes from your Parliament, which powers your Spirits. Mana slowly generates during combat, shown as green orbs collected from liberated territories. Each liberated territory in range of the Motivation Wave gives off its own Motivation Wave, generating Mana and powering your Spirits.
You can control your Spirits by either clicking on their unit or icon and choosing where you want them to move. When a Spirit is selected, you can see their attack range. Spirits cannot attack while moving. Most Melee Spirits will stop to attack once any enemy is in range. Ranged Spirits must stop moving to attack and can move through enemies. Clicking a Spirit’s portait again can stop their movement. Depending on your settings, selecting a Spirit and clicking on an unpathable area on the map can also cancel their movement.
 The paths on the map have discrete tiles that you can choose to move your Spirits to. They will walk along the shortest distance to that point. You can cancel their movement to stop midway between two tiles. Two Spirits cannot occupy the same tile unless they are attacking. If a Spirit is already on a tile, the second Spirit will attempted to move to an empty tile.
You can liberate towns by walking on top of them if they are in range of a motivation wave. They will be an uncoloured gray if this is possible. If they are not in range, they will be purple and cannot be claimed yet. If they are touched by a motivation wave, but fall out of range after, they can still be claimed but cannot generate mana or motivation.
 You can liberate towers by destroying them with your Spirits. Liberating a Tower will typically drop a reward.
Enemies will spawn from the enemy castle, enemy towers, and holes to assault your towns, towers, and parliament.
 If an enemy walks on top of a liberated town, it is razed, and must be reliberated.
If an enemy walks to a liberated tower, it will attack it until it is razed, and it must be destroyed again to be reliberated.
If an enemy walks to your parliament, it will attack it until it is destroyed, causing you to fail the map.
Your Spirits can attack and will prioritize enemy units over enemy structures to prevent them from destroying your territories.
If a Spirit wanders outside of the Motivation Wave range when it activates, they will gain a red gear which greatly lowers their stats, rendering them nearly powerless unless they can get back in range of a Motivation Wave.
If a town or tower is liberated but falls outside of the motivation wave afterwards, it will remain liberated but cannot generate motivation or mana.
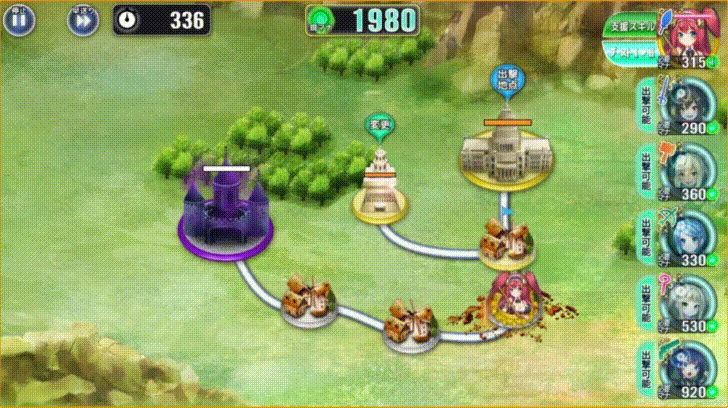 The lower teal tab is a Mana Boost. You can spend Mana to strengthen a Spirit up to 3 times. Each time costs progressively more based on the Spirit’s base cost.
Each boost provides +3.33% ATK, +33.3% ASPD, and +10% SPD for a total of 10% ATK, 100% ASPD, and 30% SPD at max.
First boost costs 150% Mana.
Second boost costs 175% Mana.
Third boost costs 200% Mana.
Total boost cost is 525% Mana, plus the original 100% to summon = 625% Mana.
 Above a summoned Spirit’s portrait is a bar indicating the time remaining on their skill cooldown. The First Recharge is faster than subsequent Recharges. Once their skill is available, it will appear as an upper tab, either Red (Attack), Green (Party Buff), Yellow (Self Buff), or Purple (Enemy Debuff). Mousing over it can show its range and effect, and clicking the tab activates their skill and puts it on cooldown to recharge.
It can be costly to upgrade a unit in combat, and it can affect your final score as you are rewarded for keeping a minimum amount of Mana, though it does not affect victory overall.
Victory is achieved when the enemy Castle is destroyed, and even if enemies are on the field, they’ll disappear. After the enemy Castle falls, your remaining time will be counted with your liberated territories to calculate your remaining Mana earned. There are additional bonuses (stars) awarded for clearing the map without losing a territory (120% Gold) or clearing the map while reaching a minimum amount of remaining Mana (120% EXP). Getting all three stars for the first time (clearing the map without losing territories while reaching the minimum mana) awards you with a Nomination Ticket.
Furthermore, there is a “Complete Victory” condition, where you earn all three stars under a certain amount of time while liberating all towers and towns. By completing these conditions, you can sortie to this particular map and will always gain the full three star bonus even if you don’t meet the conditions again.
There are also keyboard shortcuts to select Spirits instead of clicking on them. The number row 1~6 selects a spirit according to their order on the right side.
The |S| key will activate the currently selected Spirit’s Skill.
The |B| key will activate the currently selected Spirit’s Mana Boost.
The |M| key will stop the currently selected Spirit’s movement.
The |O| key will deselect the currently selected Spirit.
The |V| key will display your spirit’s corresponding number on the map.
The |N| key will change your current deployment location.
The |Z| key will activate your Parliament skill.
Holding down |SHIFT| and pressing a number will activate that Spirit’s Skill
Holding down |ALT| and pressing a number will activate that Spirit’s Boost.
Holding down the SPACE key will activate fast forward.
|ESC| will pause the game and bring up the menu. The Blue button quits the map. The Green button restarts the map. The Yellow button returns to the map.
Battle Part 3 (Weapons and Effects, and Tips)
There are four Weapon Types; Melee, Ranged, Magic, and Heavy. They are colour coded, and each Weapon Type has various Weapons.


The following descriptions are a general summary of the classes. There are several exceptions in each class that go against the summary, but the majority of Spirits lean closer to the summary than not.
- Melee Spirits typically have single target physical damage and attack relatively fast. All melee units can stun. Melee Spirits typically must attack enemies when they are in range and cannot move until enemies are no longer in range. This does not include Towers.
- Ranged Spirits typically have long ranged physical damage. They can typically attack flying enemies and many have a strong single target DPS. Ranged Spirits are able to walk through enemies and begin attacking when they stop moving.
- Magic Spirits typically have long ranged area of effect magical damage. Compared to Ranged units, they typically have more area of effect, and as such lower DPS. Magic Spirits are able to walk through enemies and begin attacking when they stop moving.
- Heavy Spirits typically have short ranged area of effect physical damage. Compared to Melee, Heavy focus on much slower attacks that have area of effect and higher damage per hit. Heavy Spirits typically must attack enemies when they are in range and cannot move until enemies are no longer in range. This does not include Towers.
All weapons have special effects and differing stats that separate them from one another. These effects are listed in the Unit page above the Spirit’s level and below their weapon icon. Their effects, range, area, attack, attack speed, movement speed, mana cost, and the Spirit’s skill all factor into a Spirit’s uniqueness. For example, some Spirits have extremely long range, while others attack incredibly fast, or have exceedingly high attack power but very small or no area of effect.
Stronger Spirits will have higher mana costs, but this makes them much more difficult to deploy and boost. Some maps also have very strict mana requirements to get full stars.
Examples of some weapon effects
Debuffs:
- Stun: All Melee weapons, and many others have the ability to Stun. In Seimani, a Stun is a 92% decrease (decrease to 8%) in MSPD for its duration, and the duration varies per weapon. Slower weapons typically stun for longer, but faster weapons can keep enemies stunned in place very well too.
- Slow: Many Magic weapons will Slow enemies. Decreases MSPD by 40% and ASPD by 33% (+50% delay)
- Curse: Decreases ASPD by 20% (+25% delay), and decreases MSPD, PDEF, MDEF, and ATK by 40%.
- Armor Break: Decreases PDEF by 60%.
- Seal: Decreases ASPD by 50% (+100% delay), and decreases ATK by 90%.
Effects:
- Anti-air: Not all Ranged weapons can target flying enemies. For example, Cannons cannot.
- Multi-hit: Many weapons can hit two or three times; for example, Brooms hit twice; Katanas hit three times
- Target Lock: Many Melee weapons will lock on to a target. Once they begin attacking something, they do not switch targets until that target dies or they move out of range. This can be used to begin attacking a Tower or a strong Yato, and continue to attack it even if other enemies walk into range; for example, Great Sword and Katana will Target Lock.
- Delayed Projectiles: Many projectile weapons will take time before their projectile hits its target, some longer than others; for example, Bows have a short delay before their arrows land
- Pass Through: Some Melee weapons have the ability to pass through enemies instead of being forced to attack them when they are in range. They can be used to sneak through enemies and claim Towns or attack Towers. For example, Dual Blades can pass through enemies.
A more thorough description of every Spirit and their effects will be provided in another guide.
- You can restart a map at any time by pausing and pressing the green button. If things are going very badly, don’t be afraid to try again.
- All Melee Spirits have some form of Stun which slows down enemies. Use them to delay enemies while your Ranged Spirits deal more damage.
- You cannot cancel a Spirit’s attack delay by making them move. If they attack once every 5 seconds, they must wait (almost?) the total 5 seconds while not moving before they can attack again.
- You cannot stand directly on Parliament. When a Spirit is deployed, they will move slightly to the side. Force them to stop if they need to be attacking right away.
- Stop your Melee Spirits on the tile before a Town to make sure it’s safe before liberating it.
- You can move a Spirit on top of another Spirit, and force them to stop. If there is an enemy in range, they will begin attacking instead of moving to an empty tile. Particularly useful for stacking Ranged and Magic Spirits, but be careful of where they move to after the enemies are gone.
- For Melee and Heavy Spirits, they will automatically stop moving if an enemy is in range.
- Spirits overlapping will move to an empty tile before trying to attack a Tower. You can prevent this by activating their skill, forcing them to stop. After the skill ends, they will attack anything in range, including a Tower, instead of moving.
- Higher mana cost Spirits are stronger, but you will not always have enough mana to afford them. It may be easier to deploy a lower cost Spirit and boost them further into the stage than to wait for the mana to deploy a very high cost Spirit.
Enemies (A Brief Summary)
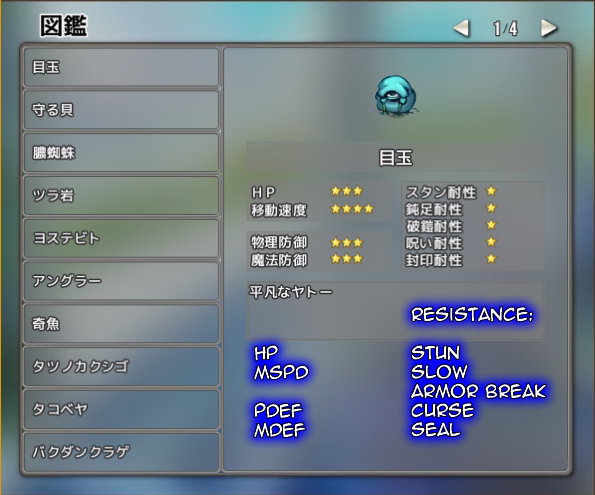 The in-game encyclopedia, found under the options button on the top left of the Home Page, shows pictures and stats outlines for most enemies in the game.
The names I will be using are general descriptions used in the past, rather than direct translations of the Japanese names. This is a very brief summary of enemies.
- Page 1:
- Eyeball – The weakest enemy.
- Pink Shell – Higher PDEF than Eyeballs.
- Spiders – Probably the first, and continual hurdle. They are very fast, and can easily run past lower level Melee Spirits who are too slow to stun lock them.
- Rocks – Very high PDEF, but very slow. They pose a thread to fast Spirits who have low physical ATK.
- Hermits – The first tanky enemy you will see. They have very high HP and can power past your Spirits if they don’t do enough damage.
- Anglerfish – Very high MDEF and resistances to all debuffs and fairly fast.
- Strange Fish – Extremely high MDEF and very high PDEF. Basically immune to all debuffs.
- Seahorse – Fairly fast flying enemy.
- Octopus – Fairly tanky flying enemy.
- Bomb Jellyfish – Extremely high PDEF enemy that has extremely high attack. Typically requires magic to defeat.
- Page 2:
- Cannon Tortoise – A slow, high PDEF enemy that has a ranged attack. Though it’s not super strong, it can constantly attack which poses a big threat.
- Dead Fish – Extremely fast and with high HP, but low defense.
- Crystals – Low HP, but extremely high defenses. Basically a super rock.
- Fairies – High MDEF that buff enemies’ speed.
- Mana Jellyfish – They’ll self-destruct on your buildings to give you Mana, but they can still raze Towns.
- Green Octopus – Fast flying units that come in swarms.
- Crab – When they are hit with a physical attack, they’ll go into their shell and gain extremely high PDEF but stop moving. Very hard to kill without Magic.
- Speedy fish – Fish that are almost immune to all debuffs and become extremely fast when below half HP.
- Crystal Knights – Extremely high PDEF that almost always require Magic to kill.
- Pillbug – Always take 1 damage. Needs extremely fast units to effectively kill.
- Page 3:
- Flying Pillbug – It flies
- Crocodile – Very very high HP late game enemy
- Ray – Very very high HP high MDEF late game enemy, but weak PDEF
- Lobster Boss – The first boss monster. High HP, and they’ll become common further on.
- Jellyfish Boss – Very high HP and PDEF boss.
- Sand Worm – Not actually sand but looks like it. Veeeery high HP but slow.
- Flying Worm Boss – Very high HP and slow, but flies
- Flying Worm Boss but with a face – Even worse
- Various Urhcins – Stationary enemies with low HP and explode when killed, hurting all enemies in range, possibly with a debuff.
Experience and Leveling
After combat, EXP is distributed to all Spirits in the party, regardless of whether they were summoned or not. The EXP is distributed evenly among the number of Spirits. If a Spirit is at max level, they do not gain EXP and the EXP is distributed among the Spirits who can still level.
If a Spirit has a different rarity version with a higher level, there is a catch-up bonus available. Depending on the level difference, the lower level version can gain anywhere between a 1.5x (1 level) to 4x (25~ levels) to 7x (90+ levels) increase in EXP.
As the stages get closer towards the boss stage, the EXP they provide increases. The lettered stages are ordered on their release date, so F may be later in the alphabet but have lower EXP/difficulty because it was placed closer to the start of the map when it was released after E.
You can level up Spirits more quickly by sortieing with fewer Spirits in the party, or with more max level Spirits in the party. The optimal method of leveling is with only one Spirit who is not maxed level gaining all the EXP.
You can very easily solo N1-1 with any Spirit to quickly level up early on. After a few levels, they can begin soloing H1-1. Getting several N or N+ rarity Spirits to 30 or 40 can help early leveling, though it’s not absolutely necessary. A party of relatively strong Spirits can carry one lower level Spirit to get EXP. Once that lower level Spirit is strong enough, she can also participate in clearing the map.
Since there is no stamina or resource consumption for combat, there are several Event maps that can be easily cleared for EXP.
If you get a Complete Victory on a map, you can focus solely on speed; aiming to destroy the enemy Castle as fast as possible since you don’t need to liberate Towns or worry about protecting them to get the full 3 star clear bonus. You can also ignore the full star bonus if you want to simply clear as fast as possible.
Recommended Spirits (Melee)
Complete details of each Spirit in Japanese can be found on https://wikiwiki.jp/seimani
A full guide in English will be provided at a later date.
All Spirits can be obtained at almost any time with no RNG element. The following are only some of the recommended Spirits based on their performance in the previous version of the game.

Hillary Itou – Great Sword
- Physical Attack
- Attacks stun enemies
- Target Lock until the enemy is defeated
- Range: 64
- Skill: (Red) Shockwave. 8-hit physical attack on a small point. Range: 120
- First Charge: 15s
- Recharge: 50s
Very high initial cost, but extremely powerful. She has very high single hit damage, meaning defense doesn’t hurt her much. Her skill can be used to snipe towers since it has 120 range, and the hits can kill strong enemies that are standing directly on the tower as they spawn.

Rin Hayashi – Katana
- 3-Hit Physical Attack
- Attacks stun enemies
- Target Lock until the enemy is defeated
- Range: 60
- Skill: (Yellow) Increases ASPD to 250% for 8s.
- First Charge: 10s
- Recharge: 55s
Very high initial cost, but extremely powerful. She is commonly used to quickly burst down a tower right after being summoned since her first charge is so short. Compared to Hillary, she suffers against high defense enemies early on, but high levels can overcome this in the future.


Talua Katsura and Yulia Abe – Dual Blades
- 2-Hit Physical Attack
- Pass through enemies
- Attacks stun enemies
- Range: 40
- Talua
- Skill: (Yellow) Increases ASPD to 200% for 18s
- First Charge: 20s
- Recharge: 65s
- Yulia
- Skill: (Green) Increases ASPD to 120% and MSPD to 135% for all allies in range.
- First Charge: 10s
- Recharge: 40s
Dual Blades are extremely low cost, fast, and can pass through enemies. They can be used to sneak past enemies that would block other Melee, and liberate Towns behind enemy lines, snipe tower, or focus on enemies further down the line. Talua is particularly strong at sniping with her skill’s focus on DPS, while Yulia is more suited for liberating with her focus on movement speed.

Isthrene Shidehara – Bewitched Blade
- 3-Hit Magical Attack
- Attacks stun enemies
- Range: 60
- Skill: (Yellow) Increases ASPD to 200% for 15s.
- First Charge: 15s
- Recharge: 45s
Bewitched Blades are basically a magic version of Katana. Isthrene in particular is like a magic version of Rin, with an early ASPD buff. Their cost is a bit lower and their DPS is also lower, but they do attack faster.

Natasha Nabeshima – Claw
- 2-Hit Physical Attack
- Attacks stun enemies
- Target Lock until the enemy is defeated
- Damage increases while attacking the same enemy
- Range: 40
- Skill: (Yellow) Increases ASPD to 200% for 10s
- First Charge: 10s
- Recharge: 45s
A moderate mana cost Spirit, but with a very powerful effect. Each attack she does against the same target will cause her damage to increase until that enemy dies or moves out of range. After 15 hits, she deals 3x damage, and she can reach the 15 hits very quickly by using her skill. Very powerful against high HP targets.

Margot Ibuka – Lightsabre
- Magical Attack
- Attacks stun enemies
- Hits build a gauge
- When the gauge is maxed, ATK, ASPD increase and gains Area attack
- Range: 60
- Skill: (Red) High damage magic attack on all enemies in range. Range: 150
- First Charge: 15s
- Recharge: 45s
A very powerful unit with a unique mechanic. Her base attack is middling, but when she transforms to Super Lightsabre, the ATK (1.5x), ASPD (2x), and Area (60) buffs make her very powerful. Requires 20 hits to max gauge, which lasts 20s. Each hit during Super Lightsabre extend the duration by 1s. Her skill’s area of effect also counts towards her hit count, building a large amount of gauge if it hits many enemies.

Keria Mochizuki – Boots
- Physical Attack
- Attacks stun enemies
- Pass through enemies
- Increases ATK by 1.5x when on a special path
- Range: 48
- Skill: (Red) Shockwave. Deals damage in a rectangle shape around the target.
- First Charge: 45s
- Recharge: 100s
Available from Event Page 6, Event #6. Boots offer high MSPD, while dealing extra damage when on a highway or a slow path. Her skill is extremely powerful and can be used to snipe buildings in one shot if positioned correctly; however, it may be more difficult to use her because she is an EX rarity unit compared to the SR Dual Blades.
Recommended Spirits (Ranged)
Complete details of each Spirit in Japanese can be found on https://wikiwiki.jp/seimani
A full guide in English will be provided at a later date.
All Spirits can be obtained at almost any time with no RNG element. The following are only some of the recommended Spirits based on their performance in the previous version of the game.


サブリナ・カトー and ティターニィ・カトー
Sabrina Katou and Titany Katou – Bow
- Physical Attack
- Can target aerial enemies
- Short time delay before impact
- Range: 190
- Area: 1
- Sabrina
- Skill: (Yellow) Increases APSD to 150% for 30s.
- First Charge: 35s
- Recharge: 85s
- Titany
- Skill: (Yellow) Increases ATK to 130% for 30s.
- First Charge: 35s
- Recharge: 85s
Bows are low cost but efficient. Sabrina and Titany offer a low mana cost and low max level so you can max them very easily and deploy them in a wide range of situations. Their Area of 1 means they can still hit multiple stacked enemies. Sabrina’s very high ASPD in particular makes her very strong. They have the disadvantage of taking time for their arrows to land, which can waste shots. I recommend their R or R+ forms because of how cost effective they are. Incidentally, I’ve found they are much more effective than the SR bow, Caroline, and their EXA are very competitive with Caroline’s SSR.


シェロブ・ビッグベア and ティナ・カタヤマ
Shelob Bigbear and Tina Katayama – Crossbow
- Physical Attack
- Can target aerial enemies
- Range: 210
- Shelob
- Skill: (Yellow) Increases ASPD to 200% for 12s
- First Charge: 30s
- Recharge: 55s
- Tina
- Skill: (Blue) Transforms her attack into a piercing shot and increases ATK to 130% for 20s
- First Charge: 20s
- Recharge: 60s
Crossbows are more expensive than Bows, but feature very high ATK in comparison. They are often strong enough to take down high PDEF enemies that other ranged Spirits may struggle with where you would need Magic. Shelob can burst down very quickly when her skill is active, and Tina offers an extremely powerful pierce effect that causes her bolts to travel the entire distance of the map. Shelob’s overall DPS isn’t as good as Tina’s because of the rarity difference and her R/R+ forms are weaker than would be expected for some reason. Tina is also one of the best characters in the game. Just look at her.

カーラ・イノウエ
Carla Inoue – Lightning Arrow
- Magical Attack
- Attacks stun enemies
- Can target aerial enemies
- Range: 210
- Area: 1
- Skill: (Red) Shockwave. Large area of effect stunning magic attack. Range: 210
- First Charge: 30s
- Recharge: 70s
Similar to a crossbow but with Magic. She has an Area of 1, and her arrows can stun, so she can start stacking enemies together and deal damage to multiple targets. Her skill is a wide range nuke. Becomes much more powerful as she gains ASPD from leveling, since she can slow enemies into a pile.


キララ・タナカ and ティアラ・イヌカイ
Kirara Tanaka and Tiara Inukai – Gun
- Physical Attack
- Can target aerial enemies
- Range: 140
- Kirara
- Skill: (Yellow) Increases ATK and Range to 120% for 50s
- First Charge: 25s
- Recharge: 90s
- Tiara
- Skill: (Red) Shockwave. Damage increases with hits. 40 hit physical attack. Range: 160.
- First Charge: 30s
- Recharge: 70s
One of the best original weapons. Guns have some of the highest ASPD in the game, leading them to incredible DPS, low downtime, and low damage waste. They are very weak against high DEF enemies and have fairly low Range though. Kirara has a very high up-time buff skill and the higher ATK of the two making her a DPS powerhouse. Tiara has the higher ASPD of the two, allowing her to kill weaker enemies faster, and her skill is an extremely powerful burst.
Recommended Spirits (Magic)
Complete details of each Spirit in Japanese can be found on https://wikiwiki.jp/seimani
A full guide in English will be provided at a later date.
All Spirits can be obtained at almost any time with no RNG element. The following are only some of the recommended Spirits based on their performance in the previous version of the game.

トリクシィ・ハラ
Trixie Hara – Magic Ordnance
- Small 5-Hit Area of Effect Magical Attack
- Can target aerial enemies
- Range: 160
- Area: 16
- Skill: (Red) Shockwave. Focused magic attack on one spot. 24 hit magical attack. Area: 16 Range: 160.
- First Charge: 40s
- Recharge: 80s
An extremely expensive Spirit, but considered to be one of the most powerful. Her single target attack power is one of the highest in the game with no conditions required, but she attacks very slowly. She can easily one-shot towers and castles with her skill, and even doing so with her attack. Her attack has a very small area of 16, but she can kill tightly stacked enemies easily.

ケイシア・オカダ
Kacia Okada – Magic Tool
- Area of Effect Magical Attack
- Attacks slow enemies
- Can target aerial enemies
- Range: 140
- Area: 100
- Skill: (Purple) Curses all enemies in range for 20s. Range: 250
- First Charge: 25s
- Recharge: 45s
One of my preferred area of effect Magic Spirits. While she has less ATK, Range and Area than a Staff, her ASPD and cost is much more managable.

プリミュラ・コノエ
Primula Konoe – Rod
- Small 3-Hit Area of Effect Magical Attack
- Attacks slow enemies
- Can target aerial enemies
- Range: 160
- Area: 16
- Skill: (Purple) Curses enemies at a point for 36s and hits 18 times. Range: 160
- First Charge: 15s
- Recharge: 55s
A moderate cost small area focused Magic Spirit. Very reliable at DPS for a more manageable cost compared to someone like Trixie.

ミレイア・ヨナイ
Mileia Yonai – Notebook
- Small Area of Effect Magical Attack
- Can target aerial enemies
- Range: 180
- Area: 64
- Skill: (Red) Deals magical damage to all enemies in range. Range: 200
- First Charge: 15s
- Recharge: 35s
The lowest cost Magic Spirit. She has fairly good Range, and a moderate amount of Area. Effective for her cost.

ビアンカ・マエジマ
Bianca Maejima – Magic Talisman
- Small Area of Effect Magical Attack
- Can target aerial enemies
- Range: 140
- Area: 16
- Skill: (Red) Deals continues magical damage to all enemies in range of the highest HP target for 20s.
- First Charge: 15s
- Recharge: 60s
More expensive than Primula. The fastest ASPD Magic Spirit. She has low range and area, but very good DPS, especially for her cost, and she has high strategic value with her Skill basically creating a damage over time around the highest HP target nearby.

ユノ・オザキ
Yuno Ozaki – Divine Staff
- Small Area of Effect Magical Attack
- Can target aerial enemies
- Attacks deal more damage for each debuff an enemy has (Max 5)
- Range: 160
- Area: 16
- Skill: (Purple) Shockwave. 4-hit attack with debuffs that last 20s. Range: 160
- First Charge: 20s
- Recharge: 50s
Often considered (one of) the strongest Spirit in the game, I believe. She possesses some of the highest damage potential in the game, dealing up to 3.5x more damage with all 5 debuffs active, on top of her already relatively powerful base ATK and ASPD, and moderate cost. Debuffs include Stun, Slow, Curse, Seal, Armor Break, and she can apply 4~5 herself with her skill.
Recommended Spirits (Heavy)
Complete details of each Spirit in Japanese can be found on https://wikiwiki.jp/seimani
A full guide in English will be provided at a later date.
All Spirits can be obtained at almost any time with no RNG element. The following are only some of the recommended Spirits based on their performance in the previous version of the game.

ビッキー・トウジョウ
Vicky Toujou – Razor
- Area of Effect Physical Attack
- Attacks stun enemies
- Attacks deal increased damage when attacking more enemies
- Range: 72
- Area: 80
- Skill: (Yellow) Increases ASPD, Range, and Area to 150% for 15s.
- First Charge: 30s
- Recharge: 65s
Razors provide extremely powerful area of effect damage, but are very expensive. The more enemies in range of their attack, the more damage they do. This can scale incredibly high to such a degree that they’ll struggle with one or two enemies, but when enough walk in, they can oneshot the whole pack.

タイス・イタガキ
Thais Itagaki
- Area of Effect 2-Hit Physical Attack
- Attacks stun enemies
- Mana boost increases area of effect
- Range: 44
- Area: 64
- Skill: (Red) Shockwave. 7-hit area of effect stun attack. Range: 80
- First Charge: 40s
- Recharge: 80s
A moderate cost Heavy. Fairly cost effective for a strong area of effect attacker. Her delayed two hits help keep enemies stunned despite her slow attack speed, and she has a unique effect of gaining more area of effect when she is boosted.

フューリー・ヤマカワ
Fury Yamakawa – Drum
- Area of Effect Magic Attack
- Attacks stun enemies
- Range: 72
- Area of Effect: 100
- Skill: (Green) Boosts herself and one other Spirit closest in range.
- First Charge: 30s
- Recharge: 100s
One of the very best support units in the game and the lowest cost Heavy. Her combat performance isn’t particularly great; her DPS isn’t very high, but she does deal Magic damage instead of physical. Her skill gives a free boost to herself and one other Spirit. Increasing the level can eventually boost up to 3 other Spirits in range. Extremely powerful for boosting high mana cost Spirits you otherwise can’t afford.

ヨハンナ・アベ
Johanna Abe – Hammer
- Area of Effect Physical Attack
- Attacks stun enemies
- Range: 52
- Area of Effect: 52
- Skill: (Red) Physical area of effect attack that petrifies enemies for 3s. Range: 140
- First Charge: 20s
- Recharge: 55s
Hammers are the second lowest cost Heavy. The performance difference over the R rarity Lacy is probably worth trying the SR Hammer if you want a cheap physical area of effect.
By Folseus