Here is a full guide on how to use the level editor in Severed Steel.
Level Settings
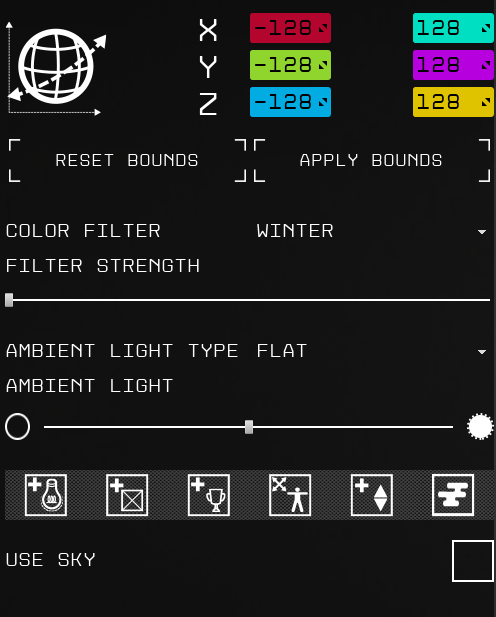 You can change level boundaries.
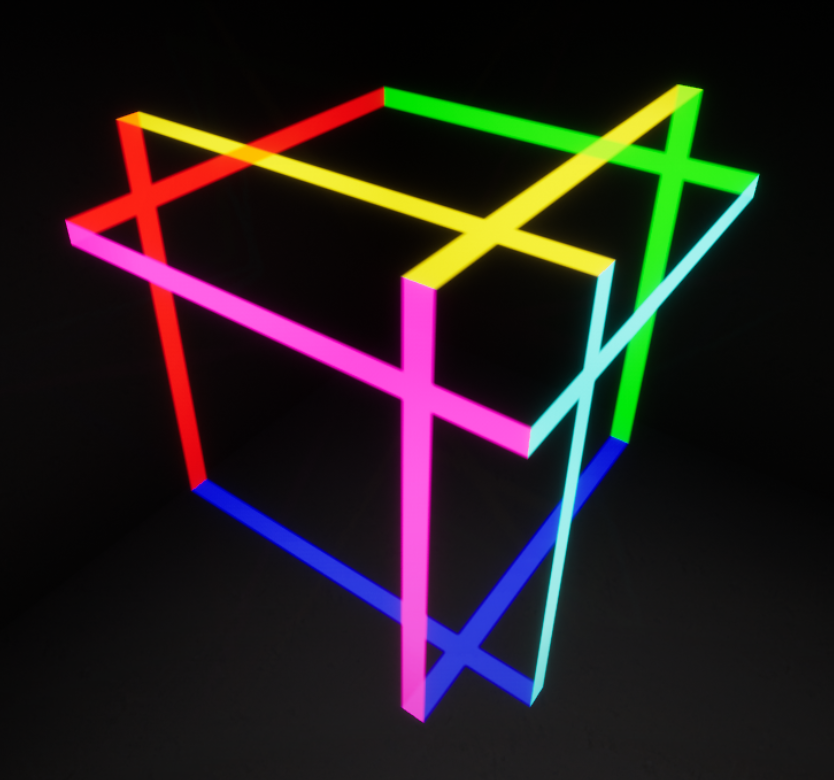
Toggling grid visibility from toolbar shows the colors.
Resets the bounds the default (128x128x128)
Apllies selected bound to the map( Note: All voxels outside of the bounds will be lost)
There are 14 different filters to choose from. You can change it anytime you want. The slider adjusts the strength of the filter.
There are 4 different light types to choose from. You can change it anytime you want. Each one gives a different feel to the map. The slider adjusts the strength. Choose the one that fits the more ( It depends on the textures, additional lights, and theme of the map)

(from left to right)
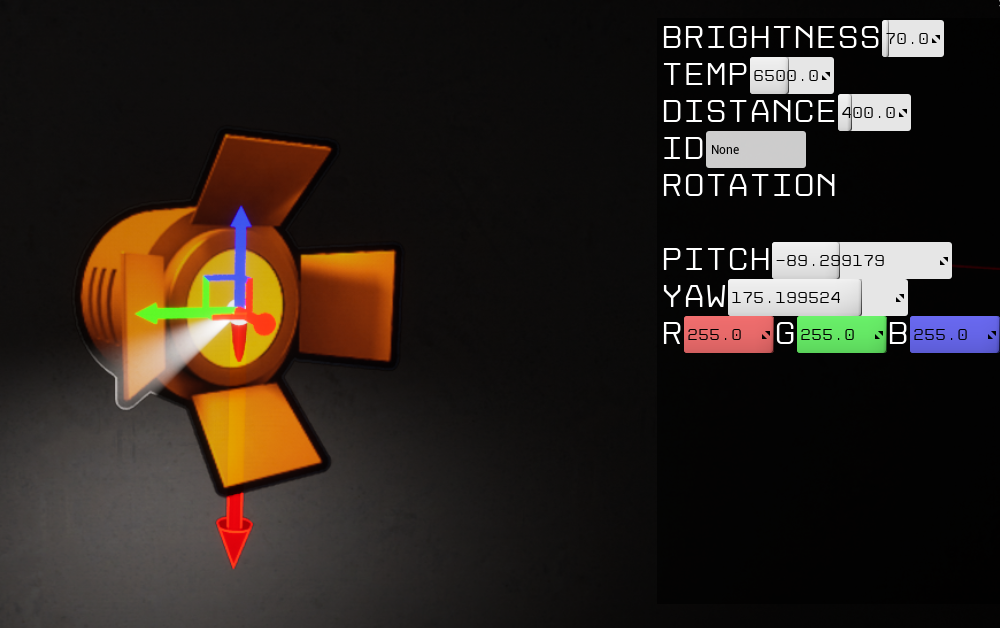 Spawns a light source.You can move it around using x/y/z arrows or using middle. You can rotate the light direction by pressing “E”. Red arrow is the light direction.
Brightness: Adjusts brightness of the light
Temprature: Adjusts warmness of the light
Distance: Adjusts max distance of the light (red circle shows the area)
Pitch/Yaw: Adjusts direction. You can press “E” and adjust it manually
RGB: Adjusts color of the light.
Spawns a wall that player can’t able to pass but NPCs can pass. You can use it for spawning enemies.
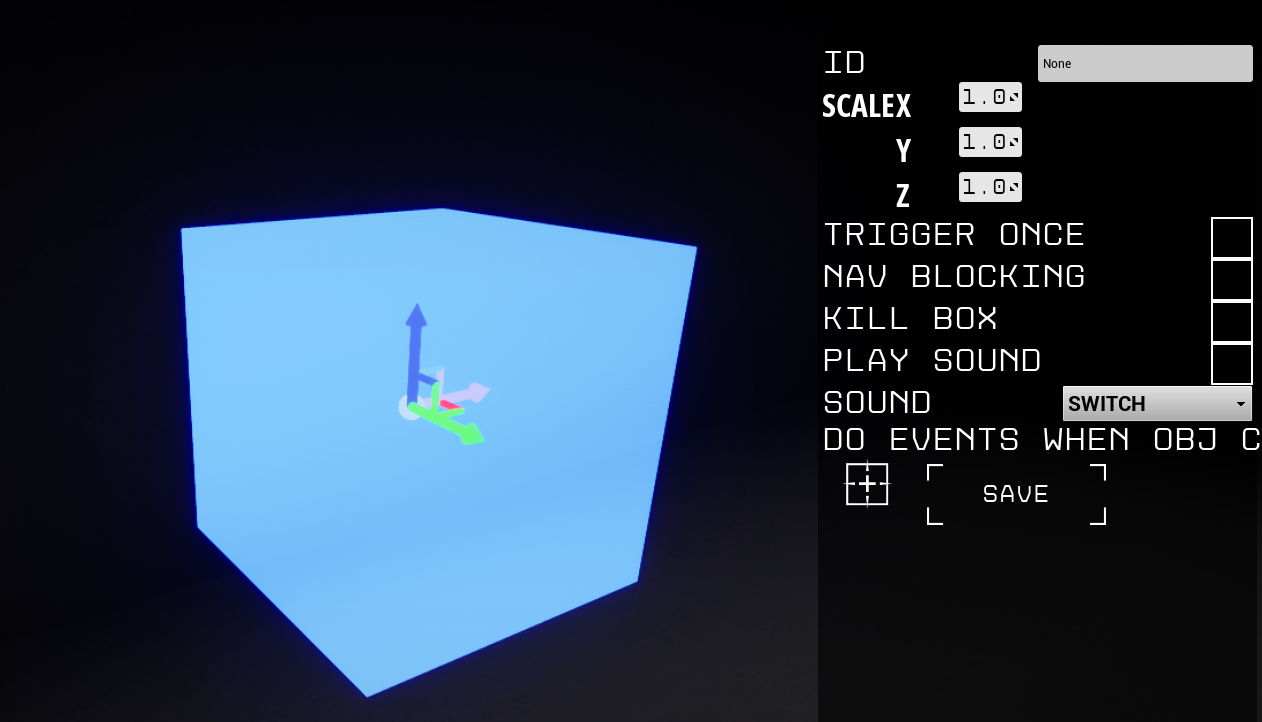 ID: For adding objectives
Scale: You can scale the cube using x/y/z
Interactable:
Trigger Once: You can only trigger it once.
Navigation Blocking: Blocks NPCs movement, NPC’s cant able the pass the wall.
Kill Box: Kills the player on touch
Play sound: Plays the selected sound
Do events when obj complete: Now you can use “events” with triggers, for more info see objective settings/events
 This is the spot where the player spawns in a level. There can be only one player spawn point
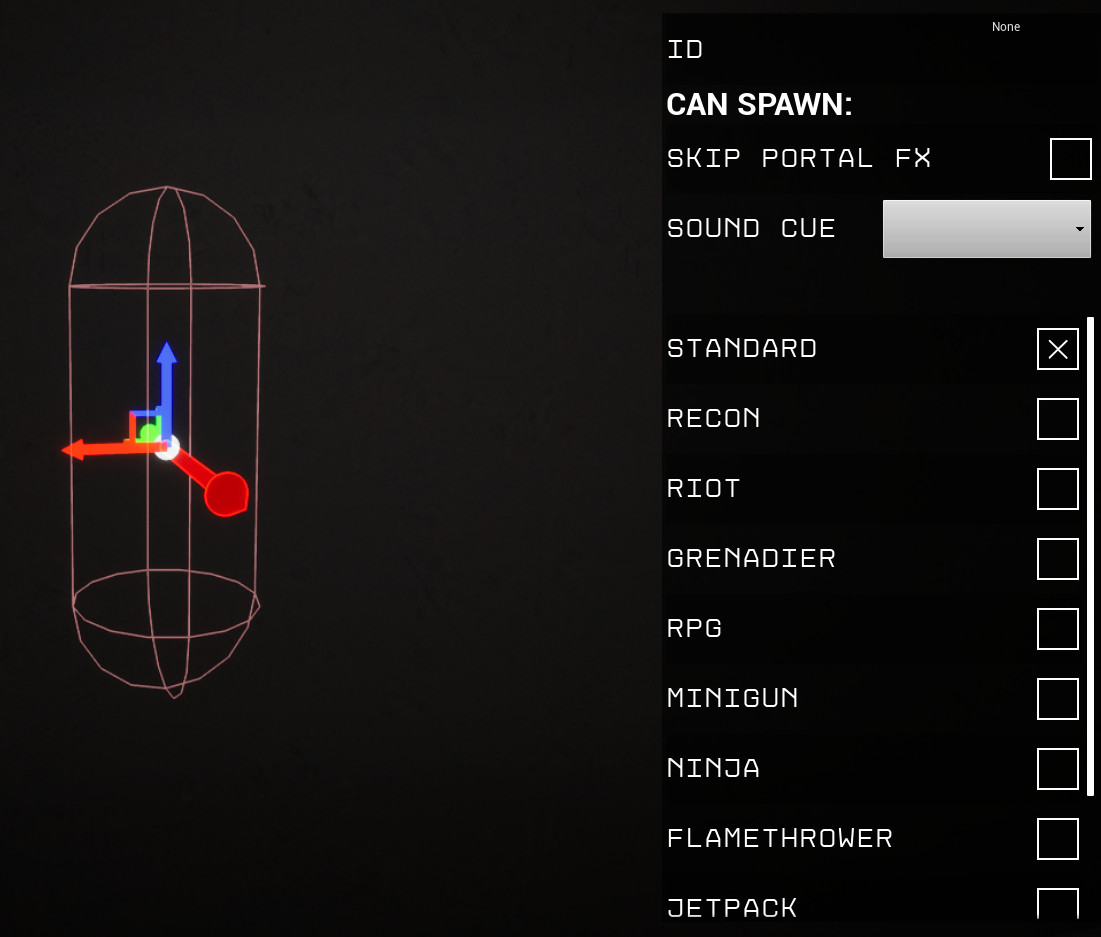 You can spawn enemies using objectives.
Spawners also can be used for:
prop move point ( You must give it an ID and deselect all enemy types)
wave spawn (ID must be empty, select the enemy types you want)
checkpoint spawn point ( You must give it an ID and deselect all enemy types)
Toggless on/off fog. It applies to whole map
Enables skybox. (You can’t able to use ambient light with a skybox) You can use the slider to set the preferred time
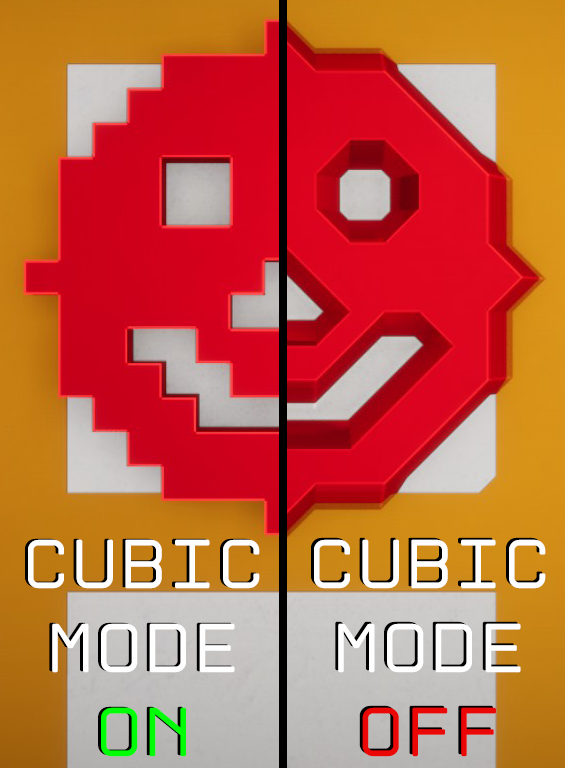
Voxel Edit Mode
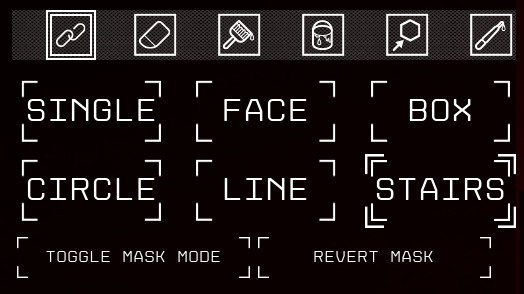
Erase Mode Subtracts voxels from the world
Paint Mode:Paints voxels with the new material
Bucket Tool:Paints all connected voxels with material
Object Tool: Allows selecting voxels to delete or copy-paste
Tool: Copies material from selected voxel
Modifies single voxel
Modifies surface

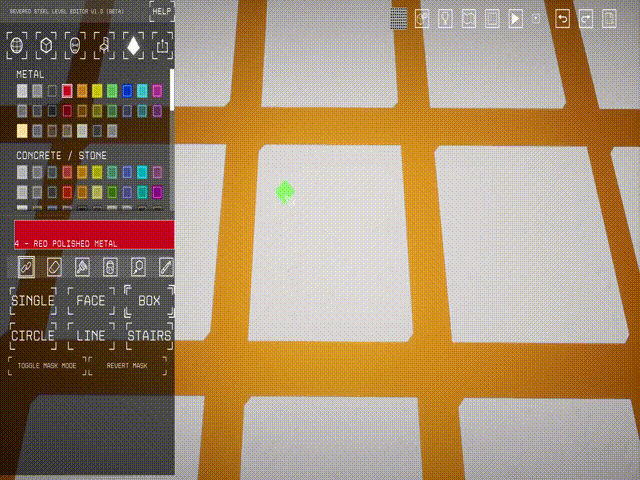
Click and drag to draw a box shape

Click and drag to draw a circle shape
Click and drag to draw a line shape
Click starting point and drag to end height
Using mask mode:
NPC Spawn Mode
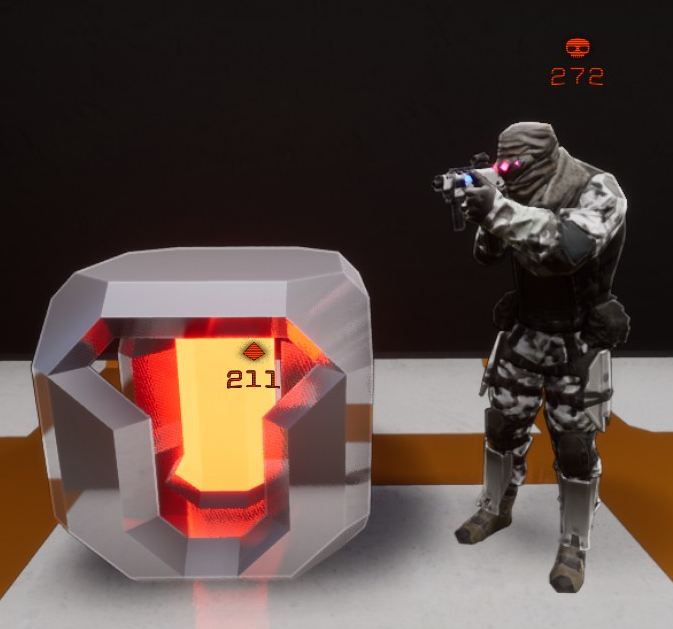
There are 12 13 unique enemy types that you can put on your map. They are really easy to spawn and move around, just click on them and place them wherever you want.
Standart: Basic enemy type. Moves around the map, looks for cover.
Sniper: He can spot the player really easily. Holds his ground. Uses sniper.
Shield: Good for blocking player, works in narrow places. Player can pick up the shield with grav gun or knock the shields off by other cannons.
Jumper: Jumps between places. The backpack can charge cannons.
Heavy: Heavy armored target, good for any map, can destroy the environment.
Jetpack: Uses jetpack to hover around. Good for vertical or open maps. After get killed jetpack explodes on impact. The backpack can charge cannons.
Minigun: Has miniguns on its shoulder, good for any map. The backpack can charge cannons.
Rocket Turret:
Machine Gun Turret:
Rocket: Has rocket launchers on its shoulders, good for any map. Can destroy the environment. The backpack can charge cannons.
Standart Elite: They have cloaking devices. Good for narrow spaces. Uses silenced weapons
Zombie:Heavy armored target, the weak point is its back. Uses: Flamethrower
Specialist: New enemy type, it can move very fast. Uses silenced weapons
Object Spawn Mode
The default section is for the campaign props. You can find the weapons here.Custom:
This is where your custom-made props will save. In here, you can find your custom props. You can delete the props you want, by simply clicking the “delete mode” once and selecting the prop that you want to delete.
AppData\Local\ThankYouVeryCool\Saved\SaveGames\propsIf you want to share your props with others, you can find them here. Right now all props have unique IDs, you can rename them from the folder.
Prop Settings
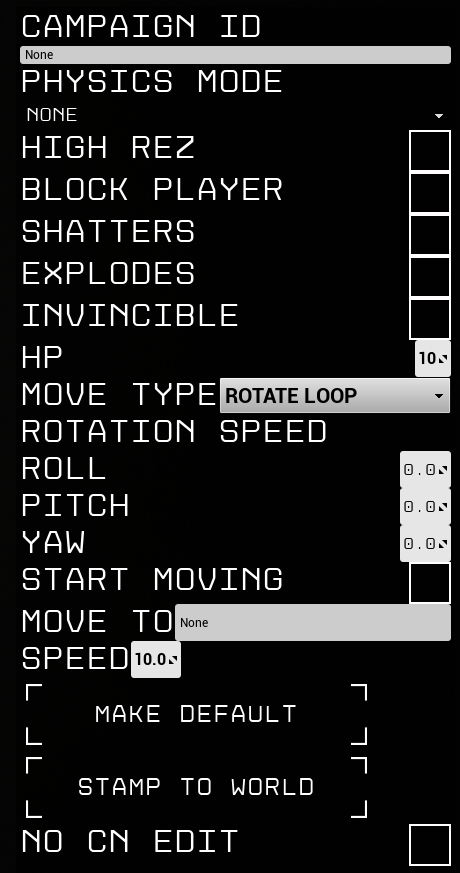 Campaing ID: ID is required for campaign features. ID can be letters, numbers. For more info see Objective Settings
Physics Mode:
High Rez: You can make big detailed props and use this feature to make them smaller
Block player: Prop can block player.
Shatter: If prop hp reaches 0, it shatters
Explodes: If prop hp reaches 0, it explodes
Invincible: Prop can’t take any damage
HP: Health point of selected prop
Move type:
Roll: roll speed
Pitch: pitch speed
Yaw: yaw speed
Start moving: prop starts moving with the start of the level
Move to: this is where prop moves. You need to place an NPC Spawner, deselect all enemy types, give an ID, and write that ID in to “move to” box
Speed: How fast prop moves
Make default: Makes current settings default for selected prop
Stamp to world: Stamps the selected prop to the world. Useful for re-editing the prop
No CN edit: No cannon edit, cannon damages the prop but without destroying any voxels
Objective Settings
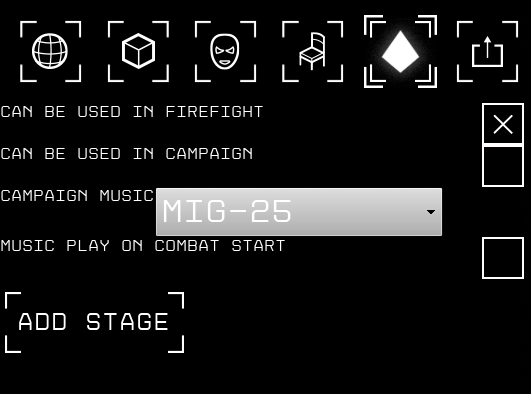 Can be used in firefight: Enables/disables firefight mode
Can be used in campaign: Enables/disables campaign mode
Campaing music: You can choose music for your level, hover your mouse on them for to listen
Music play on combat start:
Add stage: Adds stages for objectives. You can have multiple stages and multiple objectives,
Spawn weapon:
 Now you can choose which weapon will the player start with
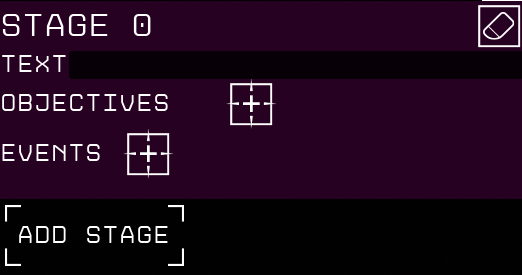
You can create your campaign-style maps with this system. You can add destroy targets to enemies/props, parkour checkpoints, hide props, turn on/off fans, add an exit to the level, etc, with objectives. Let’s start with the basics. You must enable the “can be used in campaign” for your level to work with objectives. Stages always follow each other like this, Stage 0>Stage1>Stage2>Stage2…
 Stage Eraser: Deletes current stage.
Text: This is the text that displays on the screen. It flashes on the screen at the start of the stage. Always stay on the top right objective text if the current stage is still active.
Objectives: Things that the player needs to do. Objectives are will automatically be marked with a compass. If all of the objectives are complete, the next stage starts. You can add multiple objectives by pressing “plus” and deleting them with the “eraser”.
Events: Things that happen on the map when a stage starts. You can use this feature for spawning enemies, hiding props, triggering explosions, turning on/off fans and lights.
Add Stage: Adds more stages. When all of the objectives are complete, next stage starts automatically.
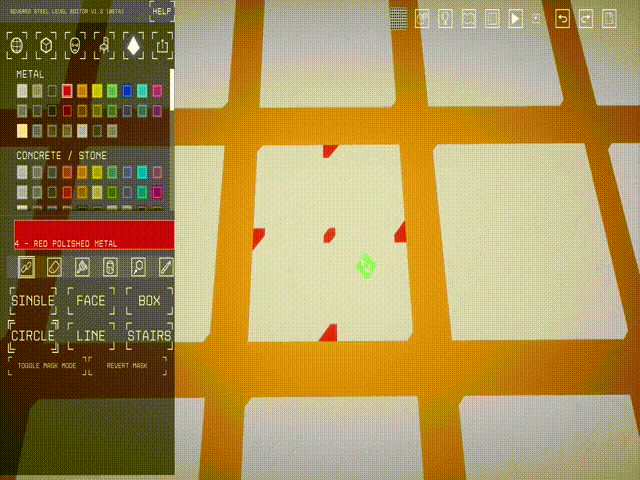
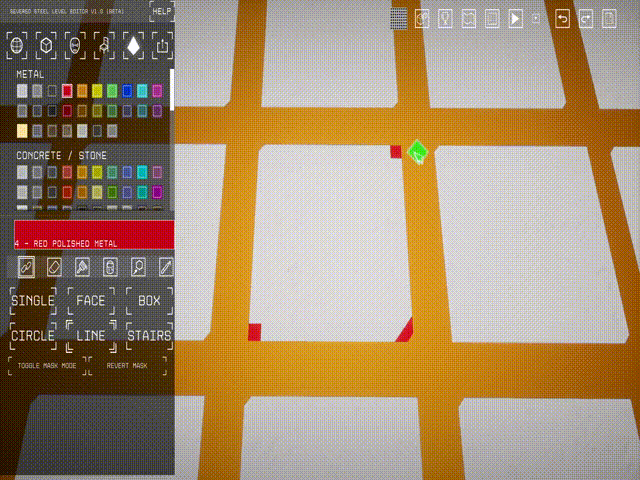
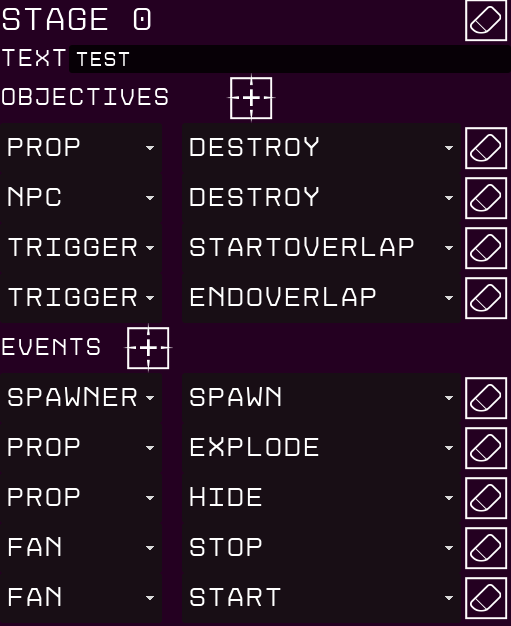 Prop/Npc Destory Objective: Player needs to destroy the targets to proceed to the next stage. You can add multiple destroy objectives.
(How they look in the game)
Destroy: Stage finishes when all of the targets have been destroyed
Startoverlap: As soon as you touch the trigger objective counts
Endoverlap: After entering the trigger zone, as soon as you left the trigger zone, objective counts
Special/ Kill Them All: You must kill all current enemies to proceed to next stage
Prop Events
- Hide: Hides selected prop.
- Show: Shows selected prop.
- Explode: Explodes selected prop.
- Start: Starts prop movement (Rotate/Slide)
- Stop: Stops prop movement
- MakeInvuln: Enables Invincible setting for selected prop
- RemoveInvuln: Disables Invincible setting for selected prop
- Showhealth: Shows selected prop’s hp bar at top of the screen
Spawner Events
- Spawn: Spawns enemies.
Lights
- Hide/Show: Hides/Shows selected lights
- Turnred: Turns red light for selected lights
Portal
- Start/Stop: Starts/Stops the portal
Special
- DowaveofX: Spawns waves of enemies. You must place NPC spawners with no name to use this feature.
- Disable/Enable AI: Disables/Enables AI (NPCs)
- UnlimitedCannon: Unlimited ammo for equipped cannon
- KillLights: Disables all lights
- RestoreLights: Enables all lights
- Stop/Play Music: Stops/Plays selected track
- KillAllNpcs: Kills all current NPCs
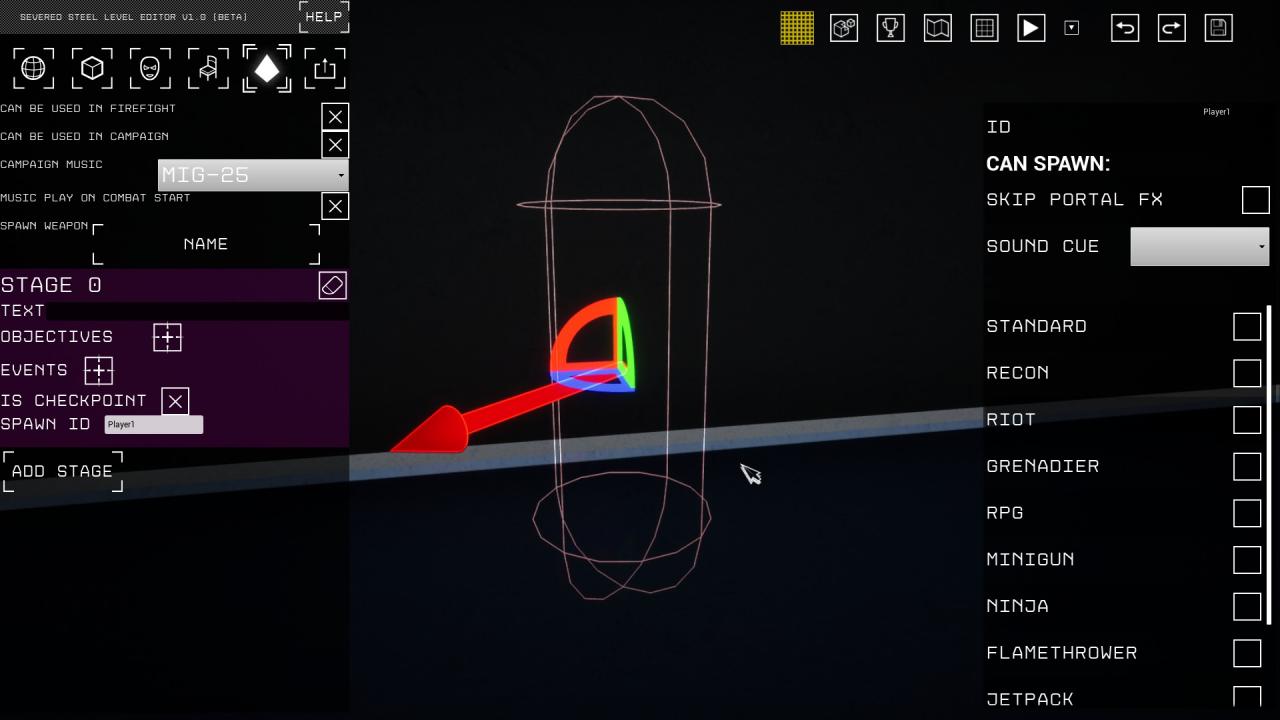 It creates a checkpoint for selected stage. But you have to place a spawn point for the player. You need to use an NPC Spawner for that. Place an NPC spawner, deselect all enemy types, give it an ID. And write that ID to “Spawn ID”
Spawner Event: It can be used with an NPC Spawnpoint. The selected enemy will be spawned when the stage starts.
Prop Hide Event: Hides the selected prop when the stage starts. It can be used for many things: you can make a prop door or prop wall, it can only be opened by completing the objectives. Or an ambush point, enemies can come through the walls.
Prop Explode Event: Explodes the selected prop when the stage starts. You can use it for visual or gameplay purposes.
Fan Start/Stop Event: Toggles fan
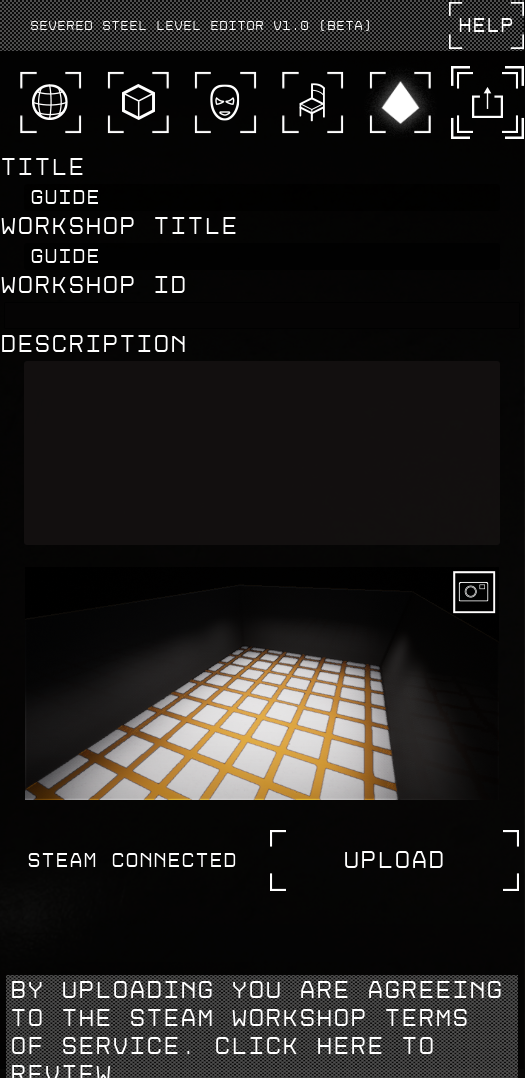 In this tab, you can upload your map to the steam workshop. After uploading your map, you can update it anytime from this tab.
Title: Title of your map, that’s what shows in-game.
Workshop Title: That’s what is visible in the workshop you can change it from here or on the workshop page whenever you want.
Workshop ID: Your unique map ID for the workshop, you can’t able to change it.
Description: That’s where you describe your map. You can always change it from this section or from the workshop page.
Screenshot of your map: You must take a screenshot of your map. It will be your workshop thumbnail. You can take a new picture whenever you want.
Upload/Update: If you are done with your map you can click upload to publish it on the workshop. After you upload the map, this button changes itself to update. You can update whenever you want.
Toolbar
 Help button: Hides keyboard shortcuts.
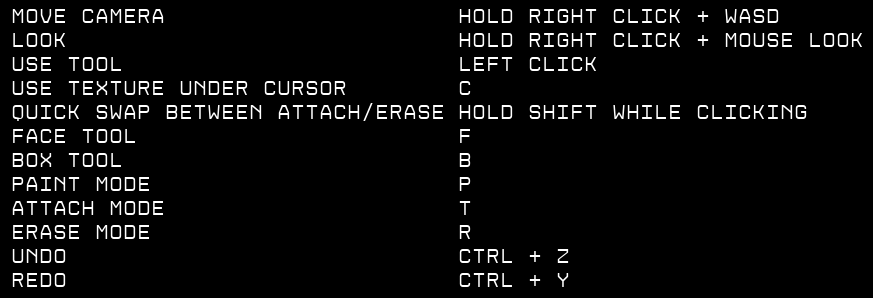

(from left to right)
Objects snaps to the grid, good for precise placing or symmetry.
Your best friend. Good for precise editing, making shapes, and creating props.
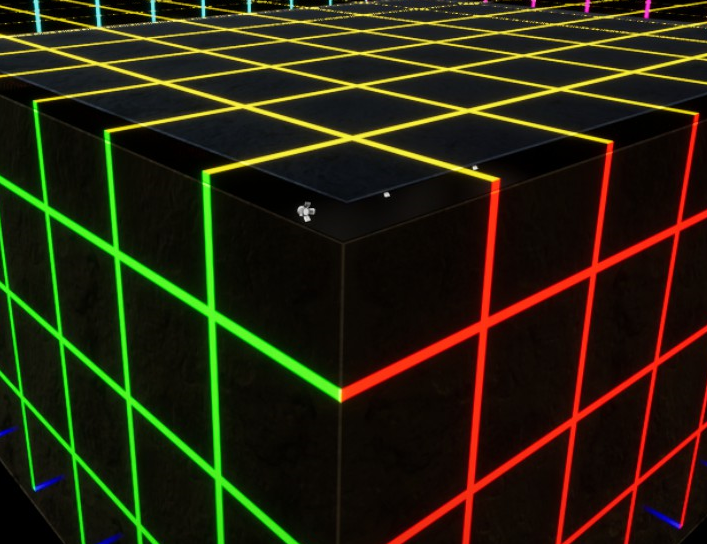 Shows the level bounds. Can be changed from Level Settings tab.
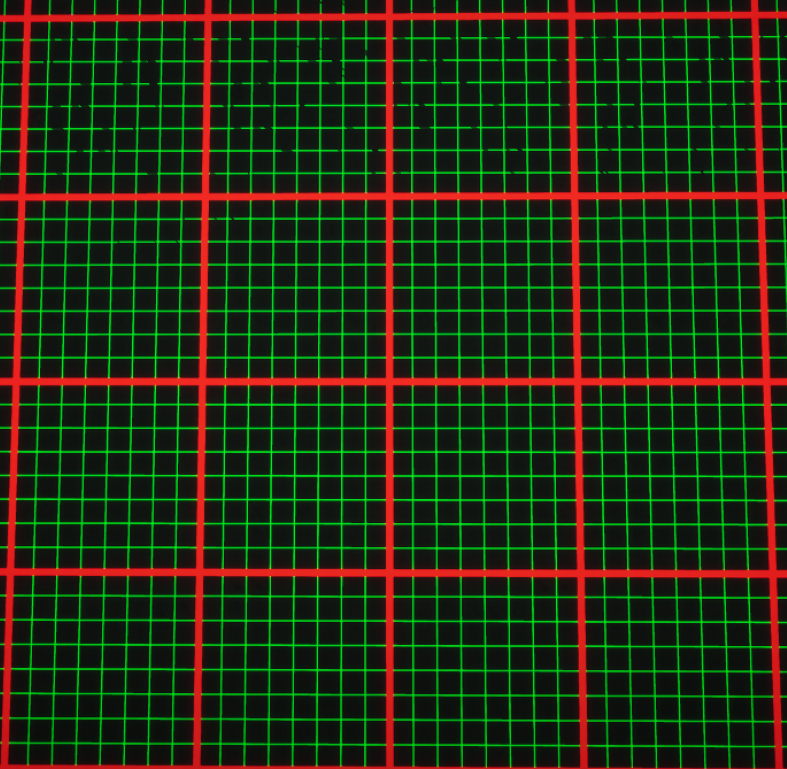 Shows the grid. Grid is useful for snap the grid, creating shapes and symmetry
Testing the map.
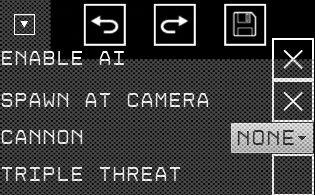 Enable AI: If AI disabled, enemies will not move,shoot etc.
Spawn at camera: If it’s disabled, player will spawn on the spawn point instead of the last camera position.
Cannon: You can change your preferred cannon here for quick testing.
Triple threat: Turns on the mutator, more enemies spawn on the map.
Saves the map. Use it constantly.
Video Examples
Using props as destroy objectives
Prop movement
Using “hide” with triggers
Wave Spawn & Kill them all
Spawn/Hide Props with delay
Using spawners
Thanks to Ouroborosso for his great guide, all credit to his effort. you can also read the original guide from Steam Community. enjoy the game.