Why Tame Rivers?
 Glorantha’s rivers are powerful magical beings as well as waterways, and crossing them is unreliable and dangerous. Your expeditions may be lucky enough to cross easily, or you may be forced to sacrifice goods or magic to the river to cross—or even forced to turn back entirely, wasting a turn.
Taming rivers permanently removes these issues, making river crossings routine, automatic successes.
(The Trout Spirit can make crossing untamed rivers easier, but it doesn’t entirely remove the risks. Even if you have it, it’s a stopgap, not a real solution to the problem.)
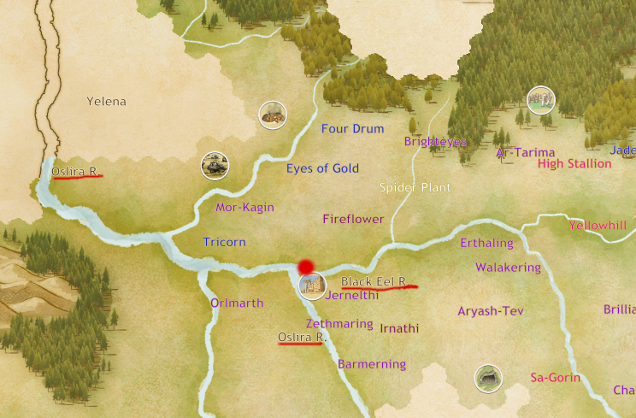
There are two tameable rivers in the game. The Black Eel, the weaker of the two, flows through your valley. While all the valley’s Rider clans are on the same side of it as you are, all the Rams and some Wheels are across the river. Sending traders or emissaries—or raiders—to their lands requires you to cross it. And if you want to send explorers to the south, including the Ram kingdom of Forosan, they’ll have to cross the Black Eel as well.
The fiercer river Oslira meets the Black Eel to your west, at the ruins of Elempur (the point where the Black Eel joins the Oslira is also marked with a red dot on this map). Usually, one or two Ram clans are on the other side of this river. You also have to cross it to visit the lands to the far west, including the Spirit Hills and Autumn Mountains and the Ram kingdoms of Pentenan and Vestenan.
Other waterways, including the Oslira’s other tributary to the west, don’t cause these issues. Perhaps they’re weaker than the Black Eel, or perhaps (since you have to cross the Oslira to get to them) they’re too intimidated by your prowess to cause trouble.
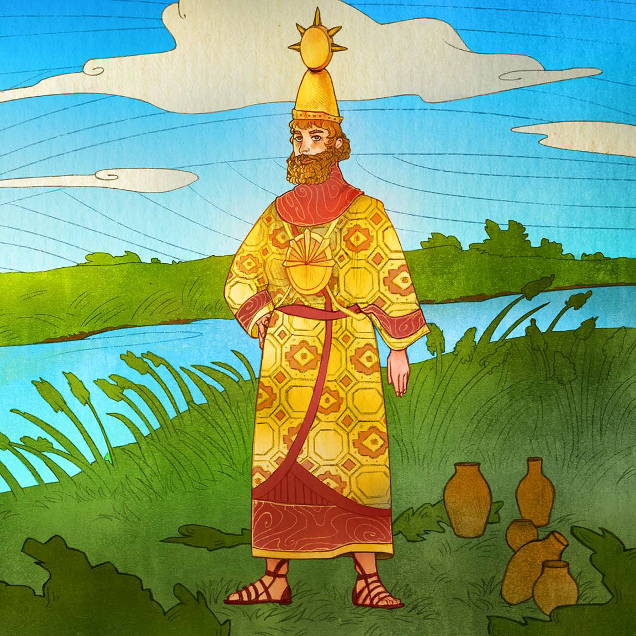 The star of this ritual is Reladivus, city god of lost Nivorah—and not one of the gods your people still actively worship. Thus, you cannot sacrifice to him for his mysteries.
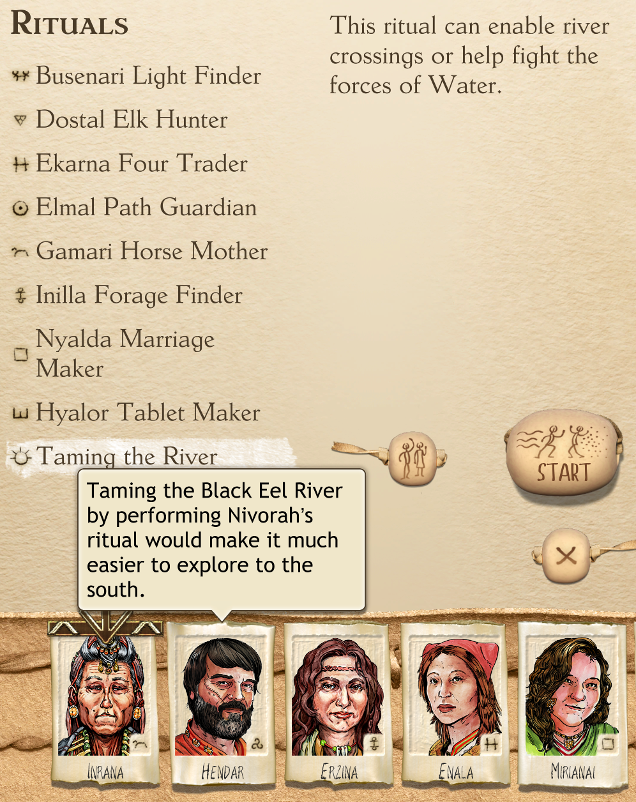
You start the game knowing Taming the River if you choose the forces of Water as your clan’s ancestral enemy.
Otherwise, you can learn Reladivus’s ritual through sacrifice to his father, Elmal. Since Elmal has a lot of mysteries, it may take a while to learn this particular one from him. Be patient, and if you’re prioritizing things that require crossing those rivers, start early.
 This ritual has four rewards:
- Taming of the Black Eel River
- Taming of the Oslira River
- Protection against the forces of Water (protects against floods and water monsters for seven years)
- Riches from below the waves (75 goods)
The first two rewards, enabling easy crossing of the two major rivers, are the important ones. Get them before you consider the others.
While not worth passing up actual river-taming for, the 75 goods reward is significant—especially when paired with the lower sacrifice cost of using Black Eel water (more below).
I have not, personally, found protection against the forces of Water useful, but you might end up in a situation where it is.
Preparation
 Putting at least two points of magic into War can help you out with one option in this ritual. (As a reminder, you can put more points of magic into War if you have worshippers of Elmal and/or Osara on the circle.)
Two points in Crafts (possible only if Tepekos was the god you took from Nivorah in clan creation) will help with another option.
Make sure you leave some magic in reserve. You need positive clan magic to conduct a Gods War ritual!
(However, one point of magic is enough. You don’t need to have the three points that Taming the River costs—just be aware that you’ll end up with negative magic if you have less than that when the ritual begins.)
If you already have the clan hall built, conducting the Ceremony venture can give you a little more clan magic and help set things up for a successful ritual. However, finishing the clan hall should be prioritized over this venture.
You can ask both fellow Riders and Wheels to help; these are separate choices, and the latter is more difficult to pull off. (You can ask Wheels only if you have already decided to ask Riders.) There’s no reason not to ask Wheels to help with this ritual, though. It predates your division into different peoples, and their presence won’t hinder or complicate any options.
For this ritual, you’ll be given the choice of whether you want to prepare using Black Eel or Oslira water. This is important for two reasons. First, you can only tame the river whose water you used! Second, using the Oslira’s water makes the ritual significantly harder. Thus, you should use Oslira water only when conducting the ritual to tame the Oslira.
I usually sacrifice about 15 goods when using Black Eel water, and 35 when using Oslira. This is probably excessive—I’ve gotten away with much smaller amounts sometimes, particularly with Ritual magic in play—but I tend to be cautious in this respect.
(There’s no difference between sacrificing goods and sacrificing herds, in terms of efficacy—I just prefer sacrificing goods because herds left alone will produce more cows and goats, which is sadly not true of trade goods.)
Choosing a Quester
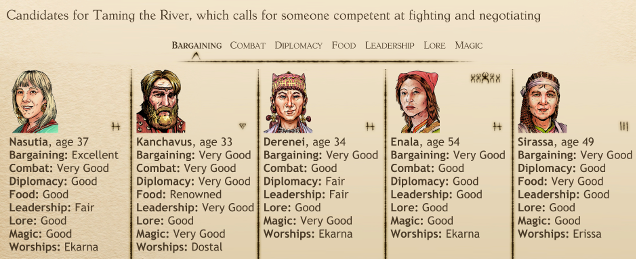 Any non-shaman leader is eligible for this ritual.
Since you no longer worship Reladivus, there’s no one best religion for this quest—although worshippers of Relandar and Ekarna do have advantages at one option each.
The main consideration for choosing your quester should be their skills. This is the single most important factor in ritual success. The selection screen says that you want someone skilled at fighting and negotiating. This is one possible combination to get through the ritual, but honestly, not the one I’d look for first.
A quester who’s highly skilled at both Bargaining and Leadership is very well set for a particular path through the ritual (Trade Valuables, Use Cunning, Command). Bargaining or Leadership plus Combat is also solid (replace Trade Valuables/Command with Subdue by Force, depending). Only having strong Combat is not going to cut it, and Leadership alone is risky, though Bargaining alone is less so.
Finally, personality matters. This is rarely a make-or-break quester characteristic, but a quester’s personality can influence their odds of success at certain options. Do you have a noble who never shuts up about the Golden City? They’ll be strongly motivated to defend it in this ritual. And other traits can help or hinder particular options.
 Unlike other rituals, which have multiple distinct stages, Taming the River essentially has the same stage three times—three floods, which you must deal with in three different ways.
There are five options; you can use each one only once. (In other words, you can avoid using only the two strategies you think would go worst.) A sixth option to “ride for home, abandoning the ritual” (give up) appears if the ritual has gone poorly so far.
At the beginning of each flood, your clan loses a point of magic. If you succeed, or fail after facing all three floods, this ritual costs your clan three points of magic.
Succeeding at two stages is usually enough to succeed at the ritual as a whole, though not always—two marginal successes and a bad failure can add up to a failed ritual.
- Test: Combat vs. Monster.
- Sacred Time Magic: War.
- Other Bonus: Water ancestral enemy.
- Personality: Checks for traits Warlike (presumably helps), Daring (ditto), Peaceful (hurts), Waffler, ☆ (this is not a typo, see below), GoldenCity (helps), AntiEnemy/ProEnemy (these two probably only matter if your ancestral enemies are the forces of Water; I’d assume that AntiEnemy helps and ProEnemy hurts here).
- Notes: That ☆ trait seems to be heroism—Ayvtu, Beren, and Yatakan have this trait, and other questers (including the demi-hero former Wheel) seem not to. And yes, it’s a star ☆ in the debug logs.
- Test: Deception (Bargaining + Leadership) vs. Skepticism.
- Other Bonus: Relandar quester; Star Ledger famous event in Clan Creation; the Snake Spirit can help with the Skepticism test, as can the Golden Honeycomb treasure.
- Personality: Traits checked include Intuitive, Pragmatic, GoldenCity (helps), Arbitrary.
- Test: Bargaining vs. Selling.
- Sacred Time Magic: Crafts (Note: you can only put the 2 points necessary to make a difference here into Crafts if the god you took from Nivorah was Tepekos, god of redsmiths).
- Other Bonus: Ekarna circle member; Ekarna quester; Brass Bazaar famous event; the Trade Wind spirit’s Sell ability can help with the Selling test.
- Personality: No personality checks for this one.
- Notes: You can choose to trade wealth or a treasure. Not sure if one is more reliable than the other. Succeeding at the test will give you a small profit, as well.
- Test: Leadership vs. Bullheadedness.
- Other Bonus: Yelm first god, chief quester, the Whistling Wind and Lion spirits can help with the Bullheadedness test.
- Personality: GoldenCity (bonus), Waffler (probably a negative—people unable to make up their minds may not be very commanding).
- Test: Gifting (Bargaining + Lore?) vs. Skepticism.
- Other Bonus: Werris Mur famous event; the the Snake Spirit can help with the Skepticism test, and so can the Golden Honeycomb treasure.
- Other Penalty: Water ancestral enemy; quester is your hero Beren.
- Personality: This checks for many, many personality traits. My gut feeling is that the Insecure, Warlike, Xenophobe, and possibly Matriarchal/Patriarchal traits would be negatives and that the Intuitive and Peaceful traits would be positives here, but I do not actually know for sure. The ProEnemy and AntiEnemy traits are checked if Water is your ancestral enemy; in this case, ProEnemy is a bonus, AntiEnemy is a penalty.
- Notes: Yes, Beren is at a disadvantage here, despite all the destiny coming out of his ears.
- Notes: This option appears only if your failures in the ritual so far outweigh your successes. It will end the ritual with no benefit, but also no further losses—in other words, it’s a chance to cut your losses and make sure your quester, at least, survives.
Related Posts:
- Six Ages Ride Like the Wind: Guide to Nyalda Marriage Maker
- Six Ages Ride Like the Wind: Guide to Gamari Horse Mother