
General Tips
- There’s no time limit on levels, but at the 3:00 mark, a spooky ghost appears and begins to chase you. The clover increases the time before the ghost comes by 2:00. If you are playing co-op, you have 30 seconds less per member of your team that is dead.
- The ghost in Spelunky 2 is faster than in Spelunky HD, and he can split into smaller ghosts and attack you from either direction!
- If the ghost passes over a gem, red, blue, or green, it will turn into a diamond. You can strategically use this to make a lot of money, but it’s much harder in this game due to the buffed ghost.
- Go slowly and analyze your surroundings, at least in the beginning worlds. Push up against the 3:00 mark if you have to in order to make the most of your time and make sure you aren’t speeding through levels. If you start to go too fast, you’ll get arrows to the face or get enemies jumping in your face. If you are rushing through, you also probably aren’t getting everything that’s easily accessible on the level.
- The bloody altars to Kali that appear randomly throughout your journey are very important. Sacrificing stuff on the altar gives you what is essentially reputation with Kali. At certain points of reputation, you get an item. The first item is a random article of clothing. The second is the Kapala, one of the strongest items in the game that allows you to collect health. Continuing to sacrifice gets you Royal Jelly, an item that gives you 6 HP! The best thing to sacrifice on the altar is an alive pet, so if at all possible at least bring Monty to any altars you find. An alive pet gets you to the next item immediately.
- Crouching while pressing the rope button drops the rope out in front of you rather than tossing it above you. This is useful on ledges that you want to be able to access again later.
- Crouching while pressing the bomb button sets the bomb gently in front of you. This is good for putting the bomb in a precise location. If you are brave, you can pick it back up and throw it into the air right in time for it to explode.
- Be careful not to use all your bombs and ropes. It’s possible to get yourself stuck if you are out of resources. The routes are generally all navigable without these items, but, for example, if you use your last bomb to blow your way into a pit and have no other resources, you can get stuck and effectively end your run. In the same vein, buy ropes and bombs at shops liberally.
- Shops can be robbed, but the shopkeeper will defend his merchandise. All shopkeepers are armed with a shotgun and have amazing reflexes. If you want to rob the shop, either pick up a weapon in his shop and stun him and kill him, or figure out an alternative way. There are many ways to stun the shopkeeper without a weapon, but he’s a quick bugger, so it’s risky. Not only that, all shopkeepers in upcoming levels will be aware that you are a robber, and shoot you on sight. They also will guard the exits to each level, making the run much harder.
1-1 will never have a shop or any other special attributes.
1-2 and 1-3 will feature one stage with Yang’s lost turkeys and one stage with the Golden key and Eye of Udjat. These will never appear on the same stage.
The Eye of Udjat:
In either 1-2/1-3, a golden key spawns as well as a 4×7 building. Bring the key into the room and there will be a chest at the top that you can unlock. The Eye of Udjat allows you to see gems and items in the ground and also unlocks secret areas in either world 2.
Lost Turkeys:
In either 1-2 or 1-3, there will be at least two stray Cave Turkeys that Yang is looking for. Jump on their backs to tame and then bring them back to Yang’s pin for access to his treasure. His treasure is usually not great, especially considering you have to give up two turkeys, but returning them will assure you Yang’s pet shop will spawn on 2-1. This pet shop usually has 2-3 turkeys. Be careful not to hurt turkeys within range of Yang, as he will avenge them (think shopkeeper defending his shop).
The Quillback:
1-4 is always a specific layout. Shops and altars do not spawn on this stage, rather there is always a mini-boss about halfway down. If you get in front of him, he does a rolling attack that will clear out blocks to either side. Have him clear blocks to one side, then lure him to the opposite side. On either side of the clearing, there is a tunnel that takes you below. To the left, you will always see butterflies next to the exit. This is the entrance to the Jungle (World 2a). On the right side there will always be snails around the exit. This is world 2b, Volcana. Since they always appear on the same sides, keep in mind which way you want to go when dealing with the boss, and make sure you go that way. In the bottom middle, in between the exits, there will always be a coffin containing a hired hand. You might have to use bombs to get to it. The door in the middle of the bottom is inaccessible, as it’s the door you will come out of when using the shortcut to 1-4.
Enemies:
- Snake: Moves from side to side slowly, doesn’t hop ledges.
- Bat: Hangs on ceiling until triggered by vicinity. Flies toward you slowly. I suggest positioning such that bats are approaching you from the front, not from above. If they are in front you can fairly easily dispense of them with your whip.
- Spider: Hangs on ceiling until triggered by being under it. It then falls and starts hopping rhythmically. Learn the timing of the jumps and to throw stuff when you can and spiders will rarely be a threat.
- Skeleton: Skeletons animate when you step close to some skulls on the ground. I suggest jumping on all skulls so that one doesn’t pop up and surprise you, knicking a health in the process. Skeletons also appear from busting the bone piles around this world, and if you’re lucky, these piles might contain a skeleton key.
- Horned Lizard: Horned lizards are yellow and as big as you are. Be careful, as getting in front of them causes them to curl into a ball and roll at you Sonic-style. When they are in a ball, it can’t be jumped on for damage, so either just avoid or throw something. You can jump on or whip them when they are not in a ball and it will do 1 damage and incapacitate it for a moment, however they don’t seem to stay down as long as other enemies. They have 3 HP and leave no corpse when dead.
- Cave Mole: Cave Moles are perhaps the most frustrating things in Dwelling. They dig through the ground and emerge only to attack you. They are very quick and chase off ledges. If you get away, it will dig back underground and re-emerge after a few seconds if you get in range. They have 3 HP.
- Caveman: Awake, the Caveman triggers if you get in front of them, they run at you and chase off cliffs, but don’t have the element of surprise that the mole does. They have three HP.
- Quillback: The mini-boss in 1-4. If you get in front of him he rolls, right through blocks and all. If you get hit by the roll attack, you will be killed. If you get above him he will do a high jump but not roll. Killing him is not usually advisable, but if you have a shotgun or paste, you can eliminate him for a heart and a bomb bag. Before killing him make sure you have enough cleared out to progress in the level.
Traps:
- Spikes: White, fang-like rows of Spikes appear in the bottom of some pits. Approaching them from the top while midair will kill you or other enemies, but if you approach from the side or climb down with a rope you can walk through them.
- Arrow Trap: Incredibly annoying dragon-headed blocks that shoot an arrow in front of it when something goes in front. Be sure to either trigger or destroy traps before passing in front of them. You can trigger with nearly any item, including a rope or bomb in a pinch. Carry rocks and other things as often as possible to trigger them. If you have a body, dead or alive in your hand, it absorbs the blow.
- Bear Trap: 2×1 tikis that have big blunt weapons shoot out one block to the side when something is on its side. Learn the rhythm and it shouldn’t be a problem.
- Log Trap: Big logs that appear with a golden idol below. Taking the idol causes the log trap to fall and crush whats underneath. Be careful to make escape easy if you choose to go for the Relic. Also check below it for anything the log trap might destroy.
Mounts:
- Cave Turkey: Turkeys don’t attack you as other mounts do. You can ride for a short period to charm them, and use them as a mount, return two to Yang if he’s in the level, or blow them up or set on fire to cook (cooked turkey gives an HP). The mount has several HP it can absorb, and can be cooked after use. Turkeys can double jump and glide (think the cape) and the attack button causes it to peck.
World 2a: Jungle
Taking the left exit at 1-4 will enter you into the Jungle.
The Black Market:
The Jungle is the only world 2 that contains the Black Market, a bustling market with several shops and containing the Hedjet at bottom right for $40,000. The Eye of Udjat from 1-2 or 1-3 will blink and make noises as you get closer to the entrance, though it is still pretty difficult to find many times. Instead of being a separate level as in the previous Spelunky, the Black Market is through a tunnel on the stage, meaning you can sometimes scope out the door through other tunnels, but also that it’s on the same time limit as the level. You will be given a clover to increase the amount of time you have as you come in, but if you’ve already hit 3:00 the ghost will still chase you.
The Three Sisters:
Randomly throughout the Jungle, caves will spawn with a movable block up top and a girl at the bottom. If you jump down there, she thanks you and tells you she got stuck. Each one you free will offer you an item (save one and its a rope pile, 2 sisters and its a bomb bag, and all 3 for a bomb box) at the top of the ladder on the first phase of Olmec in 3-1
The Moon Challenge:
On one level of world two, an alcove with a mysterious NPC spawns, offering to “Begin Challenge” for $10,000. This is the Moon Challenge, and it’s the first of three challenges awaiting you while spelunking. This challenge begins with you grabbing a clover and climbing down a ladder to a mattock. The mattock functions just like a normal one, and you use it to dig until it goes out. Hidden in the rock are areas with gems and crates, and one small opening with a bow. This is Hou Yi’s bow, a weapon in its own right (though not great) and a key to a later secret. The challenge is pretty safe, with a small possibility of enemies spawning in the room where you start. Do not set off a bomb in the room though, as you’ll anger the hooded figure on the other side of the door. Periodically there are also square, movable blocks, that if you dig directly under them, will fall and can crush you. These are easy to spot though. The only other threat is the small chance that an arrow trap spawns in one of the clearings. Always be mindful, but usually the challenge is well worth it because you tend to earn your entry money back, the clover makes up for the time you spent, you can find good items, and its relatively free of threats.
Enemies:
- Hangy Spider: This yellow spider spawns in a web, raising and lowering periodically. Just smack it with something before going under it.
- Tiki Man: Comes armed with a boomerang (a torch on dark levels) and uses it immediately when you get in front of him. Do not get in front of him because he can combo you to death. Once disarmed, the Tiki Man acts like a Cave Man.
- Monkey: Starts the level on vines and jumps on you when you get to close. They don’t hurt you directly, rather they stun you or steal something. When stunning they can throw you on a trap or spikes, which will kill you. Get to a safe place if one hops on you. They can be decommissioned with one crack of the whip.
- Man Trap: These humanoid plants will eat you if you get on hitbox range. This usually ends your run.
- Witch Doctor: This enemy is your greatest threat in the Jungle. They wear purple masks and have a spectral skill which rotates around them. Get close enough and the skull moves towards you. If you get hit by it, it curses you and sets your HP at 1 (if you are already cursed, the skull kills you). The Witch Doctor also has another attack in which it hexes you, putting a small skull over your head. After a few seconds, this deals one damage and stuns you. The only way to get rid of the mark is to deal damage to the Witch Doctor. Dealing damage to him also makes the skull go away temporarily.
- Giant Spider: This hulking spider is more intimidating in appearance than actuality. They behave exactly like small black spiders from Dwelling, but deal more damage. The key to neutralizing this spider is to throw a bomb into the spider web that always appears below them. The explosion will kill the spider, and the spider will drop 2 gems and a guaranteed Paste for your effort.
Note: Sometimes, a level “feeling” will cause it to have special attributes. The spooky graveyard feeling can cause a cave with vampire bats to spawn. Careful of vampire bats, as they move erratically and have a good chunk of health. Killing one, however, guarantees you a cape as loot.
A message talking about “buzzing” signals a beehive version of the level, in which bees will be flying around. In Spelunky HD, killing a queen bee rewarded Royal Jelly, but I haven’t been able to find a queen bee in Spelunky 2. Royal Jelly still exists as a reward from the altar, so I imagine there is sometimes a queen bee but have not confirmed.
Traps:
- Spike Trap: These traps are very frustrating. They are 1×1 boxes that spawn very often throughout the Jungle. When coming into close range of any of its four sides, spikes are released similarly to the Bear Traps in Dwelling. The biggest reason these traps are such a nuisance is that they are camoflaged by moss. Once you get used to the Jungle, they are much easier to spot, but even then you’ll miss one if you aren’t paying proper attention.
- Thorny Trap: Thorns inhabit a lot of the jungle, growing on every side of certain blocks. Unlike spikes they only deal one damage, and ones on the ground can be traversed using spike shoes (one of many reasons I consider the spike shoes a top-tier item).
- Spikes: Spikes don’t stop after Dwelling. They spawn similarly in pits, but instead of having platforms over them, they have vines that hang over them you have to jump from and to. These vines can have monkeys as well, which can stun you into the Spikes. Lower slowly onto the spikes to walk through them and minimize risk.
- Snap Trap: This trap looks like a hunter’s trap and triggers when you walk over it. They can be obscured by leaves and other things so be very careful. If you whip it, it will close, but be aware that it also will open back up if hit again. Be careful when triggering with items, as it will destroy throwables.
World 2b: Volcana
Volcana is entered through the door on the right-side at the bottom of 1-4. Though Volcana is probably easier, broadly speaking, than the Jungle, Volcana spawns lava which will kill you instantly if touched. The problem this poses is that destroying the terrain around the lava makes it spill out, sometimes making your route impassable. Try as best you can to not blow up blocks next to the lava, but keep in mind that the robot enemies run and blow up when jumped on.
Van Horseling:
There will be a locked room in this world (appearing before the stage with the drill) that contain an NPC who will reward you with a Diamond for opening. If you don’t have the Skeleton Key, there is another tunnel within the stage that has a key you can use to unlock the door. The NPC, Van Horseling, will kill Vlad if you release him and also go to the top of Vlad’s Castle.
Vlad’s Castle:
On one of 2-2, 2-3, and 2-4, a drill surrounded by purple blocks will appear at the top of the stage. There is a button up can press on one side if you’ve gotten the Eye of Udjat from 1-2 or 1-3. The button causes the drill to dig through the stage, with a chain you can climb down. However, since it digs straight through terrain, if it’s dug through lava, it can be pouring out, blocking the chain. If this has happened, try to wait some time for all the lava to drip out toward the bottom if possible. At the bottom there is a normal exit door, and a door surrounded by scarlet bricks. The one on the red background takes you to Vlad’s Castle.
If you choose to go in, there is a clover that extends your time limit and several hired hand coffins to break. At the top, if you are skilled enough to bring down the vicious vampire bats and Vlad himself, he will drop Vlad’s Cape, which allows you to double jump and fall slowly. Furthermore, there will be a crown that you can pick up to use later (can be swiped even if Vlad is still alive). If you released Van Horseling in an earlier level, he will appear at the top and snipe Vlad for you.
Moon Challenge:
See Jungle Moon Challenge explanation.
Enemies:
- Magmar: Living lava monsters that hop out of the molten earth when you are nearby. They eventually disappear.
- Robot: A robot that can be beaten by a single hop on the head, self destructing a few seconds later. These can create sticky situations if you don’t pay attention to where they are likely to explode.
- Fire Bug: Bugs that climb the chains of Volcana, periodically shooting fire from either side. They can be killed with one jump or whip, but are immune to fire (I.E. the rock dog’s breath).
- Imp: Imps fly above the ground holding cauldrons. When hit, they drop the cauldron, and if the cauldron is high enough when dropped it will spawn a magmar. The imp will then come at you and attack from the air until dispatched.
- Lavamander: Deranged reptiles that sometimes lie in lava pits, belching lava at passersby. Be very, very careful when one of these is around. The lava they throw can create impassable terrain in which might give you little room to continue.
Traps:
- Spikeball Trap: A mace looking contraption that falls on you when you get under it. The chain its attached to is climbable, but be sure not to touch the ball. The terrain the ball lands on is destroyed.
- Falling Platform: Little platforms that shake, then fall after you put your weight on it. Staying on a platform as it hits the ground absorbs fall damage, but can cause you to fry in a lava pit or put you in an otherwise compromising position. The platforms also damage whatever they land on (including you!).
- Powder Box: Explosive boxes that ignite with enough force or any fire. Relics appear under two powderkegs with lava above. When you grab the Relic, the powder boxes explode and the lava falls.
Mounts:
- Cave Turkey
- Rock Dog: Volcana is the first and most common place to find a Rock Dog, which is a tameable mount much like the cave turkey. The Rock Dog doesn’t take kindly to intruders, though. If you get in front of a Rock Dog he will immediately hit you with a burst of fire, and this can lead to you dying in sequence of flame breaths. If you are able to tame by jumping on its back and not being thrust into a pit of lava, then the Rock Dog absorbs hits and provides double jump, much like the cave turkey. Unlike the cave turkey, though, its attack is the ranged flame breath that he scorches you with.
World 3: Olmec’s Lair
World 3 is a world with only one stage that resembles the final (non-secret) chamber of the previous Spelunky. The fight is similar to Spelunky HD’s Olmec fight as well, as you have the gargantuan statue pound through the floor and break through the bottom. At the top there is treasure, crates and etc., reachable if you have the jetpack or blow it up with sticky bombs. On the right, there is a ladder you can climb and will find an alcove with the whatever sisters you saved from the Jungle. If you are getting the Ankh, you can save a mount by dropping it here, as this is the only spot guaranteed safety.
To go the easy route, have Olmec stomp through to the level under the one you enter on. On the right, behind a movable block is the exit to the Tide Pools, but go quickly, as Olmec starts to throw bomb after bomb around the map. Down another level is the entrance to the Temple of Anubis, and under that is the lava with the entrance to the Ankh room.
Olmec’s Mechanics and the Ankh Chamber
The first phase of the Olmec battle (taking place on the top level) is a familiar one. You get close to Olmec and he attempts to stomp you. Further away and he quickly moves toward you. Alternate between two stomp locations next to each other to have Olmec cut through. When stomps to the level under you, you can jump onto him to avoid damage. If you choose to stay, Olmec begins phase 2, in which he reveals he is an alien mech and hovers, throwing bombs both directions. If you stay on top, he can’t hit you with bombs, but will bomb the floor. If you let him bomb out the floor long enough, he creates an opening. The way to drop him is to hit two domes on his underside, each with three HP. If he falls onto the next level and lives, phase 3 of the fight begins. Similar to the first, Olmec stomps you but then opens back up, this time releasing two alien UFOs. The UFOs shoot beams under them and when killed, fall to the ground wildly and explode. Continue to blast through the blocks with Olmec’s stomp, UFOs, and your own bombs until an opening to the bottom is revealed. The bottom is a pit of lava, and dropping Olmec in is the only way to defeat him. Once he’s in the lava, you can jump on him and enter one of many tunnels right above the lava. These tunnels lead to the Ankh chamber. You can collect gold as you scale your way back to the top, the center of which has the precious Ankh, ready to be collected. The top right is a tunnel back to the boss layer of the level. You’ll end up where the rescued sisters are/would be, and can choose your exit. Be aware that all the blocks will still be cleared, so if you don’t have an item like the cape, jetpack, hoverpack, parachute, or a turkey, you can have trouble exiting the lair.
The Waddler
Placing two bombs under the ladder in the right of the room where you enter (on the top level) will reveal a tunnel to an NPC called the Waddler. He will supposedly bring items you drop there deeper into the cave. The most important use of the Waddler is holding Hou Yi’s bow until world 7, as you can only bring one carried item to the next level.
This world 4 is accessible through the door in 3-1 closest to the top. The door will be distinguishable by crabs being around it. Tide Pools is a gorgeous world with many pits of water. Doors block your way that have levers you will need to pull to open. You can still use bombs if a lever is in a dangerous spot. The levers can be triggered again (and by an enemy as well!), so be cautious that you don’t let the doors crush you.
The Star Challenge:
Somewhere in 4a and 4b the mysterious Tun appears for another challenge, this time costing $25,000. This time your goal is to light all the torches in the room in a short time, a difficult task if you lack the jetpack. Successfully completing this challenge in Tide Pools rewards you a Clone Gun which can copy three items/pets/mounts, etc.
4a-1/4a-2/4a-3: Madame Tusk’s Dice Game
Instead of a shop there will be a dice game on this stage. Dice games can also spawn on other stages, but this one is special in that it always spawns, but also that Madame Tusk, a huge Walrus(?) will be in it. Each roll of the dice is $5000 gold, and you can play as many times as you want. Rolling 2-6 is a loss, and you lose your money. Rolling 8-12 in a win, and you recieve $10,000. Rolling a 7 gets you the item behind the beam. I have not been able to do it, but apparently rolling a 7 seven times causes Madame Tusk to think you are a “high-roller”, getting you an invite to Madame Tusk’s Palace of Pleasure in 6-3. If you haven’t done this, the bouncer will inform you that you aren’t on the list and you will trigger enemies upon going in.
4a-2/4a-3: Excalibur and Entrance to Abzu
A sword encased in stone is at the bottom of 4-2. If you went to Vlad’s Castle and retrieved the crown, you will be able to pull the sword from the stone. It kills most anything in one hit. If you have the Ankh, you can find a small entry to the bottom of 4a-3 under a pit of lava, and retrieve a Golden Idol that sets off a lava trap similar to Volcana. Kill yourself in the lava equipped with the Ankh and Excalibur to reveal a door to Abzu.
Secret 4a-4: Abzu
Kingu: Boss in Abzu, that is killed with damage to the back. Defeating Kingu rewards a Tablet of Destiny, usable later.
Enemies:
- Jiangshi: An undead wearing purple who hops towards you at various lengths and heights.
- Jiangshi Assassin: Distinguishable from the normal Jiangshi because its wearing a washed out blue. This enemy hops much like the jiangshi, but can also stand on the ceiling.
- Flying Fish: They spawn in the pools but rise out and attack you in an L shape.
- Octopy: Shoots ink if then charges if you get in front of it. If you attack from above, it hops straight up in an attempt to stab you with its barnacles. The spike boots still kill it, but jumping on it without the boots hurts you.
- Hermit Crab: Uses treasure chests and crates as a shell, only coming out to shoot poison bubbles.
- Pangxie: Massive lobster-like creature that extends its pincer in front of him, and shoots poisonous bubbles to foes above. The Pangxie has a ton of health, so be cautious.
- Great Humphead: In 4a-2, in the water below the level, swims a gargantuan fish. Defeating him gets you a present, a hired help, and a camera.
Traps:
- Lion Trap: Much like the Bear Trap, but does more damage.
- Giant Clam: In the water there are sometimes giant clams with items in them. Swipe the item and stick around too long and it’ll close on you.
- Sliding Wall: Activate a lever, usually nearby, to open and shut these path-blocking walls.
- Snap Trap
Mounts:
The Tide Pools introduces a new mount-type, the Axolotl. It’s a pink, silly-looking animal that shoots bubbles. If you get in front of a wild Axolotl, it will shoot you with a bubble until it pops on a wall or ceiling. You can influence where the bubble goes when you are in it, but many times if you aren’t careful you get stuck in an unending loop where the Axolotl bubbles you over and over, and you can’t break free. Long story short, much like the Rock Dog, don’t step in front, jump onto. After it’s tame, the Axolotl provides you with a double jump, the bubble attack (if you keep shooting bubbles, it pushes enemies in bubbles away), and on third press of the jump button, a teleport. As with any teleporting, you can kill yourself if you teleport into a wall, so use very carefully.
World 4b: Temple of Anubis
The alternate world 4, similar to Spelunky HD’s final world, is arguably more difficult than world 5 and 6, as the enemies appear clumped, shoot fast-moving projectiles. The traps are pretty brutal as well.
4b-1: Anubis
Sleeping when you arrive, Anubis awakens when you are close to shoot devastating rings your direction. If you take him down, he drops the Scepter. If combined with the Hedjet (Black Market), the Scepter will allow entry into the Lost City of Gold on 4b-2.
Secret 4b-3: Lost City of Gold
Find golden door in 4-2 and use Anubis’s Scepter from 4b-1 with Hedjet to enter. There is indeed a lot of gold in this secret area, but the biggest attraction is the altar on which one with the Ankh can sacrifice themself, gaining entry to Duat.
Secret 4b-4: Duat
Accessible through golden door in Lost City of Gold if you sacrificed yourself on the altar. Defeat Osiris and obtain the Tablet of Destiny.
The Star Challenge:
Somewhere in 4a and 4b the mysterious Tun appears for another challenge, this time costing $25,000. This time your goal is to light all the torches in the room in a short time, a difficult task if you lack the jetpack. Successfully completing this challenge in the Temple of Anubis awards you an elixir that cures poison and curses. Besides dying and reviving with the ankh, this is the only way I know of to cure a curse.
Return of Horseling:
If you released Van Horseling in Volcana, he will appear in through a small door in Temple of Anubis (4b-1). He will reward you with an Alien Compass provided you find him.
Enemies:
- Crocman: Erratically moving and teleporting crocodiles that’ll take a bite out of you.
- Cobra: A reddish snake that moves similarly to the classic green snake, but spits poison in front of it.
- Mummy: A hulking monstrosity that shoots fast-moving locusts in front of it.
- Sorceress: Head-ache inducing women who float and send projectiles at you. If the projectiles don’t strike you, they turn into enemies like bees and bats.
- Cat Mummy: When these quick-moving felines hit you, you’ll be cursed to having 1 HP.
- Anubis: Unique enemy on 4b-1 who drops the scepter required to get into The Lost City of Gold. Watch out for the purple rings his scepter emits.
Traps:
- Crush Trap: A crush trap is a 1×1 stone that slams into the nearest wall when you pass by, whether up, down, left or right. Move quickly when you get in front of one of them or it’ll splatter you up against a wall.
- Giant Crush Trap: Same as the crush trap, but larger.
World 5: Ice Caves
This world is only one vertically elongated level. The easiest way to conceptualize the Ice Caves is by dividing it into 4 subsections. From top to bottom:
Subsection 1: Enter the level in a place reminiscent of Spelunky HDs world 3. This part of the world is much more open than any of the worlds previous. Ice blocks will cause you to slip if you have no climbing boots. At the bottom of this section is not an exit, rather an entrance tunnel to subsection 2.
2: The middle of the level is blank space on the outer layer. The way to go through is in the inner layer, where there is a cave that “smells like wet fur”. This is the yeti cave, a cave with tons of yetis and the Yeti King and Queen. There is a hired hand up top, and to the left or right, in spikes, is a clover. The top most level of icy surface holds the Yeti Queen. A level under it, the Yeti King. Both are surrounded by other smaller yetis. Below the Yeti King is a pit of spikes, on top of which is a few platforms, one holding a door. The door takes you back to the outer layer of the level.
3: This section is like the first, only at the bottom theres a never-ending pit and a door leading to world 6.
4: The never ending pit that will end your run, unless you obtained the Alien Compass. The Alien Compass allows you to take an alternate exit to the Mothership, a secret area.
Note: Many times you can skip the 2nd Yeti cave section entirely, but you’ll miss the loot. To skip, use a parachute, jetpack, hoverpack, cape, turkey, or even climbing gloves to make your way down to level 3. You can also obtain an alien mech, if one spawns, and use its jetpack. I don’t advise it, but if you do fall and have no items to help you might get lucky and grab onto an edge without landing with a faceplant. Grabbing an edge avoids fall damage.
Enemies:
- Alien: Little green thing that is super small but can deal damage if you run into them. They usually come out of UFOs or appear in mech suits that you can hop in after ridding the Alien. The suit is extremely slow but has a jetpack and can shoot a explosive beam by holding Down and pressing Attack. Neutral attack is a big arm that can tear through blocks.
- UFO: Flying saucer that shoots a beam below that eliminates one block or hurts what it hits. When destroyed, UFOs fall to the ground and explode like a bomb.
- Yeti: Big, white, furry Bigfoot who throws people who get to close. Beware of getting thrown, as you can be thrown into the pit, spikes, or just thrown over and over into a wall.
- Yeti Queen: In the Yeti Cave, this giant yeti essentially is a bigger and badder normal yeti. If killed, she drops some rope and spike boots.
- Yeti King: In the Yeti Cave, this giant Yeti not only pummels you, but blows ice breath at people within a certain distance. The ice breath causes ice blocks to fall from the above level and hit things that are under them. When killed, he drops some rope, a compass, and sometimes a Freeze Ray. If you are having trouble killing/getting past the yeti king and queen, if you bomb the floors they will continue walking, sending them into the pit of spikes.
Traps:
- Landmine: Explodes a few moments after getting stepped on.
- Spring Trap: Not necessarily a trap, but can be. These “traps” bounce you high into the air when stepping on them. They can help you reach heights you can’t normally. Spikes sometimes appear on the ceiling in the ice caves. Don’t get thrown into them!
- Boulder Trap: Taking the Golden Idol in this world triggers a massive, Indiana Jones-type boulder to smash anything and everything it rolls into. Be careful of being hit, but also be wary of this tearing through important blocks, shops, or an altar when triggered.
World 6: Neo Babylon
This pretty, purple-bricked biome is the last in the “easy” route of the game. Making it through and defeating Tiamat in 6-4 gets you to the credits and gets you credit for completing the game. Neo Babylon is not an extremely difficult world, but is highly volatile. UFOs can trigger a chain of effects that can blow up a ghost pot. Elevators that populate the level can crush one as well, and if you are on it you will go kaboom. The traps here will blow up your powerpack, jetpack, and hoverpack, resulting in tons of damage.
6-2: Ushabti Chamber and Entrance to the Sunken City (World 7)
A small doorway on 6-2 leads to a room filled with little statues called ushabtis. Every ushabti is different, and only one will do anything when taken to the next level. To determine which one, you need a Tablet of Destiny, obtained from the bosses in either Abzu or Duat. If you have it, check your journal for a hint at the correct ushabti. If you pick the right one and exit the level with it, you will enter 6-3 riding a mount that is unobtainable on the wild. This mount is called a qilin, and flies like a jetpack but without cease. Taking the Qilin to the final boss chamber in 6-4 can get you to the secret seventh world, the Sunken City. You fly above Tiamat, up, up, and up some more.
6-3: Madame Tusk’s Palace of Pleasure
On 6-3, a conspicuous door (there’s a neon sign) with a bouncer out front will appear. If you rolled a 7 seven times in Madame Tusk’s dice game in world 4, you will be on the guest list. Otherwise, you won’t be invited in. If you choose to go in anyway, prepare for many bouncers to try and murder you. Getting in with an invite is an achievement. If you don’t have a weapon by this point, consider dropping a bomb into the alcove with the bouncer. It won’t always kill him, but if you stay on top of Madame Tusk’s, the bouncer will usually run wild all over the level and get killed by traps, leaving you the shotgun.
6-4: Tiamat
The “easy” route’s final boss, Tiamat, is in 6-4. Tiamat shoots red energy orbs that damage you, or if they hit a block, they become a random enemy from prior worlds. Bubbles rise up from the water providing places to stand. Hit Tiamat in the head enough times with a weapon and she’ll go down. I’m unsure if this is doable without a weapon, as bombs with paste seem to be reflected by her.
Enemies:
- Olmite: Mini Olmecs that stand on top of each other and wear armor. The armor reflects projectiles, so don’t shoot if they’re in it! Sometimes the Olmite is encased in armor, sometimes their heads are revealed. You can jump on them if their head is unarmored, and they’ll lose the rest of their armor.
- Lamassu: Make a sound while targeting you with a fast moving laser projectile. Don’t spend a lot of time near one of these.
- UFO/Aliens/Mech-Suit Aliens
Traps:
- Laser Trap: Very similar to arrow traps from the first world, but reload after a set amount of seconds.
- Spark Trap: Glowing blocks that have balls of energy rotating around them.
- The electricity forcefields you can find in dice games and the challenges also appear here, usually on timed intervals. They don’t appear in the journal.
Mounts:
- Cave Turkey
- Rock Dog
- Axolotl
World 7: Sunken City (and beyond)
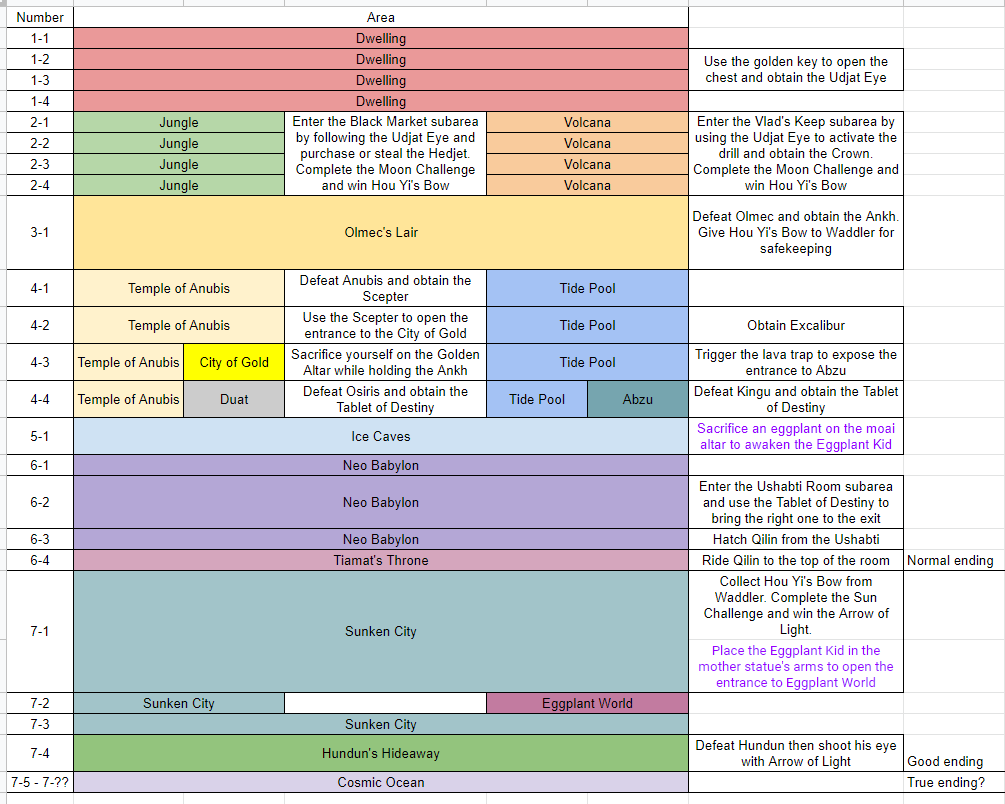
Embarrassed to admit made it here, as the game is very tough, so for now I’m leaving this blank. Information on how to get here is scattered throughout the rest of the guide, but a condensed version is in the below image (h/t to /u/captain__M on /r/spelunky for compiling this info).
Available in shops and from crates:
- Rope Pile: Contains 3 ropes.
- Bomb Bag: Bag containing 3 Bombs
- Bomb Box: Green box containing a dozen bombs.
- Paste: Makes bombs stick to surfaces and enemies.
- Spectacles: Enables vision of gems and items in the ground.
- Climbing Gloves: Grab onto walls on points with no ledge. Holding the joystick towards the wall grabs, and returning it to center lets go.
- Pitcher’s Mitt: Throw items in a long, linear path, rather than the default arc.
- Spring Shoes: Jump twice as high.
- Spike Shoes: Allows you to traverse thorns without damage, ice without slippage, and adds damage to jumping on an enemy’s head.
- Compass: An arrow appears on screen, pointing to the level’s exit(s).
- Parachute: When falling far enough to cause damage, the parachute ejects automatically, allowing slow fall. The parachute is single-use.
- Skeleton Key: Unlocks locked doors that normally require a carried metal key. Doesn’t work on the chest containing the Eye of Udjat.
Items carried on back and sold in shops:
- Cape: Yellow cape that allows slow fall by pressing and holding the jump button in mid-air. One can slow fall to avoid fall damage, as well as fall onto spikes without taking damage.
*The four following wearable “pack”-type items, explode when coming in contact with flame and gunfire, afflicting you with a ton of damage. Use at your own risk.*
- Jetpack: Allows a certain amount of flight by pressing and holding the jump button in midair. Burns out after a certain amount of time in the air without landing.
- Telepack: Allows one to press jump again midair for a teleport in any direction, but beware, used in correctly, teleportation will make you collide with blocks and kill you instantly. The telepack differs from the teleporter in that it is worn on the back instead of carried.
- Hoverpack: Allows one to press the jump button midair to levitate for an unlimited amount of time. Can be activated over and over in the air to descend slowly or reposition, but doesn’t allow you to get higher in the air without a jump off the ground.
- Powerpack: Red accessory worn on the back, allowing bigger bombs and a fiery whip. The powerpack interacts in different ways with different weapons, as the shotgun seems to have decreased recoil when wearing. The journal states that the powerpack “imbues its wearer with improved weapon handling abilities”.
Carriable Items available at shops: You can only pick up one at a time.
- Webgun: Shoots webs, trapping enemies, some projectiles, and yourself.
- Shotgun: Powerful 12-gauge shotgun both used by and sold by shopkeepers. The shotgun has a considerable amount of recoil.
- Freeze Ray: Gun that freezes an enemy, allowing them to be dispatched with ease. The freeze ray has a considerable amount of recoil.
- Crossbow: Fires an arrow in a straight line that you must retrieve before using again.
- Camera: Can damage or stun certain enemies with its flash. Its flash can also illuminate dark levels and tunnels.
- Teleporter: Carried teleportation device that allows you to teleport in any direction with the attack button. Be cautious when using, as teleporting into an already occupied block can telefrag something, and in the case of the ground or walls, that something will be yourself.
- Mattock: Mining pick allowing you to cut through blocks for a certain amount of hits.
- Boomerang: A ranged weapon that comes back to you when thrown.
- Machete: It’s a blade that can cut through burnable blocks in the jungle, as well as spider-webs. It’s also more a more powerful weapon than your whip.
- Metal Shield: Shield that blocks and reflects in front of you, but also pushes everything you walk over. If you push something into a wall, it’s destroyed. Great for enemies, not so great for other things.
More Items
Unique items and items not usually available for purchase at shops:
- Alien Compass: Used to locate the Mothership in 5-1. Obtained by rescuing Van Horseling in Volcana (world 2b), going to Vlad’s Castle and letting Horseling kill him, then finding Van Horseling yet again in 4b-1.
- Udjat Eye: Eye that lets you see items and gems in the ground just like spectacles, but also reveals secret areas in world 2. The Eye of Udjat is obtained on 1-2 or 1-3 by bringing the key to a 7×4 block building with a chest at top. Combine the key and chest to recieve the Eye. Take the eye to Volcana to use the drill and get to Vlad’s Castle or to Jungle to reveal the Black Market.
- Kapala: Sacrifice 2 still living pets, or a combination of other bodies and stunned enemies on the altar to recieve the Kapala. The Kapala collects blood droplets from enemies along the rest of your journey, giving you extra hearts.
- Hedjet: A pharoah’s crown sold in the Black Market in world 2a for $40,000. The Hedjet, in combination with the Scepter held by Anubis, gains entry to the Lost City of Gold in 4b-2.
- Crown: Obtained at the top of Vlad’s Castle in world 2b. Allows you to obtain Excalibur in 4a-2 and reach Abzu (secret 4a-4)
- from 4a-3.
- Eggplant Crown: Obtained in Eggplant Land
- The True Crown: ??
- Ankh: Revives you once. Obtained in 3-1 (see above Olmec’s Lair explanation).
- Tablet of Destiny: Obtained from secret 4a-4 or secret 4b-4. Reveals which ushabti summons the qilin (6-2/6-3)
- Royal Jelly: Restores 6 HP. Obtained from Kali Altar sacrifices (3 alive pets or more) or a Queen Bee.
- Vlad’s Cape: Allows double jump and slow-fall. Wearable on back. Obtained from defeating Vlad in Vlad’s Castle (world 2b).
- Clone Gun: Carried item. Has three rounds that duplicates one item each. (Works on mounts and pets as well). Obtained from successful completion of the Star Challenge in world 4a.
- Excalibur: Very strong melee weapon obtained on 4a-2 by a wearer of the Crown. A spelunker with the Ankh and excalibur can open the way to Abzu on level 4a-3.
- Broken Sword: Clone Excalibur with the clone gun.
- Plasma Cannon: In the Mothership (5-1), or extremely rarely elsewhere. The Plasma Cannon is an alien weapon (carried) that shoots explosive projectiles. The Plasma Cannon has a large amount of recoil.
- Scepter: Carried weapon obtained in 4b-1 from Anubis. Can be combined with the Hedjet (from the Black Market) to open the way to the Lost City of Gold in 4b-2.
- Hou Yi’s Bow: Functions like a crossbow, used in combination with the Arrow of Light to get to final secret area of game. Obtained in the Moon Challenge in world 2a/b.
- Arrow of Light: Combined with Hou Yi’s Bow, the Arrow of Light is used to get to the final secret area of the game, the Cosmic Ocean. Obtained in 7-1’s Sun Challenge.
- Wooden Shield: Carried by some Tiki Men, this carried shield reflects projectiles but doesn’t crush anything up against the wall.
- Idol: (I mistakenly call this relic in this guide, so if I don’t change that, sorry.) Retrieved from trapped locations and turned in to the exit for a hefty sum of cash.
- The Tusk Idol: Obtainable in Madame Tusk’s Dice Game in 4-1/2/3, under certain circumstances(?)
- Curse Pot: Most levels have one of these jumbo clay pots with a spooky ghostie on the front. Breaking it gives you a diamond but summons the ghost to chase you for the remainder of the level.
- Ushabti: Statuettes in 6-2 room. Use Tablet of Destiny to determine the correct ushabti to summon the qilin on 6-3.
- Eggplant: Place a present (sold by shops) on the altar to recieve a carriable eggplant. Dropping from any distance or taking any damage destroys the eggplant.
- Cooked Turkey: Set a turkey on fire, or just blow it up, to recieve this item worth 1 HP.
- Elixir: Obtained from 4b Star Challenge. Presumably cures curses and poisons, but I’ve yet to test this.
- Four Leaf Clover: Item dropped by leprechauns or in secret areas and challenge room that extends the time before the ghost comes by 2 minutes. Also creates rainbows that reveal the location of hidden pots of gold.
Playable Characters
- Ana Spelunky: Starting character
- Margaret Tunnel: Starting character
- Colin Northward: Starting character
- Roffy D. Sloth: Starting character
- Alto Singh: Unlocked in 1-4
- Liz Mutton: Unlocked in 2a-1
- Nekka the Eagle: Unlocked in Black Market (world 2a)
- LISE Project: Unlocked in 2b-1
- Coco Von Diamonds: Unlocked in Vlad’s Castle (world 2b)
- Manfred Tunnel: Unlocked in Ankh Chamber (3-1)
- Little Jay: Unlocked in 4a-1
- Tina Flan: Unlocked in Abzu (secret 4a-4)
- Valerie Crump: Unlocked in 4b-1
- Au: Unlocked in the City of Gold (4b-3)
- Demi Von Diamonds: Unlocked in 5-1, Yeti Cave
- Pilot: Unlockable in 5-1, Mothership
- Princess Airyn: Unlockable in Neo Babylon (world 6)
- Dirk Yamaoka: Unlockable in the Sunken City
- Guy Spelunky: Beat the game
- Classic Spelunky: Beat the game the hard way
Unlocking 16 of 20 of the playable characters enables you to unlock seeded runs in the base camp.
Shortcuts
At the end of World 1, World 3, and World 4, Terra Tunnel appears and asks for help unlocking shortcuts. You can take these shortcuts from your base to the bottom of 1-4, 3-1 with no Olmec, or 5-1. Playing through a shortcut doesn’t unlock every achievement, but it enables you to practice worlds that you aren’t as used to, without having to get there on a really good run and kill yourself due to inexperience.
Here’s what Terra Tunnel asks for for each shortcut:
After World 1:
- $2,000
- 1 Bomb
- $10,000
After World 3:
- 1 Rope
- A weapon
- A mount
After World 4:
- $50,000
- A hired hand
- Golden key (from level 1-2 or 1-3)
The last two are really the only ones that are that difficult. In order to get a hired hand in world 4a, you need to kill the fish in the bottom of 4a-2. The only way to safely ensure he will get to the end of 4a-4 is to carry him, and about every five seconds put him down and immediately pick him back up. If you don’t constantly juggle him, he wriggles his way out of your arms.
The golden key is the golden key that unlocks the Eye of Udjat chest. Carry this all the way from the beginning to the end of 4-4 and you will unlock the final shortcut!
Related Posts:
- Spelunky 2: How to Skip the Yeti Subworld
- Spelunky 2: How to Kill Olmec with Shortcuts
- Spelunky 2: How to Reach 7-1 (Step-by-step Guide)
- Spelunky 2: The Shortcuts Guide
- Spelunky 2: How to Easily Rob a Shopkeeper (All 5 Methods)