A walkthrough guide for Tales of the Black Forest, as well as guide for achievements.
Introduction
The Meat of the Game:
- The game is fairly short, being only three chapters long, not including the prologue, but features two different ending that are both tied to separate achievements.
- The game is more of a visual novel compared to an RPG-style game, as in there is a ton of lore to explore as well as the game comprising mostly of dialogue and not much else.
- Puzzles are straight forward as long as you are paying attention to the environment.
- Sound effects, animations, etc. are on point, even two out of the many jump scares and creepy moments did get me. There is the right balance of horror in the game, right amount of tension built up and the right sound effects accompanying them.
My Two Major Gripes with the Game:
- The game at some points feel like Point A, dialogue, Point B, dialogue, do something, dialogue, Point C, etc. Meaning characters do things because story says that they must, it is hard to explain but if you have played one of those games then you will know.
- The one thing that irritated me the most is the characters, they can just do anything and everything, again because the story says so.
Anyways, on to the prologue…
Prologue
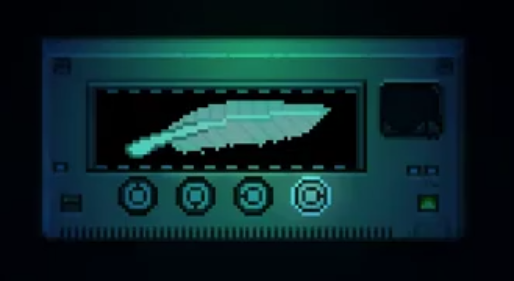
After hearing the train’s horn, proceed into the station. There is not much to do here, since it is your first time in the station. Firstly check the loudspeaker and take note of what station it is set to (FM85.4) as it is going to be important in a little bit. Then check the the hole in the floor to find a feather. After picking up the feather, the station door locks. Interact with the loudspeaker again to hear preaching, and you will be transported to train station, this time in better shape.
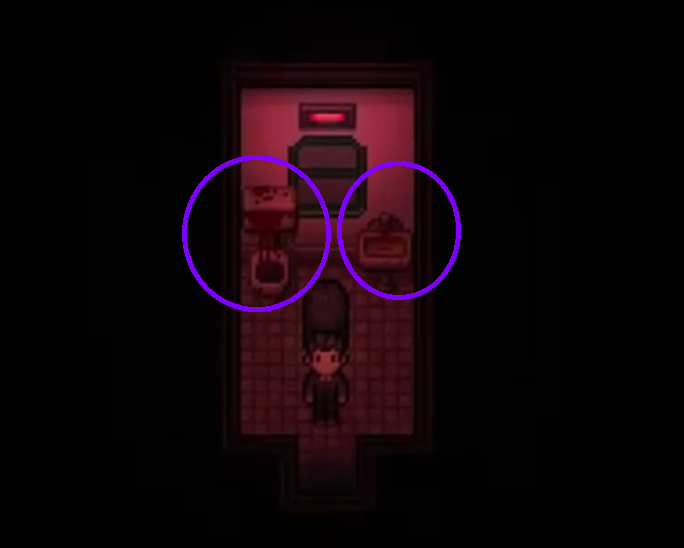
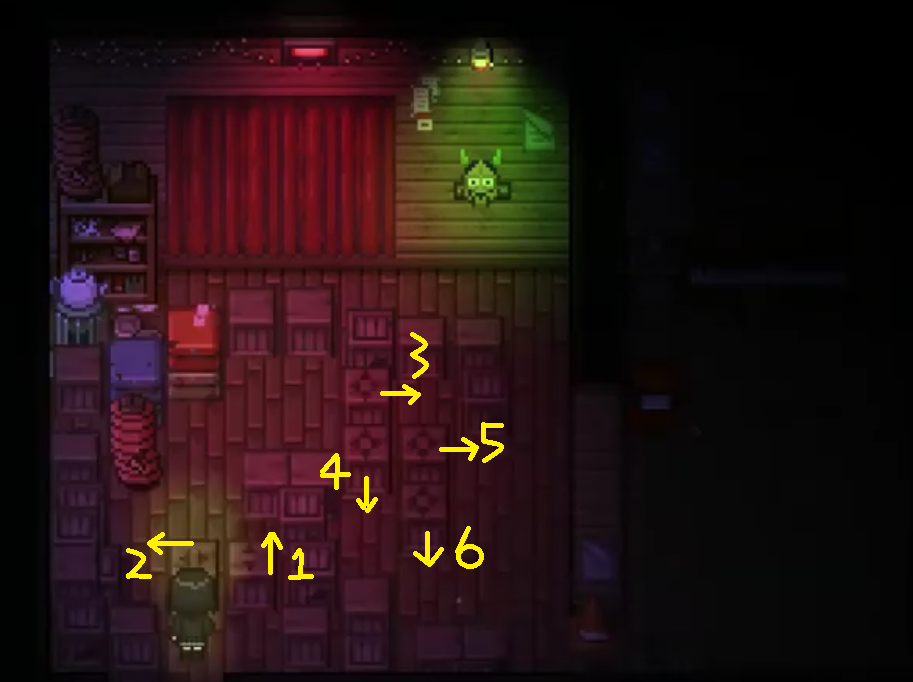
Kihara now meets Kiritani, and Kiritani explains what happened. You can talk with Kiritani to learn about what she does, interacting with the left note explains a little back story of the train station, and you will find that the radio is not working as it needs batteries. To proceed, interacting with the wall safe triggers a scene where Kiritani finds a note under a cushion, revealing the first puzzle of the game.
Puzzle 1
Pretty simple puzzle, you just need to count everything in the room and enter the numbers into safe as listed in the note, if you are unsure here is the solution:
Red Cushions = 3
Blue Cushions = 4
Chairs = 8
Light Bulbs = 2
Code is 3482
This rewards you with batteries, to use in the radio. Using batteries in the radio enables the second puzzle.
Puzzle 2:
Not really a puzzle, but I will consider it as part of this guide. If you recall the radio station that was playing before you were transported (the one with the preaching) select that one as the correct option.
FM85.4
Also, note that you can just try each of the three stations if you cannot recall the correct one.
After entering the correct station, you get to find out more about Nensha and you will be transported back to the first station. You also will learn more about the curse effecting Kiritani. After the dialogue, interacting with the ladder allows for a ‘bridge’ to be made over the hole in the station. Stepping out of the station, grab your satchel and head straight down.
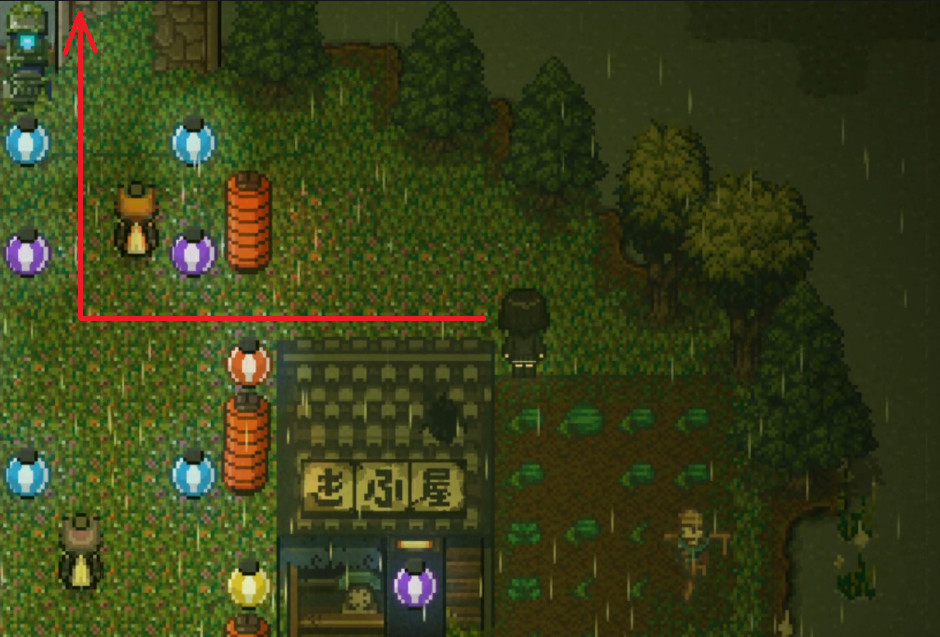
You will arrive in town, talking with the chicken you can learn about it’s master, and interacting with the message board gives you more information regarding the poison attacks, the hanged man, etc. Proceeding up the stairs give a scene where Kihara and Kiritani talk about the town. There is not much else to do in the town, so continue heading straight down.
You will encounter a strange lady asking you to take care of her baby. There is not much to do in the second part of town currently, you can interact with a couple things to learn a bit about Kihara and the town. After that, head once again straight down to begin chapter 1.
Chapter 1
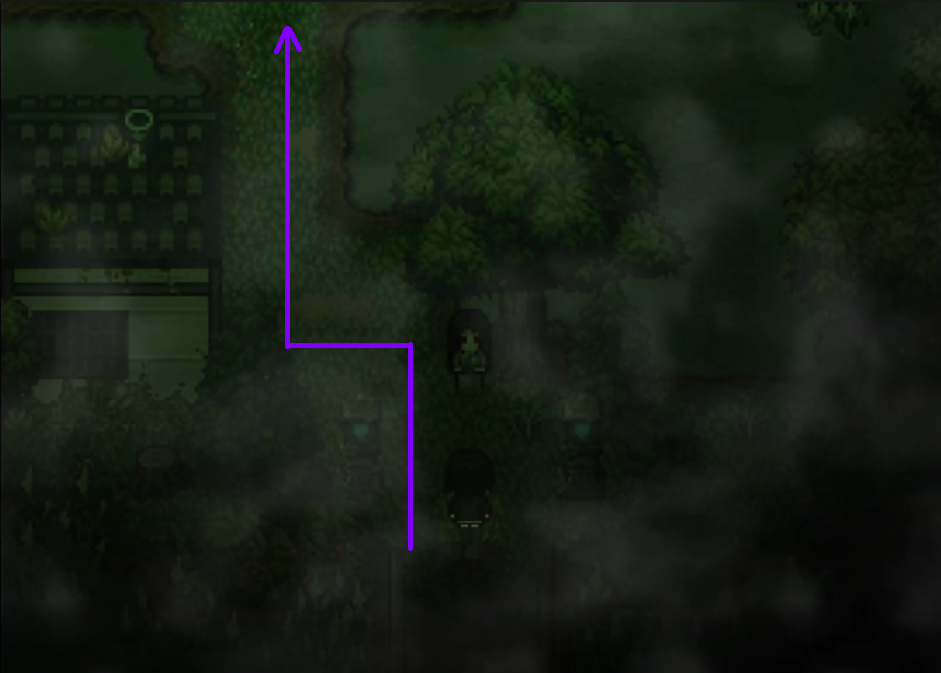
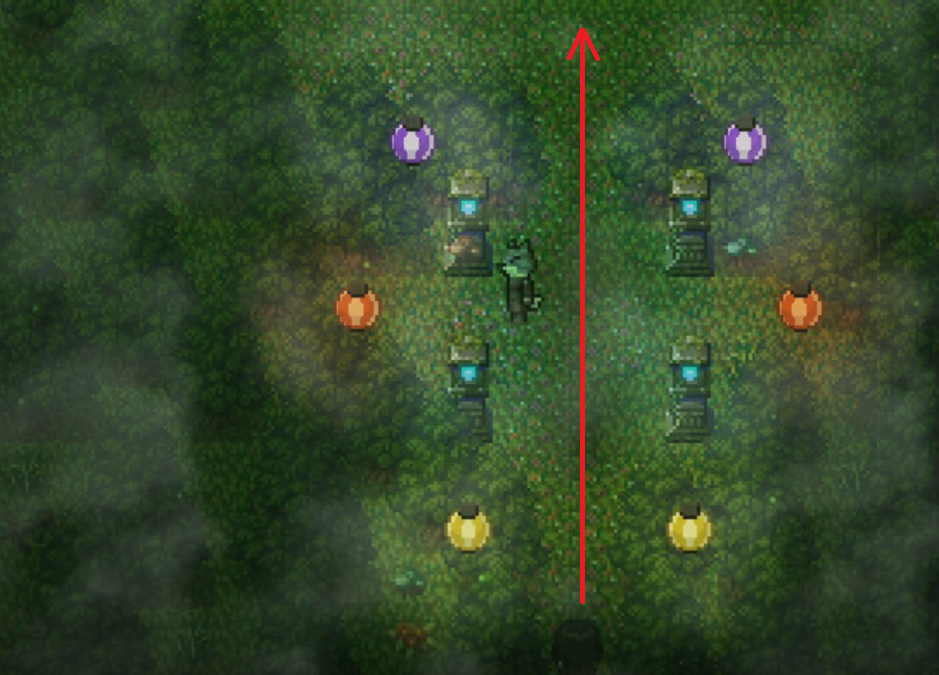
Once entering the area, a scene plays out with Kihara, Kiritani and the deer. After the scene, speak to the deer and he will tell you to give him Sunshower Rainwater in exchange he will show you a way to get to Kuromori Town, the deer will also tell you about the God that the town worshipped. He hints that the last time that there was Sunshower foxes got married, and that it was near the school. There is nothing more to do currently, so head upwards.
In the second part of town, talk with the scarecrow and he says that he will answer all of your questions if you answer all of his. He will ask two questions, and then ask for you to bring him a watermelon.
Puzzle 3:
Q1 – “What fruit looks green outside and red inside?”
A1 – Watermelon
Q2 – “What fruit is black when it is small, and green when it is fully grown?”
A2 – Watermelon
The correct watermelon to bring is the big one in the centre.
After the “puzzle” and talking with the scarecrow, you can talk to him again to learn about what was under the watermelon as well as the foxes wedding. Interestingly enough what is under the watermelon is related to the chicken’s master. The scarecrow gives you a hint to the year, that it is when the school closed down. Head on back to the notice board in the first part of town.
OH NO! The woman is back, well it is easy to get around her.
So you are going to want to sprint directly to the board, it might take a couple tries, but fairly easy to dodge, OH NO again! The woman is back and with her freaky baby. This time read the notice about the school closing and take note of two things:
1 – The year the article was published (1995).
2 – How long after the article publication, is the school set to close (“March Next Year” i.e. 1 year).
Be quick when you do this, as if you are caught then you are dead, so read and run back to the second part of town. Kiritani will say that the spirit is at rest now, so you can freely roam around the first part of town.
After getting the year, go back to the store and use the telephone. It asks you to enter a code, so puzzle 4…
Puzzle 4
Article Published = 1995
School set to close 1 year later
1995 + 1 = 1996
Therefore, code is 1996.
You will then be transported to the town, in 1996 with foxes roaming around. You decide to hide in the store. Read the sales notebook on the table to get information about the wife of the store owner. Walking to the back of the store you are introduced to Tamasaki Shizu, and she says that she can help you get the Sunshower Rainwater, but first you need to take her to Shikanaki Station. Before leaving with Tamasaki, go to the back left corner of the store, where there is something sparkling, to get a key. You can now talk to Tamasaki, and leave the store to begin your escape.
The next section is easy enough, when you get your timing down, if you get seen and caught you are dead. So let us begin…
Area 1:
 To do this, make sure that when you start running the fox at the top is facing up, so when you run next to him he will be facing right, you turn up and he turns down and you will then make it to the next area.
Area 2:
 First fox in Area 2, is easy to dodge, so moving on…
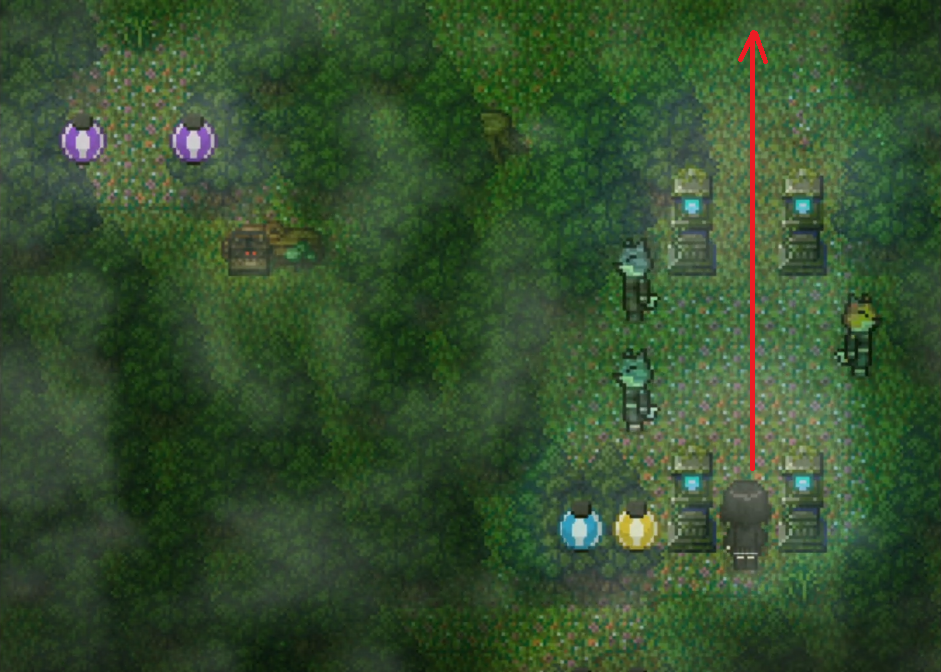
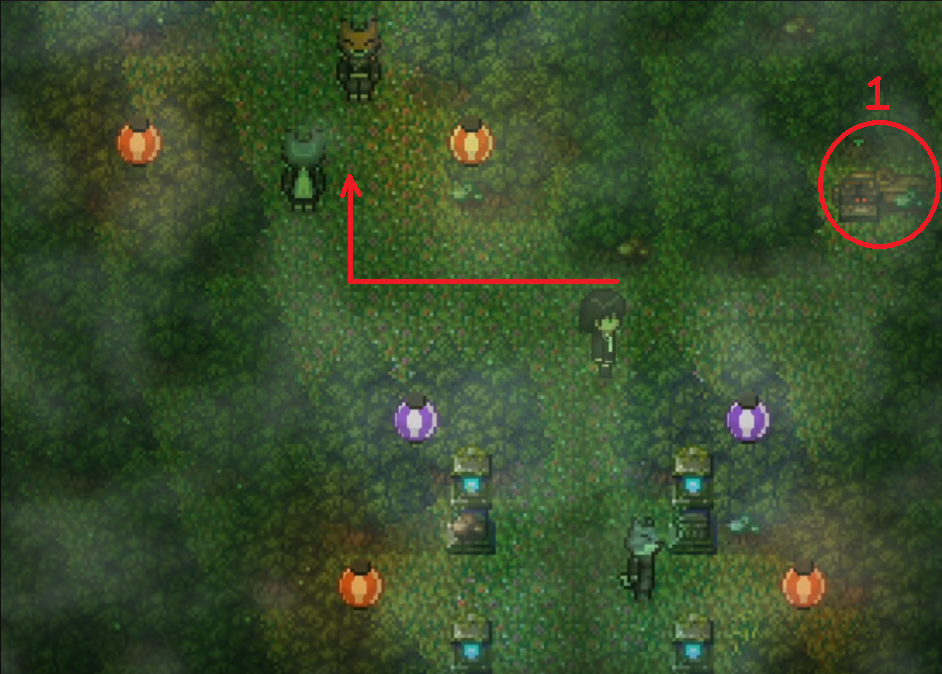 You will not be able to dodge these foxes, so move to where is is marked (1), this is a radio, allowing you to change the time to night where the foxes become somewhat of spirits floating back and forth making it easy to dodge around them.
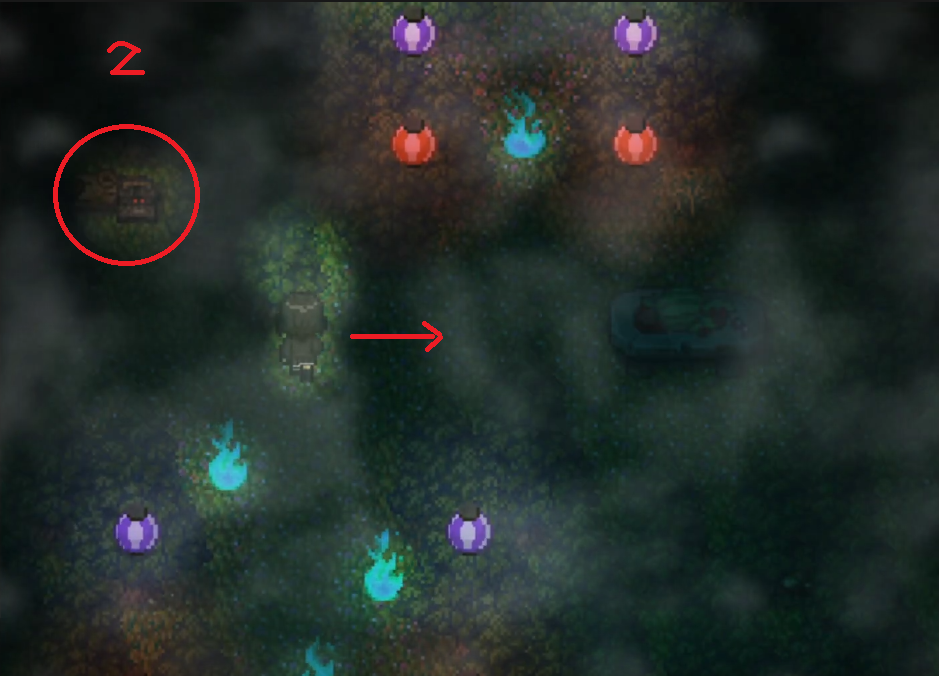 As you can see on the image, you are unable to pass due to the fox spirit being in the way, plus you cannot draw him out when he is like that, so head to (2) to change the time back to day so that he becomes a fox again.
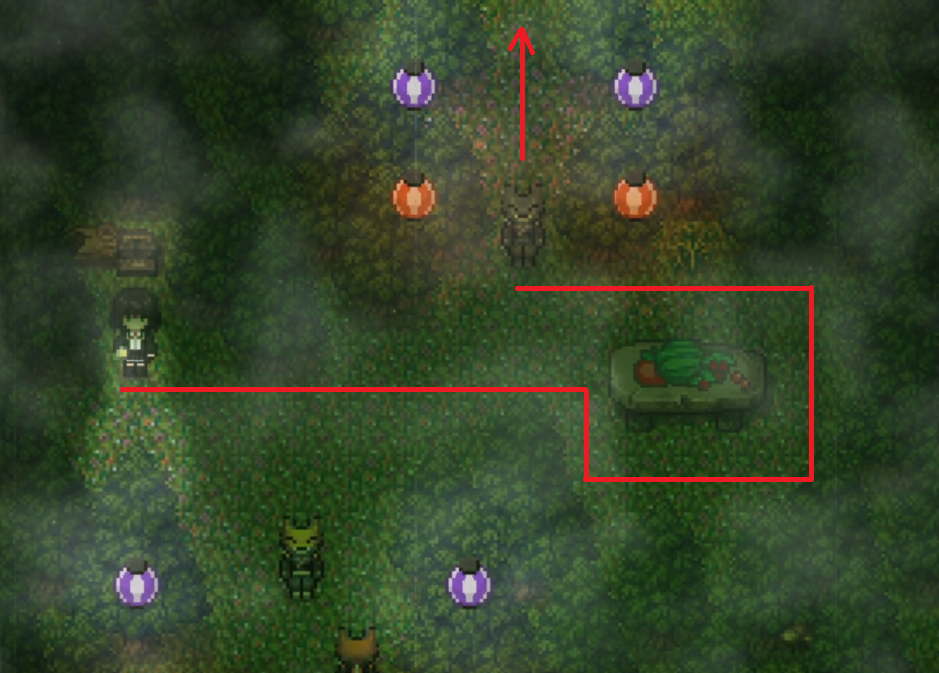 Once it is changed back, run and make sure when you do the bottom fox is looking down so he doesn’t become alerted. When you run past the top fox, he will chase you, you will then need to run around the table and upwards to the next area.
Area 3:
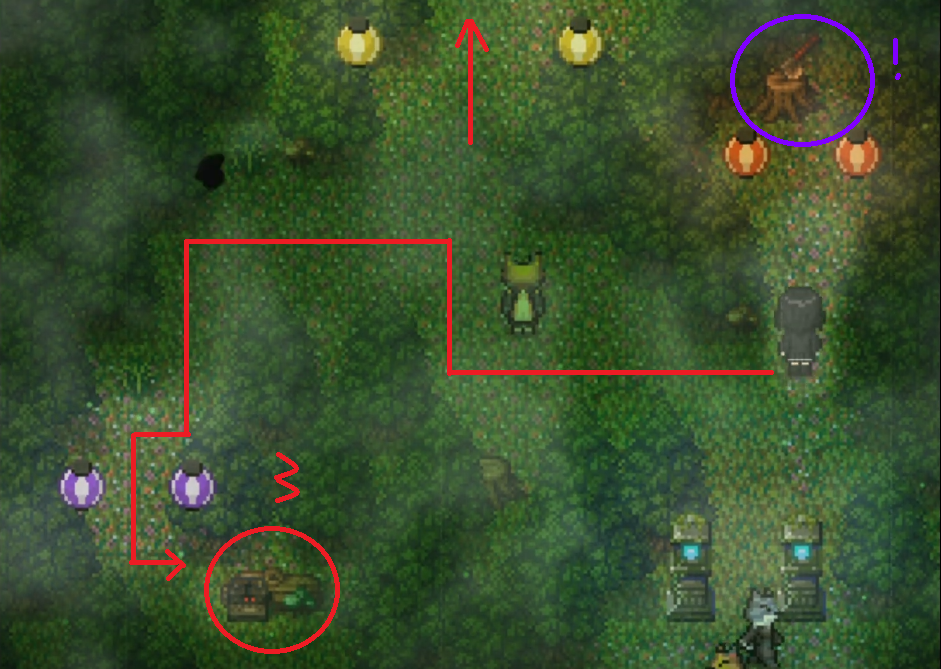 Simple dodge around this fox, be sure to make it to (3) first before heading up, there is 3 foxes at the top blocking your way so you need to change it to night before proceeding. This time changing the time results in the foxes disappearing and no fox spirits being there.
Note (!), it is an axe that you will be needing soon.
Area 4
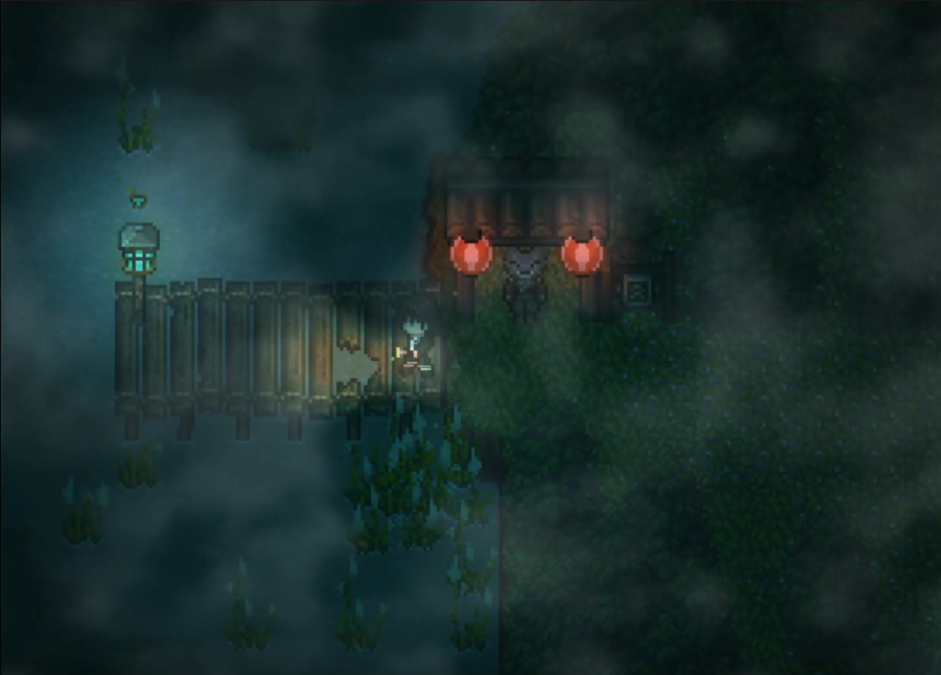 Final area, before leaving. The fox will stay asleep until you change the time. To proceed you need to walk next to the broken piece of the bridge, and interact with the lantern at the end. Then go back to the (!) in Area 3, i.e. the axe, bring it to Area 4 and use it on the bridge then interact with the lantern to change the time back to day.
Once it is day, the swan boat will appear, so get onto the boat. You will see a number of flashbacks with Tamasaki and the God (from the village). After ending up back in the train station, you can talk with Tamasaki to find out more about the cult, the village and what she is going to do next. Interacting with the sparkling wall safe reveals that there are documents kept in the general store’s safe. After reading the letter, Tamasaki will give you the Sunshower Rainwater. After Tamasaki leaves, use the radio to go back to the present.
Talking to the deer, you give him the Sunshower Rainwater and you will be able to proceed on-wards. Before we leave we have a few things to finish off.
To the general store, you will be able to use the key that you got in the past to open the store in the present. Not much in the store to do, so interact with the makeup poster on the back right wall to reveal the safe. Then go next to the group of white pieces next to the chair in front of the first display shelf on the right. Interacting with the “fish”, gives you a note. The note mentions “Water of Abundance enables plants to grow at an incredible rate…” Proceed out of the general store and interact with that big watermelon. Inside the watermelon is a key, used to open the safe. After opening the safe and reading what was inside, there is nothing more to do at the general store.
Talk to both the scarecrow and the chicken to get extra dialogue and they will move their positions to where the deer is, by the tree where you used the Sunshower Rainwater. Talking to them again provides more dialogue. Also, doing this earns you two achievements.
So going back to the area with the deer, walk across the river and keep following the road until you get to the next city.
Not much in the city currently, so you can head directly for the apartment that you discussed with Tamasaki. It is located on the back row of the buildings, next to the basket ball court. Interacting with the mailbox, in the middle of the two doors, allows you to enter the apartment. In the apartment reading the diary (in the bookshelf) gives you more information about the gas attack and talking with Kiritani gives you rules of Nensha.
Leave the apartment, in the road next to the building talk with the Cat and he tells you to go through the tunnel on the left side of the road to get to the cafe. On to Chapter 2…
Chapter 2
Starting this chapter, you will be introduced to Kinoshita Sakurako, her two cats and Aizawa Makoto. Not much happens other than you find out her cats ran away and you have to go find them. Before heading off in search of them, you unlock fast travel.
Speaking to Aizawa gives you more information about the two cats. The white cat (Rin-chan) loves horror films and is a fan of Komatsu Nanako. The hint Aizawa gives you is to pretend to like Komatsu Nanako, when talking with Rin-chan. The ginger cat (Mochi-chan) loves movies about magic, etc. The hint Aizawa gives you is Mochi-chan discovered a skull in Shikanaki Village.
Puzzle 5
It doesn’t matter what order you find both cats in.
Rin-chan (White Cat)
Head to Kuromori Town, where the apartment is, fast travelling is quickest way. Next to the bus stop there is cat footprints, investigate both sides and head downwards to the building that says CD (with Movie Posters). Talking to the poster, choose to say “Komatsu Nanako is fantasic!”, after talking to Rin-chan she will go back to the cafe.
Mochi-chan (Ginger Cat)
Head to Shikanaki Village, where the big deer skull is, fast travelling is quickest way. Once you talk to Mochi-chan, he wants to find out if he can trust you. While controlling him, you can interact with the scarecrow and chicken (if you brought them here earlier), you have to speak to the deer and he will tell Mochi-chan that he can trust Kihara. After he leaves back to the cafe, you can talk as Kihara to the scarecrow and deer for a little more dialogue.
After both cats return to the cafe, head back yourself and speak to Kinoshita. After the scene you will be transported to the train, in the past. After talking to Kiritani, you can look around the room, head to the next carriage on the right.
 Once playing as Nishimura, open the water tank to find the package and then wash it off in the sink. Once back in control of Kihara, grab the keys from the middle noose. You can now open the door to the next carriage on the right.
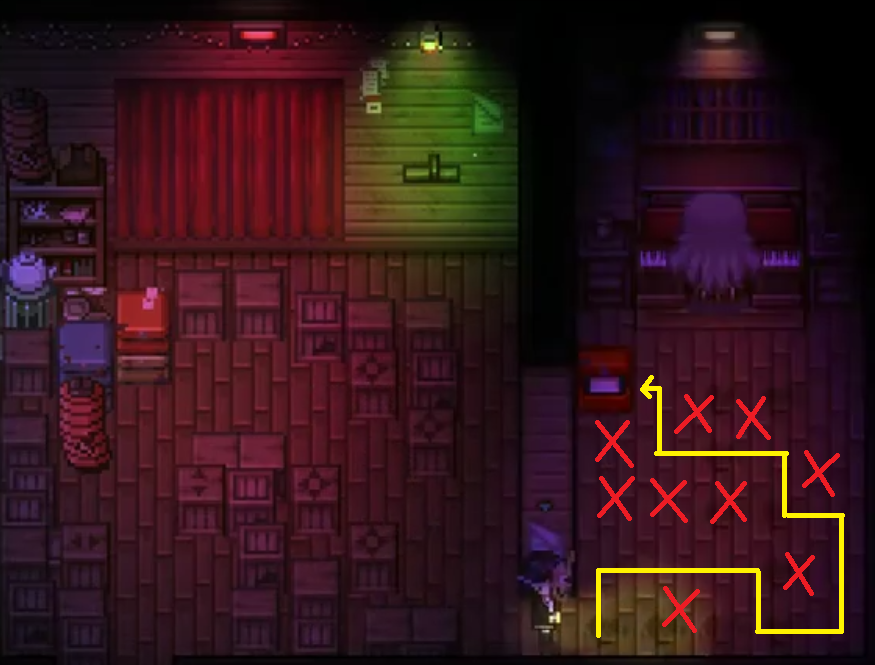
After talking with Kichijiro head to the next carriage on the right. In the carriage with the sleepy cat, take note of the poster on the left wall. The next room is a maze.
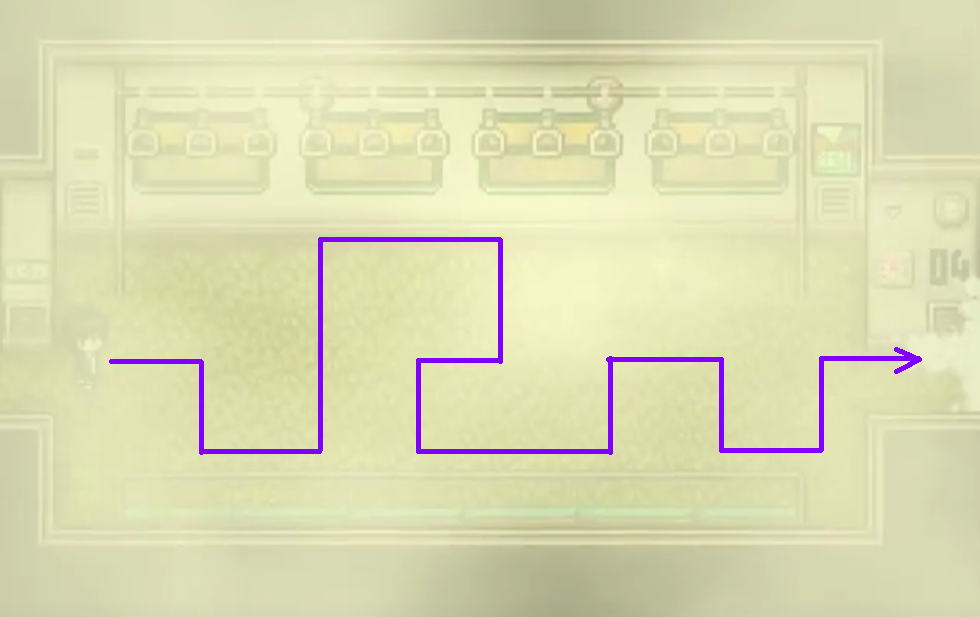
After the maze, interact with the ventilation unit to clear the fog. You can now talk with the old cat lady to hear about Shikiyaki Village, as well as Aizawa will tell you about Kinoshita and the cafe. Head back to the starting carriage and interact with the ventilation unit. You will then play as Mochi-chan for the vent maze.
Vent Maze
Keep following the path until you get to an intersection, go up past the spider to continue to the next area or go left for more dialogue between “Kihara” and Mochi-can. Before entering the next section, read the note and it will give you a hint for the next section. The second part of the vent, you need to walk/sprint where the tentacles are coming up from the floor, the path with no tentacles is the incorrect one and you will die.
After the vent section Aizawa and the cats will go back to the last carriage. You can talk to them for optional dialogue. To continue proceed into the first cart where the gas was, and is now cleared out. After the scene with Nishimura and Yamada, interacting with the corpses provides you with a lot of information that contradicts what Yamada was saying (definitely read). Interact with the guy laying face down to get the Icepick which is important for proceeding. Interacting with Nishimura, Yamada will enter the carriage and you will need to dodge past.
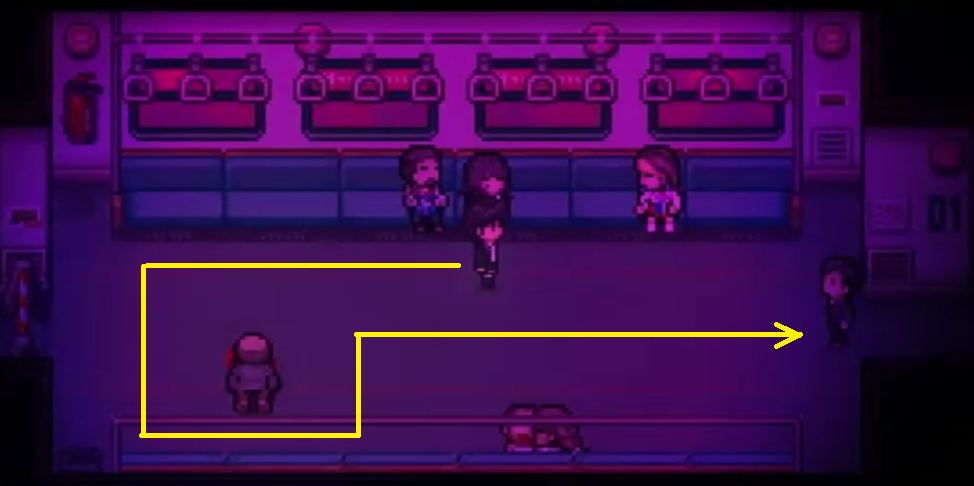 Simple dodge, similar to the fox table dodge from Chapter 1, put the body in between Kihara and Yamada, and proceed right until you get to Aizawa. Speak to Aizawa and she will tell you about the captain. Use the Icepick on the frozen door, and proceed to next area.
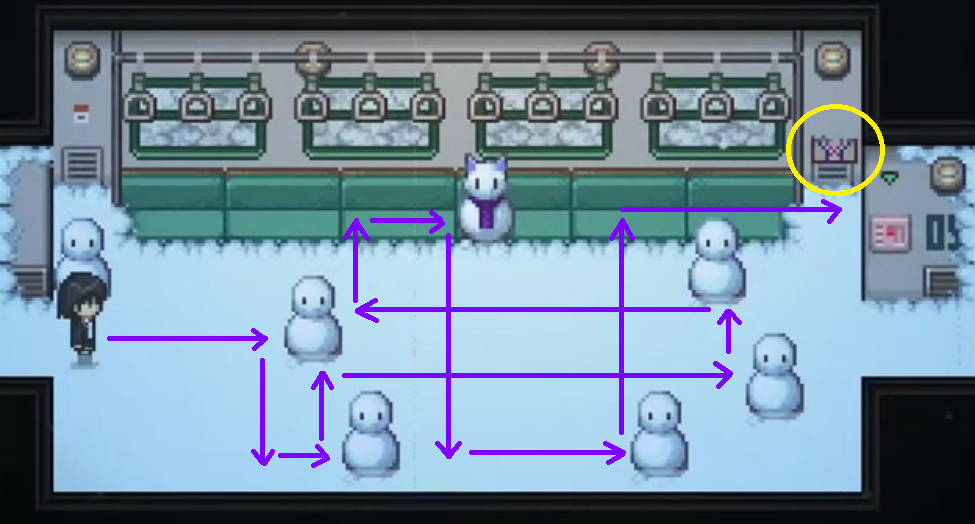 Easy enough, especially if you have played any ice mazes in Pokemon games. Solution is: Right, Down, Right, Up, Right, Up, Left, Up, Right, Down, Right Up and Right. Interact with the poster to trigger what to do next. You can interact with the frozen door for a little dialogue. Head back to the third cart, the one with the big sleepy cat. Now talk with Rin-chan and take the poster off the wall.
Head to the carriage on the left, to talk with the big cat to help him fix the water leak. This is the solution:
Dodo will then give you Lockpicks. Before proceeding, talk with Kichijiro and you will learn about him and a drawing he did. After the scene, he will draw a cute advert with Kihara (not going to spoil it). After this go all the way to the fourth carriage, where Aizawa is, speak with her and she will join your party.
Now proceed to the ice area again, following the same solution, interact with the poster again and the ice will melt. You will also get an achievement after this. Interact with the door, using the lockpicks starts a mini-game.
Puzzle 6
Picking the lock is easy enough, only three chambers with two options, and they do not reset if you mess up. Answer is Right, Left and Left. I am fairly certain it is not randomised.
Next is a flashback scene with Aizawa, after the interview, interact with the mirror. The correct answer is “Smile”. Exit through the door and enter as Kihara into the final carriage with the conductor.
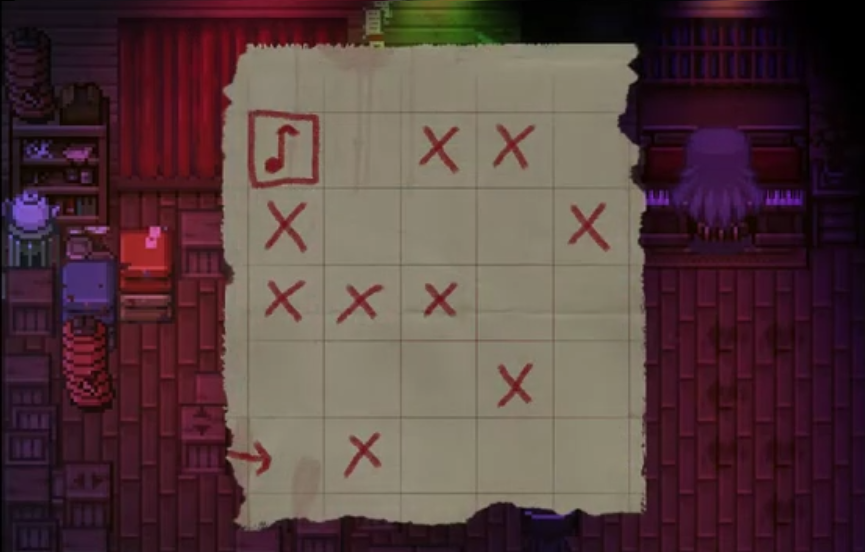
Puzzle 7
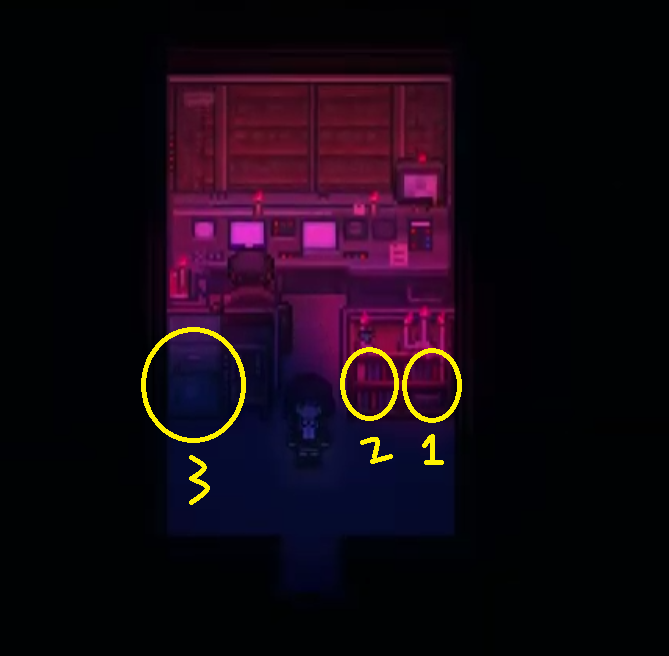 To complete, interact with (1) to discover a safe needing a combination. Then with (2) to read about the cult and discover a note in the book. The note says “Burn this message after reading it.” and literally means burn it, so interact with (3) to toss the note into the furnace and receive another note, which provides solution to the safe combination.
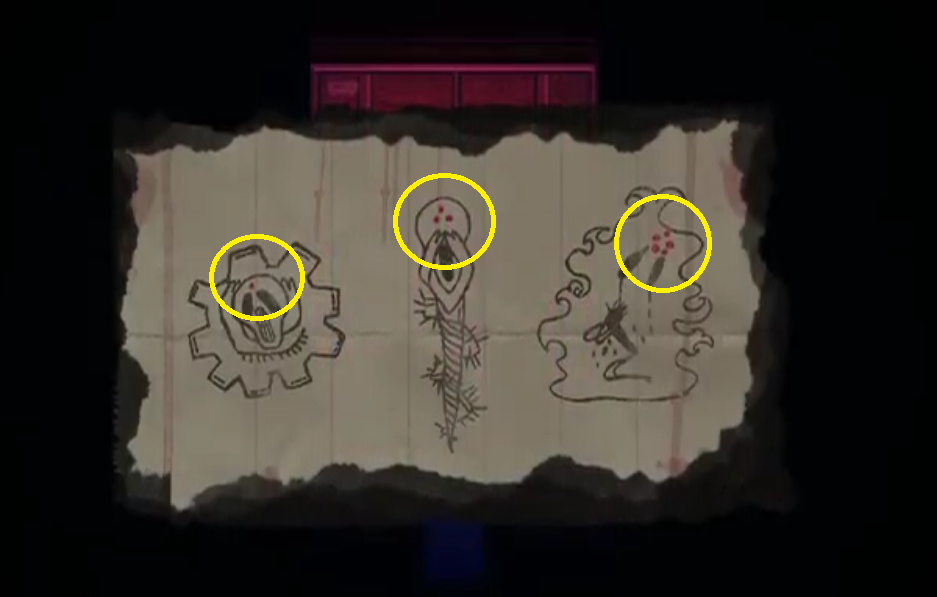 The safe code is the number of red dots per picture in that order: i.e. 1, 3 and 5. So code to the safe is 135.
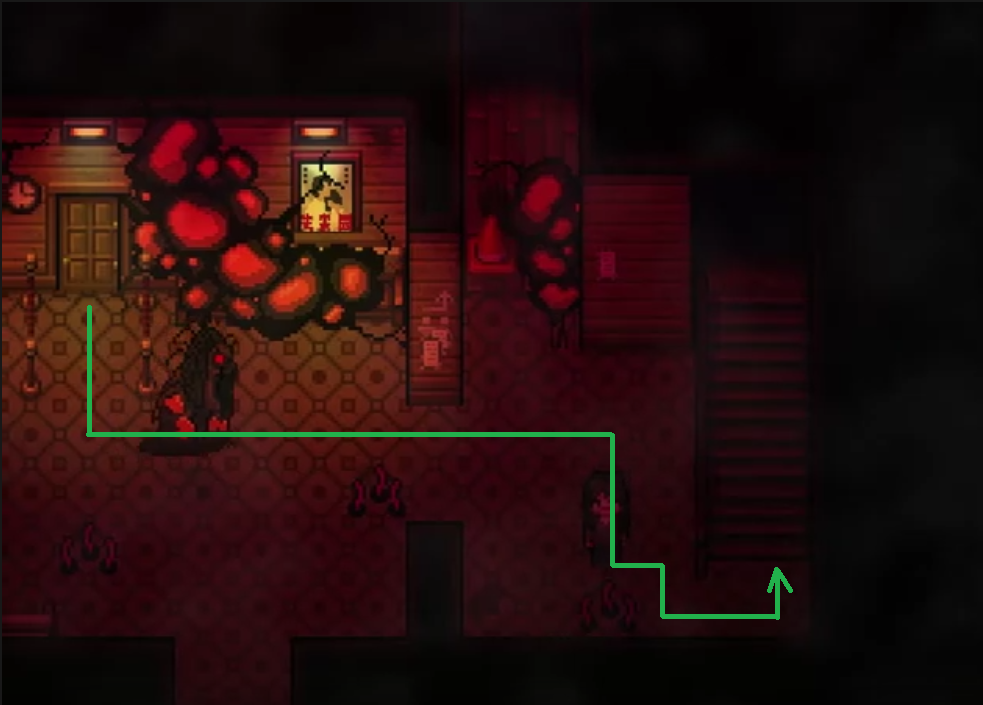
OH NO! After that is a chase sequence and you need to sprint or you die. Here are the solutions:
 The floor will turn to tentacles after Yamada enters, but just follow the path.
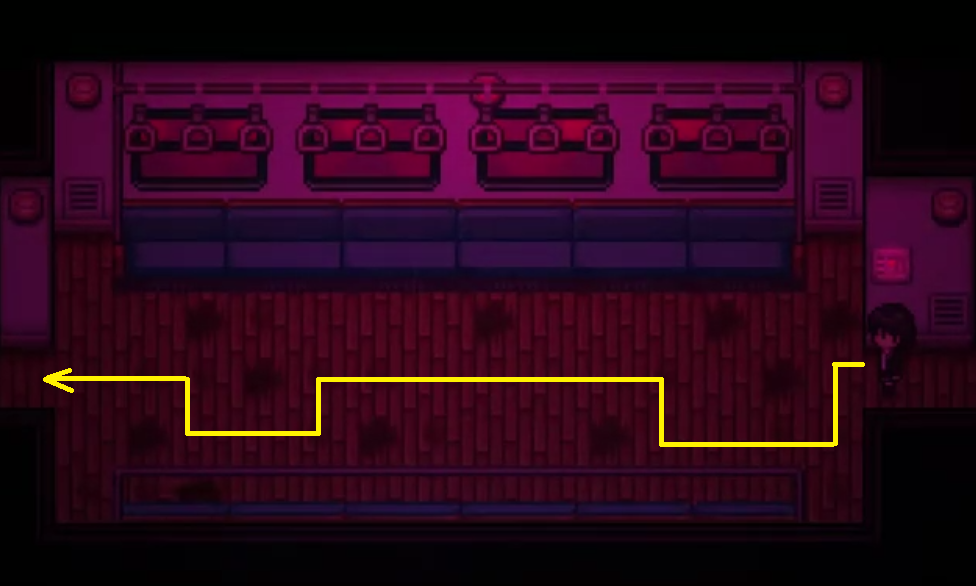
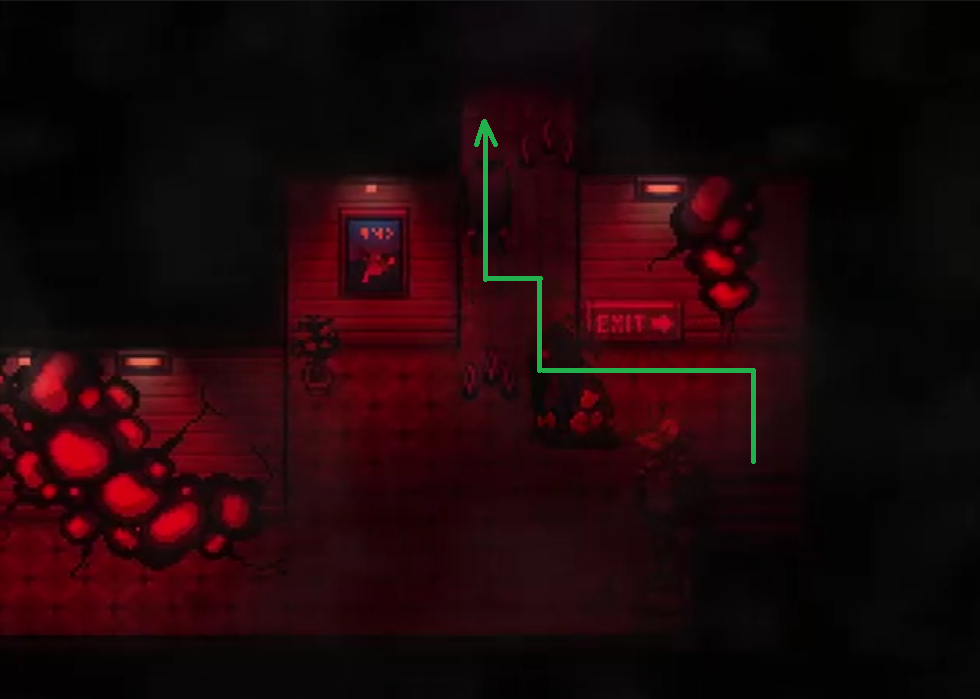
Next carriage sprint left. There is nothing blocking your way.
 The hint from the previous carriage was to follow the green lights. Just be sure to sprint, as Yamada will enter the room.
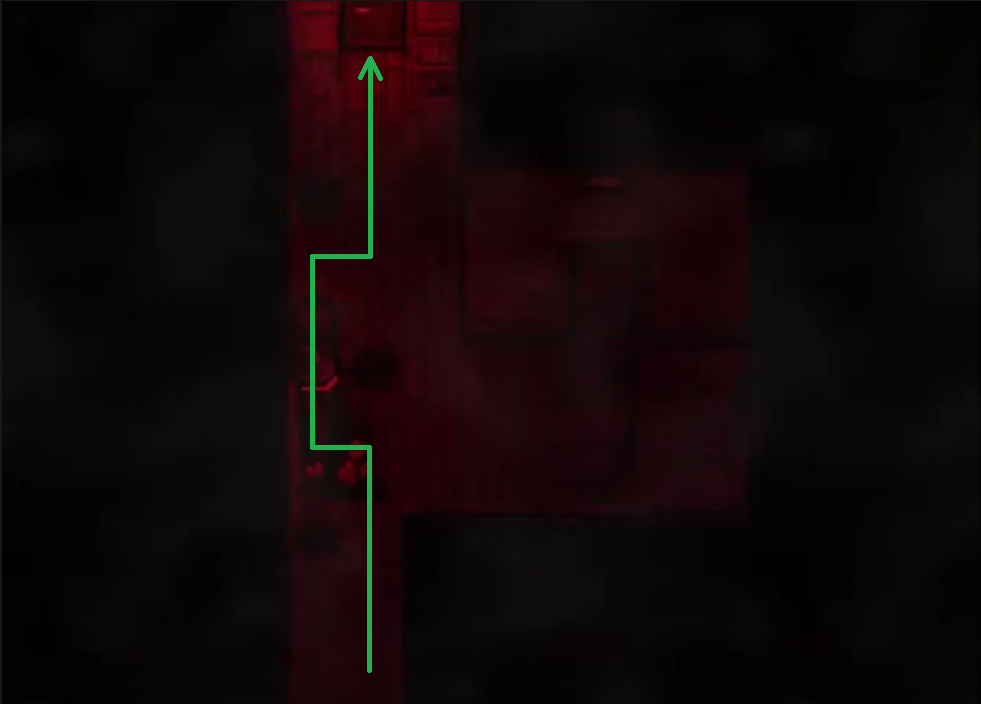
Next carriage, again sprint left.
After the chase sequence, there will be a fairly long scene with Aizawa, and what happened with Yamada. You will then receive a gemstone from Aizawa. When Kihara comes to, she will be by the train and will talk with Kinoshita about what happened. You can now talk with Rin-chan and Mochi-chan, as well as Kinoshita. There is also a note giving more info about the train. Kinoshita will give you a pearl, used to progress to Chapter 3.
Interacting with the poster you get teleported into the shop with Kichijiro, and you will learn more about the drawing. Before heading to Chapter 3, fast travel to the cafe, and talk with Dodo and Kinoshita to get two achievements. All that is left is to either fast travel to Kuromori Town Apartment and go up the stairs, or to the train station and use stairwell. Using the stairwell is another note to read. Doing either starts Chapter 3.
Chapter 3
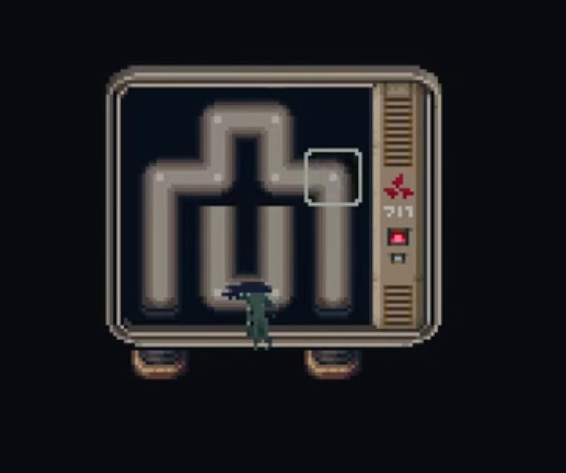
Starting off this chapter, enter into the theatre. Nothing to do on the first floor now, so use the stairs to go to the second floor. You can read the note on the wall, then proceed into the projection room. Here there is not much to do other than fix the projector by completing the image. Head in between the two projectors, and interact with the front of right projector.
Puzzle 8
The image needs to look like this:
After solving head to the rear of the projector, and switch it on. There will be a scene, head out of the projection room, Kihara will say “Was this door here earlier…”, indicating to go back into the room.
After talking with Yumme, he will give you the key to the prop room. Go back to the first floor, and you will see one of the cones are gone, you can now go through to the back of the theatre.
 This might not be obvious at first, even I was confused until I realised, boxes with arrow heads on indicate it can be pushed in either direction. So push this box to the right and continue to the prop room.
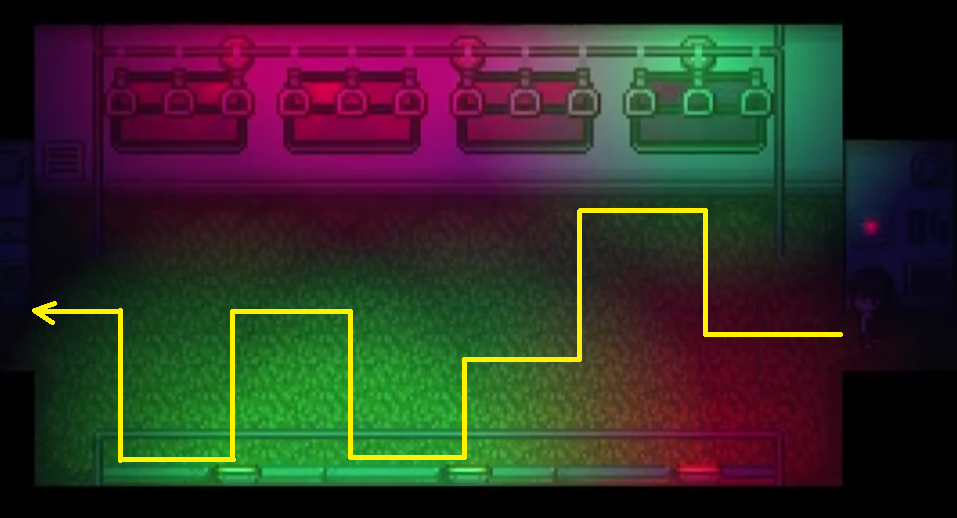
 If you are used to playing Pokemon strength puzzles, then this would be easy. If not, you can have a look at the picture. Simply Box 1 (B1) up, B2 left, B3 right, B4 down, B5 right and B6 down.
Interact with the mask at the back, Kihara will put it on and now you will be able to enter the ceremony. So go into the theatre room, next to the ticket/concessions stand.
After the scene with Ando Megumi, you will be able to talk to all the other attendees. You will need to speak with Sanmai and Izumi, telling you about the music score and prayer. You will also receive an achievement for this. To progress we need to get three items: Water of Abundance (Ando), Music Score (Sanmai) and Prayer Passage (Izumi).
First is to get the Music Score, head back to the prop room and the cone is now gone. You can now proceed with the Puzzle.
Puzzle 9
Yes, it is not 100% to scale, but it should suffice. To walk it would be (from the note): one right, one up, two right, one down, two right, two up, one left, one up, two left and one up. Face left and interact with the box to get the Music Score. Also, if you mess up you will not die, it will just reset you back to the note. After the scene return back to Sanmai and give him the score. Now head out of the room, back into the main hall and talk with Karasumi, and he will give you a key to the office on the first floor. Go to the office, it is in the same passage that connects to the prop room, you can now interact with a couple items in the office, and once you are ready use the radio to go to the past.
After the scene, head into the prop room and after to the main hall. Take note of what the girl is saying as it is a hint used in a little while. Talk with the ticket collector and he will tell you to put the mask back in the prop room. So head back to the prop room and when the caretaker asks you leave, tell him “Returning the mask“. Speak to the caretaker and he will give you another hint. Now use the clock on the right wall to go a little bit more back in time.
Now exit out of the room and go back to the main hall. You can now enter the ceremony area. Speak to the little girl and tell her that you saw “Zashiki Warashi” (hint from earlier, or I guess later?) and she will leave the room. Now speak with Terajima and the caretaker and it will trigger a scene. After the scene, go back to the prop room, and interact with the drawer next to the piano, to get the Piano Record. Use this on the Phonograph (hint from earlier, or again later?), and the caretaker will leave to investigate. Now go back to the ceremony room and tell Terajima someone was in his office, like what happened in the scene from earlier. He will thank you and leave. Talk to the little girl’s mother and she will wake up and go off to find the little girl.
Finally, go up to the altar and collect the Water of Abundance. Now to leave, go all the way back to the prop room with the clock and use it to go forward in time. After the scene, exit and then another scene. Go into the office and interact with the photo on the right wall. Open the locked drawer (next to the shelf) and you will get the you will get the Prayer passage and the radio will play allowing you to go back to the present.
After the scene, head to the back of the room and interact with the dress. After the scene, head back to the shop, second floor, and speak with Yumme. You will then be transported to the past. After the fairly long scene, head out of the projection room and to the office. Interact with the metal box on the table for the Decryption Card and more about the theatre manager (which will play a part in the real ending). Now interact with the bookcase to start the puzzle.
Puzzle 10
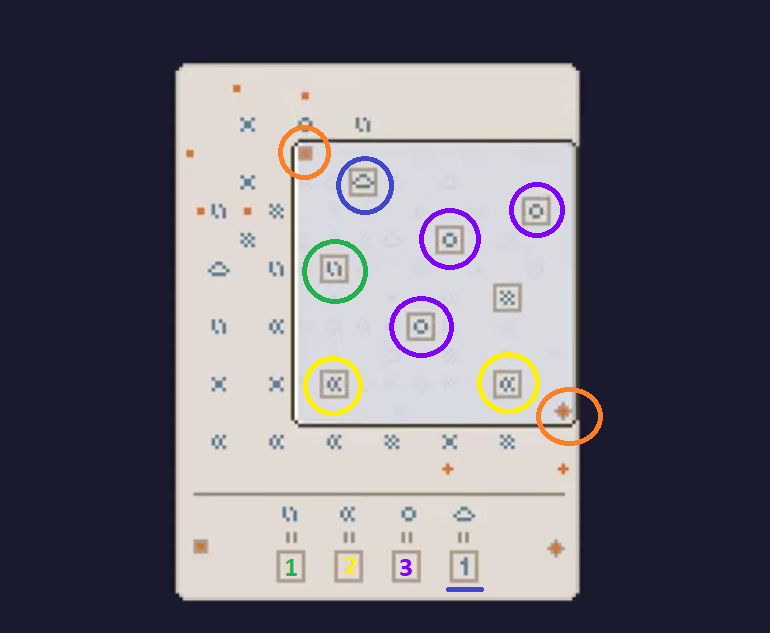 For the last puzzle, make sure the two orange corners are filled. The hint is also the triangle is one, meaning containing only one. All you need to do is count how many of each symbol there is, then the number of each symbol, in the symbol’s order is the code.
Code for metal box is 1231
Use the code to unlock the metal box and get the key, now use the key on the prop room door. It is no longer a prop room, rather a storeroom with a staircase leading to the roof of the theatre. You can interact with the boxes to tell you that you need a black film reel. Head up the stairs to the roof. After the scene you will be play as Ando, head back to the main hall on the first floor.
Interact with the red growths for more dialogue about Ando. Head into the ceremony area. After the scene, OH NO!
Be sure to sprint, and be aware of the tentacles and the holes in the floor.
After a fairly long scene, head in the direction of the projection room. There will be another scene and the game will tell you that you must save. So…
~~~~~~~~~~ !!! SAVE THE GAME !!! ~~~~~~~~~~
This is so you can enjoy both endings. The game will also tell you that everyone in the theatre will have something new to tell you. You can talk to everyone in the theatre, but the two most important people to talk to are Izumi (in the ceremony room) and the Demon Mask (in the prop room, by the piano). After talking to both you are awarded with an achievement for both.
When you are ready, it is time to wrap the game up. Go back to the hall with the door to projection room.
Ending(s)
I am not going to go into detail, or say what you need to do in either ending. I would feel as if I have spoiled the game for you, dear reader, so I hope you understand.
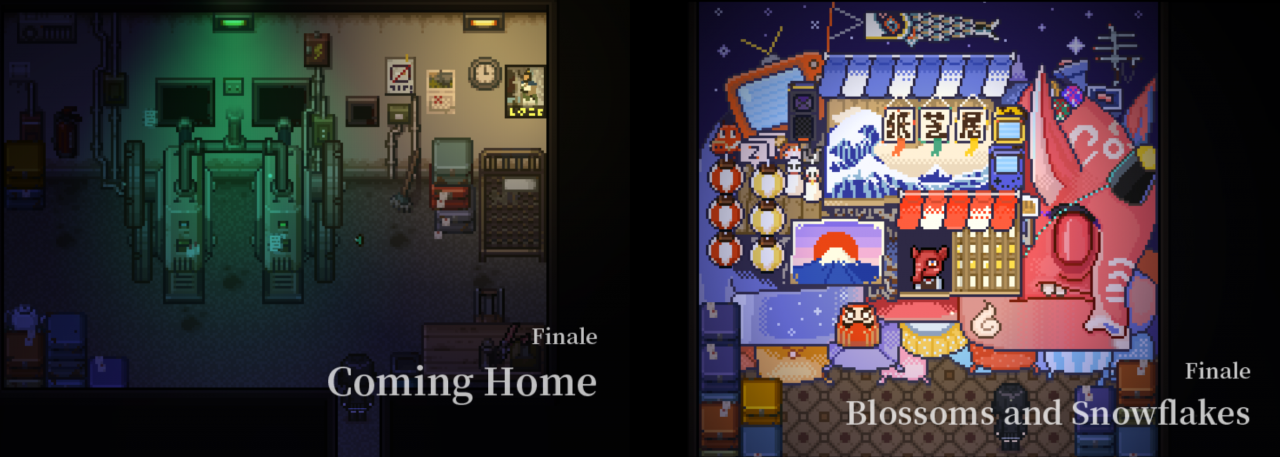
Ending 1 – Coming Home
Entering through the left door, you will be getting ending 1. This is not the real ending. It is short, get this first so you can get the achievement as well as experience the real ending to it’s fullest.
Ending 2 – Blossoms and Snowflakes
Entering through the right door, you will be getting ending 2. The real ending which ties everything together and provides the missing information of what had happened, as well as confirming a few things that we suspected that happened.
NOTE: Do not quit the game while the credits play, in either ending as there are scenes that play during the credits.
Achievements
In Tales of the Black Forest, there are two types of Achievements. Firstly what I call Participation Achievements meaning that you get it as you play the game. Secondly Backtrack Achievements meaning you need to do a little bit of backtracking before progressing the story.
 You get this during the prologue, when entering the train station and talking with Kiritani.
 You get this after completing Chapter 1.
 As I discussed in the walkthrough, after completing Chapter 1, before continuing, backtrack to the village and talk with both the Scarecrow and Chicken to get their respective Achievements.
 You will get this during a normal playthrough, after joining the two pieces of the poster together and melting the ice in the snow room.
 You will get this after completing Chapter 2.
 You need to backtrack after Chapter 2, before continuing to Chapter 3. You will need to go to the cafe, outside is Dodo and inside behind the counter is Kinoshita. Speaking to both gives you their respective Achievements.
 You will receive this during a normal playthrough, when speaking to both Sanmai and Izumi for the first time. When they ask you to get the Music Score and Prayer Passage.
 You will get this after completing Chapter 3.
 As discussed in the walkthrough, before going to the end of the game, you need to talk to Demon Mask and Izumi after finishing Chapter 3. Demon Mask is in the prop room by the piano, and Izumi is in the ceremony room (where he was earlier).
 To get this Achievement you will need to have seen Ending 1. This is done by entering through the left door.
 To get these Achievements you will need to have seen Ending 2. This is done by entering through the right door. PLUS sticking with the credits all the way through, to get a list of people the creator of the game thanks.