In this guide I will attempt to collect information on how to import MMD models into tower Unite.
Preamble
I don’t use MMD or Blender enough to be efficient in them so my terminology might be off and the process might be tedious, but hey, it works.
I will try to keep this guide as up-to-date as possible. If I come across new findings etc. I will update the guide, until then, please bear with the current version.
Do note that this guide exists as a general description of the basic process. Every model is unique and it requires a lot of troubleshooting.
Software
- Blender Version 3.3 at the time of writing
- CATS Blender Add-on[github.com] Version 0.19.0 at the time of writing
- MMDTools Blender Add-on[github.com] Version 2.8.0 at the time of writing
- Tower Unite Blender Add-on [towerunite.com] Version 1.2.4 at the time of writing
While versions are specified, it’s generally a good practice to use the latest (and greatest) version.
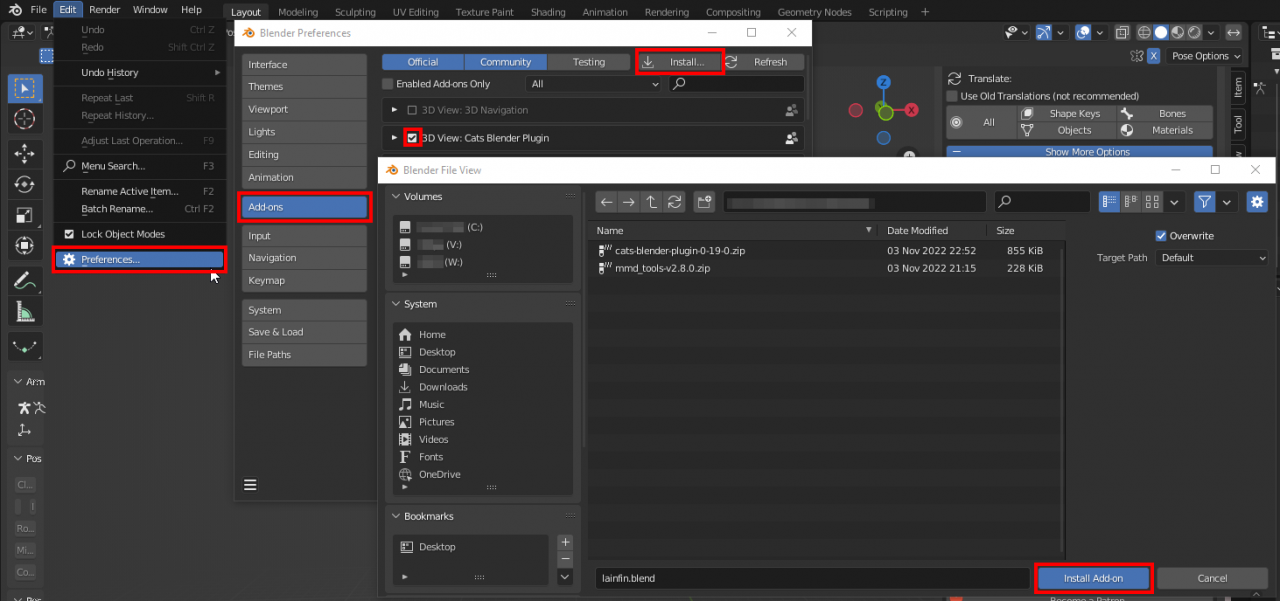
Installing Blender Add-ons
- Click Edit and select Preferences
- Select Add-ons
- Click Install Add-ons
- Browse the downloaded .zip file and click Install Add-on
- Once finished, tick the box next to the Add-on
Importing the mesh
First create a new project, if you haven’t already go to File -> New -> General.
Once it’s created, remove everything from the scene, press A and hit Delete. Here I prefer to remove the collection in the Outliner but it’s optional.
CATS is a great plugin to work with MMD models. To import simply:
- Select File -> Import -> MikuMikuDance Models
- Under Types select Mesh
- Set Scale to 1.0
- Optionally select Clean models
- Check MIP maps for UV textures (might not be required but mipmap sounds funny)
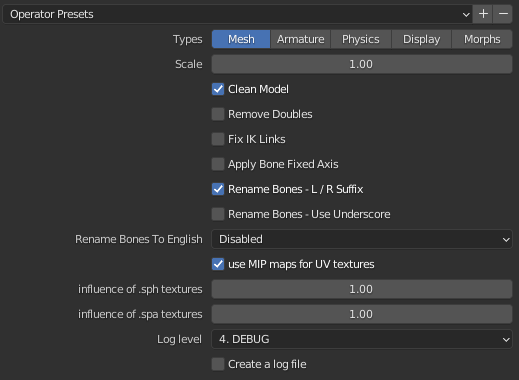
This will only import the mesh, it’s materials, a pose and an MMD bone modifier.
Removing unnecessary MMD stuff
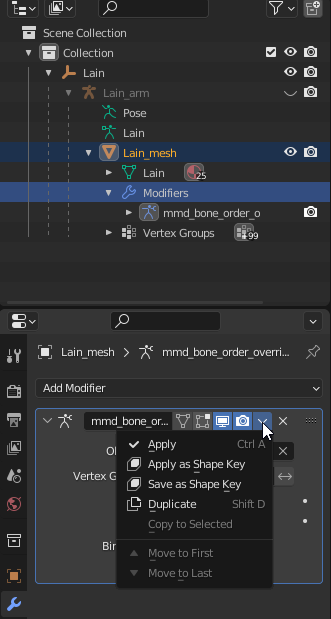
Delete the Pose:

Remove the leftover thingamajig:

After this we’re left with the mesh, vertex groups and the materials.
Materials/ Textures
This is a requirement from Tower Unite, materials other than Principaled BSDF won’t show up or misbehave. Thankfully MMDTools includes a quick fix.
- Select MMDTools
- Under Operators select Convert Materials For Cycles

- Make sure Convert to Principled BSDF is selected in the popup
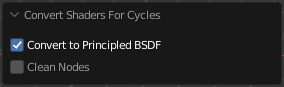
This most likely doesn’t mess up colors/ textures too much, in case it does the nodes/ colors/ textures can be edited.
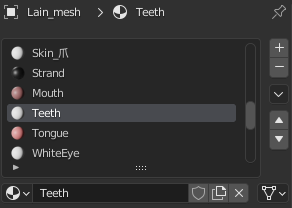
Tower Unite supports 10 or less materials per model. Most MMD models have more than this so reduction is needed. This needs to be done on a per model basis. The general workflow is something along the lines of:
- Select the Object
- Select Material properties
- If it’s not visible/ not needed remove else keep
- If the color/ material is duplicate remove -> The material will be inherited from the material above in the list (e.g.: If I remove “Teeth” from the list everything with that will have “Mouth” after removal)
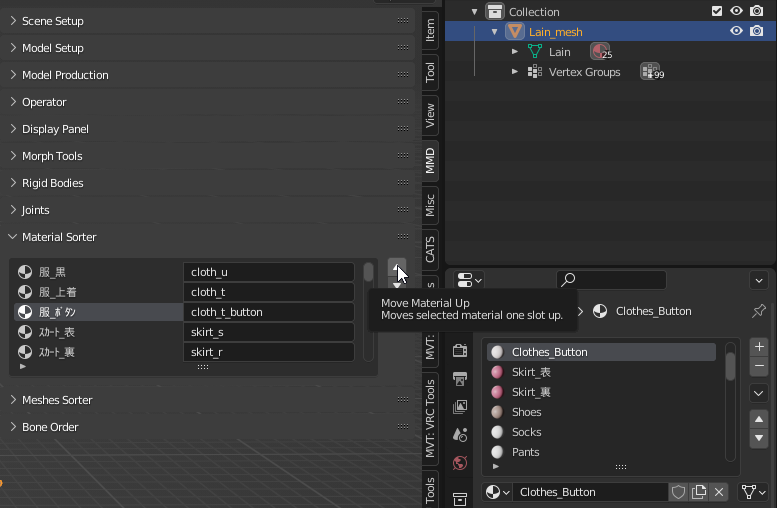
If duplicate materials are not adjacent to each other, we can re-order them with MMDTools:
- Open MMDTools
- Select Material Sorter
- Select the material you want to move and click on the arrow
You can try to bake the materials into a single UV Mesh, but I couldn’t get that to work so meh.
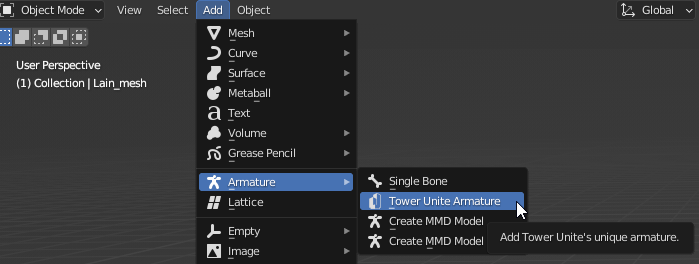
Adding Tower Unite Armature
- In Object mode click Add -> Armature -> Tower Unite Armature
- First add the armature as is, since we will have to scale the model
- Change back to object mode, select the object, press S and resize the model so it generally fits the armature
- Remove the armature
- Add the armature again but now set the length and angel of the arms
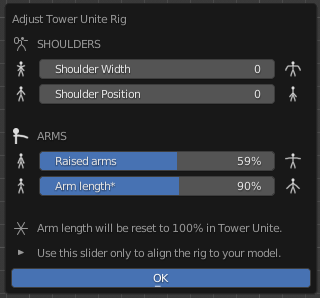
- Slightly modify the armature around the mesh as required (Josh has a great video on this)
If you have the original MMD pose at this point, you can also pose the model itself but I find it more difficult because of how complex MMD armatures are.
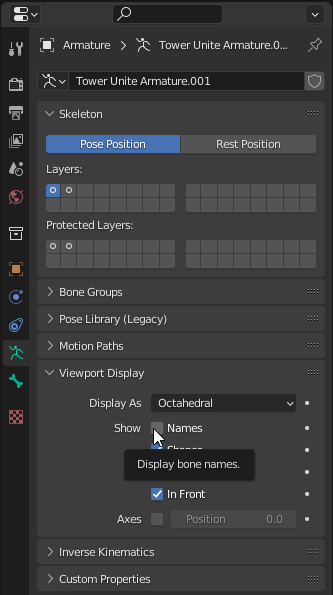
Renaming vertex groups
First thing first, enable the bone names in the viewport. This will help us with naming the vertex groups.
- Enter Weight Paint mode
- Select the mesh
- Select the Object Data Properties tab
- Click on one of the groups
- Check the viewport and see what is selected
- Rename the group to the most logical bone
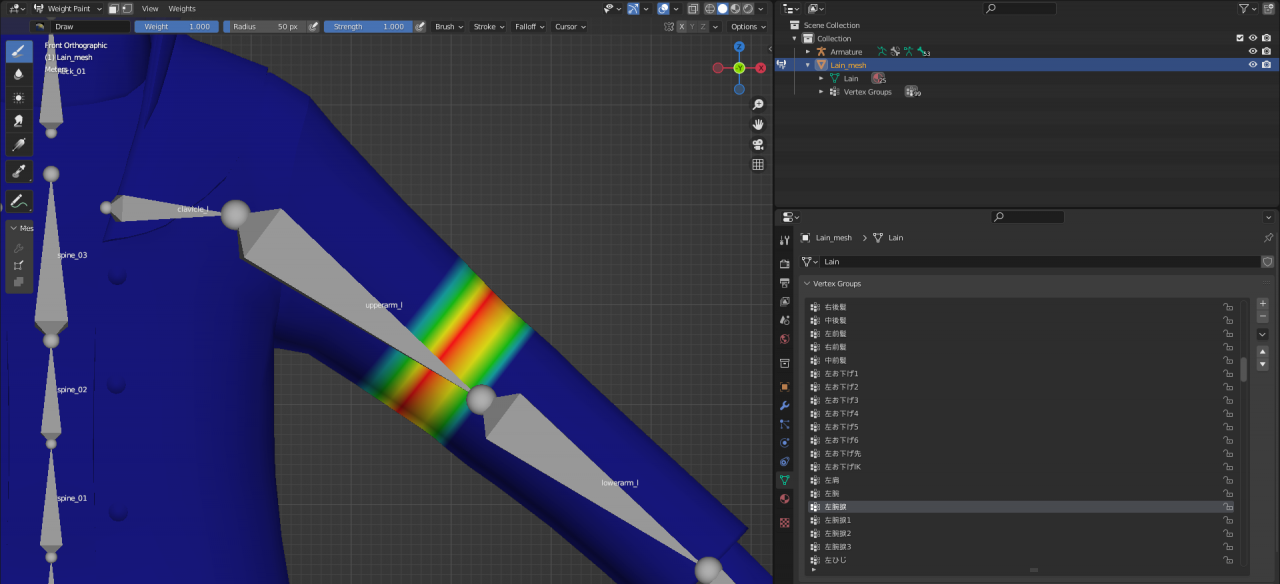
There will be multiple groups with the same name, but we will handle this later, let Blender do it’s thing with .001 naming (or be creative). If you come across illogical weighing or invisible things, remove the group. Note that depending on the complexity of the model the selected group might be on the back or in some weird spot so check the model from every angel before removing. Or translate the name of the group if you’re unsure.
Now that we have all of the groups named after a relevant bone, we will have to merge the groups so every bone has exactly one group.
- Select Modifiers
- Add Modifier -> Vertex Weight Mix
- Set Group A as the group that we will keep (e.g.: upperarm_l)
- Set Group B as the group that we want to merge into Group A
- Set Vertex Set to All
- Set Mix Mode to Add
- Apply
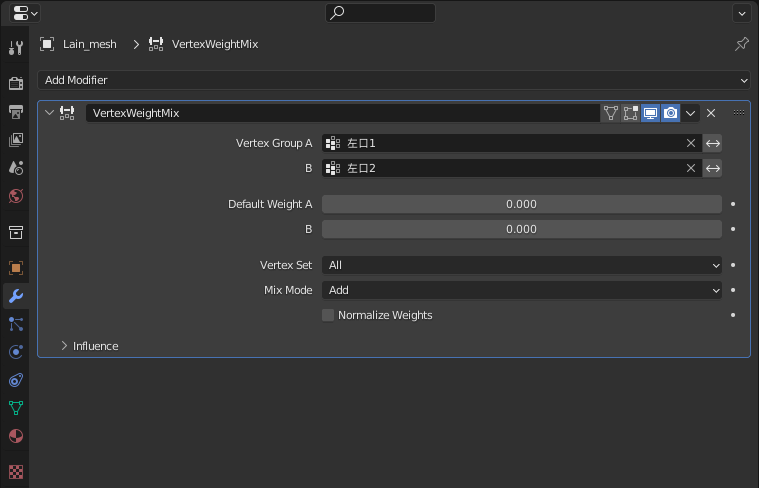
- Repeat for all eternity (SHIFT + D duplicates the modifier and CTRL + A applies the selected modifier)
After done, remove the unnecessary groups.
With this we don’t have to worry about actually parenting the armature to the mesh. Tower Unite or the export tools will do it for us, but parenting is possible.
General troubleshooty things
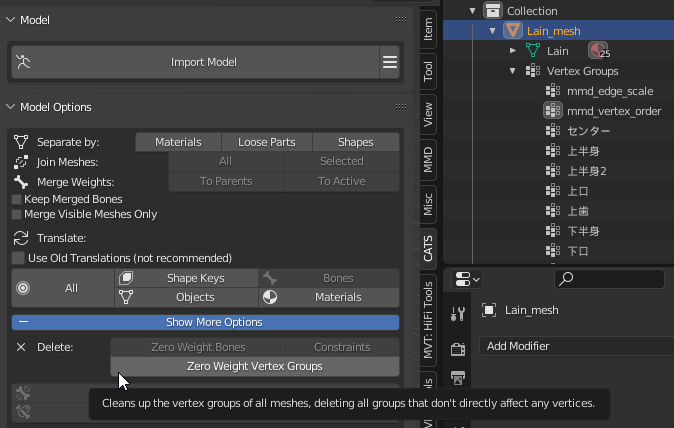
Removing zero weight vertex groups helps with MMD internal leftovers. In CATS select Show more options and simply click Zero Weight Vertex Groups under Delete.
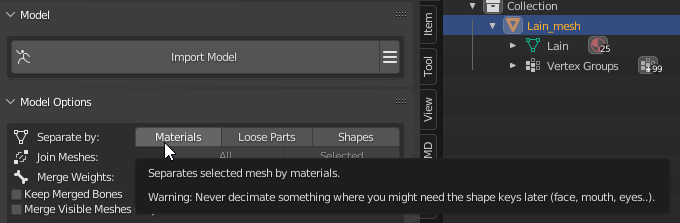
This makes weight painting and general management easier. Simply use CATS for this. Select the object and in CATS under model options select Separate by and click on Materials:
(Josh’s video also covers weight painting.)
Some issues might arise when it comes to MMD normals. Only do this if you’re facing issues with textures not showing up in Tower Unite or experiencing weird issues when importing, otherwise you can skip this.
In CATS under Model options select More options and click Recalculate next to Normals.
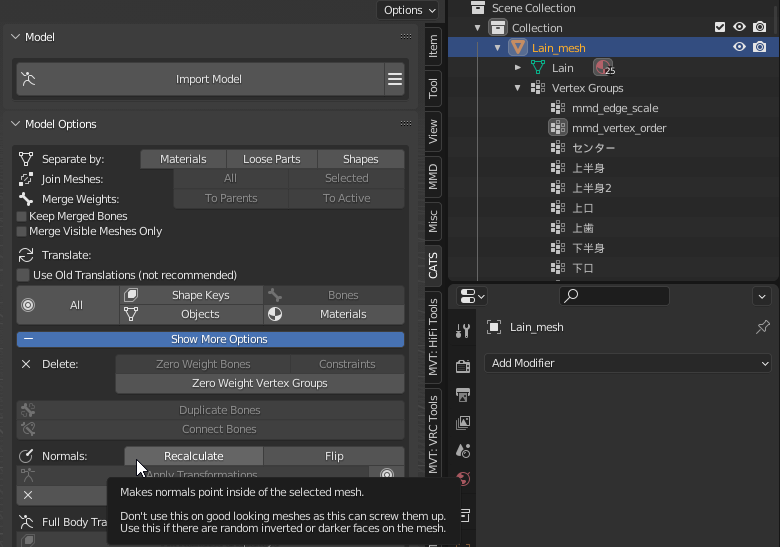
This one helped to resolve missing textures issues when importing to Tower Unite so might as well write it down.
Select File -> External Data -> Unpack Resource -> Use files in current directory
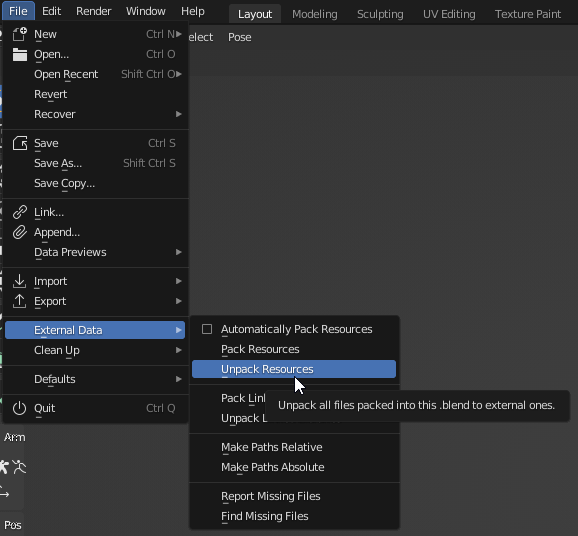
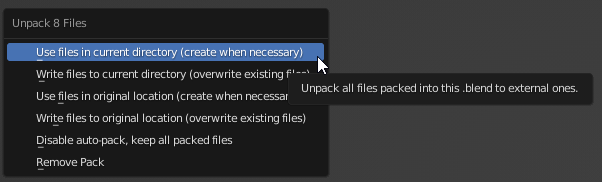
If you have custom files in the directory make sure to organize them or select the option that won’t overwrite the files.
Changing external data paths to relative or absolute might helps as well.
Export and Import into Tower Unite
The default settings work perfectly fine so just use those:
Finally open up Tower Unite, head to Workshop Editor, Select My imports and load the .dae file.
Thanks to mazli for his excellent guide, all credits belong to his effort. if this guide helps you, please support and rate it via Steam Community. enjoy the game.
Related Posts:
- Tower Unite: “Play Me A Tune, Piano Man” Achievement Guide
- Tower Unite: “The Mysterious Toxic Triceratops” Guide
- Tower Unite: Halloween 2023 Bone Locations
- Tower Unite: Halloween 2020 Obtainable Items
- Tower Unite: Virus Corrosion Plushie Locations