
Welcome! This guide was made using the following options:
* Novel mode: OFF
* Hint mode: OFF
* Random Encounters: Normal
Walkthrough
Go inside the house, then left for a Magic Water and a Potion.
Search any barrel, keep searching until you get the text “Stop It Pat”:
 Stop it Pat
Stop it.
Talk with the lone orc.
Talk with the two orcs, move up to bypass them.
Now get ready to fight the first boss, Grave Roberts.
 Robbed Rob
Defeated Grave Robert, also the Grave Roberts. Except that one guy.
He’ll drop the Forest Key.
Move to Kingfiller Cave.
Talk with the man until Axle says not to anymore.
Move to Downtown Flussblut.
Talk to the woman in red dress to get:
 No Time for Side Quests
She can get her own damn sheep.
Go up to the twin golems and talk to right one to get Deathaway and Focus Powder.
Go to the inn and talk to the Innkeeper, select More Cookies.
After resting, keep asking for cookies to get:
 Cookie Queen and Biscuit Knight
You exhausted the generousity of a kind man.
Go to the bar and talk to the woman, choose the second option. You’ll get the Warehouse Key.
Go out to the World Map, the Warehouse is north of the Castle.
Search any box until you get a Crucifix. Search again, and you’ll get:
 From Auctioneer to Zither
Found the overly long R.E.M. riff!
Kill all the rats. Move to the next section. Kill more rats. Move again.
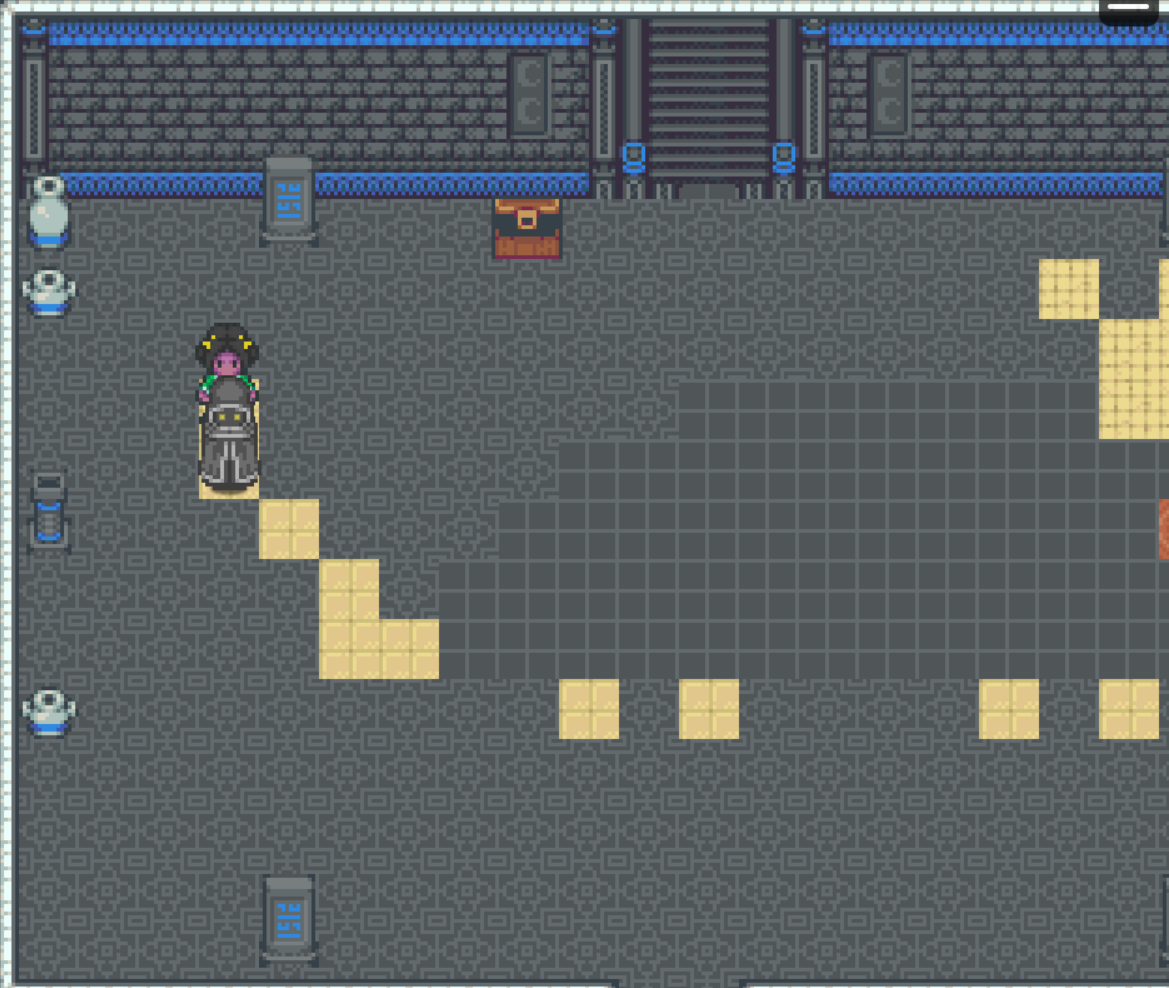
Search the chest for a Rat Whistle.
First puzzle, stay on this tile and play the Rat Whistle:
Search the chest for a Compass. Next room, there’ll be two more Compasses.
Second puzzle, move the crystals like this:
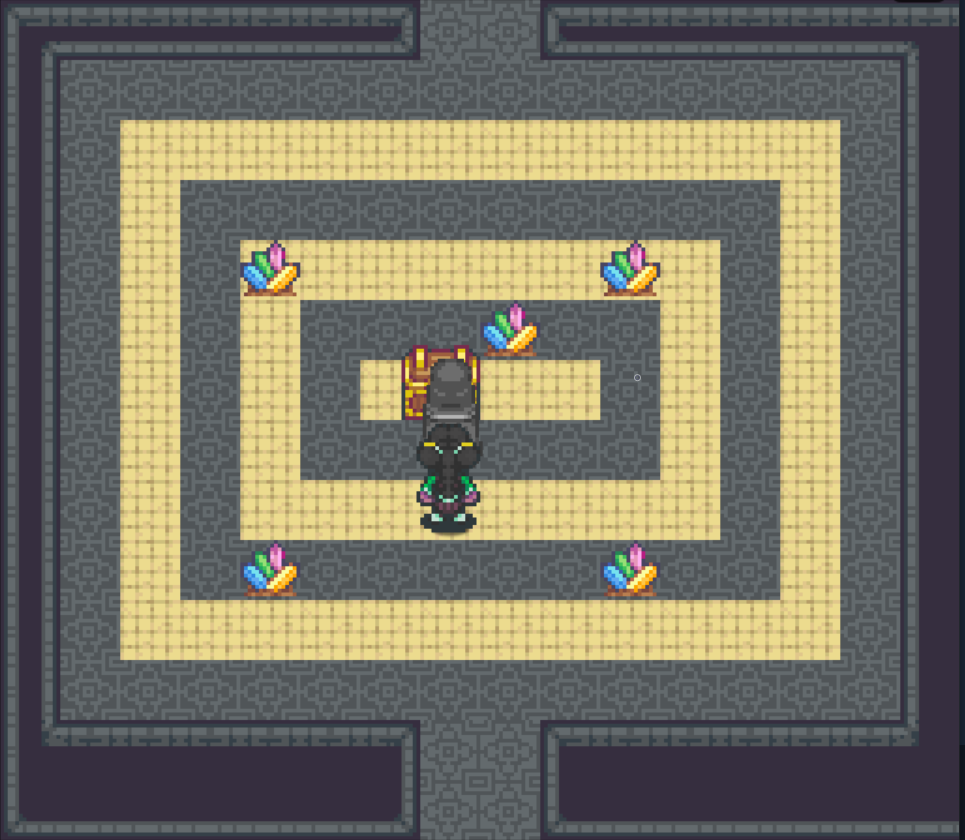
Search the chest for another Compass.
Next screen, there’ll be a scene. After that, kill all the rats and get the four chests with more Compasses and the achievement:

Pointless. Well, two points I guess.
Next screen is a very straight-forward maze. After six battles, you’ll get in a fight with all the rats. Win and you’ll get:
 Beat the Rat Ball
Once again teamwork has failed.
After that fight, he’ll drop the Maze Key. Also, no more random fights in this maze!
You can get the following items: Magic Water, Elixir x2, Rat Coin (in a jar next to the chest), Potion, Focus Powder, Super Potion, Focus Powder, Focus Powder, Focus Powder, Mysterious Maze Item D, Super Potion, Magic Water, Mysterious Maze Item L, Elixir x2.
Third puzzle, move all switches to the right.
Next scene, third boss battle. Check the chest for your upgrade.
Check the switch to open the door to the left. Go down.
Move up and open the chests, then talk to the Rat King, fight him and get:
 Royal Send-Off
Provided two bits for the King’s walk through the big black door.
You’ll lose the Rat Coins and gain the Rat Crown.
After that, you’ll be outside. Check the box for Motivational Cards.
Go back to the town and talk to the woman in the bar. You’ll lose all the rat tails and gain the Hunter Certification, a Loxodon Statue, and some jellybeans.
You’ll automatically exchange the Loxodon Statue for a Sea Shell.
Before starting this trading quest, go talk to the Jester and win his minigame for:
 Don’t Blink!
You beat the best at less eye rest!
You’ll also get Fake Fangs.
Now, let’s start our trading quest:
– talk to the man staring at the water to exchange our Sea Shell for a Jerky.
– talk to the purple woman left of the Inn to exchange our Jerky for a Nightmare Mirror.
– go to Kingfiller Cave and talk to the man to exchange our Nightmare Mirror for a Carrot Wrapped in Twine.
While we’re here, equip the Rat Crown. Fight the dragon, get the Dragon Skull and:
 Dragoff
You found the optional boss!
– go back to the town and talk to the vendor north of the bar to exchange our Carrot for a Chic Luggage Set. Talk to him again for:
 Foodie
I don’t trust that Mr. Sousa but he made a damn fine pork loin in the day.
– talk to the wannabe couple of vampires to exchange our Luggage for Capes.
– go to the Inn and talk to the man right near the entrance to exchange our Motivational Cards for a Box-B-Gone.
While we’re here, stay at the Inn until Cellean goes on about some crows and chipmunks and you’ll get:
 Deep Lore
Sometimes DMs go overboard with world building. This is the result.
Now, go to the Store and use the Box-B-Gone (you won’t be able to buy items anymore).
 Box-B-Goner
Where’d they go?!
Go down to the Basement and talk to the skeleton.
Go to the World Map and try entering the Castle.
Once here, check all the graveyards for:
 Gravemaster
You love reading graves!
Once inside, talk to the vampire next to the door. Ask to see the master.
You’ll have to answer three questions:
– Who is strong?: Dramual
– Who is wise?: Tothal
– Who is a hunter?: Q’Rok
After the quiz, you’ll get the Letter of Recommendation.
Go back to the town and down the Basement. Give the skeleton his Letter.
Now, fight all the skeletons. Check the brown chest in the table for a Focus Powder.
SAVE. Rest at the bed and you’ll get a Game Over, but also:
 DEATH BED
Image unrelated. But what a way to go!
Load the game. This time, fight the red enemy. Then the blue one.
After that, go up to the box in the wall to get the Moroi Seal.
Go back to the castle.
Go right and talk to the monsters until you get:
 It’s just “Harold”
Discovered a terrible cult forever battling in a schism of long-form versus short-form.
Before talking to the vampire, SAVE. Now’s a good time get achievements if you didn’t get them before.
Agree to meet his master, then you’ll be in a fight.
Take the chests for Full Potions.
Make your way to the Vampire Master.
After some scenes, you’ll be in a boss fight.
SAVE. Check the chest. Then use the Dragon Skull to exchange it for a Matchstick.
Go to the Demon Rat when you’re ready.
Final boss time! Use the Matchstick before anything else to get:
 crack!
Incredible power from ancient Inosculana. A deal with a mad hag. You stepped in deep lore you did.
 Beat the Aspect of Rat
Godkillers!
 All Hands Towards One Purpose
A winner is you!
Talks
- Banter
How to get it: automatically during first battle
Restores HP and TP. - That Hole
How to get it: look at the sign near the hole at the beginning.
Restores HP; MP and TP. - Graverobbers
How to get it: search the chest west of Grave Robert.
Restores HP, MP and TP; also confuses all enemies. - THE ITCH!
How to get it: look at the first sign at Kingfiller Cave.
Restores HP, MP and TP. - Weird Laugh
How to get it: talk to the golem west of the Bar.
Restores HP, MP and TP. - Annoying Math Friend
How to get it: in Flussblut, talk to the right twin golems.
Restores HP, MP and TP. - Branch Nap
How to get it: automatically during your talk with the Innkeeper.
Restores HP, MP and TP. - Cut-off Cookies
How to get it: keep asking for cookies to the Innkeeper.
Restores HP, TP and gives you Counter Attack (3 Turns). - Creeped out
How to get it: talk to the man walking in the middle of the Bar.
Restores HP, MP and TP. - Rageful Rodents
How to get it: automatically in the Warehouse, after the first puzzle.
Restores HP, MP and TP. - Lost Direction
How to get it: after getting all compasses in the Warehouse.
Restores HP, MP and TP. - Teleportation
How to get it: right after entering the maze in the Warehouse.
Restores HP, MP and TP. - Jellybeans
How to get it; automatically after gaining the Hunter Certificate.
Restores HP, MP and TP. You’ll lose the Jellybeans. - Staring Contest
How to get it: after you win the staring contest with the Jester.
Restores HP, MP and TP. - Ron
How to get it: automatically after talking to the Vampire Master.
Restores HP, MP and TP.
Skills
Grave Roberts:
– For Mysterious Hunter:
- First choice: Ice I
Inflicts Ice-type damage on an enemy. - Second choice: Heal
Restores party HP.
– For Straightforward Hunter:
- First choice: Double attack
Performs a double attack on a random enemy. - Second choice: Bodyslam
Inflicts damage and causes an enemy to lose balance.
Ball of Rats:
– For Cellean Paperbark:
- First choice: Thunder II
Inflicts Thunder-type damage on an enemy. - Second choice: Darkness I
Inflicts Darkness-type damage on all enemies.
– For Twulana Triggerroot:
- First choice: Slash
Attacks all enemies. - Second choice: Sandstorm
Blinds all enemies.
Rato
– For Cellean Paperbark:
- First choice: HP and DEF up.
- Second choice: MP and Speed up.
– For Twulana Triggerroot:
- First choice: DEF and Luck up.
- Second choice: ATK and Speed up.
Dragon
– For Cellean Paperbark:
- First choice: Confuse
Confuse all enemies. - Second choice: Stone II
Inflicts Stone-type damage on an enemy.
– For Twulana Triggerroot:
- First choice: Armor Piercer
Inflicts damage on all enemies regardless of Defense. - Second choice: Sweep
Inflicts damage and causes all enemies to lose balance.
Blue Armor:
– For Cellean Paperbark:
- Only choice: Nuke II
Inflicts damage on all enemies regardless of Defense.
– For Twulana Triggerroot:
- First choice: Triggerroot Special
Performs a super powerful attack on an enemy. - Second choice: Rain shot
Inflicts damage on all enemies 2 times.
Thanks to Kotsure for his great guide, all credit to his effort. you can also read the original guide from Steam Community. enjoy the game.