The Simplest Thing Ever: One-Way Block Signal
There is no separate tool for one-way signals: they are made with clicking existing signals with signal the placement tool: one click makes it one-way, next one makes it one-way but opposite direction and then you can click it again to tutn back into a 2-way.
Let’s start with the most trivial of the possible signal states: green and red. One-way block signal is green if the block behind it is free. And then it is red if any train/part of it is inside the block behind the signal. In the green state it lets the trains proceed and the red one makes the trains stop.
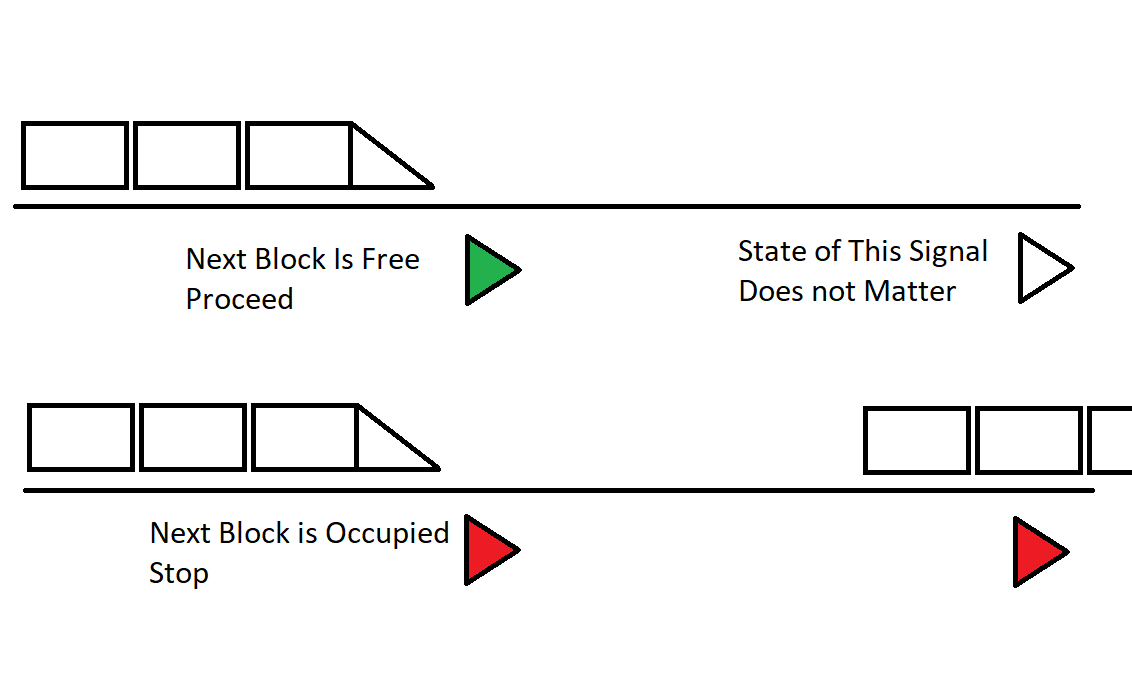
This signal behaviour is not any important on its own, since trains in WRSR will stop either way if they are going to collide. However, any railroad setup in the game that includes junctions really needs signals to operate properly. The spacing between the signals does not matter for this scenario. Howerver, I recomend keeping the spacing slightly longer than maximum allowed train length.
The Third State of the Block Signal
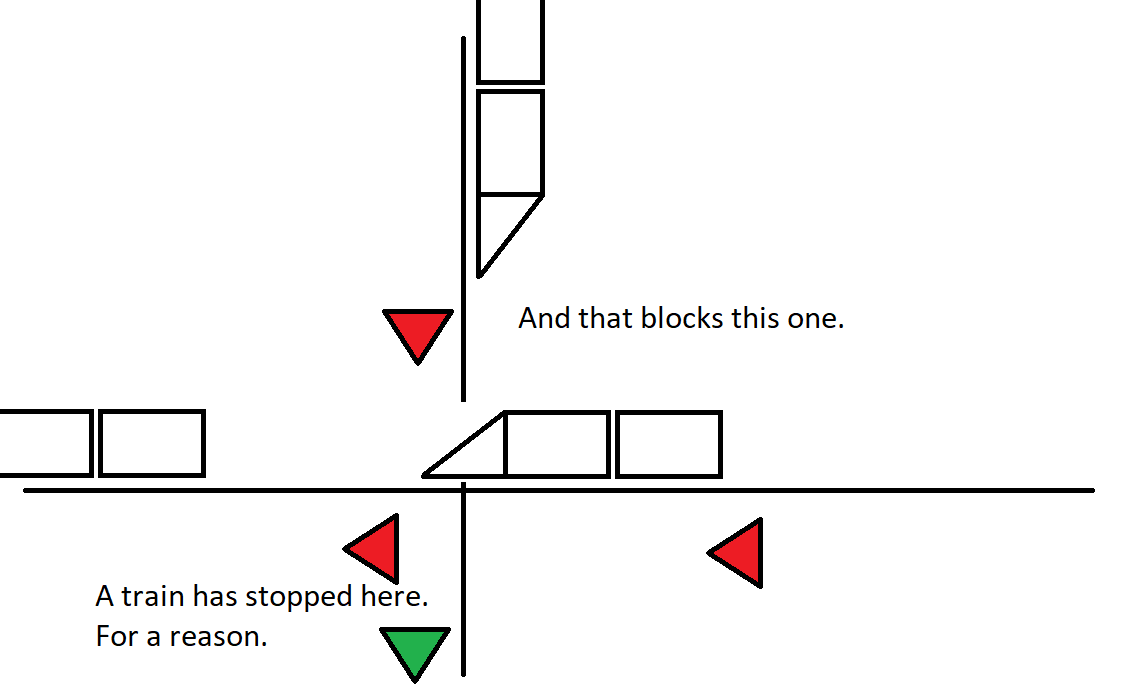
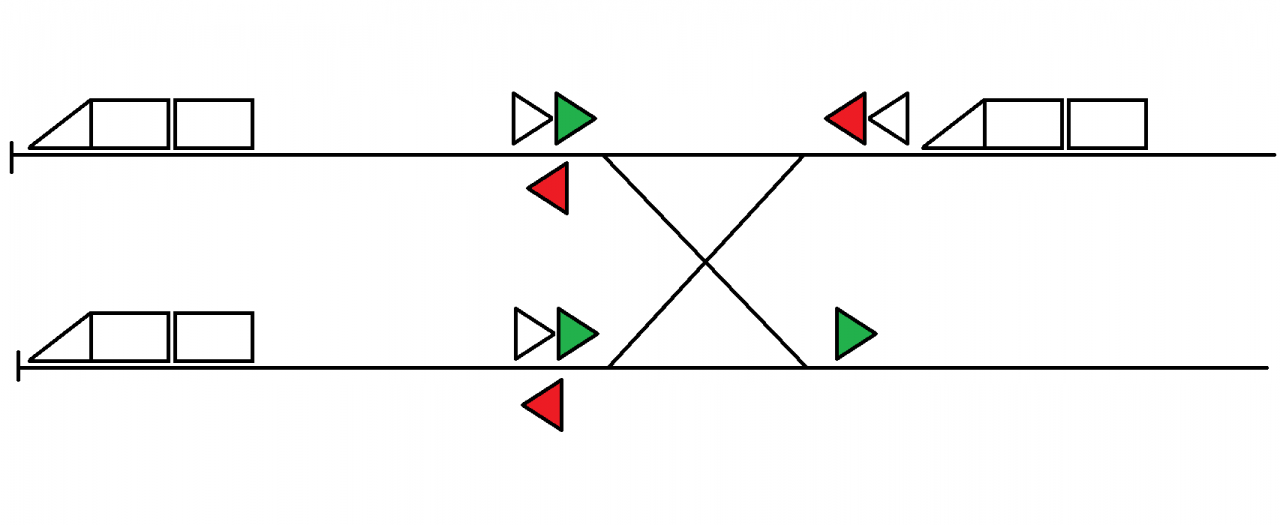
Let’s start with a random track crossing our 2-way 2-track system without any junctions. If our 2 tracks are snapped closely, you can’t avoid their segments becoming a part of one block.
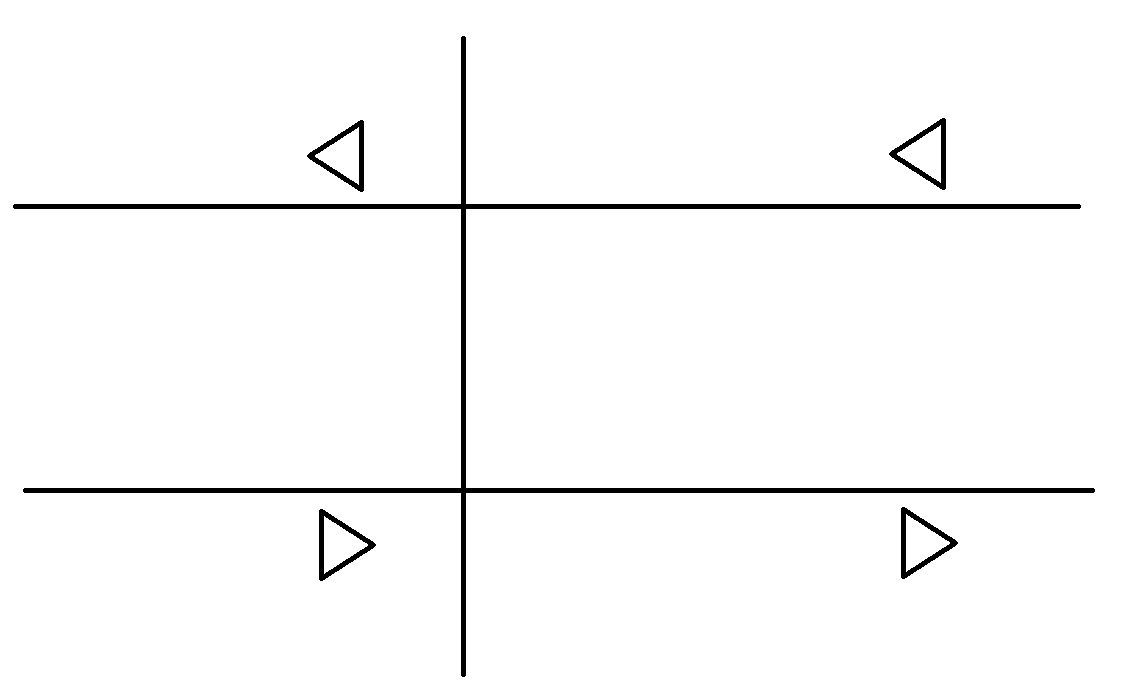
What is going to happen with 2 trains heading opposite directions attempting to cross the block at the same time? On the one hand, the first train to enter it will occupy the block and set the other train’s signal to red. On the other hand, there is no point in blocking the opposite train since there is no possible collision to happen. Do we have to use another type of signals here? Or may be space the tracks out to place a signal at the intersecting track inbetween? The answer is
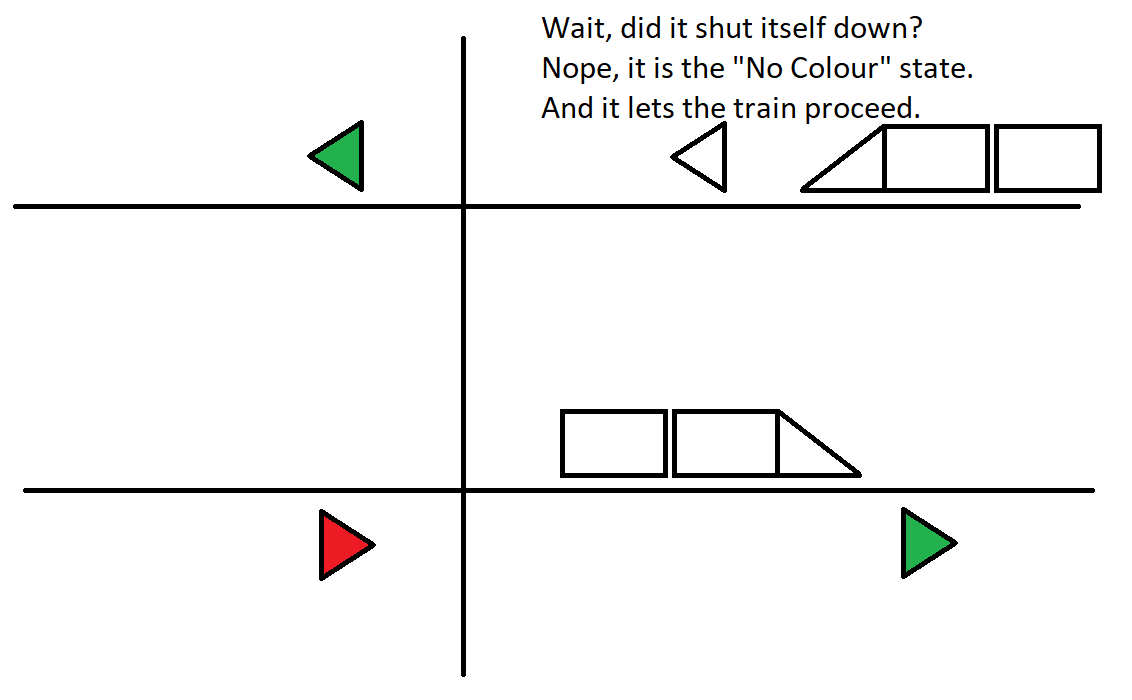
This time the uncoloured signal actually means an uncoloured signal. It disables its light in the world and its arrow becomes white on the schemes. And yes, it lets more than 1 train use the same block simultaneously. As long as there are no cource collisions, new trains can enter occupied blocks. This feature works both for block and chain signals.
Intersection Lock Prevention
From what I usually see in the gameplay of other players, the technique of solving intersections with block signals only is not any popular. And there are good reasons for that. Including the fact that it only works with intersections with 1-way tracks to enter and exit it. The “traditional” way to solve intersections includes using chain signals and is covered in other parts of the guide.
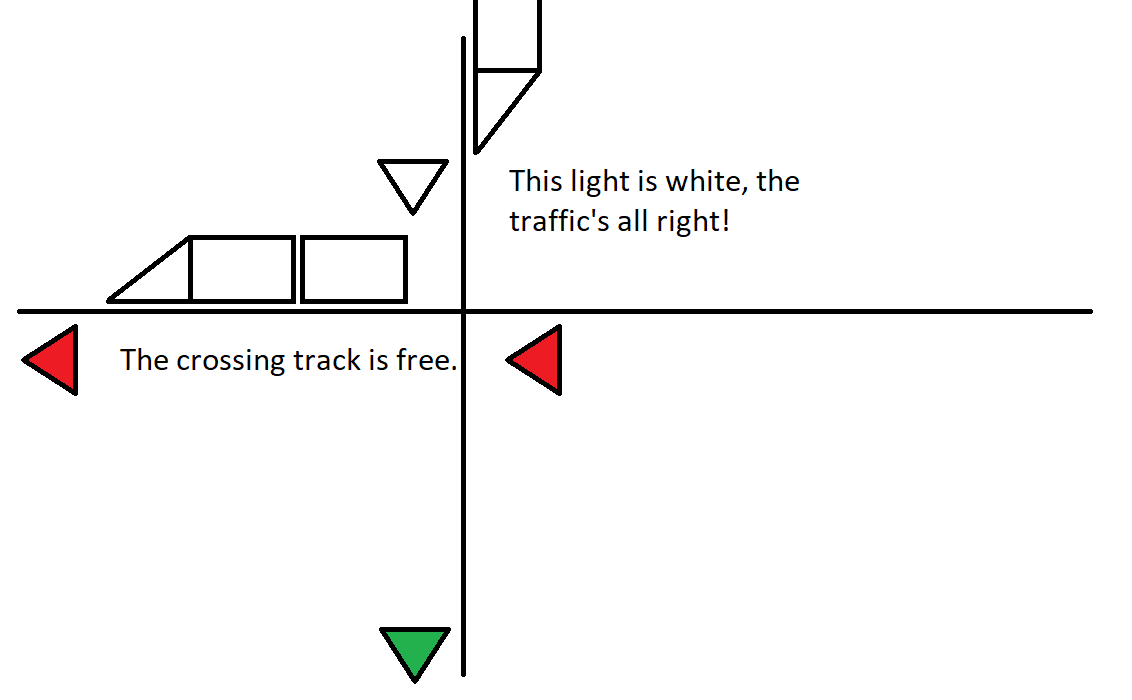
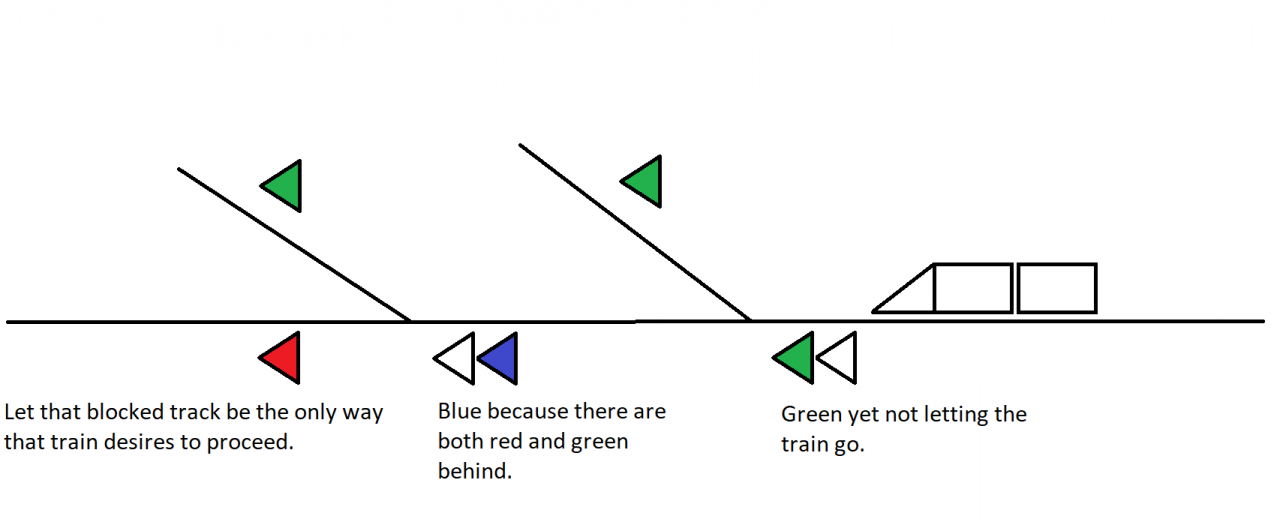
The example from the previous part has a significant flow if we take the crossing traffic into account.
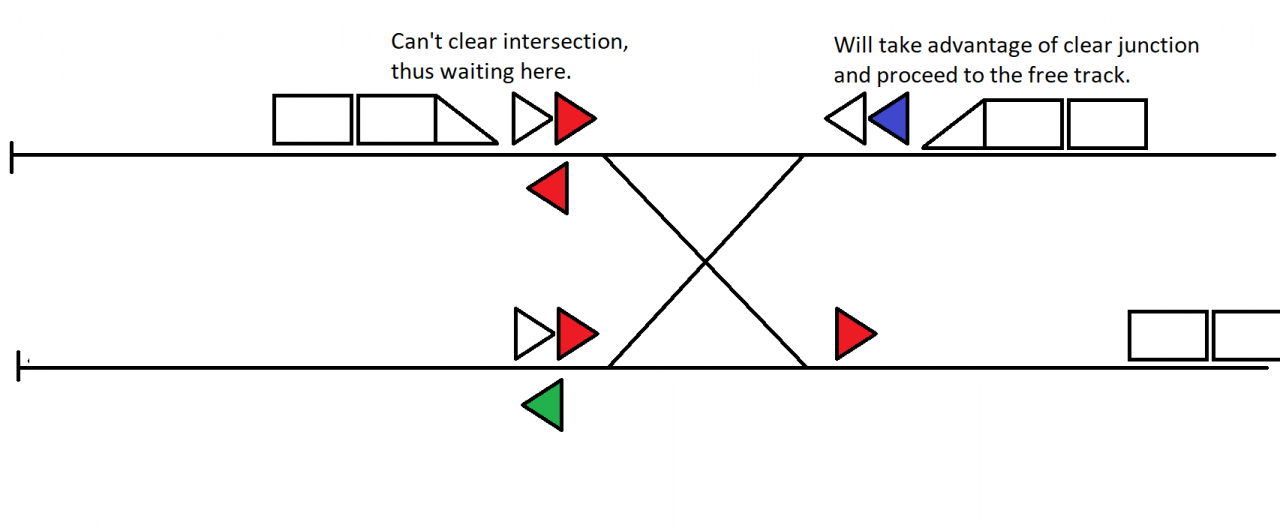
This time we see a train stopped by a signal, right at the intersection. If you don’t want such things happen, you should never place signals right behind your intersections. If you provide enough spacing, the stopped train passes behind the crossing and other trains can pass with the help of “smart-red” (red signal that switches to the “No Colour” state).
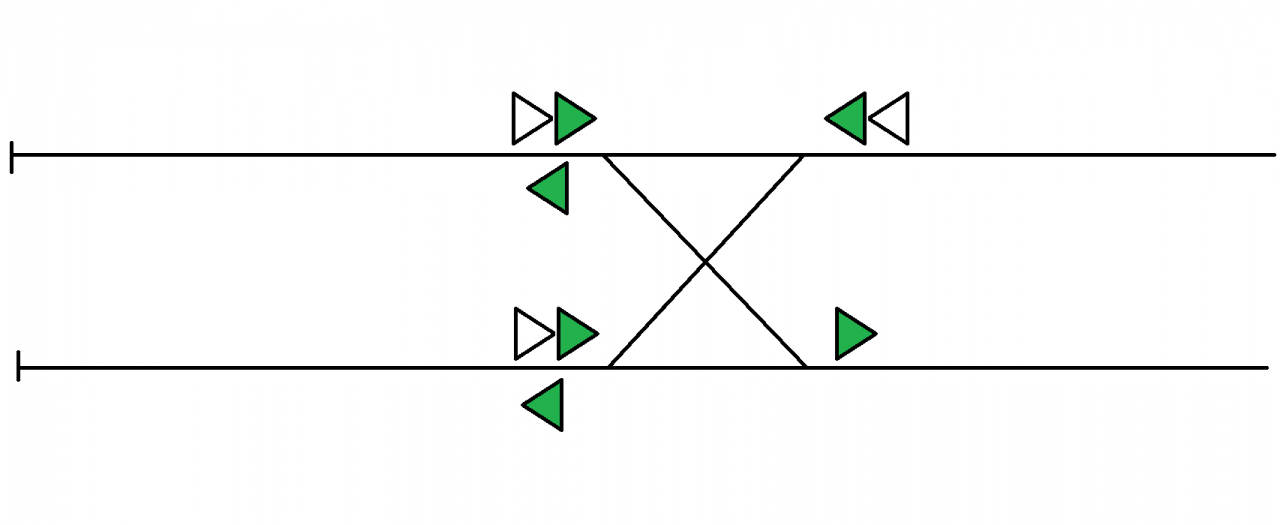
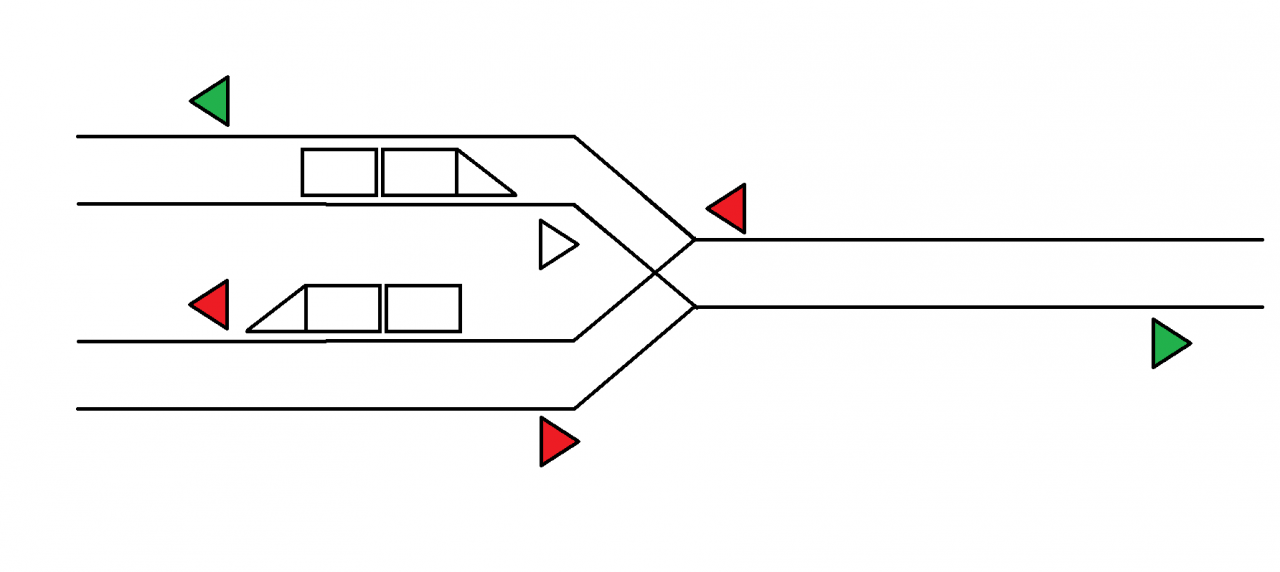
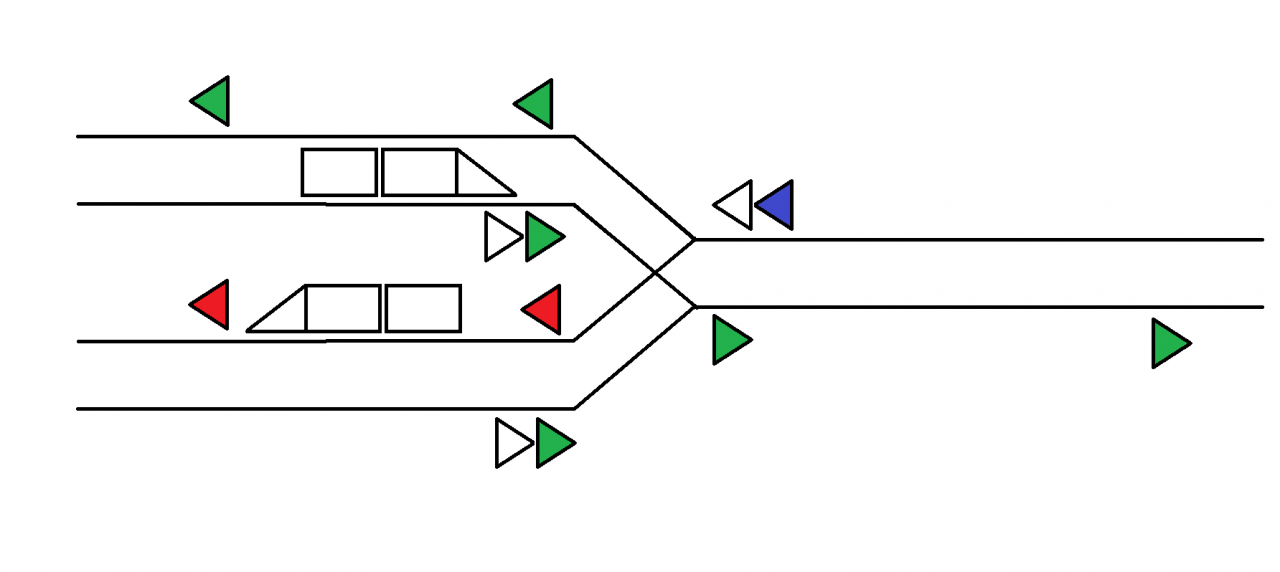
This is what it looks like when there are no trains. Double triangles are the chain signals. You can see a one-way chain signal at the arrival track. And then the dead ends have mixed signals – for one way they work as block signals and for the other one as chain signals. The direction of the triangles corresponds with which trains the “subsignal” affects. The single arrows of the mixed signals point to the left, so they will be used by the trains arriving at dead ends. And then the departing trains will interact with them as with chain signals.
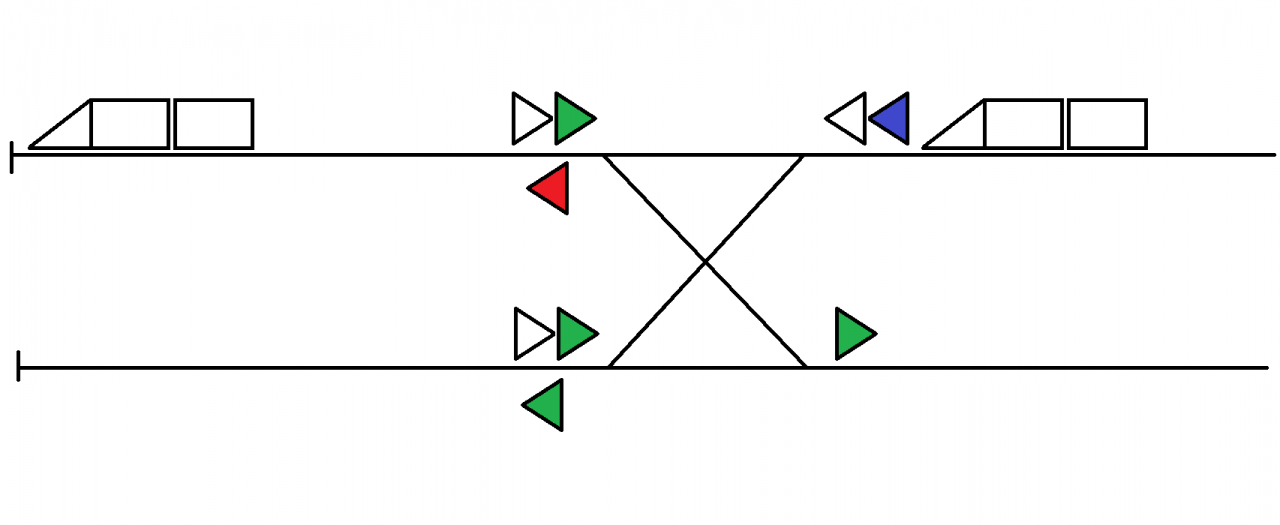
See that blue signal? The chain signal only is green if the block behind is free AND all the next block exit signals are green (or blue). Blue indicates that the signal will only let a train proceed if its next desired signal is green. In this case (assuming both tracks are a part of one station) it is completely indifferent which dead end the train uses, but letting an arrival approach an oqqupied track will cause with a deadlock. If at leas one of the “green” tracks behind the chain signal is acceptable, a train will proceed to a free one.
Then if ALL the following signals are red, the chain signal also turns red and causes the arrivals to stand in front of it, not getting furhter so they don’t obstruct the junction. These 2 situations show that the chain signal only lets a train pass if its next block signal is green.
Somewhat irrelevant fact. If you set chain signals one by one and split the track into branches between them, the signals will “propagate” the chain check and onlly let the train proceed if it can clear past one of the desired block signals. Only those signals that see red right behind them will indicate blue, but still, the check is “propagated” and a green chain signal CAN stop a train. Not that cascading chain signals should no longer be useful since the “smart-red” exists and there is not much purpose in splitting junctions in multiple blocks. Moreover, poor placing of multiple chain signals in a row can cause deadlocks or unneeded stops, with no potential benefit. Don’t do this.
Once again, please never do it this way. Just place the arrival chain signals and “exit” block signals, no other signal inbetween them.
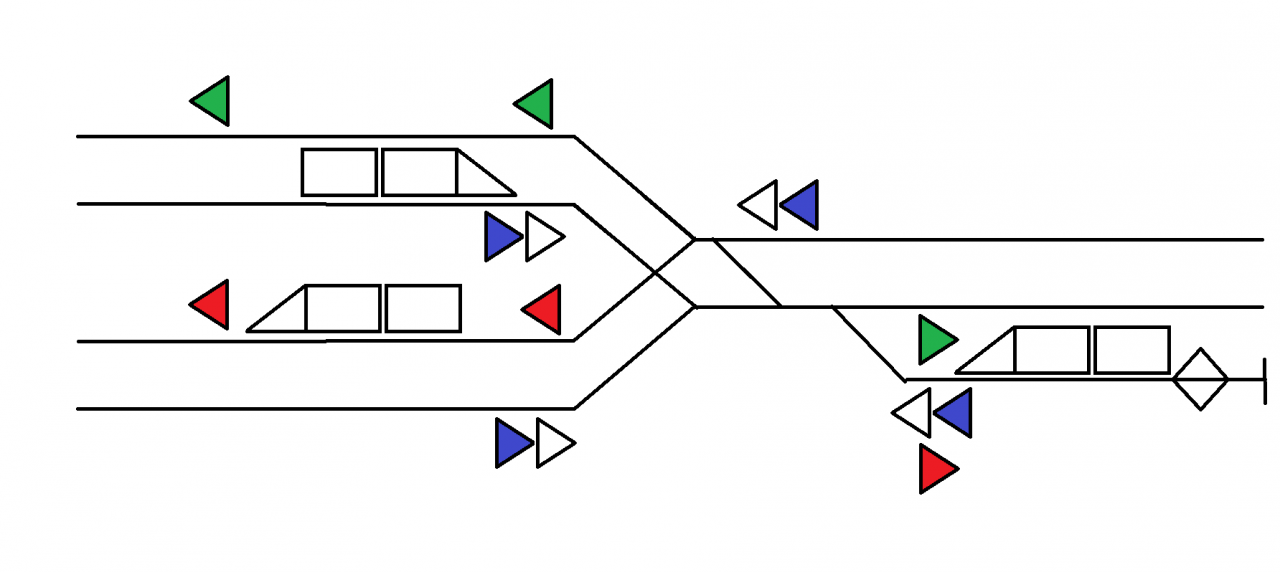
Chain signals can also be helpful even with only one possible path to choose from. If we get back to the 2 dead ends example, the dead end departure signals won’t let a train leave for blocked departure track and obstruct the junction, keeping it clear in case next arrival comes earlier than green departure light.
And yet I have not told you a reason to use mixed signals at the dead end instead of just 2-way chain signals. A chain signal with no signals behind to listen to should behave the same way as a block signal. Almost. For some reason, if you use 2-way chain signals at dead ends, the arrival trains won’t be able to use “smart” red if a departure occupies the crossing but not obstructing a possible path.
Important: you should keep enough space behind the mixed signals to let all your trains fit behind them, so once they turn around, they face it and not get their head behind them just the moment they turn around.
Y-Junction and Turn Around Tracks
Things to keep in mind: all tracks must be one-way and all trains should have enough space past the junction to fit in before the next signal.
As I have mentioned earlier in the “block-only” part of the guide, such setups are not popular and a different one would reasonably be proposed by most players.
It is just a bit safer to use if once you decide to extend it, especially with direct access to two way tracks. Still keep in mind that distance to the second signal past junction should be enough for you trains to fit in. Otherwise they may get “fake” clearance from their chain signal and get stopped with a red light too close to the junction and keep it obstructed.
If you want to upgrade your Y-junction to support traffic between its branches, you can add a turn around track. Adding it by the existing ones is one of the options available. In this case the chain signal setup is better since it needs less modification to work properly. Trains can’t turn around right at the dead ends of tracks, but instead they can turn around at waypoints that are set as their route “stops”. Remember to keep enough space between the mixed signal and the waypoint.
Bonus Level: Buffer Tracks
If you have multiple directions that trains can proceed to from a junction, it can be helpful to add some extra tracks for arriving trains to stand by the junction.
If the train stops at a buffer track due to all desired destinations being blocked, other trains following it could overtake it and proceed to their destinations if they are clear. This helps a lot if you deal with numerous delays caused by trains stopping by splits if their destination is blocked, thus blocking the whole track. Obviously the buffer track length should be sufficient to fit any train in.
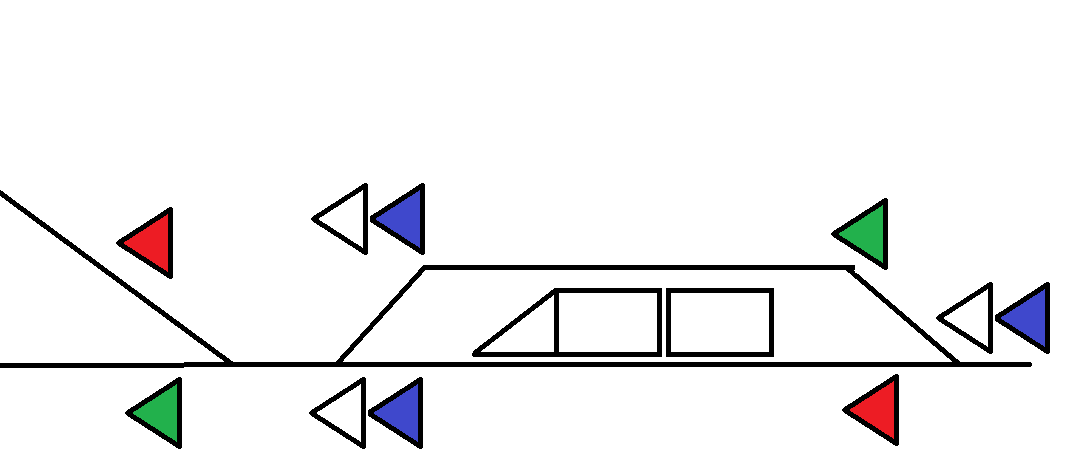
Sometimes, trains have to give way to other trains when passing merging junctions. And then they only proceed after the previous train has passed 2 signals. Which takes some time since it can be unsafe to place signals close behind the junction, right? But then once a train gets the green light, it also takes it some time to accelerate, so by the time the train is back to full speed, the distance to the previous train can be multiple train lengths. What if we could force them keep closer for higher throughput?
That way any train approaching from the left could immediately start accelerating after the previous train leaves the junction and not lose that much of potential train frequency on acceleration.
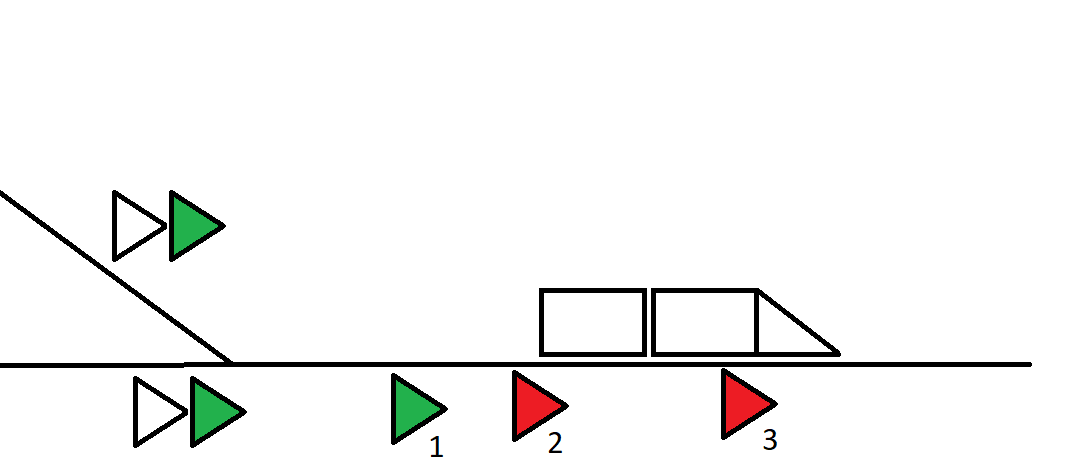
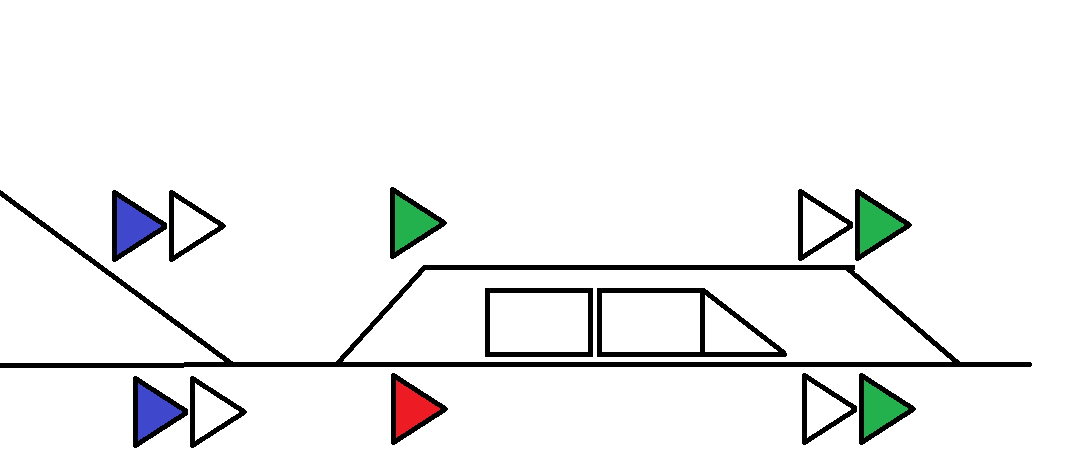
Or you can go for an extreme and set the signal up to report clearance before the previous train actually clearing the space for the next one. Signals 1 and 3 should conform the rule of having enough space to fit any train after a junction. Then you want the distance between signals 1 and 2 be as short as possible to generate the “Fake Clearance” as soon as possilbe. But distance between signals 2 and 3 should be LESS than any train length. If there is no train short enough to fit between signals 2 and 3, having signal 1 green will mean that the previous train got clearance past signal 3 and it will anyway clear all the space between 1 and 3.
Two-Way Tracks and Yellow State
If the train at the exit track on the right takes a long stop for whatever reason, the left train could get stuck inside the 2-way track. Not able to proceed and blocking the opposite direction from moving forward. So that is the use of chain signals here – they assure that no train will stop at the 2-way block.
However this may not content you. Such a setup only lets one moving train per two-way track. And the two-way track performance can be grealy increased with signals.
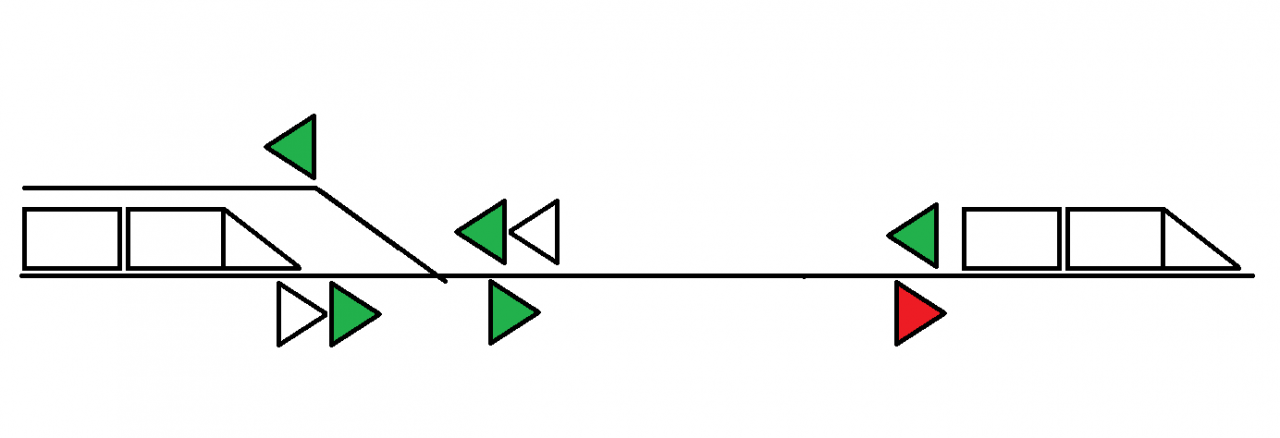
If you place several two-way signals along the two-way track, multiple trains heading the same direction will be able to use it at the same time, like if that was a one-way track. But will this cause a collision if 2 trains approach it from different sides?
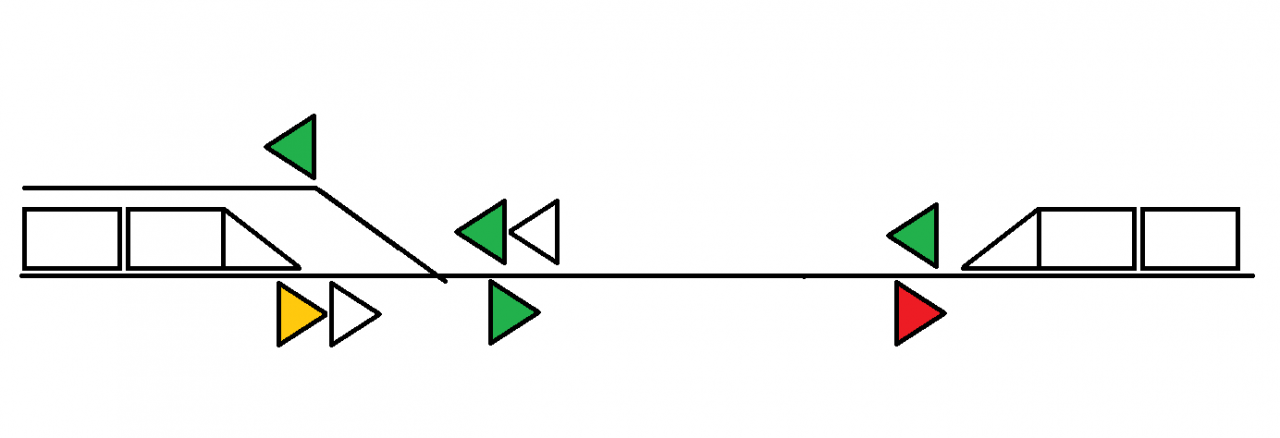
Nope, it won’t. The signal at the two-way track entrance will turn yellow. It indicates that a train is stopped by the special two-way track engagement algorithm.
Notes on this algorithm:
- It does not matter which signal you use for trains approacing it. Block signals also can emit yellow light and halt a train with the two-way algorithm. I will cause a different approach behaviour: trains will be allowed to follow the prevous train earlier, right after it clears the junction block.
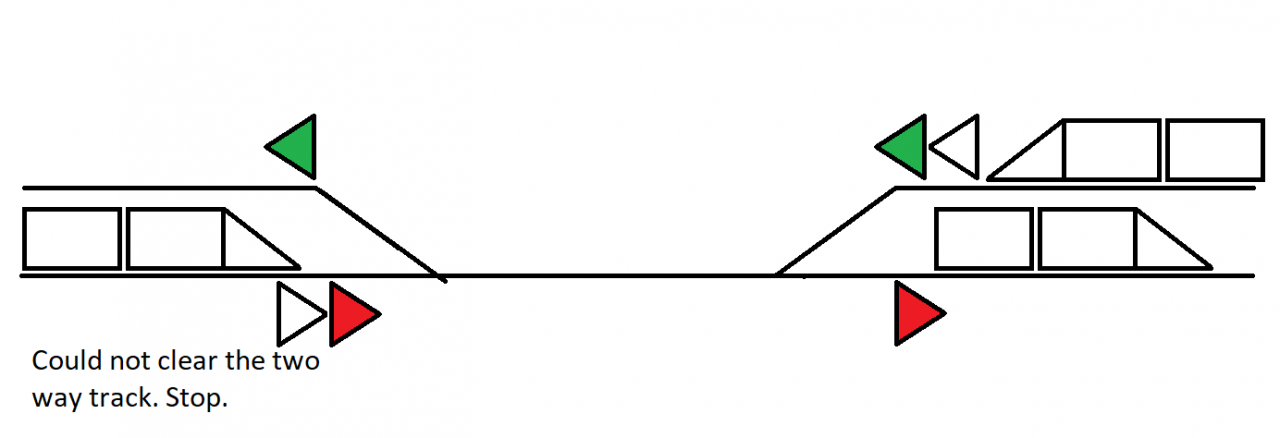
- Once an opposite direction train is caused to stop due to two-way logics, the two-way track will switch direction and won’t let more follow-up trains until the opposite direciton train passes it. With significant load it can cancel all the possible benefits of this setup if the trains queue up on both sides. It can degrade to the performance of the simple setup that only lets one moving train a time.
- It is just dangerous to let multiple trains occupy same two-way track. Unfortunately, the game’s logics for those tracks is not advanced enough to assure every train sent will get a clearance past the two-way track. Thus you better provide enough blocks on both sides to fit all the trains so that you never get a deadlock with one of the sides being full and waiting for an extra train that can’t proceed to clear the tracl.
This likely is not a full description of the two-ways signals and tracks in the game, but at least it is the part I have managed to harness and understand.
Thanks to Drillboy Jenkins for his great guide, all credit to his effort. you can also read the original guide from Steam Community. enjoy the game.
Related Posts:
- Workers & Resources Soviet Republic: How Make Realistic Forests and Interesting Mapdesign
- Workers & Resources Soviet Republic: How to Create a Resources Overlay Map in GIMP
- Workers & Resources: Soviet Republic – How to Play the Game on Linux or MacOS