
Here is a new guide covering Exploitations. as the new update V1.404 had come out in May.
Introduction
Sectors

Land Sectors
 Energy and 1
  Production. Combined with a Fertile Plain Terrain which provides 1
  Food and 1
  Knowledge, would in total provide 1 of each Resource. There are four “standard” Climates and four standard Terrains for Land Sectors.
Ignoring the above, what this means is each sector has a combination of 4 Resources. It can have 1 of each
//
, 2 of one resource and 1 of two others , or a pair of two resources (due to Climate and Terrain never having 2 of the same Resource you will never see 3 or 4 of one Resource on a Sector).Other than Terrain and Climate, Land Sectors often have other elements such as Resource Nodes, Features, Hazards, and Landmarks. These will be discussed later.
Note some Sectors are not habitable and cannot be annexed or colonized. These are quite obvious as they contain no Resources.

This is a Land Sector that has not been claimed by anyone so far. Because it is Arid it generates a
Annexation
Simply click the center hex of a neighboring territory and click Annex to bring the territory under your control. Annexing costs no Resources but does take one turn.
At a population of 16 you can annex a maximum of 4 sectors. Normally 4 annexed Sectors is the maximum number even with a higher population. Residential Exploitations can increase the number of annexations. These are discussed in a later section. Note the Colony screen will show 5/5 Sectors instead of 4/4 annexed Sectors, but that is because they are including your Colony Sector which is not technically annexed.
Despite showing 4 Resource icons, annexing a Sector does nothing except expand your borders. The newly acquired territory will have a “Sector Base” at the center hex with a garrison, but you gain no extra resources by simply annexing territory (Resource Nodes are the exception, see the Resource Nodes section). In order to start getting Resources income from a sector, an Exploitation must be built.
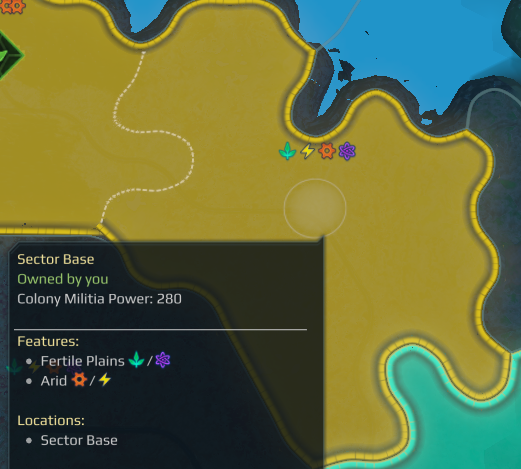 This is an annexed Sector belonging to a nearby Colony. The Colony gains nothing from this Sector as it does not have an Exploitation. Exploited Sectors have a corresponding Resource icon in the center hex signifies its exploitation. In this case, the Sector’s center hex is empty (note this is empty only in the Economic Overview, the Military Overview shows a yellow flag signifying the center hex contains a Sector Base). Moreover, because it contains no other features, particularly Resource Nodes, this Sector requires an Exploitation to generate any Resources at all.
Exploitations

The amount of income you generate per turn from an exploit is determined by the 4 resources on that sector which as explained above is determined by the Climate and Terrain. Let’s take Energy for example:
If there are 0 Energy icons on a Sector and you build the Energy Exploitation anyway, you get 10 Energy per turn.
If there is 1 Energy icon on a Sector and you build the Energy Exploitation you get 15 Energy per turn.
If there are 2 Energy icons on a Sector and you build the Energy Exploitation, you get 20 Energy per turn (which is the case in the above example).
This is what’s known as a Level 1, 2 and 3 Exploitation. Any other Resources on that Sector (Food, Knowledge, or Production) is not gained in anyway. Once an Exploitation is built, it occupies the center hex of that Sector, and a Roman numeral signifies the level of the Exploitation.
You may notice that there are 5 possible levels of Exploitation. How is this possible if there can’t be more than 2 Resources on a Sector? The answer is by Researching and then building Sector Upgrades in your Colony (see the section below).
Another important consideration is that a Colony can only support 2 of a single Exploitation. For example, a Colony with 2 Energy Exploitations can no longer build other Energy Exploitations.
Once an Exploitation has been built, more advanced structures known as Sector Specialization Structures can be built (see the section below).
There are 3 other Exploitations which are discussed in later sections: Hydro-Exploitations for Coastal Sectors, Residential Exploitations, and Orbital Relay Exploitations.
Resource Development Research
 This is the Imperial Archives entry for Food Development. On the right you can see it has unlocked the Colony Building “Food Sectors Upgrade”, this is built like any other Colony building. Below this are two buildings: Bioengineered Food Plantation & Agricultural Export Center. These structures are known as Sector Specialization Structures.
Knowledge, Energy, and Production Development follow an identical pattern for their research entries.
“Resource” Sectors Upgrade
Food/Production/Knowledge/Food Sectors Upgrade I & II are structures built at the Colony building tab. They raise the level of all Exploitations of that Resource type for all Sectors belonging to that Colony.
For example, you have a Sector with a double Energy resource on it. You annex the territory, which does nothing except expand your borders. You then build an Energy Exploitation and because you have 2 Energy Resources, it becomes a Level 3 Exploit which collects 20 Energy per turn. By building an Energy Sectors Upgrade in the Colony it then upgrades to a Level 4 Exploit generating 25 Energy per turn. Any other Energy Exploited Sectors also go up a level as well. To reach the highest level, level 5, the tier VI Resource Development II technology has to be researched and the corresponding Sectors Upgrade II built in the colony.
After you’ve built an Exploitation for a specific Sector, you are then allowed to build Specialization buildings. There are 3 buildings per Exploit type. The first two are researched with Resource Development I at tier II research, and the third Specialization is researched with the tier VI Resource Development II. You are only allowed to build one of the possible three buildings per Exploitation. But because you can exploit two Resources per Colony, you can have two out of the three possible Specialization buildings. These structures provide unique discounts with either a Military or Civil focus. They also benefit from higher Exploitation levels.
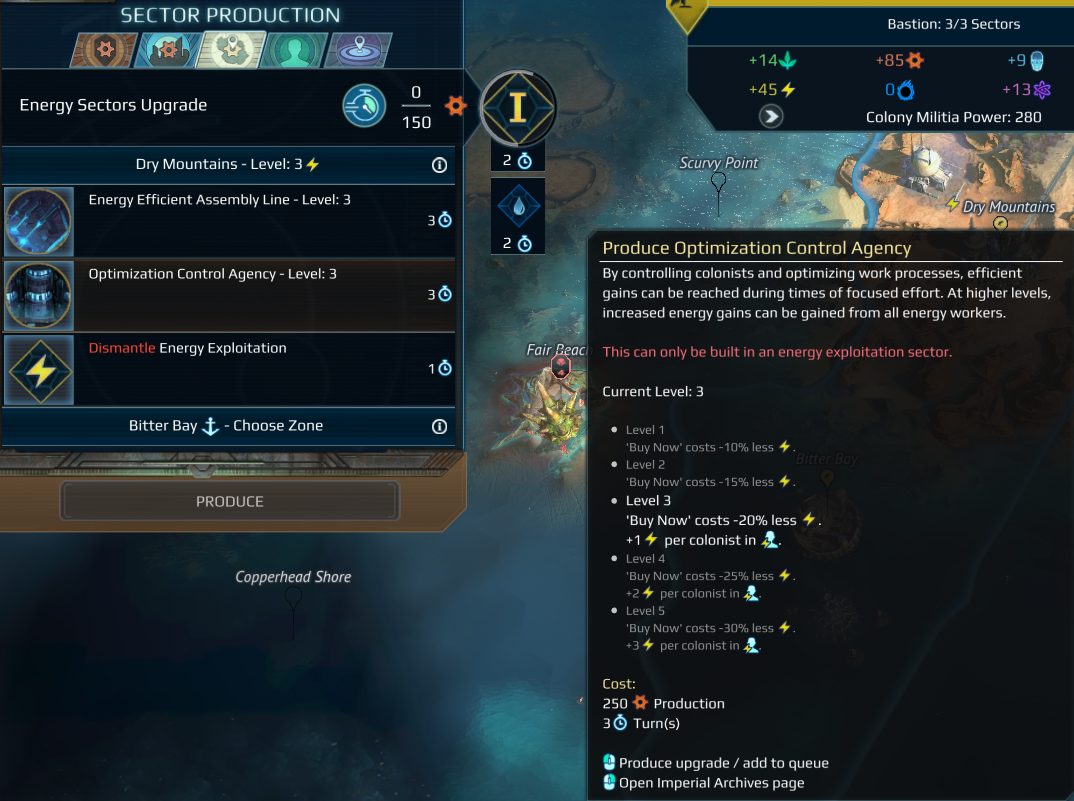
These are the two possible Specializations for an Energy Exploitation. Note the Energy Exploitation had to be built first before you can pick which Specialization you want.
The full sequence for maximum Exploitation gain is therefore: Choose which Sector to Annex, Choose which Exploitation to build on that Sector, Choose which Sector Specialization Structure for that Exploitation, and finally build the Resource Sectors Upgrade to increase the Exploitation level.
Colonization
Despite not being able to build an Exploitation at the Colony Sector, the Colony itself always generates a fixed amount of resources. This income is regardless of Terrain type and is always 60 Production, 20 Food, and 10 Happiness. Note the HQ Colony, your starting one, gets additional production bonuses.
Initially when building a Colony, a maximum of 4 Colonists can be assigned to a given resource. Building Exploitations can increase how many Colonists can work a resource. Let’s take Energy for example:
If there are 0 Energy icons on a Sector and you build the exploitation anyway, you can have 1 more Colonist work Energy.
If there is 1 Energy icon on a Sector and you build the Energy exploitation you can have 2 more Colonists work Energy.
If there are 2 Energy icons on a Sector and you build the Energy exploitation, you can have 3 more Colonists work Energy.
Level 4 and 5 Exploitations allow 4 and 5 extra Colonists respectively
In the above picture the small Colonist icon below each level indicate how many extra slots are made available by building the Exploitation.
By default a Colonist generates 5 extra Resources per turn. This can be increased by developing a Residential Exploitation (see the section below) and through certain Sector Specialization Buildings as well as Landmarks.
Residential Exploitations
Residential Exploitations do 4 things:
- Increase the productivity of each Colonist by 1, 2, or 3. Instead of a Colonist making 5 Energy per turn, they now generate 6/7/8 a turn.
- Each Residential Sector allows you to Annex another Sector. Instead of being limited to annexing 4 territories, you can now annex 6. This effectively makes Residential Exploitations “free” Exploitations in the sense they don’t count against your total.
- Allow you to Annex Sectors adjacent to your Residential Exploitation even if they are 3 Sectors away from your main Colony Sector.
- Increase the level of the each race specific Colony District Building. All Colonies can build the Basic building. The Fine building is available with level 1 or 2 Residential Exploitation, and the Immaculate building is only available at level 3.

Because there is no “Residential Resource”, the maximum level is 3, which is increased by building the Residential Sectors Upgrade (just like other Resources) in the Colony. There are no Residential Sector Specialization Structures.
Strategically Residential Sectors should be built at either population 12 or 16. Because they do not collect flat resources per turn, their only benefit is the extra gains from your Colonists. For example, a Residential Sector built at a population of 4 is only going to provide 4 extra Resources per turn from your active Colonists, whereas a Level 3 Resource Exploit would give you 20 Resources per turn. You want a larger population to benefit from the +1/+2/+3 gain before you start constructing Residential Exploitations. The ideal Sectors for Residential Exploitations are the 1/1/1/1 Sectors, or double resource Sectors that you can’t exploit further because you already have 2 of that exploit type. They can also be built to gain access to another important Sector that’s 3 Sectors away (ie. a Landmark).
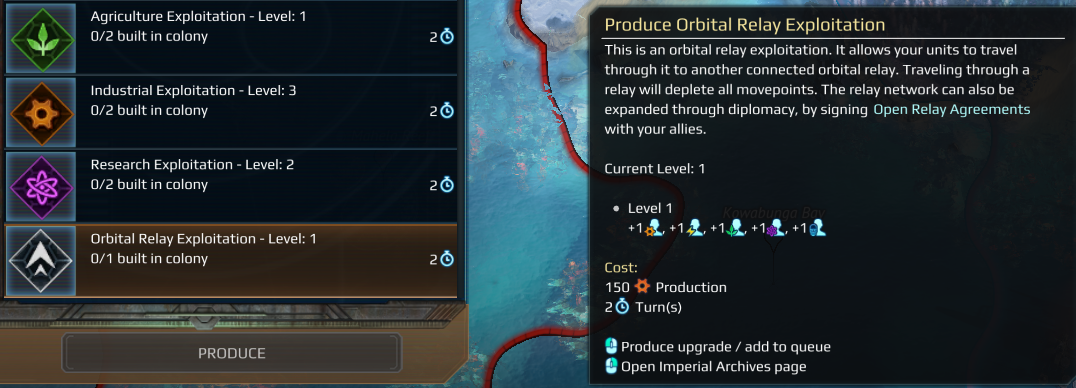
Orbital Relay Exploitation
They do provide some bonuses to your Colony. The Exploitation provides one extra Colonist slot to all Resources. Orbital Relay Exploitation have no other levels as there is this is no “Orbital Relay Sectors Upgrade” like there is for other Exploitations. This is a very poor Exploitation from an economic standpoint.
There are four Orbital Relay Sector Specialization Structures instead of three like for most Resources. Two are unlocked at the initial tier IV tech, and the final two at the tier VII tech. Only one of these has an economic benefit (shown below).
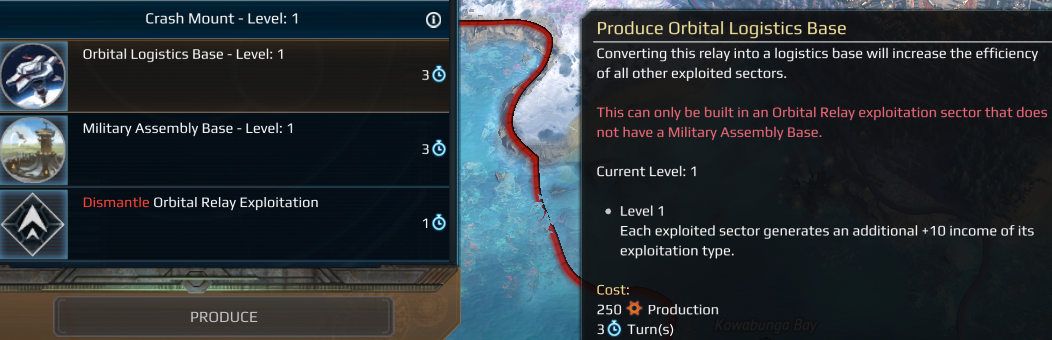
The Logistics Base Sector Structure generates at most 30 extra Resources depending on the Sectors’ Exploitations. Note Hydro-Exploitations & Residential Exploitations do not benefit from Logistics Bases at all. Taken altogether Orbital Relays should be built because you need the increase Military Mobility rather than for the unremarkable economic gain.
Water Sectors
Coastal Sectors are exploitable. Unlike Land Sectors they do not have Terrain or Climate and are all identical. They never contain landmarks but frequently have Resource Nodes.
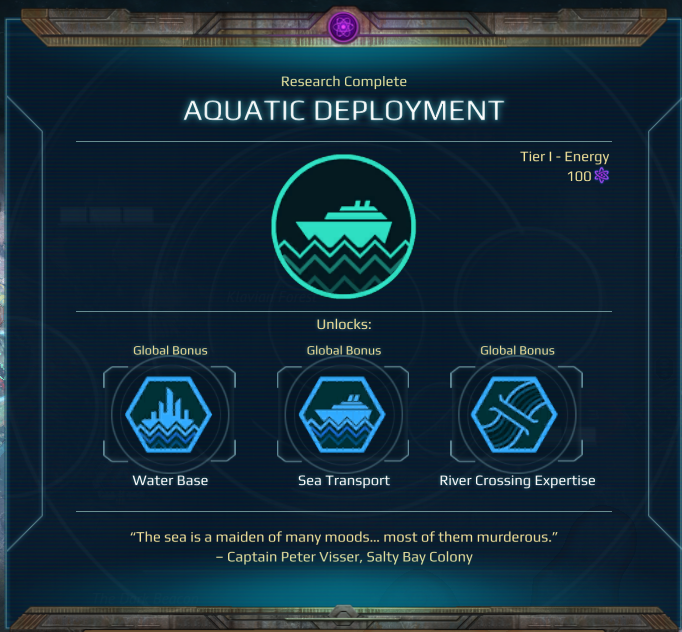
Coastal Sectors cannot be annexed at the beginning of the game, but require the tier I technology below.
Coastal Sectors always have 1 Energy, 1 Food, and 1 Knowledge. However, you do not build Energy, Food, or Knowledge Exploitations like you do for Land Sectors. Instead, the only exploitation you can build on Water Sectors are Hydro-Exploitations. Never annex more than 2 water Sectors, as the only available exploitation on Coastal Sectors are Hydro-Exploitations, and you can only have two Exploitation types per Colony.
Hydro-Exploitations always start at level 1, but you collect 10 of each resource: Food, Energy, and Knowledge. Note you gain no Production Resource from Coastal Sectors. In addition they provide one extra Colonist slot for each of the 3 resources.
At level 2 you will collect 13 of each Resource, and at level 3 you collect 16 of each (& 2 extra Colonist slots). There is no level 4 or 5 as there is no “Water” resource to increase the level beyond 3. Compared to land exploits, the total income generated from a Water Sector is 30, 39, and 48. vs Level 3, 4 and 5 Land Sectors which produce 20, 25, and 30.
Coastal Exploitations also have four Sector Specialization Structures instead of the usual three. These are quite powerful and enhance the production of the other four Resources.

In the above picture I have built a Water Exploitation on the Sector and a Water Sectors Upgrade I building in my main Colony. This has upgraded the Exploitation to level 2 so I am collecting 13 of each Resource. The “Deep Sea Mining” Resource Node is the brown cogwheel icon, which I am currently not collecting because it is still actively guarded. The “Harbor” indicates this is the Coastal region where naval military units will be created when built at the Colony. The only way to construct naval units at all is to have at least one Coastal Sector annexed. You may notice the “Sunken District” feature. For no reason, there are two Coastal features that do not show up on the game terrain as either a diamond (like Rivers or Lava) or a structure on the map. The only way to tell if a Coastal Sector has extra features is to click on the center hex and read the information. The other “hidden” feature is a Reef which provides bonus food.
Resource Nodes

Many Resource Nodes are guarded and must be cleared before their resources are made available. Guarded nodes are designated by a red border and the presence of an army. These nodes can often contain a Resources that are hard to collect otherwise, such as Happiness, Cosmite, or Influence. Resource Nodes are highly desirable. They cost nothing to utilize other than clearing any guarding creatures, and are a major consideration when choosing a Sector to annex.
River and Lava diamonds are technically not listed as Resource Nodes but “features”. Practically they serve the same purpose. However instead of being guarded, their benefits have to be unlocked by researching the required technology. The icons do not show up on the Economic Map until the research has been done, but the features are still present in the Sector information window.
Hazards
Hazards can be permanently removed once the tier II technology Adaptive Conditioning is researched. Move any unit onto the hazard, and for 100 Energy and 15 Cosmite the Hazard will be removed the following turn.
Landmarks
Landmarks are essentially prebuilt “Super” Exploitations to one of the 4 main Resources: Energy, Knowledge, Food, or Production. When annexed the corresponding Exploitation is already built and cannot be changed (but you can still pick a Sector Specialization Structure). If you already have two of the same Exploitations as the Landmark you will be unable to annex it.
Landmarks come in three tiers: Bronze, Silver, or Gold. This not only signifies the strength of the defenders, but the level of the Exploitation when annexed. Landmarks increase the level of Exploitation beyond what a standard Exploitation could. Bronze Landmarks provide +1, Silver +2, and Gold +3 levels to your Exploitation. A Gold Landmark on a Sector with none of its corresponding Resources will still start as a Level 4 Exploitation!
Note while a Gold Landmark on a double Resource Sector with 2 levels of Resource Sectors Upgrades would be at level 8 Exploitation, the maximum level is 5.
Lastly, Landmarks have other non-economic benefits. They often allow you to build powerful structures that uniquely boost produced military units from that Colony. These are built in the Sector Tab and can be built in addition to Sector Specialization Structures. Some even unlock new Strategic Doctrines or Operations.

Above is the most powerful Landmark, a Gold one. Despite this territory only having 1
But wait! There’s more. It also unlocks a building in the Colony called the “Cryo-Medical Facility” (partially obscured in the picture) which boosts the resistances of any military unit produced there, and unlocks a Strategic Operation that will instantly give 3 population in a Colony of your choosing.
Landmarks are incredibly powerful structures.