There was a change made in game mechanics in the latest version (v1.14) that changed the way that passengers are counted for passenger transport tasks. This makes these tasks significantly harder than in previous versions. Despite this, it is still possible to get all gold checks in this scenario, and this guide will show you how to do this.
This guide will start with a lot of detail. The initial setup and the first few expansions will be critical. After that it gets somewhat less specific.
This guide assumes that you know how to build track, make passing sidings, manage platform use, make signals, set up routes, and set signals. Look to other guides if you want help with these.
Difficulty Settings
There are no opponents in this scenario so realistic tracks and normal pause mode are the minimum requirements for the President’s medal. Trainiac pause mode will give you more leeway to get a President’s medal with a few green check marks, but that is not the objective of this guide. It’s all gold or bust!
Going into track-laying mode will pause the game. Abuse this mechanic as much as you can to give yourself time to think and plan. Try to be a quick as possible setting up routes and warehouses, dealing with personnel, doing finances, and research.
Choosing a Character
Cheap locomotives and free repair sheds are easily the best money savers for this scenario. you will be buying at least 12 trains right at the start which will give you an extra $252k for building. Remember, money saved in the early game will help your snowball get rolling. You will end up owning at least 2 businesses, upgrading one as much as possible, so you will encounter the Engineer’s drawback. This will happen mid-to-late game, though, when money is much less of an issue. Using the Engineer makes the tactic of putting down 2 small stations viable. It’s cheaper than a medium station and the extra maintenance sheds cost nothing.
The Industrialist will save you some money on the businesses you will build. It won’t be enough to make a difference, and certainly doesn’t compete with the massive savings of the Engineer.
The Lady and the Gangster may be tempting for the bonus incomes for freight or passengers, but you pay for this with a loss in the other type. And for the Lady, you don’t want to be spending money making sure you have the latest trains for the express bonus.
The General might save you up front on track costs, but a lot of that will get eaten up by extra bridge costs.
The Trickster is all about exploiting competitors. Since there are none in this scenario, this is pointless.
Research and Personnel
Passengers are absolutely critical. Any research you can get to increase the number of passengers is mandatory. Engine reliability, reduced maintenance, and freight prices are also important for general use, but these are secondary.
You can go back to buy research from previous eras. Don’t neglect going back to pick up passenger boosts from the 1830s research tree.
A critical engine upgrades will help to get the express route you need. Establishing a route, then upgrading to the fastest passenger locomotive available seems to be helpful for this. The passenger locomotive will also be useful for the all-important passenger transport task.
Personnel is not a tremendously large part of the strategy, except… Promoters and market criers are mandatory. Comfort to increase passengers, obviously, and population boosts for cities you are trying to grow. Inventors are always useful… more research!
Office staff can be helpful. Train staff are good — boost freight prices on freight lines, passenger prices on general purpose lines, and reliability on longer lines. Speed upgrades are not useful; speed will be regulated by passing sidings and the other locomotives on the line. Get whatever you find useful, but don’t stress over this. It’s non-critical.
The Initial Setup
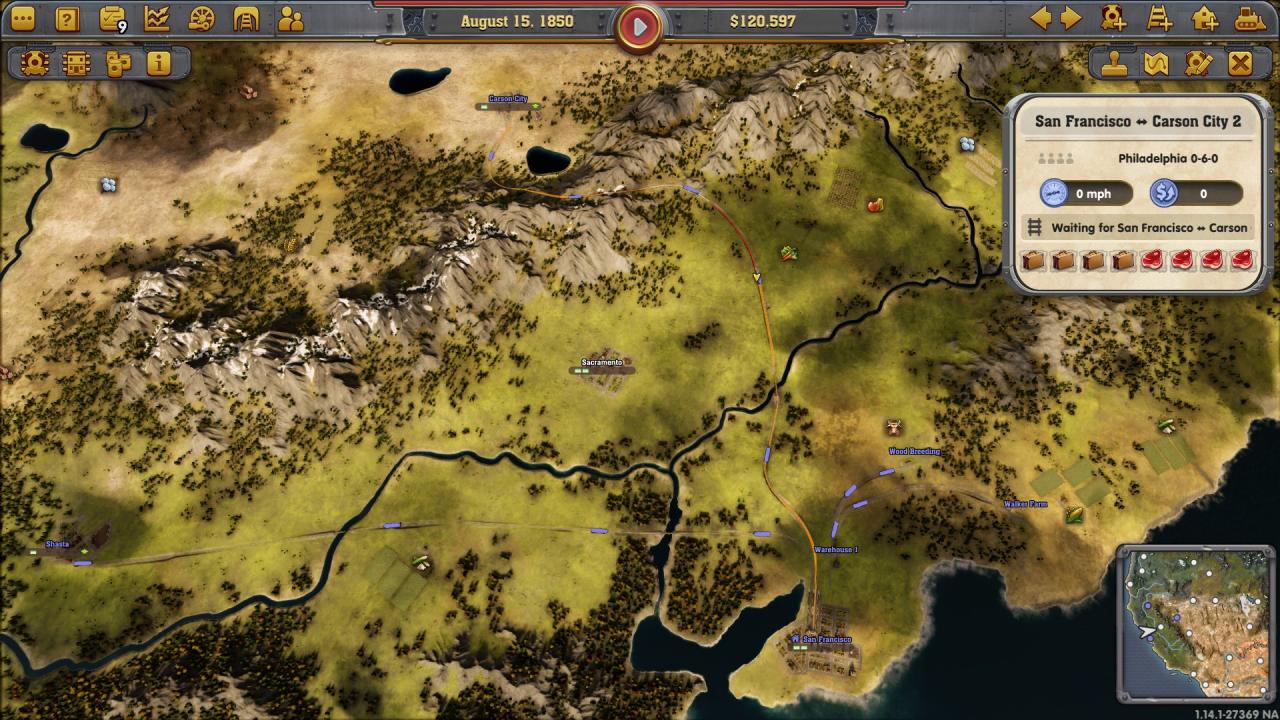
Try to keep the game “paused” as much as possible. The first task is to connect San Francisco (SF) to Shasta (SHA) and Carson City (CC). This will check the first task, and will get the gold moving. Freight and passengers will follow from this naturally. Take out your 2 bonds immediately.
Delete the station in San Francisco (SF) and replace it with a terminal station as far north and east as you can get it. (Tracks are numbered 1-4, south to north in this case.)
Connect track #3 to a small station in CC. You should be able to weave a track through a mountain pass directly west of Sacramento (SAC) using one bridge (across the river) and no tunnels. The track will have grades up to 20%, will be about 210 miles long, and will cost around $330k. Play with way-points, curving the track, elevating or lowering sections until you get it. Create 5 passing sidings spaced evenly along the route, one with a supply tower. Set signals.
Connect track #1 to a small station in SHA. Skirt to the east of the sugar, allowing room for a double track. Keep the bridges as short as possible. This section will have a maximum grade around 6%, will run for 175 miles, and will cost around $176k. Create 3 passing sidings, one with a supply tower. Set signals.
Put down a warehouse so that it is connected to SF on the east side. Leave room for rails from track #4 on the terminal station. Connect the warehouse tracks to small stations at the cattle (~ $24k) and the corn (~ $40k). Double track both of these since they are short runs, and put a supply tower on each. (You might be able to get a single tower to span both lines.) Set signals.
Now start getting trains running. Start with SF-CC, CC-SF, SF-SHA, and SHA-SF, and then duplicate them all. Duplicate the ones to/from CC again. Set the warehouse to receive cattle and corn. Set up trains from cattle and corn (minimum 8 cars) to the warehouse. Duplicate those.
You should now have 14 trains running. You should have about $80k in the bank, It will be somewhere around the August 8th.
First Expansion: First 5 tasks
NOTE 1: connection bonuses: Get them whenever you can, the delete the station and track. You get to keep the bonus, and are refunded everything you spent getting it. Cheesy? Absolutely. Effective? Absolutely!
NOTE 2: After a certain point I will stop telling you how many trains to run. As the Engineer, locomotives are cheap. In general, run lots. Three or four on a resource line is usually enough. Fewer if it is short. More if it is long. Remember to get maintenance depots at EVERY station. They’re free, so why not?
NOTE 3: I don’t always mention supply towers. They should be a standard part of line set-up along with setting signals.
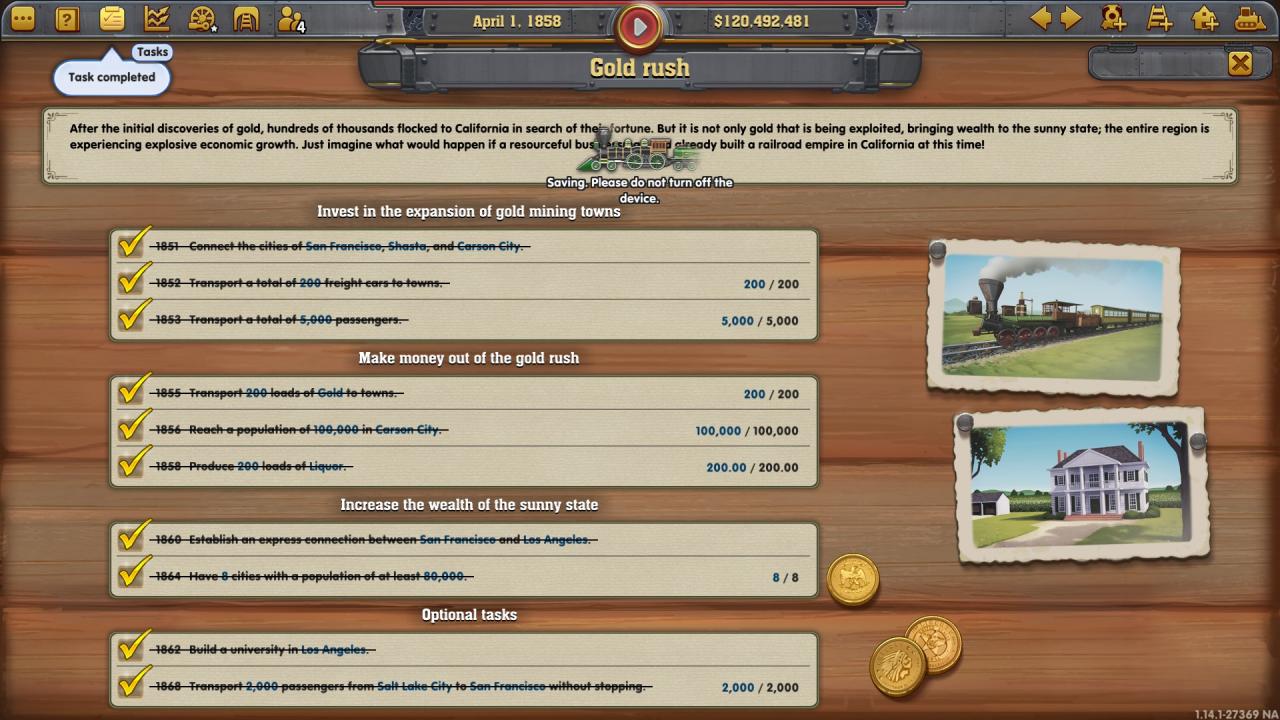
The initial set-up places you in good standing to get the first 4 objective. The first one you already have (connections to SF / CC / SHA). You’ll gold mark the others without fussing about them. The next task is 100k population in CC, and you should lean into that heavily. While doing so, you’ll lay the foundation for a distillery and 200 liquor.
Put down another station in CC and connect it to the wheat just to the north. Double track. Signals. Supply tower. Run 3 trains, minimum 8 cars at the wheat. Put a small station at the wood further north, and tie that into the CC / Wheat line; double track and all that. Two trains will be enough/
Put a small station on the sugar just south of SF. Tie that into the SF / Corn line. Double track, etc. Run 2 trains.
Put a small station at the corn south of Bodie (BOD). Bypass BOD to the west and connect it to a spare platform in CC. (Create a platform if you need to.)
Put a warehouse connected to the sugar to the south (south of the mountain range, north of Los Angeles). Run a line to tie it into the CC / Corn line. There is a pass just south of BOD that you can use. The line should run to the west of BOD. Set the warehouse to accept sugar, fruit, and milk. Connect the warehouse to small stations at the fruit and milk nearby. CC probably doesn’t need these yet, but it will soon. The distillery we put there will need the fruit stockpiled as much as possible because the production rate is very low.
NOTE 2: If CC gets a weaving factory, connect it to cotton. I was lucky in my game, and managed to get that. Consider taking that out of the hands of fate by building one yourself. Whatever factory pops up in that slot is going to need to be satisfied to keep CC growing at maximum rate.
The last thing to so at this stage is to set up SHA and SF with some wood. Put a warehouse connected to SHA on the west side. Set it to accept wheat and wood, then connect it to a small station at the wood just to the west. Connect the other platform into the line between SHA and SF, so SF can also get wood. Finally, tie in the wheat north of SHA to the warehouse. (You can tie it into the WH / Wood line.)
CC should be nearing the 90k mark at this point. It will be set up to get there with what is in place. Start saving for a distillery.
At this point it should be somewhere around August 1851. The first 4 tasks should be complete (or nearly so) and the 5th task will be getting close.
Large expenses: Tasks 6 and 10
Money should be rolling in now and you should be able to get all of this done in relatively short order. You should have a distillery up and running by January 1852, and a connection to Salt Lake City (SLC) by February 1852. The LA express should be in place before the end of the year.
As soon as CC get 90k population, build a distillery there. Renew bonds if you have to. Sell supply towers if you have to. Just do it.
Upgrade the fruit / sugar warehouse and set it to accept liquor. Adjust the routing of the trains on that route to take liquor to the warehouse on a one way trip. (Ban liquor transport from the WH to CC). This will prevent a stoppage of production due to insufficient space in the city.
Once that is done, get more trains running between CC and the sugar / fruit warehouse. (I ended up with too many due to a signalling mix-up! Ten should be plenty. You want there to always be a train loading at the warehouse.)
Upgrade the distillery. It is likely that the distillery will already not have enough sugar. The extra demand should spur extra supply. Convince the AI that it needs to upgrade the sugar farm!
You will come back to upgrade the distillery a few more times, but for now this is done. Let it sit there and move on to the next task. This is where there is a major departure from the usual plan due to the passenger count changes in v1.14
Start by saving up about $1.5M. Renew your bonds. Wait a bit. As soon as you have it…
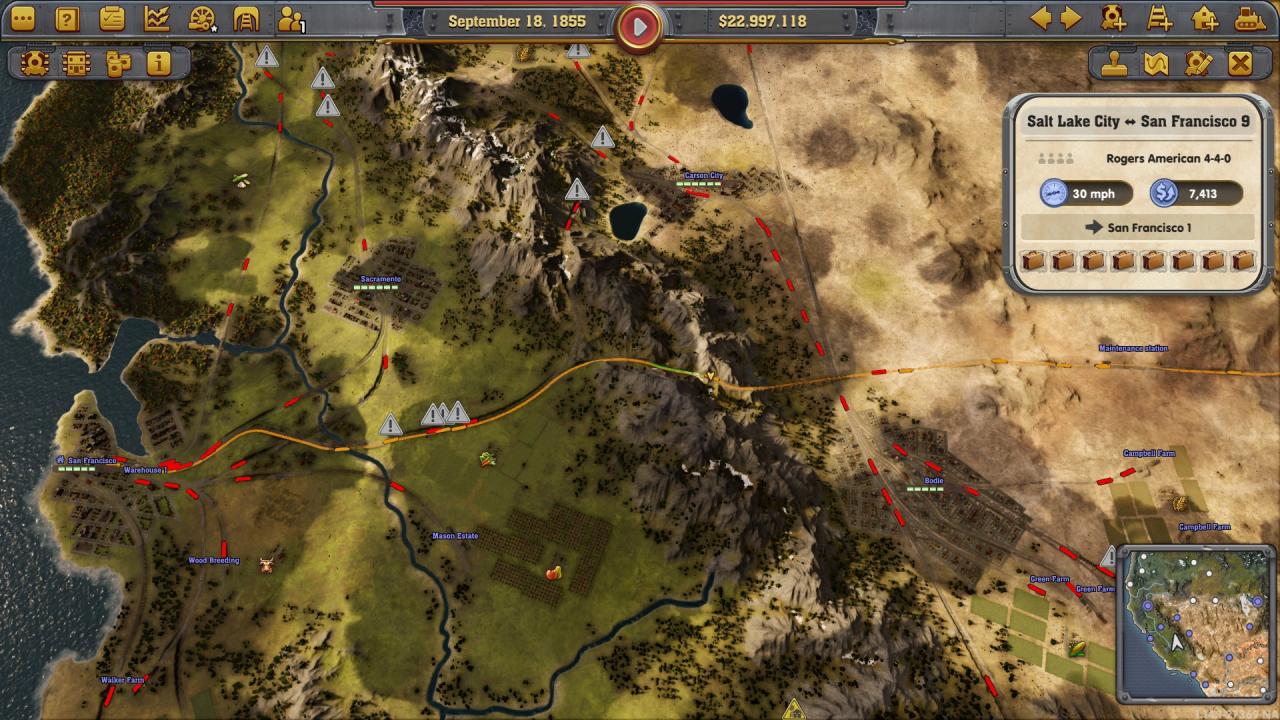
Build a small station in Salt Lake City (SLC) and connect it directly to platform 4 of your terminal station in SF. Now start adjusting the waypoints to eliminate all tunnels and all but the necessary bridge. There is a mountain pass just north of BOD that is on a pretty direct line from SLC to SF and requires only minor juggling to get up and over. You will need a bridge to go over top of your existing lines near BOD and up into the mountains.
As soon as you have the single line set up, start your first train from SLC to SF. Set it to passengers & mail, minimum 8 cars, no mail. (The return should have no restrictions.)
Set up a few passing sidings, then get duplicate the train. Gradually work on getting full double track while you continue to duplicate new trains. The objective, from here until the end of time, is to NEVER have a moment when SLC does not have a train loading in it. Keep going back to make sure this happens. At the end of the game I had 28 trains running on this route and they were just keeping up when I had a market crier active.
As a final part of this set-up, find an open area along the route (just east of BOD works) and insert a maintenance station into the line. (Put some supply towers down on either end, delete the rails, put in the station and reconnect.) With a few supply towers along the route, this is done.
To increase the number of passengers in SLC, you will need to grow the city, but that can wait a bit while you move on to your next task.
Express line; more passengers
The next task to complete is the express line between SF and LA. Put down a small station in each city and run a line between them along the coast. Try to eliminate all tunnels and bridges, but keep the route as straight as possible. The shorter the route, the more likely it is that you will get the express mark. Double the track. Set 4 to 6 trains running, set to ‘passengers and mail’. Around about this time you will be able to unlock the Rensselaer. After the trains have run end-to-end once or twice, upgrade all your ‘passenger and mail’ locomotives to the Rensselaer. This should be all you need to do for this task.
Once that is set up, you can return your attention to SLC. Connect SLC to the cattle, wheat and wood nearby. Connect SLC to Milford. Connect the wheat to Milford. Buy the business in Milford and replace it with a brewery.
Now is a good time to go back and tidy up some track. You can complete the double track for the SF to CC line and add another train or two. Put in a dedicated line from CC to the sugar/fruit WH to ease congestion on the platform (so there isn’t a conflict with the corn trains).
Upgrade the distillery again.
Population
You are now pretty much set up for all the tasks except the 80k population one. Time to work on that. You should have money absolutely rolling in by now.
Connect Sacramento (SACR) into the network. Connect it to SF and SHA. Connect it to the warehouses at each of those cities.
Connect fruit and veg into the warehouse at SF. Connect sugar and veg into the warehouse at SHA.
Now start work connecting up LA, San Diego, and Bodie. Set up a warehouse near LA and SD to help transfer meat, beer, wheat, corn, sugar, and fruit. The warehouse will link LA, SD, and BOD. You will need to bring beer and wheat down from near BOD. Connect LA to nearby cattle to get meat production going. Bring in wood from near Tucson to supply LA and SD.
Then start connecting in Kingman. You can run beer / meat between Kingman and Milford. Connect in cattle, corn, milk… anything nearby.
The name of the game now is to keep 8 cities [SF, SACR, SHA, CC, LA, SD, BOD, KING] supplied with everything they need. Build a weaving factory and clothing factory down around LA / SD. Build museums wherever you can.
Build a university in LA as soon as you can.
Look at demand fulfillment for these 8 cities. If it is not above 80%, figure out what they are missing and get it to them. Run track for miles. Use bridges and tunnels if you have to. If a factory is built that can’t be supplied, buy it and replace it with something better. Money should not be a limiting factor at this point.
Go back and upgrade your distillery one last time.
If you find yourself with lots of money and all of the needs of the 8 cities are satisfied, start doing the same for SLC. Bring in goods from WAY across the map to fulfill demand.
Winning
At some point you will achieve all 8 main tasks. If you have followed this guide they should all be gold-checked. The optional university task will also be gold-checked.
The game will end and you will score… not enough for a President’s medal because you haven’t transported 2000 passengers to SF.
“What’s up with that?” I hear you ask. “You said I would gold check everything!”
Fear not. Choose to continue playing. Get back in the game.
You can drop everything you were trying to accomplish for 80k population and concentrate on growing SLC. Get it everything it needs from anywhere you can get it. Hire any promoters that come along to boost SLC. Hire any market criers to boost comfort.
You should have already been investing in 1830’s research for passenger boost. (Remember I mentioned that at the beginning?) Make sure that you are picking up ANY research that will help passenger numbers. Then look for reliability and maintenance reduction.
Then… wait. Monitor trains at SLC to make sure there are enough. Spend research.
Eventually you will achieve the final task, and it should be gold-checked.
Press <escape> and select “Rating” to re-rate your game and get a President’s medal.
Thanks to steel_ratt for his great guide, all credit to his effort. you can also read the original guide from Steam Community. enjoy the game.