If you’re new and you want genuine tips or tricks about Caveblazers, I would like to give you a few.
Basic Tips
I haven’t played this game for a long time but I have beat every boss and at the time of writing this I’ve made it through about 70% of the game, as well as beat it twice.
Tips:
1.) When going through the caves, slow down and take your time until you’re comfortable with each enemy.
-This game likes to segment itself into different levels and themes. Levels 1 and 2 are both in caves, and the enemies there hardly change unless you’ve progressed far into the game. As well as having weaker enemies, Caveblazers has no time constraint. So you can assess your situation to keep your health high.
2.) Learn the enemies and their fight patterns.
-Obviously each enemy behaves a certain way. For example, bats will try to evade you until you get close, then rush in for an attack, where-as Orcs will instantly charge at you without running away. Once you learn how each enemy attacks, you can exploit their weaknesses and kill them with ease.
Example: Attack bats while they’re evading OR attack after they have rushed you.
3.) Hoard Items.
-As you play more and more, the items that you can find start to increase. If you hoard items you can use them in unique ways, such as giving them to your partners or another Caver you can sometimes find. (I will go over Alters and Sacrifices later, hoarding items ties in with this so go check it out!)
4.) Learn when to use range and when to use melee.
-Some enemies are easier to kill with arrows and some are easier with swords. If you use Tip #2, you’ll know when to use which, but never shy away from getting far away if you’re not confident yet as some later enemies can parry you or block your melee attacks.
5.) Learn how to parry or counter attack.
-Some new players don’t know you can actually counter attack and parry melee attacks from enemies. To parry, simply press the melee button as the enemy does, you should see a small white flash to signify the attack was parried. To counter attack, just parry and follow up with a regular melee attack or magic item.
6.) Collect and use bombs.
-Bombs can sometimes be sparse. I’d suggest always keeping one or two on you in case you need to wall-breech. Sometimes a blessing or item can be trapped behind wall, under the floor, or in vault-like rooms… you can blow a hole into the wall, floor, or ceiling with a bomb / sticky bomb to get easy access.
7.) If you want to collect a large amount of loot or gold, don’t rush to the door.
-Instead, walk across the level from side to side, and if you find a part that goes down, don’t go into it until you’re sure you’ve gone everywhere on that elevation.
8.) Use a downward slash or stab.
-When you’re in the air, you can hold Down and Melee at the same time to lunge down ward with your sword and deal more damage. If you’re above an unsuspecting enemy, use this on them. Just be sure not to miss or use it needlessly as your weapon will get stuck in the ground for a few frames. (Some weapons don’t support this attack, such as the whip)
9.) Make friends with other cavers.
-Sometimes you’ll find other cavers wondering around. They can be annoying OR helpful. Other cavers tend to snatch up loot or potions that you might want. However, it doesn’t hurt to befriend them. You can befriend a Caver by giving them items, potions, or helping them in a fight. You can then team up with them and take them into boss battles, arenas, or into random battles you come across in the caves. After all, if they die you can collect the items you gave them. (I once gave a Caver some powerful items I didn’t want. I brought them into an arena and they actually managed to help me get through many waves before dying, it was great. XD)
10.) Use potions for discounts.
-I’ll talk more about this in the Shrines and Altars Section, but you can use potions to get discounts on item shrines. Simply drop them on the ground in front of the shrine for a discount!
Basic Tricks
1.) Perk Choice and Class Building.
-As you progress, you unlock perks. Find the perk you enjoy using and pick items, magic items, and blessings that compliment your class. For example, if you are using a class that is Range Based, get blessings for range.
2.) Edge Jumping.
-When i first started playing, I kept finding myself getting stuck below or far away from something I wanted, but not being able to climb up or jump to it because the ledge it was on felt too high or too far. You can jump surprisingly far if you jump from the very edge of a block.
-If a gap is above you, and you can’t reach a certain ledge, just remember that you can likely make it up, as long as the gap is below 4 blocks. If you jump straight up you’ll notice you can just reach the bottom of the 3rd block. Use this to get up high gaps by standing on the very edge of the block you’re standing on, and wall jumping off of the block your head touches. (Trust me it’s possible, I might provide a video later on if I can)
3.) Spear Cancels (Orcs).
-Orcs can sometimes be equipped with spears, in which they can throw and catch you off guard. When I first started, their spears would always hit me.
-If you have the reactions, simply shoot the orc before it tosses the spear, and it will stop throwing the spear and resume charging you. (If you have piercing at all, this will sometimes not work as the Spear Cancel requires a form of knockback. Piercing removes most knockback and thus will not cancel their spear.)
4.) Using enemies or Cavers as lab rats.
-If you have ever drank a few potions, then you know that they can either hurt or help you. Little known fact is that Orcs, Cavers, and other intelligent enemies will actually drink potions or battle brews they find on the ground without knowing what it is. If you ever don’t feel lucky with a potion, you can toss it on the ground in front of an enemy or caver and they will likely drink it, showing you what effect the potion had.
5.) Use spare potions as weapons or aids.
-As stated before, some enemies will drink potions without a 2nd thought. Use this to your advantage in battle. If you know a potion is bad, throw it for the enemy to drink…
6.) Using spikes as cover.
-Spikes will deal 80+ damage to an enemies if they fall onto the spikes. If you didn’t yet know: You can walk through spikes, just not step on top of them. If you ever find yourself being chased down a slope, hide in the spikes and trick your chasers into landing on them. (This will not work with large enemies such as the Cave Trolls, as they squish the spikes flat).
7.) Tactical Rushing or Retreating.
-Some enemies have slow attacks, If you know when that is, attack during a cooldown.
Bosses and Their Weaknesses
General
1.) Using diagonal angles when shooting, if possible.
-Many of the flying bosses have attacks that will punish you if you’re directly below them, such as Medusa. If you can, stand off the side a bit and shoot them from an angle so that they have a harder time doing damage.
2.) Know when to rush in and do melee damage.
-Most bosses have a downed phase they go into after sustaining a certain amount of damage, when they’re down: rush in and get off high damage melee attacks.
Deathrig
-Deathrig tends cycles between three phases. One of two magical attacks, a downward attack, and then phasing out of the arena and summoning minions to attack you. The walls of the arena are also covered in magic that damages and repels you when you hit it.
-One of two magical attacks will always be picked as his first attack, and then he alternates between them when returning after phasing out.
–Spiral Bullets: Deathrig fires purple missiles in a spiral pattern. Safe points are immediately beneath him and at 45 degree angles, where you can also shoot him with diagonal shots.
–Homing Orbs: Deathrig fires 4 shorts similar to the Bohlt blessing, which home quickly on the player after about a second. Try to dodge them.
–Downward Attack: Deathrig will lower himself and chase the player across the arena for a few seconds, after which he will vomit a purple blast that cannot be run beneath. By jumping off the wall and downward stabbing, Deathrig becomes vulnerable for a few hits before phasing out.
–Phase Out: Deathrig becomes immune to damage and falls through the bottom of the arena while summoning 4-8 hovering red orbs that move slowly and fire shots at the player. Deathrig returns when all orbs are destroyed or after a long delay and repeats the cycle.
Iron Face
-Iron Face is anchored in place where he cannot move, and relies on
shields to block your attacks. Stay close to him, on the platforms to stay at an advantage.
–Magic Projectile: While the shields circle around Iron Face, they will shoot projectiles occasionally.
–Laser: Every so often, one or two of his constructs will fire a continuous laser while spinning, stay on the platforms and stay between the lasers to not take damage.
–Separated Shields: After some time, one of Iron Face’s shields will pop off and chase you while firing projectiles. Once some of his constructs are gone, they will all be respawned in a circle around him again.
–Shielding Revenge: When Iron Face dies, his remaining shields will all pop off and attempt to kill you with projectiles. Once they are all dead, the fight will end and you can collect your loot.
Grubbington
-Grubbington is one of the easiest bosses due to his limited attacks.
–Drill: After spawning, Grubbington drills up to the player from below or the side. Simply dodge him and shoot him as he is moving.
–Halted Shoot: When Grubbington stops moving partway out of the ground,
he emits projectiles from each visible body segment. Don’t be afraid to stand directly ontop of him and melee him while he is shooting… you can get alot of damage on him that way
–Weakened Segments: After you’ve done enough damage, his scales will break and you can shoot or attack his open segments for extra damage.
Chronoboid
-Chronoboid is not as hard as he seems, though some of his attacks can catch you off guard.
–Lightning Zap: Fires straight lightning bolts in 8 directions. Simply stand between them…
–Burning Projectiles: Fires one projectile after aiming causing burn if hit.
This attack is repeated about six times in rapid succession.
–Fire Bombs: Throws small fire bombs that explode on contact or hitting the ground. Causing burn if hit.
–Mines: Throws large firebombs in the air that explode on contact but remain on the ground for a while before exploding.
–Gas: Creates chasing purple gas deaing damage.
Goliath
-Goliath is very annoying but also very simple. Sometimes he can get into bad positions, simply climb the wall if you encounter this issue.
–Fists: As Goliath’s only attack… fists are very annoying and they can block you, as well as shake and fire towards the player dealing damage on impact. Simply dodge once he throws his punch.
(The fists’ speed will increase when he is recovering after being stunned.)
Azguard
-Azguard is fleshy and predictable, use this to your advantage.
–Glowing Orbs: Fires 6 projectiles at the player one after another.
–Ground Slam: Falls to the ground and creates a shockwave. Jump over this…
–Bombing Run: Flies towards either left or right end and shoots exploding
projectile towards the floor.
Medusa
-Medusa is one of the harder Bosses since she is resistant to ranged attacks.
–Lightning: Creates lightning pillars across the area.
–Slam: Chases above the player and lands to grab the player dealing damage similar to fire or poison. If she misses, she will pause momentarily and be vulnerable to an attack. Dealing damage will cause her to flail about in the air. If she takes more damage during this state, she will fall to the ground, stunned and vulnerable for more attacks.
–Projectile Orbs: Shoots 360 degrees around herself, each hit will deal 10 damage to you.
Felfang
–Poison Bomb: The spider spits 4 bombs near it. Upon impact, the bomb explodes.
It leaves a poisonous cloud after explosion that deals no damage but does inflict the poison debuff.
–Lazer Beam: Felfang jumps and lands at a random position near to the centre of the boss chamber. Then the spider charges a laser for a short period of time, then fires a laser beam at the player. If Felfang is damaged enough while the lazer is charging, it will fail to fire and the spider will become temporarily stunned.
–Stab: The spider stabs at a player or a friendly character. Felfang will only use this attack if the target is standing in-between his legs.
You may sometimes find altars and shrines that can be used, either by giving up health or gold.
Altars
-Altars are a slab looking structure with a merging symbol on the front.
1.) Combining items.
-As I was saying before, about hoarding, it is a good idea to keep duplicate items as you can combine them on altars to make them a “Super” variant. This only works with equipable items, sadly you cannot combine potions or consumables.
2.) Standard and Linear Upgrades.
-Some equipable items cannot be combines, and instead will linearly upgrade, this is common with magic items and rings. Upon upgrading, the item will destroy the Altar so be careful in the order you upgrade.
Shrines
-There are two types of Shrines: Gold Shrines and Health Shrines.
1.) Bargaining
-As stated before, you can throw potions down infront of a shrine to get a discount on what it sells.
(I’m not sure if this works with health shrines)
General Shrine Info
-Shrines can be random OR constant. Where they will sell 1 specific item that you can see by it’s shape.
-Health shrines can either give you health in exchange for a large sum of gold, or they can take your health in exchange for a good blessing.
Arena
Getting to The Arena
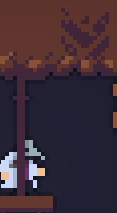
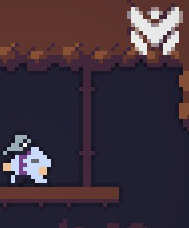
-The Arena not only skips the boss battles in favor for wave survival but also ofers some unique rewards upon completion. To get to the Arena, look for hidden switches in the ceilings and walls. They look like this before being switched on.

And after shooting them or hitting them, they glow as such…

-After you have found all 4 switches, a hidden door will open beneath the 4th hidden switch, allowing you access into the Arena.
The 5 Arenas
-Arenas spawn once per biome (Which is once ever 2 levels, not including boss battles) and cannot be accessed on the 2nd level of a biome. For example, you can find all 4 switches on Caves 1, but none will spawn in Caves 2. So find them all as soon as possible upon entering a new biome.

