
A comprehensive guide to completely destroying with Zahir! We’ll be discussing Zahir’s strengths and weaknesses along with some efficient routes that will fast track Zahir into performing as the absolute monster he is. We’ll also be discussing the reasoning behind building certain items as well play styles for the character.

Zahir is a medium range mage with insanely high damage capabilities. He has a paper tank (Ultra Squishy) that can somewhat be mitigated through items. This factor, alone, I believe is reason enough to take the gear first approach, with emphasis on boots/shoes, when creating routes. With the combination of good routes and good item selection, you’ll easily be able to dominate with Zahir!

- Hard CC:
This one takes the top spot because it completely stops Zahir’s damage and currently there are no items to mitigate this CC, currently. - High Mobility Characters/Zahir’s Low Mobility:
This is number two due to the long cooldown and slow projectile speed of Zahir’s Vayvayastra (E Skill). Vayvayastra is your only source of hard CC (with a relatively long cooldown). This makes catching characters with dashes or move speed steroids a bit more difficult without the use of baiting or zoning. (Jackie, Aya, Hyejin, Fiora, etc) Zahir has an extremely slow movement speed. (Among the slowest in the cast) - Defense:
Defense in this game scales extremely well for a single or double slotted defense build. With the way damage is calculated, just +45 points in defense gives a whopping ~31% damage reduction! While this can somewhat be mitigated by adding a few points of flat Skill Amplification, this only benefits low damage instances such as Zahir’s Gandiva (W Skill). It’s worth noting that Hyun Woo is capable of reaching a defense score of 259 by level 11 which equates to 72% damage reduction. JUST WOW! - Damage is Calculated like so for skills:
((base skill damage * (100 / (100 + enemy defense))) + skill amp – ESDR) * (1+Skill Amp% –
ESDR%) - Paper Thin Tank:
Zahir will explode if someone looks at him the wrong way. The character has negligible defense. - Longer Gearing Routes:
Zahir has a few optimal items that have specific spawns which can lead to longer gearing or forced zoning based on oxygen/gas sequences. - Slow Starter:
Zahir struggles in the early game. His extremely long cooldowns makes skirmishing earlier on extremely painful. Best to get some levels/items beforehand.
- Zoning/Kiting:
Zahir excels at both zoning and kiting with the accurate use of Gandiva (W skill). - Massive DPS:
Zahir’s skills inflict a massive amount of damage and have low cooldowns making Zahir’s damage potential top the charts. Zahir does an insane amount of DPS. - More Level dependent than item dependent:
Zahir seems to scale extremely well with experience alone. Items obviously help, but Zahir does really well with just boots/shoes.

Eye of Azrael is Zahir’s passive skill.
When Zahir hits an enemy with a skill, Eye of Azrael is instantly applied to the enemy for 6 seconds and Zahir’s movement speed increases. When an enemy with the Eye of Azrael debuff is hit with one of Zahir’s skills, the skill’s Eye of Azrael effect is applied and Eye of Azrael is consumed instantly dealing its damage to the player. If Zahir kills an enemy, you see corpses in the current area for 20 seconds (300 second cooldown).
Eye of Azrael deals 50 / 75 / 100 + 30% of AP as damage and the corpse vision has a
cooldown of 300 seconds
Narayanastra (Q)

Zahir calls upon God’s strength, dealing damage and gaining vision in a targeted area after a short delay.
Eye of Azrael effect: Narayanastra deals extra damage and the enemy’s defense decreases for 2 seconds in proportion to the difference in kills between you and them.
Narayanastra deals 40 / 100 / 160 / 220 / 280 + 50% of AP as damage and has a
cooldown of 8 / 7.5 / 7 / 6.5 / 6 seconds. Narayanastra costs 80 / 90 / 100 / 110 / 120 SP
and 1 weapon charge
Gandiva (W)

Zahir throws a Chakram in the targeted direction, dealing damage. If Zahir hits an enemy with any skill other than Gandiva, he gains 2 Chakrams that float behind him for 20 seconds. Zahir can have a maximum of 5 Chakrams floating behind him.
Eye of Azrael effect: Hitting an enemy reduces their movement speed by 30% for 1 second and reduces the cooldown of every skill, excluding Gandiva, by 1.5 seconds.
Gandiva deals 40 / 60 / 80 / 100 + 60% of AP as damage and has a
cooldown of 1.5 seconds at all levels. Gandiva costs 80 SP
and 1 weapon charge at all levels.
Vayvayastra (E)

Zahir summons and launches a gust of wind toward the targeted direction that deals damage and launches the first enemy hit airborne (stuns) for 0.5 seconds; their movement speed is also reduced by 30%.
Eye of Azrael effect: The enemy is launched airborne (stunned) for 1.5 seconds.
Vayvayastra deals 80 / 110 / 140 / 170 / 200 + 50% of AP as damage and has a
cooldown of 20 / 18 / 16 / 14 / 12 seconds. Vayvayastra costs 100 / 120 / 140 / 160 / 180 SP
and 1 weapon charge
Bhargavastra (R)

Zahir calls down Chakrams from the heavens, striking 5 times, dealing damage enemies in a wide area, dealing damage. Bhargavastra applies an Eye of Azrael indicator to enemies if they don’t have one.
Eye of Azrael Effect: None.
Bhargavastra deals 80 / 160 / 240 + 50% of AP as damage for the initial strike
followed by 4 more strikes dealing 40 / 80 / 120 + 50% of AP as damage and has a
cooldown of 100 / 85 / 70 seconds. Bhargavastra costs 120 / 150 / 180 SP.
- Eye of Azrael (EoA) is generally what makes or breaks Zahir’s damage. Pay close attention to the EoA debuff on the enemy.
- Narayanastra in conjunction with Gandiva are Zahir’s main zoning tools. Use Narayanastra to maintain Chakram stacks for Gandiva as well as to consume the EoA debuff for an insane damage boost. For solo play, this is second to your opener, Vayvayastra. The Vayvayastra, if landed, give you a free Narayanastra and a chance to reposition yourself. I find that you want to be close enough that the enemy won’t lost interest and just far enough that they can’t sustain DPS on you.
- Gandiva is Zahir’s main tool for applying EoA. Use Gandiva to kite and chase enemies, as well as a source for extra cooldown reduction for Vayvayastra. Players should try to maintain at least 2 Chakrams in Gandiva’s up time. The chakrams last for 20 seconds. That timer is refreshed whenever any other of Zahir’s skills strikes an enemy. This is absolutely huge for being able to catch unsuspecting players and keeping yourself alive.
- Vayvayastra is Zahir’s main initiation tool in solo play. If not, Bhargavastra into Gandiva followed by Vayvayastra into Narayanastra. In Duo / Squad play, Vayvayastra should be used for peeling damage off of allies and to interrupt Ultimates or other high damage skills. Use this skill sparingly as it has a Loooooong cooldown.
- Bhargavastra can be used as a zoning / initiation tool, but has massive amounts of damage. So I’d suggest using the skill on a locked down enemy or on top of Zahir to trade / discourage melee attackers.
- Summary:
Zahir does massive damage but only if his skills connect and connect in the right order. Take care to manage which skills are consuming the EoA to get the desired effect. Either hold Vayvayastra to catch initiators off guard or use it to initiate and bring down a hailstorm of damage on an unsuspecting enemy!
- Throw Weapon
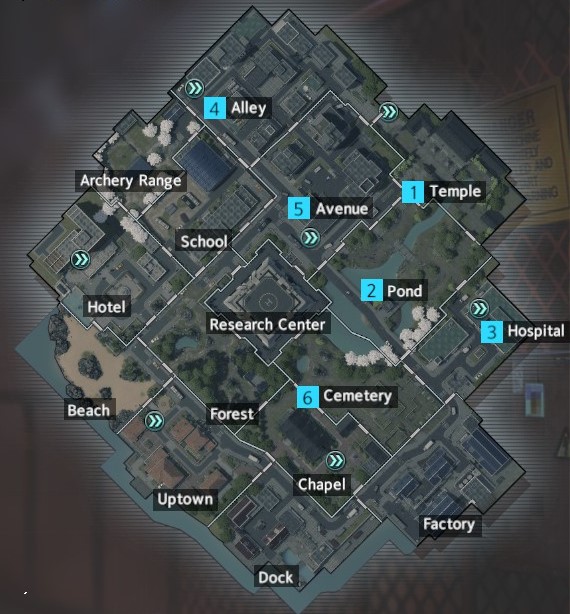
For weapons the only one that makes sense to me is the Ruthenium Marble. It gives the equivalent of +35 Skill Amplification (before defense), has raw +20% Skill Amplification, and the added bonus of reducing healing by 40% which is huge! It also has 50 charges (needed to cast Q, W, and E) and can be completed in 3 areas: Alley -> Avenue -> Pond or in Factory -> Docks -> Forest. I recommend the former for solo gameplay. It’s relatively straight forward and it gives access to your blue boots by the second area which Zahir desperately needs to secure kills and get away from those pesky, early aggressors.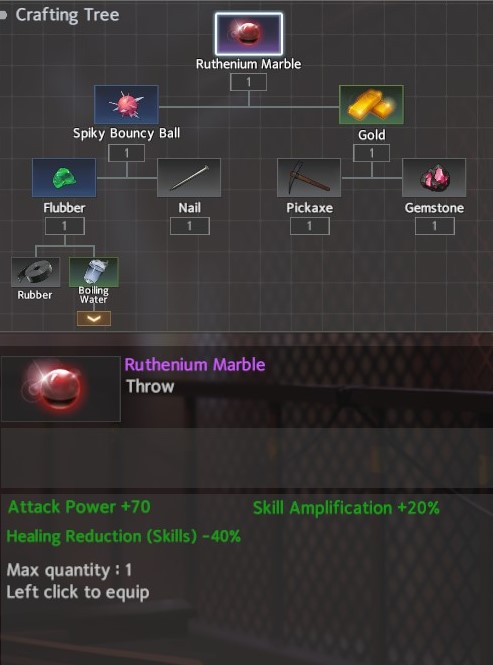
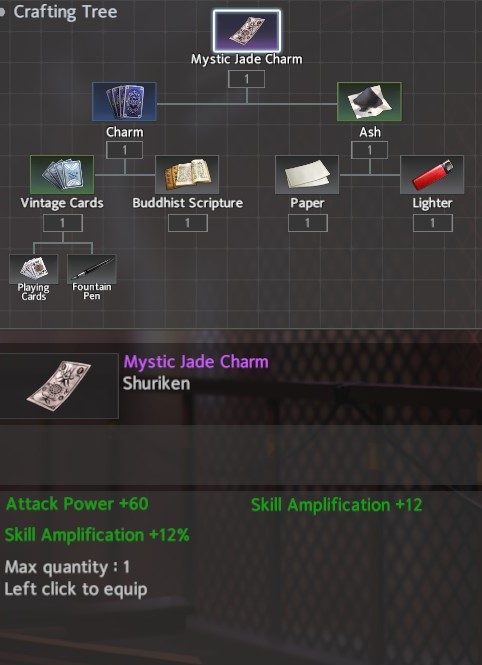
- Shuriken
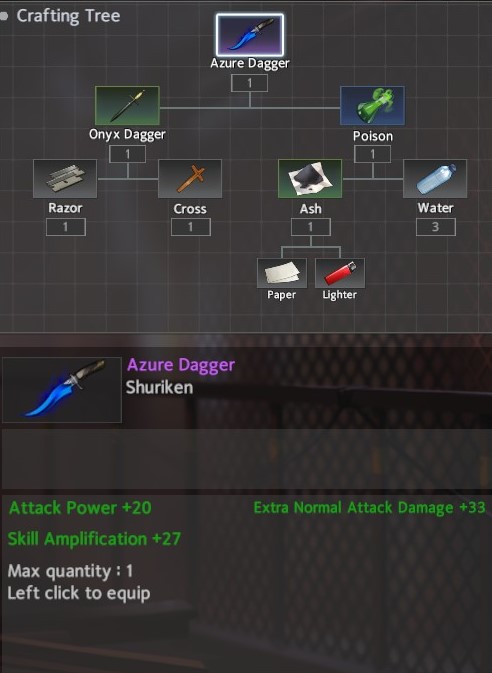
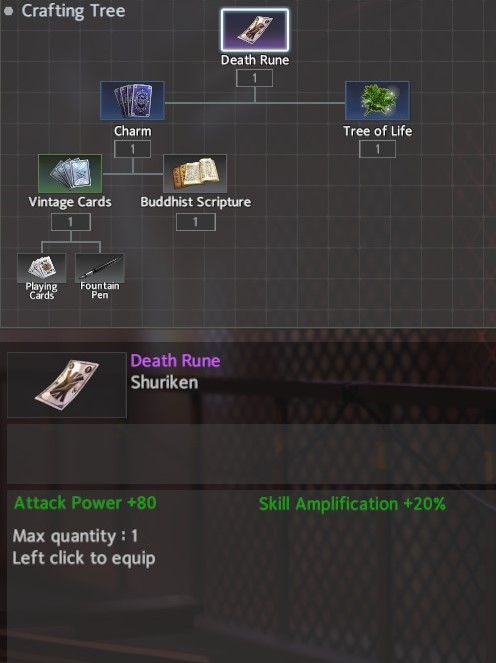
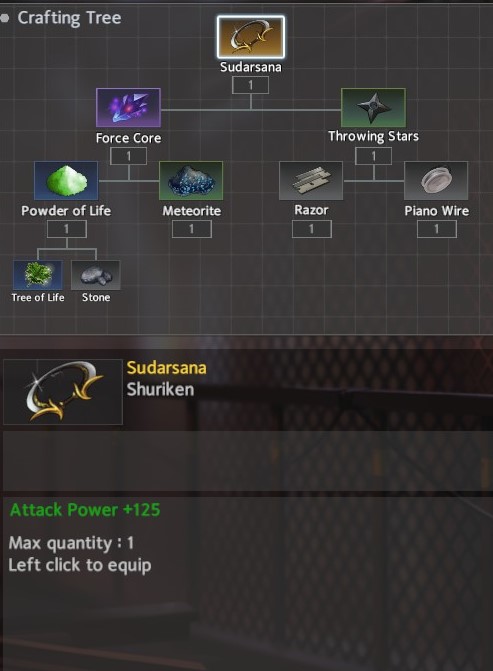
For shuriken, Zahir has several viable options, although my personal recommendation is the Wind and Fire Wheels. It can be completed in two areas Beach / Hotel <-> Temple and gives a pretty significant boost to damage. Other options include the Sudarsana, the Azure Dagger, the Mystical Jade Charm, and the Death Rune. The Sudarsana is extremely greedy, but the meteorite can easily be farmed in Archery Range / Hotel / Beach (if you’re lucky) while waiting for the first Tree of Life Spawn in Hotel.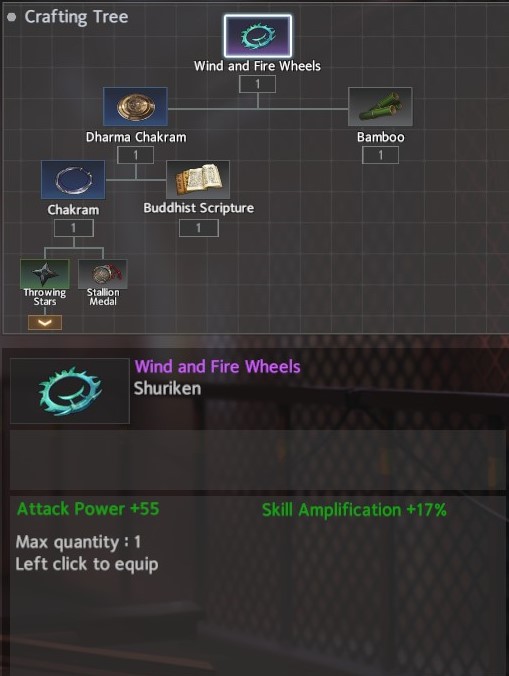
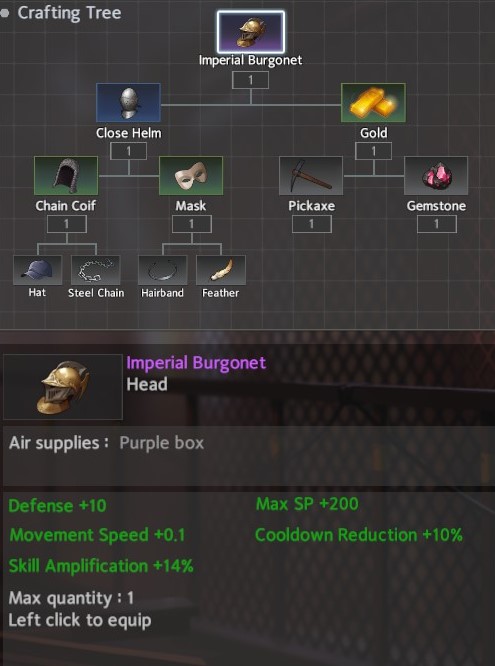
- Helm
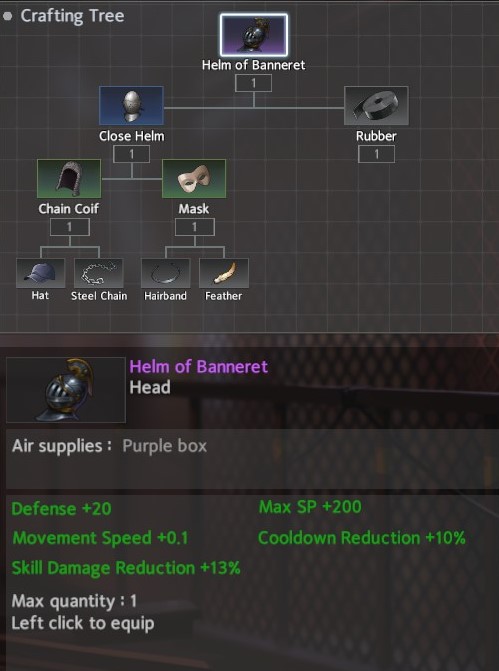
For helms 3 stand out: Imperial Crown, Imperial Burgonet, and the Helm of Banneret. The winner here and my recommendation is the Imperial Crown although the Imperial Burgonet is a close second. They can both be completed in two areas: Pond <-> Cemetary. The third, more defensive option (if you find yourself in against skill heavy characters) is the Helm of the Banneret. It can be completed in three areas Pond <-> Cemetary -> Archery Range / Alley / Docks. The Helm of Banneret and Imperial Burgonet are built from the same blue helm which provides a little diversity, but the Imperial Crown has some much needed HP / Defense as well as SP and Skill Amp. Note that the crown requires 2 gemstones which are required for several prominent accessories, helms and weapons. Just something to keep in mind.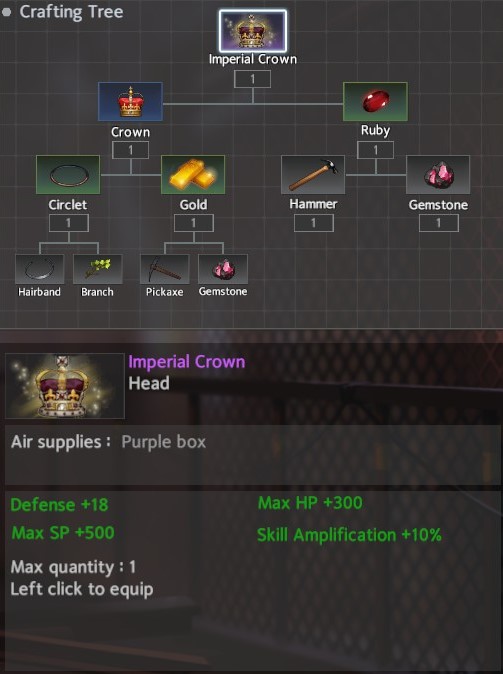
- Chest
For chests, the Chain Armor / Kabana is my recommendation here because the Chain Armor, alone, gives 20+% damage reduction and give expansion options to carry you into late game with Commander’s Armor -> Kabana for the extra skill damage. It can be completed in two areas Temple / Pond -> Cemetary.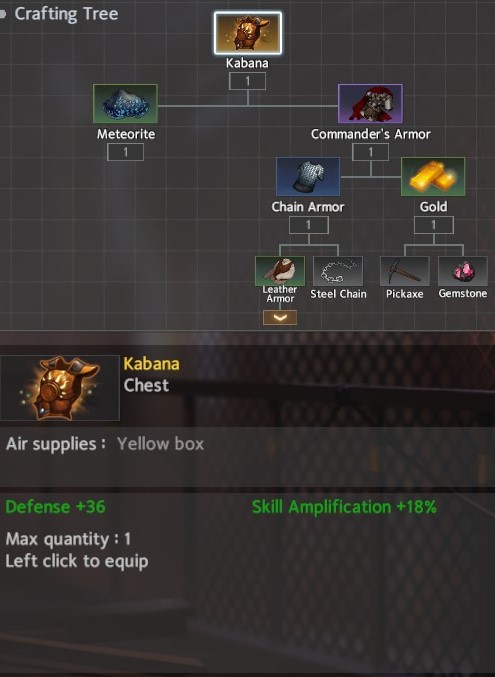
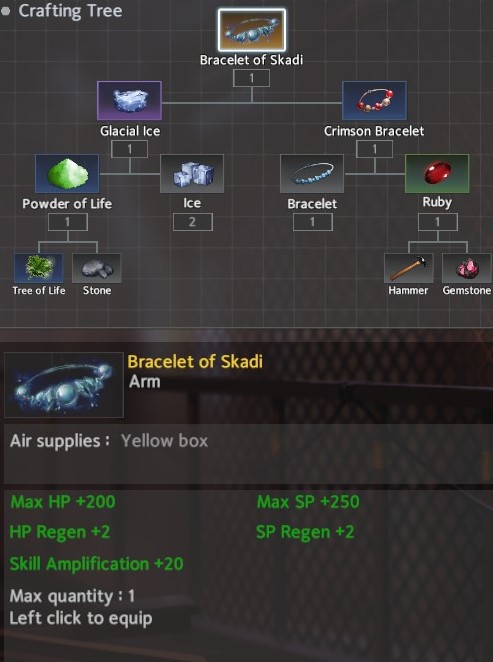
- Armguard
For Arms, the Draupnir seems the clear winner for a standard game. The slightly more greedy option would be the Bracelet of Skadi which requires the Tree of Life. The Draupnir can be completed in 2 areas: Pond <-> Hospital. Similar to the Draupnir, the Bracelet of Skadi can be completed in the same 2 areas + Tree of Life spawn. Although, the Bracelet of Skadi is a bit more greedy, it provide unquestionable survivability and the additional HP wouldn’t hurt.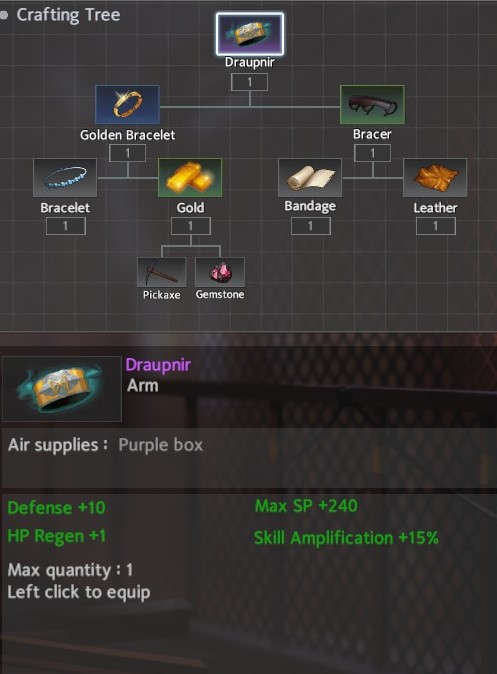
- Footwear
For footwear, I recommend the EOD Boots for Throw Weapon and the Glacial Shoes for Shuriken. The EOD Boots cant be completed in two areas with a lucky Ore drop: Avenue <-> Hospital -> Cemetary / Forest / Hotel. The Glacial Shoes can be completed in two areas as well, but doesn’t need that pesky ore: Avenue <-> Hotel. It does however need Tree of Life which can be found in Hotel.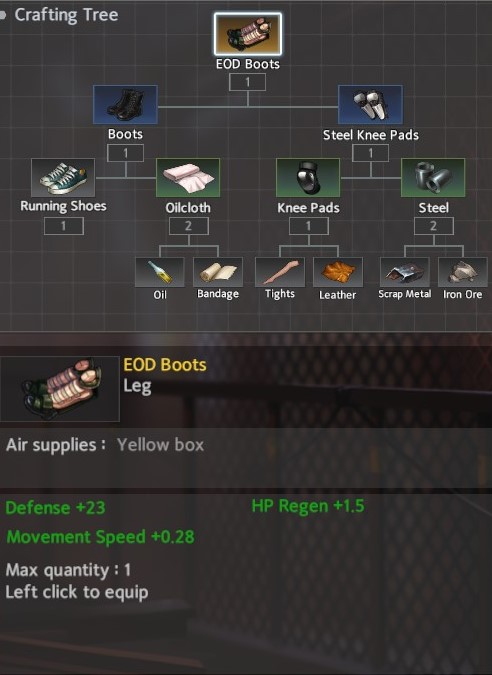

- Accessory
For accessories, I recommend Schrodinger’s Box for Throw Weapon and the White Crane Fan for the Shuriken. Schrodinger’s Box gives a significant boost to HP and can be completed in two areas: Temple / Chapel -> Docks. The White Crane Fan provides the necessary Healing Reduction along with a bit more flat Skill Amp and can be completed in two areas: Avenue <-> Forest / Hospital.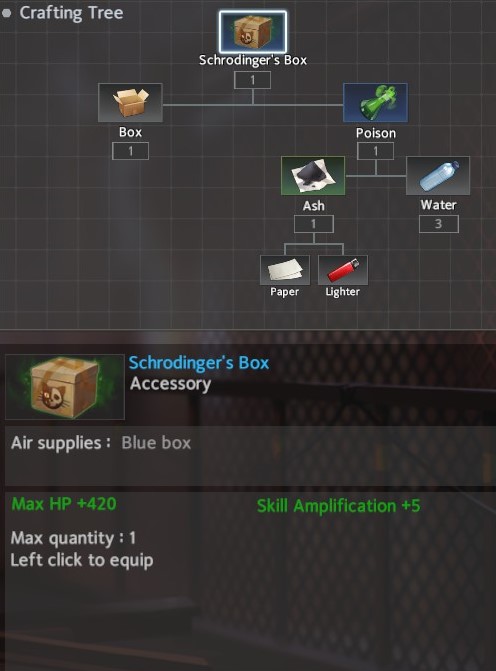

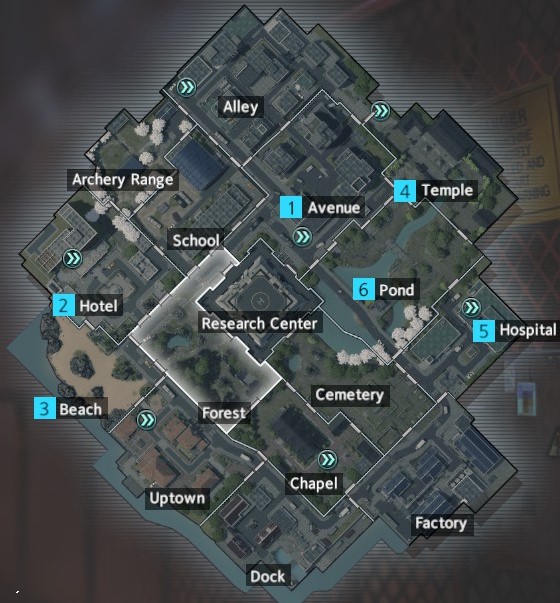
Route 1 (Weapon / Imperial Crown Rush):
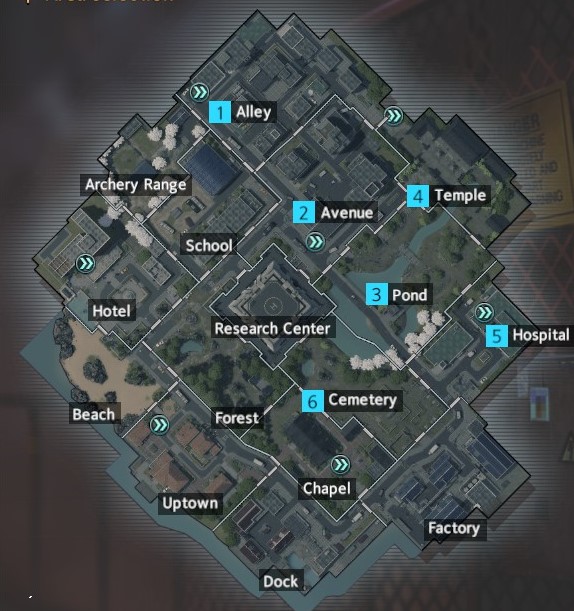
Starting in Alley, Grab 2 lighters, 3 if possible and complete the grocery list except for any collection / hunting materials. The bracelet and hammer are both optional. Be sure to pick up any Ramen. Combine a lighter and water to make Boiling Water and then combine that with Rubber to get an upgraded weapon. Dip into School and try to grab a quick bandage without going to deep into the area (optional, but highly recommended). You could also dip into Archery Range for a piece of Paper, but this is also optional / unnecessary.
Continue into Avenue and complete it’s grocery list. Collect branches and combine them with the Hairband to create the Circlet. If the bandage was previously collected, combine the bandage with the oil to create Oil cloth and combine that with your Running Shoes to create boots.
Throw the additional Oil cloth away and continue into Pond. Here you should prioritize looking for the Box, 3 Gemstones, 2 Pickaxes, and 1 Hammer to complete the Imperial Crown and Ruthenium Marble. The first 2 gemstones should be combined with pickaxes to create Gold which will then be used to complete your weapon and upgrade your helm. The third gemstone will be combined with the Hammer to complete your helm upgrade. Be sure to grab the Bracelet.
Continue into Temple and complete the grocery list. Combine the Paper and Lighter to make Ash then combine it with water to create Poison. Finally, combine the Poison with the Box to complete your accessory. Find a single piece of Leather and combine it with the Fabric Armor and then the Leather Armor with the Steel Chain. Then combine another Pickaxe and Gemstone into Gold which will then be combined with the Chain Armor to create the Commander’s Armor. This armor will carry you into the late game, but can still be upgraded should you find a piece of meteorite. Go ahead and combine a piece of Leather with the Tights if you haven’t already. When complete, make your way into Hospital and then Cemetary to complete the build.
Route 2 (Imperial Crown / Draupnir Rush):
Follow as mapped grabbing Leather and Branches in Temple.
Route 1 (Weapon/Imperial Crown Rush):
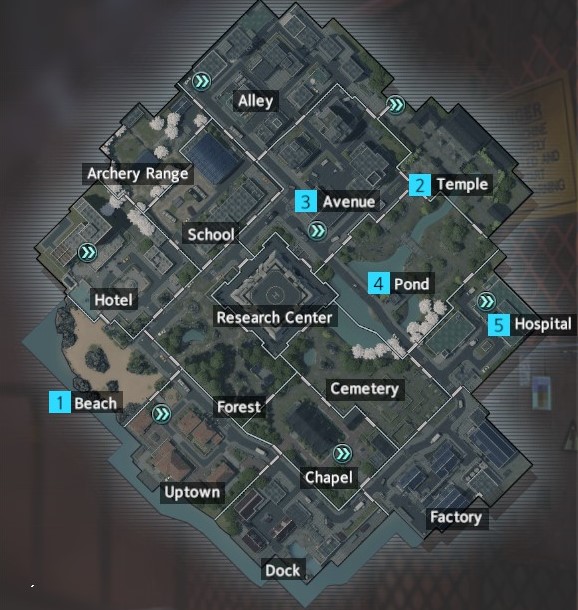
Complete the grocery list in Beach as described except for Collection / Hunting Materials. Grab the port in Uptown or Hotel and continue to Temple. Once in Temple complete grocery list + a Branch to Complete the Imperial Crown and Wind and Fire Wheels. Continue into Avenue and craft the Repaired Slippers once grocery list is complete. Continue as mapped.
Route 2 (Boots / Imperial Crown / Weapon Rush):
Follow as mapped grabbing Branches in Avenue and Leather in Temple. Optional: After Beach grab Bracelet from Uptown prior to Teleporting to Temple. Grab Stone only after obtaining Tree of Life.
Related Posts:
- Eternal Return Black Survival: How to Improve Nadine’s Skills
- Eternal Return Black Survival: Hart Guide (How to Build)
- Eternal Return Black Survival: Sissela Guide (How to Build)
- Eternal Return Black Survival: Hyejin Guide
- Eternal Return Black Survival: Jackie Build Guide