This is a guide for players looking to install mods the quick and easy way (which isn’t all that easy but I am trying to make it a little easier for you so…)
I AM NOT RESPONSIBLE FOR ANY DAMAGES TO YOUR COMPUTER AND/OR GAME “FIGHT N RAGE,” OR ANYTHING ELSE FOR THAT MATTER AS A RESULT OF ANY MODDING. YOU WILL ACKNOWLEDGE THIS, AND UNDERSTAND THAT ANY AND ALL ISSUES THAT MAY ARISE ARE YOUR FAULT, NOT MINE. ANY ADDITIONAL SOFTWARE I SUGGEST YOU USE IS UP TO YOUR DISCRETION TO USE, AS THERE ARE MANY ALTERNATE SOFTWARE THAT CAN ACHIEVE THE SAME GOAL. I REPEAT, I AM NOT RESPONSIBLE FOR ANYTHING YOU MESS UP.
=======================================
So you want to install some sweet Fight N Rage mods huh? You want to spice your game up and make it more “you,” right?
Well I can help you with that! I’ve been making mods for a while now, and from what I can tell, I’m the most prominent costume modder (at least in the artwork page) for Fight N Rage, and I have a lot of experience installing/uninstalling mods, so I decided that I would make a guide simplifying the process, so that everybody can use mods and not have the game crash out on them.
Without further ado, let’s get modding!
Recommended Software
There are many options here, such as WinRar, 7zip, among others. Some versions of Windows and other operating systems come with a built in method of opening and editing archives, so additional software is not necessary.
If you are interested though, for Windows users, I suggest using 7zip. It makes the process much much easier, more so than Winrar from my experience. It’s free, it’s open-source (which is even better), and there’s no strings attached. The link to 7zip can be found below.
Download the appropriate file for your version of Windows (64 bit for 64 bit Windows, 32 for 32 bit Windows), and install it how you see fit.
Step 1: Finding Fight N Rage’s Root Folder
If you already know how to do this then don’t bother reading this part of the guide.
We need to find the root folder of Fight N Rage because that’s where all the files we want to save/modify are located.
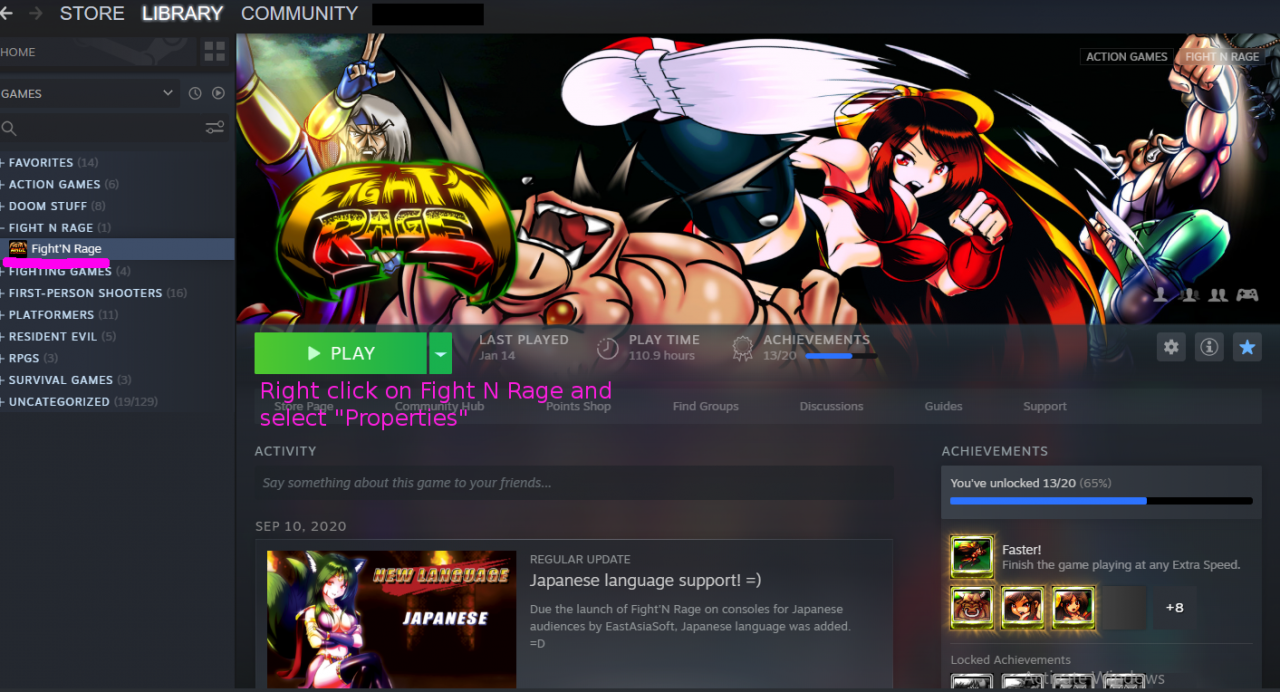
Step 1: Go To Your Steam Library Page
Step 2: Find Fight N Rage In Your Library
Step 3: Right Click ON Fight N Rage And Select “Properties”
 Step 4: Locate The “Local Files” Tab And Click It
Step 5: Click On The “Browse” Button

As detailed in the previous image, a new window should open up. It should look a little bit like this…
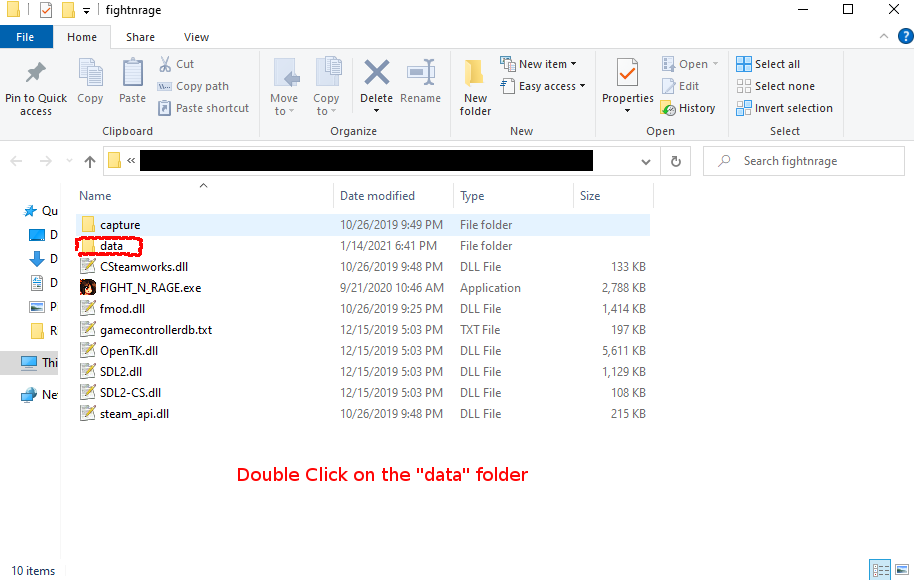
Step 6: Double Click On The “data” Folder
Congratulations, you are exactly where we need to be!
Step 2: Securing the Archives
These are archive files which contain the files that we want to modify. However, we don’t want to modify all of them, only the most important ones, those being the “0.dat” file, and then the .dat files related to the costumes of the player characters. A list of all the costumes for each character is provided below.
144.dat -> Costume 1 : “Bow” Sprite Sheet
146.dat -> Costume 10 : “Bow” Sprite Sheet (Diane’s alternate color)
148.dat -> Costume 11 : “Bowless” Sprite Sheet
150.dat -> Costume 12 : “Bowless” Sprite Sheet
152.dat -> Costume 13 : “Bowless” Sprite Sheet
154.dat -> Costume 14 : “Bow” Sprite Sheet
156.dat -> Costume 15 : “Bow” Sprite Sheet
158.dat -> Costume 16 : “Cat Ears” Sprite Sheet
160.dat -> Costume 17 : “Bow” Sprite Sheet
162.dat -> Costume 2 : “Bowless” Sprite Sheet
164.dat -> Costume 3 : “Bowless” Sprite Sheet
166.dat -> Costume 4 : “Bow” Sprite Sheet
168.dat -> Costume 5 : “Bow” Sprite Sheet
170.dat -> Costume 6 : “Bow” Sprite Sheet (Diane)
172.dat -> Costume 7 : “Bowless” Sprite Sheet
174.dat -> Costume 8 : “Bow” Sprite Sheet
176.dat -> Costume 9 : “Bowless” Sprite Sheet
208.dat -> Costume 1 : “Hoodless” Sprite Sheet
210.dat -> Costume 10 : “Hooded” Sprite Sheet (Yellow Ninja Enemy)
212.dat -> Costume 11 : “Hoodless” Sprite Sheet
214.dat -> Costume 12 : “Hooded” Sprite Sheet
216.dat -> Costume 13 : “Long Hair” Sprite Sheet
218.dat -> Costume 14 : “Hoodless” Sprite Sheet
220.dat -> Costume 15 : “Long Hair” Sprite Sheet
222.dat -> Costume 16 : “Hoodless” Sprite Sheet
224.dat -> Costume 17 : “Long Hair” Sprite Sheet
226.dat -> Costume 2 : “Hoodless” Sprite Sheet
228.dat -> Costume 3 : “Hooded” Sprite Sheet
230.dat -> Costume 4 : “Hooded” Sprite Sheet
232.dat -> Costume 5 : “Hooded” Sprite Sheet
234.dat -> Costume 6 : “Hooded” Sprite Sheet
236.dat -> Costume 7 : “Hooded” Sprite Sheet
238.dat -> Costume 8 : “Hooded” Sprite Sheet (Purple Ninja Enemy)
240.dat -> Costume 9 : “Long Hair” Sprite Sheet
242.dat -> Costume 1
244.dat -> Costume 10 (Minotauro’s Alternate Color)
246.dat -> Costume 11
248.dat -> Costume 12
250.dat -> Costume 13
252.dat -> Costume 14
254.dat -> Costume 15
256.dat -> Costume 16
258.dat -> Costume 17
260.dat -> Costume 2
262.dat -> Costume 3
264.dat -> Costume 4 (Minotauro)
266.dat -> Costume 5
268.dat -> Costume 6
270.dat -> Costume 7
272.dat -> Costume 8
274.dat -> Costume 9
Keep these files in mind, as they are where your custom skins will go.
Now then, first we need to backup the files we want to modify (in case anything goes wrong).
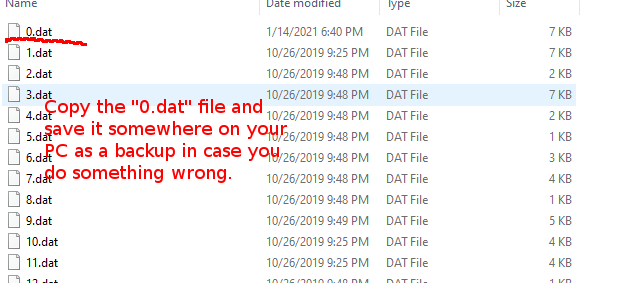
The 0.dat file is the most important file of them all, be absolutely sure to back this up.
From the list of costumes above for the character that you wish to mod, copy the archive of your choice, for example, “172.dat,” and paste it somewhere on your computer (such as the desktop) for safe keeping.
Step 3: Modifying the Costume Archive
For this, we will be using my “Blue Mary Gal” mod as an example, and the archive “172.dat”
First, we need to take the sprite image (usually going to be in .png format) and rename it to the archive file number. Do this by right clicking on the .png file, select “Rename,” delete EVERYTHING in the text-box and simply type “172,” or whatever the number of the archive is.
Your computer will tell you that removing the “.png” might break the file, but don’t worry, it’s absolutely fine. You should end up with something like in the image provided below.
 Note: I made a copy of the sprite sheet to show you what should happen between the .png format and the non-formatted one.
Now, we need to open the “172.dat” archive and place the “172” image file we just renamed inside the “172.dat” archive. To do this, hover over the “172.dat” archive, right click, select “7zip”, then select “Open Archive.” You should end up with something like this…
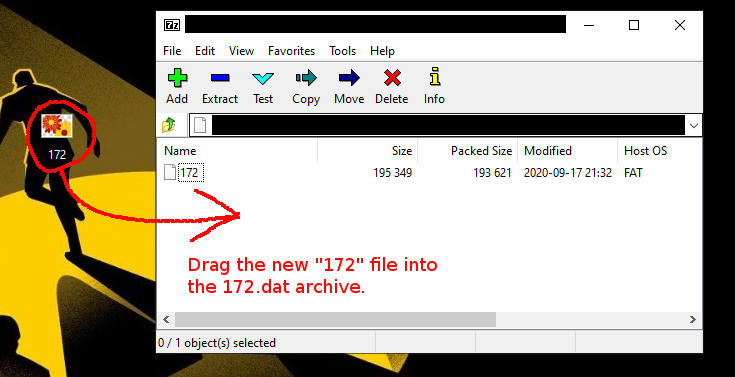
Now drag and drop the image file we had previously renamed to just “172” into the archive. It should over-write the file inside without any prompt, so be careful that you put the right file where it goes (in the event you are doing multiple mods at once).
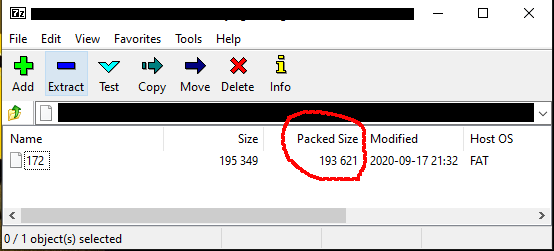
Make note of the “Packed Size” located inside the archive. This is a very important number, as we will go over soon. Reference the image. You might want to keep this window open for later.
Select “File” in the upper left and then select “Save” to save your changes to the archive.
Step 4: Changing Data Values Inside The 0.dat Archive
Since we now have the “172.dat” archive saved, with our new modded sprite image, we need to make sure the game can properly load the mod. Simply inserting the new image file into the “172.dat” archive isn’t enough, as trying to launch Fight N Rage will lead to a crash on start up (it will literally tell you something went wrong).
To avoid this issue, and properly install the mod, we have to manually edit the data values located inside the 0.dat archive. BE SURE YOU HAVE BACKED THIS UP.
We must start by opening the “0.dat” archive. We will do this the same way we opened up “172.dat” by right clicking on “0.dat” selecting 7zip, and then selecting “Open Archive.”
Next, right click on the “0” file inside the “0.dat” archive, and then select “Edit.” This should open up Notepad, and you will see something that looks like this…
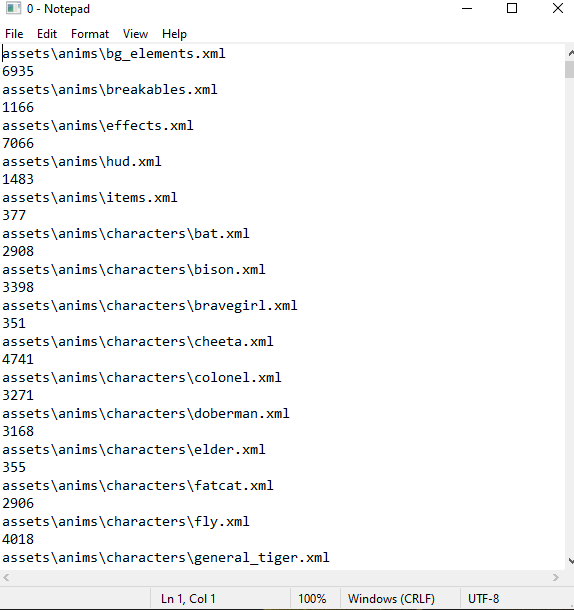
Now, scroll down through this window until you find text that says something like “girl,” “master,” or “minotaur.”
“girl” is the code-name for Gal.
“master” is the code-name for F.Norris.
“minotaur” is the code-name for Ricardo.
Remember the costume list I provided earlier? There’s a reason why I did, because all of the costumes are numbered in the exact same way, in the exact same order. The trick is knowing which archive is tied to which costume, which I have provided for you.
Our mod, “Blue Mary Gal,” has been installed into “172.dat” and that corresponds to costume 7. So, what we need to do is find where it says “assets\images\characters\girl_c7.png” in this window, and change the number underneath this line to be exactly the same as the number from the “Packed Size” of 172.dat. Reference the image below.
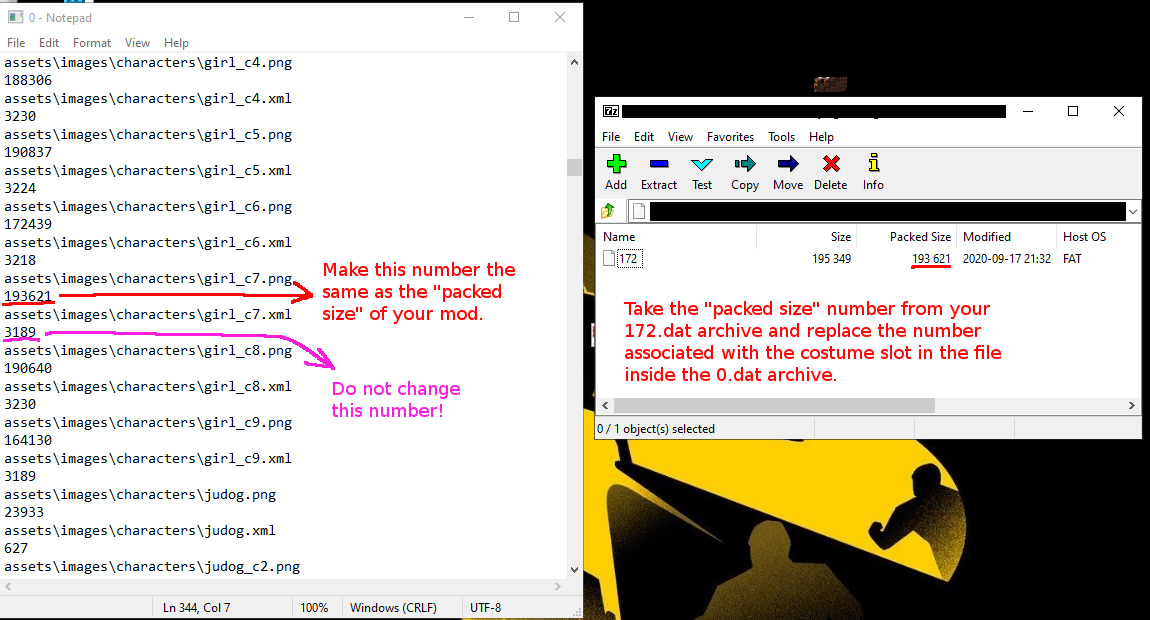
DO NOT CHANGE THE NUMBER UNDERNEATH THE .XML FOR WHATEVER REASON. THAT’S ENTIRELY DIFFERENT AND IS GUARANTEED TO SCREW SOMETHING UP. DO NOT CHANGE IT.
Now, go to the “File” tab in Notepad and select “Save.” Then close out of the window. A new window should pop-up after closing Note-pad. Click “OK.”

Close the “0.dat” Archive…
Step 5: Success!
Some Notes on Costume Types
Gal has 3 types of costumes: Bow, bowless, and Cat ears.
F.Norris has 3 types of costumes: Hoodless, Hooded, and Long Hair
Ricardo has 2 types of costumes: Hat and no Hat
It is highly recommended that you install a “bowless” sprite sheet over a “bowless” costume already present in the game, and the same goes for “bow” and “cat ears” (costumes that include both cat ears and the bow are fine, it’s simply that cat ears and bowless costumes don’t mix). This stays true for all characters. Don’t go mixing sprite sheets.
If you do just so happen to put a “bowless” skin over a “bow” costume, then you will have to edit the .xml file associated with the costume, and that’s another can of worms that I frankly do not know how to mess with, nor am I interested in figuring that out. A modding guide already exists just scratching the surface of that topic, and if that’s what you’re interested in doing, then I suggest you go there. I just make cosmetic mods.
Also note that you can replace any “bowless” sprite with another “bowless” sprite, or “bow” sprite with another “bow sprite, or “Hoodless” sprite with another “Hoodless” sprite. The costume number you change is really only up to you.
For the purpose of this guide, I used my Blue Mary Gal costume mod to replace costume 7. Blue Mary Gal was made using the “bowless” sprite sheet, and costume 7 for Gal is a “bowless” sprite sheet. For what it’s worth, I could have used any other “bowless” mod I have made and modded it over costume 7, such as my Kitana skin, Jade, or even Android 21.
So long as the mod you wish to use has the same spite sheet base as the costume you are modding over, it should work. Don’t go mixing sprite sheets.
“Something Went Wrong! My Game Won’t Launch!”
Assuming you have backed up your “0.dat” archive, and the archives related to the costumes of your choice, for example, you also backed up “172.dat,” simply drag and drop them back into the “data” folder of Fight N Rage, over-write and replace.
If you still have issues then (or you didn’t back those files up to begin with), you can always go to your Steam Library page, locate Fight N Rage, right click, select “Properties,” go to “Local Files,” and then select “Verify Integrity of Game Files.”
Steam will scan the Fight N Rage directory for any inconsistencies with their cloud and will re-download and over-write anything that doesn’t match up, making your game as vanilla as it can be.
From there you have to start all over again, just to make sure you don’t mess anything up. Take your time, take it slow, and double, triple, quadruple check that you made the correct changes.
Modding Fight N Rage is honestly not that difficult. It can appear daunting though, and there’s many hoops to jump through, but its fairly simple once you get the handle of it.