Here is the manual to guide you in the map editor tool of Humankind.
In the Main Menu, go to “Extras”, then “Community” and “Map Editor”
From there, you can either:
• Launch the editor with the default map by clicking on “Launch Editor”
• Load one of the preset maps (Tiny, Small, Normal, Large and Huge size)
• Load a previously edited map
Note: in the current version of the editor, this is the only way to load a map.
2. SHORTCUTS
• Left click: Move the camera
• Middle click: Place a tile
• Right click: Pick the value of the hovered tile. Right-click on a tile and maintain the right-click while moving the mouse to duplicate the tile, you can “draw” a tile this way
• Mouse wheel: Zoom in/Zoom out
• Ctrl + right click: Select one tile
• Ctrl + right click & drag: select a rectangle of tiles
• B: Decrease the brush size
• N: Increase the hovered tile’s height
• W: Decrease the hovered tile’s height
• X: Increase the brush size
• Ctrl + Z: Undo
• Ctrl + Y: Redo
• C: Next editing mode
3. INTERFACE
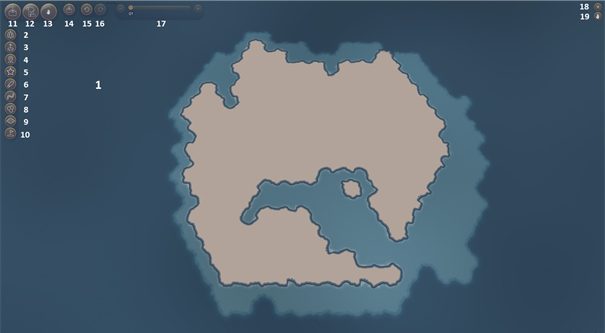
1. Viewport
2. Tile Mode
3. Elevation Mode
4. Point of Interest Mode
5. Natural Wonder Mode
6. Landmark Mode
7. River Mode
8. Territory Mode
9. Visibility Mode
10. Starting Point Mode
11. Save as…
12. Validate
13. Import a heightmap
14. Quicksave
15. Undo
16. Redo
17. Brush size
18. Close the Map Maker
19. Minimize the UI (for example: to take shiny screenshots of your map)
Click on the “Tile” button on the menu and select a tile type (forest, prairie…). Move your cursor on the viewport and click the middle-mouse button to place it.
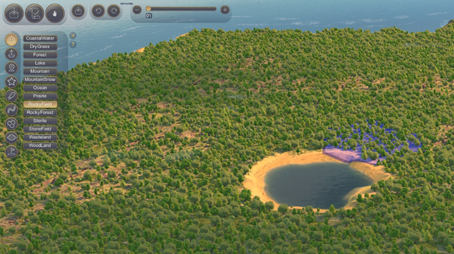
You can also click the right-mouse button on an existing tile, hold it and move it across your map to draw this tile wherever you want.
You can adjust the size of your brush by moving the cursor on the top of the screen or using the B and N shortcuts.
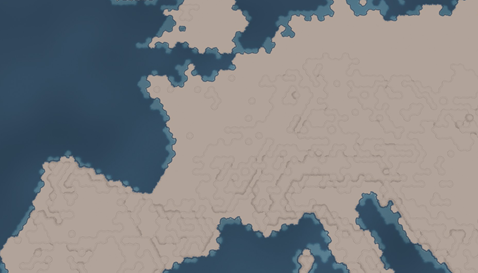
![]()
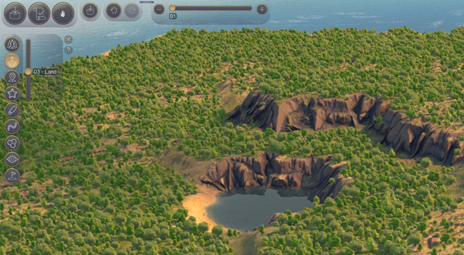
To adjust the height of your tiles and add depth to your map, select the “Height” button on the menu and a height (0 = floor level, -1 = sea level). Then hover the tiles you wish to adjust and click the middle-mouse button.
You can also hover a tile in the terrain, then use the W and X shortcuts to adjust the tile’s height.
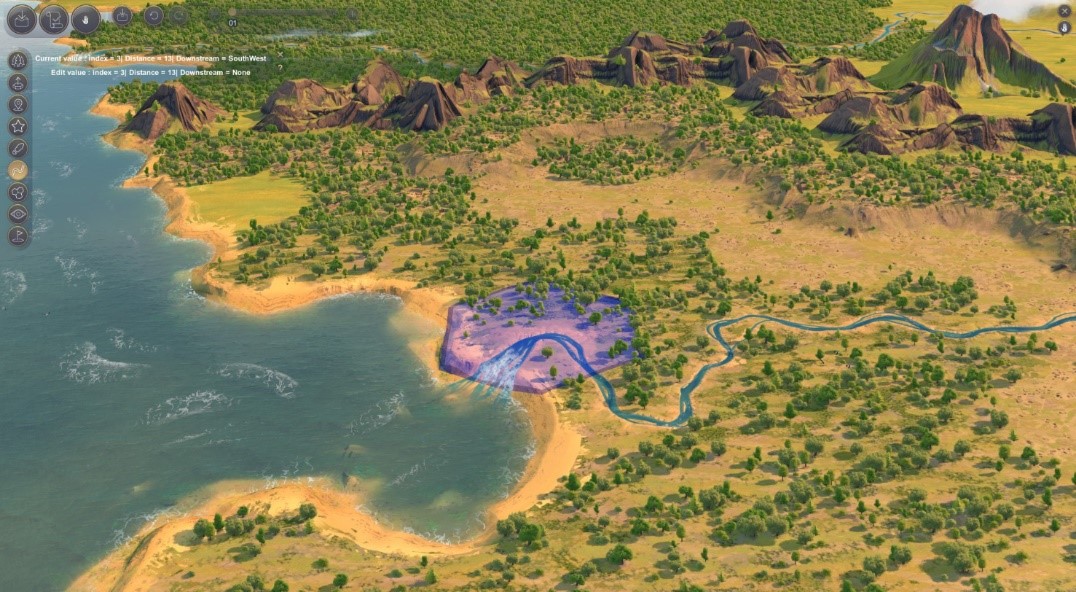
2. PLACING A RIVER
To place a river, select the “River” option in the menu, then do a middle click on the map where you want the river to start, and drag it to a coast or a lake. You can connect two rivers by dragging a river to another one.
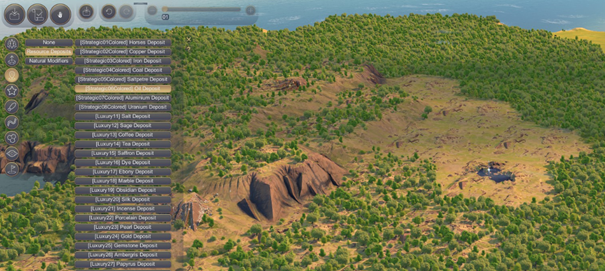
3. PLACING A POINT OF INTEREST
To place a Point of Interest, select the “Point of Interest” button on the menu, then click on the category you wish to place: Resources Deposit or Natural Modifiers. Select the element you wish to place, hover the area where you wish to place it, then click the middle-mouse button to place it.
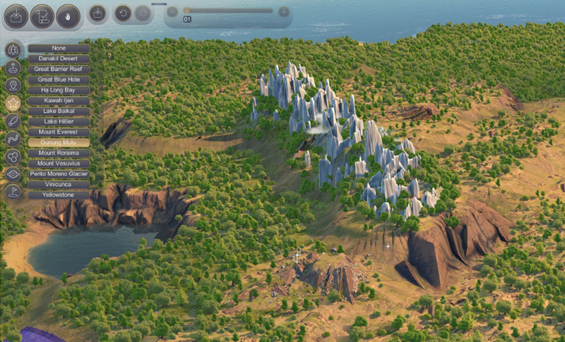
4. PLACING A NATURAL WONDER
To place a Natural Wonder, select the “Natural Wonder” button on the menu, then click on the Wonder you wish to place, hover the area where you wish to place it, then click the middle-mouse button to place it.
5. IMPORTING A HEIGHTMAP
The HUMANKIND map editor allows you to import heightmap images to automatically generate a terrain. You will need two images to do so:
• The heightmap itself, with clear colors or shades to define each height
• The palette, a reference image which will be used by the Map Maker
The two images must be in PNG and placed in the Documents/Humankind/Maps folder.
Depending on the map size, your heightmap image should have a 2:1 ratio.
There are 16 height levels, from –3 to 12, 0 being the first land level (-1 is the sea level).

Colored map and palette, with only 7 levels defined, from -1 (deep sea) to 5 (mountains).
To create a palette from your heightmap, you can use the Humankind_Sample_Palette.png file and replace the colors by the ones in your heightmap, the fifth color being the floor level “0”.
You can simply pick the colors from your heightmap and drop them in the corresponding square on the palette.
![]()
Once your two files are in the Documents/Humankind/Maps, launch the editor and click on the “Import button”. The import interface is divided in two:
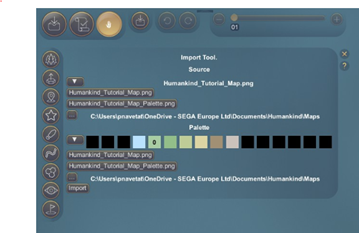
In the “Source” area, select your heighmap. In this example, this is the Humankind_Tutorial_Map.PNG file.
In the “Palette” area, select your palette. In this example, this is the Humankind_Tutorial_Map_Palete.PNG file.
Click on Import to complete the process. Your map should be showing in the viewport, time to customize it and make it playable!
6. CONSTRAINTS
Basic constraints:
• All the strategic resources must be placed.
• Luxe resources must be placed.
• Natural wonders must be placed.
Gameplay constraints:
• Every player must have a starting point in every version of the map
• Territories must follow these constraints:
o Not too big, not too small (roughly 50 tiles for a Continent Territory). Ocean territories can be bigger than continents.
o Must be flagged as a continent or as an ocean
o Only one global Ocean allowed, one Earth territory allowed.
o All “reachable” tiles (not mountains/wonder/water/ water/some POI) in a territory must be reachable from any other reachable tile without having to exit the territory. For example: a territory cut in two parts, separated par water is not a valid territory.
o All territories with islands must be “Ocean” territories.
• Ocean Natural Wonders must be placed in the Ocean.
• Ocean POI must be placed in the Ocean.
• Natural Wonders shouldn’t be cut or partly erased.
• No underwater river.
Aesthetics constraints:
• A natural wonder should be placed on a flat surface.
• Avoid 3-level high cliffs, as it blocks visibility.
• Rivers must start from a terrain and end up in a lake or in the sea.
For example, if you want your map to be playable up to 3 players/civilizations, you will need to place starting points like this:
• Place the starting point #1 for the 1-player version
• Place the starting point #1 and #2 for the 2-player version
• Place the starting point #1, #2 and #3 for the 3-player version
To do so in the editor, first click on “Starting Points”. The first row is the version of the map, the second row counts the number of Starting Points you placed:
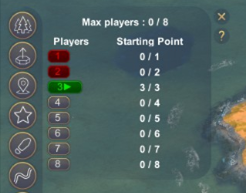
Green = Good, Red = Bad.
So, click on the “1” button for the “1-player version” of the map, then middle-click in your map to define the starting point. After that, click on the “2” button for the “2-player version” of the map, then middle-click in your map to define first starting point and a second time for the second starting point, etc.
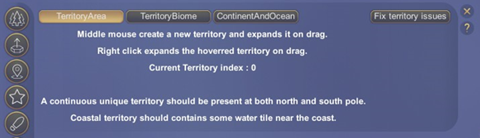
Adding territory is done in three steps:
1. Creating each territory’s area
2. Defining each territory’s biome
3. Indicating, for each territory, if it is a “Continent” or an “Ocean” territory
You will need to define territories for the entire map, and these territories must not be too small or too big.
Click on the “Territory” button, then, when you are in the “TerritoryArea” map, you can draw territories on your map by clicking on the middle mouse button. Every time you click, you create a new territory, which has a different color.
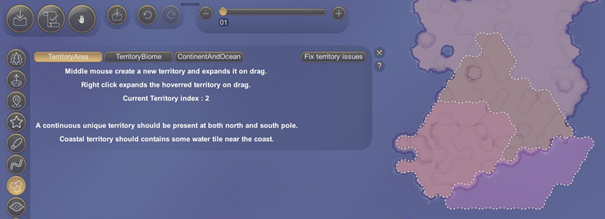
You can expand a territory by right-clicking in your territory, maintaining the click and dragging your mouse where you want to expand it.
The index of the current selected territory displayed in the tab:
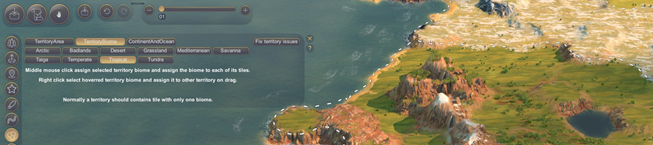
To determine which biome applies to each territory, zoom in back to a closer view of your map. Click on the “TerritoryBiome” tab, then select a biome and middle click on the territory you wish to apply this biome to.
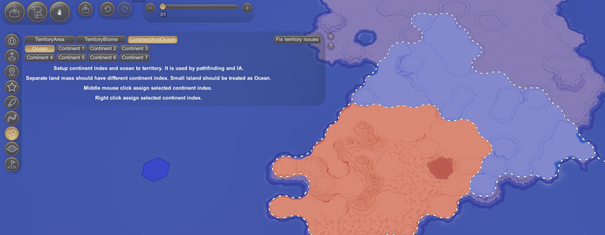
To define the territory type (Continent or Ocean), zoom-out to have a global view of your map, select the “ContinentAndOcean” tab, then select the territory type (Ocean, or Continent) and middle-click on the territory to define its type.
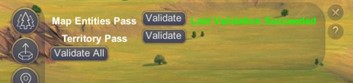
• Map Entities Pass validates that all the Starting Points are correctly set
• Territory Pass validates that all Territories are correctly set, in terms of size, accessibility and type
Note: the error message concerning territories is sometimes misleading, saying that “One of the Ocean territories contains more continent than water”, when it’s the opposite (a Continent containing too much water). It will be fixed soon.
The rules are simple:
• An Ocean territory must contain at least 50% of water tiles.
• A Continent territory must contain at least 50% of continent tiles.
• A Continent territory should be roughly 50-tiles big.
• The “Close the editor” button closes the game too
• The “W” and “X” shortcuts are hard to use on a QWERTY keyboard, they will be replaced by other shortcuts in a future version
• The “Visibility” tool will fully useable later
• The “Landmark” tool has a UI bug when typing the name of the landma0rk
Thanks to R3p0rt0laf for his great guide on how to edit map, all credit to his effort. you can also read the original guide from Steam Community. enjoy the game.
Related Posts:
- HUMANKIND™: Map Editor Territory Constraints and Caps
- HUMANKIND™: Culture Tier List (Which Culture is the Best)