A how-to guide to add a new city to a Railway Empire scenario map.
What This Guide Is About
Adding a new city is not that easy of a thing. And, if you’ve tried it before but couldn’t get it to work, it may seem to be impossible.
This guide will not only make it possible, but, hopefully, also easier. We will add Dodge City to the 1870 Southeast scenario as an example of how it is done.
In writing such a guide, with multiple steps for multiple processes, it is inevitable that at least one critical step was not mentioned. Please let me know of any missing steps via a comment.
And, let me say here, please tackle only ONE new city on your first trip through this guide. The first city you add will be taxing enough without trying to add multiple cities at once.
(This guide was written for RE Version 1.13)
Which New City?
There are three conditions hidden somewhere in that question:
- The new city needs to be a reasonable distance from another city – not another Washington and Baltimore situation, nor an El Paso and Albuquerque one.
- The new city must not overlap into a farm or mine or logging site. I’ll go into this a lot more further on.
- The new city needs flat ground (or nearly flat, no mountains, no water).
I suggest that you begin by opening up a sandbox scenario, of the time era you are interested in, such as The North, 1910-1930.
Pause the game and study the map. You may want to open up google maps for a quick geography lesson on the area. (F9 key in windows allows you to leave Railway Empire and work in another window. Re-activate RE by clicking in it.)
 Once you have decided which new city to add, you will need to find a similar city on the same map to use as a template. By that, I mean, if your new city is to be spread out on the open plain, then find a template city on an open plain. If the new city is to be pressed up against a river, then find a template city beside a river.
Remember the name of the template city. You will make a duplicate of it later on, twice.
Close out of sandbox to the main menu.
Game Balance – There are 20 cities in each scenario (21 in South-East). The game developers thoughtfully spaced the resources (food, wood, minerals) in between these cities to not only give the player the fun of laying track and running trains, but to also challenge the player to strategize on what to haul, where to haul it and when to haul it.
They strove to find a balance between challenge and fun.
Adding one new city will not throw a game out of balance. Adding five new cities might. Adding ten new cities probably will without re-balancing the entire map. Just something to think about.
Missing: Dodge City
And, I want to add three new cities to spread out my railway network a little more. I’ll add only one of those cities as an example for this guide.
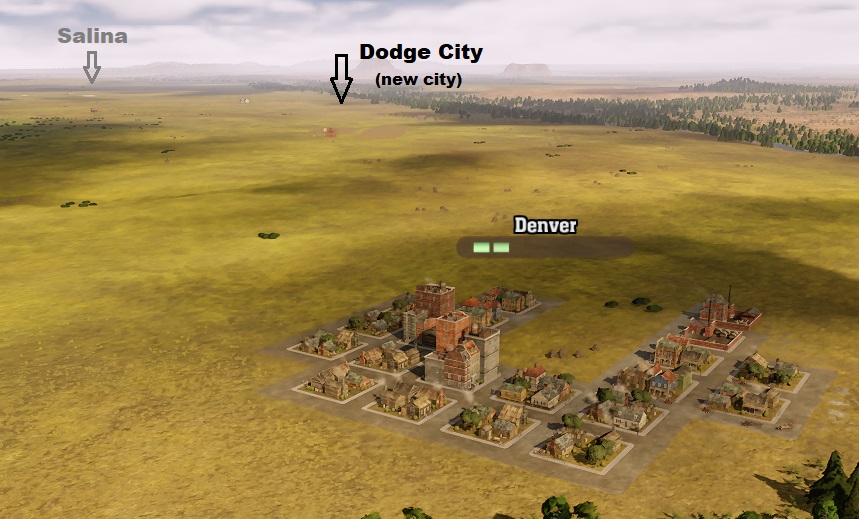
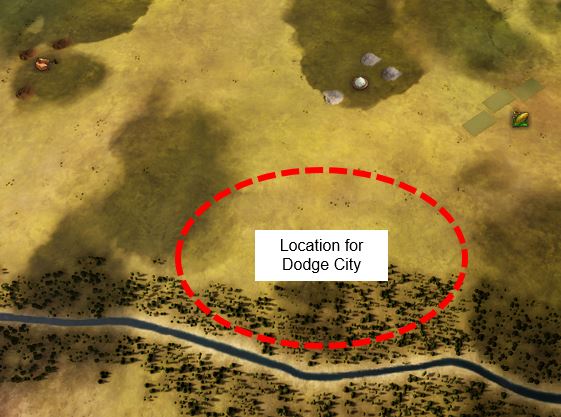
I studied the map and decided to add Dodge City to help split the distance between Denver and Salina.
 (Click on an image to enlarge it.)
I found the geographically correct location (close enough) for Dodge City on the scenario map and checked off that the spot was:
- Not too close or too far from another city. It was a reasonable distance.
- Not being crowded by a farm or mine or logging site – although I could move them, if so needed, to make more room.
- On plenty of flat ground – although it would be beside a river.
I selected Dallas to be my template city because it too was beside a river.
I closed the sandbox and opened the editor.
It helps to take a screenshot of the location for the new city while in the sandbox. The map editor makes things look very different and having a screenshot helps find the spot again.
Start Up – Back Up – Tee Up
![]() Enter the editor and start a new scenario of the time period of your choice and the map region in which you will add a new city.
Enter the editor and start a new scenario of the time period of your choice and the map region in which you will add a new city.
Exit out of or minimize Railway Empire. We will come back to the editor later on.
Starting a new scenario causes the RE editor to write a new project folder for the scenario into your documents folder:
Documents / My Games / Railway Empire / ugc / scenario code number
Adding a new city to a map just begs for a major goof-up. Murphy’s Law never rests.
It is wise to backup the scenario data before you hear yourself say, “I think I just deleted every city on the map.”
Go to and open the new project folder which holds the files of your new scenario. The pathway to the project folder will look something like this:
![]()
Notice that the RE editor assigned your custom scenario a 40-character nuclear missile launch code as a filename. (I once renamed this folder to something else but RE editor did not recognize it.) We will call this 40-character folder the “custom scenario” folder.
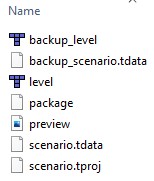
Open the custom scenario folder and make copies of level.tmx and scenario.tdata files. Rename them. I like to use “backup_level,tmx” and “backup_scenario.tdata”.
Now we can make bold changes without any worry of Murphy and his Law.
Allow me introduce these two critically important files:
Level.tmx contains all the map terrain data for your scenario (land, water, city locations, etc…).
Scenario.tdata contains all the game parameter data for your scenario (production, towns, locos, etc…).
These two files hold the keys to the kingdom. That’s why it is important to make backups.
Railway Empire editor uses the Tweedledum and Tweedledee software applications of TOME and TILED. These two applications have to be used together for us to add a new city.
TOME allows us to mod the game parameters. It creates/reads the scenario.tdata file.
TILED allows us to mod the scenario map. It creates/reads the level.tmx file.
TOME is part of the RE editor and does not need to be downloaded. TILED has to be downloaded onto your PC for it to work.
![]() If you don’t already have TILED on your PC, you can download it by clicking on “Edit Map Parameters” in the RE editor -OR- you can download it at the TILED website
If you don’t already have TILED on your PC, you can download it by clicking on “Edit Map Parameters” in the RE editor -OR- you can download it at the TILED website
It’s easy and harmless. Donate to the dev if you wish. Use the default download options.
Tooling Around in TILED
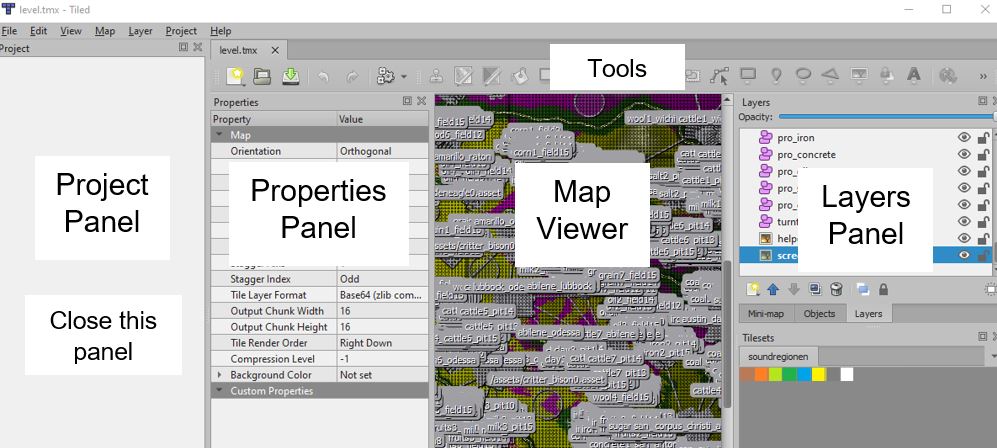
Open TILED by double clicking on the level.tmx file in the custom scenario folder. This loads the map data for your scenario.
TILED opens up with several panels visible. Close the “Project Panel” to make more room. You can also drag the edges of the map viewer to enlarge the viewer.
—
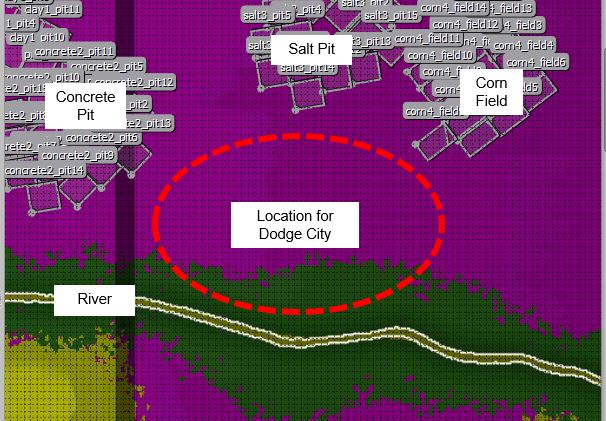 At the map viewer, zoom in on the spot (Ctrl + or – for zoom) where you want to place the new city. This is when an earlier screen shot of the spot in the sandbox helps because the colors of the map viewer are all wonky.
Double check that there is probably enough room for your new city, specifically that a farm or mine is not overly in the way. Appendix 2, at the end of this guide, tells how to move a farm, mine or logging site out of the way, but it is best if you don’t have to move anything.
If an Indian village or animal circle is in the way, see Appendix 3 on how to move it.
We need to reduce the clutter of objects on the map view so we can see the cities better.
On the Layers panel, scroll down past all the city names to the “pro-goods” list. Hide them all. Hold SHIFT key to select them all. Right click and select to hide.
The map should now better show the cities and their connection (trade) lines. Let’s look at a few things:
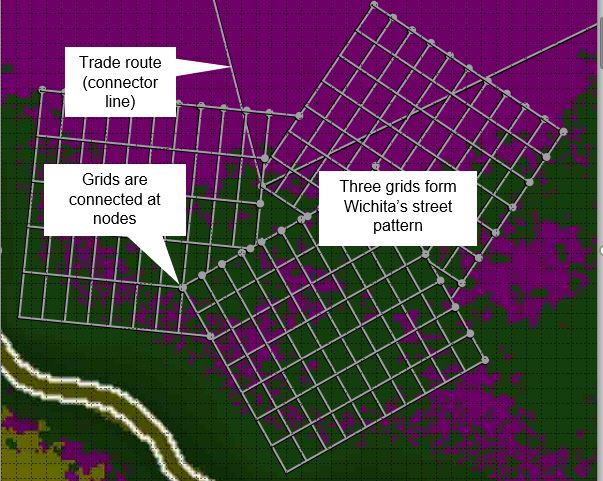
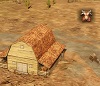
- Notice how a city is actually 3 or 4 grids of streets overlaid or pressed together. This is the largest size the city will grow to.
- And, notice how no two cities have the same pattern of street grids. (The devs tailor made each city.)
- All the streets in a city have to connect to each other. A “node” is used for a connection where grids touch each other.
- Lastly, make note of the connector lines which come into a city. These are trade routes between cities or a farm. We see them as the flow of goods, a line of small yellow chevrons, when playing a game. The lines connect to a node at/near the “city center”.
Copy ‘n Drag
At the Layers panel:
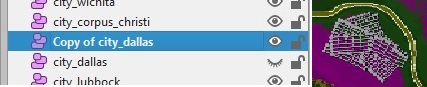
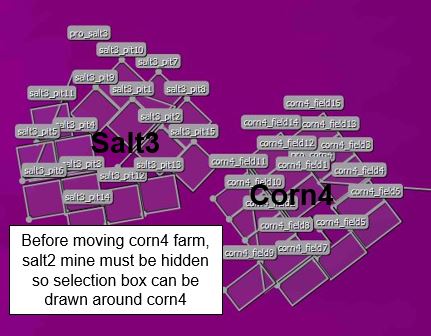
- Select the “Layers” tab and select your “template” city from the list of city layers. Right click, select “Duplicate Layers” and duplicate the template city. It’s duplicate will appear as a “Copy of city_cityname”.
- Now, hide the template city so is not accidentally moved (click on the eye).
- Select the duplicated city layer.
In our example, Dallas was the template city and has been duplicated into “Copy of city_dallas”. Dallas was then hidden from map view.
 –
–
I will now call the duplicated city, “Copy city”, so not to confuse it with any other city. Copy city is the new city without a name yet. Copy city will soon become our Dodge City.
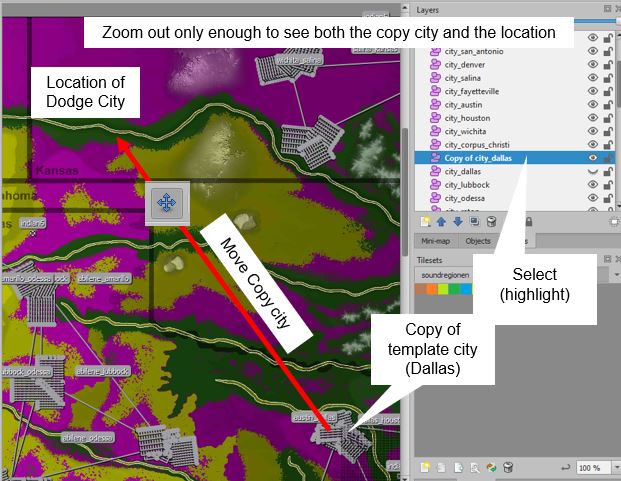
Copy city has its own layer of city streets and is exactly on top of the now hidden template city (Dallas in our example). We are going to move the Copy city to the location of the new city.
Zoom out far enough to see both the Copy city and the location for the new city. Make it as tight a zoom as possible.
 —
—
Make sure the Copy city is selected in the Layers panel or some other layer will be moved around by mistake.
![]()
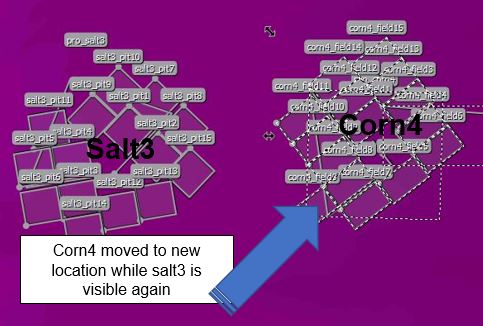
Select the MOVE tool from the tool bar.
Click on the center of the Copy city in the map viewer and drag it to where it should go, or close enough.
At the Layers panel:
- Show (unhide) the template city again.
- Now unhide the “pro-goods” list. This will make the farms,mines and logging sites visible again. Hold the SHIFT key to select them all. Right click for menu to “show” these layers.
- Select the Copy city again.
Before making the “final adjustments”, save your work thus far. File –> Save.
Q: Can I build a new city from scratch rather than copying a template city?
A: Yes. Read how to do this in the game developers’ guide here[www.gamingmindsstudios.com].
Finding the Best Fit
(Again, double check that the Copy city is selected in the Layers panel.)
At the map viewer:
- Zoom in to the Copy city (CTRL +), close enough to see how well it fits on the land and in between neighboring farms and such.
- Move a farm or mine or logging site which might be crowding the Copy city. See Appendix 2 on how to do that – and the cautions of doing that.
 Use the Move tool to settle the Copy city into its best location.
 To rotate the city (make it fit against a river better, for instance), use the Select tool. Here’s how to rotate a city layer:
- With the Select tool clicked on, draw a box around the entire city; enclose the Copy city in a selection box. You may find it easier to hide nearby layers such as a farm before drawing the box.
- The city streets should be flashing. Make sure you captured ALL the streets; none are left out.
- Also make sure you did NOT capture any part of anything else besides the city in the selection box. Clicking outside the selection box or CTRL+ SHIFT+ A allows you to undo the selection.
 Notice the “scale arrows” around the edges of the city. Ignore these arrows. Don’t mess around with the scale or the city blocks may not work right in the game.
 Click inside the city and the scale arrows change into rotation arrows.
- Click and drag on a rotation arrow and watch the Copy city spin!
- You can move the city too after rotating it by hovering the cursor near center of the city until it changes to a “move” icon. Click and drag the city into its best location.
CTRL-Z gracefully undoes any mistakes and wrong ideas.
Unselect the Copy city streets by clicking on the map outside the selection box or using CTRL+ SHIFT+ A or using Edit –> Select None.
With the Copy city settled into its new and final location, we will now change its name to the “New city“.
Once again, save your work. You are now ready for the final touches- the connection lines – to the New city.
Connection Lines
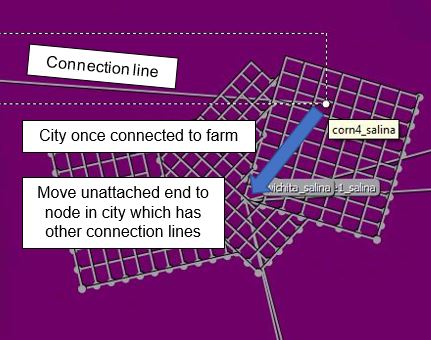
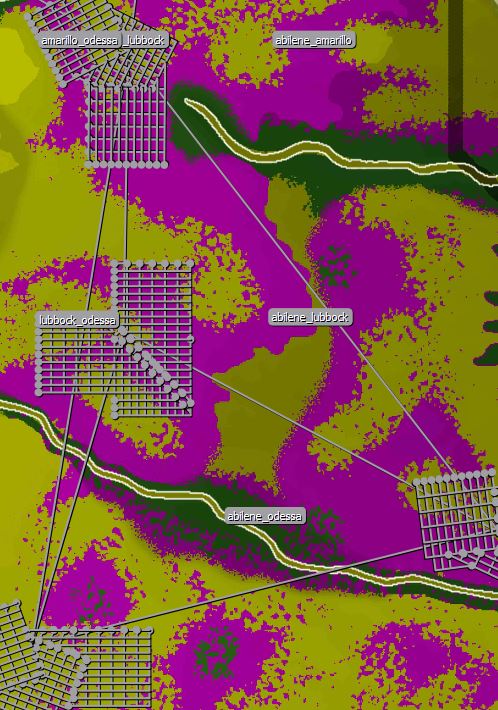 Each city has trade routes with other cities, and usually trade routes to a farm or two. The trade routes supply goods and food to the city by way of horse and cart until the railroad arrives. Connections are shown as a line in the map viewer of TILED (see image on right).
We need to add some connection lines to our New city. Connecting up to two other cities and one farm is enough.
At this point, you may be asking, “Do I need to add connection lines, or will the new city do OK without them?” It depends. If the city is put into a non-active mode (false for “active” in TOME) then its population stays unchanged until a train station arrives and it does OK without connection lines. A city in active status (true for “active) without connection lines will shrink in population (starve and die off) until your railroad shows up with food. An active city with connection lines will do OK until the railroad arrives.
We must find the New city’s “center’ first. This is where all the connection lines will hook into the New city.
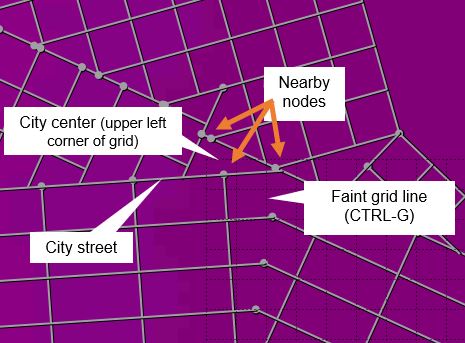
Select the New city in the Layers panel.
In the map viewer, zoom into the New city. Press CTRL+G and a faint grid shows up. The uppermost left corner of the grid is the city center. (Click on image on left to enlarge and see grid lines.)
- To brighten the grid lines, go to Edit –> Preferences –> Interface tab. Change the grid color to yellow or white or something bright.
Make a mental note or screen shot of where the city center is in the New city and which street nodes are in/near it.
We are going to copy (duplicate) an existing connection between two cities. Here are the steps:
- Zoom out to see the next closest city to the New city and find a city-to-city connection line leaving that city.
 In the Layers panel, select the layer “citylinks”. This is the layer with the city-to-city connections.
Do NOT use a farm connection for a city-to-city connection.
- Click on the Select tool and strum the cursor across the connection line. An outline box should flash off and on. Is this the connection line you want?
- Place the cursor on the connection line you want and the outline box should appear. Right click and “Duplicate Object” to copy the line.
 Click on the Edit Polygon tool, touch the copied line and the end points of the duplicated connection line flicker on.
(Remember, the duplicate is right on top of the original line.)
- Leave one end of the duplicated line fixed in the neighboring city you want to connect to and click and drag (move) the other end of the line to the New city.
- This is important. Connect the line to a node in or very near the city center of the New city. You may need to zoom in to the New city and toggle the grid line (using CTRL-G) to find the best node.
Rename the Line –
![]() Once in place, rename the new connection by clicking on the connection line with Edit Polygon tool and renaming the line in the properties panel. Be careful to use small caps and “_” for spaces. (Select tool, right click, Object properties if line properties do not show up in the Properties panel.)
Once in place, rename the new connection by clicking on the connection line with Edit Polygon tool and renaming the line in the properties panel. Be careful to use small caps and “_” for spaces. (Select tool, right click, Object properties if line properties do not show up in the Properties panel.)
Un-select a connection line by either clicking on the map outside the selection box or CTRL+SHIFT+A.
Repeat –
Do the 7-steps again for another city-to-city connection line from another nearby city. Connect to the new city at the same node used before. Rename the connection line.
Now, find the closest grain or corn farm or logging site, just one. Repeat the instructions for duplicating the connecting line, except do not copy a city to city connection line, duplicate a city to farm connection line. (Leave one end at the farm.) Rename the line.
Once again, SAVE your work in TILED.
Properties of New City
Select the New city in the Layers panel.
The “properties” or parameters of the New city are listed in the Properties panel, except It shows the data of the template city. The data for the New city needs to be entered.
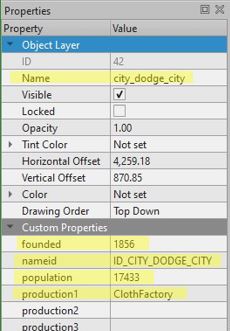
Change the data in only the fields marked in yellow in the example on the left. Leave all the other fields unchanged.
- Click on Name and rename the New city to its proper name. Use this format: city_cityname. Use small caps. Use “_” for spaces. For example, city_dodge_city.
- Leave the year the New city was founded to the same year as the template city – no need to change it.
- Change the nameid to the ID_CITY_CITYNAME. This time use caps and “_” for spaces. For example, ID_CITY_DODGE_CITY.
- Either keep the same population as the template city or set the population between 10,000 to 18,000 for a small city at game start, around 22,000 to 30,000 for a medium city.
- Select what the first factory in the city will be in the New city. The factories listed below are typically used as first factories for small cities. Make sure “Factory” is at the end of the name.
- MeatFactory (produces Leather as well)
- BeerFactory
- ClothFactory
- LumberFactory
Important! The factory has to be available in the time era of the scenario. For example, the lumber mill is only available from 1830 to 1870. Any scenario from 1870 and on does not have a lumber mill in the code for the scenario.
Selecting “LumberFactory” for Dodge City would return no factory since our example scenario is 1870 to 1890: there is not a lumber mill in the scenario code for this time period.
Make a note (screenshot) of these properties of the New city:
- Name
- Year Founded
- Nameid
- Population
- First Factory
You will need these data for final step in the guide.
A city does not have to have a factory at game start. The value for the first factory could be left blank (empty) for the player, AI or game code to build after the game starts.
Before closing out TILED, save your work for the final time.
If you did not make a copy of the properties of the New city, do it now.
Do your own rendition of a happy dance. The new city is on the map and connected. The hard work is behind us. We are almost done!
It’s Time For TOME
All that remains is to revise TOME’s scenario.tdata project file. It is part of the Tweedledum and Tweedledee thing.

Notice that TOME opens with two panels: a file tree and a data field viewer.
- Expand the “Scenario” folder,
- Also, expand the “Town” list,
- Select the template city (Dallas in our example) as shown below.
 —
—
We will copy the template city and then replace its data with the data for the New city. Simple.
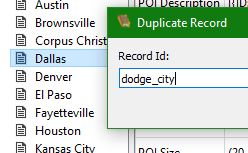
- Right click and choose “Duplicate Record” to make a copy of the template city.
- Enter the ID for the New city in this format: “cityname” with no caps, “_” for spaces. For example: dodge_city
 —
— - Select the New city (it should be at the bottom of the town list).
- Double click on it and change the Display Name to the New city name in this format: “Cityname” with caps for first letters, blanks for spaces. For example, Dodge City.
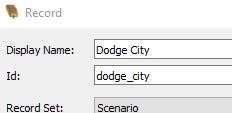
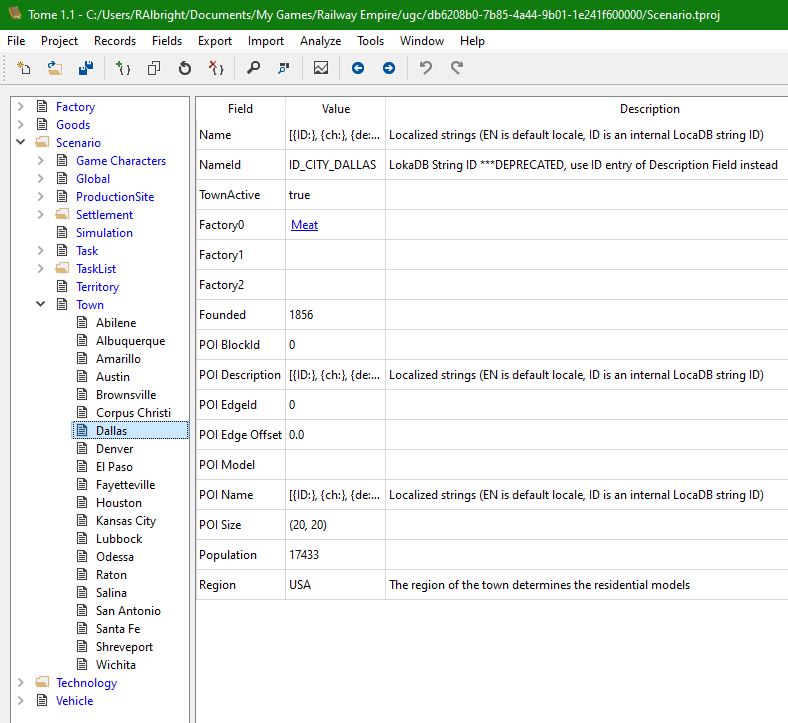
With the New city selected, change the following FIVE data fields to match the data for the New city (double click in Value column):
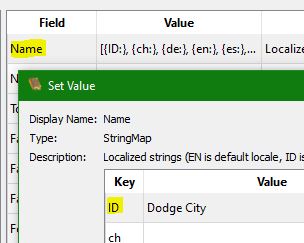 Name In value for ID, use caps for first letter & blanks for spaces, such as Dodge City.
(Sometimes a new city’s name does not appear on a map so insert a name as the ID to make sure it always appears.)
- NameId: Use ALL CAPS with “_” for spaces, such as ID_CITY_DODGE_CITY
- Factory0: Keep if using the same factory as the template city, else don’t click on the link (Meat)but beside it. Choose the factory from the drop down list:
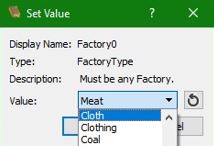 —
— - Founded: Leave the year the town was founded to the same as the template.
- Population: Either leave this the same as the template city or enter the new population number.
DOUBLE CHECK that all the right data was entered for the New city.
DOUBLE CHECK that the right format was applied in the right data fields, meaning caps, no caps, all caps, blanks and “_” were correctly used in the correct places.
Save your work in TOME: File –> Save Project. Then exit TOME: File –> Exit.
Q: Why did we not use the spreadsheet provided by the game developers to import the new city’s properties into TOME?
A: The spreadsheet doesn’t work anymore: something changed in the data fields. Besides, entering the city data straight into TOME is way easier than the ordeal of the spreadsheet.
Behold the City

![]() Open the scenario for a quick look. Your new city may be one of the last cities to appear on the map.
Open the scenario for a quick look. Your new city may be one of the last cities to appear on the map.
 The scenario regional map will show the new city.
If there are errors or your new city does not appear there are three possible reasons:
- You entered the wrong data in TOME or TILED (or missed a data field).
- You entered the right data but in the wrong format in TOME or TILED.
- A connection line was not properly connected.
I guess there is a fourth possible reason: you did all of them.
Regardless, double check that you have the right properties for the new city and that they are in the right formats in TOME and TILED. Save and then Export again.
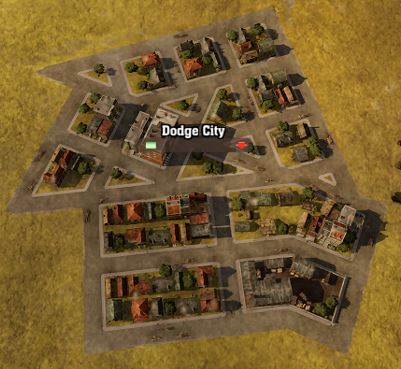
Looking at the scenario map shows Dodge City in the 1870 Southeast scenario map. Success!
Now, I am ready to go back into TOME and tweak some of the game parameters to suit my taste. Later on, I’ll go into TILED and add the cities of Laredo and Pecos to this map and go through the steps in this guide all over again.
I hope this guide has been of help in learning how to add a new city to a Railway Empire scenario map.
If so, please grant this guide a favorable rating.
You had a quick introduction to a very powerful file in Railway Empire: the scenario.tdata file. It is beyond the scope of this guide to tell you how, but changes can be made to the parameters of the game which reside in this file, by means of Notepad, which are not allowed to be made in TOME. Happy modding.
Appendix 1: Outline of the Steps
- In Sandbox, decide which city to add and where (reasonable distance, no overlap, flat ground)
- Choose a template city, close sandbox.
- In RE editor, Start new scenario.
- Backup level.tmx and scenario.tdata in custom scenario folder
- Double click on level.tms to open with TILED – download TILED first if necessary.
- Check location for new city is probably OK. Move any villages. Hide all farms, mines, etc.
- Duplicate template city, then hide template city.
- Move duplicated city to location for new city, Zoom in. Unhide everything.
- Shift new city into its best location. Move a farm, mine or logging site if needed.
- Attach at least 2 city-to-city connection lines and 1 farm-to-city connection line to new city.
- Enter the correct data for new city in Properties panel. Make a copy of the data.
- Save work and close TILED
- Open TOME in RE editor and make duplicate of template city.
- Replace data fields of template city with new city using correct formats.
- Save work and close TOME.
- Export scenario through RE editor.
- Look at the custom scenario map to verify new city was properly added.
Voila! You’re now a pro at this.
Appendix 2: Moving a Farm or Mine or Logging Site
But first, a word of caution: you can’t see the rise and fall of the land very well in TILED. You certainly can’t see the cliff lines which cross Texas. A farm field has to have nearly flat ground, not a cliff line. This may mean another visit to the sandbox to study the terrain of the map before moving anything.
Here are the steps to move a farm (or mine or logging site).
- In the map viewer, zoom in close to the farm. Every farm has its own number, such as “Grain3”. A farm is made up of about 15 fields, each field being its own object and having its own field number.
- Hide all nearby layers (other farms, etc) so only the farm is visible to you. (Do this by selecting layers in the Layer panel and hiding them.)
 —
— - Click on the Select tool and draw a box around the farm. Capture all the fields; all the lines in the farm. They flash when selected. Notice that the outline box for each connection line will be selected as well – that’s a good thing.
- Make sure ONLY the farm, and its connection lines, are selected – no other line from another object or layer. Click outside the selection or CTRL+SHIFT+A unselects everything if you make a mistake.
- Make the nearby farms, etc, visible again. You need to see them to steer clear of them.
- Hover the cursor inside the selected farm, about the middle of the farm, and a Move tool will appear. Click and drag the farm to where you want it to go, keeping in mind the earlier caution about uneven terrain.
 —
— - The move also detached the connection lines from the cities which is not a problem. You’ll reconnect them in a minute.
- You can rotate the farm while it is selected. Be aware that this also rotates the connection lines which is no issue. Just know that the end point is no longer close to the city.
- Click inside the farm, about the center of the farm, and the scale arrows showing around the farm will change to rotation arrows.
- Click on a rotation arrow and drag the farm in a circle, rotating it.
- Once the farm is where you want it and maybe rotated as you like it, move your attention to the connection lines (they should still be flashing that they are selected, if not select them and reconnect them one by one).
- Use the Edit Polygon tool to find the unattached end of a connection line and then move it to re-attach it to the same city as before where another connection line attaches in the city. Do this for each connection line.
Double check that everything is kosher – that the farm is where it should be and the connections lines are OK – then click outside the selection to un-select everything and fix it in its place.
Save your work. Well done!
Appendix 3: Moving an Indian Village or Animal Circle
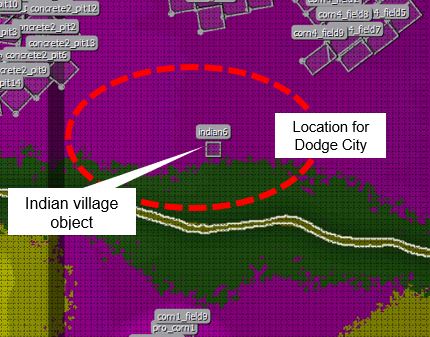 Let’s say that as you inspect the location for a new city in TILED map viewer, you notice an Indian village – or animal circle – is in the way or will be too close to the new city.
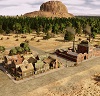
Remember that the game code places a fairly large circle of exclusion around an Indian village, so the square on the map doesn’t represent the entire Indian village area.
The circle for an animal (buffalo, eagle, etc) is the starting location of the “critter” which can then roam anywhere on the map during a game.
In the image, Indian village, “indian6”, is in the middle of the spot where we want to locate Dodge City.
I’m not sure what problems might arise if we delete the Indian village object. It might mess up the randomization of where Indian villages appear each game. Who knows?
So, we are going to keep indian6 and move it.
Here’s how to move an Indian village or animal circle:
- If we use the Move tool to move the village or animal circle, then we actually move the entire layer, meaning we move every village or circle and not just one.
- We have to use the Select tool instead of the Move tool.
- In the map viewer, draw a box around the village or animal circle. This selects the object and not the layer.
- Hover the cursor inside the selected object and a move tool appears.
- Move the object to another location, well away from any other map object like a field or city.
- Click anywhere on the map outside of the selected object and this fixes its new location on the map (use CTRL+SHIFT+A as another way to un-select the object).
Save your work.