This Guide is a complete how-to on logistics in Shadow Empire.
Within this arcane tome is the forbidden knowledge of “where’s my ♥♥♥♥♥♥♥ food?”, as well as the many untold mysteries of “how do trains?”. Enter at your own peril, seeker of knowledge, your sanity may suffer!
Contains Planes, Trains, and Automobiles; how to unstuck your ♥♥♥♥; what tools to use; secondary SHQ usage.
Required Knowledge
1.You must know your way around the UI, the various menus, tabs, and reports which inform decisions and allow gameplay.
2.You must be familiar with the construction system and how roads, rails, and assets are constructed and maintained.
3.You must know and recognise the different kinds of tile assets in the game.
Key Tools
1. Logistics Filters – these allow you to cycle through the various pathways your logistics network uses and appropriately extract useful information from them; their exact use and the information they provide will be explained later.

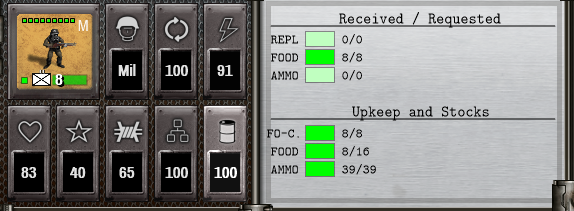
2. Individual unit supply status – this small out-of-the-way display is critical to understanding which resources are lacking in any particular unit, and by how much, and how long the unit has until it starts taking attrition casualties.
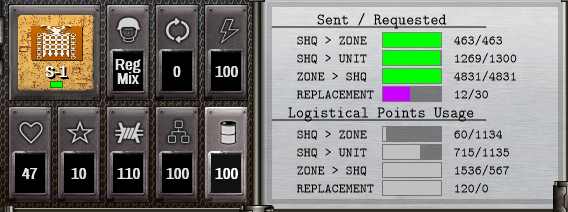
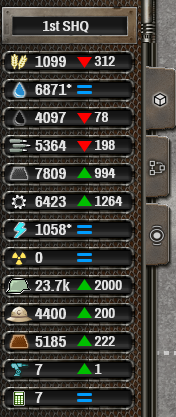
3. SHQ supply status – found in the same place as the Individual unit supply status, this instead displays the logistical status for the whole logistical network, including which area of the network is lacking supply.
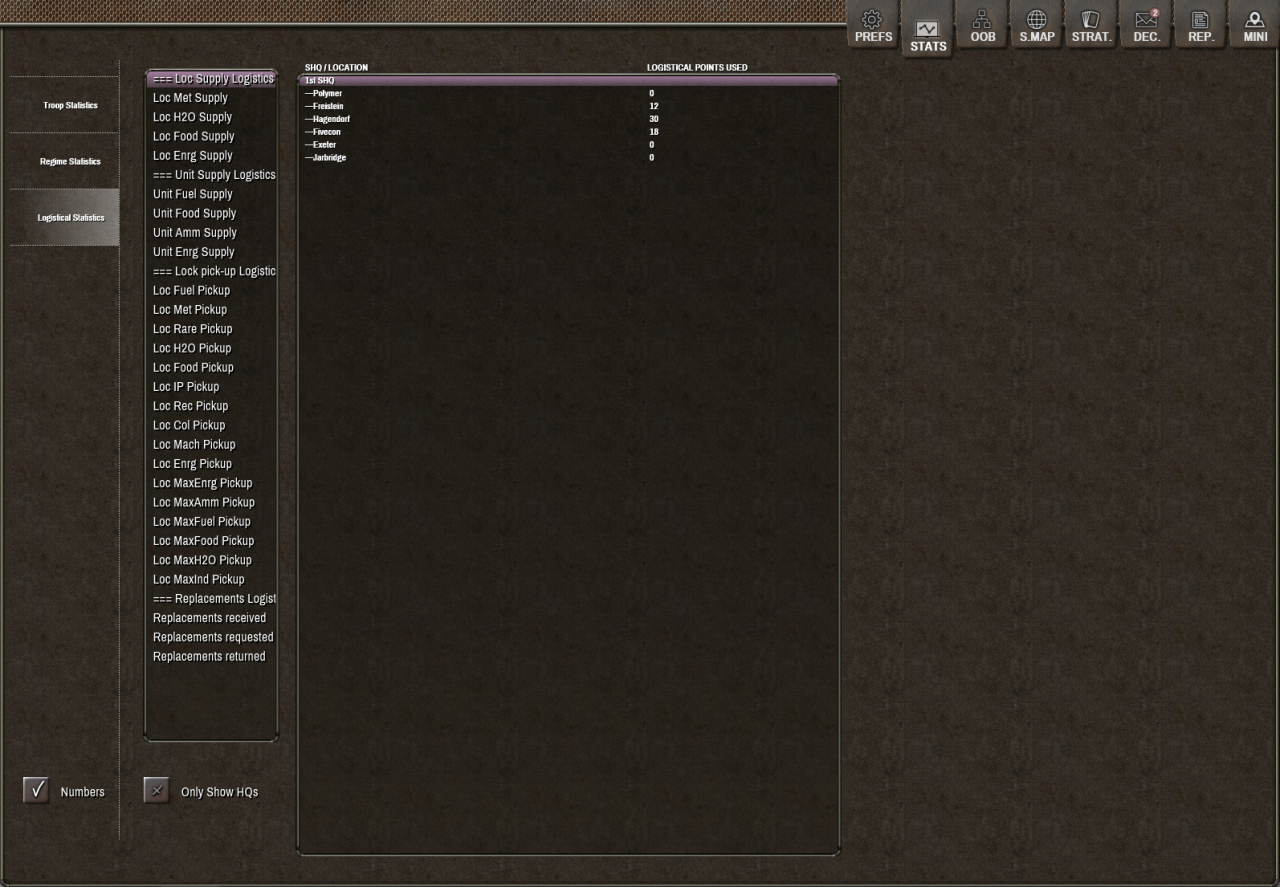
4. Stats Screen – this screen not only has your empire’s gross output details, it also breaks down by region which resources are being produced, which resources are being requested, and their logistical weight. Naturally this is only for the previous turn, but it informs your current actions closely
5. Traffic signs – a misleading name. This is your key tool for redirecting limited supplies to different areas of the map. Properly using this tool may be the difference between an over-extended network and a network only just running within the limits of its production.
If you are not already familiar with the appearance of these tools I strongly recommend you put this guide to one side and go take a look right now. The guide isn’t going anywhere in the meantime.
Resources and Logistics
The following resources require both a logistical connection and logistical capacity:
Food
Ammunition
Metal
Rare Metals
Radioactives
Manpower
Colonists
Machinery
Hi-Tech Parts
The following resources only require a logistical connection:
Water
Fuel
Energy
Industrial Points
Any resource drawn from a Hex Perk (such as industry, bonus points, or even resources which would normally require logistical capacity such as colonists)
The following resources require neither a connection nor a capacity:
Free Folk
Civilians
Workers
QoL resources and Bonus Points
Credits
The core concepts of Logistics
Firstly – every single military unit in the game (bar one) has a set of logistical requirements. Some units have more, some have fewer; some have requirements which depend on logistical capacity, others do not. It all depends on the unit. The exact requirements each unit has can be seen in the bottom tab by clicking on the supply status icon when the unit is selected.
It is not only military units which can demand resources. Most assets require some resource or other; in addition many buildings also have outputs that require collection and delivery.
All assets must be connected by road in order to provide their resource output or to receive their resource input. This includes public and private assets, both inside and outside cities, as well as Hex Perks. Note that Free Folk settlements do not require connections despite technically being assets.
As well as assets and units consuming resources, cities also consume resources. After all, people need to be fed in order to prosper. Each 100 population will require food, which either you provide or they buy for themselves.
Finally, all resources have a logistical weight, even those which do not consume logistical points. This is a tricky point, however it is immediately understandable if you apply the “Used Pts” logistical filter and examine a unit which is receiving one of these resources. These resources (typically water, energy, and fuel) are considered to be transported via pipe and cable and require no logistical points, even though they have a logistical weight which can be seen in the Stats tab and the SHQ supply display.
Those resources which do require logistical points to move will always consume them when moved from an asset or unit to another asset or unit, even if they are within the same tile; after all metal won’t walk itself out a mine and into a factory. As such, the most important part of your logistical network, after ensuring everything is properly connected, is ensuring you have enough logistical points to move all your resources around as and when they are needed.
The Logistical Filters
Current Points indicates how many logistical points are available for use on that particular tile after all resources have been requested, provided, and delivered. This is useful for knowing roughly how much slack there is in your system in any one location at any one moment. On top of this it’s also a useful indicator for when your network needs expanding or re-thinking.
Used Points indicates where resources were delivered at the start of the turn, which path they took, and how many resources were delivered. This is useful for knowing when a unit or asset isn’t receiving supplies, and figuring out at which point the supply chain is failing.
Initial Points is simply the repartition of points as of the start of your turn, before any were consumed by units or assets. The primary use for this filter is seeing where your Logistical Capacity is reaching its limits, seeing where you need to place Supply Depots, and again seeing which units are not receiving enough logistical capacity.
Bottlenecks is a visual indication of which sections of your logistical network do not have enough Logistical points. The colours Green, Yellow, Blue, Red, Black indicate what proportion of the points travelling down that route are unused. Green indicates that few of the points are used, Black indicates there are no unused points.
Preview Points is similar to Initial Points, only it shows the planned distribution of logistical capacity at the start of your next turn. The primary use for this filter is in managing traffic signals. As well as this it also serves similar functions as Initial Points, only with regards to the next turn rather than the current turn.
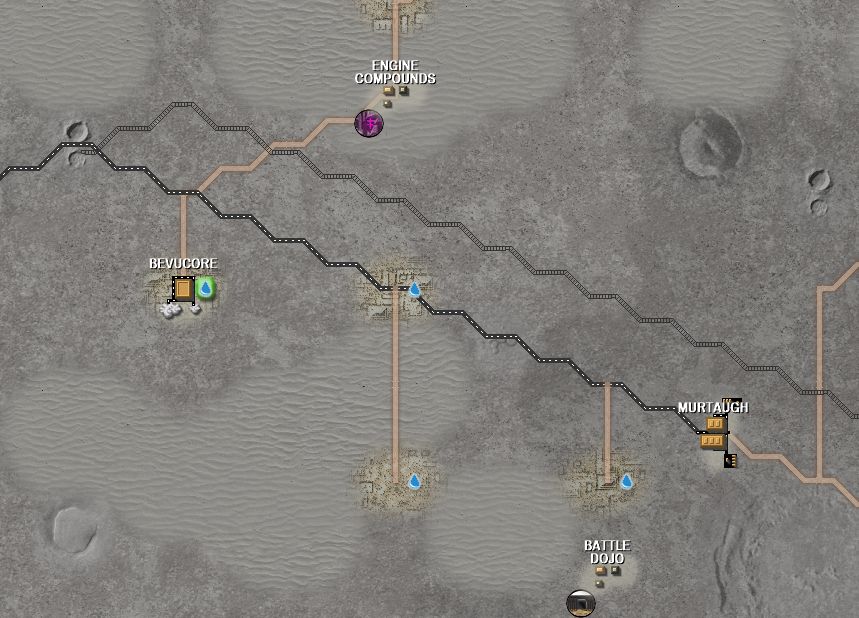
Roads function by replacing the terrain’s Action Point requirement with that of the road’s. This means that any unit entering that hex always spends however many AP that category of unit requires for road movement to enter the tile. These details can be found in the terrain popup tooltip, and are different for each category of unit as well as logistical capacity and for dirt road, sealed road, and rail. For most of the game Roads will be your principal method of moving things around. You can generally think of roads as being good for moving things over a wide area or to and from many different recipients and sources.
Rails function somewhat differently. Much like Roads they reduce the AP requirements to move from one tile to another. However for Logistical Points they function somewhat differently. A rail without a station (or railhead) at both ends limits the number of logistical points along that railway to 10%, regardless of the quantity being sent along it. The other 90% are applied only between two stations (or a station and a railhead). The final difference between roads and rails is the cost. Not only do rails cost Metal in addition to Industrial Points, they also have much higher additional costs when being built into rough terrain, and cannot be built at all in High Mountains.
In conclusion – use roads to provide supplies to your units and assets. Use railways to move resources to tiles containing Rails Stations or Rail Heads to then be moved around by trucks. Additionally, use rails to move large formations of units along great distances.
The exact details of how these all work together will be explained after the sections on how Stations and Depots work.
Truck Stations
Free Truck Action Points is not a shared resource. Instead it is applied to each route leaving the station. Therefore if a road leaves a tile with a station, then splits, it does not split the number of Free Logistical Action Points. Only the Logistical Capacity is split if the road splits.
Supply Depots
As the game’s tooltip says, this extends your network, it does not increase its capacity.
Supply Depots do not interact with Railways.
Roads, Trucks, and Depots
To move anything from one tile to another requires Action Points, in the case of anything using the logistical network, this means using Logistical Action Points. Thus a Truck Station’s provision of Free Logistical Action Points indicates how far it can distribute supplies without using Logistical Action Points. A Publicly-owned level 1 Truck Station has 100 Free Logistical Action Points. For supplies to move from one tile to another uses Truck Logistics. Therefore to move supplies along a road will use however many Action Points a road demands for Truck Logistics. If we look at the tooltip when we hover over the terrain description window, we can see that Truck Logistics costs a certain amount of AP over that terrain type, if there is a road, it will show the AP cost for that too. Dirt Roads have an AP cost of 10. Therefore a level 1 Truck Station will be able to provide the full logistical value in a range of 10 tiles (including the tile containing the Truck Station). After this range the quantity of supplies degrades in proportion to the remaining Action Points until nothing is left. As Action Points are always at a maximum of 100, the remaining Supply Action Points is a direct indication of the percentage of supplies getting through.
Now let’s add in Supply Depots. Supply Depots, much like Truck Stations, provide Free Logistical Action Points along roads. The key thing to note however is that these are not added to those provided by Truck Stations. This is the fundamental aspect of Truck Supplies: sources of Free Logistical Action Points do not stack. What happens instead is that Logistical Points entering the Hex use whichever value of Free Logistical Action Points is greater – those supplied by the Depot, or those supplied by the origin Truck Station. If then, your Supply Depot provides 50 Action Points, and your Truck Station provides 100 Action Points, if placed on the same tile, the Supply Depot has no effect. Instead you should place your Supply Depot the tile before the supply from the Truck Depot begins to degrade; this will extend your 10-tile range to a 14 tile range. The reason it does not extend the range further to 15 tiles is that you need a one-tile overlap to prevent loss.
Therefore to condense all that: Truck Stations provide supplies along a certain length of road, after that it degrades. Using a Supply Depot you can then extend that range further by a certain amount, but not increase the quantity moving along that road.
Theoretically speaking a perfect Truck-based supply network would have a level 7 Truck Station every 13th tile along a dirt road, and every 18th tile along a Sealed Road. Afterwards you would supply your advancing troops with a level 3 Supply Depot to extend your range 10 tiles at a time.
In reality you would upgrade your Truck Stations as and when needed, bridge the gaps in Logistical Action Points where they appeared by using Depots, and then place Depots at the edge of your effective Action Point range to supply your troops.
Rail Stations and Railheads
Unlike roads, rails have limits on them. A railway must have a start point and an endpoint in order for the full value of the Logistical Points to travel along the length indicated by the Free Logistical Action Points. If there is no endpoint, then the rail line is limited to 10% of the possible Logistical Points along it. If there is no start point, then there are no Logistical Points provided, thus no Logistical movement is possible.
For logistical movement rails have the measly cost of 4 Logistical Action Points. This means that a single level 1 Rail Station can provide logistical support along a rail length of 25 tiles (including the tile containing the station) before the supply begins to degrade, provided there is either a Railhead or Rail Station at the far end of the line..
In terms of Logistical throughput, assuming the correct conditions are met, Rails are far superior to roads. However, due to their costs and the limitation of requiring an end point to the network in order to function properly, they are completely unsuitable for use in supporting advancing troops.
Theoretically speaking the optimal use of Rail Stations is as connections between multiple SHQs which can then mutually support each other with troops and resources. Therefore using them for bulk movement of resources and leaving local resource management to roads and trucks.
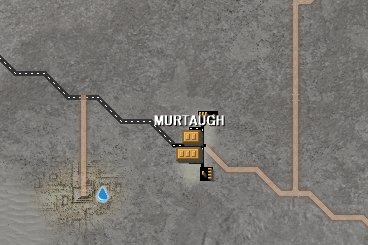
In reality you will likely use rails alongside roads as a way of simply moving more of everything in the directions it is needed, typically with a Rail Station in every major city, and a Railhead in the minor cities.
When in combination with Truck Stations it is possible to deliver a staggering quantity of supplies to all corners of your empire.
The upgrade to Rail Stations – Maglev Rails – is not an upgrade in the style of Sealed Roads, instead it is a separate building – High Speed Rail Station – which has massively more Logistical and Logistical Action Points available to it. It has much greater range and capacity. To contrast, Sealed Roads “only” extend the range of your Truck Stations.
Unlike Truck Stations, Railheads do not extend your network’s reach; they serve as a quick-build method of capping a rail line in order to obtain the full value of supplies.
Air Bridges
Functionally, an Air bridge creates a logistical connection to another tile at the beginning of your next turn at no Logistical Action Point cost. For a normal aircraft this requires an airfield on both ends; helicopters and ‘thopters can do this to and from any tile, though with a readiness penalty (which translates to a lower logistical capacity throughput on the air bridge). If connected to a logistical consumer the air bridge will then be used to allocate resources, unless that consumer is otherwise satisfied with supplies from either rail or road sources. After this, during your turn, you can then move units using the Strategic Move command.
It is important to remember that with Air Bridges resources which would normally have no logistical weight, instead have a logistical weight of 1. It is, in a nutshell, equally logistically expensive to airlift liquids as other resources.
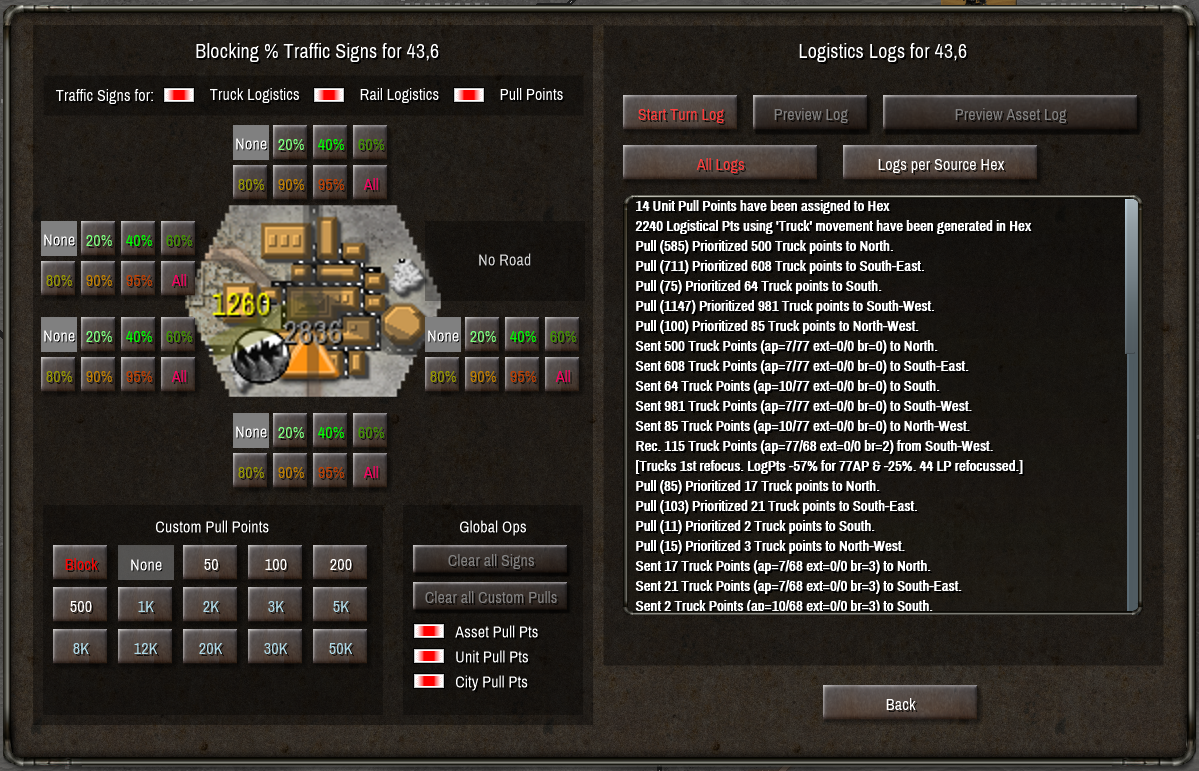
Traffic Signs
I mentioned earlier that the Traffic Signs command was an important tool in managing your logistical network. This is for two reasons.
The first is that you can block the flow of logistical points (and thus resources) coming out of a tile along any road leading out of that tile. More than this however is that you can set a percentage amount blocked (20/40/60/80/90/95/100%). This blocking is further refined by being split into rail and road blocking. This lets you fine-tune the flow of resources through any tile with a logistical connection which you control.
The simplest example of this is in preventing logistical points being sent to unused dead-end branches, such as those leading out to Hex Perks.
The other use of Traffic Signs is to set a Logistical Pull Point on any tile along your road network. This can be either a cumulative or absolute pull – either it adds to existing logistical demands, or it replaces it. This allows you to redirect logistical capacity towards critical areas. Perhaps your frontline is lacking proper resupplying – set down a logistical pull point in that direction to pre-emptively pull logistical points in that direction in order to prioritise the resupplying of your frontline.
In a nutshell this is your tool to say to the logistical AI “this is where my resources are most needed”.
Bottlenecks and Solutions
As neither roads nor rails have an upper cap on the amount of logistical points flowing along them, the reason you have a bottleneck is because you do not have enough logistical points to supply all your logistical requests. I repeat – the reason you have a bottleneck is not the rate things are moving, it is the absolute quantity moving in relation to what should be moving.
There are several solutions. The first is to identify any gaps in the Logistical Action Points coverage of your network. This means turning on your Initial Points filter, and seeing if there are any breaks or reductions in throughput at any point. If you find any – upgrade your Stations and Supply Depots, or alternatively withdraw troops to a position with more supplies, or deactivate assets which are drawing or supplying too much. If no gaps are immediately apparent, then you must do things in a slightly more involved manner – you must check the Free Truck AP range on each of your Stations, then ensure Depots cover the remaining distance. For a Rail Station, it instead means checking that each rail line is properly capped with either a Rail Station or a Railhead
If you do not find any gaps in your coverage, that simply means your network is not providing enough Logistical Points. To solve this you must build more stations or upgrade existing stations. This can be as simple as putting down an extra Truck Station nearby a major Logistical provider or requester. It is difficult to tell exactly when you would go over the capacity of your logistical network, however keeping a close eye on your SHQ(s) will give you a good idea of when you shouldn’t queue up 20 assets all at once.
Your Second SHQ
You should in every case of making a new SHQ ensure that the resources which the SHQ will require will already be (or soon be) available to said new SHQ. If your new SHQ is going to see combat – make sure it has access to Industrial Points and Metal; if your new SHQ will have lots of Militia – ensure you have enough food production; and so on and so forth.
To supply your new SHQ you can use the resources of your first SHQ. To do this select a zone allocated to your 1SHQ, click the “Transfer” button in your right-hand command bar, and select your 2SHQ. Then transfer the resources you need. Bear in mind that the usual logistical weight costs apply here – if you do not have the spare logistical capacity you will not be able to transfer any resources.
The final thing to note here is that you are not obligated to leave the new SHQ where you made it. Using the Strategic Move command you can place it in whichever city is most convenient. Combine this with resource transfers and you can potentially re-position your initial SHQ to a new location after you have reduced its logistical weight to a low enough level. To this end, it is quite useful to have local resource stockpiles rather than having all your resources immediately sent directly to your 1SHQ.
Zones and SHQs
The Military and SHQs
It is important to note here that militia units can only be directly assigned to a SHQ. They cannot be delegated under a OHQ as most units can.
Logistical Transfer between SHQs
This function of transferring resources is the third reason you want to have some logistical slack in your network (the first two being strategic unit movement, and construction projects). The ability to shift resources from SHQ to SHQ as needs arise is invaluable. Is one SHQ under attack but lacks manpower? – transfer from a different zone. Has one SHQ suddenly run dry of a particular resource? – transfer from another SHQ.
Now your immediate question is “but we could do all this under a single SHQ automatically”. Well, yes you could. However the drawback of such a system is that you have massively higher logistical costs. With a set of separate (but logistically connected) SHQs you do not need to funnel everything to a central point. With separate SHQs you can have semi-local stockpiles and not need to transfer resources from half a planet away. And so on.
Ideally you will want to have one SHQ per combat front, plus perhaps a “Head SHQ” from which you can distribute resources. This allows you to check at a glance which SHQs require more resources or manpower via the stats screen.
The final note on transferring resources between SHQs is a warning – if you have no free logistical capacity you cannot transfer any resources at all, even those without logistical weight.
Conclusion
Your second step is to ensure you have enough logistical points to supply all your providers and consumers.
Your third step is to ensure you have enough slack or overhead in your network to allow large build queues or sudden surges in resource demand.
Your final step is to divide your logistical network into smaller self-sufficient (or near enough) and interconnected sections, such that your overall logistical slack can become larger.
If you can do all these things, you will have a healthy, robust, and flexible logistical network.
Thanks to rompafrolic for his great guide, all credit to his effort. you can also read the original guide from Steam Community. enjoy the game.
Related Posts:
- Shadow Empire: Turn 1 Guide
- Shadow Empire: Unit Formations Tech Tree
- Shadow Empire: How to Run Game in a Window