
Hello! This is a guide for all achievements for The Dark Pictures Anthology: The Devil In Me
The guide will go over each achievement and detailed ways on how to get them! (and whether you would need a full playthrough for a certain achievement etc.)
I HIGHLY recommend doing a BLIND playthrough before going for achievements, as we can do some cleanup with other playthrough’s!
Before We Start…
As Said Above, I HIGHLY recommend doing your own playthrough before attempting achievements specifically to avoid major game spoilers!.
I Recommend, to save some time, doing an “Everyone Lives” (Happy Ending) playthrough! it’ll make your life easier to go back through for certain achievements
(even though 10-15 achievements might be done by then!)
To find specific achievements you can do
to find the one you need by name or look on the right hand side!
Tip: If you start with the ‘Happy Ending’ Achievement + Secrets/Collectibles, you should unlock a bunch of other achievements along the way if you havent already!
Small Disclaimer: You Will Need The Curator’s Cut DLC For A Few Of The Achievements!
Now, Shall We Get Started?
Story Order Achievements
Until Death Do Us Part 2
Scene: The World’s Fair Hotel:Continue However You Want Until Jeff Nearly Falls Into The Trap (DONT Let Him Fall)
And Marie Gets Into The BathWhen Holmes Comes Into The Bathroom, Choose INVESTIGATE as MarieAnd After A Few Cutscenes, The Achievement Should Pop As They Die With Eachother
Jeff and Marie watched each other die
Murder Castle
This One Is Very Very Easy
Simply Complete The Prologue
Completed The Prologue
Sparks
This one is pretty simple,
You just need to get Erin and Jamie To Kiss
In The Scene: Guests
You will be playing as Jamie/Erin and talking in Jamie’s room
These are all of the choices that brought me to the achievement:
Playful: “At least we don’t have to double up like last time”
Familiar: “Want to share mine?”
Concerned: “You’re sure you’re okay?”
Flirtatious: “I wasn’t lying about you being cute.”
Move In
This will get them to kiss and you should pop the achievement shortly after!

Jamie and Erin kissed
Toasty
This One Is Quite Easy Too, As Long As You Pick The Correct Options!
You will play as Charlie
You just need to make sure you keep everyone calm!
The Dialogue Options Needed Are As Follows (These are Malleable But These 100% Work):
- CONCERNED: “Who doesn’t show up to their own dinner party?”
- REASSURING: “I’m sure he has a good reason.”
- PLAYFUL: “I found a pack of invisible cigarettes.” (slightly lowers relationship with Kate)
- ENTHUSIASTIC: “I would like to toast all of you.” (This is the trigger for a successful dinner)Shortly after the scene ends you should pop the achievement!

- Charlie maintained control during dinner
0451 (First In-House Fuse Box)
For this achievement, you need to fix the Second Fuse Box in the game (first one INSIDE the castle)
I’m pretty sure this is a mandatory Story achievement but i’ll explain it here just in case you need the help!
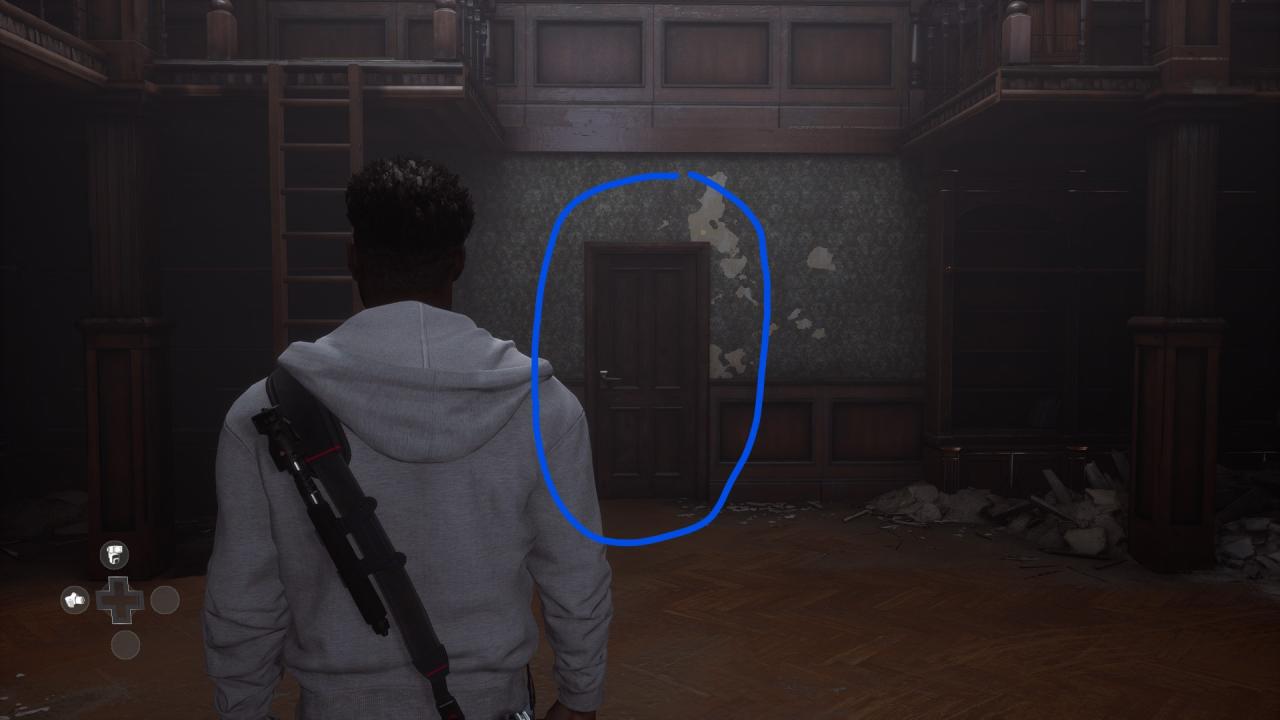
In the scene: Staff Only
You will play as Jamie, Make your way through the doors (explore as you wish) until you find a keypad on the wall (which is connected to a door, blocking the Fuse Box)
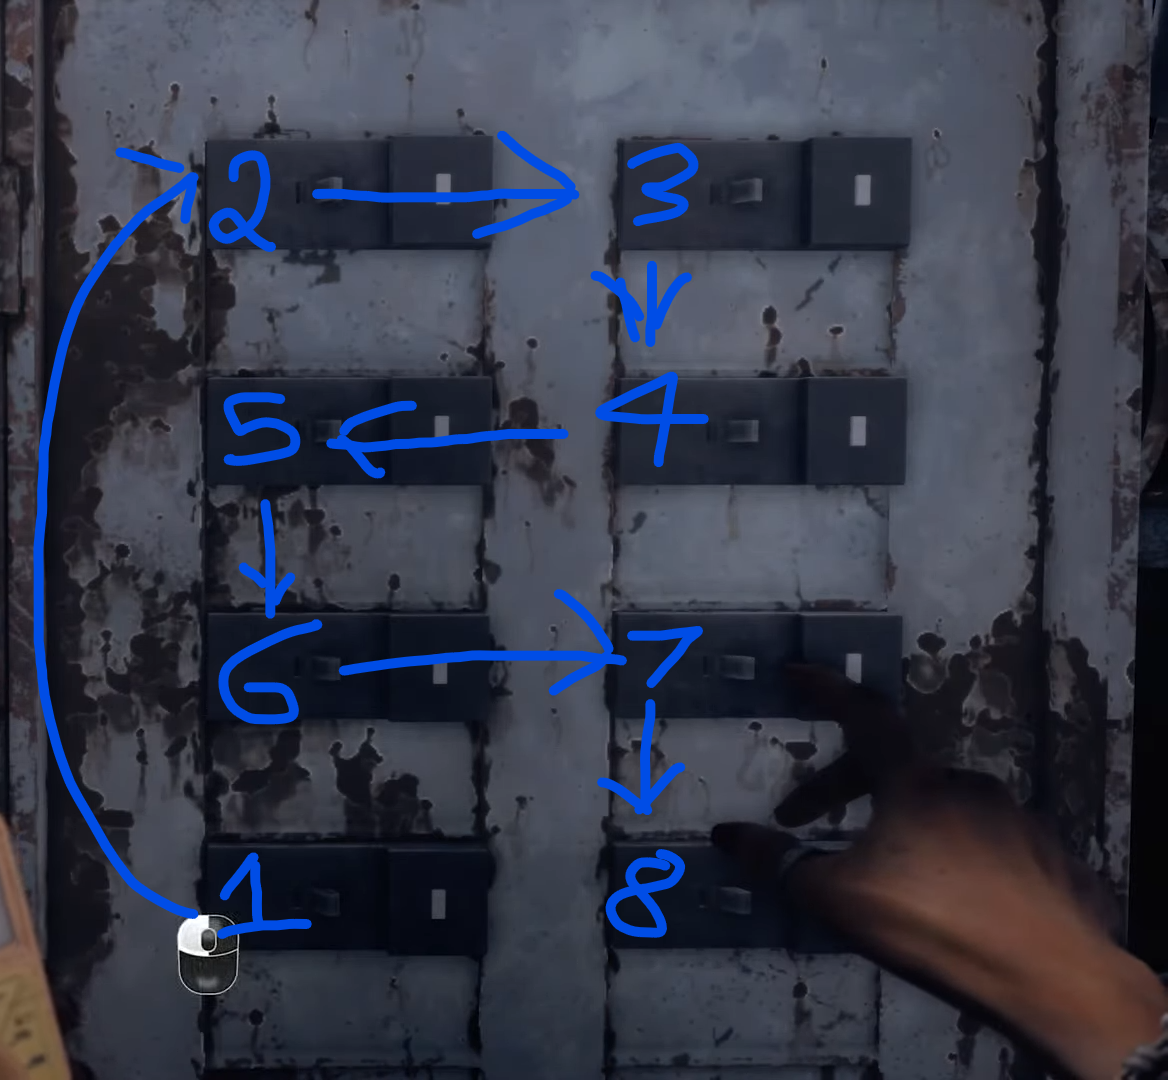
Enter the code 0451 and complete the Fuse Box Puzzle
If you need extra help with the fuse box I will attach a screenshot with numbers of which to flick at what point!
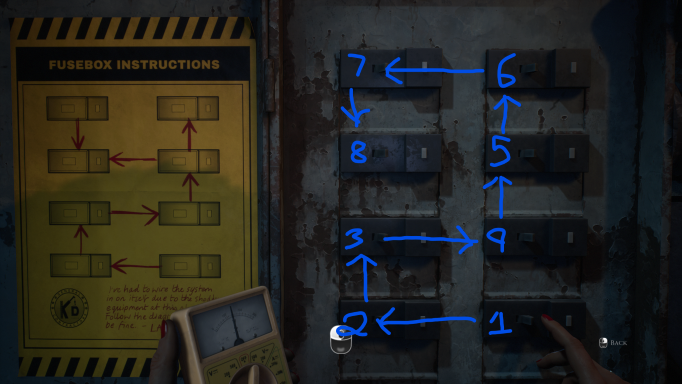
After Completing The Fuse Box The Achievement Should Pop Up!
Jamie reset the fuse box
Rekindled
This Achievement Is A Bit Time Consuming, I Personally Found It Easier In Curator’s Cut but you can also easily do it in Theatrical!
In The Scene: Scouting
Choose The Following Dialogue Options:
- EARNEST: “It wasn’t the right move.”
- REASSURING: “You look good in any light.”
- HESITANT: “Can I say something?”
- SERIOUS: “The break up is harder than i thought.”Play through the game as usual until you get to the balcony in The Scene: Dinner
- EMPATHETIC: “Charlie can be a pain in the ass.
- BITTER: “He seems to think he owns us.”
- SUPPORTIVE: “Get out while you can!”Keep playing through the game until you get to The Scene: WALL (It Doesn’t Matter If Erin Dies Or Not)
- COMPLIANT: “Maybe you’re right”
- CONFUSED: “Why didn’t you go for it?”
- SURPRISED: “I didn’t think about any of that.
- APPREHENSIVE: “You should have said this before.”
- KISS
The Achievement Should Pop Shortly After!
Curator’s Cut
In The Scene: Scouting
Choose The Following Dialogue Options:
- EARNEST: “It wasn’t the right move.”
- REASSURING: “You look good in any light.”
- HESITANT: “Can I say something?”
- SERIOUS: “The break up is harder than i thought.”Play through the game as usual until you get to the balcony in The Scene: Dinner
- In This Scene, Due to the Curator’s Cut, You will play as Charlie, Stay Quiet The WHOLE TIME (Dont mess up keep calm)
After, Choose Any Dialogue Option (I Chose To Be Kind To Kate And Mark). - Keep playing through the game until you get to The Scene: WALL (Erin Will Die But It Doesn’t Matter)
- TENDER: “Things were tough for us.”
- CONFIDENT: “I’m hoping things will change with us.”
- KISS
- The Achievement Should Pop Shortly After!
- Kate and Mark rekindled their relationship
Lend Me A Hand?
This achievement is nice and easy!
While Playing As Charlie, In The Scene: Wall
Simply fail the Spam QTE when the wall is closing and Charlie’s Hand will be crushed.
Shortly after, the achievement will pop!
Charlie’s hand was crushed
Phoenix
This is a pretty simple achievement
In the scene: Ignition
All you will have to do is make sure that Charlie Survives the incinerator.
All You’ll Have To Do Is: Lift Grate twice in a row, Charlie will then go under and survive.
The Achievement will only pop a while later when you go back to him in the scene: Waste Disposal.
Charlie Survived The Furnace
Ignighted
This achievements is very straightforward!
All you need to do is go to the scene: Breathless
And Choose To Save Erin
Achievement Should Pop Quickly After!
Jamie chose to save Erin in the suffocation chamber
Shocking
This achievement is to fix ALL of the fuse boxes.
Its quite easy and i am pretty sure you will get this by keeping Jamie alive and it will pop as long as you do them all by simply progressing the story!
Fuse Box #1
In the scene: Island
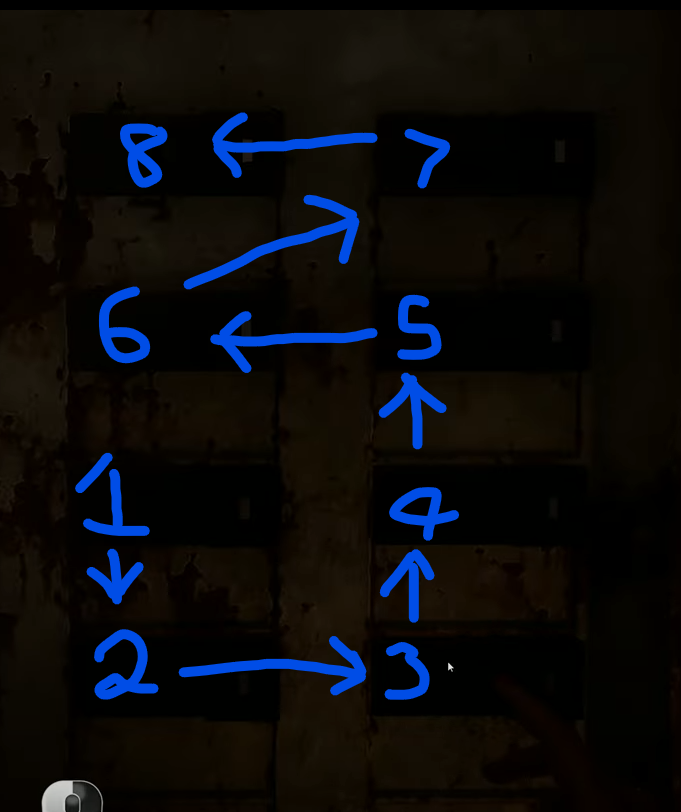
A while up when trying to get the tram working, this Fuse Box will show up and you will have to complete it.
Before the Fuse Box Will Work, you will have to turn on the power by using the ladder behind the stone structure, dropping down and turning on the power.
After the power is on, follow this screenshot below to complete it!
Fuse Box #2
In the scene: Staff Only
Make your way through the doors (explore as you wish) until you find a keypad on the wall (which is connected to a door, blocking the Fuse Box)
Enter the code 0451 and follow the screenshot below to complete it!
Fuse Box #3
In the scene:Interrogation
After walking through and past many moving doors, you will be trapped, so you will have to turn off the power to be able to move on
After this, the achievement should pop!
Fixed all of the fuse boxes
Shattering Expectations
This achievement can be subjective but is easy enough!
The Main Part Of This Achievement Is To Keep Note On Who Has The Screwdriver!
This is decided in the scene: Directors Suite
Either:
Jamie Keeps The Screwdriver
Or Jamie Gives The Screwdriver To Kate (Kate Keeps The Screwdriver)
Keep note of who has it as it will be VITAL to keep both of them alive during the Glass Trap!
After this, in the scene: Reflection
If JAMIE has the screwdriver, choose: Defiant: “I’m not playing his game” and then DO NOT press the button!
If KATE has the screwdriver, choose Apologetic: “I can’t let myself die.”
after these, if the screwdriver was with whoever is about to be crushed, after a small chat with the Curator. The Screwdriver will shatter the glass, leading them to both live!
Kate and Jamie both escaped the glass trap
Can You Pet The Dog?
This achievement is quite simple! (But takes a bit of setup)
First Of All You Must KILL CHARLIE In the incinerator.
Later On, In The Scene: Cliffside, Mark will find the dog, DO NOT throw the rock at the dog, if you’ve done everything correctly, Mark should go and pet the dog, causing the achievement to pop!
TIP: You can do this achievement while going for The 2 Achievements: “The Cycle Continues” and “Award Worthy” (which are both in this guide!)
Yes, you can pet the dog
Hark!
This is another simple Achievement, you just need to make sure that Mark Survives until the scene: Lighthouse
You must then repair the light in the lighthouse
- Go to the top
- Go around the edge of the lighthouse
- Flip the switch in the box
- WARNING!, Sparks from the box could send you flying (Single QTE)
- Go back inside and press the buttonYou should then pop the achievement shortly after!
Mark got the lighthouse working
Extinguished
This Is Quite A Simple Achievement, For This Achievement There Needs To Be Some Setup Like The Other Achievements That Require The Glass Trap
- Start in – DIRECTORS SUITE
- Make Sure Jamie Gives The Screwdriver To Kate (As Kate: NERVOUS – “I need that”)As Jamie In The Scene – REFLECTION
- Choose: Defiant: “I’m not playing his game.”
- Next, DO NOT PUSH BUTTON.
- This will have Jamie die and you should pop the achievement shortly after!
- Jamie chose to sacrifice herself in the glass trap
Guilty
Go to your Everyone Lives save and go to the scene: Lighthouse
- When you’re up to the part where Erin accuses Charlie of bringing them to be killed.
- As Mark, Choose: Afraid: “We can’t let Charlie free.”He will then get tied to the fence and left there.
- He will then get tied to the fence and left there.
- A bit later on, he will have been killed by Du’met.
- Shortly after the reveal, you will pop the achievement!
- (If Erin Doesnt Accuse Charlie, you will have to go back to the Scene: Silver Ash and listen to the phone recording!)

- The crew didn’t trust Charlie and he paid the price
Collectable Achievements
Handy
They Just May Take A While!
(You WILL Need Curator’s Cut Available For A Few Items, I Will Tell You As They Come Up)
- Scene: Worlds Fair Hotel
1) As Marie, Pick Up The Soap (1/14)
2) Then Replay The Chapter And Pick Up Face Powder (2/14) - Scene: Blackout
1) Choose: TAKE, This Will Let Erin Get The Inhaler (3/14) - Scene: Wall
1) Choose: Curt: “It makes me feel better” (This Allows Kate To Keep The Amethyst)
(Make Sure, When You Gain Control Of Kate, PICK UP AMETHYST OFF OF TABLE (4/14)) - Scene: Workshop
1) Go Into Second Room, And Past The Door On The Right, At The Top Of The Shelf, Grab The Camera Lens 1 (5/14).Tip: Use Monopod To Push It Down2) After Evading Du’Met 3 times, Just Behind The Third Hiding Spot Is A Wooden Workstation With A Screw (6/14). Pick It up And Mark Will Automatically Add It Onto His Monopod - Scene: Interrogation
(You Must Make Sure To Have BOTH Erin And Kate ALIVE (Choose Erin In Breathless Trap)
1) When You Reach The Room With Red Lights, On The Opposite Side To It, Is Erin’s Room.
Enter Erin’s Room And Retrieve Erin’s Chapstick (7/14) - Scene: Director’s Suite
1) Choose: Nervous: “I need that.”
This Will Give Kate The Screwdriver (8/14) - Scene: Cliffside
(Charlie MUST BE DEAD – Choose “Force Door” Twice In The Scene: Ignition)
1) As Mark, Run Forwards Into The Small Cabin Straight Ahead, As Soon As You Walk In, Directly On Your Right Is A Draw With Camera Lens 2 (9/14) - Scene: Homestead
1) Keep Going Forwards Until You See A Bridge Leading To A Small Cabin Surrounded By Water. Cross The Bridge And Head Around The Back To Grab The Key. Enter The Cabin And Next To The Dead Body, There is A Flashlight (10/14) - Scene: Lake
(Make Sure Kate, Erin And Mark Are ALIVE)
1) After The Boat Blows Up Behind The Police Officer, As Erin, Choose: AUTHORITATIVE: Grab the gun!. Mark Will Go For The Gun But Grab The Spray (11/14) Instead!Curator’s Cut - Scene: The World’s Fair Hotel
1) When Picking A Gift For Marie, Choose: Necklace (12/14)
2) Then Reload Save And Choose: Pocket Watch (13/14) - Scene: Party
(This Scene Will ONLY OCCUR IF ERIN IS ALIVE.
To Keep Erin Alive, Do The Following In The Scene: Blackout
Assertive: “You need to not panic.”
Reassuring: “Just try to stay calm.”After this, you’re tasked with finding something to break down the door. Keep Running Forwards until you find a Candlestick which is sitting on a small table. hit ALL attack QTE’s on the door and Erin will be safe! - When Erin Is Safe, And You’re In The Scene: Party
Just Progress as usual, After Progressing A Bit, You Should Receive The Lounge Key (14/14)The Achievement Should Pop Shortly After! - Obtained all of the inventory items
Crime Scene Photographer/Say Cheese!
These two Achievements will be quite time consuming. But Will Unlock Together (As You Need Pictures Of All Crewmates For CSP)
Mark, with his camera, can take pictures of certain parts of the map, when you hover over a piece that needs to be captured, the reticle will turn green. That’s how you know what to take a picture of.
You need to capture every place that makes the reticle turn green!
There Are A Total Of 27 Pictures Throughout The Game!
Photo’s + Area’s
- 1) When You Enter The Library, After The Clock Jumpscare, Turn Left (To see Fireplace And Desk With Secret 22 On It). Take A Photo Of The Chip On The Edge Of The Desk.
- 2) In The Final Room (Before You Go Into The 2 Small Rooms), If You Stand In The Middle Of The Room And Look At The Locked Door, The Green Reticle Should Be There (See Screenshot Below, You Will Have To Look Around The Door, If You Can’t See The Green Reticle, Move Around A Tiny Bit)
- Scene: Mannequins
1) Take A Photo of the dinner with all the mannequins at the table. - Scene: Workshops
IMPORTANT! – QTE To Make Sure Camera Doesnt Fall Into The Liquid!
1) Take A Photo Of The Steamy Liquid.
(You May Need The Camera Lens Which Is On Top Of The Shelf On The Right In The Next Room)
2) Take A Photo Of Mannequin Kate after Hiding Under The Table Successfully.
3) Take A Photo Of The Facing The Wall.
4) Take A Photo Of The Mannequin Sitting In The Chair Telling You To Press The Button. - Scene: Pool
1) Take A Photo Of The Outside Of The Castle. (You Can Do This In The Next Chapter Too, If Charlie Is Dead)
2) Take A Photo Of The Mannequin Sitting Next To The Key In The Pool.
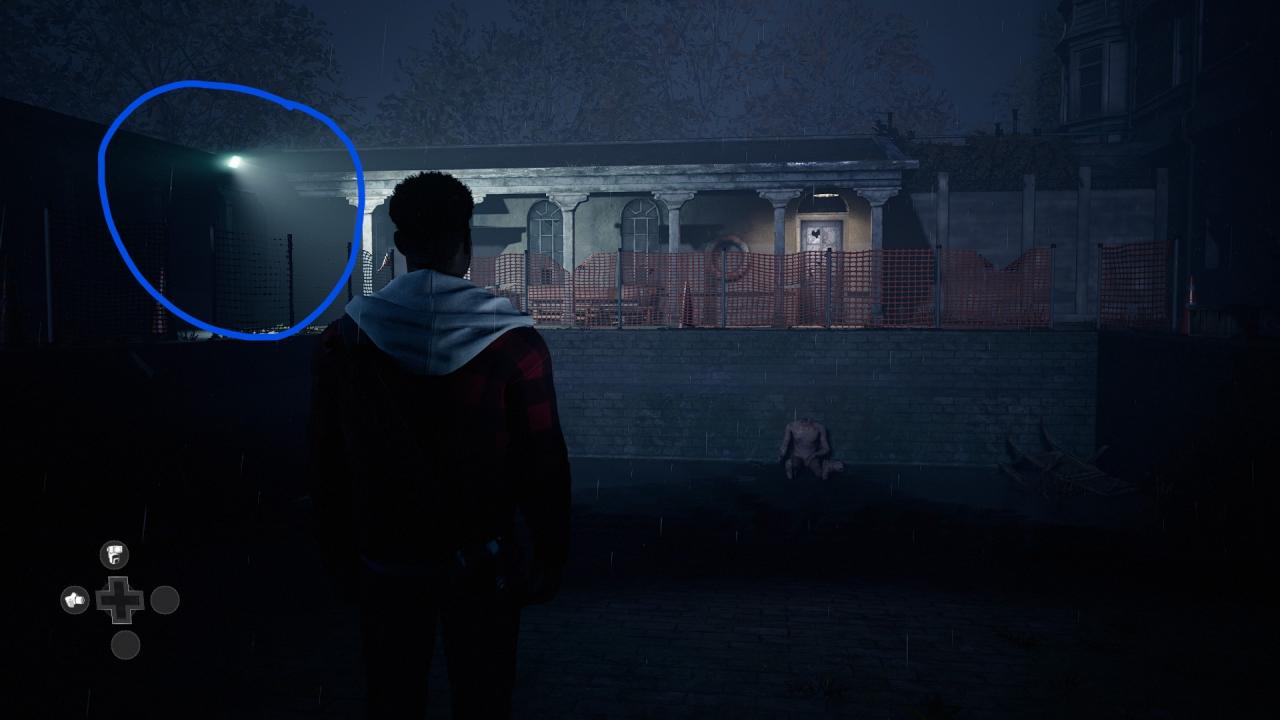
3) Stand In The Pool, Look At The Corner Of Small Pool House Where The Light Is, Look Around For The Green Reticle (See Screenshot Below)
 4) As Soon As You Enter The House, Take A Photo Of The Mannequin Directly Infront Of You
5) Photograph the Bloody stall (You Must Open It First) (3rd Stall As You Come In). - Scene: Cliffside
(For This Part, You MUST Have Killed Charlie Otherwise You Won’t Play As Mark!)
1) Head To The Small Dock Directly Infront Of You, And Take A Photo Of The Lighthouse.
2) If You Didn’t Take A Photo Of The Castle Before, Take A Photo Now (from the dock)
3) When You Reach The Warehouse, Take A Photo Of The Bloody Clothes On The Table As You Enter.
4) Take A Photo Of The Body’s Hanging From The Ceiling In The Second Room
5) Take A Photo Of The Body In The Tub (Which Is In The Third Room Behind Surgical Curtains) - Scene: Lighthouse
1) Take A Photo Of The Computer (Next To The Fake Recording Of Charlie)
- Scene: Opportunity (You Can Also Get The “Say Cheese” Achievement Here!
1, 2, 3, 4) If You Haven’t Already, Take A Photo Of Charlie, Kate, Erin and Most Importantly, JAMIE (As You Can’t Get A Photo Of Her In Theatrical Cut) (Say Cheese! Should Pop Here!)
5) Take A Photo Of The Lighthouse - Scene: Spa
1) When You Enter The Main Room (With Scaffolding Infront Of You), Take A Photo Of “Columbus Spa” which is infront of you on the other side of the room.
2) Drop Down Into The Pool, At The Top Left, Take A Photo Of The Mannequin In A Builders Outfit
3) After Progressing More, When You Fall Down Into The Pit With Jamie, Vault The Obstacles and Enter The First Door On Your Left. In There, Take A Photo Of The Mannequin On The Table
4) When Exiting The Room For Number 3, Go Left Until The End Of The Room, Then Head Right to then Take A Photo Of The Hanging Mannequin.
5) Continue Forwards Through The Rooms, When You Get To The Room With The 2 Mannequins And A Sawblade, Take A Picture Of The Mannequin On Your Right (BEFORE PRESSING BUTTON) - This Brilliant Guide Guide By Ben-Gun can help you find the ones that you may be struggling with!

Found all of Mark’s photo opportunities

Took a photo of each crew member
Photogenic/Camera Shy
These ones can be quite time consuming as you will need to find all White And Black Picture Frames (premonitions) which are scattered throughout the game!
I Will write out all locations for ease of use but if you’re having trouble, then please follow this guide by MrWilliamThor
- Picture: Explosion | Scene: Opportunity | In The Kitchen Of The Lighthouse (Top Of The Cliff)
- Picture: Turned | Scene: Island | After You Climb Up Some Platforms, (You Will See The Tram On Your Left), Jump The Hole In The Fence To The Left Of The House And Follow The Path Around, Enter The House Through The Hole In The Back. And It Is Sitting On The Table!
- Picture: United | Scene: Scouting | After Walking Up The Stairs, Go Straight Forward And It Will Be On The Wall On Your Right
- Picture: Uncanny | Scene: Workshop | Go Through The Level And REMAIN UNDETECTED! Near To The End Of The Second Hiding Room (Where Animatronic Mannequin Is Sitting On A Chair), on the left, behind the wall on the floor (Beside A Box Of Legs And Arms) will be the picture! (See Video If You’re Having Problems)
- Picture: Dragged | Scene: Morellos |After Entering Code 1999 To Enter The Room With The Crying, Turn Left And The Picture Will Be On The Wall!
- Picture: Searching | Scene: Maze | From The Starting Position, Turn Left, Go Forwards And In A Small Cubby/Dead End, The Picture Will Be On The Floor!
- Picture: Burnt | Scene: Cigarettes | After Picking Up Bar Keys, Head Into The Bar And It Should Be Directly On The Left! (corner of room)
- Picture: Stabbed | Scene: Noises | From Erin’s Room, Head Right, Then Left, Then Left Again and it should be at the end of a small corridor!\
- Picture: Cured | Scene: Blood Trail | After Charlie And Jamie Are Done Speaking, Head Down The Stairs (For Another Cutscene), The Go Directly Left, There Will Be A Tilted White Picture On The Wall, Its Down To The Right On The Floor!
- Picture Crushed | Scene: Interrogation | After Entering The Red Lighted Room As Jamie (Behind Mirror), Turn Left And It’ll Be On The Wall!
- Picture: Masked | Scene: Director’s Suite | Follow The Usual Path, When You Exit The Wooden Room And Come Up To A Fork, Head To The Right Until You Meet A Dead End, The Picture With Be On The Left (See Video If You’re Having Trouble)
- Picture: Spiked | Scene: Pool | After You Enter The Building, Make Your Way Through As Usual. Right At The End Of The Poolhouse (Before you open the final door and a cutscene starts), in that same room, on the Right will be the Picture!
Found all of the White Framed Pictures]
Found all of the Black Framed Pictures
Collector/Investigator
I Have Created A Guide That Has Every Single Secret (Detailed With Pictures) Linked In Order From Start To Finish!
Or Head To This Link For A Easy To Follow Youtube Guide By Ben-Gun!
(You will recieve the Investigator Achievement while doing the Collector Achievement)
Found all of the secrets

Found all of the Silver Framed Secrets
I Like Money
This one is also quite simple but will take some time.
The whole gist of this achievement is getting 200 obols (the ingame currency)
Something really nice is that the coins respawn everytime you reload the Scene/move Scenes
Realistically, you could find 1 coin worth 10 obols, pick it up, reload, go back and repeat to get the achievement done quicky!
But over your time of playing you should end up getting enough!
Collected 200 obols
Man Of Many Interests
This achievement can be a bit time consuming but not too bad.
With This achievement you must find all 5 of Du’Met’s business cards which are scattered across the game!
- Scene: Cigarettes
Once you gain control of Charlie, exit your hotel room and enter the hallways. Turn left twice. Beside a drawer, hidden out of view, is business card 1 on the floor. - Scene: Blood TrailWhen descending the stairs as Charlie with Jamie into the wrecked lobby, turn immediately left once you hit the landing. The business card will be on the floor near the collection of chairs beside the stairs.
- Scene: SpaWhen Jamie and Mark fall through the Spa’s lobby floor, don’t vault over the lockers. Instead, head down the hall and turn right. There, at the dead end on the floor, will be the third business card.
- Scene: CliffsideWhile controlling Charlie, you’ll meet Mark. Before heading up the ladder, inspect the tree in the middle of the yard. There, around its edges, closer to Mark, and the door you want to get through, will be a business card.
- Scene: LighthouseThe last and final Business card is in the lighthouse. Climb up the stairs from the basement of the lighthouse. Once you enter the main floor, approach the chair in the corner of the bedroom. On the floor beside it will be the business card.
This Video Guide By Stevivor Is Quick and Easy if you’re having some trouble!
Found all of Du’Met’s business cards
Ending/Long Achievements
Hope You Enjoyed Your Stay
This achievement is as simple as just completing the solo story!
No matter if everyone dies, lives, etc.
You will receive the achievement no matter what after completing the Solo Story
(You might need to watch the full credits)

Completed the Solo Story
The Cycle Continues/Award Worthy
This achievement can be tricky and take a while due to it needing more than half a playthrough so be ready!
- Start At The Scene – Blackout
- Choose To ATTACK Du’met. This will Cause Erin To Die (This is necessary!)
- In The Scene – IGNITION
- Choose To FORCE DOOR Twice! This Will Cause Charlie To Die (This is necessary!)Recommendation:In The Scene: Director’s Suite
Give The Screwdriver To Kate! (This Will Allow You To Skip A Step) - In The Scene – REFLECTION
- EITHER:
1/2) If you gave the screwdriver to Kate as mentioned above, Have Jamie Crushed By NOT Pressing The Button! (MAKE SURE KATE STAYS ALIVE)
2/2) If Jamie Still Has The Screwdriver, Its Not The end Of The World. Have Both Kate AND Jamie Live by having the glass wall close in on Jamie (You’ll Kill Her In The Next Part)This Is Skippable If Jamie Died In The Glass Trap! - In The Scene – CHASE
- Keep Kate Alive and DONT SAVE JAMIE (FLEE) from Du’met(From Here On, Keep Kate and Mark Alive NO MATTER WHAT!)
- In The Scene – LIGHTHOUSE
- Choose To HELP MARK and proceed with cutscenes (Award Worthy Should Pop)Then Make Sure To AGREE to Du’met’s terms AND STICK WITH IT! (The Cycle Continues Should Pop)
- Agree to Du’met proposal and you will recieve a secret ending and the nice achievements!
 Mark agreed to Du’Met’s proposal
Kate fell for Du’Met’s impersonation
Happy Ending
This one could be tricky so be careful!
The main thing you have to watch out for is the traps, and QTE’s, there are a lot of QTE’s that can kill you in this game.
Tip: If you ever accidentally kill one of the characters, exit to menu –> go to your save –> Scene Selection –> and select the scene at the very bottom (your most recently one) and you can retry it!
So if you would like to make things easier for yourself, you can go to Settings –> Accessibility –> and turn ON:
- Single Action Button (makes it only one button to press instead of WASD and L/RMB)
- Hold To Complete Button Mash (instead of spamming the button, hold it down and it will complete easily
- Disable QTE Timeout (Gives you infinite time to press the button and you can only fail QTE by pressing the wrong button)
- Disable QTE Combat Timer (Gives you infinite time to press the button and you can only fail QTE by pressing the wrong button)
Bare in mind that there is nothing to help with Keep Calm events apart from Kate’s Crystal!
I will now write down the Key Decisions for keeping everyone alive!
#1 When trapped as Erin in the scene: Blackout
When Du’met enters the room, Take The Inhaler!
It might seem stupid taking something from a serial killer but this will save Erin’s life!
Note: any other time that Erin needs to use the inhaler, use it, just to be safe! (i believe you should have enough charges)
#2 Before Du’met enters the Silver Ash Institute in the scene: Silver Ash
After exploring the room and hearing Jamie’s Voice through the microphone, follow the instructions and HIDE IN THE CUPBOARD!
If you try to run, Erin will die
#3 In The Incinerator As Charlie in the scene: Ignition
Make sure you Choose The Grate BOTH TIMES!
It may seem that he will die/dies but this choice saves his life!
Note: If you choose to force the door at any point, Charlie will die
#4 When Kate and Erin are trapped in the scene: Breathless
Choose To KILL KATE
This choice will Save Erin, but by a stroke of luck, there appears to be a leak of air on Kate’s ‘Pod’ which allows Mark to break the glass, leaving them both alive!
Note: If you choose to Kill Erin, she wont have the same luck as Kate and will simply just die
#5 Make sure whoever has the screwdriver has the glass coming towards them!
This is decided in the scene: Directors Suite
Either:
Jamie Keeps The Screwdriver
Or Jamie Gives The Screwdriver To Kate (Kate Keeps The Screwdriver)
Keep note of who has it as it will be VITAL to keep both of them alive during the Glass Trap!
After this, in the scene: Reflection
If JAMIE has the screwdriver, choose: Defiant: “I’m not playing his game” and then DO NOT press the button!
If KATE has the screwdriver, choose Apologetic: “I can’t let myself die.”
after these, if the screwdriver was with whoever is about to be crushed, after a small chat with the Curator. The Screwdriver will shatter the glass, leading them to both live!
#6 When On The Roof, Save Jamie in the scene: Chase
After many QTE’s and trying to escaping Du’met, eventually, He will get hold of Jamie, you will have the choice to Save Jamie or Flee
Choose To SAVE JAMIE
Note: If you flee, she will die
#7 When you’re running from Du’met with Kate, Erin and Jamie in the Scene: Chase (I believe)
When running from Du’met you will enter a barn (where the axe is outside) and you will have the option to Run, Or Barricade the door.
Choose RUN for the easiest way out of it,
if you were to choose Barricade, its not the end of the world!
After you choose Barricade, Erin will call out to you to Run, Or Climb.
Choose RUN and everyone wil be safe
Note: If you choose Climb, Erin will die
#8 At the lighthouse in the Scene: Lighthouse
When Erin confronts Charlie about trying to get them killed,
Choose: REASSURING to keep Charlie untied
Note: If You Choose Afraid, Charlie will get tied up and die a bit later on
#9Survive The Boat Fight in the scene: Lake
- If you are using the accessibility options i mentioned earlier, this should be a breeze!
- BEFORE THE GETTING ONTO THE BOAT, if you dont have Mark’s Stick with a screw on the end, you will have to collect the spray from the police officer.
- When the Boat Blows up behind the Officer, as Erin, Choose: AUTHORITATIVE: “Grab The Gun!”, Mark will end up getting the spray can after the gun falls off the dock.
- At the start, Du’met will appear behind Erin with the Axe, QTE appears here (miss it and Erin Dies)
(Erin Safe) - If the Dog is here, Connie will attack but will be safe no matter what (Connie safe)
- Next Is Charlie, Du’met will swing at him with the Axe, QTE appears here (miss it and Charlie Dies)
- Jamie Will Be Next and you can simply just Jump off the boat (don’t over complicate it)
(Fighting can work too, but you need the screwdriver so just jumping off is easier and safer)Mark and Kate Fight are a lot longer so be ready! - Mark will be attacked next, QTE to pick up Axe and then an attack QTE to slash Du’met.
- Next is Spam QTE, after that, the boat will hit a small rock and the Axe is lodged into the side of the boat. Du’met will then pin Mark above the Axe
- Over to Kate now, Choose ATTACK, otherwise Mark will die.
- Attack QTE to Punch Du’met (he will block it and kick you over)
- Back to Mark, Mash QTE then use Item, either Stick or Spray (If you dont have spray or stick, replay the scene and make sure to grab it as stated above)
- Attack QTE to hook the hook around Du’met and then one final normal QTE to jump off the boat.And Congrats! You’re Done!
Just wait out the end credits and the achievement should pop!
(the dog isn’t taken into account, only the main characters: Jamie, Charlie, Mark, Erin and Kate need to be alive!)
Everyone survived
Happier Ending
This One Is A Bit More Tricky
First Of All, Make Sure Jamie AND Kate SURVIVE until the Scene:Homestead
When you enter the house you will find a dog (Connie) whimpering in the back.
As Jamie, when you’re with the dog, Choose the option Anxious: Hide!, which tells Kate to hide
(Not sure if a lower relationship causes Kate to Rebel or not at this time)
When you’re in the back room with Connie And Jamie, make sure you DO NOT STAB Connie with the bottle
Connie will start barking and Du’met will come over, before he gets to swing his axe, kate will save Connie and everyone will run off safely.
Now you will have to wait until the very final scene where the ‘Boss battle’ happens, after Erin either jumping off, or dying, Connie will attack Du’met and get chucked off the boat, and will survive no matter what
After the final fight is over, watch a few cutscenes and the achievement will pop
The Dog Made It Off The Island Alive
Unhappy Ending
This is a very easy achievement once you have one playthrough done!
You can simply go to the Final Chapter – Lake and not complete ANY QTE’s
Yes it’s a massacre, but its worth it 😀
No-one survived
Thanks to SquashMyMouse for his great guide, all credit to his effort. you can also read the original guide from Steam Community. enjoy the game.
To get the ‘you can pet the dog’ you have to kill Charlie in the fire room, so that Mark is the one to wander outside alone and get to the lighthouse, along the way he will encounter Connie and will pet her. If Charlie isn’t dead, then it will be Charlie who encounters a barking Connie and has to scale the wall to escape.