
Hello! This Is A Detailed Guide Is Focused On All Of The Secrets In, The Dark Pictures Anthology: The Devil In Me
The Stamps On The Right Will Be Focused On Grouping The Scenes. In Each Scene There Will Be Multiple Secrets And Will All Be Listed Under Its Respective Scene With Screenshots And A Detailed Description On How To Get It!
This Guide Will Help You Receive The “Collector/Investigator” Achievements!
Welcome!
Quick Overview:
- There Are 50 Secrets Throughout The Dark Pictures Anthology: The Devil In Me.
- Some Secrets Are Quite Confusing So Try Your Very Best To Follow The Text And Pictures!(Let Me Know If Something Is Too Difficult To Follow By Commenting. I Would Happily Update It And Try My Best To Make This Guide As Easy To Follow As Possible!)
- You WILL Need Curator’s Cut For 2 Of The Secrets (They Will Be Labeled As Such)
- The Other 48 Secrets Are All Available In Theatrical Cut And I Have Ordered Them In The Order That You’d Find Them In The Story (By Scene)
- This Guide Is Assuming You Are Doing An Everybody Lives Playthrough To Minimize The Amount Of Replaying Scenes To Go Back For Specific Secrets That Could Waste Some Time/Be Annoying.
- While Following This Guide, You Can Also Follow My Other Guide Which Goes In Depth On How To Get All Other Achievements In The Game! (Also A Full Run-through Of The Everybody Lives Achievement (Happy Ending))
Theatrical Cut Secrets
(In Order Of The Story)
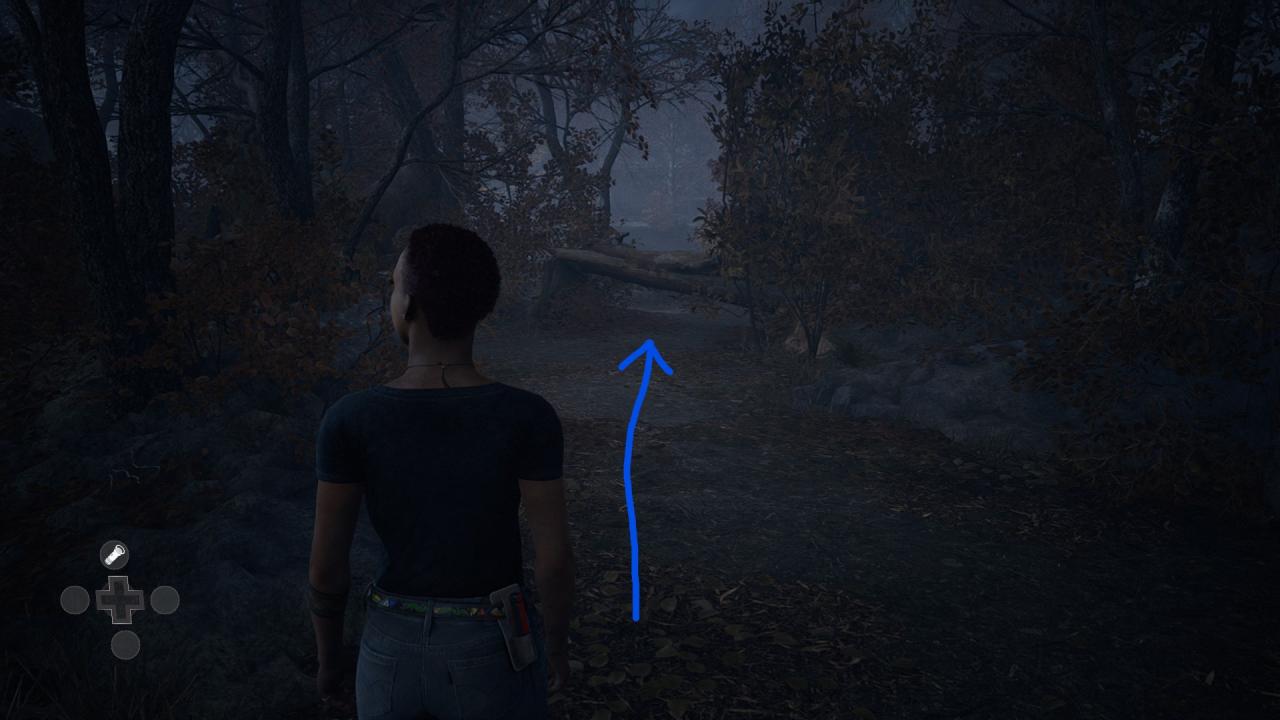
Scene: Island
Secret 10: Stiletto Shoe
When You Gain Control Of Kate/Jamie, Start Walking Down The Path (Stick To Right Hand Side)
When You Get Near The Turn, You Should Find Secret 10: Stiletto Shoe On The Floor.

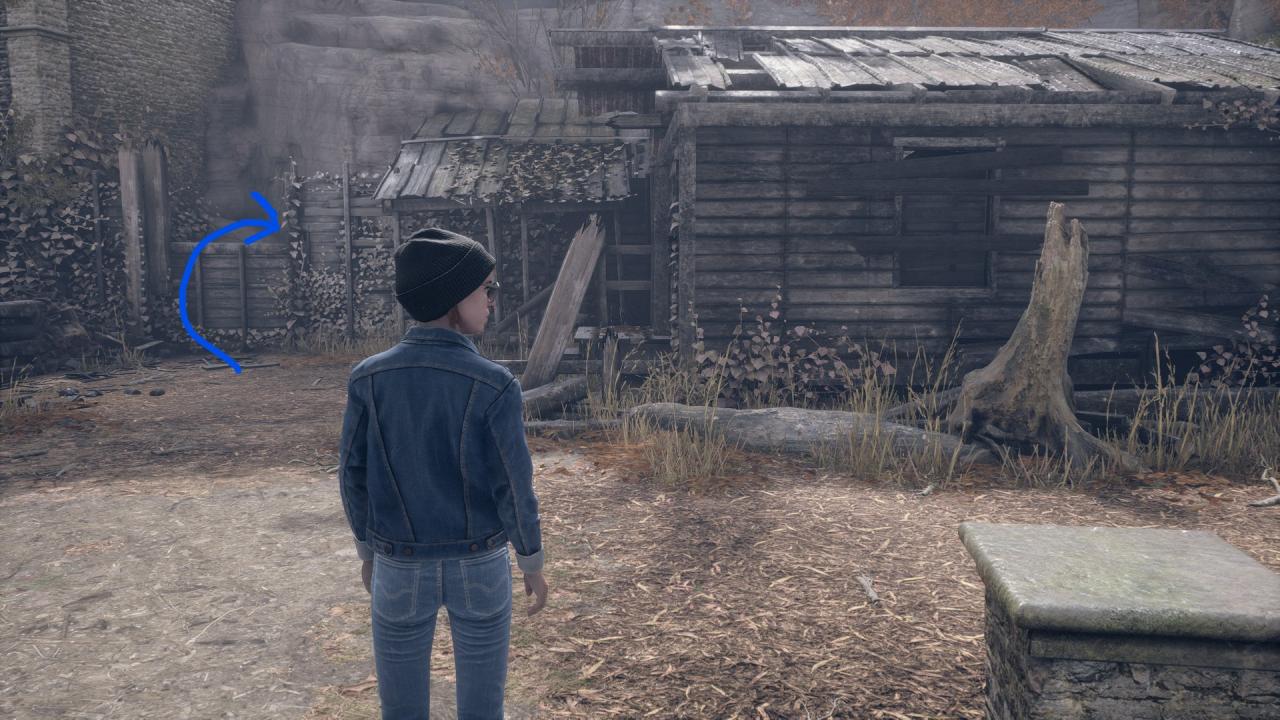
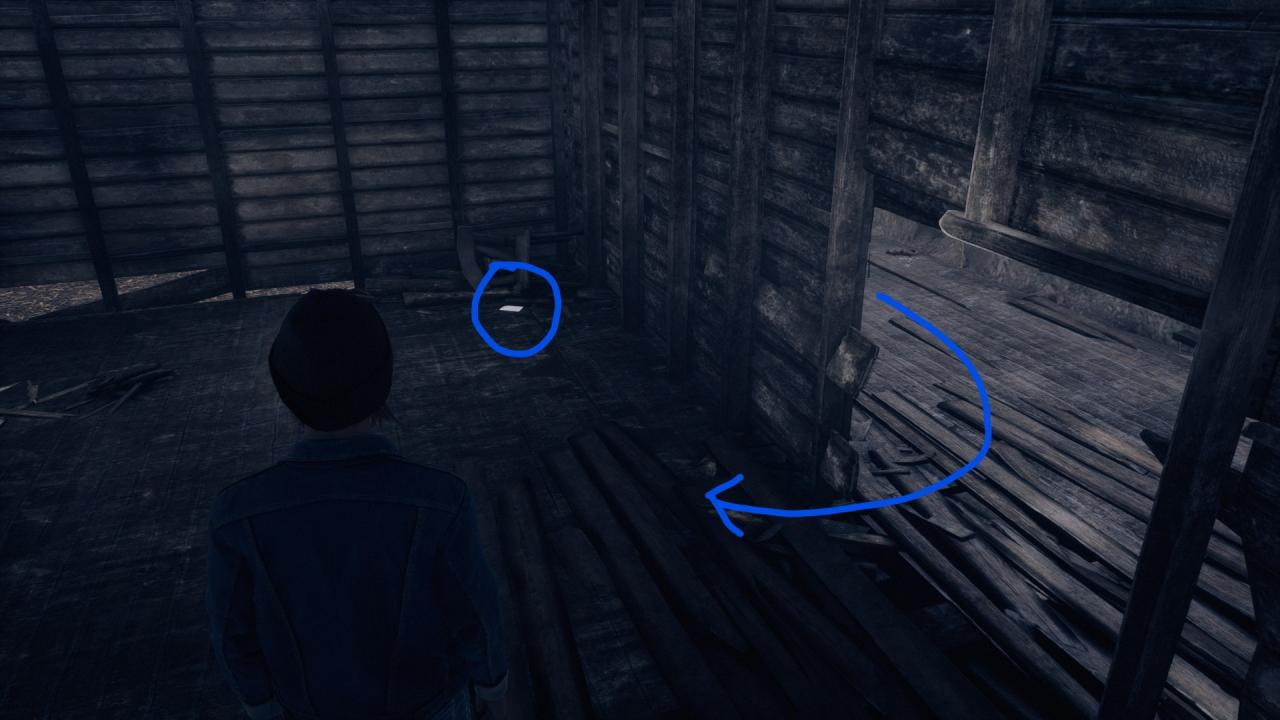
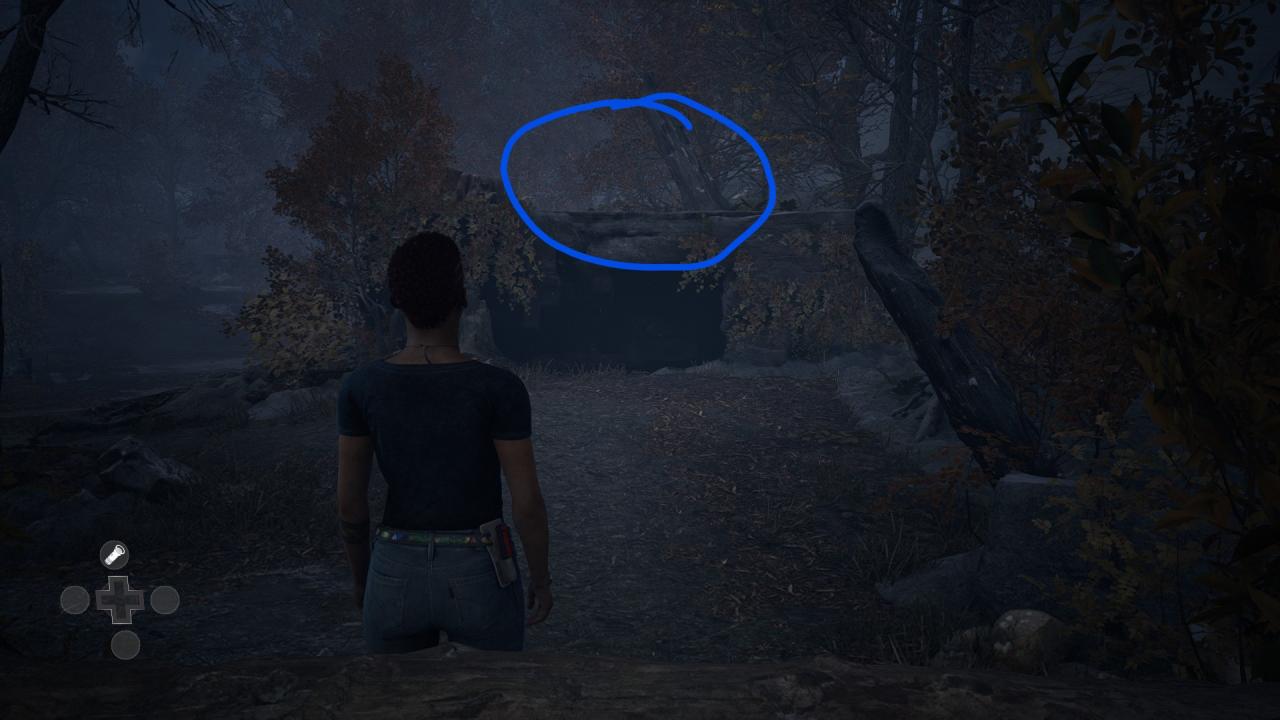
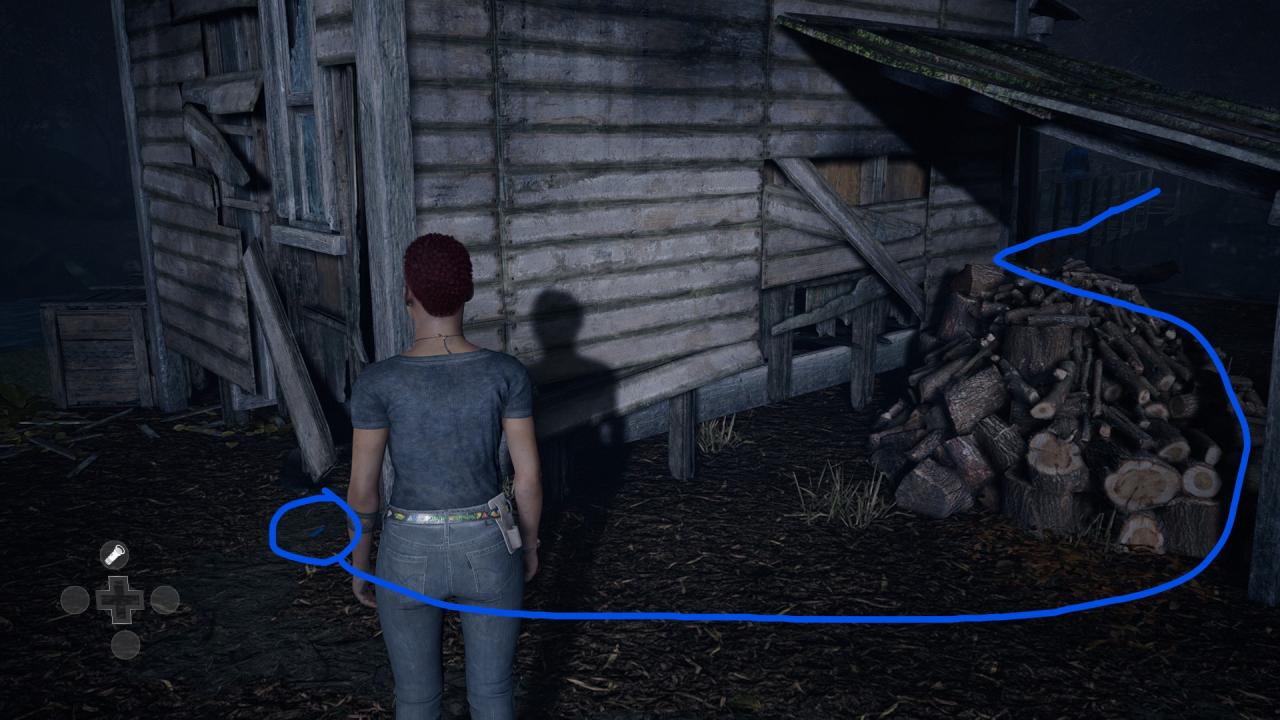
Secret 31: Vacation Photo
After Hiding From The Rest Of The Group, Proceed Upwards Until You See A Locked Shed On Your Right And The Tram On Your Left.
Don’t Go To The Tram Yet, Instead, Head Into The Opening In The Fence And Go Around The Back Of The Shed. Entering Through The Whole In The Back.
Directly On Your Right, In The Corner Of The Room On The Floor, Will Be Secret 31: Vacation Photo
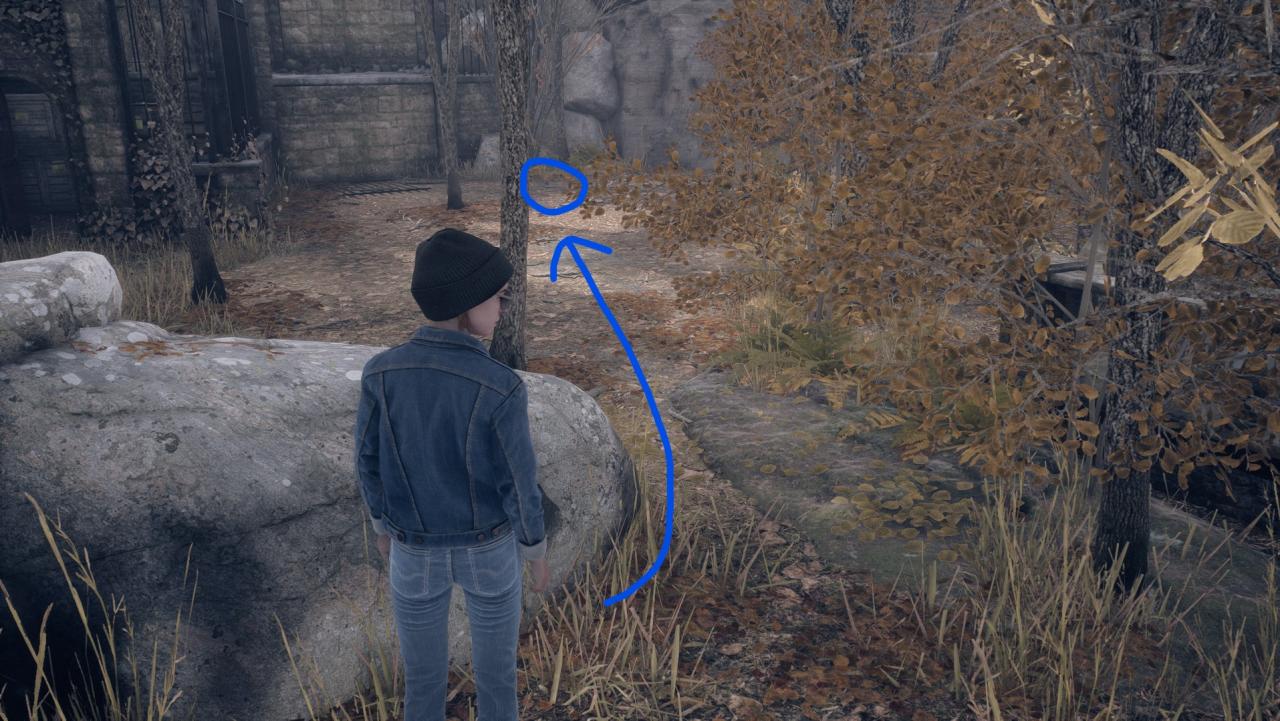
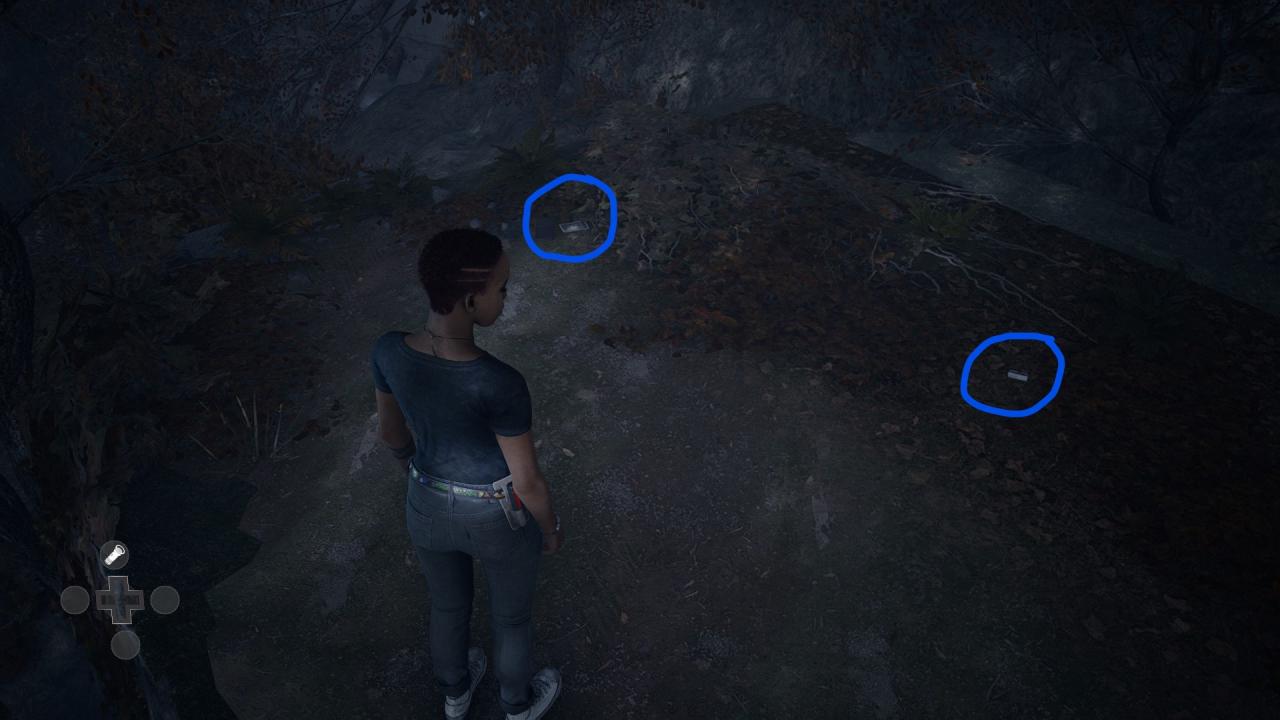
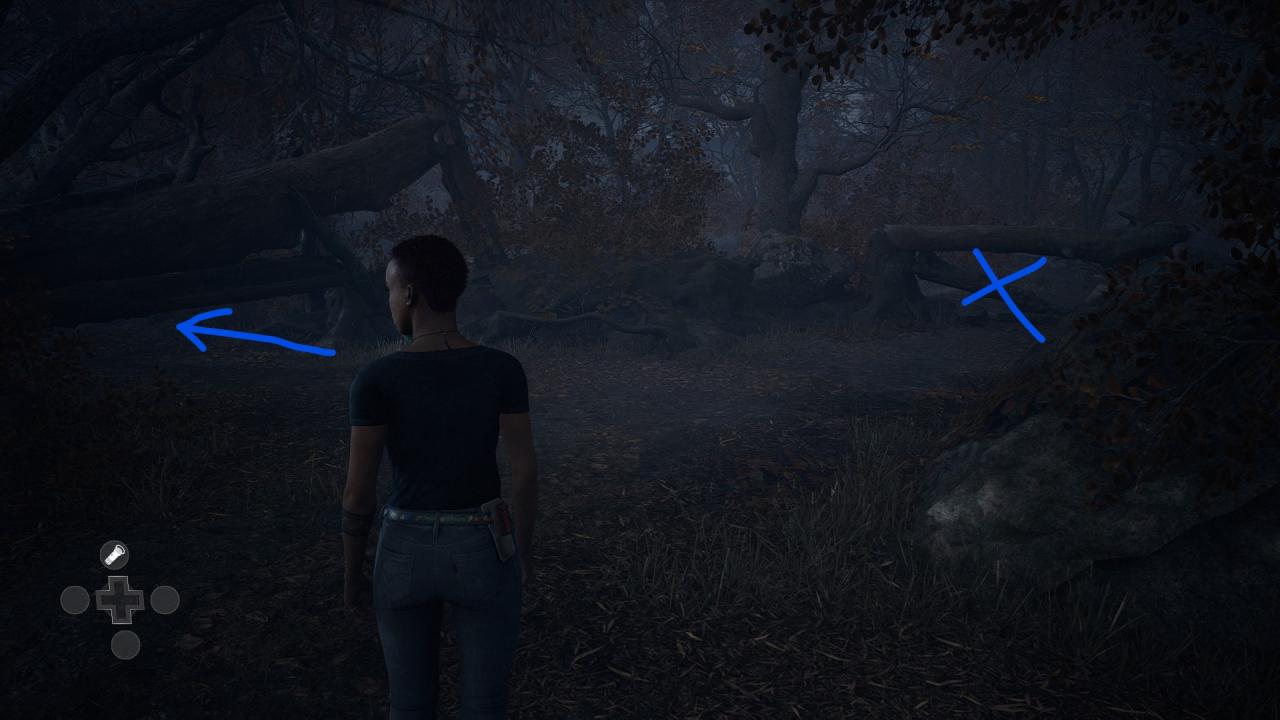
Secret 20: Stiletto Heel
After The Second Hiding Sequence (Where You’re Hiding Behind The Boulder)
From The Boulder, Head Straight Forward And You Should See Secret 20: Stiletto Heel
Scene: Cigarettes
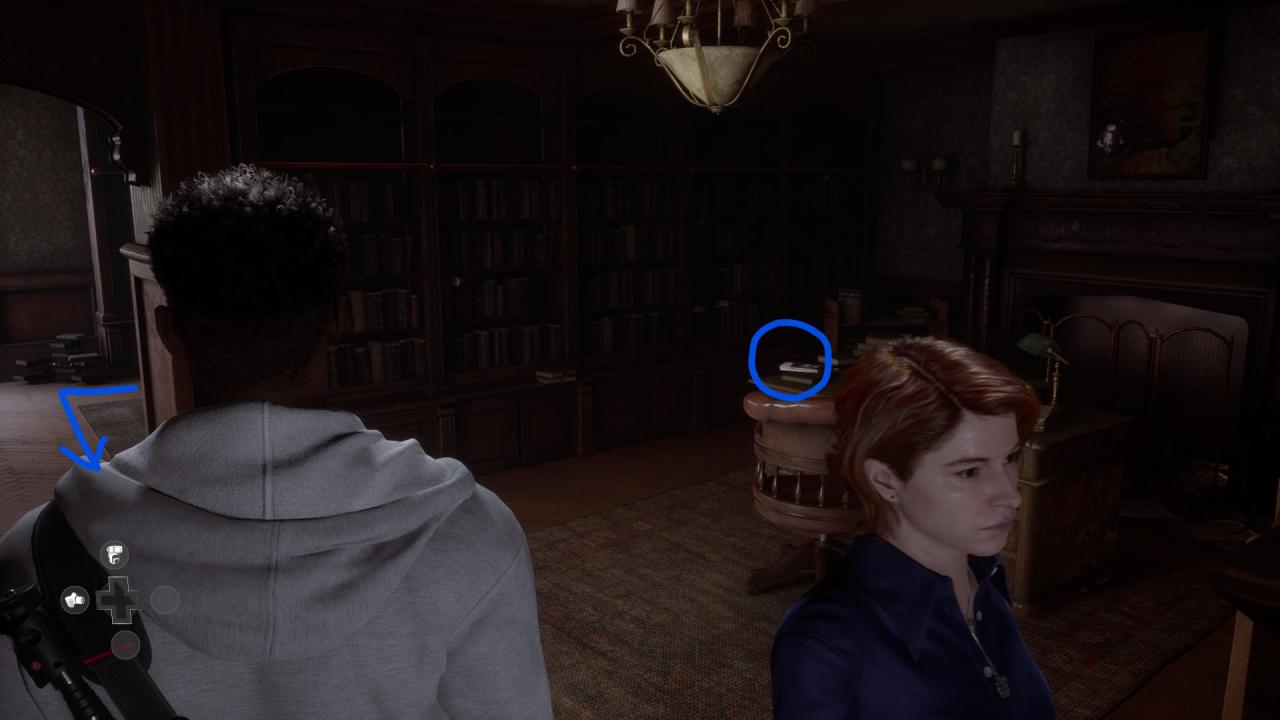
Secret 33: Morello Family Invitation
For This Secret, Make Your Way To The Balcony Area, When You Get There. Turn Right And Move Ahead, On The Closest Desk, Will Be Secret 33: Morello Family Invitation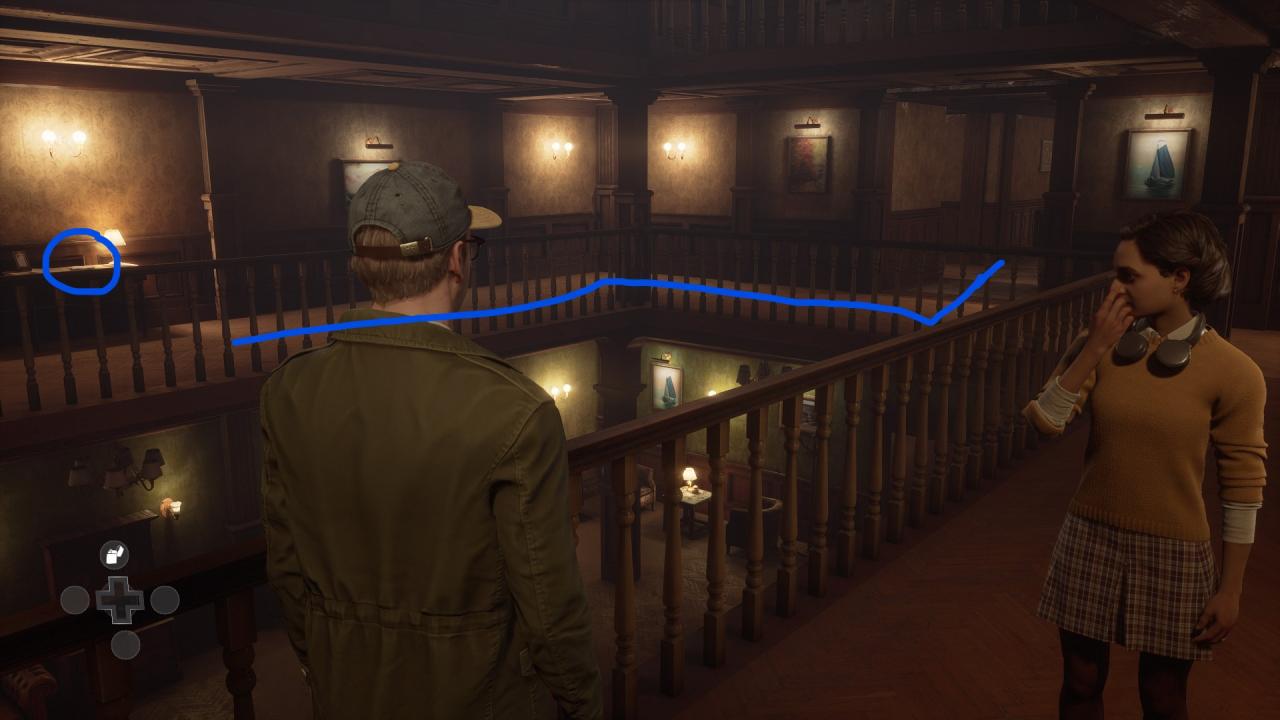
Secret 12: Hotel Guest Book
Head Down The Stairs To Get To The Main Lobby, Walk Directly Infront Of You And On You Right Hand Side Will Be The Counter With The Log Book Open. Go Through All The Pages To Unlock Secret 12: Hotel Guest Book.
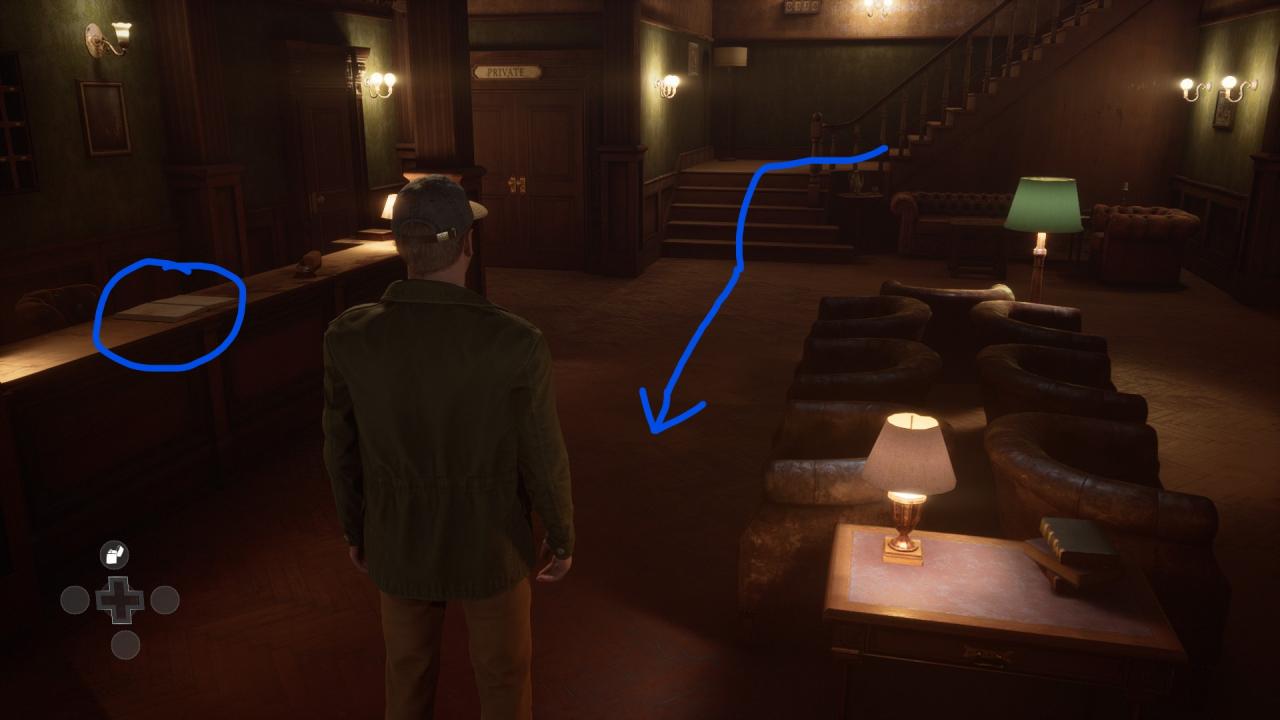
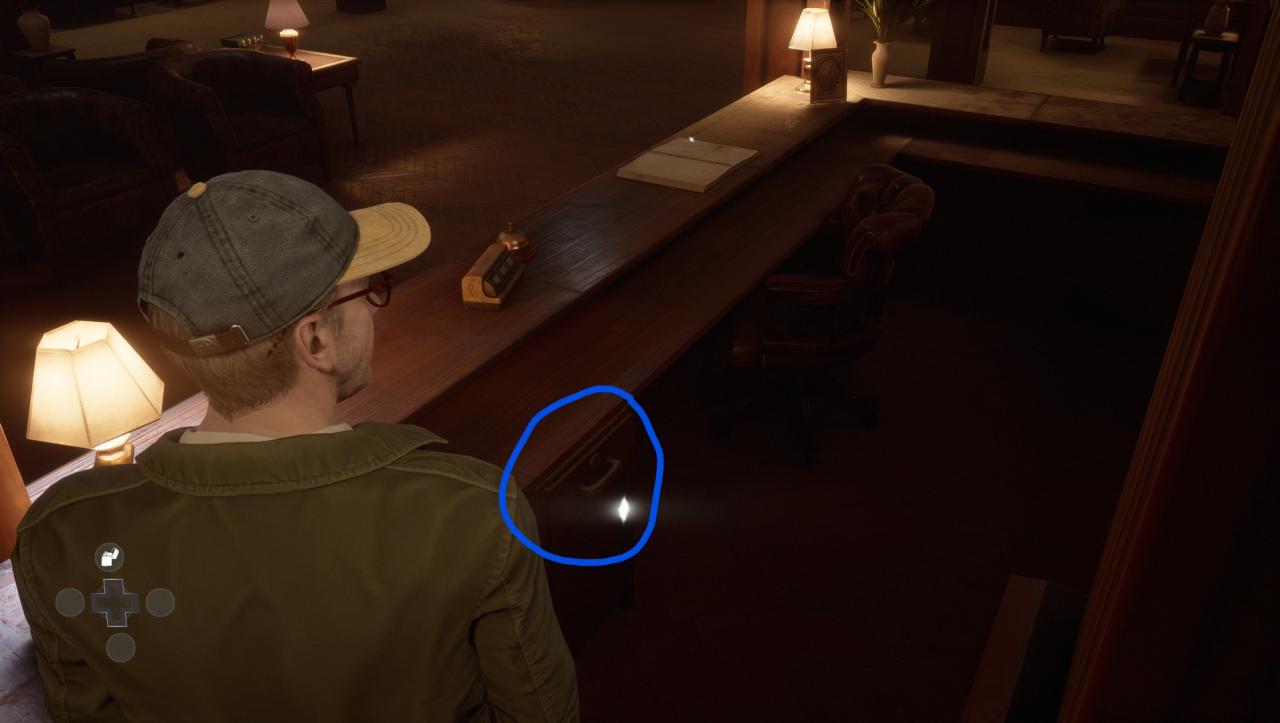
Secret 19: Welcome Postcard
From Secret 12, Head Around The Other Side Of The Counter And Open The Drawer With Charlie’s Business Card To Receive Secret 19: Welcome Postcard
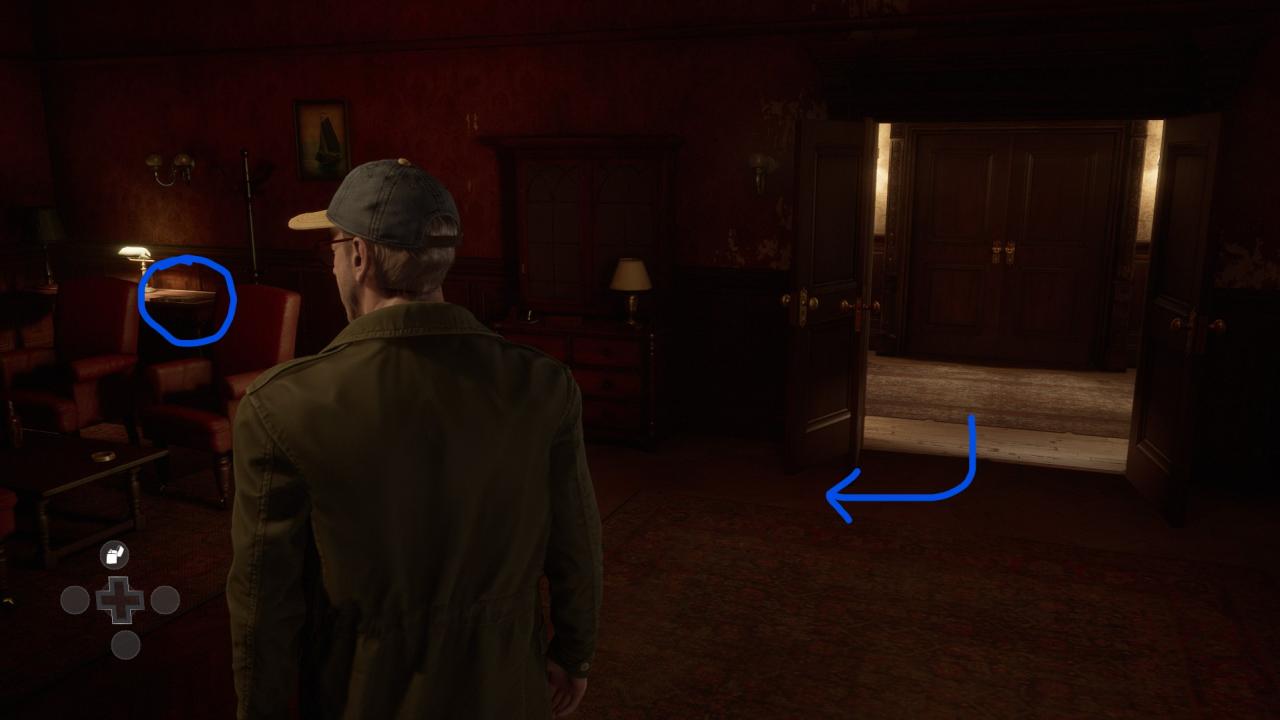
Secret 14: Front Page News
For This Secret, Keep Progressing Up Until Charlie Just Opened The Bar. Once In The Bar, Head Directly Right And Secret 14: Front Page News Should Be On The Desk In The Corner.
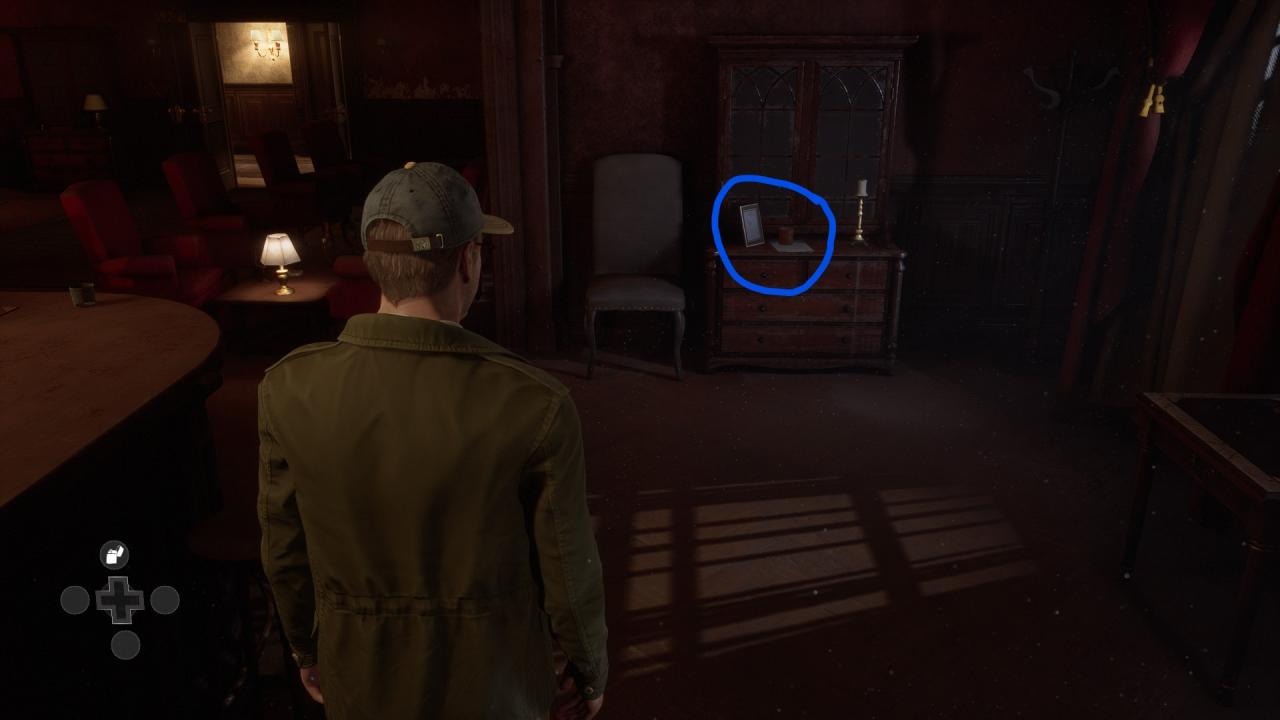
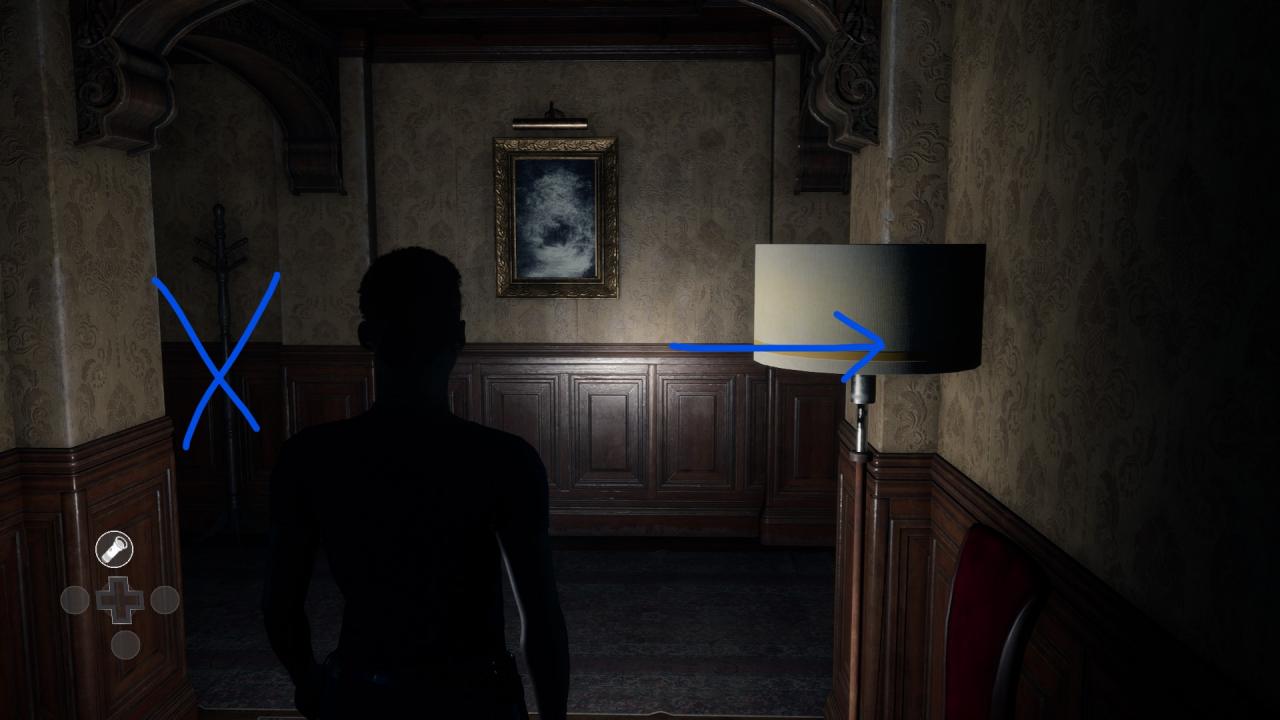
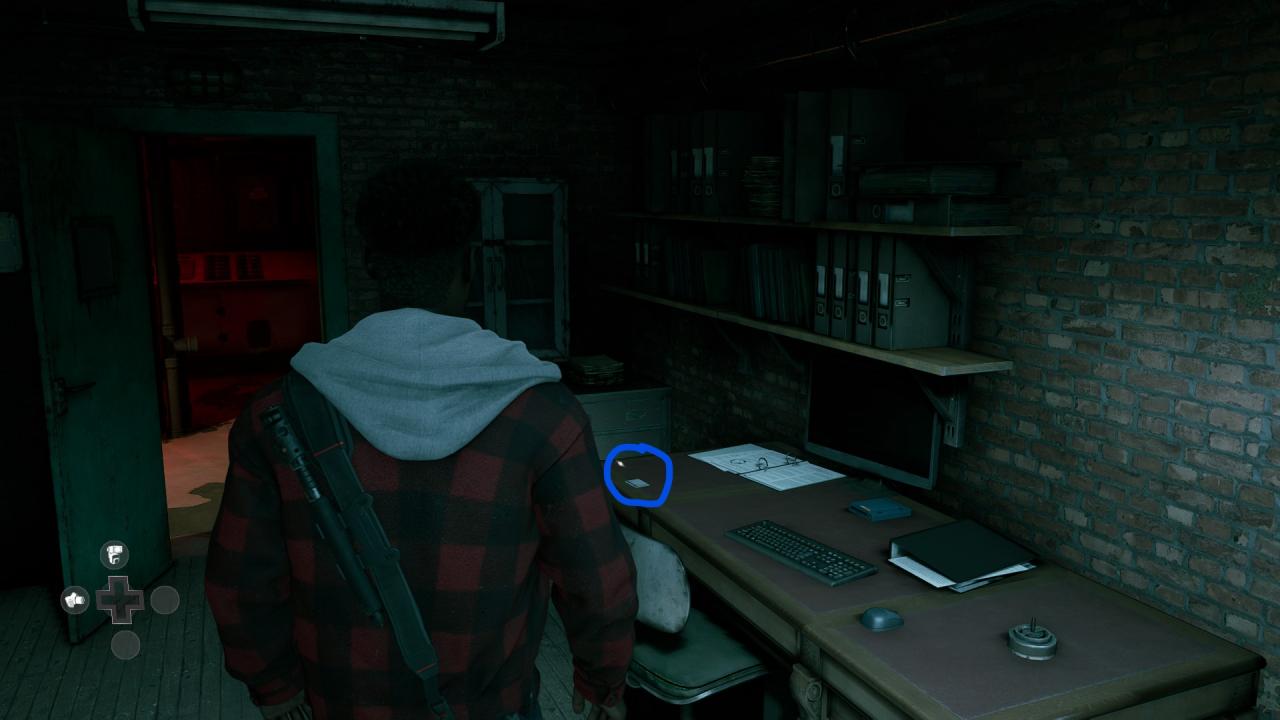
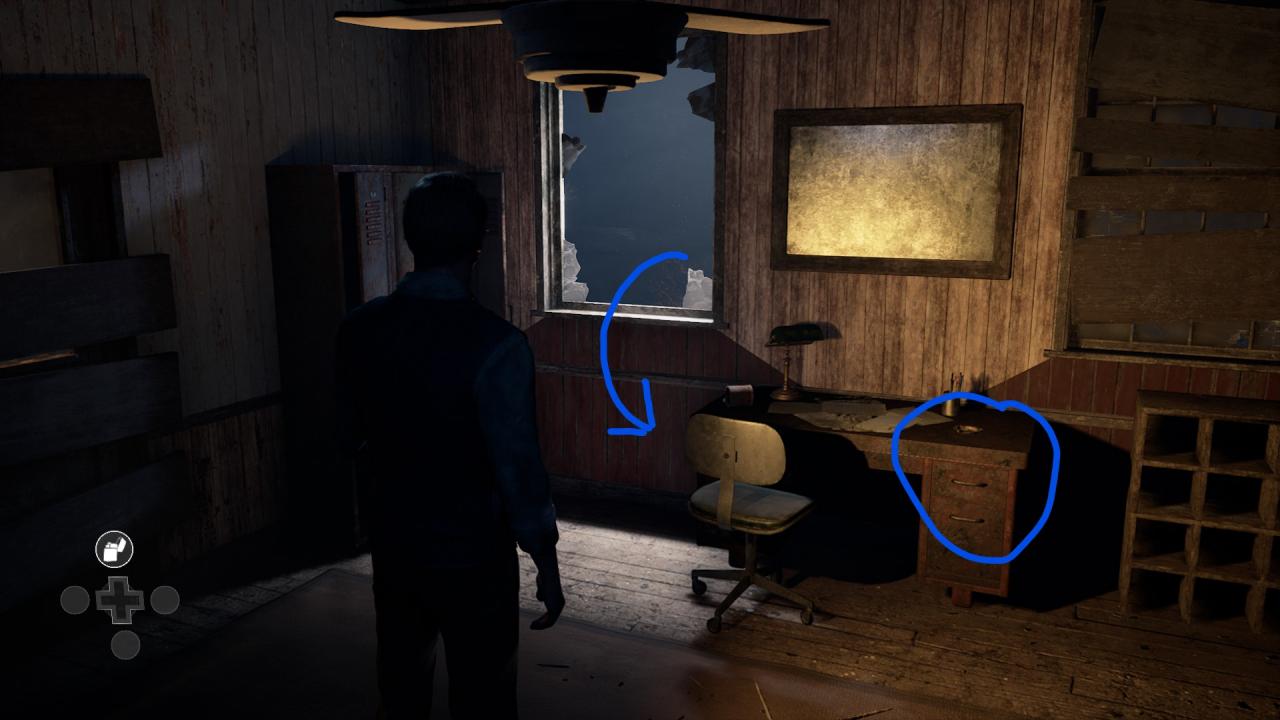
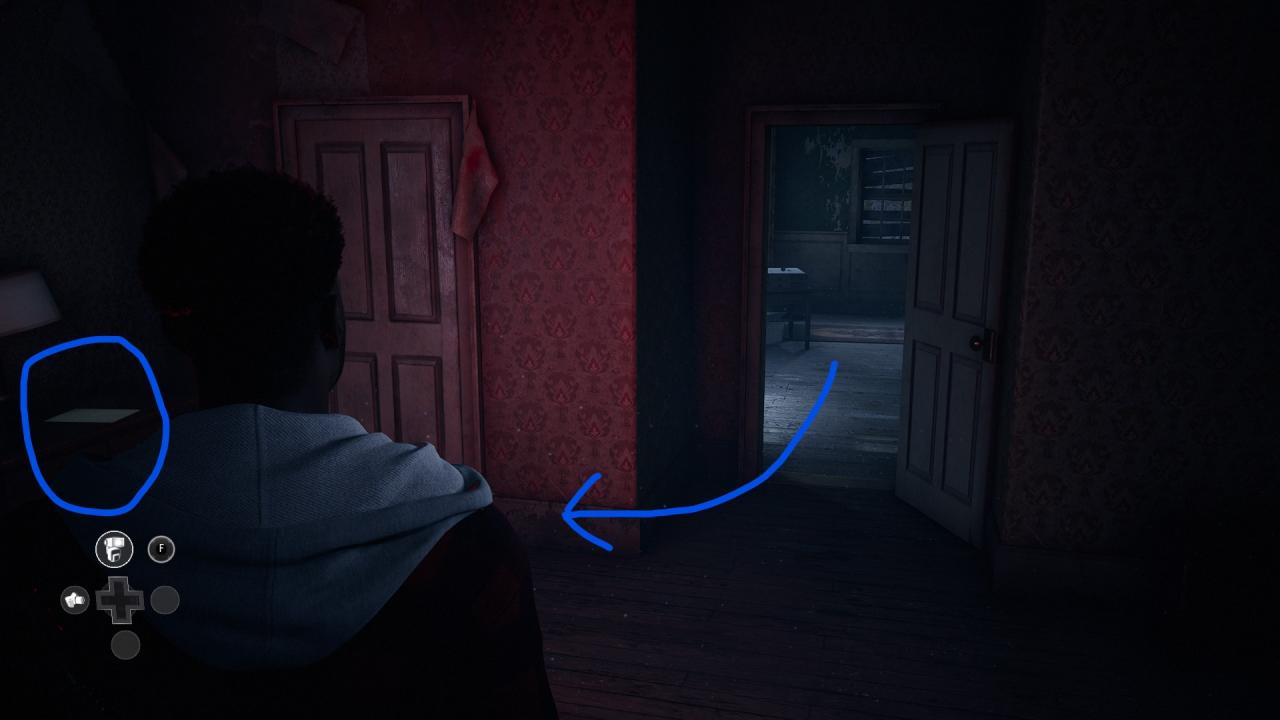
Secret 43: Grand Opening Invitation
This One Is Quite Simple, Head Over To The Cigarettes Machine (Although DONT INTEREACT JUST YET!), From The Cigarette Machine, Walk To The Opposite Side And You Should See Secret 43: Grand Opening Invitation On The Cabinet Underneath A Mug.
Scene: Scouting
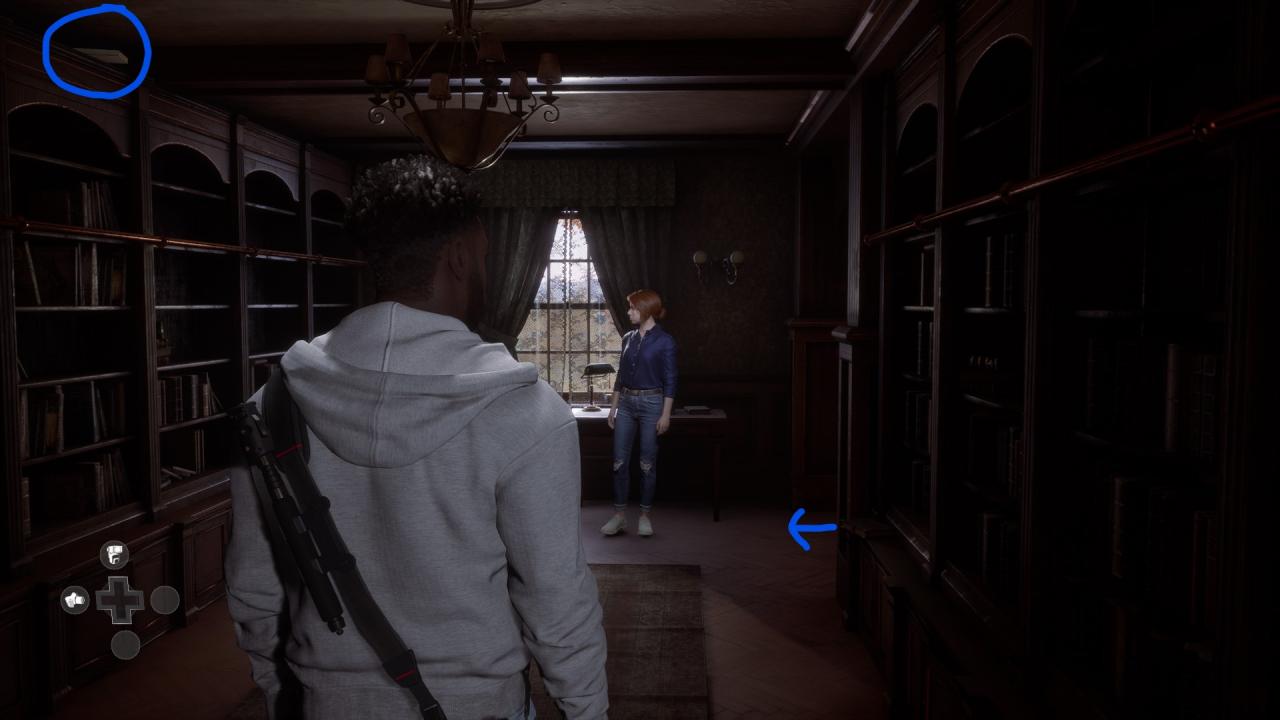
Secret 22: J. Morello Holmes Book
When you enter the study/library, turn left after you’ve passed the Jumpscare clock. You Will Receive Secret 22: J. Morello Holmes Book after turning over the book which is on the desk.
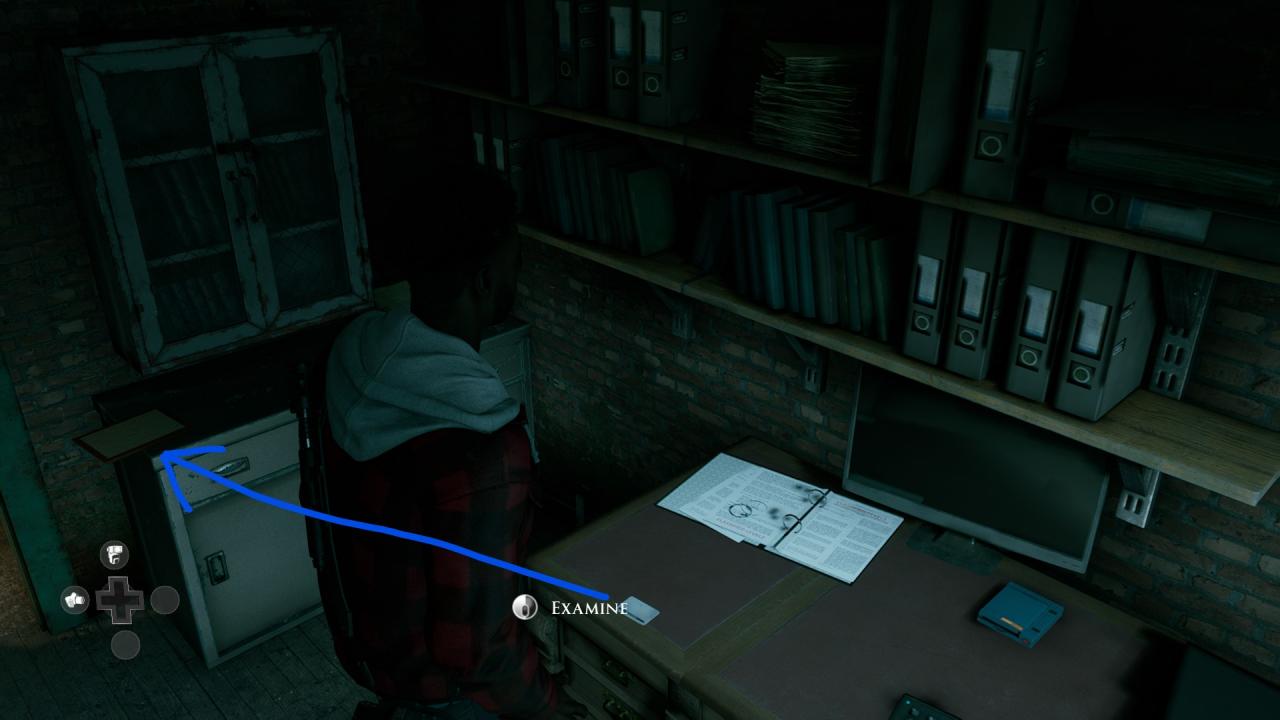
Secret 29: Newspaper Clipping
In the next small area (Where The Locked Door Is), you’ll be prompted to investigate something on top of the bookshelf infront of you, make sure you look up to the top of the bookshelf and use Mark’s Monopod to push it down. Do so, and a white book falls. Open it, and you’ll find Secret 29: Newspaper Clipping.
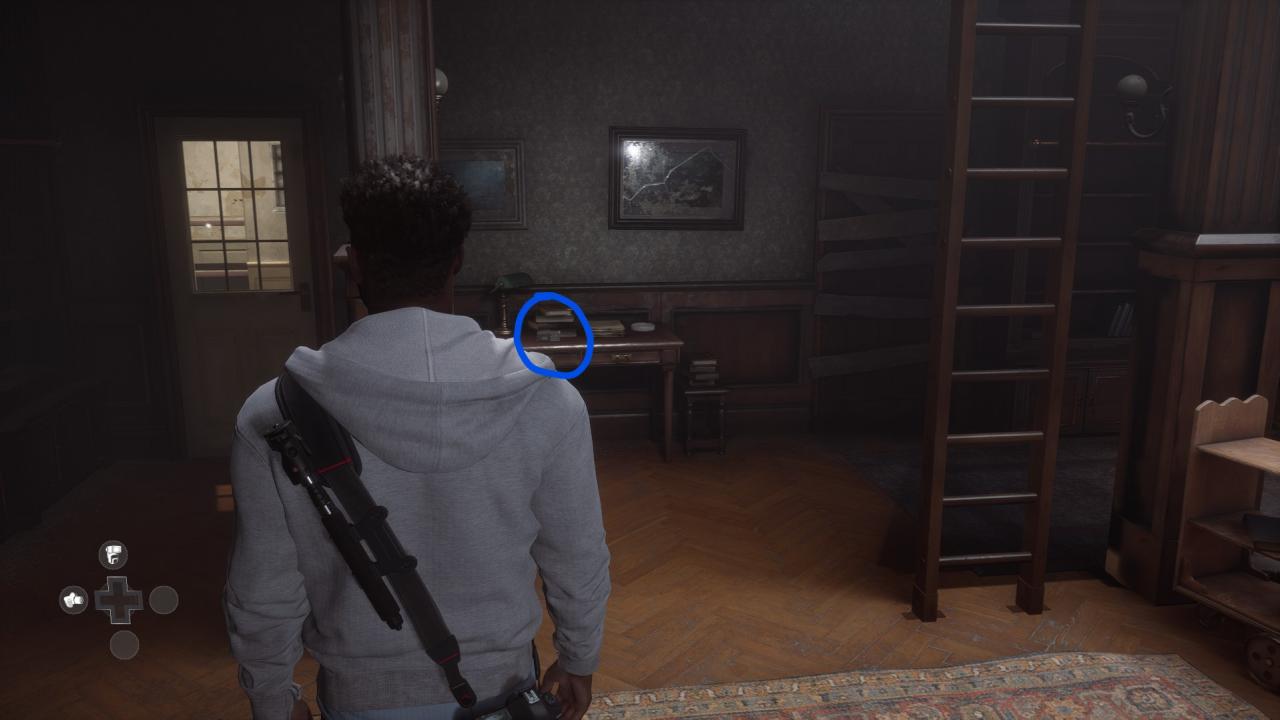
Secret 13: Sherman Tape 1 (Silver Framed Secret)
Head Into The Next Room, Directly Ahead Of You, As Soon As You Enter The Room, You Should See A White Door (Behind The White Door Is The Balcony Key) To The Right Of The Door, On The Desk With Be Secret 13: Sherman Tape 1
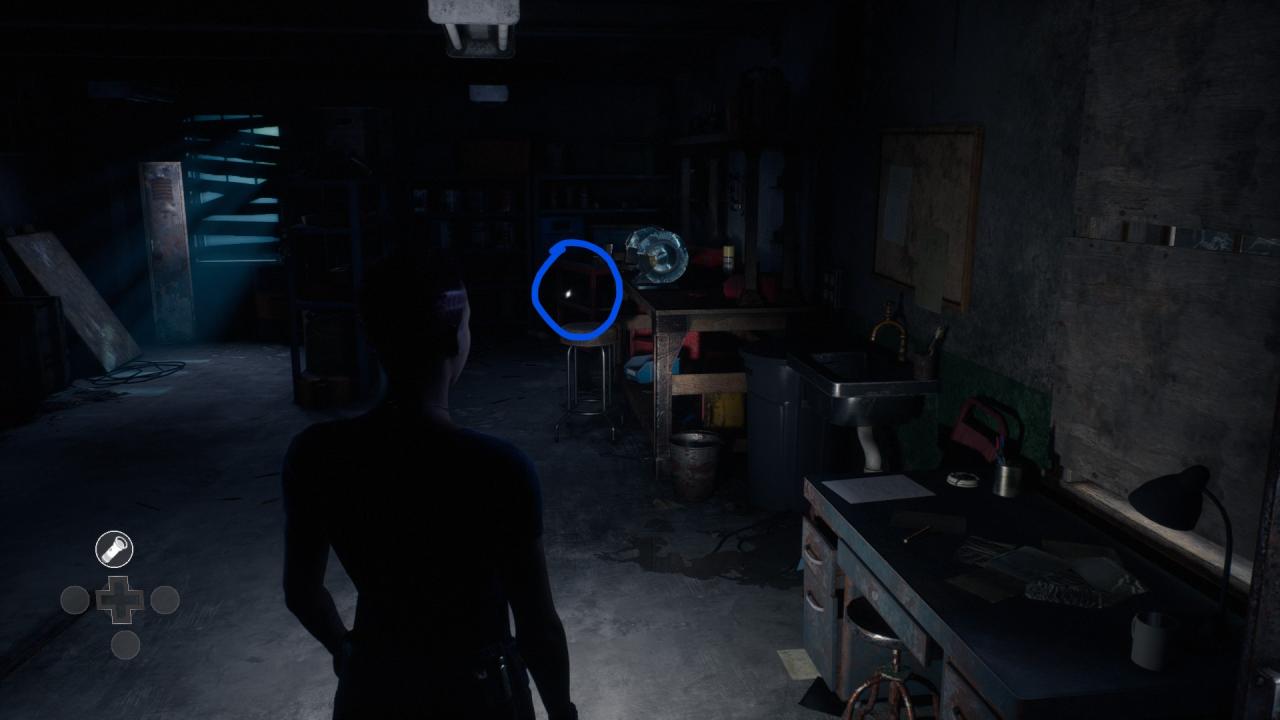
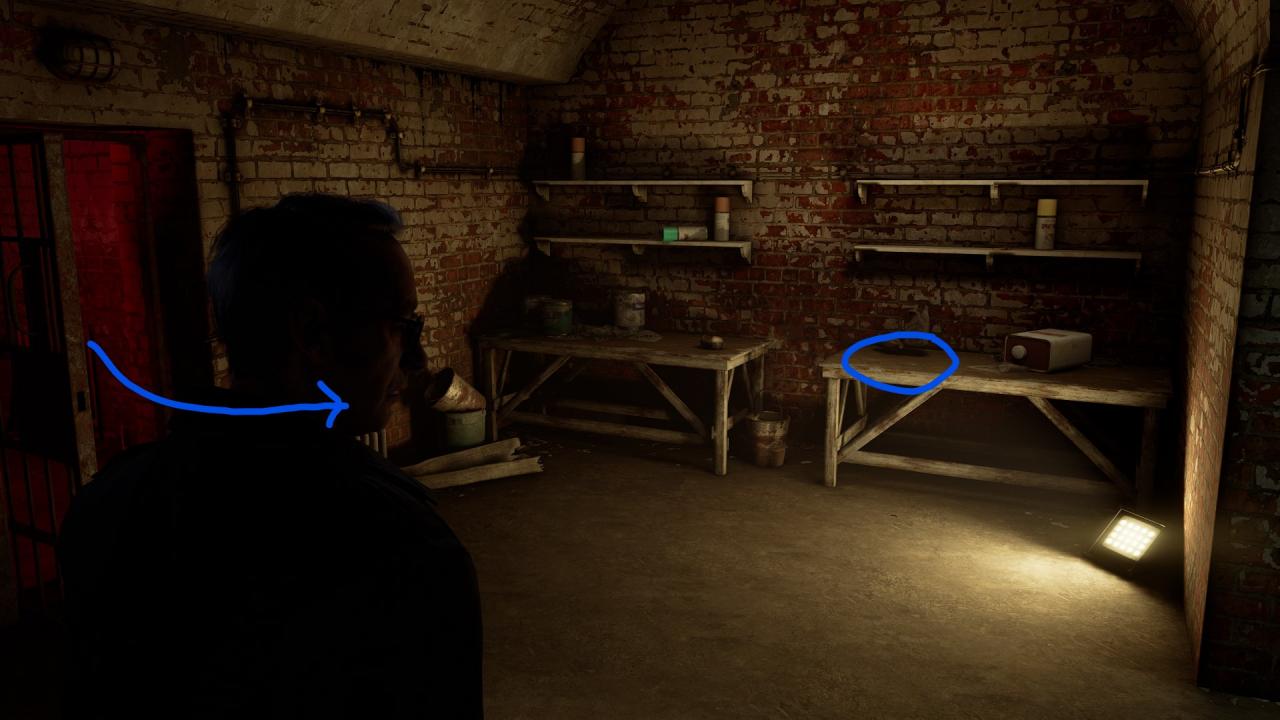
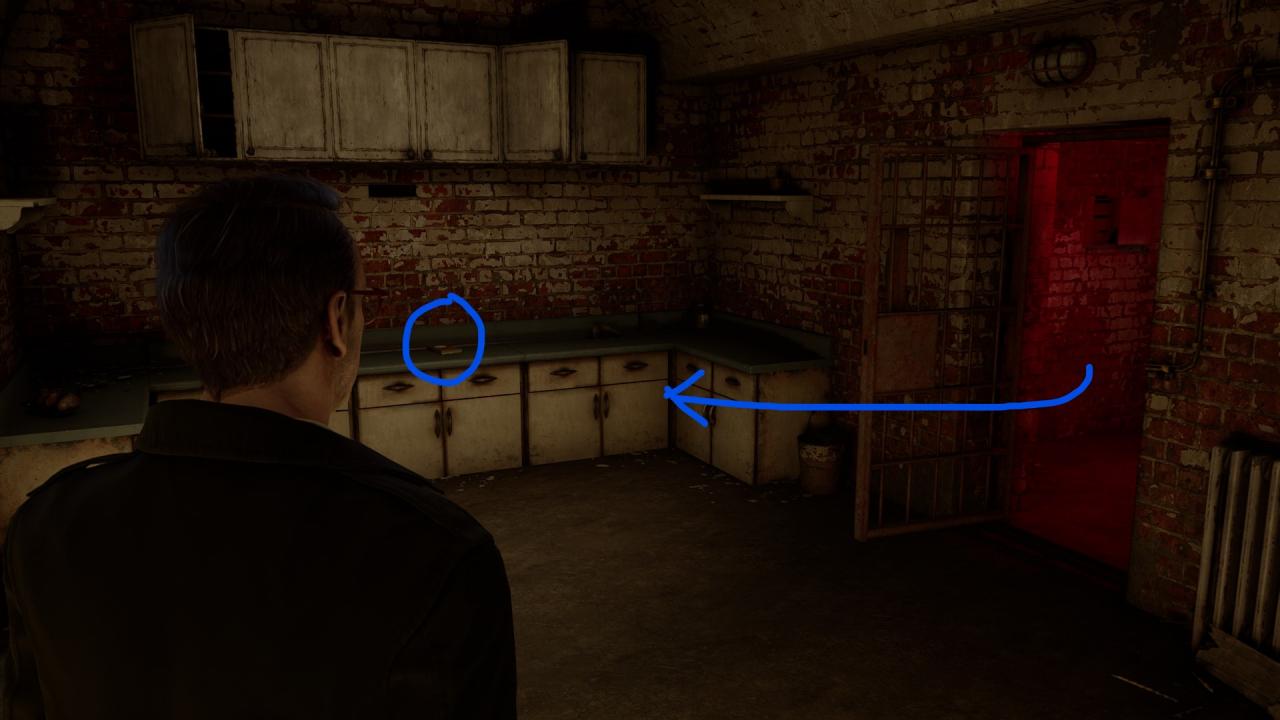
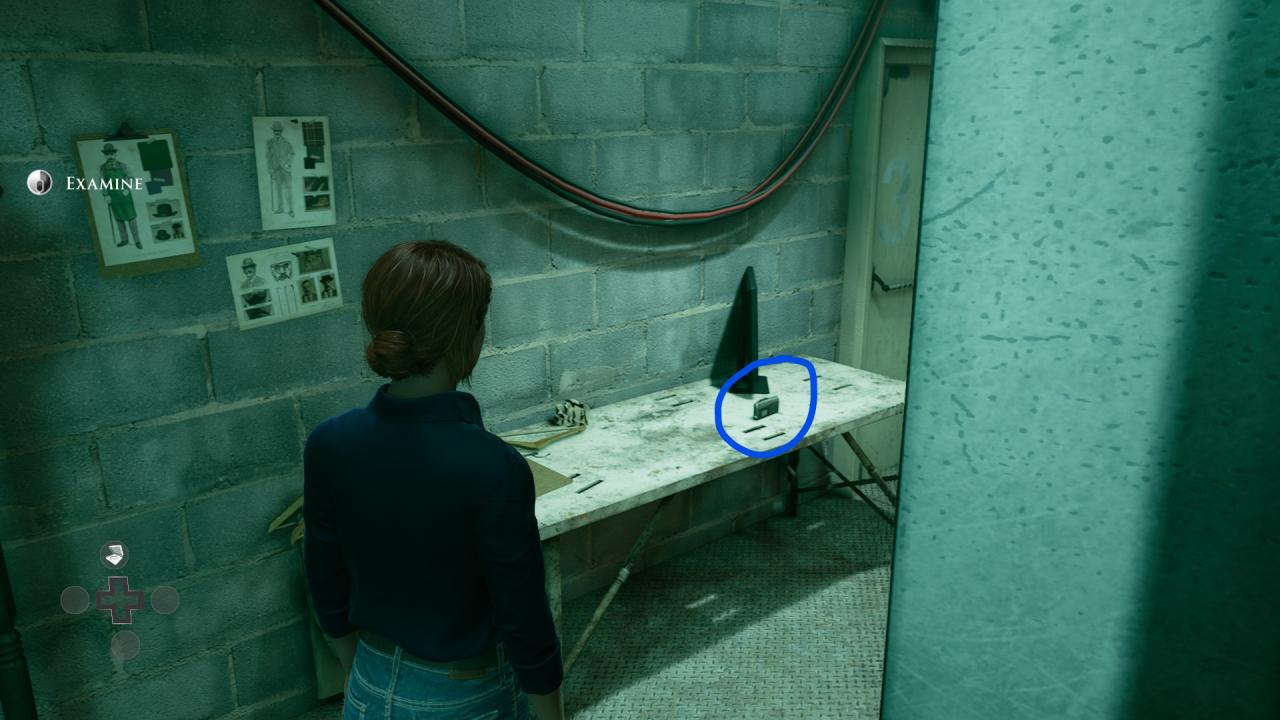
Scene: Staff Only
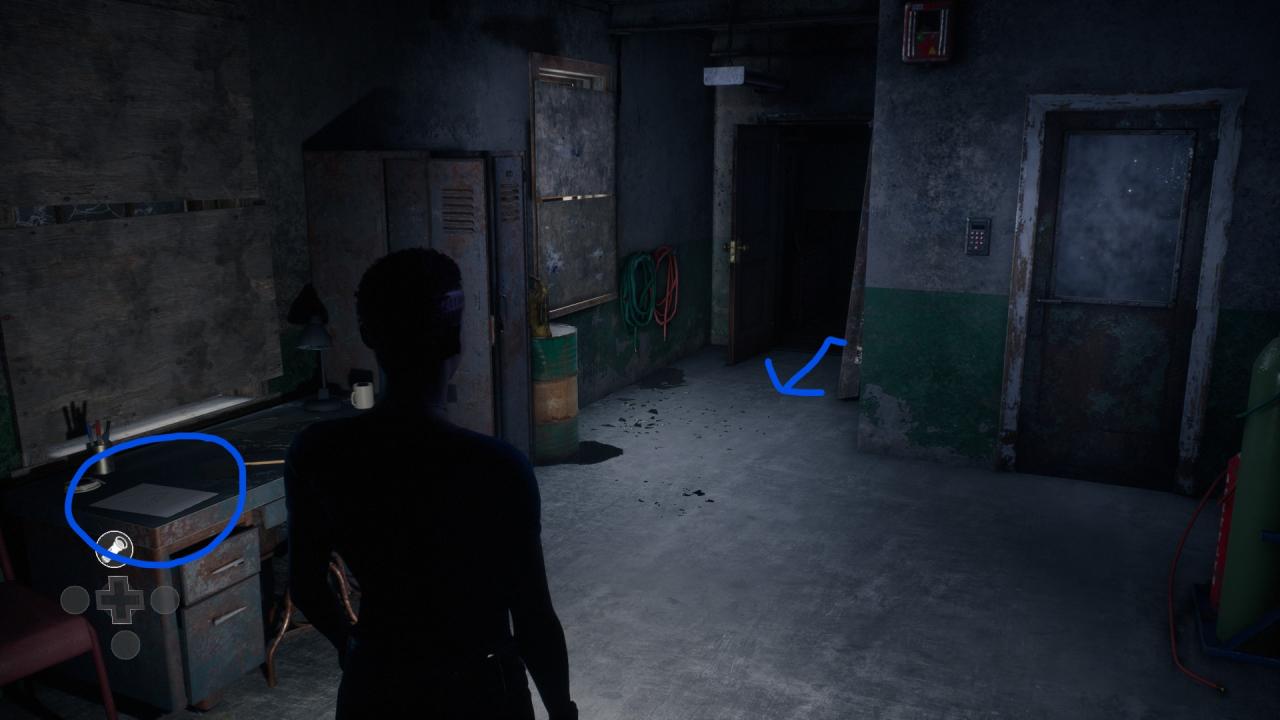
Secret 39: Auction Receipt
Follow The Path Until You Get To The Maintenance Room (Not The First Open Door Just Yet)
As Soon As You Enter The Maintenance Room. Directly Ahead Of You (Behind The Locker) On The Desk Will Be Secret 39: Auction Receipt
Secret 32: Construction Invoice
From Secret 39, Head To The Left (Into The Corner Of The Room Passing A Sink And A Workstation)
Beside The Red Shelf On The Floor Will Be Secret 32: Construction Invoice
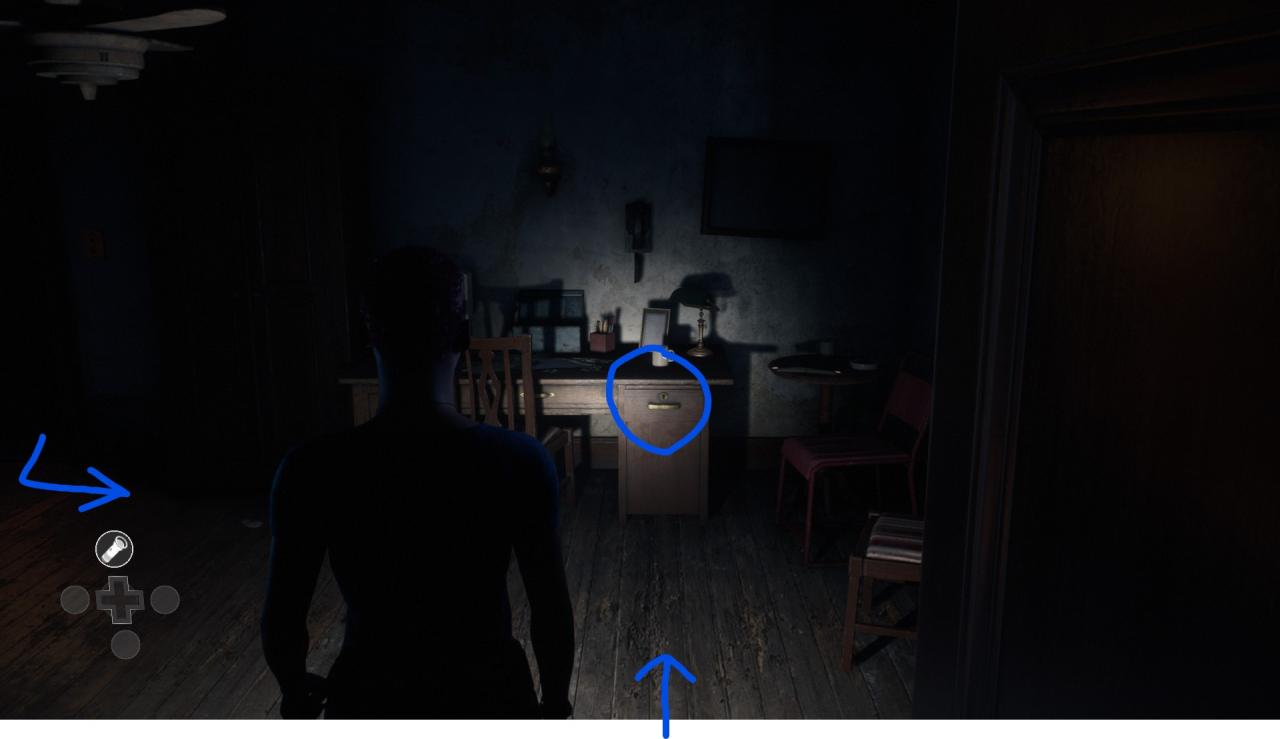
Secret 46: Will Amendment
Now You Can Head Into The Staff Break Room (Through The Door In The Workshop Or Through The One We Skipped Earlier
[list
- When Entering Through The Workshop – Directly Infront Of You In A Desk With A Chair.
- When Entering From The Hallway – Directly To Your Left (Behind The Closet) Will Be A Desk With A Chair
- Open The Right Drawer And Take Out The Piece Of Paper To Receive Secret 46: Will Amendment
Secret 49: Sherman Tape 2 (Silver Framed Secret)
(You’ll Have To Progress A Bit Into The Scene To Be Able To Get This One And I Will Not Be Covering It Here, If You’re Having Issues You Can Take A Look At My 100% Achievement Guide (And Look At Achievement 0451) Which Will Be Linked At The Bottom Of This Guide!)
After Fixing The Generator, And Pressing The Button, Go Up To The Far Singing Animatronic And On The Floor Will Be A Mini Cassette Tape. Once You Pick It Up, There Will Be A Small Cutscene, Then You’ll Have To Press A Button To Actually Receive Secret 49: Sherman Tape 2 (Silver Framed Secret).
Scene: Blood Trail
(If You Missed Secret 33 Earlier, You Can Grab Is Now Too)
Secret 33: Morello Family Invitation
After The Cutscenes, When You’re With Jamie And Charlie, Look Behind And To Your Right, You Shuold See A Small Table Which Has Secret 33: Morello Family Invitation, On Top Of It
Secret 15: FBI Memo (Silver Framed)
When Charlie and Jamie go to follow the blood trail, turn right at the end of the hall instead of the left. At the end of the hall, on the floor, will be Secret 15: FBI Memo
Scene: Separated
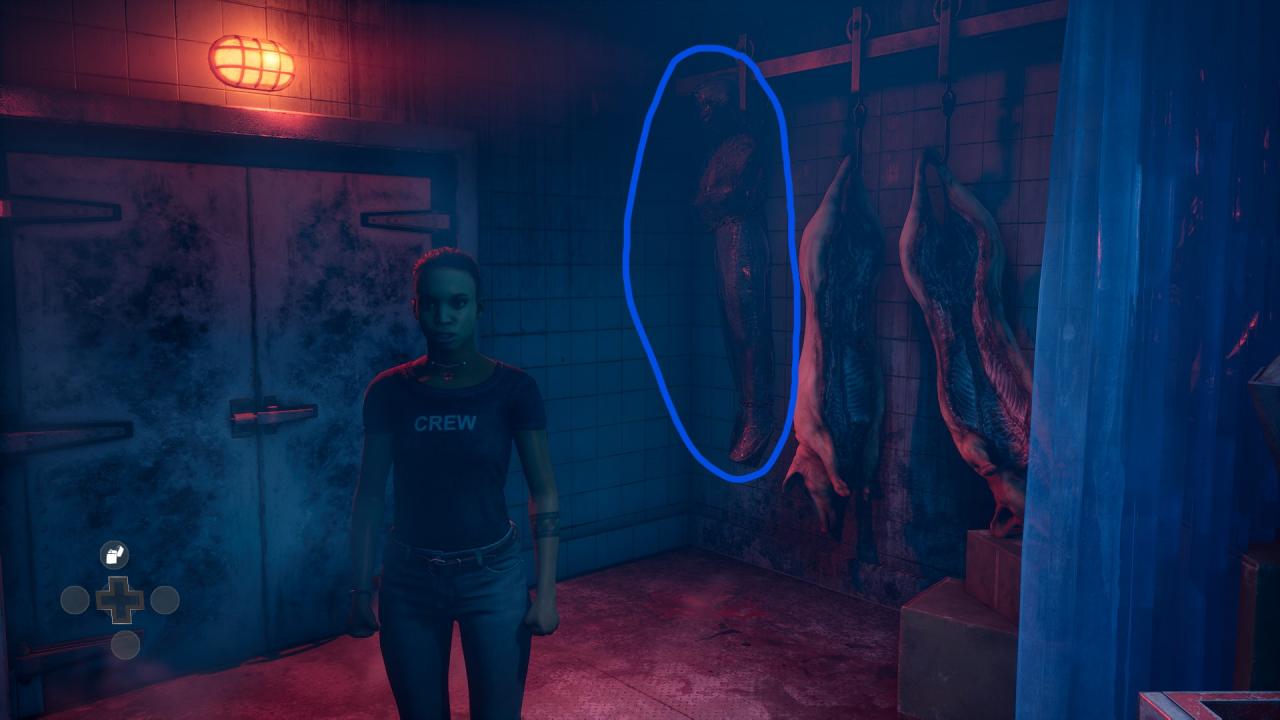
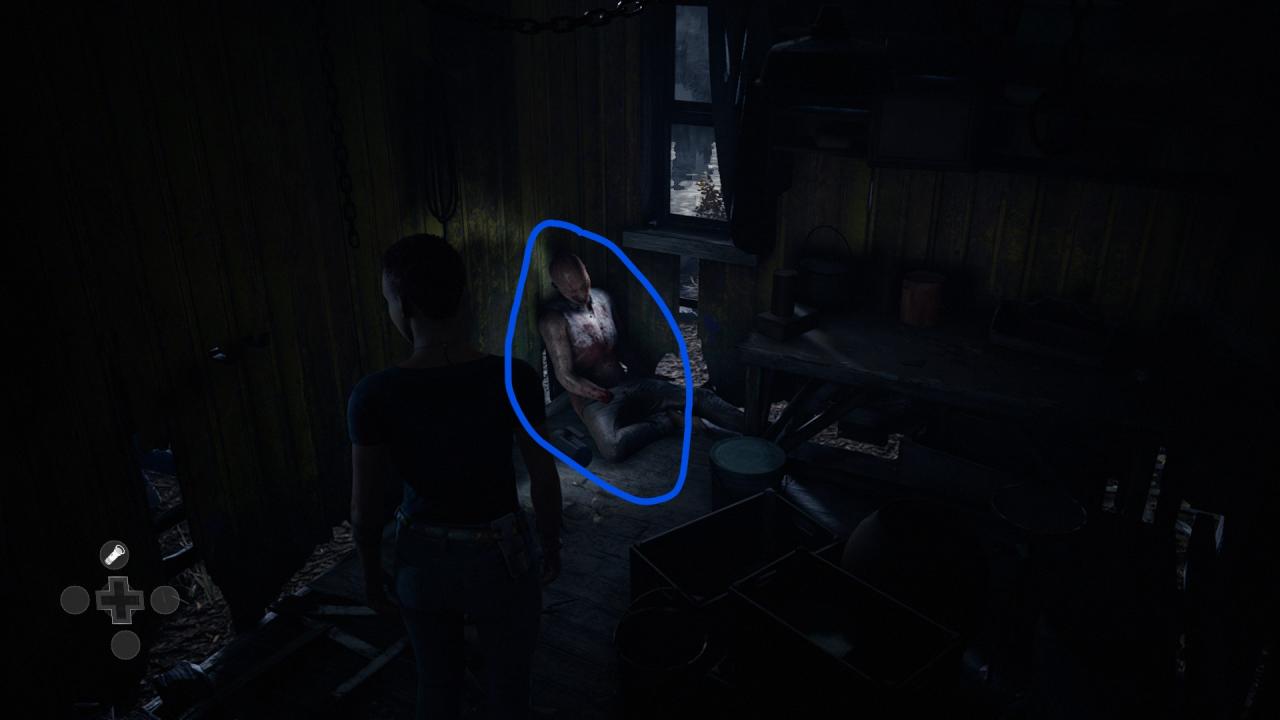
Secret 24: Natalie’s Remains
After Entering The Freezer With The Pigs Hanging Upside Down, Go To The Far Right Of The Room.
Behind The Blue Sheet, Will Secret 24: Natalie’s Remains
Scene: Silver Ash
Secret 18: School Letter
After Erin goes to investigate the Silver Ash Institute, go into the second room. And Immediately On The Left, There Is A Small Table With Secret 18: School Letter

Secret 37: ShermanTape 3
As Soon As You Enter The Second Room, There Is A Tape Recorder On The Desk Infront Of You (Top Right Of Desk) Which is Secret 37: Sherman Tape 3
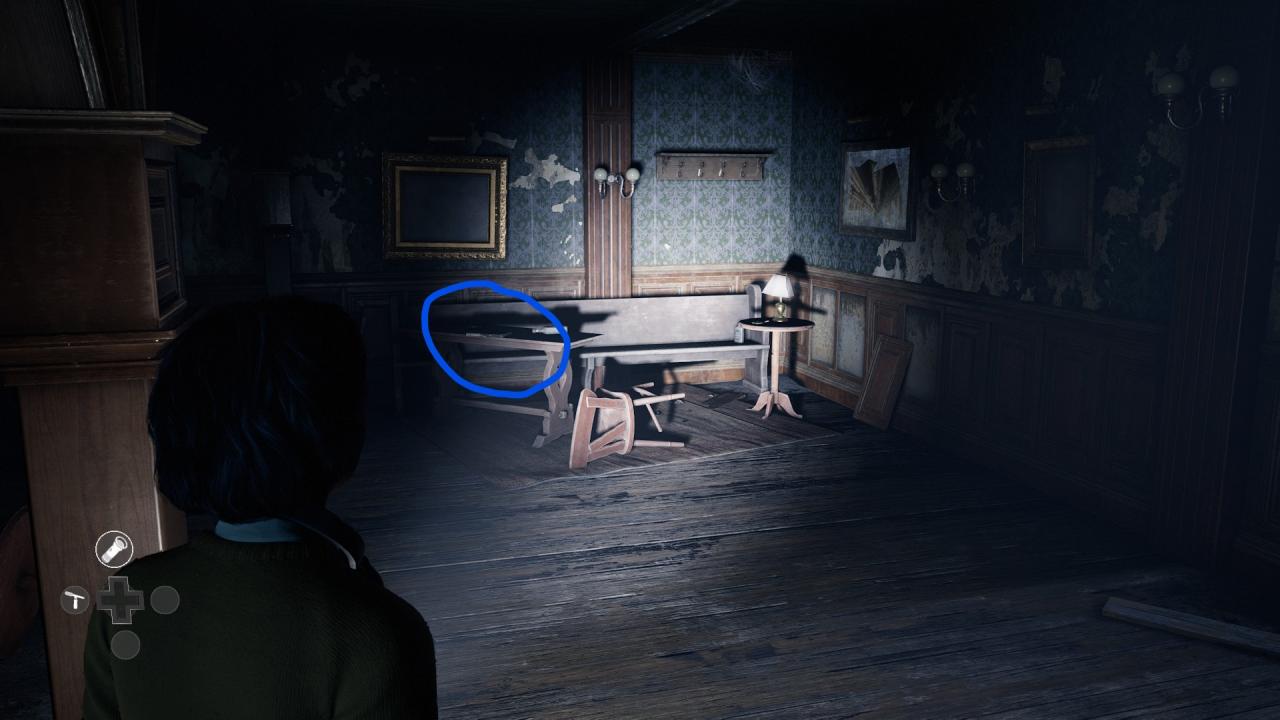
Scene: Incinerator
Secret 35: Photo’s Of Victims (Silver Framed Secret)
As Soon As You Leave The Cage As Charlie, Turn Left and You’ll See Two Photo’s On The Table.
Make Sure You Look At BOTH, Then Secret 35: Photo’s Of Victims will unlock!
Secret 42: Forman’s Log
Direction Opposite Of Secret 35/When Leaving The Cell, It Is Directly To The Right
(Make Sure To OPEN BOOK And Go Through All Pages To Unlock Secret 42: Foreman’s Log!)
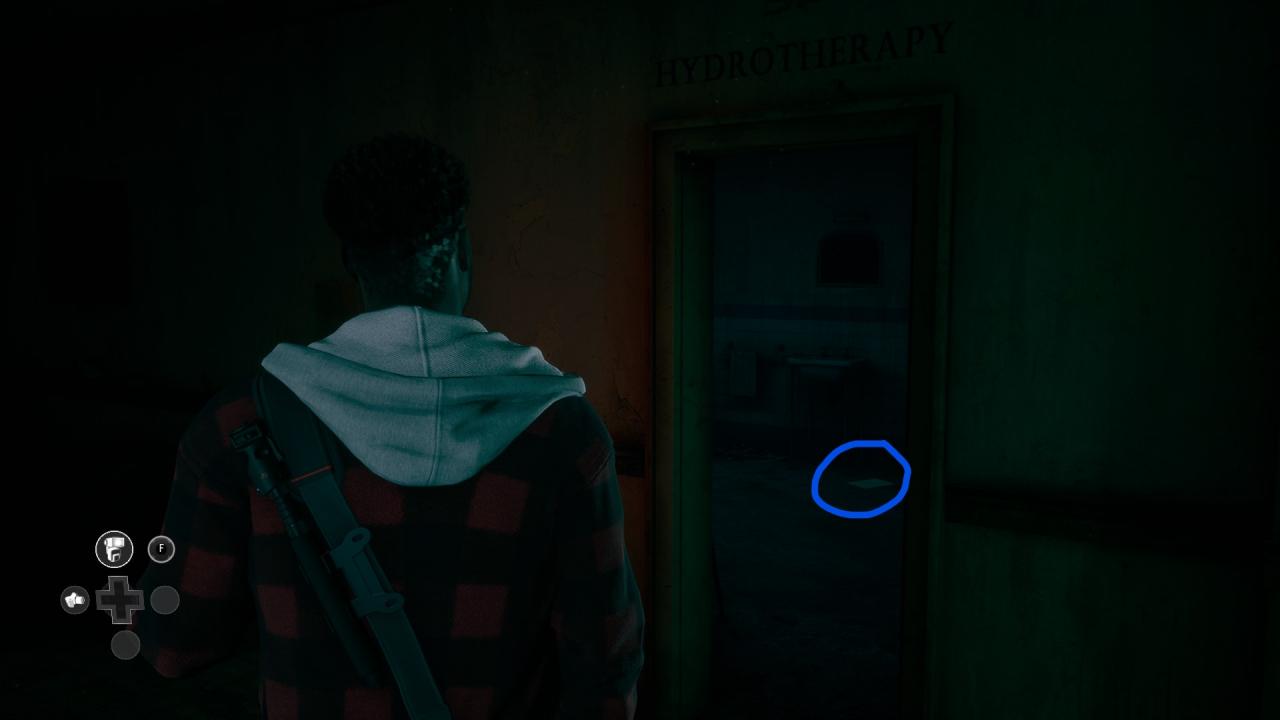
Scene: Spa
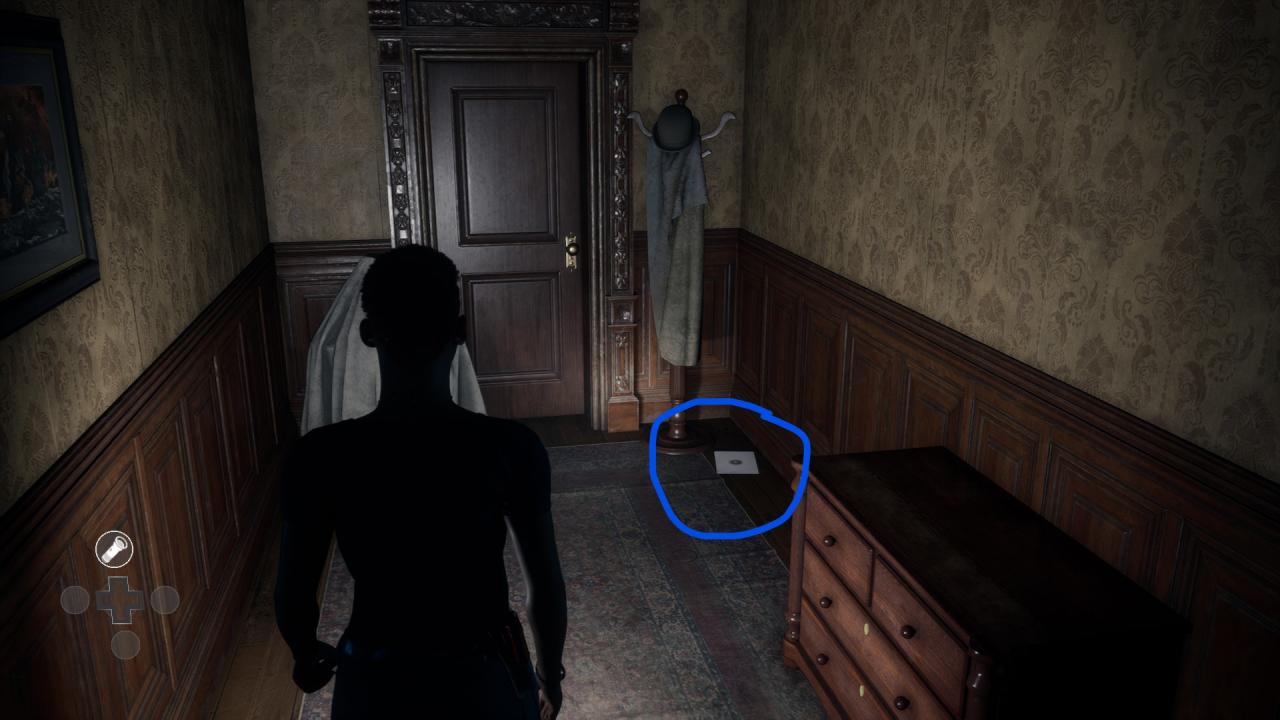
Secret 41: Resignation Letter
After Falling Down Du’Met’s Trap With Mark/Jamie, Vault Over The Locker And Enter The First Room On The Left. As Soon As You Enter, Secret 41: Resignation Letter Should Be Infront Of You On The Floor

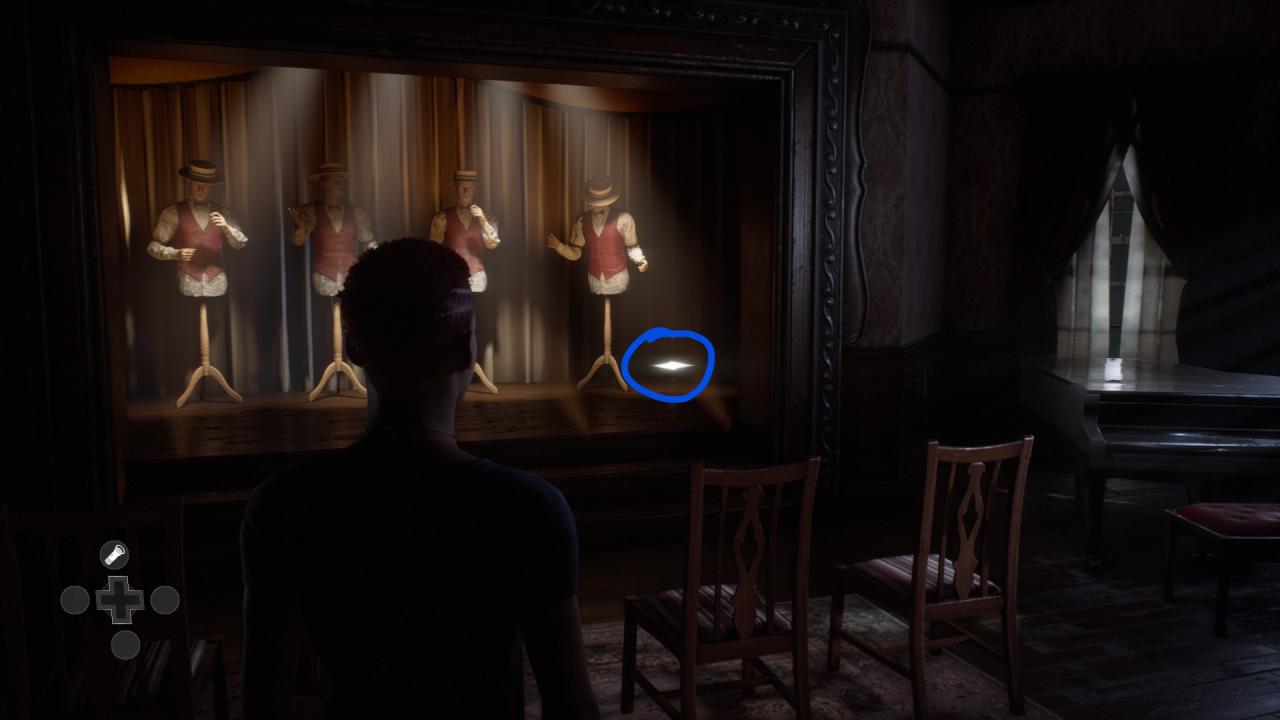
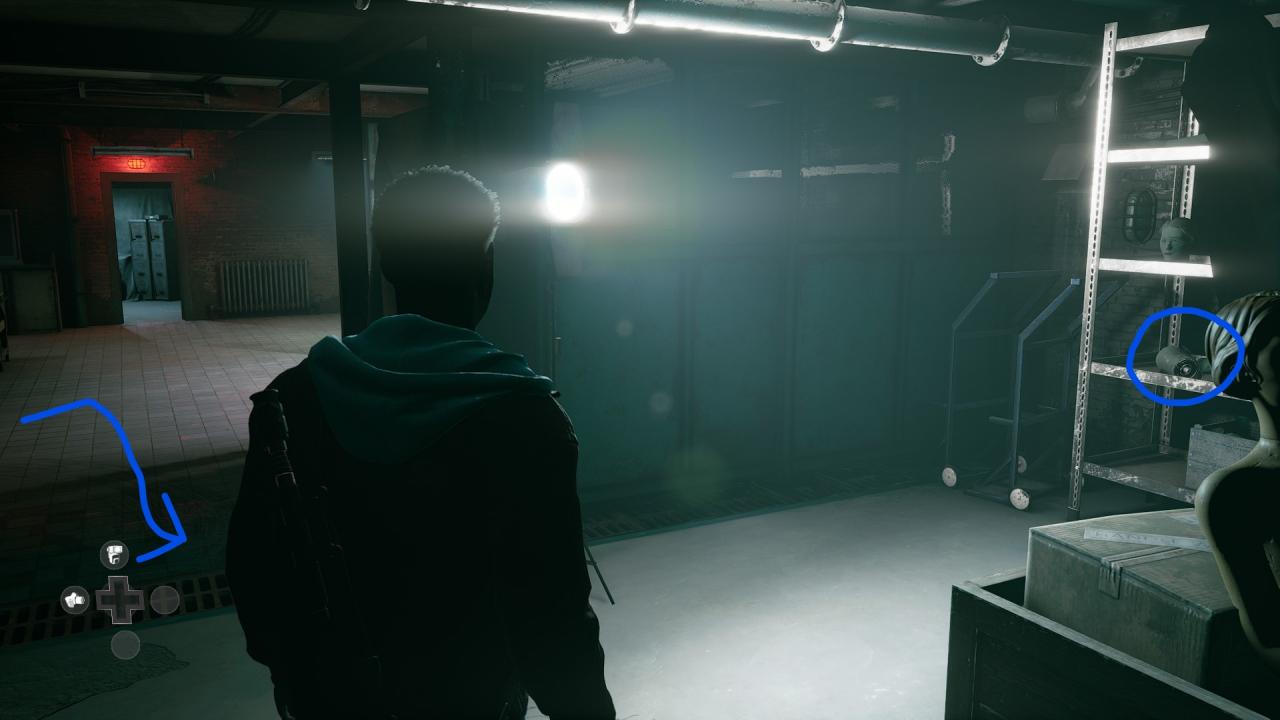
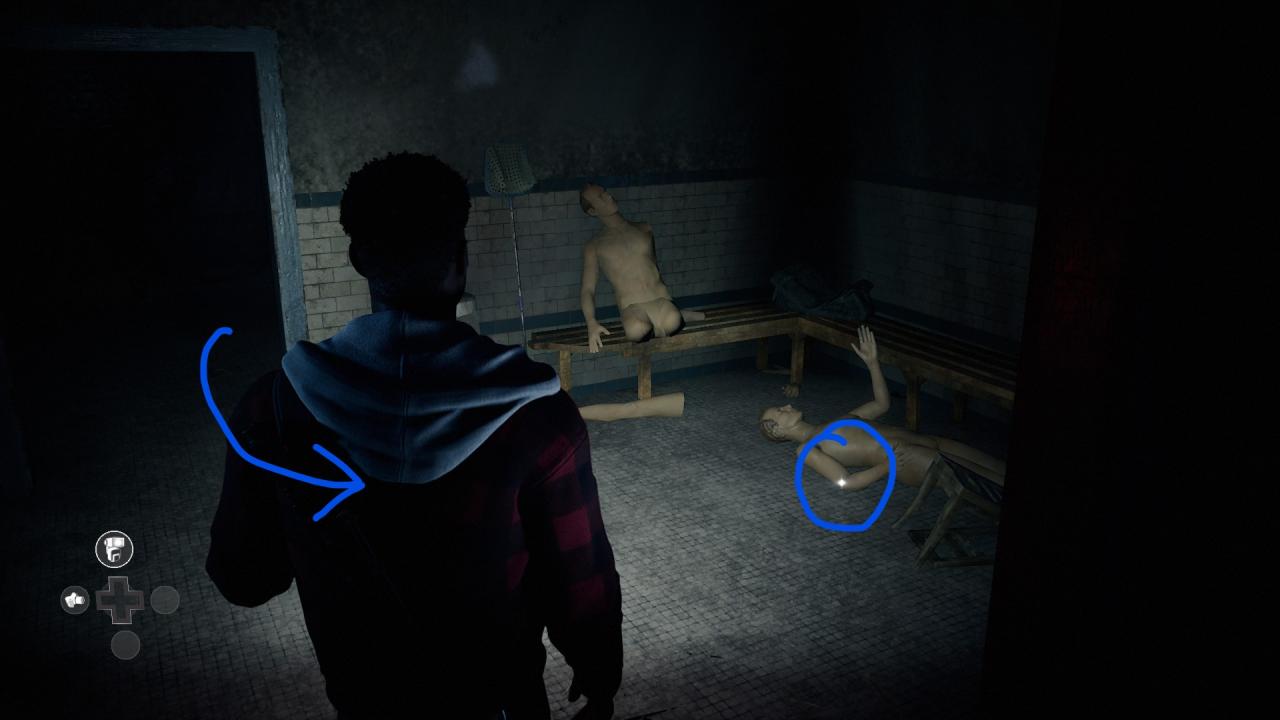
Scene: Workshop
Secret 25: Real Human Teeth
When controlling Mark in the workshop, proceed into the room full of mannequins after hiding from Du’Met Successfully All 3 Times. From The Final Hiding Spot, Go Into The Previous Area And Turn Left, There Is A Mechanical Head Which You’ll Have To Turn Around To Recieve Secret 25: Real Human Teeth
Secret 3: FBI ID Card
After the room with the speaking mannequin, you’ll see Secret 3: FBI ID Card Directly On The Desk (Difficult To Miss)
Secret 4: FBI Training Photo
Right next to where you found Secret 3. The picture will be face down. Flip it over and get Secret 4: FBI Training Photo
Secret 6: Psychological Report (Silver Framed Secret)
In The Next Room Immediately To The Left, On The Table, You Will Find Secret 6: Psychological Report
Scene: Interogation
Secret 27: Sherman Tape 4 (Silver Framed Secret)
This One Is Unmissable And Is Required To Progress The Story
Scene: Morellos
Secret 23: J. Morello Sherman Book
As Soon As You Enter The First Bedroom, At The Back Of The Bedroom, There Will Be Ransacked Suitcases, In between Them Will Be Secret 23: J. Morello Sherman Book.

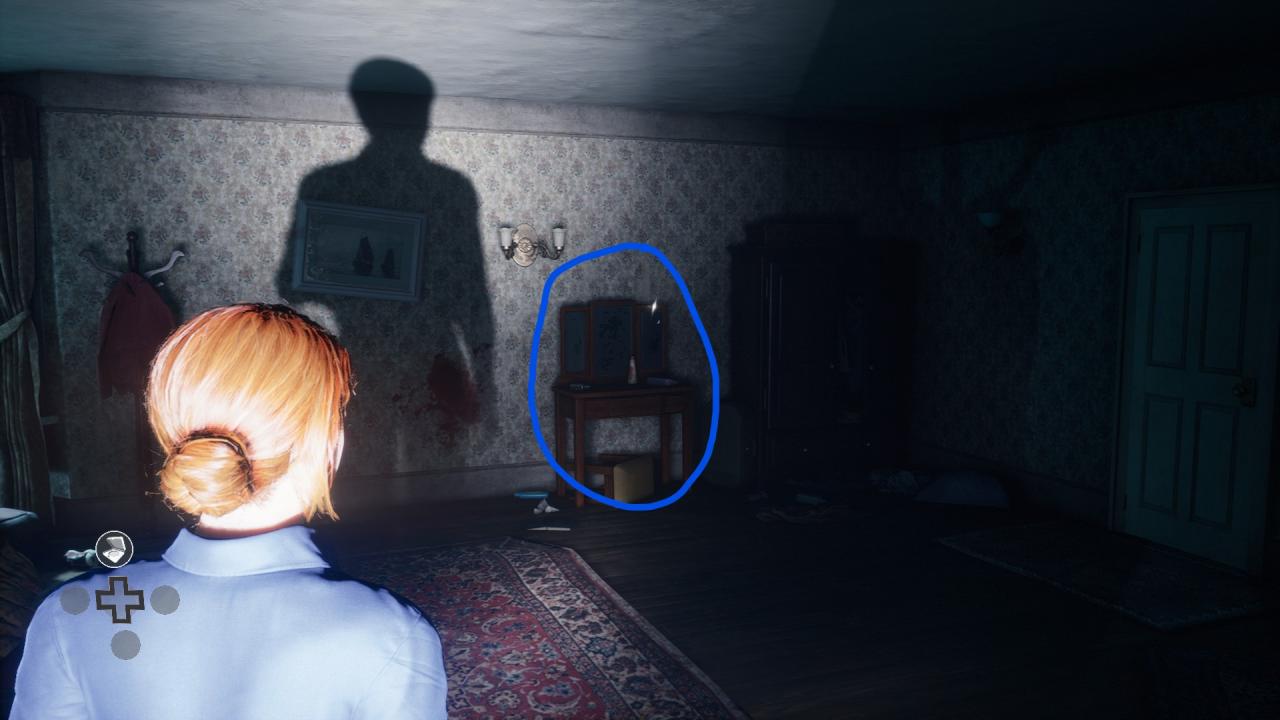
Secret 5: Body Snatching Article
Head Into The Next Room, Forwards And Right, There Will Be A Desk/Vanity Mirror, Go Up To It And You’ll Find Secret 5: Body Snatching Article
Secret 21: Mrs. Morello Animatronic
Unmissable And Required To Progress!
Scene: Waste Disposal
(Disclaimer: Charlie MUST Have Had To Survive In Ignition By Choosing “Pull Grate” Twice!)
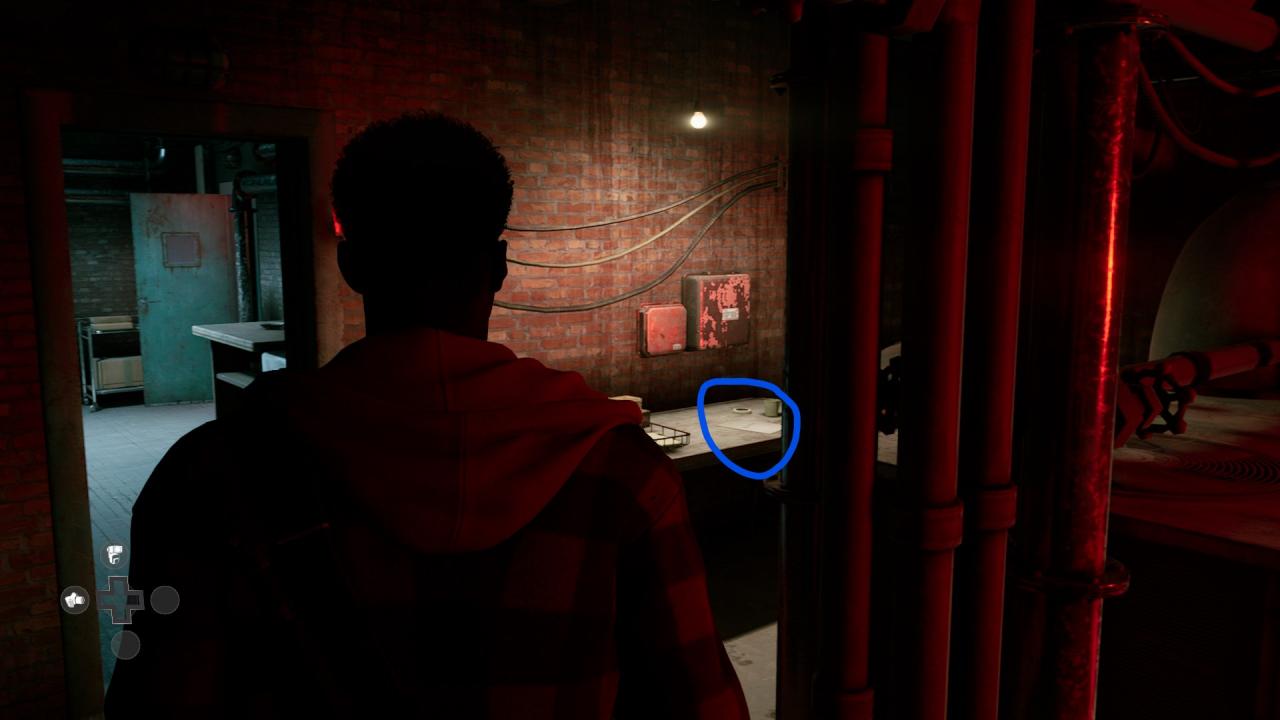
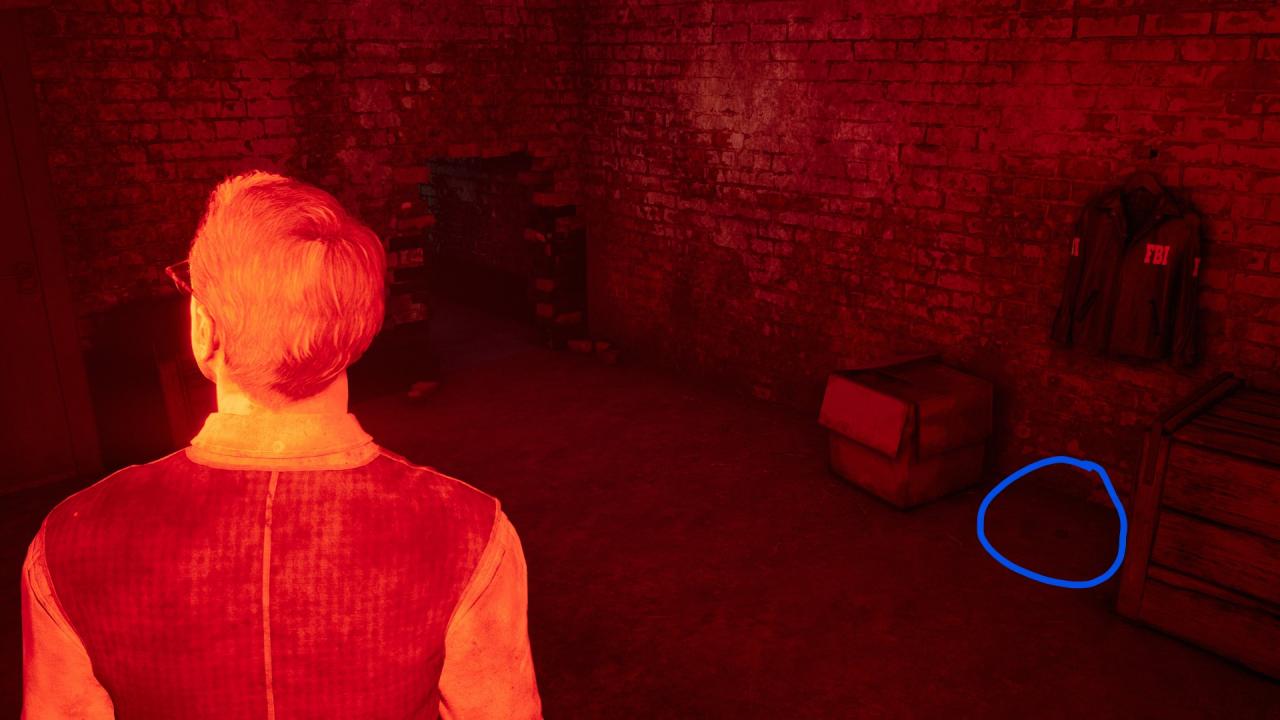
Secret 2: FBI Badge
After Charlie emerges from the incinerator; Walk Through The Door Infront Of Him Then Pull The Trolley Back And Enter By Crouching Through, Once You’re In The Small Brick Room, Directly Infront Of You Behind A Small Box Should Be Secret 2: FBI Badge
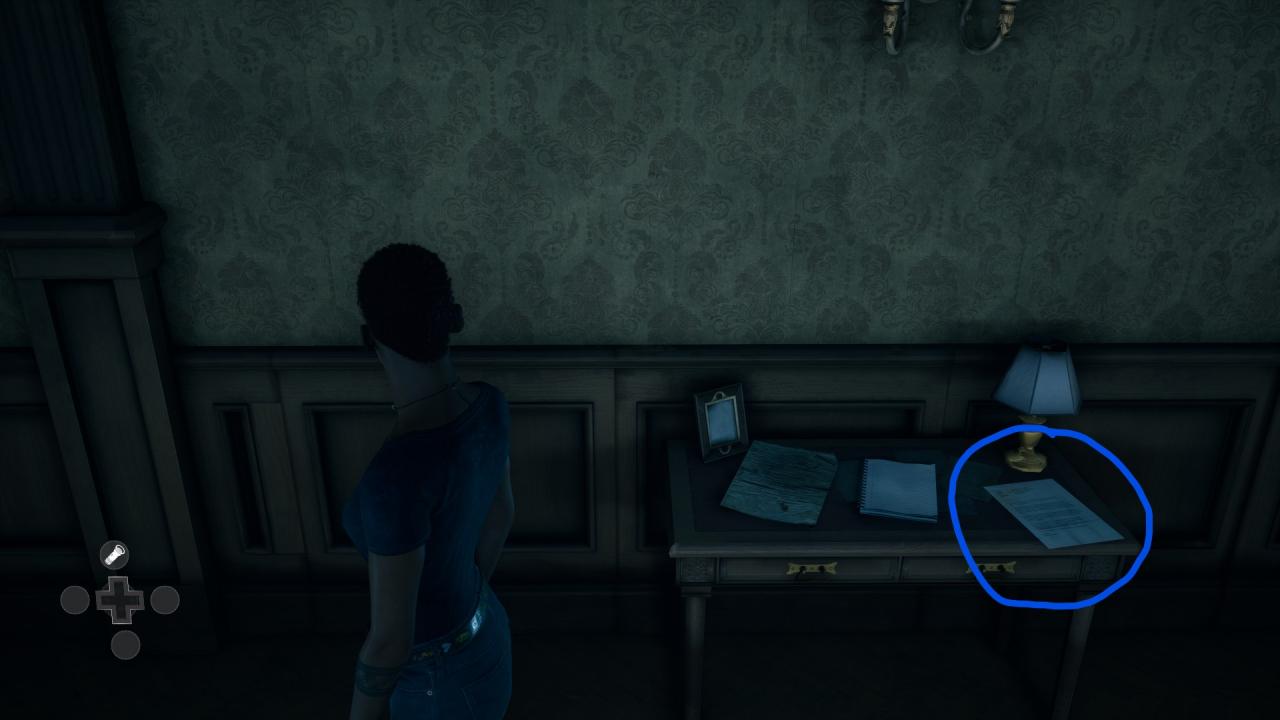
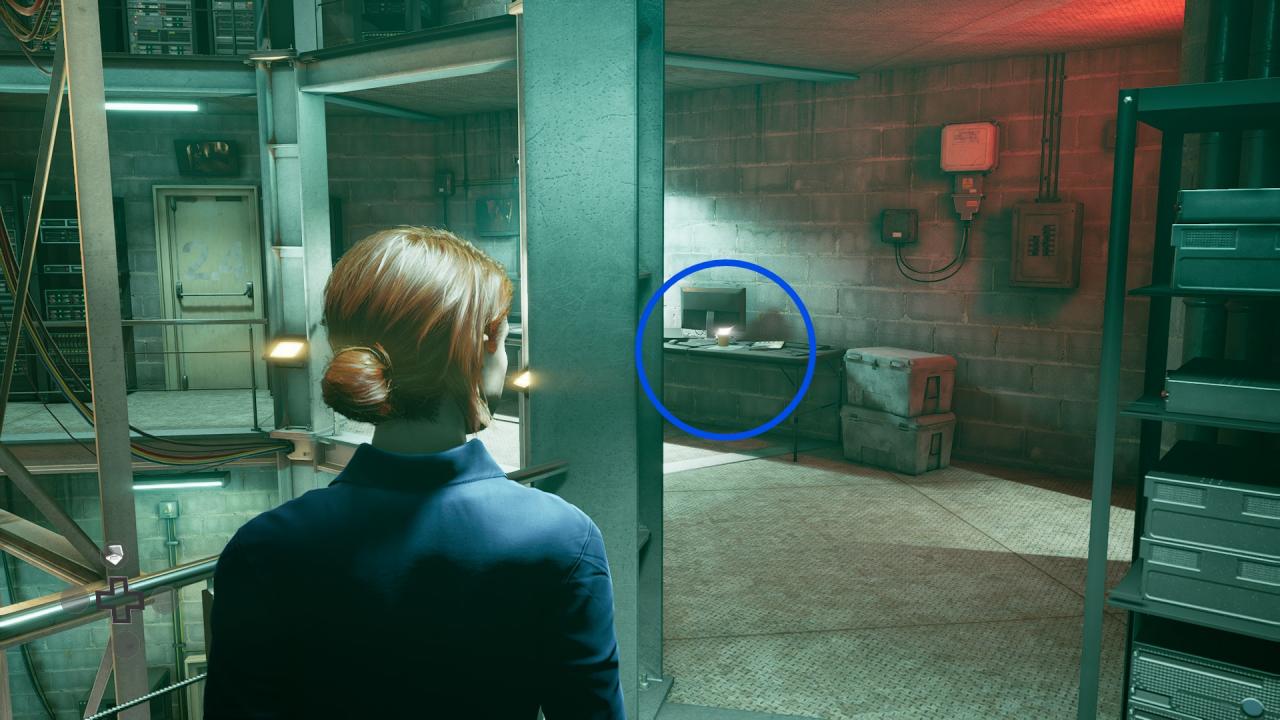
Scene: Directors Suite
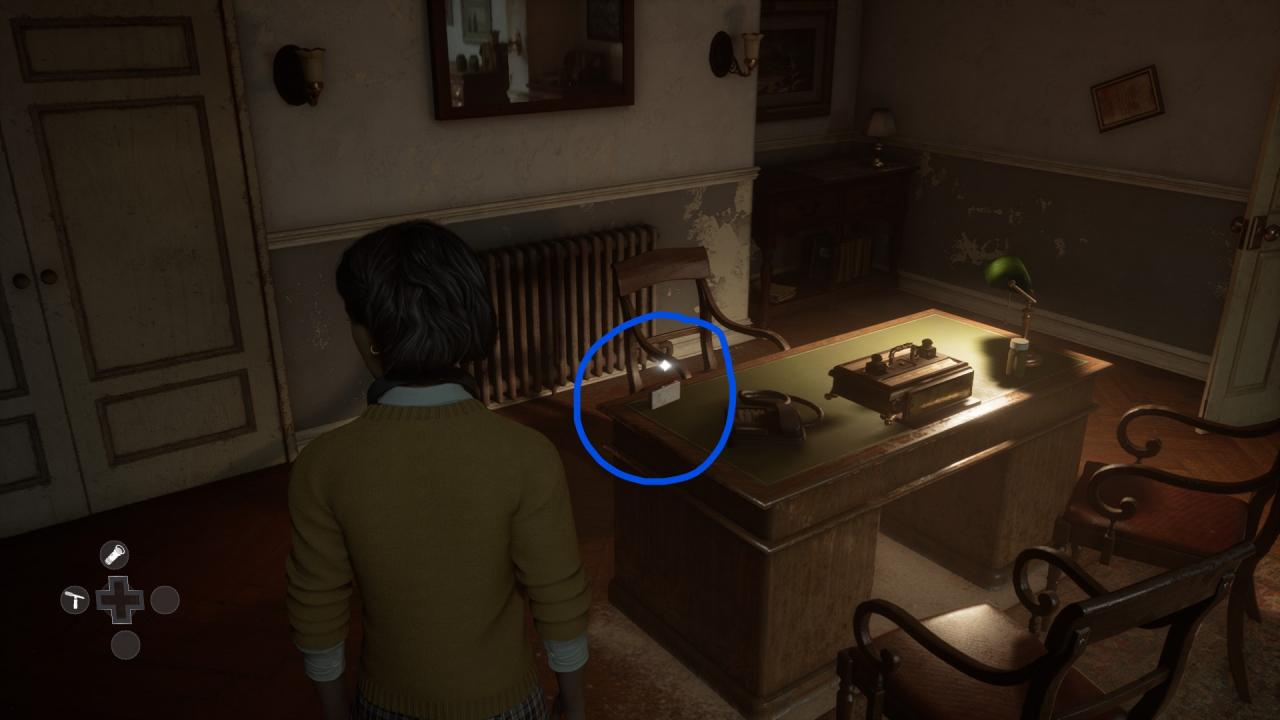
Secret 47: Custom Mask Email
As Soon As You Gain Control Of Kate, Head To The Table On Your Right, Move The Cup To Then Receive Secret 47: Custom Mask Email
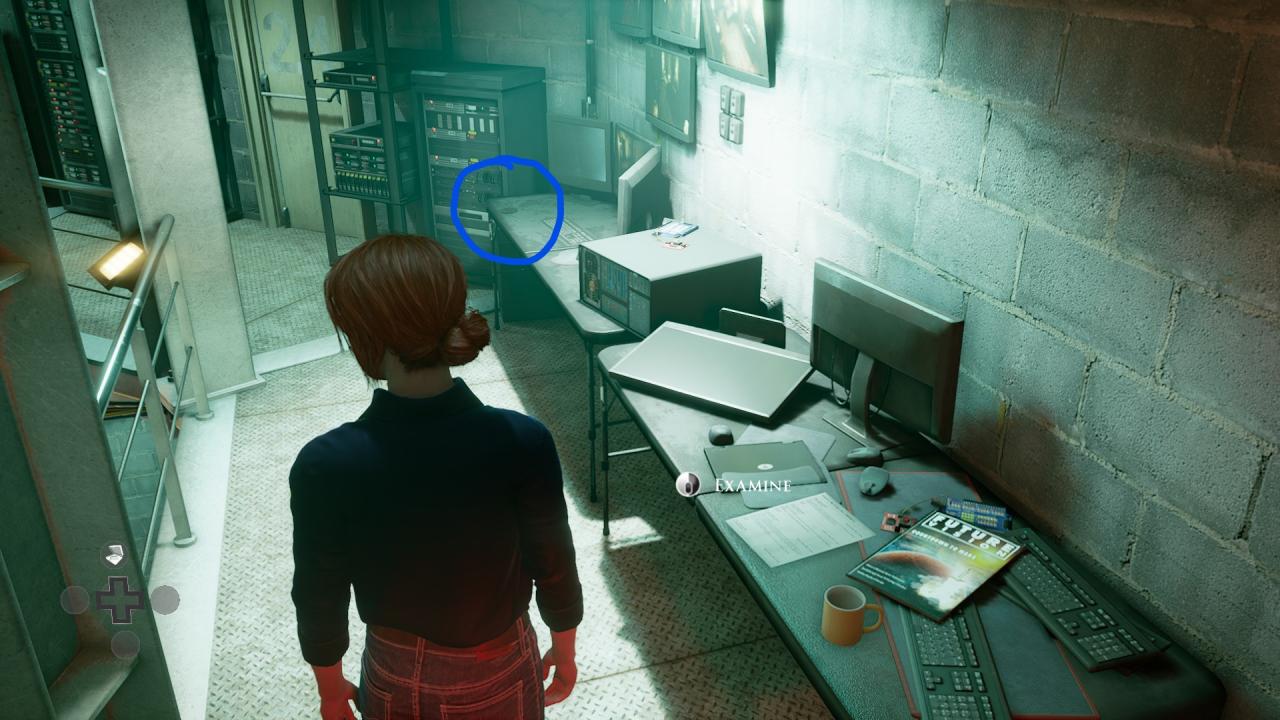
Secret 7: Chicago PD Badge (Silver Framed Secret)
Directly To The Left Of Secret 47, On The Desk Next To It! Turn Over It To Reveal Secret 7: Chicago PD Badge
Secret 40: Costume Design
Head Up The Strairs, And Walk To The Other Side Of The Platform Until You Get To A Desk With Pictures On The Wall, Look At The Pictures And You Should Receive Secret 40: Constume Design
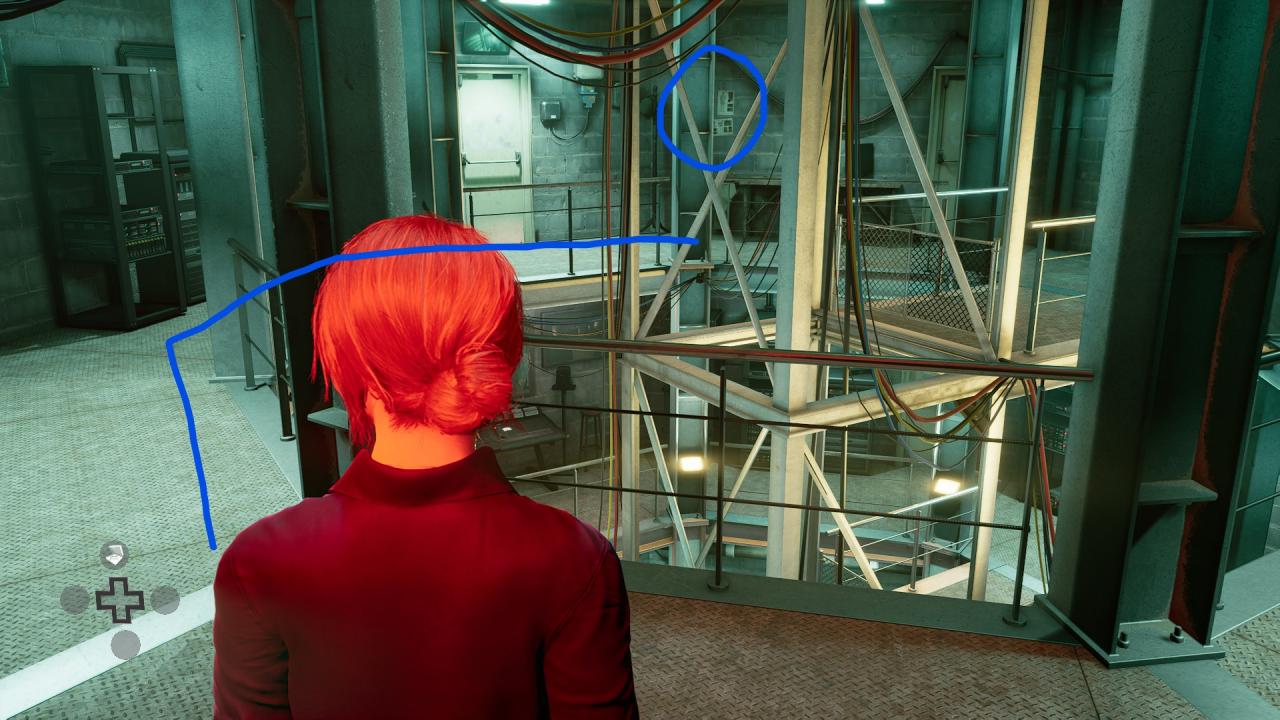
Secret 38: Answerphone Tape (Silver Framed Secret)
Directly To The Right Of Secret 40 Is Secret 38: Answerphone Tape On The Desk
Scene: Maze
Secret 26: Chicago Killer Newspaper Cutting (Silver Framed Secret)
After Going In The Secret Passage Under The Carrousel, On Your Left (From Where Camera Is Positioned From Ladder) Pick Up The Paper And Turn It Over To Receive Secret 26: Chicago Killer Newspaper Cutting.
Scene: Pool
Secret 1: Wedding Ring
This One Is Quite Simple, Get Into The Poolhouse And Make Your Way To The Room AFTER The Shower Room (The Room With The Moving Mannequin on The Floor). Next To That Mannequin Is Secret 1: Wedding Ring
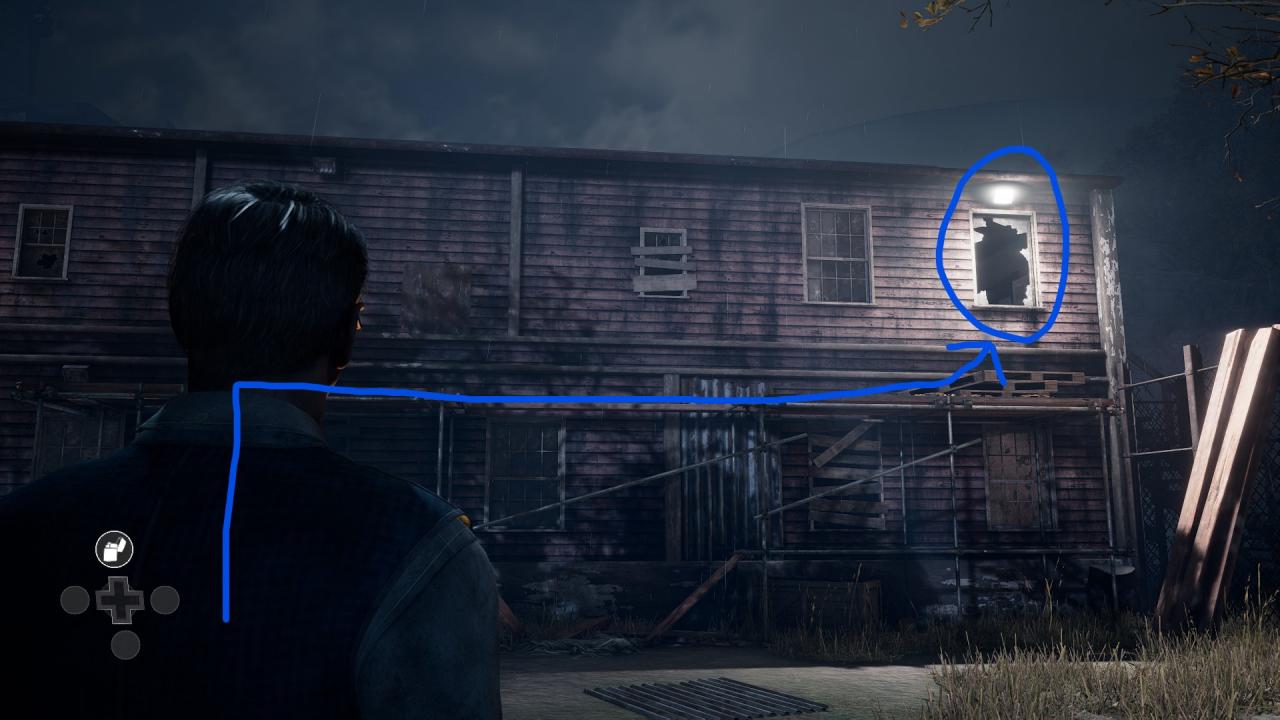
Scene: Cliffside
Secret 9: Childhood Medical Record
Make Your Way To The Outside Of The Warehouse, Climb The Ladder But Instead Of Pushing Down The Box, Shimmy Your Way To The Right Side And Enter The Hole In The Wall To Enter The Room. Open The Drawer In The Desk Directly To Your Left As You Enter The Room To Receive Secret 9: Childhood Medical Record
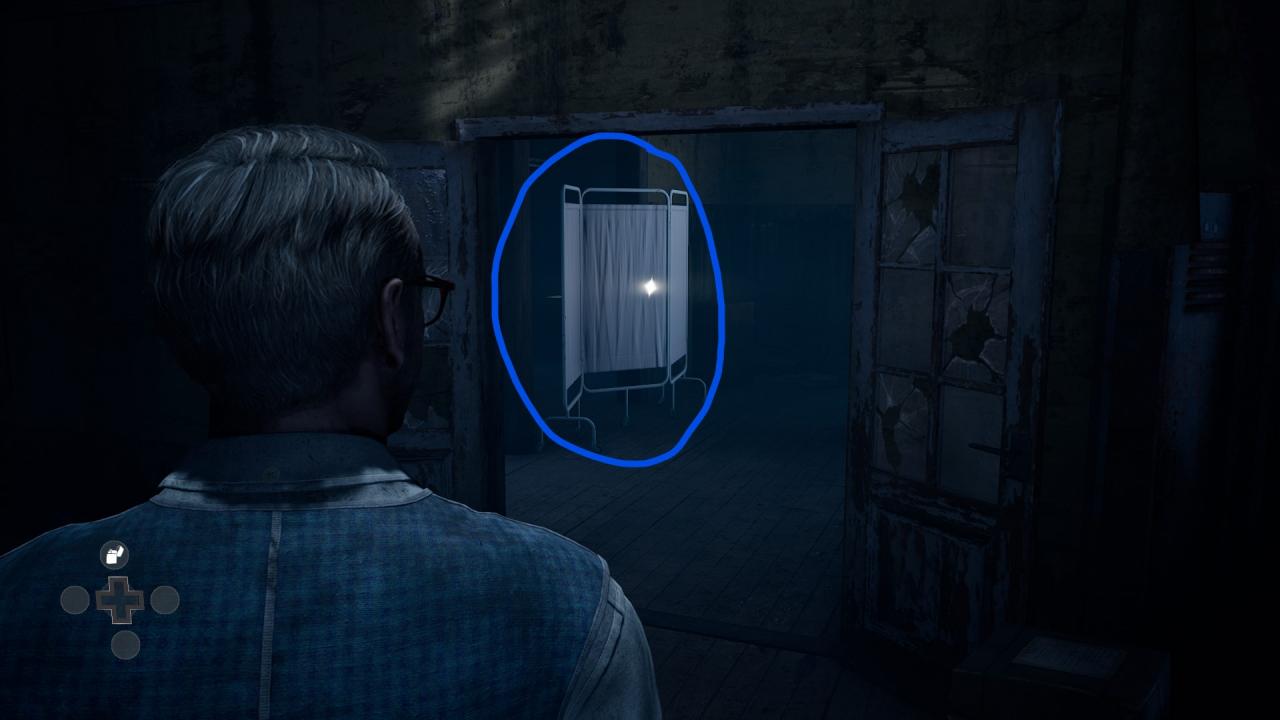
Secret 11: Clipboard
When Inside The Warehouse, Make Sure You PASS Keep Calm QTE, when you gain control again, go through the hanging room. When you reach the doors to the third room, you should spot Surgical Curtains On Your Left. Move then out of the way To Reveal A Secret Small Room. Directly On The Right, You Should See Secret 11: Clipboard
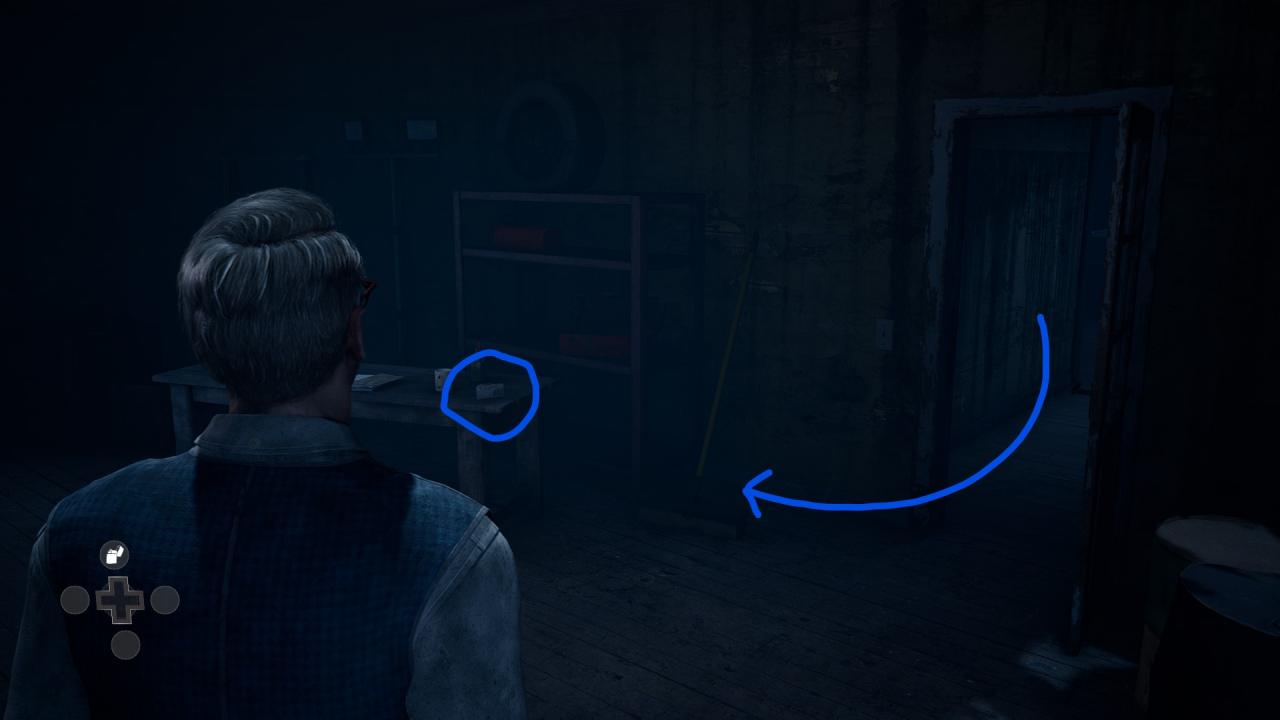
Secret 16: APB Broadcast (Silver Frame Secret)
Head Over To The Furthermost Room And Turn Right To Find Secret 16: APB Broadcast Sitting On A Table
Scene: Homestead
This Could Be Confusing So Try To Keep Up!
- Starting From When You Gain Control Of Jamie/Kate, Head Straight Forward Until You Can See A Small Path On The Left.
- Head To The Left And Then Vault Over The Log.
- Once You’ve Vaulted The Log, Straight Ahead You Can Jump Up Onto An Upper Platform.
- Balance Across The Log. Secret 44: Driver’s License Will Be Close On The Right
- Secret 45: Theme Park Photo Will Be Directly Next To It (See Images For Extra Help)
Secret 34: Mans Body
- From Secret 44/45, Drop Down, You Should See A Cabin Surrounded By Water.
- Head To The Right Until You See 2 Logs, One That You Can Vault, And One You Can Crawl Under.
- Crawl Under The Log (To The Left) (Make Your Way To The Cabin)
- You Should Now Be Right Before The Bridge, Cross The Bridge And Go Around The Back Of The Cabin To Find The Cabin Key. Now Head Back Round, Enter The Cabin And Look At The Dead Body To Receive Secret 34: Mans Body
Scene: Lighthouse
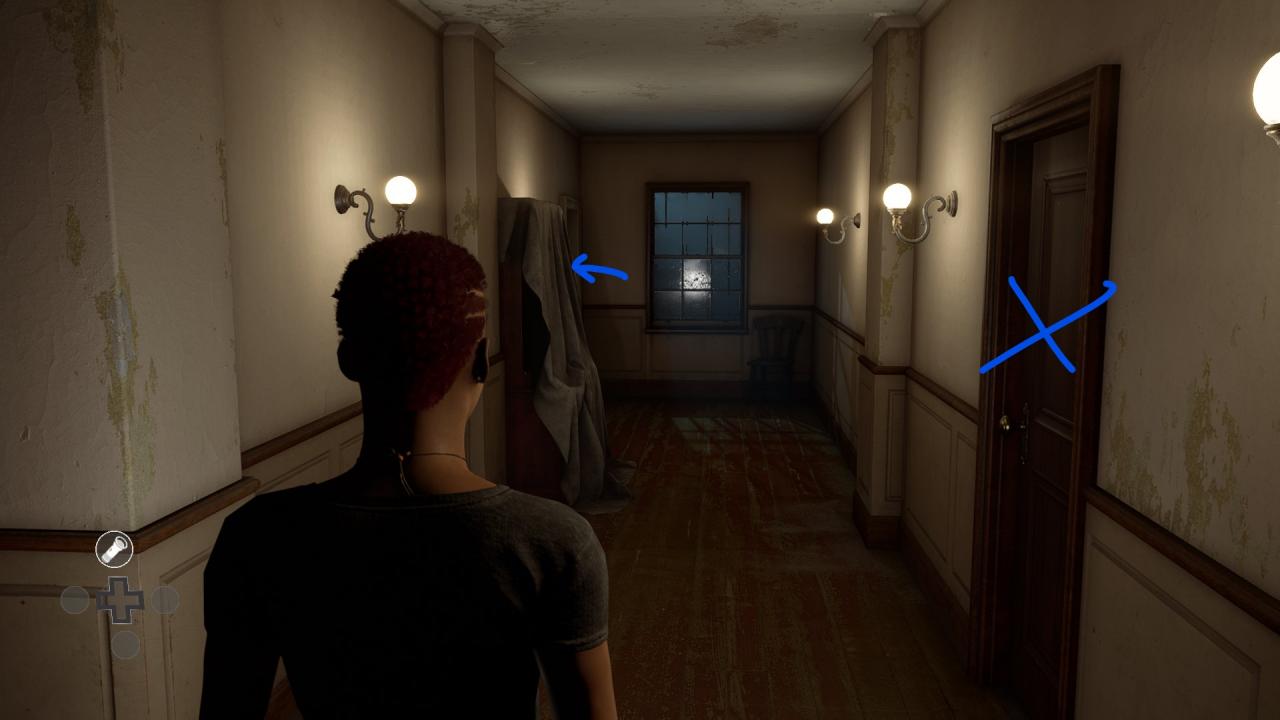
Secret 36: List Of Aliases (Silver Framed Secret)
When You Gain Control Of Mark, Walk Through The Basement And Up The Stairs, Directly Infront Of You Should Be Secret 36: List Of Aliases On The Bedside Table
Secret 50: Degree Certificate
Head Into The Next Room From Where Secret 36 Was (Room With Fake Tape Of Charlie)
Head Directly Right, In The Brown Box With Be Secret 50: Degree Certificate
Secret 30: Returned Letter
Keep Heading Up Through The Rooms Until You’re In The Final Big Room Before The Stairs To The Top (Room With Cat Closet Jumpscare)
When Entering The Room, Head Directly Right And You’ll See Secret 30: Returned Letter On The Desk.
Scene: Reunion
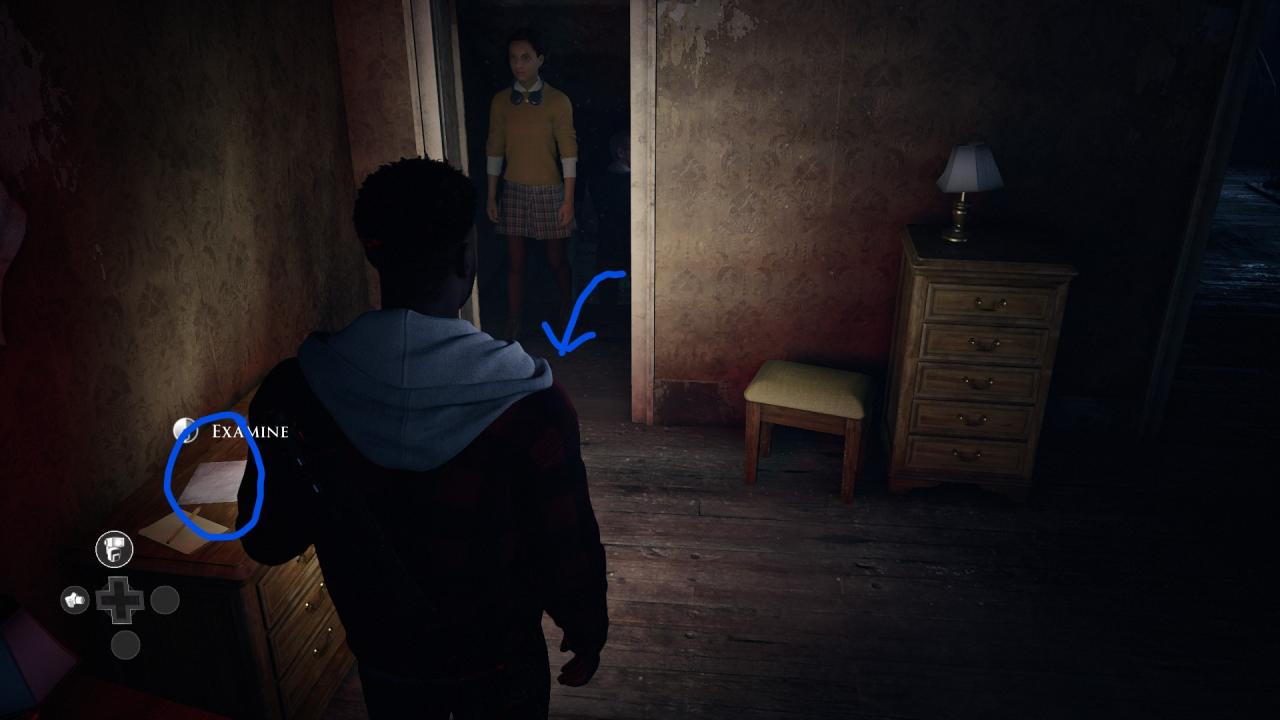
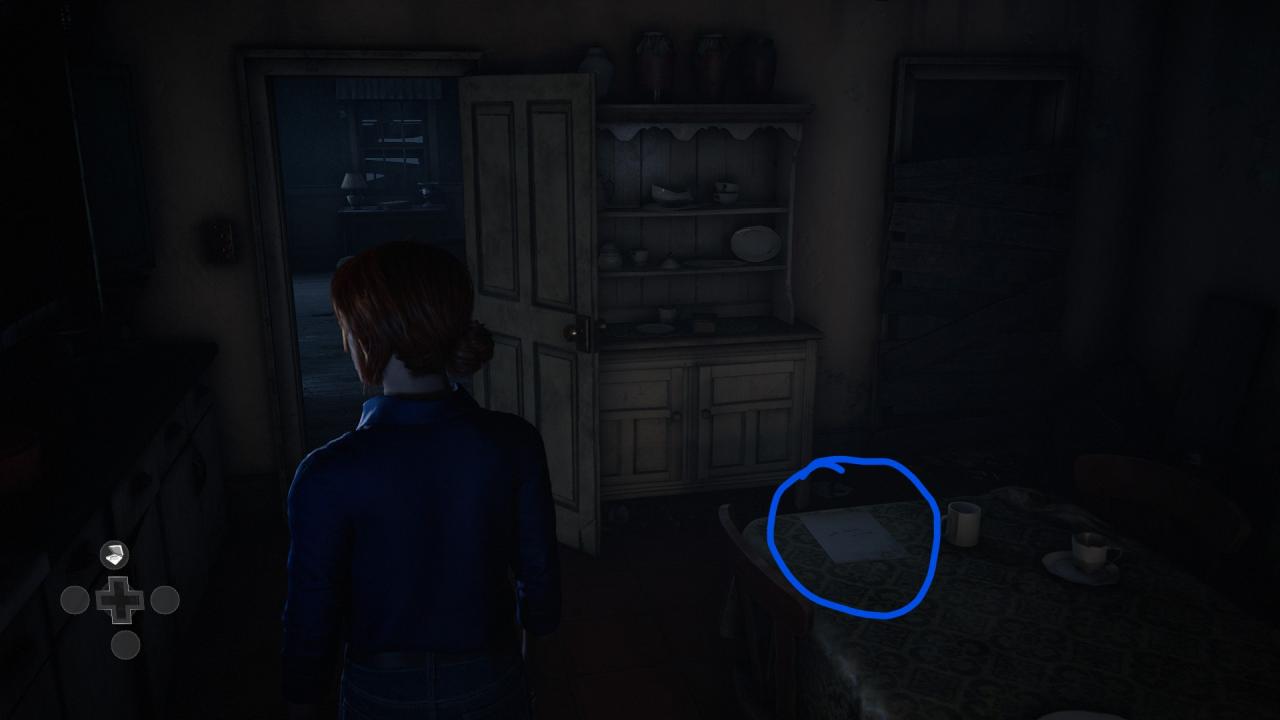
Secret 8: Disturbed Grave Letter
At The Start Of The Scene, You’ll enter into the lighthouse kitchen. You’ll See Secret 8: Disturbed Grave Letter On The Kitchen Table Directly On Your Right As Soon As You Gain Control Of Jamie/Erin.
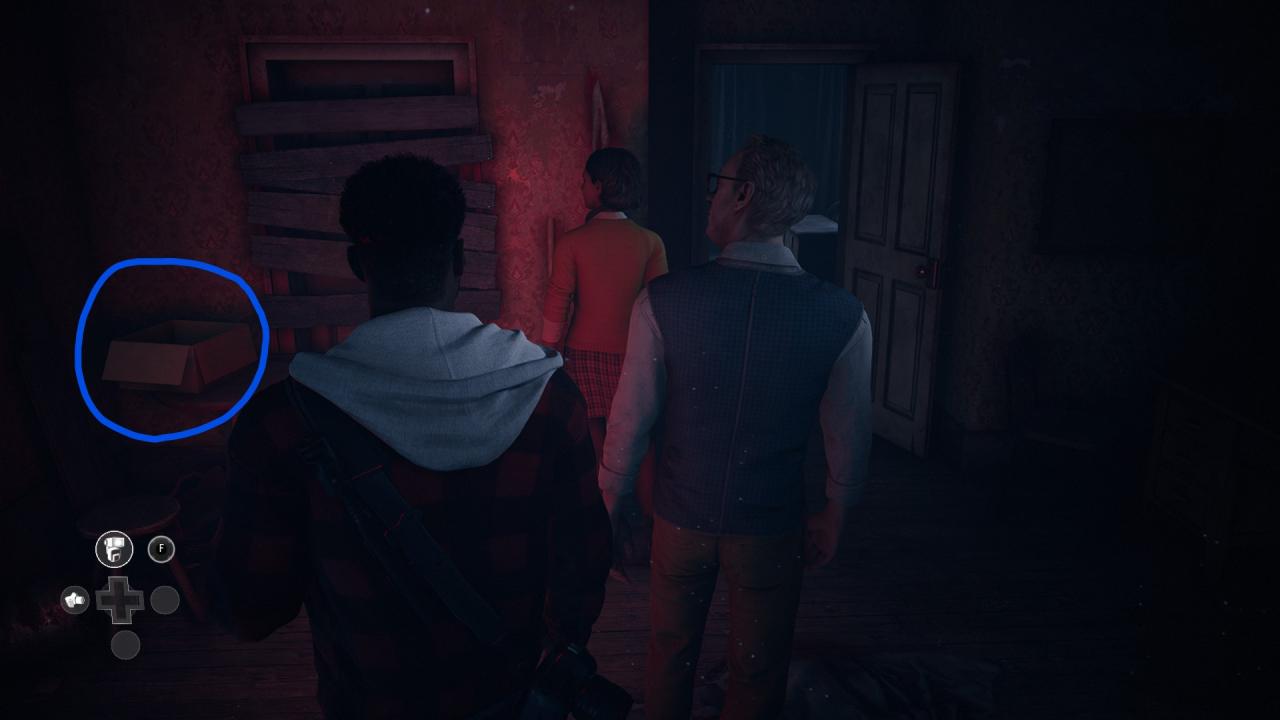
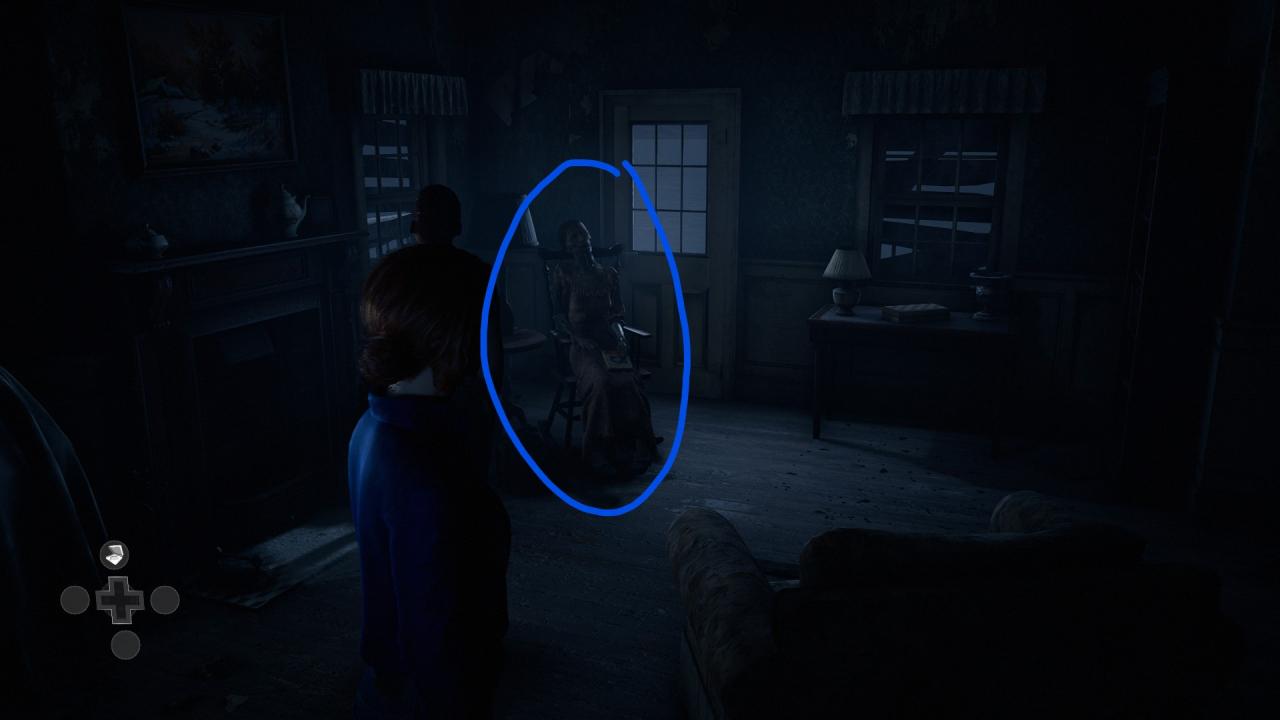
Secret 48: Children’s Book
- Walk Straight Forward Into The Next Room And You Will See A Lady/Animatronic On The Chair (She Will Also Be Speaking To You)
- Go Up To Her And Inspect, You Will Have To Look Down At The Book.
- Pick it up and press on the book to open It.
- Go Through All Pages And You Should Unlock Secret 48: Children’s Book
Curator’s Cut Only Secrets
Scene: Party
This Scene Is For Secret 17 and 28
This will only trigger if,
- You’re Playing On Curator’s Cut
- Erin Is ALIVE (After Blackout)
To Keep Erin Alive During The Scene: Blackout
Choose The Following Options as Kate:Assertive: “You need to not panic.”
Reassuring: “Just try to stay calm.”After this, you’re tasked with finding something to break down the door. Keep Running Forwards (its farther than you think) until you find a Candlestick which is sitting on a small table on your left. hit ALL attack QTE’s on the door and Erin will be safe!
(If You Mess Up, Just Go Back To Main Menu And Choose The Scene Again)
After Charlie Is Dropped Through The Floor In The Scene: Seperated, If Everything Is Done Correctly. You Will Play As Jamie
Walk Down The Corridor And Enter The Final Room
(You Need A Key (which is found in a closet in the white room) To open the door on the right anyway)
Upon Entering The Room, Secret 28: Lucinda Munday Medical Report Will Be On The Desk To The Left
And Secret 17: Funeral Invitation Will Be In The Safe. To Unlock The Safe, Enter The Code: 1916

And You’re Done!
If You’ve Followed The Guide The Whole Way Through, You Should Now Have Unlocked The Two Achievements:
 Collector:
“Found All Of The Secrets”
 Instigator:
“Found all of the Silver Framed Secrets”
Thanks to SquashMyMouse for his excellent guide, all credits belong to his effort. if this guide helps you, please support and rate it via Steam Community. enjoy the game.